1
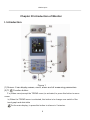
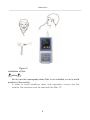
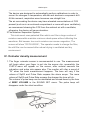
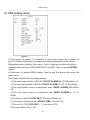
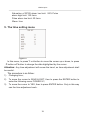
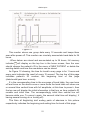
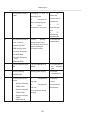
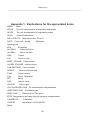
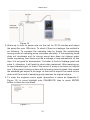
Capnograph and Oximeter
CapOx
User Manual
VirtuOx VPOD CapOx
Instructions to User
VPOD CapOx
Thank you very much for purchasing our product.
This manual includes the materials and copyright reserved. It is not allowed
to copy, reduplicate or translate into other languages without our written
permission.
Please to read this manual carefully and then to operate by the instruction of
this manual.
It is not allowed to open the monitor’s cover without our permission.
Some changes on the product due to the technologies’ promotion or due to the
special demands of user which do not influence the monitor’s work will not be
informed further. Furthermore please pay attention to the difference between
the parts or components and this manual. You may apply to our company for
technical documents about the electric circuit diagram relevant batch and lists
of parts or components and so on because the continuous promotion of the
product. You may contact us by means of the following address.
CONTENTS
1
VPOD CapOx
Chapter I Preface......................................................................…… ....................2
Chapter II Technical specifications and characteristics ..................................4
Chapter III Introduction of Monitor .....................................................................6
Chapter IV Patient connection ............................................................................7
Chapter V Screen display and Operation ........................................................ 13
Chapter VI Charge, Maintenance, sterilization, cleanness ............................ 23
Chapter VII Analysis of problems .....................................................................25
Appendix 1. Explications for the appreciated terms .....................................28
Appendix 2. Changing compensation of balance gas ...................................29
Appendix 3. Calibrating of EtCO2 precision ...................................................30
2
VPOD CapOx
Chapter I Preface
I. Brief
The purpose of this manual is for quick understanding of characteristics,
functions, operation of the monitor, preventing from mal-operation and
mistakes.
This monitor can supervise four physical parameters of patient at the same
time: concentration of EtCO2, respiration rate, pulse and saturation of
SPO2.
II. Warranty and Maintenance Warranty
The CapOx comes with a standard 1 year warranty
The following is out of warranty:
The monitor is damaged due to bad-operation (without following the
manual instruction)
The monitor is managed due to incorrect connection with other
instruments.
The monitor is damaged due to accident.
The user changes the monitor on his own will without written authority
of the company.
The serial number is torn off or unreadable.
Maintenance
If the monitor is broken beyond warranty period, the manufacturer or
distributor will fix it with a charge.
Re-packing
To take out all the sensors and accessories, then to pack them in plastic
bag.
It is recommended to use the original packing boxes and packing materials.
It is better to provide description for broken-down phenomenon.
III. Safety Demand
For the purpose of safety, please read the following and abide by the
instruction of medical instrumental products.
Warning: Indicating the possible injury on patient or operator.
·This monitor is banned to supervise patient for suffocation, and also is
banned to apply during the operation of MRI or CT.
3
VPOD CapOx
·For the monitor’s safely grounding, the hospital shall provide three-pole
power socket.
·To use the designated accessories, which complying with standard of
manufacturer...
·It is banned to remove the cover of the monitor.
·This monitor provides Concentration of EtCO2, Respiration rate or
Oximeter saturation and Pulse. These data only do auxiliary help for
diagnosis but the real diagnosis shall be made by doctor through the
clinical evaluation and symptoms.
·In order to keep the patient’s skin intact, the SpO2 ‘s sensor needs to
reput on a new place at least every 24 hours.
Chapter II Technical specifications and characteristics
1. The normal working conditions:
Environment temperature: 10ć~40ć
Relative humidity: 30%~75%
Voltage: AC 100V~250V, Frequency: 50Hz/60 Hz
Air pressure: 86kPa~106 kPa
2. Concentration of EtCO2 (see note 1)
Range: 0.0-19.7% (V/V), 0-150mmHg,or 0-20kPa
Accuracy: deviation˘±2mmHg when EtCO2 concentration in 0-40mmHg
deviation˘±5% (reading) when EtCO2 concentration in 41-70mmHg
deviation˘±8% (reading) when EtCO2 concentration in 71-100mmHg
deviation ˘ ±10%
(reading)
when
101-150mmHg
Alarm accuracy: accuracy˘±0.2%
3. Total System response time
< 1second
4. Respiration rate
Range: 3 ~150 times/min.
Deviation: the bigger of ±1% or ±1bpm
4
EtCO2 concentration
in
VPOD CapOx
5. Oximeter Saturation
Range: 0%̚100%
Accuracy: when 50%~79%, ±3% (absolute value);
when 80%~100%, ±2%(absolute value)
6. Pulse
Range: 30 times/min~250times/min
Deviation: when 30times/min~40times/min, ±2times/min (absolute value);
when 41times/min~250times/min, ±5%(relative value)
7. Trend
Parameter: EtCO2 concentration, respiration rate, SpO2 and Pulse
Range: 24 hours
8. Power Demand:
Voltage: AC 100V-250V, Frequency 50Hz/60 Hz, DC5V
Unit Consume: ”5VA
9. Battery
Battery pack 3.6Volt, 3AH
Battery fully charged time: 4 hours
10. The conditions of transportation and storage:
Transportation Demand: It is not allowed for striking, violent vibration and
humidity.
Environment temperature range: -40ć-+55ć
Relative humidity range: <93%
Storage demand: In a dry and good ventilating room without corrosive gas and
strong magnetic field.
11. Size and weight
Size: 72mm(W) x 155mm(H) x40mm(D)
Weight: about 600g
Note 1: The accuracy of CO2 concentration measurement is influenced by
interfering gas and vapour, for example the N2O,agent can raise the CO2
reading(2-10%), and He and O2 can reduce the CO2 reading(1-10%), so
compensation should be set in the balance gas MENU to meet the accuracy
requirement when interfering gases exist.
5
VPOD CapOx
Chapter III Introduction of Monitor
I. Introduction
Figure 1
(1) Screen: It can display waves, menu, alarm and all measuring parameters.
(2) Ÿ/
: Function button:
Ÿ a) When menu(except the TREND menu) is activated, to press this button to move
cursor.
b) When the TREND menu is activated, this button is to change-over switch of the
trend graph and date table
On the main display, to press this button to silence in 2 minutes .
6
VPOD CapOx
(3) ź: To press this button to move the cursor when menu is activated.
(4)Ź: To press this button to increase figures.
(5)Ż: To press this button to decrease figures.
(6) ENTER: Confirmation button: To press this button to enter menu. In
the main menu, to press this button to turn on the pump directly when
it is off.
(7)
To press this button to enter or quit menu.
(8)
Power button
(9) Indicator POWER: If yellow LED is bright, the AC/DC is connected, If
blue
LED brightening showing the machine is working.
(10) CO2: The faucet of filter
(11) SpO2: The socket of SpO2 .
(12) DC5V and data interface. Note: this interface is connected to device
which meet safety standards (13) Exhaust outlet
(14) Speaker location
(15) Battery cabin
(16) The hanging rope bayonet
Chapter IV Patient connection
I .CO2 measurement
The measurement value will be more accurate if the monitor has 2 minutes’
warming-up. To connect the CO2 filter with 3-way joint of the loop of
anesthetic machine by sampling tube, or to directly connect patient’s nose
by the hose.
7
VPOD CapOx
Figure 2
Installation of filter:
alarm
˖
Do not use the capnograph when filter is not installed, so as to avoid
pollution of the monitor
In order to avoid breathing vapor and respiratory mucus into the
module, the machine must be used with the filter T3.
8
VPOD CapOx
Figure 3
.Instruction for use of the water filterT3:
1.)
To put the convex cleat of Water Filter T3 into the notch of the
inlet port of device and clockwise to turn it to 45°. 2.)
Attach sample
line to Water Filter T3
3.) To connect the other end of the sample line with breathing loop of
ventilator, anesthetic machine or nasal breathing tube.
4.) Change the Water Filter T3 as needed
alarm
˖ If there is leakage, measured values are likely to distortion
alarm ˖Use only original sample tube, the other line measurement
results may change
II. Respiration rate measurement
The calculation of respiration rate derives from monitoring the wave of
CO2.
III. Theory introduction
1 The measure principle:
The device working theory is NON-DISPERSIVE INFRA GAS ANALIZER.
The device has an AUTO ZERO ADJUSTMENT SYSTEM and GAIN
CONTROL
2 Automatic Offset Calibrations
9
VPOD CapOx
The device was designed to automatically perform calibrations in order to
correct for changes in temperature, altitude and electronic component drift.
At this moment, respiration wave becomes one straight line.
The air surrounding the device may have elevated concentrations of CO2
present (such as in an enclosed compartment or room with poor ventilation),
we recommend cleaning the CO2 from the ambient air with a ventilator,
otherwise, the device will cause deviation.
3 The Moisture Separation System:
This instrument uses patented filter which can filter a large number of
moisture meanwhile maintain minimum dead space without affecting the
waveform. But beware: too much moisture can cause congestion; The
screen will show "OCCLUSION ', The operator needs to change the filter,
the old filter can be reused after natural drying in ventilated and dry
environment.
IV. Oximeter density measurement
1. The finger oximeter sensor is recommended to use. The measurement
will begin when your finger is put into the sensor clip, meanwhile, the
PLETH wave will appear on the screen, after several seconds the
saturation and pulse rate appear also. The monitor will utter a sound of
“Di” when the each measurement happens. The tone will vary if the
values of SpO2 and Pulse Rate surpass the alarm scope. The more
values of SpO2 and Pulse Rate surpass the sharper the tone will do.
The volume of pulse beep can be modulated and closed down by the item
of BEEP VOLUME in the SOUND SET menu. The pulse beep will
disappear under the silent condition.
10
VPOD CapOx
Figure 4
2. The use ofSpO2 sensor for neonate
The SpO2 sensor of neonate has two parts: Y-shape sensor and fixing
wrapping and binding part. When it is being used, Y-shape sensor must
be inset into wrapping and binding part. It should be wrapped and bound
on the palm or foot of neonate. Pay attention: the two windows of Y-shape
sensor should be paralleled and face to face, only in this way can the light
signal emitted by light-emitting window, through the body, irradiates on
the receiving window. If the two windows are not paralleled and face to
face, the monitoring result may be not accurate.
In addition, when SpO2 is not being monitored the probe should be taken
off the monitor or the two windows of sensor should be kept face to face,
otherwise the light window will keep shining and PLETH wave will be
disordered and the screen will appear “FAIL SEARCH”
V. Notice 1 Caution:
Showing clearly possible mis-operation to the device
Under the conditions of electromagnetic influence, for example:
electrosurgical devices, MRI, CT etc. will cause negative impact.
The filter should be taken off and replaced when it approaches full of
water, otherwise too much moisture will bring irreversible damage for inner
components. Be sure that the collection tube is open otherwise it will make
inner sampling pump overwork and reduce pump life.
2. Attention: indicating other important information.
1). CO2:
The readings will be wrong if the monitor does not warm up.
The sampling tube provided by the manufacturer, shall be used,
otherwise the readings may be inaccurate.
Under the environment of roughly changed temperature, data measured
may not be accurate. Therefore the screen will show “TEMP IMBALANCE”
when quickly changed temperature overruns a certain range. It is better to
use the monitor under the environment stable temperature.
11
VPOD CapOx
The measured data may be influenced a little bit if the patient is inflicted
by kinds of anesthetic gases. To calibrate some interferential gases if
necessary.
Please refer to Appendix 2.
Any circumstances of blocking sampling gas, such as bending, folding,
contaminations blocking sampling tube and filter or water trap etc. will lead
to inaccurate measurement.
2). Oximeter:
The monitor’s measurement to SpO2 may be influenced under outside
strong light therefore to cover the probe (e.g. to use surgical tape etc.) if
necessary.
Accuracy of oximeter readings will be influenced if there is some
radioactive dye in blood.
Please use SpO2 probe attached with the unit or the one specially
designated to this unit.
It may be the problem of SoP2 probe if the SpO2 readings or the wave
of plethysmogram are obviously abnormal. Therefore to check if the finger
has been put into probe enough deep, if the direction is right , if the there
are some contaminations inside, if the probe is somehow broken or if the
two ends of prolonged cable of SpO2 fall off.
Warning:
It shall not be used if the sensor has some electrical wires and broken
interfaces.
The test of high inside pressure of thorax and blood pressure or some
other continuous negative influence to venal circle will lead to vein vibration.
The signal of pulse will disappear.
If shock, low blood pressure, serious blood vessel shrinking, serious
anemia, over low temperature, artery block near sensor and incomplete
heart shrinking appear, pulse signal will disappear
12
VPOD CapOx
Chapter V Screen display and Operation
I. Screen main display menu
Figure 5
The first line of data shows time(hour, minute)/patient ID,patient type: adult
(ADU) or neonate (NEO), the memory area full indicator ď ˅ēalarm sound
closing (!), silence (
) or non silence () and battery indicator
.
Attention: When the full indicator for memory area displays, the data of same
ID of patient can not be stored. If you want to store the new data, you need to
delete the data from the memory area in the menu NEW PATIENT or to
change patient’s ID.
The second area shows result data:
13
VPOD CapOx
EtCO2 concentration, respiratory rate, inhaling CO2 concentration,
oxygen PLETH, exhaling or inhaling state (during exhaling,
becomes
blue color).
The third area shows CO2 respiratory wave.
It shows SpO2, pulse oxygen PLETH and histogram.
When the pump is closed, “PUMP OFF” will appear on the screen.
When the filter is not inserted into the inlet port, the screen will show ‘LINE
OFF;, the pump will also be automatically closed
Alarm indication:
1) If the EtCO2’s value exceeds the limit of high or low alarm level, the
word ‘EtCO2’ will flash and alert with ‘Di Di’ .The same situation will
happen too to respiration rate,SpO2 and pulse.
2) If the battery level is so low that the battery
indicates completely
empty, and monitor will utter sound continuously. At this time the
monitor will be closed down automatically.
3) When the apnea alarm is turned on and the apnea happens and alerts,
the screen center will appear with ‘APNEA’ (It means to stop breathing)
flashing, and if the sound alarm is turned on \, it will alert ‘DI DI’.
4) When the SpO2 sensor is disconnected or off from finger, the screen
will flash the word ‘SENSOR OFF’. If the saturation could not be
detected for long time, the screen will flash the word ‘FAIL SEARCH’.
5) The volume of continuous or interval sound mentioned above can be
modulated and closed down by the item of ALARM_VOLUME. The
sound will disappear under the silent condition. If the alarm volume is
0, the silence indicator in the main menu will show '!'
6) All the parameters ' alarm for over limits and apnea alarm, will lead to
flashing of red alarm indicator on the panel
II. The main menu
14
VPOD CapOx
Figure 6
When the main menu is open, to press the MENU button to enter the setting
menu as FIGURE 6 shows.
In this menu, to press Ÿ or źbutton to move the cursor up or down, To press
ENTER button to enter the next son menu.
This menu includes the following son menu:
The setting menu for CO2: CO2_SETUP The
setting menu for SpO2: SPO2_SETUP
The trend menu: TREND
The time menu: TIME_SETUP
The sound menu: SOUND_SETUP
The renew set: NEW PATIENT .To renew the new patient, Pay attention,
this operation trend will be refreshed meantime so it is needed to reconfirm
again.
15
VPOD CapOx
III. CO2 setting menu
Figure 7
In this menu, to press Ÿ or źbutton to move the cursor up or down, to
press Ź button orŻ button to change the data highlighted by the cursor.
Regarding some items in this menu, if not to change the data but just to
operate them such as LOAD DEFAULTS or EXIT, then to press ENTER
button.
In this menu, to press MENU button, then to exit this menu and enter the
main menu.
This menu includes the following setups:
1).The high alarm limits of EtCO2: EtCO2 ALARM_H: 22-99mmHg, off
2).The low alarm limits of EtCO2: EtCO2 ALARM_L: off, 10-60mmHg
3).The high alarm limits of respiration rate: RESP ALARM_H:5-60t/m,
off
4).The low alarm limits of respiration rate: RESP ALARM_L: off, 440t/m
5).Pump flux setup: FLOW-SET: 50cc/min-250cc/min
6).The setup of apnea time: APNEA TIME: 15s-44s, off
7).The unit of CO2:CO2 UNIT˖ %, mmHg or kPA
8).Pump switch: ON or Off
16
VPOD CapOx
9).Pump auto-closing time: AUTO-OFF-TIME: 10-30min
10).Screen speed of capnograph˖ SWEEP SPEED: SLOW, NORMAL
or
FAST
11).CO2 Wave scale: WAVE SCALE: 54mmHG or 76mmHG
12).EtCO2 average computation time: EtCO2 Averaging: every
breath,10sec,20sec,30sec
13).Default reload: LOAD-DEFAULTS 14).
Exit: EXIT
Attention:
Pump auto-closing time means that the pump will automatically be
closed down when in that long time no respiration occurs.
The wave range means the maximum value of waveform amplitude
display but it does not mean data on full-scale. Data on full-scale still
means 99mmHg.
Default values as follow:
EtCO2 alarm high limit: 50 mmHg
EtCO2 alarm low limit: 19 mmHg
RESP alarm high limit: 30 times/min
RESP alarm low limit: 08 times/min
FiCO2 alarm high limit: OFF FLOW_SET:
100 CC/Min
Apnea time: 30S
CO2 unit: %
CO2_PUMP: ON
AUTO_OFF_TIME: 10 Min
SWEEP SPEED: NORMAL
EtCO2 Averaging: 1 Breath WAVE
SCALE: 54mmHg
17
VPOD CapOx
IV. SpO2 setting menu
Figure 8 In this menu, to press Ÿ or źbutton to
move the cursor up or down, to press Ź button orŻ button to change the
data highlighted by the cursor. Regarding some items in this menu, if not
to change the data but just to operate them such as LOAD DEFAULTS or
EXIT, then to press ENTER button.
In this menu, to press MENU button, then to exit this menu and enter the
main menu.
This menu includes the following setups:
1).The high alarm limits of SpO2: SPO2 ALARM_H: 50%-100%, off
2).The low alarm limits of SpO2: SPO2 ALARM_L: off, 50%-99%
3).The high alarm limits of pulse rate: P_RATE ALARM_H: 70-250t/m,
off
4).The low alarm limits of pulse rate: P_RATE ALARM_L: off, 40100t/m
5).Wave selection: WAVE: FILL or LINE
6).Renewing of defaults. LOAD DEFAULTS
The wave selection means that: FILL indicates the wave of
plethysmogram is solid. LINE indicates the wave of plethysmogram is
linear.
Default values as follow:
Saturation of SPO2 alarm high limit: 100%
18
VPOD CapOx
Saturation of SPO2 alarm low limit: 92% Pulse
alarm high limit: 130 t/min.
Pulse alarm low limit: 50 t/min.
Wave: Line
V. The time setting menu
Figure 9
In this menu, to press Ÿ or źbutton to move the cursor up or down, to press
Ź button orŻ button to change the data highlighted by the cursor.
Attention: Any time adjustment will renew the trend, so time adjustment shall
be careful.
The procedure is as follow:
1)
Changing time;
2)
To move the cursor to SAVE & EXIT, then to press the ENTER button to
enter the following menu FIGURE 9.1;
To move the cursor to YES, then to press ENTER button. Only in this way
3)
can the time adjustment work.
19
VPOD CapOx
Figure 10
VI. Sound setting menu
Figure 11 In this menu, to press Ÿ or źbutton to
move the cursor up or down, to press Ź button orŻ button to change the
data highlighted by the cursor. This menu includes following setups:
Pulse sound volume: BEEP_VOLUME: 0(OFF)-8
Alarm sound volume: ALARM_VOLUME: 0(OFF)-8
If the alarm volume is 0, the top line in the main menu will show '!'
VII. Trend
1) The graph trend
20
VPOD CapOx
Figure 12
This monitor stores one group data every 12 seconds and keeps them
even after power off. This monitor can circularly accumulate trend data for 24
hours.
. When datum are stored and accumulated up to 24 hours, full memory
indicator
will display on the top line in the home screen, then the user
should change the patient’s ID in the menu of NEW PATIENT or delete the
existing datum and now the new datum can be stored.
As Figure 12 showing, the time for trend’s every page is for 1 hours and
every point indicates the result of every 12 second. The top line of this page
indicates patient’s ID number, the beginning time of this page
(date/month/year hour: minute).
If in the corresponding time to the one page of trend table, the user turns
off and turns on the device once or more times the trend table will show one
or several blue vertical lines with full amplitude, at this time to press ź, then
the top row will display the initial information in that turn on time: patient’s ID
number and initial time. The correspondingly initial blue vertical line will
become white one. To press ź again, the second initial time will display ( if
having several turning on or turning off).
The time at beginning and ending parts of abscissa in this picture
respectively indicates the beginning and ending time for trend of this page.
21
VPOD CapOx
Sometime the data is not complete, it shows the monitor is turned off
although it has not completed 1 hours’ record.
In this menu, to press ENTER button to change the trends of CO2
concentration, respiration rate, SpO2 and pulse (the latter 2 parameters are
selectable).
In this menu, to press Źor Ż button to change the page of trend.
In this menu, to press Ÿ/
button to change graph trend to table trend
(see Figure 13).
In this menu, to press MENU button to quit this menu and return to the main
menu.
2) The table trend
Figure 13
In this graph trend menu, to press Ÿ/ button to change graph trend to
table trend. To press Ÿ/ button again, to return to graph trend (Figure 12).
Every trend table shows 10 groups of datum with each about 120 seconds,
including time, EtCO2 (Et), respiration rate (RR), SpO2, pulse rate(PR).
Every hour covers 30 trend tables and to press ź successively to display next
datum of 120 seconds (small page).
In this menu, to press Źor Ż button to change the large page of trend
table( to display the upper or lower hour trend table)
In order to check conveniently, if the four datum in every group are zero,
the displaying data is blue
22
VPOD CapOx
VIII. NEW PATIENT
Figure 14 In this menu, to press Ÿ or
źbutton to move the cursor up or down, to press Ź button orŻ button to
change the data highlighted by the cursor. In this menu, to press MENU
button, then to exit this menu and enter the main menu.
This menu includes the following setups:
1). ERASE ALARM: to cancel the current alarm
2). ERASE MEMORY: to delete all the historical data so as to store
the new data
3). ID: patient’s ID, 00-99 optional
4). TYPE: patient type, adult or neonate optional
5). SAVE: to store the changed data (this needs to confirm by the new
menu due to possibly substitution to the original data of the same ID of
patient)
6). EXIT: to quit the current menu but not to store the changed
setup
Chapter VI Charge, Maintenance, sterilization, cleanness
23
VPOD CapOx
I. Charge
.After AC/DC power converter is connected and unit is turned on, this unit
will charge the battery with power at the same time. The battery charge will
end after battery is full.
The battery of this unit adopts reusable lithium battery group. In the case of
only battery (without DC), the first column shows the battery’s volume on the
screen. When battery electricity is lack, red
will be flashing, and the DC
power must be connected at once.
After plug in the DC power, the instrument can recharge the battery, and
stop to charge after the battery is full of electricity
The replaced battery shall be made for environmental treatment.
The battery replacement method:
Note that the operation must be done after the AC/ DC power converter is
pull up , otherwise easy to endanger personal safety.
To press and move down the battery cover, then the cover will be remove d,
you can remove battery gently, and pull up the white plug, and insert the ne w
battery’s plug to the same location.
II. Maintenance
If the monitor appears abnormal (e.g. system halted), to press the
switch the monitor at least more than 5 seconds, then it can be turned off
compulsively.
Filter:
If the screen shows ‘occlusion', we need to check if the filter and sampling
pipe are blocked, otherwise the life of unit will be influenced.
If it is contaminated the filter should be replaced (If the sampling line and
the loop are already known smooth).
It also should be replaced if its longest usage period is already overrun.
Please do not let alcohol, cleaning reagent or sterilizing reagent into filter.
To check the filter from the side of the fence whether internal membrane is
dry clean before it is used. After each use, filters should be pulled out, the
surface should be cleaned and placed in ventilated and dry environment to
24
VPOD CapOx
let its internal moisture volatilizes nature. All this work is to make easy use
for next time
Attention:
The sample line or water trap should be not sterilized and used
repeatedly if the packing indication shows that it is disposable.
Attention: For the environment, disposable sample line or filter shall be
treated suitably or recycled.
III. Sterilization, cleanness
Warning˖Before to clean the monitor and probe, power shall be turned off
and switched off form AC current.
1. The cleanness and sterilization of SpO2
probe. Care:
Not to sterilize the probe by the high pressure.
Not to dip the probe into liquid.
Not to use the probe if they have the sign of brokenness or degeneration.
Cleanness and sterilization:
To clean it with the soft cloth moistened with medical alcohol, then to
wipe with dry cloth.
2.
Cleanness
and
sterilization
of
filter
Attention:
To use clear and sterilized filter.
Cleaning:
Only the filter surface may be cleaned and/or disinfected Sterilization:
To use 70% of alcohol or isopropyl alcohol, glutaraldehyde and
Chlorhexidine and ethanol etc. to sterilize.
Chapter VII Analysis of problems
Simple analysis of problems
No.
Phenomena
Causes
Solution
25
VPOD CapOx
1
The values of CO2 is
lower
1.Leaking of filter or
sampling tube
2.
Occlusion of
filter or sampling line
3.
Parts
overused or excursed.
1.
To
check and
replace filter or
sample line
2.
To
clean the gas
loop.
3.
To
calibrate by
standard gas.
2
The values of CO2 is
zero 1. Screen
indicating PUMP
ERR and big noise.
1.Heavy
leaking
inside the gas loop
2.The lamp resource of
sensor damaged
3.Sensor broken
To contact the
manufacturer.
2. Screen indicating
IR-LAMP-BAD
3. Screen indicating
CO2
SENSOR ERR
3
Screen indicating CALERR
The last calibration is
failed.
To recalibrate by
the
standard
gas.
4
Screen indicating
Wrong power supply.
To contact
manufacturer.
1.
To provide
POWER-ERR
5
The CO2 wave is not
normal.
1.
Screen indicating
TEMP-HIGH
2.
Screen indicating
TEMP-LOW
3.
Temperature
too high.
2.
normal
Temperature
too low.
environmental
temperature.
3.Temperature sharp
change
Screen indicating
TEMPIMBALANCE
26
VPOD CapOx
6
No values of SPO2 or
no wave
1.Finger too cold
2.Interference
of
1.Warm
up
finger
2.
Avoiding strong
strong light
light.
3.
The
3 .Avoiding such
measurement test of
phenomenon.
SpO2 and blood
4.Renew sensor
of
pressure are done on
SPO2
the same arm.
4.
Red light in
the sensor no flashing.
5. Infrared and
collector of sensor is
not clean
7
Flashing ‘LOW
BATTERY’
and
closed
1. Battery lack of
power.
5.Cleaning
1. To connect AC
power.
down
automatically.
8
‘LOW AC power working
abnormally.
BATTERY’ after the
power is supplied and
AC indicator no light.
Still
flashing
1. To check AC
electric
current
cable.
and
Attention: Please to contact the client’ service center if some problems
occurred repeatedly.
27
VPOD CapOx
Appendix 1. Explications for the appreciated terms
MENU
Menu
EtCO2
The co2 concentration of expiration end phase
INCO2
The co2 concentration of inspiration phase
SPO2
Oximeter saturation
RR or R-RATE
RATE
Respiration rate PR or P-
Pulse rate mmHg
Millimeter
hydrargyrum
KPA
Kilopascal
ALARM-H
Alarm high limit
ALARM-L
Alarm low limit
LINE
Linear
FILL
Filled or solid
BEEP_VOLUME Pulse volume
ALARM_VOLUME Alarm volume
LOW BATTERY Lack of power
APNEA
Apnea or breath stop
T/Min
Times/ minute
CAL
Offset Calibration
SET
Setup
N2O:
Nitrous oxide
HELIUM
Helium gas
O2 CONCENTRATION O2 concentration compensation
ANESTHEIC GAS
ZERO GAS
Anesthetic gas
Base point or Zero point
BTPS Temperature and deep lung air pressure compensation
CALIBRATE
CANCEL:
Calibration
cancellation OCCLUSION
Block
28
VPOD CapOx
Appendix 2. Changing compensation of balance gas
Attention! Only the trained person can do the following the procedures.
First to enter the engineer menu, the method as follows:
To pressŹ and
two buttons simultaneously, then to enter the following menu.
Figure 15
In this menu, to press Ÿ or źbutton to move the cursor up or down, to press Ź
button orŻ button to change the data highlighted by the cursor.
The some items of this menu can be directly operated, such as LOADDEFAULT or EXIT: to press ENTER button, then to be executed without
through changing data. In this menu, to press MENU button, then being able
to exit this menu and to enter the main menu.
This
menu
including
the
following
BALANCE GAS: AIR, N2O, and HELIUM
O2 CONCENTRATION: 20%-99%
ANESTHEIC GAS: 0-20%
ZERO
GAS:AIR, N2
BTPS: ENABLE, DISABLE
LOAD DEFAULTS
CALIBRATE
Default values as followsġ
BALANCE GAS: AIR
O2 CONCENTRATION: 20 %
ANESTHEIC GAS: 0 %
29
setups
VPOD CapOx
ZERO GAS:AIR
BTPS: DISABLE
Appendix 3. Calibrating of EtCO2 precision
Attention: Only the trained person can do the following the procedures.
1. Attentive items and preparative work
All the devices have been calibrated before they are out of manufacturer
and during every turning on they will do excursion control and gain
adjustment according to working environmental temperature, pressure and
balance gas etc. so generally the user does not need to calibrate himself or
herself. If the unit has been used over one year and clinic readings’
deviation is big, the following procedure shall be obeyed.
1.1 Necessary instruments:
CO2 standard gas (Concentration is about 5%, or 5.0-7.0%)
Three- pass connector: inner diameter 1-3 mm, connecting with gas
bottle,the water trap and open air, is used for connection and protection.
This is because the device can not bear 1.1 air pressures and it is strictly
forbidden to connect the gas bottle directly with the device. The one end
of three-pass connector directly opens to the air so as to release the more
gas and pressure into the air even the standard bottle flows out larger gas.
The two tubes whose length can extend outside room: The standard
gas flows into the air continuously through the three-pass connector and
the module pump vents also standard gas, in the meantime CO2 gas of
higher concentration accumulates easily and quickly around the device. If
the two parts of these standard gases can not be vented outside room,
the device will pick up the value with higher concentration as Zero, thus
this will influence calibration accuracy.
1.2 To connect as following:
30
VPOD CapOx
Figure 16
2. Warm-up: to turn on power and run the unit for 20-30 minutes and adjust
the pump flux over 120cc/min. To check if there is a leakage, the method is
as following: To squeeze the sampling tube by hands, the accelerating
turning sound of sampling pump increases obviously. If the sampling pump
does not accelerate and its turning sound also does not change under
hands’ squeezing, then there must be a leakage in loop somewhere. At this
time, it is not good for demarcation. It’s better to find out leakage point and
solve it, otherwise, it will leads to short value measured. After warming-up,
to open standard gas, to listen if the sound of pump is as same as original
one. If the pump’s turning is slow and its turning sound is weak, that means
the standard gas export is too large, at this time its export flux needs to turn
down until the sound of sampling pump resumes its original volume.
3. To enter the engineer menu again (procedure is same as Appendix 2,
Figure 15), to move highlight onto CALIBRATE, then to press ENTER
button to enter the next menu.
Figure 17
31
VPOD CapOx
To move highlight onto STANDARD GAS, to adjust the value as same as
the concentration of CO2 standard gas, if your standard gas concentration is
precise enough to behind decimal two numbers, you can adopt a round
method.
To move the highlight onto CAL-BEGIN and to press ENTER button, in the
same time, to open the standard gas as the demand of Figure17 and
attention items, the device begins to calibrate. Meanwhile, in the middle of
FIGURE 18 appears ‘ADJUSTING!’
Figure 18
The cross thick bar in this menu will be erased as time passes and the
calibration will be ended when it is completely erased. If the calibration is
successful, the menu will show ADJUST OK and subsequently exit into the
main menu. If the calibration is unsuccessful, this menu will show ADJUST
ERR, at this time, the loop needs to be checked if there is a leakage or
running out of standard gas (the pressure indicator of gas bottle shows 0).
This menu still stays here if the calibration is unsuccessful.
If hoping to exit this menu during the calibration, just to press MENU
button or to move the highlight onto CANCEL, then to press ENTER button.
Do not forget to close down the switch of the standard gas bottle and
depressurized valve lest the standard gas should be wasted.
32
VPOD CapOx
Headquarter:
VirtuOx Inc.
5850 Coral Ridge Drive Suite 301
Coral Springs, FL 33076
Tel: 877.337.7111
Fax: 954-775-3538
E-mail: [email protected]
Website: VirtuOx.net
33