1
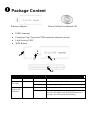
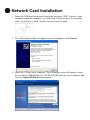
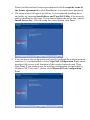
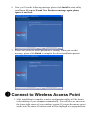
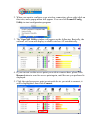
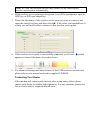
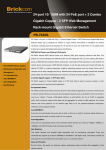
VigorN65
Wireless USB Adapter
Quick Start Guide
Version: 1.0
Date: 25/07/2011
Warranty
We warrant to the original end user (purchaser) that the modem will be free from any defects in workmanship or materials for a period of one (1)
year from the date of purchase from the dealer. Please keep your purchase receipt in a safe place as it serves as proof of date of purchase. During
the warranty period, and upon proof of purchase, should the product have indications of failure due to faulty workmanship and/or materials, we will,
at our discretion, repair or replace the defective products or components, without charge for either parts or labor, to whatever extent we deem
necessary tore-store the product to proper operating condition. Any replacement will consist of a new or re-manufactured functionally equivalent
product of equal value, and will be offered solely at our discretion. This warranty will not apply if the product is modified, misused, tampered with,
damaged by an act of God, or subjected to abnormal working conditions. The warranty does not cover the bundled or licensed software of other
vendors. Defects which do not significantly affect the usability of the product will not be covered by the warranty. We reserve the right to revise the
manual and online documentation and to make changes from time to time in the contents hereof without obligation to notify any person of such
revision or changes.
European Community Declarations
Manufacturer:
Address:
Product:
DrayTek Corp.
No. 26, Fu Shing Road, HuKou Township, HsinChu Industrial Park, Hsin-Chu, Taiwan 303
VigorN65
DrayTek Corp. declares that VigorN65 is in compliance with the following essential requirements and other relevant provisions of R&TTE Directive
1999/5/EEC.
The product conforms to the requirements of Electro-Magnetic Compatibility (EMC) Directive 2004/108/EC by complying with the requirements set
forth in EN55022/Class B and EN55024/Class B.
The product conforms to the requirements of Low Voltage (LVD) Directive 2006/95/EC by complying with the requirements set forth in EN60950-1.
Federal Communication Commission Interference Statement
This equipment has been tested and found to comply with the limits for a Class B digital device, pursuant to Part 15 of the FCC Rules. These limits
are designed to provide reasonable protection against harmful interference in a residential installation. This equipment generates, uses and can
radiate radio frequency energy and, if not installed and used in accordance with the instructions, may cause harmful interference to radio
communications. However, there is no guarantee that interference will not occur in a particular installation. If this equipment does cause harmful
interference to radio or television reception, which can be determined by turning the equipment off and on, the user is encouraged to try to correct
the interference by one of the following measures:
z
Reorient or relocate the receiving antenna.
z
Increase the separation between the equipment and receiver.
z
Connect the equipment into an outlet on a circuit different from that to which the receiver is connected.
z
Consult the dealer or an experienced radio/TV technician for help.
This device complies with Part 15 of the FCC Rules. Operation is subject to the following two conditions:
(1) This device may not cause harmful interference, and
(2) This device may accept any interference received, including interference that may cause undesired operation.
This product is designed for the 2.4GHz/5GHz WLAN network throughout the EC region and Switzerland with restrictions in France.
n Package Content
Wireless Adapter
Driver/Utility/User Manual CD
z
USB Connector
z
Connector Cap (To protect USB connector when not in use)
z
Link/Activity LED
z
WPS Button
2
1
3
4
LED Name
Color
Light Status
Description
Radio Off
Green
Off
Wireless LAN function is disabled.
Radio On
(No Link)
Green
Off
No link to wireless AP or Router.
Slow blinking
Transmitting management information.
Radio On
(Link to AP
or Router)
Green
On
Link to wireless AP or Router.
Blinking
Transmitting data or management information. If
user activates WPS mode (hold WPS button for 3
seconds), the LED will be still blinking.
o Network Card Installation
1. Insert the USB wireless network card into an empty USB 2.0 port of your
computer when the computer is switched on. Never use force to insert the
card, if you feel it’s stuck, flip the card over and try again.
2. The following message will appear on your computer, click Cancel.
3. Insert the CD into your computer. The following screen will appear. Insert
device driver CDROM into the CD/DVD ROM drive of your computer, and
execute VigorN65 Driver.exe program.
Please read the end user license agreement and click I accept the terms of
the license agreement then click Next button, to accept license agreement.
4. The setup wizard will appear as follows. It is recommend installing driver
and utility by choosing Install driver and VigorN65 Utility if the network
card is installing the first time. If you want to update the driver only, choose
Install driver only. After choosing the correct option, click Next.
5. You can choose the configuration tool used to configure the wireless network
card here. It’s recommended to select VigorN65 Configuration Tool, which
provides fully access to all functions of this wireless network card. Then
click Next. If you prefer to use the wireless configuration tool provided by
Windows XP, Vista, and 7, please select Microsoft Zero Configuration
Tool.
6. Now you’ll see the following message, please click Install to start utility
installation. If you see Found New Hardware message again, please
ignore it and wait.
7. Please wait while the install procedure is running. When you see this
message, please click Finish to complete the driver installation process.
q Connect to Wireless Access Point
1. After installation is complete, wireless configuration utility will be shown
in the desktop of your computer automatically. You will also see an icon at
the lower-right corner of your windows system. If you put the mouse cursor
on the icon, the status of wireless card will be displayed as a popup balloon.
2. When you want to configure your wireless connection, please right click on
this icon, and a popup menu will appear. You can click Launch Config
Utility to start configuration program.
3. The VigorN65 Utility window will appear as the following. Basically, the
software will scan and display available wireless AP automatically.
4. If you can not see the access point you wish to connect here, please click
Rescan button to scan for access point again, until the one you preferred is
displayed.
5. Click the wireless access point or network device you wish to connect, it
will be highlighted, then click Connect.
Note: In Vista, the network card will not connect to any unencrypted
wireless access point automatically.
6. If the wireless access point uses encryption, you will be prompted to input its
WEP key or WPA pre-shared key.
7. Please ask the owner of the wireless access point you want to connect, and
input the correct key here and then click OK. If the value you inputted here is
wrong, you will not be able to connect to this wireless access point.
8. If the wireless access point is successfully connected, you’ll see a
appears in front of the name of wireless device.
symbol
9. For advanced settings and other features of this USB wireless network card,
please refer to user manual enclosed in supplied CD-ROM.
Contacting Your Dealer
If the modem still cannot work correctly after trying many efforts, please
contact your dealer for further help right away. For any questions, please feel
free to send e-mail to [email protected].