1
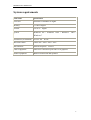
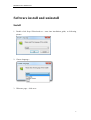
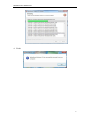
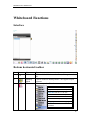
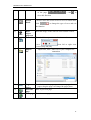
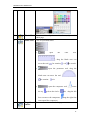
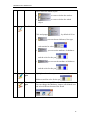
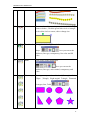
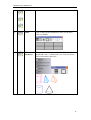
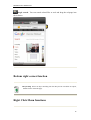
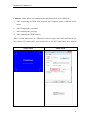
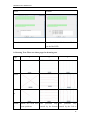
Whiteboard User Manual V2.5
Content
CONTENT ...........................................................................................................................................2
WHITEBOARD INTRODUCTION...........................................................................................................3
FEATURES:.........................................................................................................................................3
SYSTEM REQUIREMENTS ........................................................................................................................ 4
SOFTWARE INSTALL AND UNINSTALL..................................................................................................5
INSTALL .............................................................................................................................................5
UNINSTALL ........................................................................................................................................8
WHITEBOARD FUNCTIONS ...............................................................................................................10
INTERFACE ....................................................................................................................................... 10
BOTTOM HORIZONTAL TOOLBAR ............................................................................................................ 10
RIGHT SIDE VERTICAL TOOLBAR FUNCTIONS .............................................................................................. 13
LEFT SOURCES FUNCTIONS ................................................................................................................... 19
BOTTOM RIGHT CORNER FUNCTION ........................................................................................................ 20
RIGHT CLICK MENU FUNCTIONS ............................................................................................................ 20
WHITEBOARD SERVER......................................................................................................................22
FAQS FOR USING WHITEBOARD: ......................................................................................................28
2
Whiteboard User Manual V2.5
Whiteboard introduction
Whiteboard is a kind of software which designed by our factory mainly for education;
teachers can use it together with an interactive whiteboard in the classroom,
presenting students’ homework or courses on the whiteboards, and make notes
together with microphone, record the whole class and upload on the web for students
download review at home. Students or teacher can also use it as a painting tool,
drawing pictures or playing for fun. Making a vivid and interactive environment for
students study.
Features:
1.
2.
3.
4.
5.
Two people write simultaneously.
Two fingers gesture control (zoom in/out, rotate)
Support Microsoft surface multi-touch
Teacher prepared courses/e-books for class can easily add into the software.
Teacher can drag tremendous video/flash/PDF/JPG/PPT/word……into the
software and play at the same time
6. Google search directly through the software, drag the webpage into the software
and zoom in/out by two fingers.
7. Hyperlinks word/excel/ ppt/ video/ flash/jpg/ png/music…… for the selected
object.
8. Record and play (teachers can record all the operations on the software and save
and upload for students download).
9. No need to exit the software and operate computer desktop directly.
10. Hand writing recognition (hand write words, and system will change to standard
words automatically).
11. Smart pen change hand write irregular line/circle/Triangle/ into standard.
12. OEM languages, logo, business card and appearance.
13. Insert table and white words in it.
14. Common used color, pen, highlight pen, Geometry are available.
15. Other functions like cut, spotlight, screen cover, print, redo, undo… are available.
16. Right click: copy, cut, clone, delete, rotate, mirror, unlimited copy, zoom in/out,
highperlink music and voice etc.
17. And more……
3
Whiteboard User Manual V2.5
System requirements
Item name
specification
Processor
Pentium III 800MHz or higher
Memory
1 GHz or higher
DirectX
V9.0c or
System
Windows XP / Windows Vista / Windows
higher
2003 /
Windows 7
Resolution (recommend)
1024 x 768 60 Hz
Microsoft Office
Office XP / 2002 / 2003 / 2007
Web Browser
Internet Explorer,Firefox
Video Equipment
DirectX 9.0 and more powerful VGA graphics
Audio Equipment
Built-in sound card and speakers
4
Whiteboard User Manual V2.5
Software install and uninstall
Install
1. Double click Setup Whiteboard.exe,enter into installation guide, as following
picture:
2. Choose language:
3. Welcome page,click next:
5
Whiteboard User Manual V2.5
4. Choose where you want to install:
5. Installing,click next to continue:
6
Whiteboard User Manual V2.5
6. Finish:
7. After finishing, fast operation icon will be created in the start
and
7
Whiteboard User Manual V2.5
desktop
Uninstall
Uninstall from Start
Enter Start, find the software name, and click delete Whiteboard。
1. Start--Whiteboard
,click Uninstall。
2. Click Y。
3. Uninstalling
8
Whiteboard User Manual V2.5
4. Finish
9
Whiteboard User Manual V2.5
Whiteboard Functions
Interface
5
Bottom horizontal toolbar
No.
1
2
3
Icon
Name
Hide
Desktop
Mode
File
Function
Click to hide all horizontal taskbar, click again to show
all.
Click to return to desktop mode. Click again to open
software
Click to open the file submenu
New file: new a “.rio” file
Import file: import office of pdf file
Save file: save as a “*.rio” file
Save as: save as office or .pdf file
Send email: use outlook to send
Print: use default printer to print
Language: set the GUID language
About: check the info of the
software
10
Whiteboard User Manual V2.5
4
Click
Through
Click this icon in Transparent Desktop Mode, the icon
will change to
, then it will prohibit the mouse
function of the software, permit desktop normal
operation, click again return to transparent mode
5
Mode
Switch between Whiteboard Mode and
Transparent Desktop Mode
6
Cut
Click cut, mouse will change to Scissors shape, and
place to the area you want to cut from and drag, the
area will be cut and drag the mouse to paste it. You
can control the size of the cutting and the pasting
picture
,first one is to cut a rectangle area,
other one is free area.
7
Zoom
in/out
Zoom in/out a selected area. click
zoom out,click
zoom out, the selected area can be moved freely.
click
8
Spotlight
to close this function.
Highlights a selected area, and cover other area. Click
the small circle on the bottom right corner of the
rectangle that out of highlight area
,can
change the size of highlight area, change the shapes
of the highlight area by clicking bottom right corner
11
Whiteboard User Manual V2.5
, click
of the page
to
close this function
9
Screen
shade
Can free move the screen cover to cover a certain area,
click
to change the type of cover and exit
the function
10
11
Real
object
projector
Record
12
Import
file
13
Page
Sorter
Previous
page
Next page
14
15
Read the image on the software from outside camera.
Record all the operation and voice on the screen and
save.
From left to right icon:
record, stop and play.
Import PPT, DOC, PDF files in your computer for
annotation
Provide the entire pages preview, one page show 6
pages; drag the page can change the pages place.
Back to previous page
Enter into next page
12
Whiteboard User Manual V2.5
16
New page
17
Undo
Create a new page,
, there are
white page, black page, green page and the background
page to choose, the default one is white page.
Back to last operation
18
Redo
Redo the last operation
19
Save
20
Exit
Save the all the page and function as a “*.rio” file, and
this “*.rio” file can be open by Whiteboard software
Click to exit the current Whiteboard application
Right side vertical toolbar functions
No. Icon
1
Name
Hide
2
Switch
3
Recorder
Function
Click to hide all vertical taskbar, click again to show
all.
Click to switch between vertical common used tools
and graphics.
Click this button to record all the operation on this page
4
Play
Click to play what you recorded just now
5
Stop
Stop the record or playing.
6
Colors
The pen color default as black, if you want to change
colors please use the quick setting
13
Whiteboard User Manual V2.5
7
Flood fill
8
Math Tools
Choose a color and paint one closed area, object or the
whole page
Click to open math tools:
open
1)
the
ruler
tool,
, drag the blank area can
move the tool,
for rotation,
exit, for stretch.
open the protractor tool, drag the
2)
blank area can move the tool,
,
for rotation, exit.
open the compasses tool,
3)
the top
9
to draw the circle,
, rotate
exit,drag the left
foot can move the compasses, drag the right foot
can expand the compasses.
Page Zoom Zoom out or zoom in the whole page
Out/In
14
Whiteboard User Manual V2.5
10
Page Move
Click the icon, the page can move arbitrarily when drag
the blank area of the page
11
Text
Click this tool, in win7 system, it popup a submenu like
,
choose “Text “, position finger at the place you want to
add text, then use the keyboard to input words
.
Choose “HandleWrite”, here you can use handwriting
change irregular words into standard.(The
“HandleWrite” is for English and Chinese only at this
period)
12
Stamper
Click first star shape to choose the stampers in the
software, click the other one to choose any format
image as stamper
13
Eraser
Circle and popup
, by default, the
15
Whiteboard User Manual V2.5
eraser erases the whole object.
1)
to erase or delete the strokes.
2)
to erase or delete the whole
object.
14
Pen Tool
Click and popup
1)
, by default it’s Pen.
, you can choose thickness, line type,
end terminal or color
2)
, you can set the attribute of thickness
and the color for the pen
3)
, you can set the attribute of thickness
and the color for the pen
15
.
Fluorescent Highlights selected text, you can set the attribute of
pen
thickness and the color for the pen
16
.
Creativity
pen
.
Write and draw using different brush sizes.
You can change the thickness, import self-defined icon
and select different format of the brush
.
16
Whiteboard User Manual V2.5
17
Selection
You can select objects or shapes to let it move, modify,
rotate or delete.., click the green little circle or triangle
or the white circle to rotate, edit or change size.
18
Free hand
Change hand drawing line, circle etc… into standard
shape.
here you can set the
thickness, line type, transparency, line color and fill
color.
19
Line
Draw a line on the whiteboard.
here you can set the
thickness, line type, end terminal, transparency and
color.
20
Geometry
Draw geometry on the whiteboard(Rectangle, Circle,
Ellipse ,Triangle, Right-angled Triangle, Diamond,
Pentagon, Star, Table
,
17
Whiteboard User Manual V2.5
21
Table
Draw a table on the whiteboard, write words in the
table is available.
22
3D
Geometry
Click to open the submenu, Cuboid, 4 Diamond Cone,
Mitsubishi Cone, Cylinder and Cone. You can choose
different thickness and color.
18
Whiteboard User Manual V2.5
Left sources functions
Click will pop up a menu, Drag pictures, word, ppt, pdf, flash, mwv into the
software.
Gallery,default path is the place where the Whiteboard Installation Path. Some
images and backgrounds are in the software by default.
Attachment,You can open your images or files.,
Add
delete.
19
Whiteboard User Manual V2.5
Google search,You can search related files or web and drag the webpage into
the software.
Bottom right corner function
Recycle bin:Select an object and drag into the Recycle bin can delete an object,
double click to clean the page.
Right Click Menu functions
20
Whiteboard User Manual V2.5
Copy: Copy the selective objects to the clipboard of software.
Cut: Cut the selective objects to the clipboard of software.
Paste: Paste the objects from clipboard to the page of software.
Clone: Clone the selective objects to the page of software.
Delete: Delete the selective objects, you can choose “Redo” to
restore the deleted objects.
combine
Combination:
multi
objects
together, or cancel the combination.
Rotate a selective object, you can
Rotate:
choose different angle.
Change the layer sequence
Layer sequence:
of the object in the page.
Flip the selective object horizontal or
Flip:
vertical
Mirror
Mirror:
the selective
object
horizontal or vertical.
Unlimited
copy:
Click
the
select
this
function
, select an object and drag it the other
area, there will be another same object.
21
Whiteboard User Manual V2.5
Whiteboard Server
After installing the software, there will be an icon
on the bottom right
toolbar of your computer, right click it you will see below window:
The icon have below three status with different colors:
a.
Grey means your computer doesn’t connected with a computer or doesn’t
connected well
b.
Orange means the computer has connected with an IWB and it is single
touch
c.
Green means the computer has connected with an IWB and it is multi-touch
Language: currently we have English, Portuguese, Simplified Chinese, Turkish. We
can also customize languages for users.
22
Whiteboard User Manual V2.5
Calibrate: Under below circumstances the whiteboard need to be calibrated:
a. After connecting the IWB with projector and computer, please Calibrate before
using.
b. After changing the resolution
c. After adjusting the projector
d. After adjusting the IWB location
There is some differences in Calibration between single touch and multi-touch (for
more about win7 multi-touch, you can also refer to the Win7 multi-touch user manual)
single touch
Multi-touch
23
Whiteboard User Manual V2.5
Setting: Switching between Single touch and Multi-touch, the server icon will change
colors.
When click the setting, there will be a dialogue appear on the screen, you can choose
between single touch and multi-touch.
After setting the device, the server will be a little different between single touch and
multi-touch
single touch
Remark:
the
disable
rightclick
Multi-touch
and Remark:
the
disable
rightclick
and
disable PPT Notes are black, it means this disable PPT notes is grey, it means this
two functions are available. When you two functions are not available (because
click either of them, there will be a right it processing automatically by the system
Win7 you are using)
14
icon in the front
24
Whiteboard User Manual V2.5
Disable Right Click: Right click can’t use
Disable PPT Notes: PPT Annotation can’t use
Set Shortcuts: Setting up the two horizontal hotkeys pasted on each side of the
IWB.
Test: Testing the board whether it works well or tell users to solve some small
problem,
a. LED Test:
25
Whiteboard User Manual V2.5
Good
Problem
Remark:
Remark: the lower blank area will show
you the Bad LED
b. Drawing Test: There are three pages for drawing test.
Page
1
3
3
Blank
Good
Proble
m
Remar
Means this IWB have The
k
some problems
problems
may The
problems
may
caused by the bottom caused by the Left or
26
Whiteboard User Manual V2.5
or top LED where the Right LED where the
break happens
break happens
Help: Whiteboard User Manual
Exit: Exit the server
27
Whiteboard User Manual V2.5
FAQs for using Whiteboard:
1. Q: When repeat to calibrate the device on the multi-touch model, the
calibration interface stop working.
A: The window7 system will save the last calibration data for the multi-touch
device. If the new calibration data is so different from the last one, the calibration
is invalid. Solution: click Esc key to exit the calibration interface, and then open
the control panel to clear the last calibration data as the following pictures:
2. Q: The Hotkeys on the whiteboard are not available?
A: Please make sure that you have finished the “Whiteboard Calibration and Hotkeys
Setting”. The following picture is the calibration for the whiteboard hotkeys:
28
Whiteboard User Manual V2.5
3. Q: It fails to switch the device between single-touch and multi-touch model
sometimes?
A: The touch model switching need to get the confirmation of the hardware, the
confirmation does fail sometime. Solution: before switching the model, pull up the
USB connector then plug it again.
Thank you for using Whiteboard and hope you have a nice time with our
software.
29