1
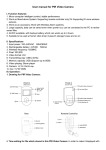
HD Camcorder Watch Item No. 203212 Thank you for choosing the Sharper Image HD Camcorder Watch. This amazing device is designed for a long life of fun and enjoyment as both a timepiece and a high-definition video recorder. Please take a moment to read these instructions and familiarize yourself with its operation and features. Be sure to keep this guide for future reference. PACKAGE CONTENTS HD Camcorder Watch USB cable User manual CD Extra USB Port cover FEATURES Elegant analog watch with seconds hand Records high-definition video with sound Video format: AVI, 1280*720 resolution Internal memory: 4GB (stores approx. 55 minutes of video) USB interface: 2.0 High-Speed Battery: built-in Lithium-ion battery Run time: about 2 hours Charging time: 3-4 hours Compatible with PC and Macintosh computers System Requirements: Windows ME, 2000, XP, 7, Vista or later; Mac OS 9.2.2 or later Time stamp on videos Can be used as a USB drive IDENTIFICATION OF PARTS 1. Power On / Off / Record / Save 2. Time Adjustment Knob 3. Microphone / Mic Cover Knob 4. Camera Lens 5. USB Port 6. Mode Button 7. Indicator Light RECORDING VIDEO 1. Press the Power On / Off / Record / Save button (1) until the red light turns on. The red light will turn off after three seconds, and a blue light will stay illuminated, indicating the HD Camcorder Watch is entering standby mode. 2. Press the Power On / Off / Record / Save button (1) once more. The blue light flashes 3 times then turns off, indicating that the HD Camcorder Watch has started recording. (Please note: The Camera Lens (4) is concealed in the 6:00 position of the watch face and is intentionally mounted upside down. When you record, rotate your wrist so that the 12:00 position is closest to the floor. This will produce an image that is right-side-up.) 3. To stop recording, press the Power On / Off / Record / Save button (1) once. The blue light will turn on, showing the video is saved, and the HD Camcorder Watch is back to the standby mode. 4. During recording, the system will automatically save the file every 20 minutes. In order to save power, the Indicator Light will stay off as it saves the file. NOTE: For maximum secrecy, the Indicator Light is very small and sometimes difficult to see in bright light. You may need to cover it with your hand or go to a dark area to see if it is illuminated. CHARGING THE HD CAMCORDER WATCH In the Power Off mode, connect the HD Camcorder Watch to a computer with the included USB cable. (To expose the hidden USB Port, unscrew the decoy knob/cap, located at the 9:00 position on the dial.) When the HD Camcorder Watch is connected to a USB power source, both the blue light and the red light will illuminate during charging. When the HD Camcorder Watch is fully charged, both lights will turn off. NOTE: Charging time is approximately 3-4 hours. NOTE: Charging time is approximately 3-4 hours. SYSTEM RESET Should you encounter an error in recording, you might need to reset your recording system. Press Power On / Off /Record / Save button (1) and the Mode Button (6) at the same time to power off and reset the HD Camcorder Watch. NOTE: If you reset the system while recording video, your current file will not be saved. VIDEO PLAYBACK In Power Off mode, connect the camera to a computer via USB cable to play back video on computer. Please make sure that you have some video playback software (such as Quick Time player, KMPlayer or Mplayer) before connecting. If you do not, a disc is provided with video player software. Or, you can download them for free from the Internet. 1. Go to My Computer to search for the Removable Drive. 2. Click on Removable Drive, then click through the folders until you find your videos. 3. To delete files, right click on the file you wish to delete and hit delete. SWITCHING OFF THE HD CAMCORDER WATCH In any mode, press and hold the Power On / Off / Record / Save button (1). The red light flashes 3 times and then turns off, indicating that the device is powered off. NOTE: When powering off in this method, your video file will be saved automatically before the device shuts off. TO SET THE TIME Gently pull out the Time Adjustment Knob (2), located near the 3:00 on the face, and rotate the stem to the proper time. Then, push the stem back, as you would a typical watch or clock. SETTING THE ON-SCREEN TIME STAMP ON VIDEOS During video playback, device will show the Time Stamp in the lower right corner of the video. Please set the time as follows: 1. Create a file named “Time.TXT” and edit it according to this format: 2010.12.12 12:12:12. NOTE: A sample Time.TXT document is on the software disc included in the package. 2. Copy the file to the root of the disk of the camera and disconnect the camera from the computer. 3. When you operate the HD Camcorder Watch the next time, the Time Stamp will be updated. TECHNICAL NOTES 1. When taking video continually, the system will automatically generate a new video file after each operation. 2. Please make sure you have enough power. If the device has low power, the red light flashes 10 times, saves the current file automatically, and turns off. 3. For optimal sound recording, remove the Mic Cover Knob (4) completely. The Mic Cover Knob (4) is located in the 4:00 position. 4. The time it takes for computers to recognize the HD Camcorder Watch varies. Please be patient while your computer recognizes this device. If your computer does not recognize the device, please make sure your operating system, drivers and USB cable are up-to-date and in good working order, then try to connect again. 5. For optimum battery performance, please charge the battery fully before the first five times you use the HD Camcorder Watch. This will help the battery reach and maintain its full capacity. 6. When the internal memory is full, the red and blue lights will flash simultaneously for 5 seconds. The camera will save the current file automatically and then power off. To make more room, connect the HD Camcorder Watch to a computer and manually delete the video files by dragging them into the Trash or Recycle Bin or right clicking on them and selecting “delete.” 7. For best playback, you may have to drag the files onto your computer desktop, and then open them from your computer. NOTE: As with many high-tech devices, it may take a little time to get familiar with the HD Camcorder Watch. Please take a few minutes to read these instructions and practice using the device. Before long, you’ll be an expert! Be sure to save these instructions for future reference. CUSTOMER SERVICE If you require any additional assistance with your HD Camcorder Watch, please call 1 (877) 714-7444, and select Option 3.