1
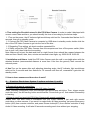
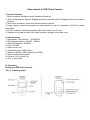
User manual for PIR Video Camera
I. Function features:
1. Micro-computer intelligent control, stable performance
2. Work as Stand-alone System: Supporting remote controller only! Or Supporting10 more wireless
sensors.
3. Work as an accessory: Work with Wireless Alarm systems.
3. Large capacity, data can be saved even when power-cut, can be connected to the PC to review
saved files.
4. AC/DC available, with backup battery which can works up to 4 hours.
5. Suitable to be used at home\ villa\ shop\ museum\ storage house and so on
II. Specifications
1. Input power: 100~240VAC 50HZ/60HZ
2. Rechargeable battery: 4.8VDC 500mA
3. Wireless frequency: 433MHZ
4. Pixel: 300,000
5. Video format: AVI
6. Transmitting way: USB 2.0(Hs)
7. Memory capacity: 2GB (Support up to 8GB)
8. Video playing: Storm player
9. Camera: 1/4”OV CMOS chip
10. Size: 112*60*38MM
III. Operation:
Drawing for PIR Video Camera:
“4)”is battery power
2. Time setting for file which stored in this PIR Video Camera: In order to make it displayed with
correct current date and time, you should modify the time of recording by the below steps:
1.1Turn on the power, the #7 indicator light would keep solid red for 3 seconds then flashes for 10
seconds, then go to standby mode.
1.2 Connect the PIR Video Camera to computer by USB when in standby mode, double click the
disc of the PIR Video Camera to get into the root of the disc..
1.3 Regarding Time setting, pls check another seperated file.
1.4 Safely unload the PIR Video Camera from the computer and turn off the power switch (Note:
has to turn it off), then finish the time setting.
Note: Make sure to input the date and time in a right format, there should be a space between the
date and time. Month, date, hour, minute and second is two digits, eg. 2008-08-18 18:28:38.
3. Installation and fixture: Install the PIR Video Camera onto the wall in a suitable place with the
attached bracket (recommended distance is more than 1.8m from the ground).Then connect the
external power.
4. Use:Turn on the power after well adjusting detecting angle, the #7 indicator light would keep
solid red for 3 seconds and then flashes for 10 seconds and then off, meanwhile it gets into the
standby mode.
5. How to learn sensors and how does it work?
A.
If work as Stand-alone System: 2 options as below 1.) and 2.)
1.) Supporting remote controllers:
1.1) How to learn remote controller to this PIR Video Camera?
Press “Learning ”button(#14) once, the indicator light #8 will keep solid blue. Then, trigger remote
controller twice, the #8 learning button would flashes 5 times then go off, that means successfully
in learning.
1.2)How to use if just work this PIR Video Camera with remote controller?
Please note: You don’t need to arm\disarm this PIR Video Camera if just work with remote
controllers, no other sensors, If you want it to make Audio & Video recording, just press Emergency
button (#19) from remote controller, and press Disarm button(#17) from remote controller to stop
Audio & Video recording. It will take 60 seconds recording each time without your stopping.
2.) Supporting other wireless sensors:
2.1) How to learn wireless sensors to this PIR Video Camera?
This PIR Video Camera support up to 10 more wireless sensors, Press “Learning ”button(#8) once,
the indicator light #8 will keep solid blue. Then, trigger wireless sensors twice, the #8 learning
button would flashes 5 times then go off, that means successfully in learning. Please note that :
Each time, you can learn one kind of wireless sensor at most per time.
2.2) Hot to use together?
You need to arm(#16)\disarm(#17) this PIR Video Camera by remote controller, it will sound a “di”
then go to entry delay for 15 seconds, also you can disarm this PIR Video Camera by pressing
disarming button from remote controller(#17), and PIR Video Camera will sound a “didi”. Please
note: During Audio & Video recording, you can stop recording by press this disarm button(#17). If
any sensors get triggered, this PIR Video Camera will begin to AV recording automatically for 60
seconds then stop. During Audio & Video recording, the #7 light would keep flashing all the time,
and #9 light would keep solid green. When finish recording, the #7 light would be off, and #9 light
would keep solid red. The file will be stored automatically with a default name of video-start time.
B. If Use with Wireless Alarm Systems:
This PIR Video Camera will start video and audio recording automatically upon the trigger of the
alarm and then saved as a video file automatically. Notes: For learn to alarm host panel.
1) How to learn this PIR Video Camera to Wireless Alarm systems?
1.1. Turn on the power for AV recorder, press the learning button(#14) from back side, the light(#8)
would keep solid blue.
1.2. Take out alarm host panel, press Emergency button from alarm host panel’s keypad, 5
seconds later, press disarm alarm host panel.
1.3. The light(#8) from PIR Video Camera would flash for 5 times, it means learned successfully.
2) How to delete from Wireless Alarm systems?
Turn on the power, press the learning button(#14) for 10 seconds, then release, the blue light(#8)
will flash once, it means delete successfully.
Note:
1. Please note that : Each time, you can learn one kind of wireless sensor at most per time.
2. If you want learn to alarm host panel, please use keypad from Wireless alarm host panel
3. There is no limit for how many PIR Video Cameras learned to alarm host panel.
C. If work with lamp holder:
Step 1: Power on the lamp holder,and press the learning button one
time(as right), you would hear a “di” (it means it enter into learning
status)
Step 2: please open the cover of the motion video camera, and press
the learning button 5 times (#8 learning button (Blue), as showed from
drawing for PIR Video Camera in above part III Operation1),
If you hear “di di di di di” 5 times sounding in total from lamp holder, it means learned successfully,
or else, it will just sound “di di” two times to exit, which also means failed.
Pls note:
this is the switch “OFF-ON” for back-up battery, the left is off, the right is
on, so, when you switch to right position “on”, so, it will work on battery if AC power failed, and if will
charge battery if AC power on.
6. View files: In standby mode, connect the PIR Video Camera to a computer with the USB. You
can view the recorded files after continuous click of the folders.
Notes:
1. Do not trigger the alarm host or have any other operation when viewing the files.
2. The recorded files are supported by the stormplayer, Kmplayer, Mplayer, rainstorm video and
audio, kmplayer, Mplayer, also, you can download from www.videolan.org
3. You need to reset the recording time according to the instruction of “Time setting” before each
safe unloading.
4.You need to turn off the power after each safe unloading and turn it on before make it works
again!
5. Make sure to charge it before using if power is low (at the same time, make sure the power
switch is “ON”), unplug the external power and turn off the power switch when it does not work in
order and then turn on the switch (the battery has certain power at this moment) and plug the
external power.
IV. Cautions:
1. Please abide by the applicable laws and regulations. Do not use this unit for other illegal
purposes or you should bear all responsibility.
2. Please do not use it at the ambient humidity which human can not fit and do not place it in a
humid operating condition, this product is not waterproof.
3. Please do not face the camera to the sun or other strong light to avoid damaging optics parts.
4. Please do not use it under a dusty condition so as to keep its lens and other parts from dust or
void video affection.
5. Please clean the lens with lens wiping paper or glass towel periodically.
6. This product is precision electronic product and do not make it subject to any impact or strong
shake, do not use in strong magnetic field or electric field.