1
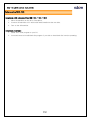
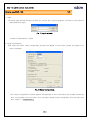
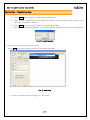
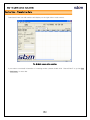
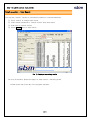
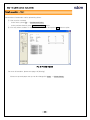
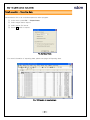
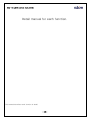
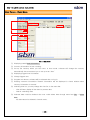
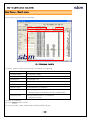
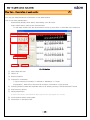
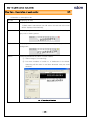
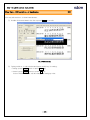
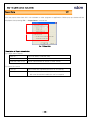
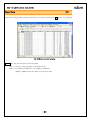
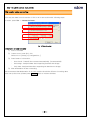
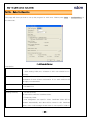
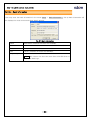
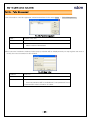
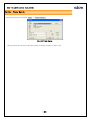
SDC-100 USER MANUAL Ver4.2(ENG)
User’s manual of SDC-100
(Version 4.XX)
-1-
SDC-100 USER MANUAL Ver4.2(ENG)
Index
Quick guide
Before using SDC-100
----------------------------------
4
How to use SDC-100
----------------------------------
5
How to use – Input Data
----------------------------------
7
Detail Operation – Searching ----------------------------------
9
Detail Operation – Printing
10
----------------------------------
Detail Operation – Exporting Data
----------------------------
11
Detail Description
Main Screen
----------------------------------------
13
Data View
----------------------------------------
15
Printing
----------------------------------------
18
Export Data
----------------------------------------
19
Old version data converting
----------------------------------
21
Set Up – Setup Configuration ----------------------------------
23
Set Up – Bank Information
----------------------------------
25
----------------------------
26
----------------------------------
27
Set Up – Teller Management
Set Up – Setup Printer
-2-
SDC-100 USER MANUAL Ver4.2(ENG)
Quick Guide of SDC-100
This quick guide will describe how to use SDC-100 program at the below:
-3-
SDC-100 USER MANUAL Ver4.2(ENG)
Before using SDC-100
Installation of SB series machines (SB-1000 / 1100 / 1800)
1. Place SB machine on the flat or fixed place.
2. Connect SB machine to PC with serial cable installed at the rear side.
3. Turn on the SB machine.
Installation of software
1. Install SDC-1000 program to your PC.
2. You would need to install black-list program if you wish to have black list function operating.
-4-
SDC-100 USER MANUAL Ver4.2(ENG)
How to use SDC-100
1/2
1. Login.
The below login window will pop-up after you run the SDC-100.exe program. You have to input teller ID
and password to login.
Pic. 1) Log-in window.
※ Default ID & password is ‘admin’
2. Setup Configuration.
After login, the below ‘setup configuration’ window will appear on the screen. Please see page 23 for
more information.
Pic. 2) Setup Configuration.
※ This ‘Setup Configuration’ window appears automatically on the screen when user installs execute the
SDC-100 program for the first time. User could also change setup configuration from the menu next
time. (Setup → Configuration...)
-5-
SDC-100 USER MANUAL Ver4.2(ENG)
How to set up other information
2/2
3. Entering Bank information
Bank information could be entered and saved. Page 25 describes how to enter Bank information.
Pic. 3) Bank information
4. Operating SDC-100 program.
After finished default setting, you can start operating the SDC-100 program.
Pic. 4) Main screen
All setup information is saved in SDC-100.ini, you may delete SDC-100.ini file to clear all setup
information.
-6-
SDC-100 USER MANUAL Ver4.2(ENG)
Saving Data – Transferring data
1. Transferring data to PC Software after counting is finished.
a. Press MODE button to select P-OCR mode in SB Machine.
b. Place a stack of banknotes on the hopper and machine will automatically start counting. Once
counting is completed, follow ©
c. Press START button to transfer data to PC application software.
d. After data is transmitted completely, a ‘view data’ window will appear on the screen automatically.
Pic. 5) Transmitting data
2. Correcting of transferred Data in Edit Screen.
Press Save button after making correction to the transferred data.
Pic. 6) View Data
※ For more information, please see page 15. ‘View Data’
-7-
SDC-100 USER MANUAL Ver4.2(ENG)
Saving Data – Transferring Data.
Transferred Data from SB machine will display on the right side of main screen.
Pic. 6) Main screen after counting
If you want to see detail information of counting results, please double click “View all Data” or go into Edit
→ Edit Data... in menu bar
-8-
SDC-100 USER MANUAL Ver4.2(ENG)
Detail operation – Data Search
You may use “Search” function to find data information of counted banknotes.
① Press ‘Search’ to change main screen.
② Select search parameter in “Search Criteria” drop down menu
③ Enter date for Search Criteria
④ Press Search button to start Search
Pic. 7) Displayed searching results
For more information, please see page 14. ‘Main screen – searching mode’
※ Default search day is the day of the program operated.
-9-
SDC-100 USER MANUAL Ver4.2(ENG)
Detail operation – Print
Saved data of banknotes can be printed by printer.
① How to print out data?
-
In the menu, press File → Preview and Print...
-
In the preview window, press Preview and Print button.
② You may select number of copy in ‘Preview’ window and press Print button to print.
Pic. 8) Preview window
For more information, please see page 18 (Printing)
※ Printer set up and paper set up can be changed in Setup → Printer Setup...
- 10 -
SDC-100 USER MANUAL Ver4.2(ENG)
Detail operation – Exporting data
Saved data in SDC-100 could be exported to other program.
① In the menu, press File → Export Data...
② Select target data to export.
③ Select export file format.
④ Press OK button to export.
Pic. 9) Export Data
※ For more information of exporting data, please see page 19 Exporting data.
Pic. 10) Results of exported data
- 11 -
SDC-100 USER MANUAL Ver4.2(ENG)
Detail manual for each function.
This manual describes each function in detail.
- 12 -
SDC-100 USER MANUAL Ver4.2(ENG)
Main Screen – Basic Mode
1
8
9
2
3
4
5
6
7
Pic. 11) Main screen
① Displaying saved Bank Information...
② Currency information for last counting.
③ Set up the currency which you will count. In Auto mode, software will change the currency
automatically. We recommend you to set up as an ‘Auto’
④ Displaying logged user information
⑤ Change logged user.
⑥ Program lock button; software will be released after re-log in.
⑦ Entering customer information; Entered information will be displayed in viewer window when
currency information is entered
⑧ Selecting view list, you may change the view list. In the menu bar.
-
View All Data: display all the data for present date.
-
Search: searching data.
⑨ Selected data could be deleted; also user could delete date through menu bar Edit → Delete
Data
※ All data cannot be deleted in Search mode.
- 13 -
SDC-100 USER MANUAL Ver4.2(ENG)
Main Screen – Search mode
Press Search in the list tap for searching.
3
1
2
4
Pic. 12) Main screen – Searching
① Select ‘Search Criteria’ and enter key information for searching.
Only Date
By date
Customer Name
By customer’s name
Customer Account
By customer’s account
Customer ID
By customer’s ID
Teller ID
By user’s ID
Serial Number
By Serial no. of banknote
Currency Type
By denomination of banknote
Black List Data
Searching registered serial no. in Black List DB
※ DB searching root should be set up in setting menu.
Duplicate Data
Searching same serial no. of banknote.
※ within set up date.
② Date for searching.
③ Press Search button to start.
④ User may edits, prints, exports with searched data in the list.
- 14 -
SDC-100 USER MANUAL Ver4.2(ENG)
View Data – Description of each section
1/3
You may see detail banknotes information in view data window.
How to see view data window?
-
Automatically display when data is transmitting from SB series.
-
Select saved data in main screen and edit data.
※ To edit data, double click the saved data in the list or press Edit -> Edit Data in the menu bar.
9
1
2
3
4
5
6
7
8
Pic. 13) View Data
① Saved data and time
② Teller’s ID
③ Data information
④ Customer’s information
※ If ‘Input customer Information’ is marked in ‘Mandatory’ in ‘Setup
Configuration’, data will not be saved till customer information is fully entered.
⑤ Checking black list data and duplicate data for all data by pressing “Recheck all data” button.
⑥ Print button by printer.
⑦ Saving data button.
In data edit mode, confirmation message will be displayed for saving.
⑧ Close window without saving data.
⑨ Information of description tab.
- 15 -
SDC-100 USER MANUAL Ver4.2(ENG)
View Data – Description of each section
2/3
※ Information of description tab.
All Data
Displaying all data.
Blank Data
Displayed uncertain data which fail to display the serial no.
※ If Blank data is transmitted from SB series, this tab and edit screen
will be displayed automatically.
Black List Data
Displaying registered banknotes in Black List DB with B red flag in
grey color of back-ground
Duplicate Data
Displaying duplicated data with D yellow flag in grey color of
background.
Search
Searching banknotes by value or serial number.
① Select category for searching.
② Put some numbers of serial no. of banknotes in the blank.
Searching will be done in real time whenever user put some
numbers.
Pic. 14) Searching in View data
- 16 -
SDC-100 USER MANUAL Ver4.2(ENG)
View Data – Edit serial no. of banknotes
3/3
You may edit serial no. in View Data window.
① Double click saved data in the list or press Enter key to edit.
Pic. 15) Edit serial no.
② Typing serial no. in edit window and press modify key for saving.
- Saving: press Modify button or press Enter key
- Cancel: press Cancel button or press Esc key
※ Color of Edited serial no. will be changed to dark grey color.
- 17 -
SDC-100 USER MANUAL Ver4.2(ENG)
Printing
You may print out data using one of SBM’s recommended Printers by following steps.
I.
Select data in the list of main screen and press File → Preview and Print... in the menu bar.
II.
Press Print button in Preview window.
※ You may print out several data together with No. 1.
1
4
2
3
Pic. 16) Preview
Description of ‘Preview’
①
Select number of copy.
②
Select pages in preview window.
③
Select Ratio of preview window.
④
Display printing page.
Notice Printing property will follow Windows printer set up through Setup → Printer Setup... If you want to
have different print format, please change the printer set up in Windows.
- 18 -
SDC-100 USER MANUAL Ver4.2(ENG)
Export Data
1/2
You may export data from SDC-100 software to other program or application. Below pop-up window will be
displayed after pressing File → Export Data... in menu bar
1
2
Pic. 17) Export Data
Description of Export data window
① Target data to Export
Data on ...
Export all data in selected date.
All Data in List
Export all data in the list of main screen
Selected Data in List
Export selected data in the list of main screen
② Export file format
CSV file
Export data after separate the items as a comma(,)
XLS file
Export data as a MS excel format
※ MS excel should be installed in user’s computer
- 19 -
SDC-100 USER MANUAL Ver4.2(ENG)
Export Data
2/2
After select Target data to Export and Export file format, please press OK button for exporting.
Pic. 18) Result screen after exporting
Notice File root and name after exporting data.
Root: Location of exported data is SaveData folder.
Name: SDC_MMDD_HHMM.xls or SDC_MMDD_HHMM.csv
※ MMDD_HHMM means time when user exports data.
- 20 -
SDC-100 USER MANUAL Ver4.2(ENG)
Old version data converting
You may use data from old version of SDC-100 in new version with following steps.
In menu, press File → Convert 3.x Data...
1
2
3
4
Pic. 19) Data Converter
Description of Data Converter
①
Root of old data
②
Current root of new SDC-100
Same root of [Setup]->[Configuration...]
③
④
Data format of old version.
-
Auto check : Data will be converted automatically. (recommended)
-
Has Image : Analyzed data after supposing that data has image
-
Only data : Analyzed data after supposing tat data has not image.
New workstation ID after converting.
We recommend that Workstation ID in each machine should be different for saving data.
After set up the roots, please press Convert button to convert the data.
- 21 -
SDC-100 USER MANUAL Ver4.2(ENG)
Set Up – Setup Configuration
This page will show you how to set up the program for each user. Please press Setup → Configuration... in
the menu bar.
Pic. 20) Setup Configuration.
Description
COM Port Number
Set up serial COM port to communicate SB series and PC
※ After setting COM port, software of SDC-100 should be rebooting.
Workstation ID
Identify user’s machine, Up to 3 digits, user could grant the
workstation ID and different workstation ID for each machine will
be highly recommended.
Date Format
1. MM/DD/YYYYY
2. DD/MM/YYYY
Save Option
Working Directory
1. Default Directory
All data will be saved in SaveData folder.
2. Temporary folder.
If user designates one specific folder, SaveData folder will be
created automatically and data will be saved in this SaveData
folder. User could manage several data in one specific folder in
- 22 -
SDC-100 USER MANUAL Ver4.2(ENG)
the network. To access folder in the network, folder has its own
access right.
Notice If user uses only one machine, please use Default
Directory for saving data, otherwise data, which was saved
through other computer, will be searched and modified in other
computer.
Save OCR Data
1. Data and Image
Save OCR and Image data together.
2. only Data
Save only OCR data..
※ We recommend use 1. Data and Image saving if computer has
enough capacity.
Input Customer
1. Mandatory
Information
Data will not be saved if customer name and account number is
not entered.
2. Optional
Data will be saved even though customer’s information in not
entered.
Checking Serial No. of Banknotes.
Black List DB Path
Save ‘mdb’ file for black list information.
Without setting, Black list searching is not available.
Period of Duplicate
Set up the term of searching for duplicated data.
Data Target
- 23 -
SDC-100 USER MANUAL Ver4.2(ENG)
Set Up – Bank Information
User may enter the bank information in the menu Setup → Bank Information..., Set up bank information will
be displayed on main screen and when data is printed.
Pic. 21) Bank Information
Name
Bank Name, maximum 36 letters are available.
Address
Bank Address, maximum 40 letters are available in one line
Telephone
Phone No. maximum 30 letters are available.
Fax
Fax No. maximum 30 letters are available.
Logo Image
Logo of bank, JPG and BMP file is available.
Notice Main screen size shod be more than 1024*768 sizes to
display the bank logo.
- 24 -
SDC-100 USER MANUAL Ver4.2(ENG)
Set Up – Teller Management
User information could be registered, edited and deleted in the menu Setup → Teller Management...
Pic. 22) Teller Management
New...
Register new user
Edit...
Edit information of selected user
Delete
Delete selected user
※ admin could not be deleted.
When new user is added or deleted, below pop-up window will be displayed and you may register new user or
modify the user information in this window.
Pic. 23) New Teller
Teller ID
User’s ID
Name
User’s Name
Password
Password.
※ Previous password will be maintained if new password is not
entered when teller information is edited.
- 25 -
SDC-100 USER MANUAL Ver4.2(ENG)
Set Up – Printer Set Up
Set up the printer in the menu Setup → Printer Setup...
Pic. 24) Printer Setup
※ Above printer set up will not be saved after close the software of SDC-100.
- 26 -