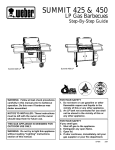
1
Guide Star Selection Software User’s Manual SOAR Adaptive Module (SAM) Revision 2.5.2, December 2013 i Change Record Version Date Description Owner Name 2.4.0 04/01/2011 First table entry Rolando Cantarutti 2.5.0 09/04/2013 Updates. Add chapter on user catalogs. Rolando Cantarutti 2.5.1 12/06/2013 Updates to section 2.1.1 and 3.1.2 Rolando Cantarutti 2.5.2 12/06/2013 Fix footer label Rolando Cantarutti ii Contents Getting Things Running 1.1 Starting the GMAP Software...........................................................................................................1 1.1.1 Launching GS3 from ICSOFT (updated 04sep2013)..............................................................1 1.1.2 Launching GS3 from the command line..................................................................................1 1.2 Stopping the GMAP Software.........................................................................................................1 1.3 Environment Variables....................................................................................................................1 GUI Reference 2.1 MAIN > File Menu..........................................................................................................................3 2.1.1 MAIN > File > Skymap Window............................................................................................3 2.1.2 MAIN > File > Airmass Window............................................................................................5 2.2 MAIN > Telescope Selector Box....................................................................................................5 2.3 MAIN > Guider...............................................................................................................................5 Common Operations 3.1 Interactively Selecting a Guide Star Using GS3.............................................................................7 3.1.1 NGS Mode...............................................................................................................................7 3.1.2 LGS Mode...............................................................................................................................7 Configuration Files and Macros 4.1 Environment File gs3rc...................................................................................................................9 4.2 Configuration Files..........................................................................................................................9 4.2.1 egmap.dat.................................................................................................................................9 Telescope section.........................................................................................................................9 Camera section...........................................................................................................................10 Guider section............................................................................................................................10 Server section.............................................................................................................................11 User Guide Stars iii Chapter 1:Getting Things Running Chapter 1: Getting Things Running This user manual is intended to describe the use o f the SAM Guide Star Selection Software (GS3) from the user's point of view. It is not a programming manual. 1.1 Starting the GMAP Software You can either launch the GS3 utility program from the Instrument Control Software (ICSOFT) or from your favorite terminal. Both ways will be described here. 1.1.1 Launching GS3 from ICSOFT (updated 04sep2013) 1. With the ICSOFT running select the Guide Probes Tab from the main GUI window. 2. Press the button labeled “GMAP CATALOGS”. The button is near the center of the pane. 1.1.2 Launching GS3 from the command line Open a shell window and invoke the GS3 software with the following command: % cd /home/GS3/bin % ./start_gs3 [ options ] Normally, you will invoke GS3 with no options. Valid option values are listed below: -h Prints a usage message -c [catalog] A catalog name: -c s SAO -c p PPM -c g GSC -c u USNO-SA -c o USNO-AO -f [font-name] Set font used 1.2 Stopping the GMAP Software To stop the GS3 application select Exit from the File menu. 1.3 Environment Variables GMAP reads some environment variables to locate some special files that are normally handled by the initialization script start_gs3. GMAPCATS Defines the place where the star catalogs are installed. Typically points to 1 GS3 User Manual Rev 2.5.2, December 2013 Chapter 1:Getting Things Running directory ~/Catalogs GMAPCONFIG ~/GS3/config. Defines the path to the configuration files. Typically will point to GS3 User Manual Rev 2.5.2, December 2013 2 Chapter 2:GUI Reference Chapter 2: GUI Reference When the application starts the user is presented with a single window containing the most relevant system status variables. Figure 2.1: Main GUI. Use the File menu to open the skymap window. 2.1 MAIN > File Menu Skymap Menu Option. Open and close the sky map window. Read section 2.1.1 below. Airmass Menu Option. Open the air-mass window. Read section 2.1.2 below. Exit Menu Option. Terminates the application. 2.1.1 MAIN > File > Skymap Window Catalog Menu. Use this menu to select among the available catalogs. If a catalog is selected while not having installed the correspondent database, the selection will be ignored. See section TBD for configuring a user defined short catalog. Set Button. Centers the field to the star just selected. Tel Button. Use this button to retrieve the current telescope mount coordinates. Guide probes coordinates get updated as well. PA Button. Use this button to retrieve the current SAM position angle. Guide probe coordinates get updated as well. 3 GS3 User Manual Rev 2.5.2, December 2013 Chapter 2:GUI Reference YGMAP + North East θ XGMAP Figure 2.2: The position angle (PA) is the angle between YGMAP axis and the North axis. FC Button. Use this button to reset the offset between the center of the field (star right over the WFS) and the mount coordinates. Select a star, press this button and then press the Tel button to update the map. Mainly useful under SAM NGS operation mode. FO Button. Left click this button to set the field offset (FO) between the center of the field and the mount coordinates. Right/Center click this button to reset FO to zero. FO is calculated as the difference between the x-y distance between the mount and the selected star, and the x-y distance between the selected star and the center of the field as reported by the ICSOFT. Useful under SAM LGS operation mode. Features Menu. N-vector. Two arrow vectors are displayed in the upper right corner of the sky map window. The long arrow represents the north direction. The short arrow represents east. To refresh the icon press the PA button, so the position angle gets updated from the ICSOFT. Up-vector. An arrow is displayed pointing in the Up direction. Z-dot. A red & white dot showing the current zenith position. Random offset. Pan center. Star colors. Toggles on/off the color code assignment for each star in the map. Prin Guider. Shows/Hide guide probe one. Sec Guider. Shows/Hide guide probe two. Ctr Guider. Camera FOV. Shows/Hide the science camera field of view. User Overlay. Show/Hide the user catalog objects. Zoom Arrows Buttons. Use the arrow buttons to zoom in and out the sky map. GS3 User Manual Rev 2.5.2, December 2013 4 Chapter 2:GUI Reference P1|P2 Button. Send the coordinates of the currently selected star to the ICSOFT. The coordinates will be displayed in the GP1|GP2 Target indicator of the Guide Probes Tab in the ICSOFT GUI. 2.1.2 MAIN > File > Airmass Window This window will show an air mass extinction graph. 2.2 MAIN > Telescope Selector Box Use this selector box to select the observatory parameters to use. When using SAM this box should always show the label SOAR. 2.3 MAIN > Guider Use this selector box to select the guider subsystem to use. When using SAM this box should always show the label SAM_GDR. Ysami Xsami Ygp Xgp Figure 2.3: The skymap window. Use the TEL and PA buttons to update the field coordinates and rotation. The tiny yellow boxes represent the guide probes; GP1 to the right and GP2 to the left. Camera field rotation in red might differ from current configuration. 5 GS3 User Manual Rev 2.5.2, December 2013 Chapter 3:Common Operations Chapter 3: Common Operations 3.1 Interactively Selecting a Guide Star Using GS3 3.1.1 NGS Mode 1. Point the telescope to the science field and put the natural guide star on the WFS. Use the WFS acquisition camera to aid in that task. 2. If not already running GS3, this is a good time to launch the GS3 program either manually or from the ICSOFT (Guide Probes Tab). 3. Select the Skymap menu option from the File menu in the main GUI window. The skymap windows shows up. 4. Press the Tel button in the sky map window to grab the field coordinates. The window contents get updated. 5. Press the PA button in the sky map window to update the position angle. The window contents get updated again. 6. Assuming that the natural guide star is now on the sky map, right click on the star and press the FC button to grab the offset between the mount and the center of the SAM field. The offsets are sent automatically to the ICSOFT. 7. Press the Tel button in the sky map window to refresh the screen and reflect the new field center offsets. 8. Left click on a star inside the patrol field to select a guide star. A white circle around the star signals that the star has been selected. 9. Press [P1|P2] button to send the coordinates of the selected star to the ICSOFT. The guide star candidate coordinates are loaded into the target indicators in the Guide Probes Tab of the ICSOFT main GUI window. 3.1.2 LGS Mode 1. Point the telescope to the science field and take a picture with SAMI. 2. “mscdisplay” the image. It is important to have the whole picture coordinates right. You can check that by simply moving the cursor around and watch for the coordinates not resetting to zero when changing detector. 3. Put the active focus on the SAMI GUI and press F3 to activate the interactive selection cursor. 4. Select a star by putting the cursor on top of a star and pressing “C”. The field coordinates of the star in units of CCD pixels is sent to the ICSOFT. 5. If not already running GS3, this is a good time to launch the GS3 program either manually or from the ICSOFT (Guide Probes Tab). 7 GS3 User Manual Rev 2.5.2, December 2013 Chapter 3:Common Operations 6. Select the Skymap menu option from the File menu in the main GUI window. The sky map windows shows up. 7. Press the Tel button in the sky map window to grab the field coordinates. The window contents get updated. 8. Press the PA button in the sky map window to update the position angle. The window contents get updated again. 9. Identify and right click on the same star you just click on SAMI display and then press the FO button. This will calculate the offset between the center of the field and mount coordinates taking into account the offset between star and field center calculated using SAMI and ICSOFT. The offset is sent back automatically to the ICSOFT and the sky map window gets refreshed to reflect the new field center offsets. 10. Left click on a star inside the patrol field to select a guide star. A white circle around the star signals that the star has been selected. 11. Press [P1|P2] button to send the coordinates of the selected star to the ICSOFT. The guide star candidate coordinates are loaded into the target indicators in the Guide Probes Tab of the ICSOFT main GUI window. g s o = g − s o Figure 3.1: The cross mark the telescope coordinates in the sky map. The circle is the selected star. The triangle is the field center. GS3 User Manual Rev 2.5.2, December 2013 8 Chapter 4:Configuration Files and Macros Chapter 4: Configuration Files and Macros Configuration files provide a mean to set multiple system parameters to some predefined value. Some o f the parameters can be changed by the user during run-time, others will remain fixed and can only be changed by editing the files and restarting the GS3 program. 4.1 Environment File gs3rc By default this file is installed in the home directory as .gs3rc (note the dot at the beginning). Though not strictly necessary, it is advisable to include this file in the login shell startup script so the environment variables in it get defined when the user log on to the account. When the start_gs3 command is executed, the gs3rc file gets sourced to ensure the environment variables are defined and only then the application starts. % cat ~/.gs3rc # This is the GMAP program home directory setenv GMAPHOME ~/GS3 # This is where the catalogs live setenv GMAPCATS ~/GS3/catalogs # This is where the configuration files live setenv GMAPCONFIG $GMAPHOME/config # Bitmaps setenv BMPDIR $GMAPHOME/share/bitmaps 4.2 Configuration Files The environment variable GMAPCONFIG defines the place where the configuration files live. 4.2.1 egmap.dat This file is composed of multiple sections. The user can hand-edit this file to modify parameter values. By including the word “default” in the line following the section name, the entry is set as the default one. A detailed description of each section follows. 4.2.1.1 Telescope section name. Label with the observatory name. This name is showed in the Telescope selector box in the main GUI window. longitude. Observatory longitude in [deg]. East is positive. latitude. Observatory latitude in [deg]. North is positive. 9 GS3 User Manual Rev 2.5.2, December 2013 Chapter 4:Configuration Files and Macros 4.2.1.2 Camera section name. Camera displayed identification. This label will be used in the camera selector box in the main GUI window. nchips. Number of CCD chips in the science camera. choffx1 (1-n) x offset in [arc-seconds] choffy1 (1-n) y offset in [arc-seconds] dimx. Number of pixels in x. dimy. Number of pixels in y. pixscale. Size of each pixel in [arc-seconds]. rot. Camera FOV rotation with respect to the guide probes in degrees. 4.2.1.3 Guider section name. Displayed identification. offaxis-x. Displacement in x in [arc-seconds]. The value is used for all guide probes. offaxis-y. Displacement in y in [arc-seconds]. The value is used for all guide probes. field-w. Field width of camera in x. field-h. Field width of camera in y. unit-x. Size of x unit in [arcseconds]. Only valid when nguider has NOT been defined. unit-y. Size of y unix in [arcseconds]. Only valid when nguider has NOT been defined. center-x. center-y. px. Is the size of the guide box in pixels. For SAM each APD can be think of as a pixel of size TBD arcseconds. 2X2 in total. nguider. Is the number of guide probes for the guider. mode<N>. N is the guider number. Mode 0 for rectangular coordinates and 1 for polar coordinates. scale. Guide probe scale in [mm/arcsec]. Used to calculate the x-y coordinates in mm displayed in the sky map. Only valid when nguider has been defined. xlo<N>, ylo<N>, xhi<n>, yhi<N>. Range of motion for guide probe N in units of [arcseconds]. Only valid when nguider has been defined. psize<N>. Is the size of each pixel in arc-seconds. Only valid when nguider has been defined. Only valid when nguider has been defined. GS3 User Manual Rev 2.5.2, December 2013 10 Chapter 4:Configuration Files and Macros 4.2.1.4 Server section The GS3 communication infrastructure is built upon the SOAR communication library (SCLN). The SCLN is an implementation of a network communication layer that suites the interoperability requirements of the SOAR telescope environment. Each section starting with the server keyword, defines a client-server pair with the corresponding listening port server ICS ip_server=X.X.X.X ip_client=X.X.X.X ip_port=xxxxx For more information on the SCLN and its protocol read the document “SOAR Communication Library New” available at the SAM web site archive. 11 GS3 User Manual Rev 2.5.2, December 2013 Chapter 5:User Guide Stars Chapter 5: User Guide Stars It is possible to include a user defined star catalog. The catalog takes the form of a text file with the reserved name usercar.txt that includes a list of coordinates of equinox 2000. The catalog is selectable from the skymap catalog menu for display and star selection. When other catalog is selected the stars in the user catalog that fall in the field will be displayed as white circles for reference. Each line of the text file corresponds to one object. There are three space separated fields: object number, RA coordinate in hours west positive, and Dec coordinate in degrees north positive. Optionally a fourth field specifying magnitude can be included, otherwise a dummy magnitude of 10.1 will be assigned for cosmetic purposes. % cat ~/Catalogs/usercat.txt 1 05:08:45.79 -68:45:38.6 2 05:30:40.8 -67:17:17 3 05:42:08.6 -69:12:44 4 05:13:38.9 -65:27:52 5 05:27:48 -68:59:12 6 05:27:40.8 -69:08:05 7 05:09:30.39 -69:07:45 8 05:57:34 -69:11:48 9 05:58:54 -68:31:06 10 05:32:19.8 -67:31:16 11 05:30:21 -66:53:02 12 04:50:37 -69:59:06 13 05:13:10.88 -69:07:02.9 14 05:57:45 -68:27:36 15 05:14:36 -63:57:18 16 05:36:54.52 -70:09:43.7 17 05:17:22.39 -69:20:16.2 18 05:57:57.9 -72:58:44 19 06:25:49 -68:55:12 20 06:10:42 -71:31:42 21 03:10:29 -68:35:54 22 14:11:46.3 -33:03:14 GS3 User Manual Rev 2.5.2, December 2013 12