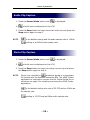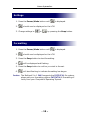
1
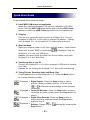
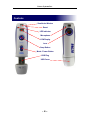
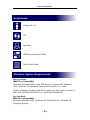
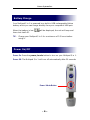
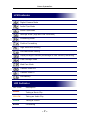
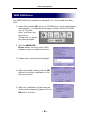
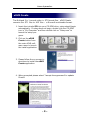
uick S
Guide
User Manual
User Manual for Multipod 5 in 1 USB device
504A Vandell Way, Campbell, CA 95008, USA
Phone: 408-866-8424
Fax: 408-866-4252
Email: [email protected]
Web: www.octave.com
Octave Systems Inc.
User Manual
Contents
2
4
5
5
6
6
7
7
8
9
11
12
13
13
13
14
14
15
15
16
16
Quick Start
Controls
Accessories
Minimum System Requirements
Battery Charge
Power On/Off
LCM Indicator
LED Indicator
WEB CAM Driver
eDVR Create
DirectCap
Windows 98 Driver
Web Cam
USB Storage
Taking a Picture
Audio Clip Capture
Movie Clip Capture
Settings
Formatting
Troubleshooting
License Information
20050224
-1–
Octave Systems Inc.
Quick Start Guide
To get started follow steps as shown.
1. Install WEB CAM drivers and application
Insert the supplied installation CD into the computer's CD-ROM
drive. Click the WEB CAM driver button and click the eDVR Create
button to install the eDVR Create application for file transferring.
2. Charging
Turn on your computer and connect the Multipod 5 in 1 to your
computer’s USB port. It will begin to charge the battery. Charge
your Multipod 5 in 1 a minimum of 2.5 hours before using it.
3. Web Cam Mode
Make sure camera power is off, then hold the power / mode button
down until a small 'BEEP' is heard and
is displayed. Plug the
Multipod 5 in 1 into your USB port.
Caution: You must install the Web Cam Driver before using your
Multipod 5 in 1 as a Web Cam.
4. Transferring files to your PC
Connect the Multipod 5 in 1 to your computer's USB port to transfer
your files.
Caution: Do not unplug the Multipod 5 in 1 during file transferring.
5. Taking Pictures, Recording Audio and Movie Clips
Press Power to turn on the Multipod 5 in 1. Press the Mode button
to change operating modes.
Displayed = Digital Camera –Press the Snap button to take a
picture. When you take a picture, LCM will show
to indicate the percentage of free memory
remaining.
Displayed = Audio Clip Recorder -Press the Snap button to begin
recording an audio clip and press the Snap button to
stop it.
Displayed = Digital Video Recorder -Press the Snap button to
begin recording video and press the Snap button
again to stop it.
Displayed = Settings -Change
or
settings by pressing the
Snap button.
-2–
Octave Systems Inc.
Quick Start Guide (continued)
Displayed = Formatting -Press the Snap button and you are
ready to begin formatting.
will flash, then press the Snap button to
format.
will flash indicating formatting is occurring.
Displayed = Indicates a Low Battery. The machine will beep
then turn itself off.
Caution: The Multipod 5 in 1 uses the FAT(FAT16) file system. Don't
format to the other types. A PC can be used to format back
to FAT16.
Caution: Our product adopts the latest Multimedia technology; please
make sure to update with the latest Microsoft Media Player version available. You can download it from the Microsoft website:
http://www.microsoft.com/windows/windowsmedia/default.aspx
or you can use Internet Explorer to update your Media Player
version. From the tools menu simply select 'Windows Update'
and follow the instructions on the Windows Update website.
-3–
Octave Systems Inc.
Controls
Viewfinder Window
Reset
LED Indicator
Microphone
LCM Display
Lens
Snap Button
Mode / Power Button
USB Plug
USB Cover
-4–
Octave Systems Inc.
Accessories
Multipod 5 in 1
CD
Necklace
USB Flexy Extension Cable
Quick Start Guide
Minimum System Requirements
Web Cam Mode:
IBM PC or Compatible
Microsoft Windows 98SE (install USB driver), Windows ME, Windows
2000, Windows XP Operating System with DirectX 8.1 or later.
Graphics Adapter Capable of 800X600 resolution, 64k colors, Pentium II
266, with 64M RAM (Win98/ME) or 128M RAM (Win2k/XP)
Pen Cam Mode:
IBM PC or Compatible
Microsoft Windows 98SE, Windows ME, Windows 2000, Windows XP
Operating System
-5–
Octave Systems Inc.
Battery Charge
Your Multipod 5 in 1 is powered by a built-in USB rechargeable lithium
battery which you can charge directly from your computer’s USB port.
When the battery is low
then shut itself off.
TIP:
will be displayed, the unit will beep and
Charge your Multipod 5 in 1 for a minimum of 2.5 hours before
using it.
Power On/Off
Power On: Press the power/mode button to turn on your Multipod 5 in 1.
Power Off: The Multipod 5 in 1 will turn off automatically after 30 seconds.
Power / Mode Button
-6–
Octave Systems Inc.
LCM Indicator
Digital Camera Mode
Audio Clips Mode
Movie Clips Mode
Settings Mode (High and Low resolution)
Formatting Mode
Confirm Formatting
High Resolution Setting
Low Resolution Setting
Displayed digits indicate percentage of free memory remaining
Flash Storage Mode
Web Cam Mode
Transfer Data Out
Transfer Data In
Low Battery
LED Indicator
LED Color
Description
AMBER
Taking a Movie Clip
YELLOW
Taking an Audio Clip
GREEN
Taking a Picture
BLANK
Formatting
-7–
Octave Systems Inc.
WEB CAM Driver
The WEB CAM Driver enables the Multipod 5 in 1 to be used as a Web
Cam.
1. Insert the included CD into your CD-ROM drive, setup should begin
automatically. If setup does not begin, double click the CD-ROM
icon in “My Computer” and then double click on
“Setup.exe” to launch
the setup program.
2. Click the WEB CAM
Driver button from the main eDVR
software menu to install the drivers.
3. Please select your desired language.
4. When prompted, please click the OK
button to continue installation of the
web cam drivers.
5. When the installation of the web cam
drivers has completed, please click the
OK button to finish.
-8–
Octave Systems Inc.
eDVR Create
The Multipod 5 in 1 records video in .STJ format files. eDVR Create
converts the .STJ files to .ASF files – a Microsoft multimedia format.
1. Insert the included CD into your CD-ROM drive, setup should begin
automatically. If setup does not begin, double click the CD-ROM
icon in “My Computer” and then double click on “Setup.exe” to
launch the setup program.
2. Click on the eDVR
Create button from
the main eDVR software menu to launch
the install application.
3. Please follow the on-screen instructions to install the eDVR
Create application.
4. When prompted please select ’I accept the agreement’ to update
DirectX.
-9–
Octave Systems Inc.
eDVR Create (continued)
5. Select the “Yes, I want to restart my computer now.” option and
click the Finish button to restart your computer.
6. Once you have installed the eDVR Create application, simply connect your Multipod 5 in 1 via USB and double click on any of the
STJ files shown on the device. The software will automatically recognize and convert the STJ files to ASF format and save the ASF
files to the folder you select.
Caution: If you cannot play the ASF files, please make sure you have the
latest version of Windows Media Player. You can download it
from the Microsoft website: http://www.microsoft.com/windows/windowsmedia/default.aspx
or you can use Internet Explorer to update your Media Player
version. From the tools menu simply select 'Windows Update'
and follow the instructions on the Windows Update website.
- 10 –
Octave Systems Inc.
DirectCap Create
DirectCap Create turns the Multipod into a Camcorder for the PC.
1. Insert the included CD into your CD-ROM drive, setup should begin
automatically. If setup does not begin, double click the CD-ROM
icon in “My Computer” and then double click on “Setup.exe” to
launch the setup program.
2. Click on the DirectCap button from the main eDVR software menu
to launch the install application.
3. Please follow the instructions to install the DirectCap application.
4. To start streaming video,
select ’NMS Video camera (Webcam)’ from the
drop down menu next to
Video Device then
press the Start button to
begin recording. To stop,
press the Stop button.
5. To start streaming audio,
select your own device
(if available) from the
pull down menu next to
Audio Device then
press the Start button to
begin recording. To stop,
press the Stop button.
Video and audio may be streamed simultaneously, but the ’preview’
function will show a short time lag for audio. When streaming to a
file, the time lag does not occur.
- 11 –
Octave Systems Inc.
Windows 98 Driver
Windows 98 Driver allows Windows 98 PCs to connect to the Multipod 5 in
1.
1. Insert the included CD into your CD-ROM drive, setup should begin
automatically. If setup does not begin, double click the CD-ROM
icon in “My Computer” and then double click on “Setup.exe” to
launch the setup program.
2. Click on the Win98 driver button from the main eDVR software
menu to install the drivers.
3. Please follow the instructions to install the Win98 drivers.
4. Press the OK button to
continue the Win98
driver installation program.
5. Press the OK button to
restart your computer.
- 12 –
Octave Systems Inc.
Web Cam
1. Make sure camera power is off, and then hold the power / mode
button down until a small 'BEEP' is heard and
is displayed.
2. Plug the Multipod 5 in 1 into your USB port.
NOTE:
WEB CAM mode requires drivers to be installed prior to use to
enable the streaming video capability.
USB Storage
1. Connect the Multipod 5 in 1 to your computer’s USB port
2.
NOTE:
will be displayed.
(data out) will flash when the computer
For file transfer,
reads files,
to the device.
(data in) will flash when files are being written
Caution: Do not unplug the Multipod 5 in 1 while data transfer is occurring.
Taking a Picture
1. Press Power/Mode button to turn on your Multipod 5 in 1.
2. It will ’beep’ once and
will be displayed on the LCM.
3. To take your picture, keep your Multipod 5 in 1 steady and press
the Snap button to capture and store your pictures.
NOTE:
is the default setting and the resolution is VGA (640x480).
setting is QVGA (320x240) resolution.
- 13 –
Octave Systems Inc.
Audio Clip Capture
1. Press the Power/Mode button until
2.
is displayed.
should now be displayed on the LCM.
3. Press the Snap button to begin record an audio clip and press the
Snap button again to stop it.
NOTE:
is the default setting and the audio sample rate is 11KHz.
setting is an 8KHz audio sample rate.
Movie Clip Capture
1. Press the Power/Mode button until
2.
is displayed.
should now be displayed on the LCM.
3. Press the Snap button to begin recording a movie clip and press
the Snap button again to stop it.
NOTE:
Movie clips recorded in
mode are stored in a proprietary
file format with the filename extension STJ. The eDVR Create
application is required to convert this file. Please follow the instructions on page 9 for installing and using the eDVR Create
application.
is the default setting at a rate of 30 FPS and an 11KHz audio sample rate.
setting is 15 FPS and an 8KHz audio sample rate.
- 14 –
Octave Systems Inc.
Settings
1. Press the Power/Mode button until
2.
is displayed.
should now be displayed on the LCM.
3. Change settings to
or
by pressing the Snap button.
Formatting
1. Press the Power/Mode button until
2.
is displayed.
should now be displayed on the LCM.
3. Press the Snap button to start formatting.
4.
will be displayed and flashing.
5. Press the Snap button to confirm you wish to format.
6.
will start flashing to indicate formatting has begun.
Caution: The Multipod 5 in 1 ONLY supports the FAT(FAT16) file system,
please set your formatting options FAT(FAT16) if formatting directly from your Computer’s Operating System.
- 15 –
Octave Systems Inc.
Troubleshooting
1. If the Multipod 5 in 1 freezes try pressing the reset button with a
paper clip to reset the device. Please see page 4 for location of reset button.
2. If you format the Multipod 5 in 1 using the fat32 or NTFS file system, it will cause the device to stop functioning. Please format your
Multipod 5 in 1 using the FAT(FAT16) file system.
3. Please install the Windows 98 driver before using the Multipod 5 in
1 on a computer using the Windows 98 operating system.
4. DirectX 8.1 or above is required to play movie clips that you record.
5. If you cannot play ASF files please make sure you have the latest
version of Media Player from Microsoft.
TIP:
You can download the latest version of Media Player from the
Microsoft website:
http://www.microsoft.com/windows/windowsmedia/default.aspx
or you can use Internet Explorer to update your Media Player version. From the tools menu simply select 'Windows Update' and follow the instructions on the Windows Update website.
Additional Support can be found here:
http://www.octave.com/mpsupport
Copyright Information
Windows 98SE, Windows ME, Windows 2000, Windows XP, Windows
Media Player, and DirectX 8.1 are all registered trademarks of the Microsoft Corporation.
- 16 –