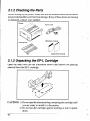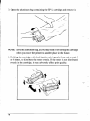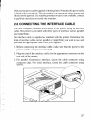
1
Safety Notices
This printer is certified as a Class 1 laser product under the USDepartment
of Health and Human Services
(DHHS) Radiation Performance Standard according to the Radiation Control for Health and Safety Act
of 1968. This means that the printer does not produce hazardous laser radiation.
Since radiation emitted inside the printer is completely confined within protective housings and external
covers, the laser beam cannot escape from the machine during any phase of user operation.
The Center for Devices and Radiological Health (CDRH) of the U.S.Food and Drug Administration
implemented regulations for laser products on August 2,1976. These regulations apply to laser products
marketed in the United Stales. The label on the printer indicates compliance with the CDRH regulations
and must be attached to laser products marketed in the United States.
Caution-use of controls or adjustments or performance
may result in hazardous radiation exposure.
of procedures
other than those specified herein
Federal Communications Commission
Radio Frequency Interference Statement
-
This equipment has been tested and found to comply with the limits for a Class B digital device, pursuant
to Part 15 of FCC Rules. These limits are designed to provide reasonable protection against harmful
interference in a residential installation. This equipment generates, uses and can radiate radio frequency
energy and, if not installed and used in accordance with the instructions, may cause harmful interference
to radio communications.
However, there is no guarantee that interference will not occur in a particular
installation. If this equipment does cause harmful interference to radio or television reception, which can
be determined by turning the equipment off and on, the user is encouraged to try to correct the interference
by one or more of the following measures:
l
Reorient or reloate the receiving antenna.
l
Increase the separation
l
l
Connect the equipment
connected.
between the equipment
and receiver.
into an outlet on a circuit different from that to which the receiver is
Consult the dealer or an experienced
For compliance
-_
radionV
with the Federal Noise Interference
technician
for help.
Standard, this equipment requires a shielded cable.
The above statements apply only to printers marketed in the lJ.S.A
Self Declaration
Radio interference regarding this equipment has been eliminated according to Vfg 1056/1984 announced
by the DBP.
DBP has been informed of the introduction
examine the whole series.
of this special equipment
It is the user’s responsibility to see that his own assembled
regulations under Vfg 1046/1984.
To conform to FTZ-regulations
The equipment
and has been granted the right to
system is in accordance
it is necessary to make all connections
to the printer with shielded cable.
may only be opened by qualified service representatives.
The above statement applies only to printers marketed in Germany.
with the technical
-
-
i
Statement of
The Canadian Department of Communications
Radio Interference Regulations
This digital apparatus does not exceed the Class B limits for radio noise emissions from digital apparatus
set out in the Radio Interference Regulations of the Canadian Department of Communications.
Le present appareil numerique n’tmen pas de bruits radioelectriques depassant les limites applicables aux
appareils numtriques de la classe B prescrites dans le Reglement sur le brouillage radioelectrique edict6
par le Minis&e des Communications
du Canada.
The above statement applies only to printers marketed in Canada.
Safety Notices for Finland
Taml Kirjoitin LUOKAN
Laitteen kayttlminen
turvallallisuusluokan
DENNA SKRIVARE
1 LASERLAITE.
muulla kuin t&l klyttoohjeessa
mainitulla
1 ylittlvalle n~ymlttomllle
lasersateilylle.
AR EN KLASS 1 LASERAPPARAT.
Om apparaten anvlnds pa annat sltt an i denna bruksanvisning
osynlig laserstralning, som overskrider grlnsen for laseklass
i
tavalla saattaa altistaa klyttajan
specificerats,
I.
kan anvlndaren
utsattas for
The above statement applies only to printers marketed in Finland.
Trademark
LaserPrinter
AppleTalk:
4 StarScript,
Acknowledgements
StarPage: Star Micronics Co., Ltd.
Apple Computer Inc.
FX-850: Seiko Epson Corporation
HP LaserJet HP: Hewlett Packard Company
IBM PC/XT, IBM Proprinter:
Lotus l-Z-3: Lotus Development
International
Microsoft Word, Microsoft Windows:
PageMaker:
Business Machines Corporation
Corporation
Microsoft Corporation
Aldus Corporation
PostScript: Adobe Systems Inc.
WordPerfect:
WordPerfect,
Inc.
NOTICE
.
All rights reserved. Reproduction of any part of this manual in any form whatsoever
STAR’s express permission is forbidden.
-
The contents of this manual are subject to change without notice.
l
.
*
without
All efforts have been made to ensure the accuracy of the contents of this manual at the time of press.
However, should any errors be detected, STAR would greatly appreciate being informed of them.
The above notwithstanding,
0 Copyright
STAR can assume no responsibility
1991 Star Micronics Co., Ltd.
for any errors in this manual.
TABLE OF CONTENTS
1
1. How to Use This Manual .........................................................................
1.1 Laser Printing ............................................................................
1.2 The Star LaserPrinter 4 - An Introduction ..............................
.2
.4
.7
2. Setting Up the Star LaserPrinter 4 .......................................................
.8
8
10
10
11
11
2.1 Unpacking .................................................................................
2.1.1 Unpacking the Printer .....................................................
2.1.2 Checking the Parts ........................................................
2.1.3 Unpacking the EP-L Cartridge.. ....................................
2.1.4 Optional Items ...............................................................
2.15 Carrying the Printer ......................................................
2.1.6 Opening and Closing the Printer.. .................................
2.2 Installing the EP-L Cartridge ...................................................
2.3 Loading Paper ..........................................................................
2.3.1 About Paper .................................................................
2.3.2 Loading Paper Into the Multi-purpose Tray ................
2.4 Selecting Paper Delivery ..........................................................
12
16
21
.21
.2 1
24
2.5 Connecting the Power Cord ....................................................
2.6 Connecting the Interface Cable ................................................
2.7 Adjusting Print Quality ............................................................
.26
27
29
__
31
3. Initial Operation .......................................................................................
3.1 Front Panel ..............................................................................
3.1.1 Powering Up .................................................................
3.1.2 The Buttons ..................................................................
3.1.3 Light Indicators ............................................................
3.1.4 Hex Dump ....................................................................
3.2 Self Test.. .................................................................................
3.2.1 Printing Test Sheets ......................................................
3.2.2 Status Sheet Description ...............................................
3.3 Programming from the Control Panel .....................................
.31
32
.33
.37
.38
.38
38
39
.4 1
4. Quick Start with the Star LaserPrinter 4: A Tutorial ....................47
4.1 Preliminaries.. ..........................................................................
4.2 Control Panel ...........................................................................
4.2.1 Basic operations ............................................................
4.3 Connecting the Printer to the Computer ...................................
4.3.1 Selecting the Interface ...................................................
4.3.2 Activating the Parallel Interface ..................................
.47
.48
49
50
51
.53
-
.~
4.4
4.5
4.6
4.7
4.8
4.3.3 Saving the Setting .........................................................
4.3.4 Returning to Factory Settings .......................................
Manual Feed .............................................................................
Paper Size .................................................................................
Printing in Landscape Orientation.. .........................................
Changing Character Set.. ..........................................................
Selecting Display Language ....................................................
54
54
55
56
.57
57
.58
.59
5. Font Selection ...........................................................................................
5.1 Hewlett Packard LaserJet IIP ..................................................
5.2 Epson FX-850 ..........................................................................
.63
64
6. Interfacing With Applications Programs ..........................................65
6.1
6.2
6.3
6.4
Lotus l-2-3 Release 2. ..............................................................
WordPerfect Version 5 ............................................................
Microsoft Word 4.0 ..................................................................
Microsoft Windows ..................................................................
66
.68
69
69
73
7. Maintaining the Star LaserPrinter 4 ..................................................
7.1
7.2
7.3
7.4
.73
Replacing the EP-L cartridge ..................................................
Storage and Handling Precautions for the EP-L cartridge ..... ..7 3
.74
Cleaning the Fixing Assembly ................................................
75
Cleaning the Exterior of the Printer .........................................
............. .77
8. Troubleshooting ..........................................................................
8.1 Error Messages Displayed on the Screen ................................. 77
78
8.2 Service Call Messages ..............................................................
8.2.1 Engine Service Call Messages ..................................... .78
8.2.2 Controller Service Call Messages ................................ .78
.80
8.3 Operator Call Messages ..........................................................
80
8.3.1 Engine Problems ...........................................................
8.3.2 Font/Emulation Cartridge Problems ............................ .8 1
.8 1
8.3.3 Optional Hardware .......................................................
82
8.3.4 Change Paper Size ........................................................
.84
8.3.5 Manual Paper Feed ......................................................
8.4 Operator Information Messages .. .. .. ... ... ... .. .. .... . ... ... .. ..*............ 85
8.4.1 Host Communication problem ... .. ... .. .. ... .. ... ... .. .. ... .. .... .. 85
8.4.2 Function or Size Incompatibility ... ... .. .. ... ... .. ... .. ... .. .. .... 85
8.4.3 Font/Emulation
Cartridge .... .. .. ... .. ... ... .. .. ... ... . .. .. .. .. ... .... 86
8.5 Status Messages ... .. .. ... ... ... .. .. .. ... .. .... .. ... .. ... .. ... .. .. ... ... ... .. .. .. .... .. . 87
8.6 Paper Jamming . ... .. .. .. ... ... .. ... .. ... .. ... ... .. .. ... ... ... .. .. .. ... ... .. ... .. ... .. .. 89
8.6.1 Clearing paper jams .. .. .. .. ... ... .. ... .. ... ... .. ... .. .... . .. .... .. .. ... .. 89
8.7 Streaky Prints . .... . ... ... .. .. ... ... ... .. .. .. ... ... ... .. .. ... .. .... .. .. .. ... ... ... .. .. ... 95
8.7.1 White Streaks . .. .. .. ... ... ... .. .. ... ... .. ... .. ... .. ... ... .. .. ... ... ... .. .. ... 95
8.7.2 Stains on Transparency Films ... ... .. .. ... ... ... .. .. ... ... ... .. .. ... 97
9. Options .............................................................................................. 99
9.1 Paper Feeder and Cassettes .. ... .. ... .. ... .. ... ... .. .. ... ... ... .. .. ... .. ... ... .. . 99
9.2 Expansion RAM Board . .. .. .. ... ... ... .. .. ... ... ... .. .. ... .. ... ... .. .. ... ... ... . 100
9.3 Font Cartridge .. .. .. .. ... ... ... .. .. ... ... .. ... .. .. ... ... ... .. .. ... .. .... .. .. .. ... ... .. 100
10. Specifications ...........................,............................................................. 10 I
10.1 Specifications ... .. .. .. ... .... . ... .. ... .. .. .... .. ... .. ... ... .. .. .. ... ... ... .. .. ... .. . 101
104
10.2 Reliability ..,..............,..............,............................................
10.3 Pin Functions on Interfaces . .. ... .. ... ... .. .. ... .. .... .. .. .. ... .. .... .. .. .. .. 105
Glossary .......................................................................................*................107
I.,.
,’. :’
-.
;
How to Use This
Manual
b
-
Congratulations on purchasing a Star LaserPrinter 4 StarScript version. You
will be delighted with both the quality of the printed images and the ease of
operation. With your computer and this printer, you can create professionallooking documents.
h
This Operations Manual is one of two that explore the entire range of printing
possibilities of the Star LaserPrinter 4. This manual is for beginners and for
those who plan to concentrate on the basics. Advanced users and those
interested in programming should refer to the Applications Manual.
I
~..
i-
--
Chapter 2 begins with an overview of the manual and of the Star Laser
printer. This chapter explains how to unpack your new printer and prepare
it for initial operation. Chapter 3 explains how to operate the printer’s control
panel and display screen.
Some people like to skip the preliminary explanations and begin using the
printer immediately. Chapter 4 provides the information for such a fast start.
If you begin with Chapter 4, at some later time you should read the rest of the
manual in sequence, for a more complete picture of your printer and its
operations.
s..
Chapter 5 describes the type characteristics
printed pages that professional look.
that will enable you to give your
The Star LaserPrinter 4 StarScript version emulates the operation
following widely-used printers:
L_
l
PostScript
l
HP LaserJet IIP, a laser printer
l
Epson FX-850, a dot-matrix printer
of the
1
With this capability, the Star LaserPrinter 4 StarScript version will operate
with a wide range of applications programs on the market, both old and new.
Chapter 6 provides the information that will allow you to use your printer
with four popular applications programs: Lotus l-2-3, WordPerfect,
Microsoft Word, and Microsoft Windows.
Chapter 7 and 8 describe the maintenance and troubleshooting operations to
keep your Star LaserPrinter 4 working in “perfect” condition.
1.1 LASER PRINTING
Before you begin learning about your new Star LaserPrinter 4, you may find
it helpful to know something about laser printing itself.
_
A laser is actually a beam of light of just one wavelength (Laser is an acronym
for Light Amplification by Stimulated Emission of Radiation). Such a beam
of light, described as “highly coherent”, can be focused very sharply. Lasers,
generated by gases, liquids or semiconductors, are widely used in applications ranging from surgery to the visual arts.
Laser printing is a process that uses a laser beam - in this case, generated
by a semiconductorto activate portions of an electrically charged surface.
These activated parts represent the words, numbers, or graphics being sent
from the computer for printing. Other parts of the printer transfer this image
to paper, then clean the surface and prepare it to receive more information to
be printed.
In other words, this process is a type of laser-activated
temporary engraving.
In the St’ar LaserPrinter 4, two interconnected units produce the complete
printing process: the toner cartridge and the printer body.
The toner cartridge contains the drum, which is the rotating surface. In the
darkness of the toner cartridge, the drum holds a negative charge placed on
it by the primary corona wire in the printer. Shutters on the bottom of the toner
cartridge assure that no unwanted light penetrates its interior.
2
-
When text or graphics are sent by the computer to the printer, laser beam is
generated by a semiconductor laser diode. This beam is focused by special
scanning mirrors that turn the light beam into a tool that “writes” or “prints”
on the surface of the drum. The areas of the drum touched by the laser beam
lose their negative charge and contain a reverse image of the information sent
from the computer. As the drum rotates, it passes a developer unit that is also
rotating, but in the opposite direction. The surface of the developer unit is
covered with toner (“ink”) which has a negative charge. The neutralized
portions of the drum, containing the information to be printed, pick up
negatively charges toner from the developer unit.
At this point, paper fed from the paper cassette moves through the transfer
unit, from which it receives a positive charge. As the drum rotates, the
negatively charged particles of toner are attracted to the positively charged
surface of the paper.
A combination of heat and pressure fuse the image to the paper. The paper
is then ejected from the printer.
Finally, a cleaning mechanism in the toner cartridge cleans excess toner from
the drum, and a special light beam neutralizes its entire surface. Then the
entire process can begin again.
3
1.2 THE STAR LASERPRINTER 4 INTRODUCTION
AN
You will meet each portion of your Star LaserPrinter 4 as you read this
manual, but a brief introduction is in order here. The following figures show
the front, rear and inside views of the printer.
@ Side Cover
0
@ Face-down Tray
@ Multi-purpose
@ Paper Stop
@ Extension Tray
@ Control Panel
@ Paper Guide
@‘Cartridge
6jI Front Upper Door
Slot
@ Power Switch
4
Release Button
Tray (MP Tray)
-
@ Paper Delivery Selector
-
Rear View
I
b.
@ Parallel Interface Connector
@ Air Vent
@ AppleTalk Interface Connector
@ Power Receptacle
@ Serial Interface Connector
@ Density Adjustment Lever
@ Transfer Roller
@ EP-L Cartridge
@ Paper Access Door
@ Pick-up Roller
@ Separation Pad
@ Fixing Assembly Cover
@ Feed Roller
5
MEMO
-
-
1
LaserPrinter 4
The fact that you’re now reading this manual shows that you’ve got at least
as opening the carton containing your new Star LaserPrinter 4. This chapter
will help you to unpack the printer, set it up, and get it running.
First, though, you should make some preparations. You may already have
decided on the printer’s new location. Whether you have or have not, run
through this checklist of requirements:
l
Environmental control
The printer and toner cartridge should never be exposed to strong sunshine
or other direct heat sources. It should also be located away from air
conditioning ducts, dust and fumes. Excessive moisture should be
avoided, such as humidity in excess of 80% or less than 20%. If it is
comfortable for you, then it will be comfortable for your printer.
l
.-.
i
A large, strong table or stand
The printer weighs approx. 22Slbs (10kg) and must be firmly supported.
Also, the printer will need more room than it takes up in the shipping
carton, because the paper tray will extend forward from the front; so plan
for a space at least 2 x 3.2 ft (0.6m2).
-.
l
‘A three-pronged outlet
The outlet should be no more than 8 feet (2Sm) from the printer (the length
of the power cord), preferably one shielded from power fluctuations. In
any case, no motor-driven appliance should be connected to the same
outlet, to avoid interface with the printer’s operations.
-_..
l
A fresh toner cartridge (product #EP-L)
l
Paper
A package of 16-201b (60- 135g/m2) photocopier paper is best to start with;
however, the printer can use thicker paper, as well as special media, such
as envelopes and transparent sheets.
7
2.1 UNPACKING
The printer comes in two boxes. The large box contains the printer and its
accessories, and the smaller one contains the EP-L cartridge. Follow these
instructions when unpacking.
2.1.1 Unpacking the Printer
Follow the instructions below to unpack the printer.
1. Open the large box, and remove the accessories box.
2. Remove the printer from the box.
8
11
,I
L.
i_
“.
--
3. Remove the packing material from round the printer.
-
/
-
-
-
4. Open the accessories box. Remove the face-up tray, power cord, Operations Manual and Applications Manual.
,
i
-
-
-
-
NOTE: Save the packing boxes and materials. If you need to move the
printer (for new location or service etc.), use these materials to
protect the printer from damage.
2.1.2 Checking the Parts
Before setting up the printer, make sure that all standard items shown below
are provided and they are free from damage. If any of these items are missing
or damaged, contact your supplier.
Power cord
Operations
manual
Face-up tray
Applications
manual
2.1.3 Unpacking the EP-L Cartridge
Open the small box (see the illustration
material from the EP-L cartridge.
below) and remove the packing
--
CAUTION: 1) Do not open the aluminum bag containing the cartridge until
you are ready to install it in the printer.
2) Do not lean the cartridge against anything or turn it upside
down.
10
1
j!
2.1.4 Optional Items
Some of the following items may have been ordered. Unpack them. For
details, refer to Chapter 9. Options.
l
Paper feeder
l
Cassette (A4, Letter, Legal, Executive size)
l
RAM board (2 or 4MB)
l
Emulation cartridge
2.1.5 Carrying the Printer
Whenever moving the printer from one place to another, always make sure
the multi-purpose tray is closed, and carry the printer firmly at the bottom
with two hands.
CAUTION: Never attempt to carry the printer using the face-down slot.
NOTE: When moving the printer, remove the EP-L cartridge from the
printer. After removing the cartridge from the printer, replace it in
the aluminum bag in which it was originally packed, or cover it with
a thick cloth to protect it from direct light.
-
11
.
2.1.6 Opening and Closing the Printer
l
l
l
When opening the printer’s side cover, do not stop it in the half-way. This
will open the protective shutter of the drum, and light will permanently
damage the drum.
Do not place anything beside the printer. It may damage the multi-purpose
tray when the tray is opened.
Do not put anything in or on the multi-purpose
not press the tray downward.
tray except paper, and do
CAUTION: The parts of the printer shaded in the illustration below become
extremely hot when the printer is used. To avoid any personal
injury, do not touch these parts when the printer is open.
Although the printer’s cover is closed while printing, it will need to be
opened when replacing the EP-L cartridge when clearing paper jams. Open
or close the cover in the following way:
12
.-
A
5.
j,.. i_
Opening the Cover
1. Hold the knob of the multi-purpose
tray and pull it to open the tray.
2. The tray opens to about 80 degrees.
13
3. Press the release button (at the right ) upwards and open the cover.
_-
The cover opens to about 80 degrees (the multi-purpose
about 90 degrees.).
14
tray then opens to
NOTE: Remove the two orange stoppers by pushing the lower part of the
stoppers upwards and removing
below).
it (as shown in the illustration
Closing the Cover
1. Using both hands, lift the cover and close it gently until it latches.
-
15
2. Lift the multi-purpose
tray and close it until it latches on both sides.
2.2 INSTALLING THE EP-L CARTRIDGE
Important Notice
Install the EP-L cartridge immediately after opening the aluminum bag.
Permanent damage can be caused by light to the photosensitive drum.
NEVER expose the cartridge to the strong light (more than 15000 lux) or
room lighting (1000 lux) for more than five minutes.
Do not open the drum protective
shutter on the EP-L cartridge.
Keeplthe cartridge away from CRTs, disk drives, diskettes, etc. Otherwise, CRTs and disk drives can be damaged, and data on diskettes can be
destroyed by the magnet inside the cartridge.
When handling the cartridge, do not touch the bottom of the EP-L
cartridge. Print quality will be adversely affected if the protective shutter
is open and the drum is damaged. ‘The drum can also be damaged if it
exposed to light.
Always keep the EP-L cartridge with the label facing up. Do not turn it
upside down or stand it on end. The toner may become caked, and this
causes print quality to deteriorate.
Use the cartridge before the expiry date printed on the carton. Otherwise,
print quality may deteriorate.
16
l
Use only genuine EP-L cartridges as recommended
by your supplier.
Follow the instructions below to install the EP-L cartridge for the first time,
or replace an used one.
1. Open the multi-purpose tray and the side cover as described in “2.1.6
Opening and Closing the Printer”.
2. If you are installing the EP-L cartridge for the first time, skip to step 3. If
you are replacing the old EP-L cartridge, remove it by pulling it by the tab.
I
I
j
.--
,
i
NOTE: If it is difficult to remove the EP-L cartridge, press the green lever
located at the right, and try again.
j
-
3. Open the aluminum bag containing the EP-L cartridge and remove it.
NOTE: Save the aluminum bag, as you may need it for storing the cartridge
when you move the printer to another place in the future.
4. Holding the cartridge with both hands, rock it gently from end to end, 5
or 6 times, to distribute the toner evenly. If the toner is not distributed
evenly in the cartridge, it may adversely affect print quality.
.-
18
5. Place the cartridge on a flat surface. While holding down the cartridge
with one hand, use the other hand to pull the orange tab to remove the seal.
Make sure that the tab is pulled smoothly in a direction parallel to the flat
surface. Otherwise, the tape may break or snap, making the cartridge
unusable.
1
1
c
t
.
i
-
6. Holding the cartridge by the tab, align the arrow on the cartridge with the
V mark on the printer.
_..
19
7. Slide the cartridge into the printer gently.
8. Make sure that the cartridge is securely seated, then close the cover gently.
NOTE: 1) If you have purchased
accordance
optional accessories,
with their installation manuals.
install them in
2) When replacing the cartridge, clean the fixing assembly,
described in “7.3 Cleaning the Fixing Assembly”.
20
as
2.3 LOADING PAPER
2.3.1 About Paper
Print quality and printer life are greatly affected by the paper used. Paper can
be fed into the printer either from the multi-purpose tray or paper cassette (if
cassette is installed). Types and sizes of paper can be used with the multipurpose tray are listed below.
Size
Type
Weight
Print delivery
Plain paper
97 x 148 - 216 x 356mm
(Letter, Legal, A4, B5,
Executive)
Transparency films
Letter, A4
Face-up
Labels
Letter, A4
Face-up
Envelopes
97 x 148 - 216 x 356mm
60 - 105g/m2
60 - 90g/m2
Face-down/up
Face-up
2.3.2 Loading Paper Into the Multi-purpose Tray
1. If the multi-purpose
it forward.
tray is not open, open it by unlatching and bringing
2. Hold the arrow at the center of the multi-purpose
extension tray.
3. Slide the paper guide to the left.
22
tray, then pull out the
4. Take a small stack of paper and align the edges by tapping it on a flat
surface.
5. Align the right side of the stack of paper with the right-hand paper guide.
Slide the paper stack gently into the printer as far as it will go. Make sure
that the height of the paper stack does not exceed the mark on the paper
guide.
.~
. .,.
-.
b...
L..
23
6. Slide the left-hand paper guide so that it touches the left side of the paper
stack. Make sure that the paper guide does not press too tightly or fit too
loosely against the paper stack. Otherwise, this can cause paper jams or
other problems.
2.4 SELECTING PAPER DELIVERY
The printer provides two types of paper delivery; face-up and face-down.
With face-down delivery, the paper is ejected from the printer with the
printed side facing downward. With face-up delivery, the paper is ejected
with the printed side facing upward.
Selecting Face-down Delivery
1. Open the multi-purpose
tray by unlatching and bringing it forward.
2. For face-down delivery, simply open the multi-purpose
tray.
3. Adjust the paper stop located on the top of the printer to the position which
matches the paper size.
24
Selecting Face-up Delivery
1. Open the multi-purpose
tray by unlatching and bringing it forward.
2. Switch the paper delivery selector for the face-up position.
3. Attach the face-up print tray to the side cover of the printer. Fit the pegs
at the sides of the tray into the holes in the printer.
When face-up printing is finished and the multi-purpose tray is closed, the
printer automatically switches back to face-down delivery.
25
2.5 CONNECTING THE POWER CORD
Make sure that the power switch on the printer is set to OFF, then connect the
power cord to the printer and a AC power outlet as shown below:
1. Make sure that the power switch of the printer is off (that the “0” side of
the switch is pressed down).
2. Plug the power cord into the power connector, then plug the other end into
the AC outlet.
26
Only use the power cable supplied with the printer. Note that this power cable
is fitted with a ground pin. This grounding is an important safety feature and
should not be ignored. If a suitable grounded socket is not available, contact
a qualified electrician to rectify the situation.
2.6 CONNECTING THE INTERFACE CABLE
The host computer transmits information to the printer along an interface
cable. The printer is provided with three types of interface (serial, parallel
and AppleTalk).
No interface cable is supplied as standard with the printer. Determine the
kind of interface cable (serial, parallel or AppleTalk) you want to use, and
purchase the appropriate cable from your supplier.
1. Before connecting the interface cable, make sure that the power to the
printer and the computer is turned off.
2. Plug one end of the interface cable into the appropriate connector on the
rear side of the printer.
3. For parallel (Centronics) interface, secure the cable connector
connector clips. For serial interface, fasten the cable connector
screws.
using
using
27
-
4. Connect the other end of the cable to the appropriate interface on the host
computer.
NOTE:
28
The printer’s factory setting is for a parallel interface. If the other
interface is to be used, you need to select the interface on the control
panel. See “4.3.1 Selecting the Interface” for selecting the type of
interface.
2.7 ADJUSTING PRINT QUALITY
At some time you may find that the quality of the printing is not what you
want. You may run test prints and then make the printing lighter or darker by
adjusting the the print density adjustment lever located inside the printer.
1. Hold the knob of the multi-purpose
tray and pull it to open the tray.
2. Press the release button (at the right) upwards and open the cover.
3. To increase print density, move the density adjustmen&%r&ne
To reduce the density, move the lever to the left.
right.
NOTE: The density adjustment lever has four settings from left to right. As
you move the lever, it clicks at each of the two positions in the
middle.
la -BI
-
30
Initial Operation
-
-
3.1 FRONT PANEL
The front panel of the Star LaserPrinter 4 is a combination control board and
interactive message center. The panel consists of:
I.
,
L
!
i
l
a 1 line, 16 character LCD display screen
l
5 LED lights, 1 orange and 4 green
l
7 momentary contact buttons
The momentary contact buttons permit you to instructions to the printer. In
turn, the printer uses the display screen and the light indicators to convey
information to you.
The screen display is the primary way the printer communicates with the
operator. It informs the operator about the machine’s state, the printer’s
status, alarm conditions that require some action by the operator, “soft”
errors, and messages when selecting current, initial and default printer
parameters. The LEDs provide an “at glance” summary of the printer’s
status.
The printer operates in two main modes when the printer is Off Line:
1. Normal Mode (white buttons) - performs function labeled on the button.
2. Program Mode (brown buttons) - press the [PROGRAM] button to enter
menu selections.
The meaning and use of the panel buttons depends on the mode in which the
printer is operating.
31
3.1.1 Powering Up
Take note of the following points when turning on or off.
l
When the printer is connected directly to a computer:
Power on: First turn on the computer, and then turn on the printer.
Power off: First turn off the printer, and then turn off the computer.
l
Power on: First turn on the computer, then other devices, and finally turn
on the printer.
Power off: First turn off the printer, then other devices, and finally turn off
the computer.
CAUTION:
Always wait at least three seconds between turning off and
turning on again.
Turn on the printer by pressing the “I” side of the power switch. The printer
will begin its internal diagnostics and warming up, displaying a series of
message on the screen as follows.
1. All LEDs are lit and the LCD display screen turns black.
2. The screen displays “LaserPrinter
4”.
3. Then the screen displays “Memory Test 2 MB”.
If an optional 2 MB RAM board has been installed, the message will display
“Memory Test 3 MB”. The actual value will depend on the size of the RAM
board installed (2 or 4 megabytes).
4. After a short while, the screen displays “EEPROM LOAD DONE” for a
moment. This means that default parameters have been read from the
EEPROM and the EEPROM CRC has been checked.
5. “PRINTER WARMUP” is displayed, the READY indicator starts blinking and the ON LINE lights up.
6. When the printer is ready, the screen displays “PRINTER READY” and
the READY indicator is now continuously lit.
32
--
When the printer is connected to a computer through other devices:
-
1
3.7.2 The Buttons
This section explains the various meaning and uses of the buttons, including
their light indicators, where present. Keep in mind that the buttons’ functions
depend on the mode the printer is in: the Normal Mode and Program Mode.
[ON LINE]
Pressing this button switches the printer from Off Line to On
Line or vice versa. When the printer is On Line (ON LINE LED
is lit), the printer is able to receive information from the
computer and print it. All other buttons (except for the ERROR
SKIP button under certain conditions) are inactive when the printer is On
Line. When the printer is Off Line, the printer is unable to receive information and print, but the other switches can be used. If the printer is in the
Program Mode, pressing this button exits from the Program Mode, and enters
to the Normal Mode.
L-J
When the printer is On Line, the LED is on.
When the printer is Off Line, the LED is off.
[PRINT]
PRINT
El
This button is active only when the printer is Off Line. Pressing
the switch will print any page. If there is no page, the depression
of the switch will be ignored. When printing is in operation, the
LED is on.
[ERROR SKIP/<]
l-l
This button is basically active only when the printer is Off Line.
In the Normal Mode, a depression of this button has no effect
if no alarm condition exists. However, if an alarm or warning
condition exists, pressing this switch causes the printer to
return to the previous state after corrective action has been taken.
ERROR
SKIP
-
When the printer is Off Line and in the Program Mode, this key is called
NEXT. During programming, pressing this button displays the various items
under a category for the operator to select next in the sequence.
-
33
[TEST/>]
1
TEST
j
This button has two functions when the printer is Off Line.
l
Pressing this button when the printer is in the Non-menu
Mode will operate in the following sequence:
1) Pressing this button displays “HOLD FOR TEST”. If the button is
released while this message is displayed, the printer returns to the previous
state.
2) If the button is held down for three seconds, the screen will display
“STATUS SHEET”. Whether pressing the button or not within one
second after “STATUS SHEET” is displayed will alter the printer
operation.
3) If the button is released without being pressed within one second, the
printer will print a status sheet (see 3.2.1 Printing Test Seets).
4) If the button is pressed once within one second, the screen will display
“FONT LIST”, and a font list will be printed (see 3.2.1 Printing Test
Sheets).
5) If the button is pressed twice within one second, “CLEANING PAPER”
will be displayed and a cleaning paper will be printed (see 3.2.1 Printing
Test Sheets).
6) If the button is held down for more than 6 seconds after “STATUS
SHEET” is displayed, the screen will display “TEST PRINT MODE”. If
the button is released while this message is displayed, the printer will print
a test ,print mode (see 3.2.1 Printing Test Sheets).
l
In the Program Mode, pressing the [TEST] button as PREVIOUS presents
the available items in reverse sequence.
[RESET/v]
RESET
‘=
V7
This button has three functions when the printer is Off Line.
Pressing and holding this button when the printer is in the
Normal Mode displays “HOLD FOR RESET”. If this button is
Iii
held for more than three seconds, “REINITIALIZE” message
is displayed and the printer is reinitialized to the initial settings of the
emulation currently selected. This will also clear the input buffer, any
page in composition, and composed pages queued up.
34
l
l
l
When the printer is in the Program Mode, this button is called ENTER.
Pressing the button selects the value with a @.
Turning on the power while holding down the button causes the printer to
enter the display language selection mode. (See “4.8 Selecting Display
Language”.)
[PROGRAM/A]
q
To start using the Program Mode, you must first set the printer
Off Line, then press the [PROGRAM] button. Within a programming sequence, pressing the [PROGRAM] button takes the
A=2
programming Menu to the next higher level, or exits from the
Program Mode and displays “PRINTER READY”. For details, refer to 3.3
Programming from the Control Panel.
PROGRAM
[FEEDER SELECT]
This button controls from where the printer will expect paper
when printing. To change from one source to another, the
printer must be Off Line, press the ON LINE button if the ON
LINE LED is on, then hold down the FEEDER SELECT button
111
for a while. The screen will display “FEEDER SELECT”.
FEEDER
SELECT
1) If the button is released while this message is displayed, the screen
displays the current feeder selection (e.g. multi-purpose tray). Further
presses will cycle through the options below:
Cassette Only
Auto Selection
Cassette
MP Tray
’
Manual Feed
-
Cassette Only
.
35
NOTE:
(1) The screen display will indicate only available selection. If the LC
Cassette unit is not installed, only MP TRAY and MANUAL FEED are
displayed.
(2) The Factory Setting is MP Tray. However, when the LC Cassette unit is
installed, the Factory Setting will be changed to CASSETTE ONLY.
(3) If the DATA LED is lit or blinking, the new selection will be stored in
Initial Setting and issued at the top of the first page stored in the printer.
2) Holding down this button for more than 2 seconds causes the screen to
display “MP TRAY SIZE”. If the button is released while this message is
displayed, the screen will display the current multi-purpose tray size.
Further presses will cycle through the options below:
-
Paper: Letter
Paper: Legal
Paper: A4
Paper: Executive
Paper: B5
ENV: Monarch
ENV: COM-10
ENV: lntntnl DL
ENV: lntntnl C5
.-
Paper: Letter
NOTE:
(1) The paper size selected by this button will be stored in Current and Initial
Settings.
(2) This option is available in all feeder selections except Cassette Only.
To exit from this mode, press the [ON LINE], [TEST], [RESET] or [PROGRAM]
button.
36
-
3.1.3 Light Indicators
[READY]
READY
The READY LED indicates that the printer is ready for use
when it is lit. This LED flashes the printer is warming up, then
lights continuously.
[ALARM]
ALARM
The ALARM LED will light up in the event of an error which
requires operator to take action (e.g. paper out). The bell will
sound for 2 seconds whenever this LED lights up.
[DATA]
The DATA LED shows the data status of the printer. It is
continuously lit when data has been received and not printed
DATA
yet, and it flashes when the printer is waiting for more data. The
DATA LED will go out when all received data has been
processed. Do not turn the printer off while the DATA LED is lit, otherwise
data will be lost.
[ON LINE]
The ON LINE LED shows that the printer is ready to receive
data
(the printer is set On Line when this LED is lit. This LED
ON LINE
is off when the printer is not ready for receiving data (the printer
is set Off Line). The LED flashes when the printer is printing
a page or when the printing is switching from On Line to Off Line.
[PRINT]
PRINT
This LED is continuously lit while a page is being transferred
through the printer. Otherwise, the LED is always off.
37
3.1.4 Hex Dump
The Star LaserPrinter 4 can also operate in the hexadecimal mode. This
means that it will print information sent to it in its equivalent hexadecimal
notation (in base 16 numbers). This mode is useful in correcting communication incompatibilities between some computers and Star LaserPrinter 4,
that can result in incorrect text or formatting. For information on performing
a Hex Dump, see “Chapter 8. Troubleshooting”.
3.2 SELF TEST
The Star LaserPrinter 4’s test print provides a complete summary of what it
is currently capable doing for you. It shows the quality of the printing of text.
It summarizes the printer’s configuration, including amount of memory and
which fonts are installed or available. It explains how the printed page will
look at the current settings. This includes paper size and page layout. It tells
whether the parallel or serial interface is active.
-
3.2.7 Printing Test Sheets
There are four stages to the self test. Also refer to [TEST/>]
Buttons.
of 3.1.2 The
1) Printing a status sheet
Hold the [TEST] button until the screen displays “HOLD FOR TEST” then
“STATUS SHEET”.
Releasing the button will print the 1 page status sheet.
2) Printing a font list (This operation is effective only in StarPage and HP
modes.)
Hold the [TEST] button until the screen displays “HOLD FOR TEST” then
“STATUS SHEET”
Press the [TEST] button “once” within one second after “STATUS SHEET”
is displayed. The screen displays “FONT LIST”.
When you release the button, the printer will produce a font list.
38
-
3) Printing a cleaning paper
Hold the [TEST] button until the screen displays “HOLD FOR TEST” then
“STATUS SHEET”.
Press the [TEST] button “twice” within one second after “STATUS SHEET”
is displayed. The screen displays “CLEANING PAPER”.
When you release the button, the printer will produce a cleaning paper. This
paper is used to clean the fixing assembly (see 7.3 Cleaning the Fixing
Assembly).
4) Printing a test print mode paper
Keep holding down the [TEST] button until the screen displays “HOLD FOR
TEST”, “STATUS SHEET” then “TEST PRINT MODE”.
When you release the button, the printer will produce multi-page “barber
pole”. Pressing the button again will display “TEST PRINT STOP” and stop
Printing.
3.2.2 Status Sheet Description
You can tell several things about the printer’s settings by just looking at the
print, without reading any of it. First (and obviously) the printer is operating.
Second, the page is printed in the portrait orientation. That is, the printing
runs on the page the way portraits are usually painted, higher than they are
wide. When the printed area is wider than it is high, the orientation is referred
to as landscape. If the printer is set for landscape orientation, the sample is
printed that way.
The status sheet is divided into two sections. The first section summarizes
your printer’s basic configuration, identifying the version of its operating
system (Firmware rev.) and specifying the amount of total RAM (memory)
and the amount of RAM available for your use. If your printer has an optional
RAM expansion board, its memory size will also be listed here.
The latter portion of the status sheet provides information on the options for
printer operation that are currently active, in the order you are most likely to
need the information. You can change any of these by programming from the
front panel.
Two sets of selected (or default) options are listed:
l
Initial - the settings that were selected when the printer was first turned
on.
39
l
Power-up - the settings that are stored in EEPROM (see Glossary).
The function of the EMULATION
l
GROUP is:
Emulation - the printer whose functions the Star LaserPrinter
emulate.
4 is set to
The NUMBER OF COPIES GROUP function includes;
l
Number of copies - the number of copies of each page to be printed.
The function of CHARACTER
l
GROUP is:
Character - character set, pitch, table
-
The function of JOB SIZE GROUP is:
l
Job Size - the size of paper.
The functions of the LAYOUT are:
l
l
l
l
l
Orientation
- portrait or landscape.
Margin settings - left, right and top in relation to the available page area,
and page (text) length in number of lines.
VMI - Vertical Motion Index. VMI refers to the smallest increment that
can be made in the vertical or y axis. Line spacing is a multiple of VMI.
End of line - whether auto wrap function is on or off.
Auto line feed - whether there is an automatic carriage return (CR) at a
paragraph break, an automatic line feed (LF) at the end of each line, and
a form feed (FF) after each page.
The PAPER FEED GROUP includes:
l
Feeder - whether the paper will be fed from the cassette or manually.
l
MP tray size - the size of paper to be used by the multi-purpose
The PAGE MODE GROUP function includes:
l
Page Mode - partial or full
The INPUT BUFFER GROUP function includes:
l
Input Buffer - memory capacity of the input buffer
The function of the INTERFACE
l
40
GROUP is:
Interface - parallel, AppleTalk, or serial
tray.
-
3.3 PROGRAMMING
PANEL
FROM THE CONTROL
As the status report indicates, the various functions that you can select from
the control panel are arranged in an outline form, or a hierarchy. This means
there are main groups and several levels within each one.
Remember: you enter (by pressing [v]) or exit (by pressing [A]) a Level to
select the previous (by pressing [>I) or next (by pressing [<I) Item within a
Group.
[EXIT]
[PREVIOUS]
[NEXT]
+
[ENTER]
To get into the Program Mode, you must perform two actions:
l
l
Press [ON LINE] to go off the light, then
Press [PROGRAM]. This will cause the screen to respond by displaying the
phrase “NUMBER OF COPIES”.
The order of the main categories within Program Mode is:
CHARACTER
JOB SIZE
LAYOUT
PAPER FEED
EMULATION
PAGE MODE
INPUT BUFFER
INTERFACE
SET POWER-UP
LOAD FACTORY SET
41
You move from one item to the next in this level by pressing [<I. Pressing
[<I displays the next item of the next higher level. If no such item exists, [v]
displays the value that is to be selected with @ added. [ON LINE] ends the
Program Mode. Pressing [>I returns the display to the previous item at the
same level you are currently in. Pressing [A] displays the next lower (previous) level.
Here’s how this works in real life, using a portion of the EMULATION group
hierarchy. Set the printer Off Line and press [PROGRAM] so the screen reads
“NUMBER OF COPIES”.
Then press [<I until the screen displays “EMULATION”.
Pressing [v] will display one of the following:
StarPage
HP LaserJet IIP
Epson FX-850
Hex Dump
Pressing [<I continuously
will list all the available emulations.
Suppose you want to select HP LaserJet IIP as the emulation
StarPage emulation.
from the
First get into the Program Mode,
l
l
Press [ON LINE], so that the light is off
Press [PROGRAM],
COPIES”.
after which the screen displays
l
Now press [<I. The screen responds with “JOB SIZE”.
l
Pressing [<I twice displays, in order
PAPER FEED
EMULATION
42
“NUMBER
OF
I
l
l
l
l
Pressing [v] here displays “StarPage@” as the default emulation.
want to stay in this level of the hierarchy, so this time
You
Press [<I, giving you “HP LaserJet IIP” which is the emulation you want.
To select it,
Press [v]. This displays “REINITIALIZE” which means that the printer
is being initialized for HP LaserJet IIP emulation. After a while, the screen
displays “HP LaserJet IIP@“.
Press [ON LINE] to exit the Program Mode.
To see if the printer has been set for HP LaserJet IIP emulation.
l
Carry out the same operation until the screen displays “EMULATION”.
Then press [v]. The screen will display as the default “HP LaserJet IIP@“.
The entire hierarchy is shown on the next pages.
43
STAR LASERPRINTER 4
CONTROL PANEL HIERARCHY
To enter program mode:
1. Take the printer off line by pressing the ONLINE button.
2. Enter program mode by pressing the PROGRAM button.
3. Follow the charts below, moving with the buttons indicated.
@I
0
a
E!!!
INTERFACE
FACTORY
INPUT
EMULATION
PAGE
POWER-UP
APPLETALK
SERIAL
PARALLEL
FULL
PARTIAL
PAGE
PAGE
-
44
DTR
ROBUST
POLARITY
XON
PROTOCOL
STOP
BIT
PARITY
DATA
BAUD
BIT
RATE
NOTE:
0 HP LaserJet IIP mode only
0 Epson FX-850 mode only
0 Skip in StarPage mode
@ Skip in Hex Dump mode
NUMBER
CHARACTER
JOB SIZE
LAYOUT
PAPER FEED
OF COPIES
0
MP TRAY
TABLE
FEEDER
PITCH
CHARACTER
SET
SIZE
AUTO
END OF
LINEFEED
LINE
MARGIN
VMI
ORIENTATION
1 1
AUTO
MANUAL
SET
DEFAULT
AUTO
MARGIN
MARGIN
TEXT
TOP
RIGHT
LEFT
LENGTH
MARGIN
MARGIN
MARGIN
SOURCE
NUMBER
SYMBOL SET
45
MEMO
46
Quick Start with the
Star LaserPrinter 4:
A Tutorial
This chapter is designed for dual use, since most computer users fall into one
of two categories. Some people like to read the documentation through from
beginning to end. Others like to plunge right into the hands-on mode, using
documentation as a quick reference, at most.
This chapter is for both groups. It can be read in sequence with the rest of the
book. or it can be used as a stand-alone aid.
4.1 PRELIMINARIES
Your Star LaserPrinter
l
the printer body
l
the EP-L cartridge
4 comes in two basic parts:
When you place your printer for use with your computer, be sure that:
l
it sits on a strong, stable table
l
there is circulation
l
you remove all the packing material before you use the printer.
on all sides, including the bottom
If you are just setting up your Star LaserPrinter 4, and have not read the
material in Chapter 2, please take the time to read the section “2.2 Installing
the EP-L Cartridge”. It is very vital that you handle and install this component precisely, because it contains important laser printing devices, as well
as the toner (“ink”) that actually prints on the paper.
In addition to the multi-purpose tray that is provided as a standard feature,
various types of paper can be fed into the printer using an optional paper
feeder unit. Five different cassettes are available for use with the feeder unit;
A4, Letter, Legal, Executive and Envelop. For installing the feeder unit and
cassettes, see separate manuals.
The printer’s on-off switch is located at the front.
47
4.2 CONTROL PANEL
The front panel of the printer provides information about the printer’s
internal and operating status. It also allows you to program it for your (and
your computer’s) specific needs. The Star LaserPrinter 4 works in two basic
modes when the printer is off line:
Normal mode-using
Program mode-using
the white buttons
the brown buttons
The buttons have different functions in each mode:
BUlTON
FRONT PANEL MODE
(WHITE BUTTONS)
PROGRAM MODE
(BROWN BUTTONS)
[ON LINE]
When light is on printer can
print. When light is off all
other buttons are enabled
Fast exit (termination) of Program Mode (returns to Printer
Ready)
[PRINT]
Print information
No function
[ERROR SKIP/<]
Continue printing or display
error code
Display next item within current level of menu selections
[TEST/>]
Initiate tests
Display previous item within
current level of menu selections
[RESET/v]
Discard information
Display next level within current item of menu selection.
When in last level of current
item, executes function
[PROGRAM/A]
Enter program mode
Display previous level within
current item of menu selection
[FEEDER SELECT]
Select paper source for
printing
No function
in memory
-
[EXIT]
t
[NEXT] -j--w
[PREVIOUS]
t
[ENTER]
Remember: you enter (by pressing [v]) or exit (by pressing [A]) a Level to
select the previous (by pressing [>I) or next (by pressing [<I) Item within a
Group.
The front panel also has some lights. When lit they mean:
READY (green) -
the printer is ready for printing or for programming
ALARM (orange) DATA (green) -
information
ON LINE (green) PRINT (green) -
and error condition exists and the printer is Off Line
received, not yet printed
the printer is ready for printing
the printer is printing information
4.2. I Basic operations
Ther are four basic operations performed
l
l
l
l
from the panel:
On Line and Off Line -The printer can receive information from the
computer and print it only when it is On Line. When the printer is On
Line, the light on the [ON LINE] button will be lit. For all other
functions, the printer must be Off Line. This is accomplished by
pressing the [ON LINE] button until its light is out.
Form feed - The printer may have unprinted information in its
memory. This is indicated by the lighted DATA light. To clear it from
the printer, take the printer Off Line. Then press [PRINT]. When all the
remaining information is printed, the paper will be ejected and the
DATA light will go out.
Error Skip - In case of an error, the printer will go Off Line and stop
printing. If the error is minor, it is possible to continue printing. To do
this, press [ERROR SKIP], then [ON LINE] until its light is OIZ.If the
error was minor, printing will resume. If the error was more serious, the
panel will provide information on how to handle it.
Reset -To clear the printer memory and restore settings to emulation
defaults, press [RESET].
49
Before you begin printing, at any time, but especially when you are new to
the process, it is a good idea to run a test or sample print. To do this, take the
printer Off Line. Then press and hold [TEST] until the display reads Status
Sheet. The printer will provide a status sheet showing.
l
its configuration
l
the quality of its text printing, and
l
a summary of its settings -
initial and power-up preset.
4.3 CONNECTING
COMPUTER
THE PRINTER TO THE
The Star LaserPrinter 4 StarScript version comes equipped with a standard
Centronics parallel interface, an AppleTalk interface, and an RS-232 serial
interface. They can be connected simultaneously, though only one can be
active at any one time.
The printer comes from the factory pre-set with the Centronics parallel
interface active. You can confirm this by looking at the Interface Group
portion of the sample print.
PAPER PlLD
Peoder
HP tray
*Lx.0
Auto 9electlon
A"to ne1ection
Paper8
Paper:
A4
A4
PrnX MoLm
i!artia1paga
Partial
INPUT BUPPER
1X byte,
1X bytm
INTPAPACII
Perall.
Paralla
Error
pg.
History
This means that the Centronics parallel interface is active. If the serial port
were active, that line would state serial.
50
-
-
If you are going to use a Centronics interface, you don’t need to make any
changes. If you want to use an RS-232 interface, you must perform a
programming sequence. Programming will involve pressing various panel
keys and following the information provided on the display screen. The
control panel indicates the selected function with the@ symbol following the
function displayed.
4.3.1 Selecting the Interface
Note that when you have completed the selection sequence, the settings must
be stored in EEPROM (see 4.3.3 Saving Settings).
l
Take the printer Off Line by pressing the [ON LINE] button until the
button’s light is ofs
l
Then press [PROGRAM].
l
Press [e] until the display screen reads
INTERFACE
l
Press [v]. Now the screen will read
PARALLEL@
l
Now press [cl. The screen will change to
SERIAL
l
With the display reading SERIAL, this time press [v]. The screen will
show
BAUDRATE
l
Pressing [v] now displays
9600baud
l
l
Press [<I to display a series of options, from 300 to 19200. Keep
pressing until the one you want appears on the screen.
Pressing [v] now displays
9600baudQ
51
. Then press [A] displays BAUD RATE. Pressing [<I displays these options:
DATA BIT
PARITY
STOP BIT
-
PROTOCOL
ROBUST-XON
DTR POLARITY
The settings from the factory for these options are:
8 bit
no parity
1 stop bit
DTR
High
Whenever you want to change any of the serial parameters, follow the same
sequence as for selecting the baud rate. For example, to change the data bit,
at SERIAL press [v] then [e] until DATA BIT is displayed on the screen.
Pressing [v] will display the first option, and [<I will give the rest of them.
Press [v] when your choice appears on the screen. Finally, press [ON LINE],
which readies the Star LaserPrinter 4 for printing.
If your applications program requires an XON/XOFF
handshake (“software”
rather than DTR “hardware”), set it from the SERIAL menu by
l
Pressing [v] then [<I until you see
PROTOCOL
l
Pressing [v] displays
DTR
l
52
Pressing [<I until the display rends
XONIXOFF.
Press [v] to execute.
-
The next step is to activate your choice to the printer.
l
Press [A] 3 times to display
INTERFACE
l
Press [<I to display
SET POWER-UP
l
l
Press [v ] to store the current settings into EEPROM.
Press [ON LINE], which allows the Star LaserPrinter
printing through the serial interface.
4 to begin
4.3.2 Activating the Parallel Interface
To return to a parallel interface, do this:
l
Take the printer Off Line by pressing the [ON LINE] button until the
button’s light is off
l
Then press [PROGRAM].
l
Press [<] until the screen displays
INTERFACE
l
Press [v], which displays
SERIAL @
l
Press [<I which gives
PARALLEL
.
l
Press [v] to select parallel.
l
Press [A] once to display
._.
_
INTERFACE
l
SET POWER-UP
__^”
l
..
l
,
Press [<I to display
Press [v] to store the current settings into EEPROM.
Pressing [ON LINE] will allow the Star LaserPrinter
printing through the parallel interface.
4 to begin
53
4.3.3 Saving the Setting
The new setting will remain in the printer’s RAM memory until it is turned
ofi To understand why, you should realize that there are four different types
of settings stored in the printer’s memories.
The FACTORY SETTINGS, which are those put into the printer’s
unchangable ROM memory at the factory.
l
. The POWER-UP SETTINGS, which the user can create, then store in a
permanent memory called EEPROM, even when the power is turned off
at the end of the session in which they are created. These settings will then
override the Factory Settings, being activated when the printer is turned
off, then on again.
-
_
-
The INITIAL SETTINGS, which the user can create and use as long as the
printer is not turned off. These are stored in temporary or volatile RAM
memory. They override the Power-up Settings.
l
The CURRENT SETTINGS, which are those stored in temporary RAM
memory. These may be issued by software commands that override all
other settings.
l
To make the setting permanent, you must save it in EEPROM! Perform this
programming sequence, after taking the printer Off Line.
l
Press [PROGRAM].
l
Press [<I until the screen displays
SET POWER-UP
l
Press [v], after which the screen will display
EEPROM LOAD DONE
l
Finally, press [ON LINE]. Your new settings are now saved, and you
can continue with other printing, if desired.
4.3.4 Returning to Factory Settings
If for some reason you want to start from the beginning, with the original
factory settings, follow this procedure:
l
In the Program mode, press [c] until the screen reads
LOAD FACTORY SET
54
-
l
Press [v]. The screen will display
EC Set @
l
Pressing [c] display the other option:
US Set
Select the one you want.
l
Press [v]. The screen will display briefly
LOAD FROM ROM OK
then
LOAD FACTORY SET
The factory settings are now restored, and you can go On Line for other
activities.
4.4 MANUAL FEED
The Star LaserPrinter 4 can feed paper automatically using an optional
cassette. If an optional cassette is installed, the factory default of feeder is
Cassette Only. To change this setting from the control panel, put the printer
Off Line, and press [PROGRAM].
l
Press [<I until the screen displays:
PAPER FEED
l
Press [v], and the screen will now display:
FEEDER
. Press [v], which will display
Cassette Only@
l
Pressing [e] displays these options:
Auto Selection
Cassette
MP Tray
Manual Feed
l
Press [<I to display
Mp Tray
or
Manual Feed
55
.-L
l
l
Pressing [v] confirms the change.
Finally, press the [ON LINE] button to make the Star LaserPrinter
ready for printing.
4
Manual paper feeding should always be done from the multi-purpose tray
(MP tray), If OHP transparencies, label sheets or envelopes are to be fed
manually, the face-up tray should be used.
If during either manual or automatic feed, you get a paper jam, refer to the
chapter on “Troubleshooting,”
for ways to clear the machine.
--.
--.
4.5 PAPER SIZE
The factory default of MP TRAY SIZE is A4 paper. If you want to use other
size of paper or envelops, you must first instruct the printer. After going Off
Line and pressing [PROGRAM]:
l
Press [<I until the screen reads
PAPER FEED
l
Press [v], which will display
FEEDER
l
Pressing [<I displays
MP TRAY SIZE
l
Press [v], which will display
‘Paper : A4 (for EC set) or Letter (for US set)@
l
Pressing [NEXT] repeatedly
Paper
Paper
Paper
Paper
Paper
Env.
Env.
Env.
Env.
56
:
:
:
:
:
:
:
:
:
Letter
Legal
A4
Executive
B5
Monarch
COM-10
lntntnl DL
lntntnl C5
will list the other choices,
-
Press [v] when the required
screen.
l
paper/envelope
size is displayed
Finally, press [ON LINE], which readies the Star LaserPrinter
printing.
l
on the
4 for
Before you start printing, refill the cassette with the appropriate paper.
4.6 PRINTING IN LANDSCAPE
ORIENTATION
If you want to change from portrait to landscape orientation for your
printed page, follow this procedure, after going Off Line and pressing
[PROGRAM]:
l
Press [c] until you get
LAYOUT
l
Press [VI, which will display
ORIENTATION
l
-.
-.
Press [v] for
Portrait@
l
Pressing [*I gives
Landscape
l
Pressing [v] selects Landscape.
_-.
4.7 CHANGING
CHARACTER
SET
-.
-
If you want to use a character set other than that provided at the factory,
follow this procedure:
l
After going Off Line and pressing [PROGRAM]
l
Press [*I until you see
-
CHARACTER
l
Press [v], which displays, in case of the HP LaserJet IIP emulation
SOURCE R (or SOURCE C or SOURCE S)@
-.
(SOURCE R means Resident,
SOURCE S for Soft font)
SOURCE
C for Cartridge,
and
57
l
Press [v] displays
NUMBER l@
l
Pressing [v] again gives various options for SYMBOL SET.
l
Pressing [<I until you see the desired one.
l
Then press [v].
l
Press [ON LINE].
4.8 SELECTING
-
DISPLAY LANGUAGE
The language for display can be selected from English, French, German,
Italian or Spanish. To select the display language, turn off the printer then
follow the procedure below.
-
1. Hold down [RESET/v] and turn on the printer (make sure that [RESET/
v] is held at least until the screen displays “SELECT LANGUAGE”). The
screen displays
_
--
SELECT LANGUAGE
Memory Test 2 MB
ENGLISH@
2. Pressing [ERROR SKIP/<] or [TEST/>] changes the language as displayed in the screen.
3. Press [ON LINE] after selecting new language. The language will be
saved and the printer goes On Line.
If [RESET/v] is released before “SELECT LANGUAGE” message is
displayed, the printer will not enter the display language mode (i.e. normal
startup operation will be carried out). The factory setting of display language
is English.
58
_
-
Font Selection
The style of printing that appears in your finished work consists of five
elements:
l
l
l
l
the symbol/character
able for use
set -
the letters, numbers, and symbols avail-
the fonts present in the Star LaserPrinter 4 - some fonts come as
standard equipment, while others are available in cartridges that are
installed in the cartridge slot of the printer; you may also purchase fonts
on a disk and load them down (downloading) from the computer to the
Star LaserPrinter 4’s RAM (for more information consult a software
dealer)
font attributes - consisting of character
style, stroke weight, and typeface
spacing, pitch, point size,
the printer you select to emulate - the Star LaserPrinter 4 StarScript
version can emulate the PostScript, and two widely available printers,
the Hewlett Packard LaserJet ZIP (a laser printer) and Epson FX-850 (a
dot-matrix printer).
? the capabilities of your applications
software.
The Star LaserPrinter 4 StarScript version comes equipped with many
families of fonts. Try to print out the Font List with control panel operation.
(Refer to “3.2 SELF TEST”.)
You will get the Font List as shown in next pages.
59
LaserPrinter
4 StarPage Interpreter
Font List
RESIDENT
FONTS
phst~ Name]
AWltGde-Book2
AvantGanieSookOblique2
AvaMGardeDemi2
AvaMQardeDemiOblk&
Bookman-Demi’
Bookman-Demillalic*
Bwkman-Ligh?
Bcokman-LightItalic
Font Name]
ITC-Avant-Garde-BookSWA
ITC-Avant-Garde-BookObliqueSWA
ITC-Avant-Garde-DemiSWA
ITC-Avant-Garde-DemlObliqueSWA
ITC-Bookman-DemiSWA
ITGBookmamDemUtaliSWA
Courier-Bold
Courier-SWA
Courier-BoldSWA
Courier-BoldOblique
Courier-SoldObliqueSWA
COUdW
Courter-Oblique
Courier-ObliqueSWA
Hehretica'
Swiss721 -SWA
Helvetica-Bold’
Helvetica-SoldOblique’
HMICEI-NanOW’
Helvetica-N--Bold’
Helvetica-Nanow-BcJdOoldOMique’
Helvetica-Narrow-OMiue’
Hetvetii-Oblique’
NavCenturySchlbk-Bol$
NavCentutySchlbMoldltatii3
NewCentutySchlbk-Italic3
NmvCenturySchlbk-Roman3
Palatine-Bold’
Palatino-Boldltalic’
‘Palatino-Italic’
Palatinc-Roman’
Symbol
Times-Bold’
Times-BoldItalic’
Times-Italic’
Times-Roman’
ZapfChanwy-Mediumltal!~2
ZapfDingbats’
-
ITC-Bookman-LightSWA
ITC-Bookman-LfghtltallcSWA
Swiss’Ml-BoldSWA
Swiss72143oldObllqueSWA
Swiss721-NsrrowSWA
!Mss72bNarrowBoldSWA
Swiso721.NarrowBoldObliqueSWA
Swiss721-NarrothUbliquaSWA
Swiss721-ObiiqueSWA
Century-Schoolbook-BoldSWA
Century-Schoolbook-Z3oZdZtSWA
Century-Schoolbook-ZtalicSWA
Century-Schoolbook-SWA
Zapf-CalligraphictJOl-BoldSWA
Zapf-Calligraphic801-BoldltSWA
Zapf-Calligraphic801-IfalicSWA
Zapf-CalligraphiclOl-SWA
B&L~oA-IE~-ZRA
(Symbol-Set-BWA)
DutchSOl-BoldSWA
-
V--
DutchBOI-BohiIMicSWA
Dutch801 -1talicSWA
Dutch801-RomanSWA
IE-zapf-C~ly-MediumI~A
**m*m*WVA*W
(ITC-Zapf-DingbatsSWA)
-
60
Star LaserPrinter
NO.
_---
4
Pitch
Point
Style
Weight
ID
_____
_____
---------------Escape Sequence
Symbol
__________
------------------------
Residrat
FONT LIST
Typeface
Sample
Fonts:
ROOl
10.00
ROMAN0
12.0 Upright
Medium
Courier
‘E*c>tau~Esoc,op,o.mhlz.ovorca3r
ABCDabcdlS'123
ABCDabcd#$'123
ABCDabcd#$'123
ABCDabcdlS'123
ABCDabcd#$'123
R002
Courier
ABCDabcdXS'lZJ
JiBCDabcd#$'123
FiBCDabcd#$'123
ABCDabcd#S'123
ABCDabcdX$'123
R003
Courier
ABCDabcdXS'123
ABCDabcdXS'123
ABCDabcdXS'l23
ABCDabcd#$'123
ABCDabcdXS'l23
R004
Courier
R005
R006
R007
61
--
Many of the available fonts can be selected from the control panel with the
HP LaserJet IIP mode. The ultimate in printing flexibility is provided by
programming with the command sets. For more on this, see the chapter 6
“Interfacing With Applications Programs” and the Applications Manual.
For each of the two printers that the Star LaserPrinter 4 emulates, there are
default print styles that it will use if you do not make other choices. In the
material that follows, the default values will first be presented together, for
your convenience. Then the entire range of choices for each attribute without
an optional Font Cartridge will be presented; the default values will be
marked with an *.
‘Y
-
62
5.1 HEWLETT PACKARD LASERJET UP
Default Values, primary and secondary fonts:
Character number:
1 (Courier, lOcpi, 12point, Medium)
Symbol set:
Roman-8
A vailable Values, primary and secondary fonts:
Character number:
1* (Courier, lOcpi, 12point, Medium)
2 (Courier, lOcpi, 12point, Bold)
3 (Courier, lOcpi, 12poinL Italic)
4 (Courier, 12cpi, lOpoint, Medium)
5 (Courier, 12cpi, lOpoint, Bold)
6 (Courier, 12cpi, lOpoint, Italic)
7 (LinePrinter,
Symbol set:
16.66cpi, 85point,
Medium)
Roman-8 *
ECMA94
IBM PC
IBM DN
PC-850
IS0 2: IRV
IS0 4: UK
IS0 6: USASCII
IS0 10: Swedish
IS0 11: Swedish
IS0 14: JIS ASCII
IS0 15: Italian
IS0 16: Portug
IS0 17: Spanish
IS0 2 1: German
IS0 25: French
IS0 57: Chinese
IS0 60: Norweg
IS0 61: Norweg
IS0 69: French
63
IS0 84: Portug
IS0 85: Spanish
HP German
HP Spanish
5.2 EPSON FX-850
Default Values:
Character set:
USA
Pitch:
10 cpi
Table:
Italic
A vailable Values:
Character set:
USA*
French
Germany
UK
Denmark I
Sweden
Italy
Spain
Japan
Norway
Denmark II
Pitch:
10 cpi*
12 cpi
17 cpi
20 cpi
Proportional
Table:
Italic*
Graphics Set #l
Graphics Set #2
64
.-
I
!I _
Interfacing With
Applications Programs
If this were the best of all possible computer worlds, every software
application would run automatically on the Star LaserPrinter 4 or any other
printer. The fact is that software applications-word
processing, spreadsheets, databases, or others-are
designed to work with a specific printer or
a limited group of printers.
Some very popular software applications were written before laser printers
became common, and require a dot-matrix or daisy-wheel printer. Some
software is linked to a particular brand of computer and printer. And some
can be used on only one brand of laser printer.
As you have read, some of the commands needed for printing are resident in
the Star LaserPrinter 4. Some can be programmed from the control panel.
And some must be issued by the computer, from within a program. Some
applications programs allow the user to specify a printer or printers, either by
name or by type. Once the selection is made, it becomes part of the program
file. As a result, printing usually requires nothing more than issuing a one or
two keystroke command.
-.
-
:
-
In this chapter you will learn how to specify the Star LaserPrinter 4 for four
popular applications programs for IBM-compatible computers: Lotus l-2-3,
WordPerfect, Microsoft Word, and Microsoft Windows. The Star LaserPrinter4 will print graphics as well as words and numbers, emulating Hewlett
Packard graphics, all densities of the Epson dot matrix printers. It can also
be used with the two popular desktop publishing programs, Aldus PageMaker, and Xerox Ventura Publisher, which uses the GEM desktop environment. Both are compatible with the HP LaserJet IIP. For further information
consult the Applications Manual.
Before you begin printing, be sure your Star LaserPrinter 4 is correctly
configured for your computer by having either the parallel or serial interface
selected and the correct cabling. Prior to printing, make sure that you have
selected the same emulation from the front panel as the one you specified in
the application.
65
6.1 LOTUS l-2-3 RELEASE 2
This section explains how to installing Lotus l-2-3 for use with your Star
LaserPrinter 4. For detailed information, refer to the Lotus Getting Started
manual.
First, add the following commands to the AUTOEXEC.BAT
on parallel or serial interface used.
file, depending
Parallel: If your printer is connected to the computer’s parallel port LPTl,
add the following command to the AUTOEXEC.BAT file:
MODE LPTl:,,P
Serial: If your printer is connected to the computer’s serial port COM 1, add
the following command to the AUTOEXEC.BAT file:
MODE COM 1:9600,N8,1 ,P
MODE LPTl :=COM 1
l
Installing the Lotus l-2-3 INSTALL Program
If the Lotus l-2-3 has not been installed, you must install it before proceeding. At the DOS prompt, type LOTUS and press [RETURN]. This causes the
computer to display the l-2-3 Access System.
Move the cursor to “Install”, then press [RETURN] to run the INSTALL
program. Lotus may ask you to insert the UTILITY disk. This will display
the MAIN MENU. You can select your printer following the procedure
below.
1) Select “Change Selected Equipment” and press [RETURN],
displays the Selected Equipment screen.
which
2) Select “Test Printer(s)” and press [RETURN], which displays the Text
Printer(s) screen.
3) Select “HP” and press [RETURN].
screen.
This displays the Text Printer(s)
4) Select “2686 LaserJet or LaserJet+” and press [RETURN].
The printer type for texts has been selected. To select the printer type for
graphics, go back to the Selected Equipment screen.
66
5) Select “Graphics Printer(s)” and press [RETURN],
Graphics Printer(s) screen.
6) Select “HP” and press [RETURN]
screen.
which displays the
to display the Graphics Printer(s)
7) For 150 or 300DP1, select “LaserJet+” and press [RETURN].
select “LaserJet” and press [RETURN].
For 75DP1,
When you have completed the selection of a graphics printer, press [FlO].
Your current selections will displayed. Make sure that the selections are
correct. If not, repeat the installation process.
To save your selections,
screen.
press [Esc] to return to the Selected Equipment
1) Select “Save Changes” and press [RETURN],
Changes screen.
which displays the Saving
2) Read message and press [RETURN].
3) Now, you have saved the changes you made. Press[F9] to go to the Main
Menu, or press [RETURN] to leave the install program. The EXIT screen
will be displayed.
4) Select “YES” and press [RETURN].
l
Selecting Default Settings
After running the INSTALL program, you must select printer defaults.
At the DOS prompt, type LOTUS and press [RETURN] to display the 1-23 Access System. Move the cursor to “l-2-3”, then press [RETURN] to run
the l-2-3 program. Lotus may ask you to insert the SYSTEM disk.
At the opening screen, press [/] to access the spreadsheet menu. Then, type
[Wlorksheet, [Gllobal, [DIefault and [Plrinter. The configuration menu will
be displayed. Now you are ready to make some selections about the
configuration of your Star LaserPrinter 4.
1) Type [I] Interface and select the number which corresponds the interface
for your printer.
For parallel, type “I”, and for serial, type “2” (for example).
2) Select appropriate settings for auto linefeed, left margin, right margin, top
margin, bottom margin, page length, wait, setup and name.
67
3) When you have completed, type [Q]uit, then [Ulpdate. The l-2-3 will
save your selections and use these defaults when printing.
Now, you are ready to use your Star LaserPrinter
4.
You can also use the Star LaserPrinter 4’s Epson FX-850 emulation,
following the same routine from the Lotus Menus.
6.2 WORDPERFECT
VERSION 5.0
WordPerfect must be installed before you can select a printer. Refer to the
“Installation” section in your WordPerfect Manual. Once this is done, follow
the procedure below to select a printer.
-
1) Press [Shift] and [F7], then select [S] Select Printer.
2) Select [2] Additional Printers, which displays the Select Printer screen.
3) From the list of defined printers, select either HP LaserJet IIP (or HP
LaserJet II), Epson FX-850, then press [RETURN].
4) Press [RETURN] to accept the displayed printer filename or enter a new
name, then press [F7] Exit. The Select Printer: Edit screen will be displayed.
5) Now you must specify the interface connection. Select [2] Port at the
Select Printer: Edit menu, which displays a list of ports.
6) If you are using a parallel interface, for LPTl, type “1”.
7) If you are using a serial interface, for COM 1, type “4”. The WordPerfect
will display the Select Printer: COM port menu.
You must now specify the serial parameters, including baud rate, parity, stop
bits, character length and XON/XOFFfunction. Be sure that you specify the
same values in WordPerfect as you do for the Star Laser-Printer 4. To save
your WordPerfect selections, press [F7] to exit the program.
68
_
-
6.3 MICROSOFT
WORD 4.0
To use Microsoft Word with your Star LaserPrinter 4, appropriate Printer
Descriptions (PRDs) must be installed. PRDs are found on Supplemental
Printer Diskettes. These PRDs provide (1) internal and cartridge fonts in both
orientations and (2) Hewlette-Packard soft fonts. Install them following the
procedure described in Microsoft Word manuals.
In Microsoft Word, you can make your printer selections through the Print
Menu.
1) At the text screen, type [E]sc and [Plrint.
2) In the resulting menu, select OPTIONS by typing [Olptions.
A list of available printers appears at the top of the screen. Each of these
printers is the subject of a Printer Description (PRD) file.
6.4 MICROSOFT
WINDOWS
Microsoft Windows is a program that coordinates the use of various
programs that might not otherwise be compatible on the screen. Windows
can be configured for your printer, but you should also be aware that any
applications program that you use may have its own printer requirements,
which must be taken into consideration.
To choose a printer for Windows, at the initial Menu select
CONTROL PANEL.
From the resulting Menu, select the
INSTALLATION
Menu, then
ADD A PRINTER.
The screen will display a box that reads:
Add printer
Insert the disk with the printer file
you wish to add into drive A, or choose
an alternative drive/directory:
69
A:\
OK
CANCEL
Insert the Utilities disk in drive A and press
OK
Now the screen displays this box:
Available Printers
Printer File:
Epson FX-80
NEC 3550
HP LaserJet
HP LaserJet Plus
HP 7470A
Add
Cancel
Highlight HP LaserJet Plus or Epson and select
ADD
Another box appears in response:
Copy associated printer file HPLASERP.DRV
to drive/directory:
C:\Windows
Yes
No
(if you have a hard disk)
Cancel
selecting YES confirms your printer choice and returns you to the
CONTROL PANEL Menu.
If you are just starting with Windows, you should select SETUP from the
CONTROL PANEL Menu. This will present a Menu with three options.
You should first select PRINTER and from the list choose the printer
you wish to use.
Next, from SETUP select CONNECTIONS. This will let you designate
the parallel or serial port for the printer, clicking OK to confirm it.
If you are using a serial printer, go to SETUP once again, and select
70
-
-.
COMMUNICATIONS
After you indicate the active port you have already chosen, Windows
will present a series of settings options. Type in the desired baud rate
and “push the button” for your selection of word (bit) length, parity,
stop bits, handshake, and port.
Select HARDWARE
handshake and 1 stop bit.
Be sure that the other selections match the printer settings shown under
Interface Group on the Star LaserPrinter 4’s sample print.
71
MEMO
.-
‘V
-
72
Maintaining the
Star LaserPrinter 4
The LaserPrinter 4 does not require much care and maintenance. However,
it is important to perform a few cleaning tasks to maintain your printer in
good condition. This chapter will explains procedures for replacing the EPL cartridge, handling the EP-L cartridge and printer, and cleaning the printer.
7.1 REPLACING
THE EP-L CARTRIDGE
Replace the EP-L cartridge in the following cases:
l
l
If print quality is still low, even after you have redistributed the toner by
removing the cartridge and rocking it gently from end to end about five or
six times.
If transparency
films.
films show stain problem at either the top or bottom of the
NOTE: For directions on replacing the EP-L cartridge, refer to “2.2 Installing the EP-L cartridge”.
7.2 STORAGE AND HANDLING PRECAUTIONS
FOR THE EP-L CARTRIDGE
The EP-L cartridge contains both the photosensitive drum and toner used for
printing. Since the drum is extremely sensitive to the light, it may be
permanently damaged if it is exposed to the direct sunlight or strong light.
Caked or unevenly distributed toner may result in poor print quality.
Therefore, always observe the following rules:
l
;
Always keep the EP-L cartridge in the aluminum bag in which it was
originally packed. And do not open the bag until you are ready to install
it in the printer.
--
73
l
l
l
l
l
l
l
Do not store the cartridge where it will be exposed to direct sunlight.
Store the cartridge with the label facing up. Do not turn it upside down or
stand it on end.
Store the cartridge at a temperature
95°F).
of between 0°C and 35°C (32°F and
Do not store the cartridge in salty air, or where there are corrosive gases
such as ammonia.
Keep the cartridge away from CRTs, disk drives and floppy disks. The
magnet in the cartridge can adversely affect them.
-
Always keep the cartridge away from children.
Be sure to use the cartridge before its expiration date. Otherwise, print
quality will be affected.
When handling the EP-L cartridge, also pay attention to the following points,
in addition to the above.
l
l
Do not touch the bottom of the cartridge when handling the cartridge.
Do not open the drum protective shutter. If it is opened, print quality may
be affected.
7.3 CLEANING THE FIXING ASSEMBLY
Transparency films may sometimes show stain problem at either the top or
bottom of the films. This problem may be caused by a dirty paper path or the
flaw on’the EP-L cartridge. In this case, clean the fixing assembly, and
replace the EP-L cartridge if necessary. Regular cleaning of the fixing
assembly will reduce the possibility of paper jam and will prolong the life of
the printer. The fixing assembly can be cleaned using cleaning paper.
First print a sheet of “CLEANING PAPER” on letter, A4, or legal size paper
according to the following procedure (see “3.2.1 Printing Test Sheets”).
1) Hold the [TEST] button until the screen displays “HOLD FOR TEST”
then “STATUS SHEET”.
2) Press the [TEST] button “twice” within one second after “STATUS
SHEET” is displayed. The screen displays “CLEANING PAPER”.
74
-
3) Releasing the button will produce a cleaning paper. When the cleaning
paper is produced, the screen displays “MP LOAD THE PAP”.
4) Now place the cleaning paper face up in the multi-purpose tray, inserting
it as far as it will go without forcing it. Make sure that the paper guides are
aligned with the paper.
5) Press the [TEST] button. The printer will feed the paper and the screen
displays “NOW CLEANING”.
6) When cleaning is done, the screen will display “CLEANING
one second.
DONE” for
7.4 CLEANING THE EXTERIOR OF THE PRINTER
Before cleaning, make sure that the power cord is removed.
Use only water and neutral detergent to remove marks and spots from the
printer, then wipe the printer dry with a soft dry cloth. Use of any other
cleaning solution may damage the printer.
.
The printer does not require lubrication. Never attempt to lubricate any
internal or external parts of the printer. Otherwise, lubrication may affect the
operation of the printer and damage the printer.
75
-
MEMO
-
76
/
/
L
Troubleshooting
An important key to reliable operation of your Star LaserPrinter 4 is knowing
how to respond when trouble occurs. Some problem conditions can be
handled on the spot by the printer operator. Others require servicing by
trained personnel. This chapter will explain when to do what. It will also help
you deal with the paper jamming and other operational problems.
8.1 ERROR MESSAGES
SCREEN
-_.-__-
DISPLAYED ON THE
The control panel screen may display a variety of messages during the course
of operation of the Star LaserPrinter 4. You are already familiar with the
display sequence during power-up, and when programming the printer.
Some messages provide information about the paper supply in the cassette
or the condition of the EP-L cartridge. Others have to do with fonts or
emulations.
Another way of considering errors is that some of them result from failures
in hardware or software. Other errors are functional, meaning that either the
printer operator or the host computer has commanded the controller to
perform an operation that is beyond its designed capabilities.
If the printer malfunctions for some reason, warning messages will appear
on the screen, recommending what action you should take. The most serious
are messages that tell you to call for repair service. Some messages concern
less serious conditions that can be handled by the printer operator. Information messages relate a communication problem with the host computer, but
do not affect the printer’s operation. These messages are summarized here.
8.2 SERVICE CALL MESSAGES
8.2.1 Engine Service Call Messages
Engine service call messages are related to the interface with engine. They
can result from either a communication failure, or a halt in the engine’s ready
level.
1Message
1Action
1Meaning
CALL SERVICE 01 fixing assembly;
bit 2
status 2, processing
stops; alarm beeps;
press [ERROR SKIP] to reset
engine and recheck
CALL SERVICE 02 faulty BD; status 2, bit 3
CALL SERVICE 03 scanner motor malfunction, status 2, bit 4
-
processing stops; alarm beeps;
press [ERROR SKIP] to reset
engine and recheck
processing stops; alarm beeps;
press [ERROR SKIP] to reset
engine and recheck
CALL SERVICE 04 improper communication
processing stops; alarm beeps;
turn off the power then on to
reset engine and recheck
8.2.2 Controller Service Call Messages
Controller error messages result from failure in either hardware or software.
Some controller error messages occur during startup tests. The messages
mean that the controller is malfunctioning, but is still able to display the error
massage. Certain conditions can also be detected during controller reset, on
insertion of a cartridge, and at other times after the completion of power-up
initialization. An error stops the test sequence, the unit goes off line, and the
alarm sounds. The controller will attempt to recover, if possible. If the
problem is not found during initialization, but recurs during operation, most
likely the fault is in the hardware.
78
_
-
r
Message
Meaning
Action
CALL SERVICE 05
CRC error in controller
main ROM program
program halts; fatal
CALL SERVICE 06
CRC error in resident
font ROM
program halts; fatal
CALL SERVICE 07
read/write test error in program halts; fatal
on-board RAM
CALL SERVICE 08
read/write test error in sequence stops; alarm beeps;
shut off power and fix probexpansion RAM
lem; or press [ERROR SKIP]
to continue, in which case the
expansion RAM will be ignored
CARTRIDGE BAD
CRC error in Cartridge
(if installed)
sequence stops; alarm beeps;
shut off power and fix problem; or press [ERROR SKIP]
to continue, in which case the
cartridge will be ignored
ZALL SERVICE 10
CRC error in EEPROM
sequence stops; alarm beeps;
shut off power and fix problem; or press [ERROR SKIP]
to continue,
in which case
program uses factory settings
as power-up settings
UO FONT PRESENT
no font present
program halts; fatal
UMER ERROR
counter-timer
error
program halts; fatal
79
-
8.3 OPERATOR CALL MESSAGES
Whenever the screen displays operator call messages, the printer goes off
line and the alarm sounds. The problem is one that the operator should be able
to resolve. After making any corrections, you should press [ERROR SKIP]
to recheck the status. If the error message is not displayed again, you may
continue printing straight away (if the error was one of the Engine Problems
below). If the error message was of any other type, you should press [ON
LINE] before continuing the print job.
8.3.1 Engine Problems
These are mechanical problems that prevent the engine from being ready to
print.
Message
Meaning
Action
CASS: REFILL X
(X means the
current job size)
cassette
is current
feeder; out of paper
printing stops; refill paper
TRAY: REFILL X
(X means the
current job size)
no paper in the multipurpose tray
printing stops; refill paper
LOAD X CASS (X
means the current
job size)
cassette
is current
printing
feeder; no cassette in LC sette
slot
PAPER JAMMING
paper is jammed within;
status 1, bit 5
SET EPKLOSE
side cover is open or no close the side cover or install
the EP-L cartridge
EP-L cartridge
80
stops; install the cas-
follow printer procedure
“8.6 Paper Jamming”
in
-
8.3.2 Font/Emulation Cartridge Problems
The font and emulation cartridge are plugged into the printer. They can
should not be inserted or withdrawn while the DATA LED is continuously
lit. If someone does this, the screen will indicate “CARTRIDGE ERROR”.
The printer must be reinitialized by turning off the power and then on again.
If an emulation cartridge is removed while it is being accessed, the screen
will indicate “CARTRIDGE ERROR” until the printer is re-powered up. If
a font cartridge is removed while the DATA LED is blinking, the screen will
display “REINSERT CART”. In this case, the operator must insert the font
cartridge or press [ERROR SKIP]. If [ERROR SKIP] is pressed, the
printer will select the closest font.
Meaning
Message
Action
CARTRIDGE
ROR
ER- emulationorfont cartridge Turn the power off then on
CARTRIDGE
ROR
ER- emulation cartridge is re- Turn the power off then on
is removed while DATA again to initialize the printer
LED is on
REINSERT CART
moved while emulation
again to initialize the printer
font cartridge is removed insert the cartridge or press
while DATA LED is [ERROR SKIP]
blinking
8.3.3 Optional Hardware
The following messages will be displayed if necessary optional hardwares
(e.g. RAM expansion board) have been removed.
Action
Message
Meaning
INSUFFICIENT
RAM
full page .mode as power- repower-up with expansion
up setting; no expansion RAM board, orpress [ERROR
SKIP]
RAM installed
NO EMULATION
CART
cartridge emulation mode repower-up with the emulaas power-up setting; no tion cartridge, or press [ERemulation cartridge in- ROR SKIP]
stalled
81
8.3.4 Change Paper Size
-.
Certain emulations permit job size to be specified by the host computer. Also,
job size can be selected from the menu. If a change in job size is required, the
screen will display a message to that effect. The alarm will beep and the
printer will go Off Line. You may have the printer ignore such a message by
pressing [ERROR SKIP]. (In this case, the printer will print the job size
image on the different size paper.) If the current feeder is cassette, inserting
the correct paper cassette causes the printer to start printing automatically. If
the current feeder is the multi-purpose tray, changing the multi-purpose tray
size via panel starts printing automatically.
Action
Message
Meaning
CASS: CHANGE
A4
A4 size is required; cas- follow procedure above
sette
TRAY: CHANGE
A4
A4 size is required; multi- follow procedure above
purpose tray
CASS: CHANGE
LTR
Letter size is required; cas- follow procedure above
sette
TRAY: CHANGE
LTR
Letter size is required;
multi-purpose tray
CASS: CHANGE
LGL
Legal size is required; cas- follow procedure above
sette
TRAY: CHANGE
LGL
Legal size is required;
multi-purpose tray
CASS: CHANGE
EXE
Executive size is required; follow procedure above
cassette
TRAY: CHANGE
EXE
Executive size is required; follow procedure above
multi-purpose tray
CASS: CHANGE
B5
B5 size is required; cas- follow procedure above
sette
TRAY: CHANGE
B5 size is required; multi- follow procedure above
purpose tray
BS
82
-
follow procedure above
follow procedure above
-
-
Message
Meaning
Action
CASS: CHANGE
MON
Monarch size is required;
cassette
follow procedure above
TRAY: CHANGE
MON
Monarch size is required;
multi-purpose tray
follow procedure above
CASS: CHANGE
COM
Corn- 10 size is required;
cassette
follow procedure above
TRAY: CHANGE
COM
Corn-10 size is required;
multi-purpose tray
follow procedure above
CASS: CHANGE
DL
DL size is required;
sette
cas-
follow procedure above
TRAY: CHANGE
DL
DL size is required; multipurpose tray
follow procedure above
CASS: CHANGE
C5
C5 size is required;
sette
cas-
follow procedure above
TRAY: CHANGE
CS
C5 size is required; multipurpose tray
follow procedure above
83
8.3.5 Manual Paper Feed
Certain emulations permit specifying manual paper feed from the host
computer. Also, you may select manual feed from the menu. The following
message tell you to hand feed paper of a specific size. The alarm beeps and
the printer goes Off Line. When you feed the appropriate paper into the multipurpose tray and press [ON LINE], the message will be turned off and
printing will continue. The operator has the option of pressing [ERROR
SKIP], which turns off the message and causes the printer to continue
printing.
If there is no paper in the multi-purpose tray, pressing [ERROR SKIP] turns
off the message and causes the printer to feed paper from cassette and then
displays the message again.
Message
Meaning
Action
M-FEED A4
A4 paper to be hand fed
follow procedure above
M-FEED LETTER
Letter paper to be hand fed
follow procedure above
M-FEED LEGAL
Legal paper to be hand fed
follow procedure above
M-FEED EXEC.
Exec. paper to be hand fed
follow procedure above
M-FEED BS
B5 paper to be hand fed
follow procedure above
M-FEED MONARCH
Monarch paper to be hand fed follow procedure above
M-FEED COM-10
COM- 10 size paper to be hand follow procedure above
fed
M-FEED DL
DL size paper to be hand fed
follow procedure above
M-FEED CS
C5 paper to be hand fed
follow procedure above
I
-
__.
.
84
-
8.4 OPERATOR INFORMATION
MESSAGES
Certain problems with communication with the host computer may be
detected. Messages listed below provide information, but do not halt the
printing process. The printer uses a default value if necessary. You may
remove the message by pressing [ERROR SKIP]. Note that if there are
multiple errors, the last one detected is displayed.
8.4. I Host Communication problem
Message
Meaning
Action/Status
LINE ERROR
parity error in host data
follow procedure above
INPUT OVERFLOW
input buffer overflow
follow procedure above
BAD FONT DATA
downloaded
downloaded
font ignored
BAD FONT CODE
downloaded font in error
downloaded
font ignored
BAD CHAR CODE
loaded character outside
of index
downloaded
font ignored
font bad
8.4.2 Function or Size Incompatibility
There are problems that occur when the host computer requests a function not
provided or a function that requires more memory than is available.
Message
Meaning
PAGE OVERFLOW
page buffer
overflow
CANNOT ROTATE
insufficient
rotate font
Status
partial
page currently
composed is printed and
ejected; remaining
data
for page is printed on next
sheet
memory
memory
to
font rotation
aborted;
printing continues using
closest available font
CANNOT DOWNLOAI D insufficient
memory
download font
to
font download is aborted;
printing continues using
closest available font
received character not in
currently selected font
blank space is printed for
that character
-..
CHAR NOT IN FONT
-
85
8.4.3 Font/Emulation Cartridge
The font and emulation cartridge are plugged into the printer. The operator
may insert or withdraw a cartridge only when the DATA LED is off or
blinking. The following messages acknowledge the change.
Message
Meaning
Status
CART. CHANGED
font cartridge is inserted
message will remain for
one second
or removed when DATA
LED is off
CART. CHANGED
CART. CHANGED
CART. CHANGED
font
c&dge
is inserted
when DATA
blinking
LED
emulation
cartridge
meSSage
Will
is
one second
is
IlleSSage
Will
inserted
when DATA
LED is off or blinking
one second
emulation
IlleSSage
cartridge
is
removed when DATA
LED is off or blinking or
when the printer is not in
cartridge emulation
Will
remain
fOI’
IlTllain
for
F3’IlaiIl
for
one second
-
8.5 STATUS MESSAGES
Status messages are low priority messages that either indicate normal
conditions or provide warnings that need not be acted upon immediately.
These conditions should not occur when the printer is On Line. If they do,
however, the alarm will beep and the printer will go Off Line. For some
conditions however, there is the possibility of acondition occurring when the
printer is On Line. If it does, the alarm will not sound and the printer will
remain On Line.
Message
Meaning
ActionlStatus
PRINTER
WARMUP
printer is warming up but
-
service call not necessary
ENGINE
TEST
operator has initiated a test of
the printing
ENGINE
RESET
engine is being reset
controller
REINITIALIZE
soft initialization
test in progress
-
occurs when [RESET] is
pressed or emulation is
changed; may also occur
when printer is on line if
emulation is changed or
reset is sent from host
status sheet printout
occurs when [TEST] is
held for at least 3 but less
than 6 seconds
font list printout
occurs when [TEST] is
held at least 3 seconds
and pressed within one
second
cleaning paper printout
occurs when [TEST] is
held for at least 3 seconds
and pressed twice
MP LOAD THE PAP
waiting for cleaning paper
occurs after printing
cleaning paper
NOW CLEANING
feeding cleaning paper
occurs when the cleaning
paper is being fed
CLEANING
finished cleaning
occurs after cleaning;
remaining for one second
STATUS
SHEET
FONT LIST
CLEANING
PAPER
DONE
the
87
Message
Meaning
ActionlStatus
TEST PRINT MODE
test pattern printout
occurs when [TEST] is
held for more than six
seconds and terminating
switch nor pressed
TEST PRINT STOP
test pattern stop
occurs when test print
terminating
switch
pressed
REPRINT LOST
PGS
retransmission
may occur
jamming
ROTATING FONT
wait for font rotation
PRINTER READY
all condition
normal and
proper but printer is not operation; no unused data in
controller or pages in printing
PRINTER ACTIVE
all condition
proper; printer
tion; no unused
troller or pages
88
of lost sheets
normal and
is in operadata in conin printing
after paper
may occur when on line
8.6 PAPER JAMMING
As paper travels from the multi-purpose tray (or cassette if installed) through
the printing area and is ejected, it can jam at the following locations:
A : Paper pick-up area (multi-purpose
tray)
B : Paper pick-up area with optional cassette paper feeder
C : Fixing assembly area
D : Face-up print delivery area
E : Paper access door
8.6. I Clearing paper jams
1) Remove any paper from the multi-purpose tray and close the extension
tray. Leaving paper in the tray causes the paper position to shift during
disposal of jam, resulting in further paper jams when printing is restarted.
89
2) If the face-up tray is installed, remove it.
3) Open the side cover by pressing the release button upwards.
90
4) If you have been printing with the multi-purpose tray, check the paper
pick-up area first. If there is a paper jam here, remove the paper by pulling
it in the direction of the arrow.
CAUTION:
The fixing assembly area becomes extremely hot when the
printer has been operated for some time. Never touch this area
when the printer is open. Otherwise, personal injury may
result.
5) If you are using the cassette paper feeder, pull out the cassette and check
the paper pick-up area. If there is a paper jam here, remove the jammed
paper before replacing the cassette.
91
6) If paper is jammed in the fixing assembly area, pull the paper back into the
printer and remove it.
7) If the paper does not extend from the side of the fixing assembly area, pull
it in the direction of the black arrow. If the paper is extracted in the
opposite direction, infused toner can be deposited inside the printer,
staining the back of subsequently printed pages.
92
8) If the paper has passed completely through the fixing assembly area, pull
it out in the direction of the arrow.
9) If a paper jam has occurred in the face-up delivery area, put the paper
straight upwards to remove it.
-I
10) After checking all the areas described here, close the side cover, replace
the face-up tray (if it is being used), pull out the extension tray and refill
the multi-purpose tray. Printing will restart.
93
11) If the jam is still present, a small tom piece of paper may be remaining
inside the printer. Check the side upper door for any such paper.
94
8.7 STREAKY PRINTS
8.7.1 White Streaks
White streaks occur if the toner level is low and the toner inside the EP-L
cartridge is not distributed evenly. They can be eliminated by re-distributing
the toner.
1) Leave the printer power on to prevent data corruption during a print
operation. Remove any paper in the multi-purpose tray and close the
extension tray. Press the release button upwards to open the side cover.
2) Remove the EP-L cartridge by pulling the tab.
95
3) Hold the EP-L cartridge as shown below, then rock it gently back and forth
about 45 degrees in each direction, about 5 or 6 times. This will redistribute the toner inside the cartridge.
4) Replace the EP-L cartridge in the printer, then close the side cover.
If vertical white streaks still appear after the toner inside the cartridge has
been re-distributed, the cartridge needs to be replaced. See “2.2 Installing the
EP-L cartridge” for replacing the cartridge.
96
8.7.2 Stains on Transparency Films
Transparency films may sometimes show stains at either the top or bottom
of the films. These stains may be caused by a dirty paper path or the flaw on
the EP-L cartridge.
l
l
Clean the fixing assembly. The fixing roller inside the fixing assembly
may have been stain with toner. For cleaning, refer to “7.3 Cleaning the
Fixing Assembly”. If the stains still appear, use a different type of
transparency film.
Replace the EP-L cartridge. The photosensitive drum in the cartridge may
have been damaged due to exposure to the bright light. For replacing the
cartridge, see “Installing the EP-L cartridge”.
97
MEMO
98
I!i
:
The following options are available for the printer. This chapter provides
brief explanation for these options. For details on installation and maintenance, please refer to their own manuals.
l
Paper feeder
l
Cassette (A4, Letter, Legal, Executive and Envelope)
l
Expansion RAM board (2 or 4MB)
l
Font cartridge
l
IBM emulation cartridge
9.1 PAPER FEEDER AND CASSETTES
The optional paper feeder is used with one of optional paper cassettes, to feed
paper from the paper cassette into the printer. The paper feeder can be
attached easily to the bottom of the printer using screws.
Cassettes are available following paper sizes: A4, Letter, Legal, Executive
and Envelope. Once the paper feeder is installed, paper size can be changed
easily by replacing the cassette.
Each cassette can holdup to 250 sheets of plain paper (paper weight:80 g/m*),
and the envelope cassette holds about 25mm stack of envelopes or about 20
envelopes.
99
Types and sizes of paper can be used with the cassettes are listed below.
Size
Type
Weight
Print delivery
Plain paper
Letter, Legal, A4, B5,
Executive
iFe$sparency
Letter, A4
Face-up
Labels
Letter, A4
Face-up
Envelopes
98 x 190 - 162 x 250mm
60 - 105g/m* Face-down/up
60 - 9Og/m*
Face-up
-
1
9.2 EXPANSION RAM BOARD
Two kinds of memory expansion board are available for the printer: a 2 MB
RAM board and a 4 MB RAM board. These RAM board permit printing of
full page graphics. To tell whether a board is installed in your printer, watch
the printer display screen during power-up. If no board has been installed, the
display will read:
Memory Test 1 MB
If a memory board has been already installed, the display will give the total
amount of memory available (for example):
Memory Test 5 MB
9.3 FONT CARTRIDGE
Fonts can be added to the printer by installing an optional font cartridge. The
font cartridge is installed in the slot beneath the control panel of the Star
LaserPrinter 4.
Insert the font cartridge with the arrow label facing up. If the font cartridge
is inserted upside down, the cartridge and/or printer may be damaged.
CAUTION:
100
The Font Cartridges for LaserPrinter 4 cannot be used with this
printer.
_
-
Specifications
10.1 SPECIFICATIONS
l
Type
Laser beam page printer
l
l
Engine
Resolution:
Speed:
Warm up:
Emulation
Resident:
Optional:
l
300 x 300 dots per inch
4 pages per minute (A4)
under 1 minute (at 68°F or 20°C)
PostScript
HP LaserJet series IIP
Epson FX-850
IBM Proprinter
RAM
Resident : 2 megabyte
2, or 4 megabytes on RAM Expansion Board
Optional:
l
Host Interface
Serial:
Parallel:
AppleTalk
RS-232C
Centronics
l
Default Settings : Changeable using the control panel
l
Fonts
Resident:
Option:
Courier
LinePrinter
Font cartridges
101
l
Paper
Manual feed: 97 x 148mm - 216 356mm
Cassette feed (Option)
Legal/Letter/Executive/A4/BS/Envelop
Face down: approx. 50 sheets
output
approx. 20 sheets
Face up:
60 - 105g/m* (plain paper)
Weight:
OHP film
Special:
Adhesive labels
Postal cards
Envelopes
x
l
l
l
Printing Area: top and left margins: 2.5mm
bottom margin: 4.5mm
4.0mm
right margin:
Acoustic noise: stand by: max. 43dB
printing: max. 53dB
Environment
Operating:
Standby:
Storage:
50°F to 90°F (10°C to 32.5”C)
20 to 80% relative humidity, no condensation
32°F to 95°F (0°C to 35’C)
10 to 80% relative humidity, no condensation
-4°F to 140°F (-20°C to 60°C)
10 to 95% relative humidity, no condensation
9 Power Source: 100/l 15V (50/60Hz) for North America and Japan
200/24OV (50Hz) for Europe, Asia and
Oceania
102
l
Power Consumption:
l
Weight
l
Dimensions
max. 550W (when operating)
: Print engine
Cassette
EP-L cartridge
1Okg
2.4kg
lkg (toner and drum cartridge)
387
t
mm
-I
103
10.2 RELIABILITY
Suggested monthly print volume
2500 prints
Definition of failure
Any loss of operation that requires calling a service person.
Operation errors and installation failures are not included.
Product life
Five years or 150,000 prints, whichever comes first.
Mean time between failures
4,000 hours or less
Mean time to repair
30 minutes or less
Paper feed reliability
Frequency
Type
l/2000 or less
Paper
l/1000 or less
Multifeed
l/2000 or less
Others
Toner cartridge life (EP-L cartridge)
3,500 prints at 5% print duty (A4/Letter size)
104
10.3 PIN FUNCTIONS ON INTERFACES
Parallel
l
Interface
Pin No. 1
1
Signal
Name
1STROBE
IDirection 1
1IN
I
2
3
4
5
6
7
8
9
10
DATA1
DATA2
DATA3
DATA4
DATA5
DATA6
DATA7
DATA8
ACK
IN
IN
IN
IN
IN
IN
IN
IN
OUT
11
BUSY
OUT
12
PAPER
OUT
1SELECTED\
OUT
OUT
18
19-3C
) +SVDC
1GND
1OUT
31
(RESET
(IN
Function
/ Goes from High to Low (for a t
least 0.5 microseconds) ‘whet1
data are valid.
I
Eight-bit character data.
DATA8 is the most significant
bit; DATA1 is the least
significant bit. High is logic 1
and Low is logic 0.
A low pulse acknowledges
receipt of data.
Low when the printer is ready
to accept data.
Goes High if the printer runs
out of naner.
1High when the printer is on lint
1External supply of +SVDC
1Twisted pair return signal
( ground level.
1Low input resets the printer to
105
l
Serial interface
106
ASCII (as’ kee) - a standardized and commonly accepted numerical code
that represents letters, numbers, and symbols, as well as command
sets. ASCII stands for American Standard Code for Information
Interchange.
Baud-
a measure of the speed at which information is transmitted. The baud
rate, which is set for serial transmissions, is approximately the
number of characters transmitted per second multiplied by 10.
Byte -
a series of 8 bits that represents one character.
Centronics interface - a standard wiring configuration for parallel data
transmission. Centronics is often used as a synonym for the parallel
standard developed by Centronics Inc.
Character Set -
the complete set of characters available in a font.
Data Bits - the number of bits in a transmitted byte that actually contains
data.
EEPROM - Electrically Erasable Programmable Read Only Memory. It
has an internal switch to permit a user to erase the contents and write
new contents into it by means of electrical signals.
EP-L Cartridge - A disposable type of process cartridge which contains
the photosensitive drum and toner.
Emulation - behaving like something else. The Star LaserPrinter 4 can
emulate, or behave like two other printers, the Epson EX-850 and the
HP LaserJet IIP laser printer.
Expansion RAM hoard -An available option that is easily attached to the
LaserPrinter 4 to expand its RAM to a maximum of 5 MB. Three
kinds of memory expansion board are available: a 1MB RAM board,
a 2MB RAM board and a 4MB RAM board.
107
1
Face-down delivery-A
1
;
k
Face-up delivery - A type of paper delivery in which the paper is ejected
type of paper delivery in which the paper is ejected
from the printer with the printed side facing downward.
from the printer with the printed side facing upward. Face-up
delivery is used for printing envelopes, transparency films and
labels.
i
1
Fixing assembly -
The assembly used to fix the toner on to the paper or
other material using heat and pressure in printing process. It is
located inside the printer and it gets extremely hot during the
operation.
1
1
f
/
Font -
i
1
,
t
Font cartridge -
a set of letters, numbers, and symbols of the same typeface design.
Font cartridges contain fonts which can supplement the
available resident fonts of the printer to increase the variety of
typefaces.
Glyph -
a graphic symbol that conveys information.
Handshaking -
in data communication, the automatic acknowledging by
the receiving device of information that has been sent to it, either by
signals and the interface (“hard”) or by software control (“soft”).
Hex dump -
conversion by the printer of ASCII symbols into their
hexadecimal (base 16) equivalent. This is useful for programmers or
other users who want to troubleshoot the communications between
the computer and the printer.
.-
HMI (Horizontal Motion Index) -
refers to dot spacing in the smallest
increment that can be made in the horizontal or x axis.
Interface - a hardware plug that allows cable connections of two devices.
For instance, a cable from a computer
parallel port.
parallel port to a printers
Landscape -
printing on paper across its wider dimension, such as a
spreadsheet that is 11 in. wide and 8.5 in. high; landscape pictures
are usually wider than they are tall.
NV RAM - NV(Non-volatile)
Random Access Memory is the permanent
storage by the Star LaserPrinter 4 of settings programmed from the
front panel, even when the power is turned off. When the printer is
turned on again, these settings become the current settings.
108
-
Parallel - a communications
interface that sends or receives
information plus control signals at a time.
Parity -
8 bits of
a bit in a serial information that allows a computer and printer to
automatically check for errors in transmission.
Pitch -
the width of a typeface measured in characters per inch.
Point -
the height of a type font, measured in points, or l/72 of an inch.
Portrait-printing
on paper across its narrower dimension, such as a letter
on paper that is 8.5 in. wide and 11 in. high; portrait pictures are
usually taller than they are wide.
Proportional type - a typeface in which some letters take up more room
on a printed line than others, such as W taking more space than Z. The
spacing of the letters is also intended to enhance the esthetic quality
of the printed page.
RAM -
Random Access Memory, or memory that can be used to store
information temporarily, such as text or printing configurations.
RAM-stored information is erased when the power is turned off.
ROM-Read
Only Memory, or memory in which information can be stored
permanently, whether the power is on or off.
RS-232 - a wiring configuration for sending and receiving serial transmissions, including data and acknowledgments between sending and
receiving equipment (“handshaking”).
Serial -
a communications
interface that sends or receives
information at a time at a specified baud rate.
1 bit of
Stop Bit - 1 or 2 bits used by the computer for the timing of a transmission
of information.
Stroke weight-the
intensity of a printed character, such as light, medium,
or hold. Normal printing is medium weight.
Symbol Set - the entire list of ASCII letters, numbers, and symbols used
with a particular language, such as English or Spanish.
VMI (Vertical Motion Index) - refers to line spacing, the smallest increment that can be made in the vertical or y axis.
109
MEMO
110
-._
,D
ALARM light, 37
ASCII code, 107
/B(
BAD CHAR CODE message, 8.5
BAD FONT CODE message, 85
BAD FONT DATA message, 85
BAUD rate, 5 1
Buttons, control panel, 3 1, 33-36
c
CALL SERVICE message, 78-79
CANNOT ROTATE message, 85
CANNOT DOWNLOAD message, 85
CARTRIDGE BAD message, 79
CART. CHANGED message, 86
CARTRIDGE ERROR message, 8 1
CASS CHANGE message, 82
CASS REFILL message, 80
Centronics connector, 101
Character set, 57
CHAR NOT IN FONT message, 85
CLEANING DONE message, 87
CLEANING PAPER message, 39,87
Control panel (front panel), 4, 3 1,.
33-37,41-43,48-49
/
-
Courier typeface, 60-61
Current settings, 54
Data bit, 52
DATA light, 37
Display screen, 3 1
DTR message, 52
EEPROM, 32, 107
Emulation modes, 40, 59, 63-64
ENGINE TEST message, 87
ENGINE RESET message, 87
EP-L Cartridge, 16-20, 107
Epson FX-850 emulation mode, 64
ERROR SKIP/< button, 33,48
IF
Face-down delivery, 24
Face-down tray, 4
Face-up delivery, 25
Factory settings, 54-55
Fixing assembly, 74, 108
Font, 59-64
Font cartridges, 100
FONT LIST message, 38, 87
IHJ
Hex dump, 38
HOLD FOR TEST message, 38
Host communication
problems, 85
HP LaserJet BP emulation mode, 63-64
.._
111
Initial settings, 54
INPUT OVERFLOW message, 85
INSUFFICIENT RAM message, 8 1
INTERFACE group, 40
INTERFACE message, 4 1,5 l-53
El
LANDSCAPE message, 57
Landscape orientation, 40,57
Laser, 2
Laser printing, 2-3
LAYOUT group, 40
LAYOUT message, 43,57
LINE ERROR message, 85
LinePrinter typeface, 60-6 1
LOAD CASS message, 80
LOAD FACTORY SET message, 41,
54
Lotus l-2-3,66-68
jM/
Maintenance, 77-97
MEMORY TEST 2MB message, 32
M-FEED message, 84
Microsoft Windows, 69-7 1
Microsoft Word, 69
Multi-purpose tray (MP tray), 4
MP LOAD THE PAP message, 87
IN
NO EMULATION CART message, 8 1
NO FONT PRESENT message, 79
NOW CLEANING message, 87
lol
ON LINE button, 33,48
ON LINE light, 37,49
Operator call messages, 80-84
Operator information messages, 85-86
112
Optional font cartridges, See font cartridges
ORIENTATION message, 57
1pI
PAGE OVERFLOW message, 85
Paper, 2 1, 100
Paper cassette, 11,99- 100
PAPER FEED group, 40
PAPER JAMMING message, 80
Paper loading, 2 I-24
Parallel interface, 5, 27-28, 50-53
Parallel interface pin function, 105
PARITY message, 52
Pitch, 40
Portrait orientation, 40
Power receptacle (connector), 5, 26
Power switch, 5, 26
Power outlet, 7
Power-up settings, 54
PRINT button, 33,48
Print density, 29
PRINTER ACTIVE message, 88
PRINTER READY message, 88
PRINTER WARMUP message, 87
PRINT light, 37,49
Print quality, 29-30
Program mode, 3 1,33-35
PROGRAM/A
button, 31, 35,48
m
RAM expansion board, 11,100
READY light, 37,49
REINITIALIZE message, 87
REINSERT CART message, 8 1
REPRINT LOST PGS message, 88
Release button, 4, 14, 29,90
RESETmi button, 34,48
Resident font, 60-61
ROTATING FONT message, 88
RS-232C connector,
tor
See serial connec-
Self test, 38-40
Self test status sheet, 38
Serial interface, 50-53
Serial interface connector, 5, 27-28
Serial interface pin function, 106
SET EP/CLOSE message, 80
Specifications, 10 I- 103
Status messages, 87-88
STATUS SHEET message, 38,87
STOP BIT message, 52
Stains, 97
Streaky prints, 95-96
/TI
TEST/> button, 34,48
TEST PRINT MODE message, 39,88
TEST PRINT STOP message, 39, 88
TIMER ERROR message, 79
TRAY REFILL message, 80
TRAY CHANGE message, 82
u
Unpacking,
-_
WA
WordPerfect,
8- 16
68
113
Consumer Response
Star Micronics Co., Ltd. invites your suggestions and comments
printer and this manual. Please address your correspondence to:
Worldwide Headquarters:
STAR MICRONICS CO., LTD.
194 Nakayoshida
Shizuoka, JAPAN 422-9 1
Attn: Product Manager
American
Market:
STAR MICRONICS AMERICA, INC.
420 Lexington Avenue, Suite 2702-25
New York, NY 10170
Attn: Product Manager
European
Market:
STAR MICRONICS DEUTSCHLAND
Westerbachstral3e 59
P.O. Box 940330
D-6000 Frankfurt/Main 90
F.R. of Germany
Attn: Product Manager
GMBH
U.K. Market:
STAR MICRONICS U.K., LTD.
Star House
Peregrine Business Park
Gomm Road, High Wycombe
Bucks. HP13 7DL, U.K.
Attn: Product Manager
French
Market:
STAR MICRONICS FRANCE S,A.R.L.
25, rue Michael Faraday
78 180 Montigny-le-Bretonneux
Attn: Product Manager
Asian Market:
STAR MICRONICS ASIA LTD.
I Room 2408-10 Sincere Building;
173 Des Voeux Road, Central, HONG KONG
Attn: Product Manager
on your