1
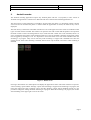
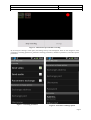
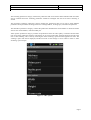
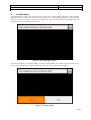
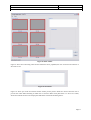
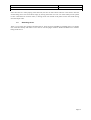
LiveTv
User manual
Version 1.0
LiveTV
User manual
Version:
1.0
Date: 2010-01-15
Revision History
Date
2010-15-01
Version
0.01
Description
Initial Draft
Author
Amer, Clement, Darko,
Dalibor, Neven, Željko,
Nima
Doc. No.:
Page 2
LiveTV
User manual
1.
Version:
1.0
Date: 2010-01-15
Introduction
1.1
Purpose of this document
The purpose of this document is to provide users with manual for using mobile recorder, pc studio and mobile
player.
1.2
Document organization
The document is organized as follows:
•
Section 1, Introduction, describes contents of this guide, used documentation during
developing process etc.
•
Section 2, Android recorder, describes how to use Android recorder mobile application.
•
Section 3, Symbian recorder, describes how to use Symbian recorder mobile application.
•
Section 4, Android player, describes how to use Android player mobile application.
•
Section 5, Symbian player, describes how to use Symbian player mobile application.
•
Section 6, Java player, describes how to use Java player mobile application.
•
Section 7, PC studio, describes how to use PC studio desktop application.
•
Section 8, Streaming server, describes how to use streaming server.
1.3
Intended Audience
The intended audience is:
•
Project customer
•
Project supervisor
•
Project team members
•
Users
1.4
Scope
1.5
Definitions and acronyms
1.5.1
Definitions
Keyword
1.5.2
Definitions
Acronyms and abbreviations
Acronym or
abbreviation
NTR
Definitions
Nothing to Report.
There is no information to a specific topic available or necessary.
Page 3
LiveTV
User manual
1.6
•
•
Version:
1.0
Date: 2010-01-15
References
Technical documentation
Installation manual
Page 4
LiveTV
User manual
2.
Version:
1.0
Date: 2010-01-15
Android recorder
The Android recording application requires any Android phone with the 1.5 (Cupcake) or later version of
Android. The application is called LiveTV Recorder and can be found in the installed applications list.
The main activity of the application is intended to be used when the phone is in horizontal position, and the
screen will not be rotated as the phone is rotated. When the applications is started, the main activity will be
displayed.
The main activity contains the viewfinder with the two icons in the upper left corner. These icons indicate which
types of content will be streamed. The camera icon represents the video content and the speaker icon represents
the audio content. If the icon's background is red, it means that this content will not be streamed, and if it is
green, it means that this content will be streamed. These two icons are touchable, streaming of particular content
can be toggled by touching its icon. It is important to notice that these icons will not be touchable when the
streaming is in progress. They can be used only when streaming is stopped. The viewfinder will show the
camera preview if the video streaming is enabled, and will show only the black screen if the video streaming is
disabled.
Figure 1 - Blank screen
Pressing a menu button on a mobile phone will display the application's menu. This menu contains two options:
“Start recording” option and the “Settings” option if the streaming is stopped. If the streaming is in progress, the
menu will contain the “Stop recording” option, and the “Settings” option will be disabled, because it is not
possible to change the settings while the streaming is in progress. When the streaming is in progress, the red dot
will be blinking in the upper right corner of the screen.
Page 5
LiveTV
User manual
Version:
1.0
Date: 2010-01-15
Figure 2 - Menu button pressed while recording
By choosing the “Settings” menu option, the Settings activity will be displayed. There are four categories of the
preferences: streaming preferences, parameters exchange preferences, destination preferences, and video options
preferences.
Figure 3 - Streaming parameters
Figure 4 - Parameters exchange options
Page 6
LiveTV
User manual
Version:
1.0
Date: 2010-01-15
The streaming preferences category contains the preferences that can be used to define whether audio and video
will be streamed and if the streaming parameters should be exchanged with the server before streaming is
started.
The parameters exchange preferences category defines the preferences that can be used to setup different
preferences about parameters exchange, these are: exchange address, exchange port, username and password.
The destination preferences category contains the preferences that define the remote address to which the stream
will be sent: remote address, video and audio port.
Video options preferences category contains the preferences about the video quality: resolution and the frame
rate. If any of the preferences used for video quality are set to an invalid value, the application will not allow the
user to start streaming. This is done by removing the “Start streaming” option from the application's menu. The
“Settings” option will still be displayed, and the user must set the settings to correct values in order to “Start
streaming” option reapers.
Figure 5 - Video options
Page 7
LiveTV
User manual
3.
Version:
1.0
Date: 2010-01-15
Symbian recorder
This guide will describe how to use the recorder application on the phone. The application runs on Symbian 3rd
edition phones, version 3.1 and higher as well as 5 th edition phones. It was developed primary for 5th edition
phones.
The application is called “LiveTV Recorder” and can be found in the Applications menu.
After starting the application, a query pops up requesting the user to decide which network would he like to use.
Either mobile network or WLAN can be used.
After this is chosen, the user interface is displayed as well as the viewfinder.
In the lower left corner is the Menu button which opens the menu. The menu consists of two buttons:
Record/Stop and Preferences. The first one starts or stops the recording process. The second one opens a new
menu where settings can be changed. The settings are:
•
•
•
•
•
Set Server IP – this changes the IP address where the Studio application is located
Set Server Ports – this changes the incoming port of the Studio application. The studio application
listens on this port for incoming connections which are then authenticated and given a proper video and
audio port
Credentials – this changes the username and password which are used for authenticating in the Studio
application
Resolution – this sets the video resolution of the recording. It is currently limited to 176x144 because
of the video codec used
Frame Rate – this changes the number of frames per second used in the recording process. This can not
be increased over 15fps for current video format
After the settings are set, the recording process begins with the Record/Stop button. The screen should flicker
for a moment indicating that the recording and streaming has started. The recording can be stopped by clicking
the same button again.
Page 8
LiveTV
User manual
4.
Version:
1.0
Date: 2010-01-15
Android player
Using application is really easy because it does not have lots of functionality and options. After lunching
application user will see one text box and one button, URL of our server is default address in text box and user
needs just to press Go! Button. There is also capability to open other URL addresses and application will
automatically save new addresses for next time.
Figure 6 - Streaming URL input box
The other functionality is sending feedback. In order to send feedback user should click menu button to see
options. There are two choices, hate and like and user can select one of them to send feedback.
Figure 7 - Feedback support
Page 9
LiveTV
User manual
5.
Version:
1.0
Date: 2010-01-15
Symbian player
Working with this application is really easy. User should click on option button, then the only choice is play!
After clicking on play real player will be opened and it would play the video which is streaming from our
server.
6.
Java player
The Java ME player application uses the JSR-135, also known as the Mobile Media API (MMAPI). This
application can be used on any mobile phone on which this API is implemented.
When the application is started, an empty screen will be displayed to the user and two menu options will be
available: menu and feedback. The menu option can be used to access the application's menu, and the feedback
option can be used to send feedback about the stream to the server.
When the feedback option is selected, a menu will appear with two options: “I like it” and “I hate it”. The user
can send feedback to the server by choosing one of those options. In case of any errors when sending feedback
to the server, an error message will be displayed.
The menu option contains the following options: open a stream, close a stream, go to fullscreen, volume up,
volume down, mute, check support and exit. Check support option can be used to print all of the supported
streaming formats on the phone. Other options are self-explanatory, so they will not be explained in this guide.
If the use wants to open a remote stream, he needs to select the open stream option, after that a dialog showing
one input field will be displayed. In this dialog the user must enter the address of the remote stream that will be
opened. After the user enters this address and confirms it, the stream will start playing. The user can stop the
stream at any time, by choosing the stop stream menu option while the stream is being played.
7.
PC studio
The purpose of this part is to familiarize the user with Graphical User Interface and Interface features of the
Studio Application. To explain things easier for each part of the interface, screen-shot of that particular part is
shown first, which is then followed by detailed explanation.
7.1
Graphical User Interface
Studio Application Graphical User Interface is made to be very simple, and therefore it contains only the most
necessary form elements.
Figure 8. represents the main window of the studio application. Parts of the main window are going to be
explained in a logical order in which the user should use them.
Page 10
LiveTV
User manual
Version:
1.0
Date: 2010-01-15
Figure 8. Main window
Figure 9. shows list of incoming video streams. When this list is populated, the user can choose the video he or
she wants to use.
Figure 9. Stream list
Figure 10. shows part of the area which contains stream preview panels. Panels are used to allow the user to
preview the videos before deciding on which one to send live. Below each panel there is a “Go Live!” button,
which forwards the stream to the output panel and further to Darwin Streaming Server.
Page 11
LiveTV
User manual
Version:
1.0
Date: 2010-01-15
Figure 10. Stream preview
Figure 11. represents the area in which the output video stream is being played.
Figure 11. Output stream
Figure 12. shows the list similar to the Stream list. Advertisement list is populated with the videos that are
loaded locally, using the Add button. Videos loaded this way can also be added to one of the previously
mentioned Stream preview panels. Advertisement video can be removed using the Delete button.
Figure 12. Advertisement list
In the upper left corner of the application, there is a menu bar which contains two items: File and About. Figure
13. shows collapsed menu item File, listing its two items: Settings and Exit. Setting window is presented on
figure 14. In this window there are different fields that are used to set up communication between the studio
application and both mobile phones that are sending the streams, and Darwin Streaming Server.
Page 12
LiveTV
User manual
Version:
1.0
Date: 2010-01-15
Figure 15. shows collapsed menu item About.
Figure 13. Menu bar - File
Figure 14. Settings window
Figure 15. Menu bar - About
7.2
Interface Features
Drag and drop
User can add video to preview panel by selecting any video from both stream and advertisement lists, dragging
it and dropping it on wanted stream preview panel.
Sound on mouse over
Page 13
LiveTV
User manual
Version:
1.0
Date: 2010-01-15
Since there can be 7 videos playing at the same time, the user can select which video he or she wants to have the
sound coming from. This can be done simply by moving the mouse icon over one of the stream preview panels
to have sound from one of those videos, or having mouse icon outside of all panels to have the sound coming
from the output video.
7.3
Streaming server
There is no specific user guide for Streaming Server. Once the VLC and DSS are installed, there is no further
user interaction directly with them as VLC runs as ActiveX plugin inside PC Studio and DSS runs a windows
background service.
Page 14
LiveTV
User manual
Version:
1.0
Date: 2010-01-15
List of Tables
Page 15