1
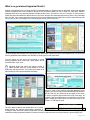
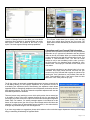
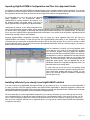
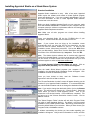
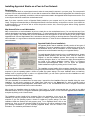
Getting Started Guide
What’s so great about Appraisal Studio? .................................................................. 2
Importing HighPerFORM’s Configuration and Files into Appraisal Studio ............ 4
Installing inRoads if you already have HighPerMAP installed................................. 4
Installing Appraisal Studio on a Stand-Alone System.............................................. 5
Installing Appraisal Studio on a Peer-to-Peer Network ............................................ 7
Installing Appraisal Studio on a Dedicated File-Server Network............................. 8
Appraisal Studio Support Options ............................................................................. 9
Appraisal Studio System Requirements .................................................................... 9
Page 1 of 9
What’s so great about Appraisal Studio?
Prepare to be dazzled by the new report interface in Appraisal Studio. It is simply the best on the planet. All the other appraisal
software companies have tried but failed to provide a true WYSIWYG (What You See Is What You Get) report interface.
Appraisal Studio is the only appraisal software to display all the forms in your report in one view. Just think, no more having to
switch back and forth between the different forms in your report. We have also mastered page zooming. Zoom to any percentage
from 10 to 500, not to mention automatic zooming to fit your screen width and screen height. Once you have setup the screen the
way you like, we save your settings so your reports appear the way you like every time.
The two examples above illustrate the “Page Width” and “Whole Page” options found in the zoom dropdown list. You can choose
from any predefined value between 10% and 500% or simply type in a new zoom value.
You can change the form layout from horizontal to vertical
scrolling pages as shown to the right. These options can be
found under the “View” menu.
Appraisal Studio now offers form panning similar to
Adobe Acrobat. When the mouse pointer is a hand,
simply click and drag the form. This is often much easier to do
than scrolling the form using the standard scroll bars.
“Jump” or “Jump to Form” mode on the toolbar displays all of the
pages in your report using our best-fit thumbnails logic (shown to
the left). Now you can quickly see all the pages in your report.
To jump to a specific page, double-click on top of the page. As
a matter of fact, the location where you double-click on top of the
page is exactly the location where you will end up back in the
“Report “ or “Edit Report” mode.
Form Editing Modes
The form editing modes on the toolbar allow you to quickly
switch between the important report editing operations. A
rectangle is drawn around the selected mode button indicating the current mode. Modes are loaded into the same screen space,
instead of launching in separate windows. A fast way to exit any mode and return to the report mode is to press the [ESC] key.
Page 2 of 9
“Forms” or “Manage Forms” mode allows you to see all the
categorized forms available in Appraisal Studio and quickly
add, remove, reorder and rename all the forms in your
report. This mode supports full drag and drop capabilities.
The “Photos” mode allows you to quickly click and drag
photos from multiple photo sources into your report. The
page selector arrows automatically find and scroll to the next
photo page.
Calculations and Carry-Forward Field Information
Appraisal Studio updates its calculations and carry-forward field
information as you type and all calculation and carry-forward
fields can be user over-ridden. When you override a calculated
or carry forward field, the field will become outlined in red. This
indicates a “User-Overridden Field”. The field will remain
outlined in red (or user-overridden) until the value (or text) in
the field returns to the Appraisal Studio calculated or carryforward value. This helps you remember all the fields you’ve
over-written.
To see what the calculated or carry-forward value is for a useroverridden field, simply select the field, and then rest your
mouse on top of the selected field to popup the yellow tool tip
showing the “Calc” (calculated or carry-forward) value and the
“User” (user-overridden) value. If you want to reset the value
back to the “Calc” value, press the [F7] key.
The @ sign used to do automatic comparable adjustments, has been enhanced with
a new dialog allowing for more specific adjustments to be performed as well as
remembering the adjustment criteria. Remembering the adjustment criteria allows
Appraisal Studio to automatically readjust an item’s adjustment results when the item
being adjusted changes. The @ sign automatic comparable adjustment still uses the
same fast keystrokes as it did before.
There are just too many new things to cover in this quick preview, but we wanted you
to be aware of some of the more important changes to help you get started. We
encourage you to take some time to explore and see all the new things that Appraisal
Studio offers. For instance, if a warning message appears in the status bar at the
bottom of the report screen, just click on top of the message and the field where the
message is coming from will automatically become selected, or how about doubleclicking on any thumbnail image to see an enlarged view.
If you have any questions or suggestions, please don’t hesitate to call our technical support department and they will be happy
help you start taking full advantage of Appraisal Studio.
Page 3 of 9
Importing HighPerFORM’s Configuration and Files into Appraisal Studio
It is important to realize that HighPerFORM and Appraisal Studio are two completely separate software packages. They can both
be installed on the same computer and they will operate independently. With this in mind, we know that most of our customers
that upgrade will want to keep all the previous work done in HighPerForm and use it in Appraisal Studio.
To accommodate this, at the very end of the Appraisal
Studio installation, we will automatically detect if
HighPerFORM is currently installed on the computer. If so,
the following question will appear asking if you want to
import HighPerFORM’s configuration into Appraisal Studio.
Configuration is made up of such things as signature files,
macro entries, photo titles, program settings, custom dictionary changes, comps database, office management information, etc. If
you answer YES to this question, we will locate and import HighPerFORM’s configuration into Appraisal Studio. This will allow
you to move from HighPerFORM to Appraisal Studio without interruption. If you answer NO to this question, Appraisal Studio will
look and feel as though it were a new installation.
Importing HighPerFORM’s configuration information does not import any actual appraisal report files (the files from
HighPerFORMS’s user folders) or Photo files (the files from HighPerFORM’s photo library or user scrapbooks). We highly
recommend that you import both the appraisal files and photo files (if disk space permits). This is done by running an import
program called HPFImport. This program can be found in the Appraisal Studio folder. When you start the program, you will see a
screen similar to the one shown below.
After the installation, but before you launch Appraisal Studio
for the first time, you’ll need to run the HPFImport program.
The HPFImport program reads and displays the appraisal
folder structure and files from HighPerFORM. It also counts up
and displays the number of appraisal files and photo files and
their disk space requirements. Based on the available disk
space, the HPFImport program will automatically select the
appropriate import options. Only the appraisal files can be
individually selected to be imported into Appraisal Studio. The
photo files are an all or nothing option.
In most cases you should not have to do anything except
press the Import Files button to start the importing process. In
some cases where available disk space is limited, you may
want to call Technical Support for assistance in determining
the best option for you.
Installing inRoads if you already have HighPerMAP installed
If you are currently using HighPerMAP with HighPerFORM, you can continue to do so. You should not uninstall HighPerMAP if
you want to continue using the mapping software with HighPerFORM. HighPerMAP is specifically designed to integrate with
HighPerFORM. InRoads on the other hand is specifically designed to integrate with Appraisal Studio. InRoads does not integrate
with HighPerFORM and HighPerMAP does not integrate with Appraisal Studio.
We recommend that you leave HighPerMAP installed during an interim period when you are evaluating and converting
over to Appraisal Studio. Go ahead and install inRoads and use it with Appraisal Studio. If disk space is limited, you can
call our Technical Support department to discuss what the best solution is for your situation. At some point in the future
when you have completely switched over to Appraisal Studio, you may want to uninstall HighPerFORM and HighPerMAP
to regain the disk space.
Page 4 of 9
Installing Appraisal Studio on a Stand-Alone System
Standard Installation
Appraisal Studio installation is easy. After a few steps, Appraisal
Studio copies the software and creates a United Systems program
group and desktop icon. If you are a network administrator, you will
find more information on how to install Appraisal Studio Network
Version later in this document.
Before you begin installing Appraisal Studio on your computer, make
sure that Windows 98/2000/XP is installed on your computer and the
computer meets the minimum requirements stated in the Getting Help
Appraisal Studio Requirements section.
Note: Make sure all other programs are closed before installing
Appraisal Studio.
Insert your Appraisal Studio CD into the CD-ROM drive of your
computer. This will initiate the auto-run feature on the CD.
If your system does not bring up the installation screen
automatically when you insert the CD into your hard-drive, you may
have the auto-run feature disabled on your PC. To bring up the
installation screen, follow these instructions: Click on the Start button
from your Workstation. Select "Run" from the Start Menu and type the
drive letter of the CD-ROM followed by :/setup.exe. Then click OK.
Note:
The Adobe Acrobat software that is included with Appraisal
Studio is the Acrobat Reader. In order to send reports in PDF Format,
the full version of Adobe Acrobat must be purchases from your local
software supplier or online at http://www.adobe.com/.
Note:
The United Systems Software Setup Menu will appear. Click on
Appraisal Studio (Standard), then click Install This Program.
After the Install Shield Wizard prepares your computer for the
installation, the Appraisal Studio installation screen will appear. Click
on Next to continue the installation process.
Once you have clicked on Next, read the "Software License
Agreement" and click on Yes to continue.
The "Choose Destination Location" screen will appear showing you the
location for your Appraisal Studio installation. It is recommended that
you use the default location and do not change the destination folder.
Note: If you need to change the destination folder, click on the Browse
button. This will bring up a directory list - "Choose Folder." Select the
folder where you wish to install Appraisal Studio. Click on the
directories to the desired location. Click on OK once completed. This
will return you to the "Choose Destination Location" screen. Click on
Next to continue.
The "Select Program Folder" window will ask which Program Folder
you wish to install Appraisal Studio in. By default, it will recommend
installation in the United Systems folder. We strongly recommend you
leave the default folder as your selection. When you have chosen your
Program Folder, click Next to continue.
A window summarizing the choices you have made regarding your
installation will appear. Verify that this information is correct, and click
Page 5 of 9
Next to begin installation. If anything is incorrect in this information, click Back through the options and make the desired
changes.
Once you click Next on the "Start Copying Files" window, Appraisal Studio will begin copying all files to your computer.
When copying is complete, the very first screen from the beginning of the installation process will appear. If you wish to
install additional applications, such as Apex or Acrobat Reader, you can do so at this time. Otherwise, exit this screen
and open your newly installed Appraisal Studio.
Once you log into Appraisal Studio for the first time, you will be prompted to enter your activation
information. If you are evaluating Appraisal Studio, click the “Continue Trail Evaluation”. The
evaluation period lasts for 30 days.
Page 6 of 9
Installing Appraisal Studio on a Peer-to-Peer Network
Requirements
To install Appraisal Studio on a peer-based network, select the most powerful computer in your peer group. The most powerful
computer is the one with the fastest CPU, the one with the most amount of RAM and with the largest hard drive. Make sure that
the computer meets, or preferably, exceeds the minimum requirements stated in the Appraisal Studio Requirements section. This
is the computer that will be used as the non-dedicated server.
Note: If you have a previous version of Appraisal Studio installed on your computer and it is your intent to reinstall Appraisal
Studio, it is highly recommended that you install Appraisal Studio in the same directory as the previous version. If you install it into
a different directory, you will not be able to access the previous version. Also, close all programs before running Appraisal
Studio’s install program.
Map Network Drive on each Workstation
Map a network drive on each workstation to point to a hard drive on the non-dedicated server. (You can skip this step if your
network administrator has already mapped a network drive.) To map a network drive, double-click on the Network Neighborhood
icon on your desktop. Then double-click on the non-dedicated server and right-click on the drive where you are going to install
Appraisal Studio. Choose “Map Network Drive” and select a drive letter by clicking on the drop-down box. Repeat this process for
each workstation. It is a good idea to choose the same drive letter, the “C” drive for the non-dedicated server and the “F” drive for
each workstation.
Appraisal Studio (Server Installation)
An Appraisal Studio network installation actually consists of two types of
installations. The server installation (which is performed only once on the
non-dedicated server) and the workstation or client installation (which is
performed on each workstation intending to run Appraisal Studio).
To install Appraisal Studio (network) to the non-dedicated server, choose
“Appraisal Studio (network)” from the setup menu. Click the “Install This
Program” to start the installation process. Move though the installation
wizard by clicking the “Next” or “Yes” buttons. It is highly recommended that
you install to the default destination location, which is C:\Program
Files\United Systems\Appraisal Studio. You can cancel the Appraisal
Studio installation at anytime by clicking on the “Cancel” button.
The installation process installs all the necessary shared files to the nondedicated server. At the end of the installation you may be prompted to reboot the computer. It’s always a good idea to reboot the
computer to give the operating system a chance to update any system settings. The server installation does not install any
desktop icons or program groups. In order to run Appraisal Studio, you will need to perform the client installation on each
workstation intending to run Appraisal Studio.
Appraisal Studio (Client Installation)
The client installation is not started from the setup menu. Instead the client installation files were installed during the server
installation. You will need to navigate to the “Install Client” folder and run the “Setup.exe” file, which is typically found at
C:\Program Files\United Systems\Appraisal Studio\Install Client on the non-dedicated server and F:\Program Files\United
Systems\Appraisal Studio\Install Client on each workstation.
Move though the installation wizard by clicking the “Next” button. It is highly recommended that you install to the default
destination location, which is C:\Program Files\United Systems\Appraisal Studio. You can cancel the Appraisal Studio installation
at anytime by clicking on the “Cancel” button.
The installation process installs all the necessary files to the workstation. At the end of the
installation you may be prompted to reboot the computer. It’s always a good idea to reboot the
computer to give the operating system a chance to update any system settings. The client
installation installs the desktop icon and program group. To run Appraisal Studio, click on the
desktop icon. Once you log into Appraisal Studio for the first time, you will be prompted to enter
your activation information. If you are evaluating Appraisal Studio, click the “Continue Trail
Evaluation”. The evaluation period lasts for 30 days.
Page 7 of 9
Installing Appraisal Studio on a Dedicated File-Server Network
Requirements
Make sure that the computer meets, or preferably, exceeds the minimum requirements stated in the Appraisal Studio
Requirements section.
Note: If you have a previous version of Appraisal Studio installed on your computer and it is your intent to reinstall Appraisal
Studio, it is highly recommended that you install Appraisal Studio in the same directory as the previous version. If you install it into
a different directory, you will not be able to access the previous version. Also, close all programs before running Appraisal
Studio’s install program.
Map Network Drive on each Workstation
Map a network drive on each workstation to point to a hard drive on the server. (You can skip this step if your network
administrator has already mapped a network drive.) To map a network drive, double-click on the Network Neighborhood icon on
your desktop. Then double-click on the server and right-click on the drive where you are going to install Appraisal Studio. Choose
“Map Network Drive” and select a drive letter by clicking on the drop-down box. Repeat this process for each workstation. It is a
good idea to choose the same drive letter, the “C” drive for the server and the “F” drive for each workstation.
Appraisal Studio (Server Installation)
An Appraisal Studio network installation actually consists of two types of
installations. The server installation (which is performed only once on the
server) and the workstation or client installation (which is performed on
each workstation intending to run Appraisal Studio).
To install Appraisal Studio (network) to the server, choose “Appraisal
Studio (network)” from the setup menu. Click the “Install This Program” to
start the installation process. Move though the installation wizard by clicking
the “Next” or “Yes” buttons. It is highly recommended that you install to the
default destination location, which is C:\Program Files\United
Systems\Appraisal Studio. You can cancel the Appraisal Studio installation
at anytime by clicking on the “Cancel” button.
The installation process installs all the necessary shared files to the server.
At the end of the installation you may be prompted to reboot the computer. It’s always a good idea to reboot the computer to give
the operating system a chance to update any system settings. The server installation does not install any desktop icons or
program groups. In order to run Appraisal Studio, you will need to perform the client installation on each workstation intending to
run Appraisal Studio.
Appraisal Studio (Client Installation)
The client installation is not started from the setup menu. Instead the client installation files were installed during the server
installation. You will need to navigate to the “Install Client” folder and run the “Setup.exe” file, which is typically found at
C:\Program Files\United Systems\Appraisal Studio\Install Client on the server and F:\Program Files\United Systems\Appraisal
Studio\Install Client on each workstation.
Move though the installation wizard by clicking the “Next” button. It is highly recommended that you install to the default
destination location, which is C:\Program Files\United Systems\Appraisal Studio. You can cancel the Appraisal Studio installation
at anytime by clicking on the “Cancel” button.
The installation process installs all the necessary files to the workstation. At the end of the
installation you may be prompted to reboot the computer. It’s always a good idea to reboot the
computer to give the operating system a chance to update any system settings. The client
installation installs the desktop icon and program group. To run Appraisal Studio, click on the
desktop icon. Once you log into Appraisal Studio for the first time, you will be prompted to enter
your activation information. If you are evaluating Appraisal Studio, click the “Continue Trail
Evaluation”. The evaluation period lasts for 30 days.
Page 8 of 9
Appraisal Studio Support Options
User's Guide
The Appraisal Studio User's Manual contains comprehensive, detailed information on using the software. This manual includes
step-by-step procedures, reference information, and demonstrations.
Technical Support
If, after reading the user's manual you decide that you require additional training with this program, there are numerous options
available. United Systems offers you access to high-quality, responsive technical support. We recognize that support needs
vary from user to user; our product support services allow you to receive the type of support that best meets your needs.
Telephone Training
Training via telephone is available for users as well as multiple users (conference call). A United Systems Software Technician
will walk you though all facets of Appraisal Studio. Training is available in one-hour increments. Please contact your account
representative to schedule a training session. Technical Support can be reached at 1-800-241-4756.
FAX
You can reach the support department by facsimile at (480) 449-2657. Use the fax line to send your support engineer
questionable printouts or written descriptions of a problem. The support department is also available to answer many questions
using its automated fax service. Make sure we have your current fax number to expedite your request.
Support via Electronic Mail
You can contact the next available technical support engineer by sending an e-mail to [email protected]. Be sure
your reply address is correct so that the engineer can return your message promptly. Include your name, account number, and a
detailed description of the problem you're experiencing. If you need information on renewing your support contract, contact your
sales representative at 1-800-969-8727. Your support contract entitles you to all of the benefits listed above as well as periodic
software updates.
Version Insurance Protection & Support
United Systems Software Company offers the comprehensive Version Insurance Protection program to provide its customers
with the latest product updates, new product information, discount on future purchases, and access to the United Systems
Product Support Line. The VIP program is provided on an annual basis for a fee that is price based on the size and needs of
your company.
Helping Your Support Engineer Help You
Providing product support can be challenging, since practically everyone has different computer configurations. To assist the
support engineers in providing you with the best possible service, when calling for technical support please be at your computer
and have the following information ready:
•
•
•
•
Your account number
The version of the program and operating system that you are using (click the help button to get the version number)
The exact wording of any messages that appeared on the screen
What happened and what were you doing when the problem occurred
Appraisal Studio System Requirements
CATEGORY
MINIMUM SPEC’s
RECOMMENDED SPEC’s
Processor (CPU)
Memory (RAM)
Hard Drive
Monitor
Video Colors
Video Resolution
Modem
CD-ROM
Operating System
Digital Camera
Scanner
Pentium II or better
64 MB
100 MB free space
15”
8 bit (256 colors)
800x600
33,600 or faster
8X
Windows 98/ME/NT/2000/XP
TWAIN Compliant
TWAIN Compliant
Pentium III or better
128 MB or more
1 GB free space
17” or larger
16 bit (65,536 colors)
1024x768
DSL/Cable/ISDN
44X
Windows 2000/XP
TWAIN Compliant
TWAIN Compliant
Page 9 of 9