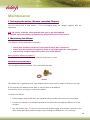
1
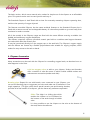
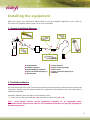
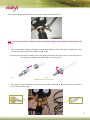
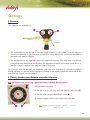
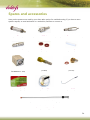
User manual Remote controlled Cliqueur Standard cliqueur Manual valve cliqueur You have just purchased an Oenodev cliqueur. Vivelys would like to thank you for the trust you have placed in it and is here to help you make your investment a success, both in terms of your wine and your profits. In nearly 15 years, now with Vivelys’ products, Oenodev has established itself as one of the great names in wine cellar oxygen control. Through its various international subsidiaries, the company now operates in all of the world’s wineproducing regions. To date, it has distributed 15,000 pieces of micro-oxygenation equipment/cliqueurs, including 1,800 tanks set up in 2008, and each year plays a part in the fermentation of 15 million hectolitres, almost 5% of world production, using effective oxygen management solutions throughout the process. The purpose of this manual is to provide as much information as possible on the product, how it works, and how to install and use it. For further information on your equipment or other products from our range, go to www.vivelys.com or contact us at [email protected]. 2 3 Contents Using the cliqueur and managing oxygen in the cellar ..............................................5 1. What does using a cliqueur entail ? .......................................................................................................... 5 2. Interest in wine-making ................................................................................................................................. 5 3. Introduction to Oenodev equipment ....................................................................................................... 5 4. Cliqueur Accessories ........................................................................................................................................ 6 Installing the equipment .........................................................................................................8 1. General installation diagram ........................................................................................................................ 8 2. Detailed installation ......................................................................................................................................... 8 Settings....................................................................................................................................... 11 1. Pressure.............................................................................................................................................................. 11 2. Timing (Standard and Remote-controlled cliqueur) ....................................................................... 11 3. Use ....................................................................................................................................................................... 12 4. Warning ............................................................................................................................................................. 12 Maintenance ............................................................................................................................. 16 1. Battery recharging (Remote-controlled cliqueur) ............................................................................ 16 2. Maintaining the diffuser .............................................................................................................................. 16 3 Maintaining the piping ................................................................................................................................. 18 4. Checking the seals ......................................................................................................................................... 18 Spares and accessories ......................................................................................................... 21 FAQs – Troubleshooting ...................................................................................................... 22 Notes ........................................................................................................................................... 24 4 Using the cliqueur and managing oxygen in the cellar 1. What does using a cliqueur entail? Using a cliqueur or “macro-oxygenation” is a wine-making procedure which enables precise amounts of oxygen to be added and controlled for wine produced in a tank or barrel. The equipment is designed so that it provides easy ventilation, more controlled than that obtained using the traditional racking technique. Compared with micro-oxygenation which concerns small quantities injected continuously, using a cliqueur brings into play precise, more violent oxygen addition (1 to 6 mg/l) using porous ceramics for optimum distribution. The addition therefore affects the content and consequently great respect for the product. 2. Interest in wine-making Easy to use, the cliqueur is the ideal substitute for bottling in terms of time and labour, yet makes for comparable oxygen addition. Depending on the equipment used, the procedure may be timed, making for greater precision and fewer errors in terms of the addition to be made. The cliqueur also helps to produce wine effectively by preventing phenomena which cause reductions and enabling oxygen to be added to fermentation yeasts. It may also take place further to production on the sediment found in barrels. The tanks or barrels do not need to be adapted in any way in order to use a cliqueur, as the cliqueur is placed on top of the installation in the cellar. 3. Introduction to Oenodev equipment The Oenodev cliqueur range includes 3 different products: the Standard Cliqueur, the Remotecontrolled Cliqueur and the Manual Cliqueur. Manual Valve Standard Cliqueur Remote-controlled Cliqueur 5 The basic version, which uses a manual valve, makes for simple use of the cliqueur at an affordable price. This system can be used to start injection and stop it. The Standard Cliqueur is itself fitted with a timer for accurately measuring cliqueur operating time, and thus the quantity of oxygen injected. The Remote-controlled Cliqueur has the same technical features as the Standard Cliqueur but is fitted with a remote control and rechargeable battery. It is therefore possible to go more easily from one barrel or tank to another. All of the models in the Cliqueur range are fitted with the same diffuser ensuring a suitable size bubble and satisfactory oxygen distribution. This diffuser comprises a porous cylindrical ceramic part held on a stainless steel support between two seals which hold the ceramic part. It may be introduced directly into the stopper cap or the tank hole. The Cliqueur’s oxygen supply and the diffuser are formed by a flexible polyurethane tube suitable for supply purposes, which makes for easy access to the tank or barrel. 4. Cliqueur Accessories Many accessories may be used with the Cliqueur for controlling oxygen levels, an absolute boon to what happens in the store. 0-16 bar oxygen valve: to add to your cliqueur, Vivelys and Oenodev offer a number of valve kits some of which include suitable outlets and maintenance accessories (washer and drier) Brewing pipe: Shaped for use with barrels, once connected to your Cliqueur, you can use the brewing pipe to oxygenate your wine and make use of sediment in one single operation. This pipe, which has a special ceramic part and brewing brushes, provides all of the benefits of a cliqueur, yet also leaves any sediment suspended. Slider: The slider is a sliding pipe which enables the diffuser to be introduced at the bottom of the tank through a bubble valve. It is thus possible to use the cliqueur on the wine at the bottom of the tank, above the sediment. 6 Ground oxymetry: Fitted with LDO probes, ground oxymeters allow you to measure oxygen dissolved quickly and easily. Hach Lange models, distributed by Vivelys, are in the form of a portable case containing all of the equipment you need for online measurement. Anti-spill stopper: Injecting oxygen into a barrel induces an increase in volume, which means that the wine may spill and so liquid may be lost. With the anti-spill stopper, the volume displaced by the addition of oxygen is transferred to the barrel on which the cliqueur was used previously. Using one therefore means that the effects of an overflow and loss of wine may be kept to a minimum. For further information about cliqueurs or their associated accessories, feel free to go to www.oenodev.com or contact us. All of our references (equipment & spares) may also be found at the end of this manual. 7 Installing the equipment When you receive your equipment, please check it using the checklist appended to your order. In the event of a problem, please contact us as soon as possible. 1. General installation diagram O O I Oxygen bottle Pressure regulator Outlet fitting for regulator Quick connection bayonet (1) 4/6 mm tube Doser/Cliqueur Quick connection body Check valve Quick connection bayonet (2) Diffuser 2. Detailed installation All joints which will have to be connected and disconnected frequently are fitted with automatic seal connectors. Merely using the cliqueur makes for a sealed link. Once disconnected, the female part is sealed automatically. Install the different joints and parts in the following order: Fit the valve to the gas bottle ( → ). Connect the valve outlet ( → ). N.B.: using oxygen requires special equipment, especially an O2 compatible valve. Charledave valves, offered as an extra on our installation estimates, are specially designed for Oenodev equipment. 8 The outlet must be screwed firmly using a key to ensure a hermetic seal. N.B.: Do not use grease or Teflon to screw the outlet. Oxygen will explode in the presence of grease. Take an adequate length of tubing to be installed between the bottle and the equipment and connect the tubing to the first supply 4/6 ( → ). For that purpose undo the mobile part of the supply, introduce the tube, push it in the fixed part of the supply and tighten the mobile part around the tube. All of the other joints (doser outlet, equipment inlet and outlet and diffuser joint) are attached in the same way. The supply + tube assembly is connected at the valve outlet ( → ) and the inlet connection (E) on the doser ( → ). 9 Prepare a second length of tubing a little longer than the height of the clicking tank. Connect the tubing to the second supply 4/6 ( → ) and the diffuser ( → ). Connect the supply to the regulated valve ( → ). The regulated valve is a part which can be used to check the output and also prevent any rise in the wine level in the tube. It must be placed close to the tank but must never be placed inside it or come into contact with the wine. It is therefore necessary to guarantee that the length of the tubing between the diffuser and the valve is greater than the height of tank to prevent it from dipping in the wine. Prepare a third length of tubing suitable for the installation. To do this, base yourself on the lengths already cut and deduct from them the length necessary for using the equipment properly. Connect the third tube to the doser outlet ( → ) and the outlet connection (S) of the doser ( → ). Connect the doser outlet to the regulated valve ( → ). The assembly is complete. To start the injections, install the diffuser in the tank by placing it at the bottom, above the sediment. 10 Settings 1. Pressure The valve has two manometers : Bottle Cliqueur The manometer on the left () shows the oxygen pressure in the bottle. It can be used to monitor the quantity of gas consumed, the pressure being 200 bars for a full bottle and falling gradually, to 0 when it is empty. The manometer on the right () shows the regulation pressure. This value may be adjusted using the thumb wheel found on the valve. The regulation pressure must remain static, and is 3 bars for using the cliqueur in the tank and 1 bar in the barrel. The pressure must be adjusted on shutdown (with the joint detached for increased certainty). During injection, it is normal for the regulation pressure to fall slightly below the chosen value. It is reset once the oxygen has been added. 2. Timing (Standard and Remote-controlled cliqueur) N.B.: the mode screw (on the top right of the timer) is preset. Do not touch it. Using a small screwdriver: Set the units (hr, min, sec) using the bottom right screw (). Set the scale using the bottom left screw (). Set the orange cursor to the chosen time value (). Eg : for 10 minutes’ injection “min”, “0 to 12”, cursor on 10 11 When you press the push button, the solenoid opens and closes after the programmed time has elapsed. 3. Use On the next few pages are a number of graphs enabling optimum Cliqueur use according to the oxygen dose you would like to add. These graphs are based on operating at a pressure of 3 bar in the tank and 1 bar in the barrel. N.B.: It is essential that using these graphs includes the presence of the regulated valve () in your assembly. If it does not, the dose added will be much higher than the one anticipated. The data is provided for information only for standard use instances. It does not constitute an absolute rule for using a cliqueur, as certain parameters are unique to each cellar (tank type and shape, etc.). Monitoring with an oxymeter remains the best way of controlling and optimizing oxygen management in your process. The first graph relates to tanks with a volume of less than 200 hl. The next graph concerns use with a larger tank (> 200 hl). For these two graphs, several addition values are anticipated, 4mg/l being the dose generally added to wine when it is racked. The third and final graph is a basic estimate of the clicking time for barrel use (calculation volume used = 225 l): N.B.: if the wine has a high CO2 content, set aside a headspace sufficient for preventing any spillage into the tank or barrel. It may, however, be the case that you need an anti-spill stopper, for use in a barrel (details are given at the beginning of this manual). Clicking may also take place towards the end of the yeast increase phase to help these and prevent any fermentation from grinding to a halt. The addition necessary for this operation must take place at a rate of between 5 and 10 mg/l. 4. Warning The fact that the system is easy to use should not constitute any reason to forget that too much ventilation may harm the wine’s quality, as will excessive racking or any other operation carried out ill-advisedly. It is therefore the responsibility of the wine producer to assess their wine’s oxygen requirements according to their goals and decide how much oxygen to add. 12 13 Volume of tank (hL) Estimated tank cliqueur time (<200hL) 14 0 10 20 30 40 50 60 70 80 90 100 110 120 130 140 150 160 170 180 15 Maintenance 1. Recharging the battery (Remote-controlled Cliqueur) The box comes with a lead battery. equipment. This is recharged using the charger supplied with the N.B.: do not use a charger other than the same type as the one supplied. If possible, leave the battery permanently on charge while you are not using it. 2. Maintaining the diffuser The diffuser is a key equipment component. Never leave a diffuser out of use in the wine for more than a few hours. Never leave the ceramic part dipped in water or any other liquid for a long period. Never brush, scrape or touch the ceramic part in the diffuser. When should a diffuser be cleaned ? The diffuser must be rinsed and dried correctly each time it is used. Standard cleaning procedure The procedure requires a washer. This comes with the valve. washer The washer has a “gardening hose” type adaptor which can be used to attach it directly to the tap. If you received your washer before 2001, it may not have a tap adaptor. You can buy one in our shop or order a new washer. To clean your diffuser: Detach supply 4/6 (part ) from the regulated valve (part ) and connect it to the washer. Connect the washer to a standard tap and let the water flow through the diffuser for a few seconds. Dry the ceramic part. To do this, disconnect the washer supply, and connect it directly to the valve outlet (part ) and allow the gas to pass through the diffuser for 2 to 3 minutes. 16 A ceramic part stored damp will quickly become a source of moisture Comments: Store diffusers in a clean, dry place. Clean the diffuser as often as possible (water + oxygen drying), for example when changing tank or during temporary shutdown. Check regularly that the diffuser is working properly. When it is immersed in the wine, you should see a fine foam on the surface. If the ceramic part is damaged, the bubbles produced will be larger. But beware, as the bubbles always appear to be larger in water than wine. Complete cleaning/unclogging procedure : Remove the diffuser by unscrewing the screws at the bottom of the diffuser. Remove the metal washer. Carefully remove the red silicon seal at the bottom of the diffuser. Gently shake the ceramic part until it comes away. NEVER TOUCH THE INSIDE OF THE CYLINDER. Remove the upper silicon seal. Place the metal and silicon parts in a plastic container (about 1 l). Place the ceramic parts in a 250 ml Pyrex beaker. Place the stainless steel body and the polyethylene piping (rolled up in advance) in a plastic bucket (8/10 l). Dip the ceramic part in a 50% javel solution (which may be purchased from our shop) for 2 hrs. Rinse the ceramic part thoroughly in water. Place it in an ultrasound bath for 45 minutes. These stages may be repeated until the ceramic part looks clean. Follow safety procedures when using chemicals. Dip each metal part, the stainless steel body and the polyurethane pipe in a percarbonate/hot water solution for 30 minutes. Then dip them into a citric acid/hot water solution for 10 minutes. Rinse thoroughly in water (allow water from the washer to pass through the pipe). Follow safety procedures when using chemicals. When all parts have been cleaned, reassemble the diffuser and test the outlet pressure. 17 If the outlet pressure test is satisfactory, store the diffuser in a clean, dry place or put it back into service. If the diffuser has to be stored, you must guarantee that it is completely dry to prevent any damp from appearing on the ceramic part. 3. Maintaining the piping Once the piping has been installed correctly, in accordance with the explanations given in this manual, piping does not need any particular maintenance. 4. Checking the seals If you note any excessive gas consumption (oxygen or nitrogen), there may be a leak in your equipment’s supply. If you see anything like this, here is the checking procedure to be followed. Stage 1: check the valve seal : Your valve is designed as follows: The manometer on the left () shows the oxygen pressure in the bottle. It can be used to monitor the quantity of gas consumed, the pressure being 200 bars for a full bottle and falling gradually, to 0 when it is empty. The manometer on the right () shows the regulation pressure. This value may be adjusted using the thumb wheel found on the valve. The regulation pressure must remain static, and is 1 (barrel) or 3 (tank) for clicking and 6 for microoxygenation. To check: Disconnect the supply at the quick joint to that you can carry out the test on the valve alone. Open the gas bottle and set the outlet pressure (which may be checked on ) and 6 bar. Enter the bottle pressure on the manometer and then close the bottle. Wait a few minutes, reset the pressure and reopen the supply. If the pressure is at the same level as in the first check, your system’s valve is sealed. Go to the next stage. If the manometer pressure is very different, the valve is not working. 18 If, on shutting off the supply, the pressure on has fallen or you have noticed a shift on the dial at the bottle opening, your equipment has a leak. Then check that the valve is correctly screwed to the bottle and that the outlet joint is correctly screwed to the valve (the two must be mounted without any Teflon). If they are reliable, check the seal on the outlet joint using a Gazobul aerosol leak detector or by dipping it in water. If there is a leak, replace the outlet joint. Check it again after it has been repaired. If all of the checks are satisfactory but you still note leakage problems, replace the valve (contact Vivelys). We recommend that you work on your equipment with original Vivelys valves: Our manufacturer modifies them specifically to guarantee the fine tuning necessary for them to work with our equipment. Stage 2 : Checking the equipment’s supply circuit : Reconnect the equipment to the valve without programming any dose so that the equipment does not start up Open the bottle and set the outlet pressure () on the usage pressure (1 or 3 bars for a clicker, 6 bars for a micro-oxygenator). Set the bottle pressure to and then close the bottle. Wait a few minutes, reset the pressure and then reopen the supply. If the pressure does not change, the equipment has no leaks. If the pressure on has fallen while the bottle was closed or you have noticed a shift on the dial at the bottle opening, your equipment has a leak. As this is not coming from the valve (you checked this in stage 1), carry out the following checks: Check the seal on the valve outlet (on the quick joint) using a Gazobul leak detector or by dipping it in water. If you find a leak, replace the valve outlet (this is the most commonly found breakdown) and, if necessary, the tank outlet connection which is associated with it. Check the state of the supply pipe: It must not be kinked or pierced, as this would cause serious risk of a leak. Replace it if necessary. Check the seal on the equipment’s inlet joint and replace it if necessary. 19 After any repairs, double check everything. If you still find any leaks, the problem could be with your dosing equipment. Please contact Vivelys after-sales service quickly. 20 Spares and accessories Here are the spares most used by your after-sales service for troubleshooting. If you have a more specific request, or need assistance or a technician, feel free to contact us. Diffuser (2.3.2Diffuseur) Doser outlet 4/6 (included in the maintenance kits) Supply 4/6 (included in the maintenance kits) Regulated valve (included in the maintenance kits) Diffuser seals (2D.101) Bare ceramic part (2D.C100) Timer (2E.OMRON10 – 220V 2E.OMRON11 – 24V) Valve outlet Washer (3.1.SD1) (3.1.LV1) Maintenance kit for cliqueur Anti-spill stopper Brewing pipe (2.4KitSAVCliqueur) (2.2BONDE) (2.2CANNE) Slider (2.2COULISSEAU50 - slider Ø 50 for cliqueur) 4/6 Rislan tube (25 m roll) (2.3.2Tube4/6) 21 FAQs – Troubleshooting Here are some potential solutions to the problems most commonly encountered by users of our equipment. Feel free to contact our after-sales service for advice further to that below or if you have not found a solution to your problem. OBSERVATION CHECK TO BE MADE Is the red “out” indictor light on the timer ? NO Check that the equipment is connected NO Check that the timer is indeed in “C” mode YES When you begin a cycle, there is no electrical response. The solenoid does not break down. Is the green “power” light on the timer flashing ? YES YES Have the voltage checked or check that the socket brushes are not rusted. The solenoid coil has failed. Contact after-sales service. YES The timer has failed. Contact after-sales service. Check that the equipment is correctly Connected or that the connections are not rusted. NO Clean the connections and reconnect the equipment. YES Check the bottle opening and the pressure setting. NO Set the pressure to 1 or 3 bars according to use. YES When you start the cycle the solenoid breaks down but nothing comes out. Remove the equipment outlet pipe, The oxygen must escape freely when the cycle is launched. NO The solenoid has failed. Contact after-sales service. NO Remove the regulated valve from the circuit. The air must leave freely. (N.B.: Do not click without this valve, the dose would be incorrect) YES Remove the diffuser inlet pipe. The oxygen must escape freely when you start the cycle. YES YES The ceramic part is blocked. Clean it (procedure p.16). The regulated valve has failed. Contact after-sales service. 22 Oxygen consumption Is too high Is there a regulated valve in the circuit ? NO YES Check that there is no leak in the circuit. (procedure p.18). Begin a cycle by force on the front of the box. YES NO Remote-controlled clicker only: When a cycle Is launched using the remote control, The solenoid does not break down Place the regulated valve. Is the red “out” indictor light on the timer lit? NO The remote control is not working Check the batteries . Otherwise, the remote control or electronic card has failed . Try with a new remote control before replacing the card. Check whether the battery is charged up (12V minimum). Otherwise, put it on Charge for 24 hours YES Is the green light on the timer flashing? YES The solenoid coil has failed. Contact after-sales service. NO Check that the timer is indeed in “C” mode. Otherwise, put it in “C” mode. YES Have the voltage checked at the socket and check that the socket brushes are not rusted. YES The timer has failed. Contact after-sales service 23 Notes ........................................................................................................................................................................................................... ........................................................................................................................................................................................................... ........................................................................................................................................................................................................... ........................................................................................................................................................................................................... ........................................................................................................................................................................................................... ........................................................................................................................................................................................................... ........................................................................................................................................................................................................... ........................................................................................................................................................................................................... ........................................................................................................................................................................................................... ........................................................................................................................................................................................................... ........................................................................................................................................................................................................... ........................................................................................................................................................................................................... ........................................................................................................................................................................................................... ........................................................................................................................................................................................................... ........................................................................................................................................................................................................... ........................................................................................................................................................................................................... ........................................................................................................................................................................................................... ........................................................................................................................................................................................................... ........................................................................................................................................................................................................... ........................................................................................................................................................................................................... ........................................................................................................................................................................................................... ........................................................................................................................................................................................................... ........................................................................................................................................................................................................... ........................................................................................................................................................................................................... ........................................................................................................................................................................................................... ........................................................................................................................................................................................................... ........................................................................................................................................................................................................... ........................................................................................................................................................................................................... ........................................................................................................................................................................................................... ........................................................................................................................................................................................................... 24 ........................................................................................................................................................................................................... ........................................................................................................................................................................................................... ........................................................................................................................................................................................................... ........................................................................................................................................................................................................... ........................................................................................................................................................................................................... ........................................................................................................................................................................................................... ........................................................................................................................................................................................................... ........................................................................................................................................................................................................... ........................................................................................................................................................................................................... ........................................................................................................................................................................................................... ........................................................................................................................................................................................................... ........................................................................................................................................................................................................... ........................................................................................................................................................................................................... ........................................................................................................................................................................................................... ........................................................................................................................................................................................................... ........................................................................................................................................................................................................... ........................................................................................................................................................................................................... ........................................................................................................................................................................................................... ........................................................................................................................................................................................................... ........................................................................................................................................................................................................... ........................................................................................................................................................................................................... ........................................................................................................................................................................................................... ........................................................................................................................................................................................................... ........................................................................................................................................................................................................... ........................................................................................................................................................................................................... ........................................................................................................................................................................................................... ........................................................................................................................................................................................................... ........................................................................................................................................................................................................... ........................................................................................................................................................................................................... ........................................................................................................................................................................................................... ........................................................................................................................................................................................................... 25 Domaine du Chapitre 170, bd du Chapitre 34750 Villeneuve-lès-Maguelone France Tél. : +33 (0)4 67 85 68 40 – Fax : +33 (0)4 67 85 68 41 www.vivelys.com – [email protected]