1
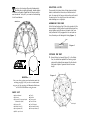
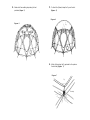
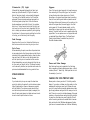
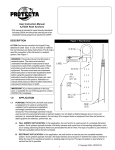
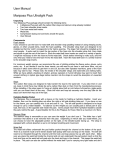
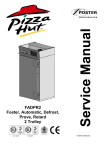
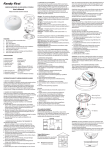
Satel
lite
Satellit
Owner
Owner’s Manual
Mountain Hard w e a r
4911 Central Av e n u e
Richmond, CA 94804
510-558-3000 FAX 510-559-6709
© 1999 All rights reserved.
Printed on recycled paper.
PLEASE READ THIS MANUAL.
IT CONTAINS IMPORTANT
INFORMATION ABOUT YOUR TENT.
hank you for choosing a Mountain Hardwear tent.
We take pride in making lightweight, durable shelters
for outdoor enthusiasts. Please take the time to read this
user manual and “test pitch” your new tent before taking
it into the wilderness.
Satellite
SELECTING A SITE
Choose a site that is level, clear of sharp stones and other
debris, is sheltered from the wind, and will drain when it
rains. You may wish to face your tent south or east to catch
the morning sun. Do not pitch your tent under trees, in
water drainages, or on ridge tops.
ASSEMBLING THE POLES
Unfold the tent body and lay it flat on the ground with the
door unzipped. Unfold the shock-corded tent poles so they
spring together gently. Make sure that each insert from
each pole section is fully engaged into the next pole section, otherwise you will damage the tubing (Figure 1).
insert
Figure 1
PITCHING THE TENT
1. Spread the tent out evenly (Figure 2). In the illustration, the dotted lines represent the five long purple
poles and the dashed lines represent the five shorter
black poles. Adjust all grommet tabs to the same
length.
Figure 2
WARNING !!!
For your safety, please read and understand the
warning on page 14. If you do not understand
any part of the warning call Mountain Hardwear
at 510.559.6700 before using the tent.
purple pole
PARTS LIST
◆ Owner’s Manual
◆ Tent body
◆ Tent poles (5 long purple poles,
5 shorter black poles)
◆ Tent pegs (20)
◆ Window covers (3)
◆ Line tighteners (20)
◆ 200 ft. spool of cord
◆ Tent fly
◆ Pole sack
◆ Tent peg sack
◆ Tent stuff sack
◆ Cord (20 pieces)
◆ Seam sealer (6 tubes)
◆ Pole repair sleeves (3)
black pole
2. All grommet tabs are color-coded. Attach all five purple poles to the purple grommet tabs. Make sure to
guide the poles along the seam lines (Figure 3).
Attach all clips along the seam lines to the poles.
Attach double clips at all ten pole intersections as
shown in Figure 3a .
3.Attach all five black poles (Figure
4) to the black
grommet tabs. Attach all corresponding clips as
described in Step 2.
Figure 4
Figure 3
black poles
Figure 3a
4. Stake out all ten webbing loops along the tent
perimeter (Figure 5).
5. To attach the flysheet, drape the fly over the tent
(Figure 6).
Figure 6
Figure 5
Fly
6. Attach all clips along the fly perimeter to the poles on
the tent body (Figure 7).
Figure 7
Fly
Tent body
7. There are three clear UVX widows on the Satellite tent
body. The Satellite comes with three window covers
which can be attached either inside the tent (as shown
in Figure 8) or outside the tent over the windows.
Place the widow covers on the outside to protect the
windows from direct sun. Place them on the inside of
the tent if you wish to use the storage pockets sewn to
the window covers.
Figure 8
HOW TO CARE FOR
YOUR TENT ON THE TRAIL
Stormproofing Your Tent
Even though most of our tents are free-standing, we recommend you always stake out your tent to prevent it from
flying away in a gust of wind. Secure all stake-out webbing
loops located on the perimeter of the tent. Attach all external guy lines to tent pole intersections (Figure 10).
Figure 10
Pole intersection
Guy line
Pocket
7. The Satellite is a floorless tent, designed for use in
snow and rugged terrain. An optional floor/footprint
can be purchased to create a removable waterproof
floor. Attach this floor by clipping the snap hooks
which are sewn to it to the O-rings located on the
inside tent perimeter (Figure 9).
Use your internal guy system for extreme weather conditions and high winds. The internal guy system consists of
pieces of cord (96” long) and line tighteners (Figure 11).
As the wind increases, increase the tension by tightening
the line tighteners.
Figure 9
Tent body
Optional floor/
footprint
Figure 11
Ultraviolet (UV) Light
Zippers
Ultraviolet light degrades lightweight tent fabric (and
almost any synthetic material). UV light will cause the
fabric to fade, lose strength, and eventually disintegrate.
The canopy of the Satellite consists of an UV-resistant,
waterproof, titanium dioxide membrane laminated to a
40-denier polyester ripstop fabric. While this titanium
dioxide membrane is practically UV-proof, the polyester
fabric is not. The best way to prolong the life of any tent
is to keep it out of the sun as much as possible. Pitch the
tent in a shady spot whenever possible. By striking (taking
the tent down) in the morning and repitching the tent late
in the day, you will add to any tent’s longevity.
One of the keys to zipper longevity is to keep them away
from sand and grit. When pitching your tent, be careful
to keep the door and window zippers out of the dirt.
Never step on the zipper. Keep zippers clean by washing
them (at home) with a garden hose and pressure nozzle.
Food Storage
Never store food in your tent. Animals will often tear or
bite their own entrance into a tent to get at your food.
Most zipper failures result from wear to the coating on the
inside of the zipper slider (the metal toggle). Once that
coating wears off, the metal abrades rapidly, and the
zipper slider no longer joins the continuous plastic coils
securely. The plastic coils then tend to separate behind the
zipper slider. You can replace a worn out zipper slider with
our patented Zipper Repair Clamp. The Zipper Repair
Clamp (pictured below) is available from your local
Mountain Hardwear dealer.
Pole Care
When assembling the poles, never allow the pole sections
to snap against each other. Always make sure that all pole
sections are fully engaged before bending. Keep the poles
clean and free of silt, sand, and salt, taking special care
with the tips as they are not anodized and can corrode.
When disassembling your poles, always start from the center, then work your way to the tips. This allows the elastic
cord to be evenly stretched, an important matter when the
poles are stored disassembled for a long period of time.
FIELD REPAIRS
Tears and Other Damage
Small holes and tears can be repaired in the field using
either a needle and thread, adhesive repair tape, or liquid
urethane (Mcnett™ Seam Grip). Field repairs do not void
the warranty of your tent.
Poles
CARING FOR YOUR TENT AT HOME
If you break a tent pole you can repair the break temporarily by splinting the pole with a short aluminum sleeve
(called a repair sleeve—three such sleeves are provided
with the Satellite). The aluminum repair sleeve is fitted
over the broken pole section and taped (or wedged) into
place. Ski pole repair sleeves, tent stakes and even branches can be used to splint broken tent tubes.
Never pack or store your tent if it is dirty and/or
damp. If you do so, mildew can form and ruin the
waterproof coating on your tent. Mildew will cause
your tent to smell and can eventually delaminate and damage the polyurethane coating which will cause your tent to
leak. There is no cure for mildew damage. Prolonged
moisture on the polyurethane coating (storing the tent wet
for more than a few days) can cause hydrolysis. This will
soften the coating and cause the coated fabric to become
sticky and bond to itself. Mildew damage and hydrolysis are not covered under our Lifetime Warranty.
Seam Sealing Your Tent
If your tent will be subject to prolonged rainfall, all doubleneedle seams on the tent body and the floor perimeter
seams must be sealed. Do not seam seal the zippers. Pitch the tent in a well ventilated area (preferably
out of doors and in the shade). Make sure the tent is clean,
dry, and taut. Stake out the tent floor. Never seam seal in
cold, damp (humid) environments. Seal the coated (dull)
side of the fabric whenever possible. On the Satellite, the
coated side is on the outside of the tent. Seam sealer does
not adhere as well to the uncoated side because the water
repellent finish is applied to that side. Apply several thin
coats instead of one thick coat. Work the seam sealer into
the seams and on top of the
Seal over
double-needle stitching by applystitching.
ing pressure and brushing the
liquid back and forth. Seam seal
all points where webbing is sewn
Seal
into or on a seam. Work the
under fold.
sealer into and around these
coated side
of fabric
attachment points using the
techniques described above. The
seam along the tent floor perimeter where webbing is
attached should also receive extra attention. Follow the
drying instructions on the seam sealant tube carefully to prevent damaging your tent.
HOW MUCH DOES YOUR TENT WEIGH?
The weight of a tent is one of the most important factors
used by consumers when making purchasing decisions. In
the past, tent manufactures have independently determined which components they included in their publicized
weights. The Tent Manufacturers Association (T.M.A.),
under the Outdoor Recreation Coalition of America
(O.R.C.A.) umbrella, has set voluntary guidelines for how
tent manufacturers determine and report the weights of
their tents.
Under the T.M.A. guidelines, there are two weights
manufacturers can report: the Minimum Weight and
the Packaged Weight.
Minimum Weight: The Minimum Weight is the total
weight of the tent body, flysheet, and poles only; it is the
weight of the bare essentials. This is the figure most often
used for comparative purposes when purchasing a tent.
Packaged Weight (Also known as Trail Weight): The
Packaged Weight includes everything that comes with
the tent when the tent is purchased (less any shipping container): tent body, flysheet, poles, tent stuff sack, pole
sack, peg sack, pegs, cord, line tightners, user manual,
repair items and any other items included by the manufacturer other than shipping materials.
Cleaning Your Tent
LOW IMPACT CAMPING
Never machine wash or machine dry your tent. For
localized cleaning, use a sponge with warm water. When
cleaning the entire tent, wash in a tub (bathtub) of cold
water. Never use hot water, bleach, dish-washing liquid,
pre-soaking solutions, or spot removers. If you use soap,
always use a non-detergent soap. Dry your tent by pitching
it in the shade or by line drying only. Never machine dry
your tent.
Camp away from streams, lakes and trails. Use biodegradable soaps sparingly, 200 feet or more from water. Pack
out what you bring in. Please call 800.332.4100 for
more information on LEAVE NO TRACE camping.
TENT ACCESSORIES
Mountain Hardwear offers the following tent accessories:
◆
The Gear Loft—a clip-in “attic” for stowing gear
inside the tent
◆
Easton tent pegs—long-lasting, durable pegs made
from 7075 E9 aluminum
◆
The Snow and Sand Anchor—a bombproof way to
guy-out your tent in snow or sand
Storing Your Tent
Store your tent in a cool, dry environment. Pack the tent
loosely, and, if possible, leave the shock-corded poles
completely or partially assembled.
◆ V-Pegs
These accessories are available at your Mountain Hardwear
dealer.
MOUNTAIN HARDWEAR
LIFETIME WARRANTY
Mountain Hardwear guarantees that the materials and
workmanship in every product we make will stand up to
the use for which it was designed. This warranty does not
cover damages caused by improper care, accidents or natural breakdown of materials over extended time and use.
All products should be returned to us for evaluation and
will be repaired or replaced at our discretion. Damages due
to accident or improper care will be repaired at a reasonable rate.
REPAIRS
All items covered under our warranty will be repaired or
replaced (at our discretion) at no charge. We can provide
cost estimates for repairing damaged items not covered by
our warranty. California State Law requires that all items
which are to be repaired must be clean. We do not have
the facilities to wash tents. Soiled tents will be
returned to the owner for cleaning before the item can be
repaired.
The Mountain Hardwear
Warranty Department can be reached at:
Mountain Hard w e a r
4911 Central Av e n u e
Richmond, CA 94804
510-558-3000 FAX 510-559-6709
W A R NING!!! P LE ASE R E AD!
FIRE: All Mountain Hardwear tents are made of flameretardant materials, but most nylon and polyester fabric
will melt or burn when exposed to high heat or an open
flame. Never place your stove, hibachi, campfire,
or other heat source in or near your tent. We
recommend that you always position your tent upwind of
a camp fire. This will reduce the chances of having a flying
ember land on your tent. Never use a candle as a light
source inside your tent.
Do not cook with, light, or refuel a stove (or any
other heat source) inside your tent or in your
vestibule! Asphyxiation and serous injury are
possible! Stoves, hibachis, lanterns and heaters can malfunction (operator error is also possible) and can start a fire
that will spread too rapidly for occupants to escape a tent.
Using combustible materials and/or petroleum-based fuels
can increase the carbon dioxide levels within a tent
enough to cause asphyxiation to the occupants.
Maintain adequate ventilation inside your tent at
all times. Never seal your tent up completely. Always
leave a small part of a window open. Never allow your tent
to become buried in snow past the bottom of the flysheet
since this may allow the carbon dioxide and carbon monoxide levels inside the tent to become dangerously high.
Campsite selection: Consider the possibility of falling
rocks or tree limbs, lightning strikes, flash floods, avalanches, strong winds, and other objective hazards when
choosing a campsite.
Properly stake and guy out your tent at all times.
Lightweight tents are very strong for their weight and can
withstand severe weather when properly staked out and
guyed out. Always use the proper tent stakes to anchor
your tent and guylines to the ground. Use the internal
guy system (included with all four-season tents) during
severe weather. You may wish to purchase more and/or
different tent stakes and nylon cord, depending on when
and where you intend to use your tent. It is impossible for
Mountain Hardwear to include anchors for every possible
environmental condition.
IF YOU DO NOT UNDERSTAND ANY
PART OF THIS WARNING CALL
MOUNTAIN HARDWEAR AT 510-558-3000
BEFORE USING THE TENT.