1
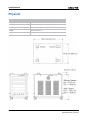
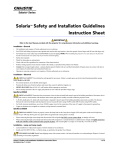
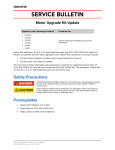
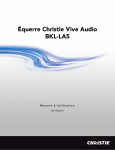
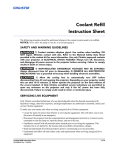
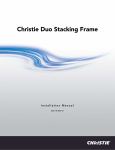
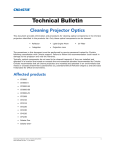
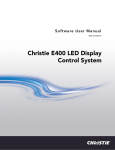
Christie Rack Mount Pedestal
Installation Guide
020-100632-03
Christie Rack Mount Pedestal
USER MANUAL
020-100632-03
NOTICES
COPYRIGHT AND TRADEMARKS
© 2013 Christie Digital Systems USA Inc. All rights reserved.
All brand names and product names are trademarks, registered trademarks or trade names of their respective holders.
REGULATORY
The product has been tested and found to comply with the limits for a Class A digital device, pursuant to Part 15 of the FCC Rules.
These limits are designed to provide reasonable protection against harmful interference when the product is operated in a
commercial environment. The product generates, uses, and can radiate radio frequency energy and, if not installed and used in
accordance with the instruction manual, may cause harmful interference to radio communications. Operation of the product in a
residential area is likely to cause harmful interference in which case the user will be required to correct the interference at the
user’s own expense.
CAN ICES-3 (A) / NMB-3 (A)
이 기기는 업무용 (A 급 ) 으로 전자파적합등록을 한 기기이오니 판매자 또는 사용자는 이점을 주의하시기 바라며 , 가정 외의 지역에서
사용하는 것을 목적으로 합니다 .
GENERAL
Every effort has been made to ensure accuracy, however in some cases changes in the products or availability could occur which
may not be reflected in this document. Christie reserves the right to make changes to specifications at any time without notice.
Performance specifications are typical, but may vary depending on conditions beyond Christie's control such as maintenance of
the product in proper working conditions. Performance specifications are based on information available at the time of printing.
Christie makes no warranty of any kind with regard to this material, including, but not limited to, implied warranties of fitness for
a particular purpose. Christie will not be liable for errors contained herein or for incidental or consequential damages in
connection with the performance or use of this material.
The product is designed and manufactured with high-quality materials and components that can be recycled and reused. This
symbol
means that electrical and electronic equipment, at their end-of-life, should be disposed of separately from regular
waste. Please dispose of the product appropriately and according to local regulations. In the European Union, there are separate
collection systems for used electrical and electronic products. Please help us to conserve the environment we live in!
Canadian manufacturing facility is ISO 9001 and 14001 certified.
GENERAL WARRANTY STATEMENTS
For complete information about Christie’s limited warranty, please contact your Christie dealer. In addition to the other limitations
that may be specified in Christie’s limited warranty, the warranty does not cover:
a. Problems or damage occurring during shipment, in either direction.
b. Projector lamps (See Christie’s separate lamp program policy).
c. Problems or damage caused by use of a projector lamp beyond the recommended lamp life, or use of a lamp supplied by a
supplier other than Christie.
d. Problems or damage caused by combination of a Product with non-Christie equipment, such as distribution systems,
cameras, video tape recorders, etc., or use of a Product with any non-Christie interface device.
e. Problems or damage caused by the use of any lamp, replacement part or component purchased or obtained from an
unauthorized distributor of Christie lamps, replacement parts or components including, without limitation, any distributor
offering Christie lamps, replacement parts or components through the internet (confirmation of authorized distributors may
be obtained from Christie).
f. Problems or damage caused by misuse, improper power source, accident, fire, flood, lightening, earthquake or other natural
disaster.
g. Problems or damage caused by improper installation/alignment, or by equipment modification, if by other than Christie
service personnel or a Christie authorized repair service provider.
h. Problems or damage caused by use of a Product on a motion platform or other movable device where such Product has not
been designed, modified or approved by Christie for such use.
i. Problems or damage caused by use of a projector in the presence of an oil-based fog machine.
j. For LCD projectors, the warranty period specified applies only where the LCD projector is in “normal use.” “Normal use”
means the LCD projector is not used more than 8 hours a day, 5 days a week. For any LCD projector where “normal use” is
exceeded, warranty coverage under this warranty terminates after 6000 hours of operation.
k. Image retention on LCD flat panels.
l. Failure due to normal wear and tear.
PREVENTATIVE MAINTENANCE
Preventative maintenance is an important part of the continued and proper operation of your product. Please see the
Maintenance section for specific maintenance items as they relate to your product. Failure to perform maintenance as required,
and in accordance with the maintenance schedule specified by Christie, will void the warranty.
Table of Contents
Introduction . . . . . . . . . . . . . . . . . . . . . . . . . . . . . . . . . . . . . . . . . . . . . . . . . . . . . 1
Features . . . . . . . . . . . . . . . . . . . . . . . . . . . . . . . . . . . . . . . . . . . . . . . . . . . . . . 1
What’s in the Box? . . . . . . . . . . . . . . . . . . . . . . . . . . . . . . . . . . . . . . . . . . . . . . . 2
Components . . . . . . . . . . . . . . . . . . . . . . . . . . . . . . . . . . . . . . . . . . . . . . . . . . . . 3
Component Mounting Options . . . . . . . . . . . . . . . . . . . . . . . . . . . . . . . . . . . . . . . . 4
Contact Support . . . . . . . . . . . . . . . . . . . . . . . . . . . . . . . . . . . . . . . . . . . . . . . . . 4
Installation and Setup . . . . . . . . . . . . . . . . . . . . . . . . . . . . . . . . . . . . . . . . . . . . . 5
Install the Pedestal Feet and Casters . . . . . . . . . . . . . . . . . . . . . . . . . . . . . . . . . 5
Adjust the Pedestal Height . . . . . . . . . . . . . . . . . . . . . . . . . . . . . . . . . . . . . . . . 6
Position the Pedestal . . . . . . . . . . . . . . . . . . . . . . . . . . . . . . . . . . . . . . . . . . . . 7
Level the Pedestal
............................................. 7
Install the Foot Brackets . . . . . . . . . . . . . . . . . . . . . . . . . . . . . . . . . . . . . . . . . 8
Install the Projector Foot Locks
.................................... 9
Configure the Rack for Side-Mounting . . . . . . . . . . . . . . . . . . . . . . . . . . . . . . . . 9
Troubleshooting . . . . . . . . . . . . . . . . . . . . . . . . . . . . . . . . . . . . . . . . . . . . . . . . 11
Hardware Troubleshooting . . . . . . . . . . . . . . . . . . . . . . . . . . . . . . . . . . . . . . . . . .11
Specifications . . . . . . . . . . . . . . . . . . . . . . . . . . . . . . . . . . . . . . . . . . . . . . . . . . 13
Supported Projectors . . . . . . . . . . . . . . . . . . . . . . . . . . . . . . . . . . . . . . . . . . . . . .13
Physical . . . . . . . . . . . . . . . . . . . . . . . . . . . . . . . . . . . . . . . . . . . . . . . . . . . . . . .14
Christie Rack Mount Pedestal Installation Guide
020-100632-03 Rev. 1 (05-2013)
i
Introduction
The Christie Rack Mount Pedestal is designed to hold any Christie Solaria Series or DLP Cinema
projector. This installation guide provides instructions for installing and adjusting the Christie Rack
Mount Pedestal.
Features
•
Adjustable height of 109.3 ~ 139.2 cm (43 ~ 55 in.)
•
Casters
•
Projector foot locks
•
Panel locks
•
30 RU of space for rack accessories (12 RU with a lamp power supply)
•
Easy cable routing and access
Christie Rack Mount Pedestal Installation Guide
020-100632-03 Rev. 1 (05-2013)
1
Introduction
What’s in the Box?
This section describes the components that are shipped for the Christie Rack Mount Pedestal
(P/N: 108-416102-XX). Verify that you have all these items before installing the pedestal.
•
4 Foot Brackets
•
•
4 Foot Locks
1 Bag of Hardware
(not illustrated)
•
•
•
2
1 Christie Rack Mount Pedestal Body
2 Vertical Supports
4 Feet
•
4 Casters
Christie Rack Mount Pedestal Installation Guide
020-100632-03 Rev. 1 (05-2013)
Introduction
Components
This diagram illustrates the main components of the Christie Rack Mount Pedestal.
A
Wire Access Slot (1 of 2)
F
Projector Foot Bracket and Projector
Foot Locks (1 of 4)
B
Wire Access Plug (1 of 3)
G
Key Lock (1 of 4)
C
Security Rail (1 of 2)
H
Side Panel (1 of 2)
D
Space Panel (1 of 10)
I
Leveling Foot (1 of 4)
E
Rubber Grommets (1 of 6)
J
Caster (1 of 4)
Christie Rack Mount Pedestal Installation Guide
020-100632-03 Rev. 1 (05-2013)
3
Introduction
Component Mounting Options
These diagrams illustrates Christie Rack Mount Pedestal component mounting options.
A
Back-Mounting
B
Front Side-Mounting
C
Back Side-Mounting
Contact Support
For assistance with common problems, see Troubleshooting on page 11.
If you are unable to resolve your issue, contact Christie support. Provide your support representative
with the Christie Rack Mount Pedestal part number: 108-416102-XX, so that they can better assist
you. For contact information for your region, see the back cover of this document.
4
Christie Rack Mount Pedestal Installation Guide
020-100632-03 Rev. 1 (05-2013)
Installation and Setup
This section provides information and procedures for positioning and installing the Christie Rack
Mount Pedestal.
Complete the procedures in the order that they are provided.
Install the Pedestal Feet and Casters
Two or more people are required to safely lift and install the Christie Rack Mount Pedestal.
Failure to comply could result in death or serious injury.
1. Position the pedestal upside down.
2. Preassemble the leveling feet:
a. Thread 1 M16 lock nut onto each of the four leveling
feet.
b. Adjust the space between the lock nut and the head of
the leveling foot until it is approximately 6 cm
(2.5 in.).
3. Thread 1 leveling foot into each of the four corners of the
pedestal.
4. Optionally, attach 1 caster to each of the four corners of the
pedestal using 4 screws for each caster.
Christie Rack Mount Pedestal Installation Guide
020-100632-03 Rev. 1 (05-2013)
5
Installation and Setup
Adjust the Pedestal Height
Two or more people are required to safely lift and install the Christie Rack Mount Pedestal.
Failure to comply could result in death or serious injury.
Adjust the pedestal height, so that (when in use) the center of the projector lens points to the center
or above the center of the port window.
1. Remove 4 screws from each of the four outside
bottom corners of the pedestal.
2. Measure the distance from the center of the port
window to the floor. This is the approximate
height required to center the projector lens with
the port window. Use a chart below to determine
the required leg extension position for your
projector.
For CP2220, CP2230, CP4220, and CP4230:
Approximate Height to Center of the
Projector Lensa
Leg Extension
Position
111.5 ~ 116.4 cm (43.9 ~ 45.8 in.)
-
116.5 ~ 121.4 cm (45.9 ~ 47.7 in.)
1
121.5 ~ 126.4 cm (47.8 ~ 49.7 in.)
2
126.5 ~ 131.4 cm (49.8 ~ 51.7 in.)
3
131.5 ~ 136.5 cm (51.8 ~ 53.7 in.)
4
For CP2210, Solaria One, and Solaria One+:
Approximate Height to Center of the
Projector Lensa
Leg Extension
Position
112.6 ~ 117.5 cm (44.3 ~ 46.2 in.)
-
117.6 ~122.5 cm (46.3 ~ 48.1 in.)
1
122.6 ~ 127.5 cm (48.2 ~ 50.1 in.)
2
127.6 ~ 132.5 cm (50.2 ~ 52.1 in.)
3
132.6 ~ 137.6 cm (52.2 ~ 54.1 in.)
4
a. 1) Height may vary due to the variations in the projector foot height.
2) Caster removal subtracts 1.7 cm (0.7 in.) from the minium heights. 3)
Pedestal feet provide an additional 5 cm (2.5 in.) of leveling adjustment.
For example, if the distance from the center of the port window to the floor is 125 cm (49.2 in.)
and you have a CP4230, set the leg extension position to 2.
6
Christie Rack Mount Pedestal Installation Guide
020-100632-03 Rev. 1 (05-2013)
Installation and Setup
3. Slide the bottom frame (containing the pedestal feet)
of the pedestal up.
4. Make sure that all four corners of the pedestal are
adjusted to the same leg extension position.
5. Install 4 screws into each of the four outside bottom
corners of the pedestal, to hold the extended frame in
position.
6. Turn the Christie Rack Mount Pedestal over, so that its feet or casters are on the floor.
Position the Pedestal
Place the pedestal in front of the port window so that the front of the stand (the side with the rubber
grommets) faces the port window.
Level the Pedestal
• Leveling feet are used for leveling only. Do not use the leveling feet to tilt or angle the
Christie Rack Mount Pedestal.
• Leveling feet must be sufficiently screwed into the base of the pedestal. For rack stability,
make sure that each pedestal foot is correctly installed.
The Christie Rack Mount Pedestal feet provide a 5 cm (2.5 in.) range of leveling adjustment.
1. Loosen 1 lock nut on each of the four pedestal feet using a
24 mm (15/16 in.) wrench.
2. Place a leveling device on top of the pedestal.
3. Adjust the height of each pedestal foot until the leveling
device indicates that the pedestal is level.
Turn the feet on the bottom of the pedestal clockwise or
counter-clockwise 1/8th of a turn at a time to extend or
retract them.
4. Tighten 1 lock nut on each of the four pedestal feet.
Christie Rack Mount Pedestal Installation Guide
020-100632-03 Rev. 1 (05-2013)
7
Installation and Setup
Install the Foot Brackets
Two or more people are required to safely lift and install the projector. Failure to comply
could result in death or serious injury.
1. Determine the bracket location for your projector
model.
A
Front foot location for CP2220,
CP2230, CP4220, and CP4230.
B
Rear foot location for CP2220,
CP2230, CP4220, and CP4230.
C
Rear foot location for CP2210,
Solaria One, and Solaria One+.
D
Front foot location for CP2210,
Solaria One, and Solaria One+.
2. Align 4 foot brackets with the holes on the top of the pedestal. Position the brackets with the flat
portion of the bracket facing in.
3. Loosely install 4 screws in each of the 4 foot brackets.
4. With two or more people, place the projector on top of the Christie Rack Mount Pedestal.
If required, adjust the foot bracket location to accommodate the projector.
5. Tighten the foot bracket screws.
6. Adjust the projector feet to obtain the required height and tilt of the projector.
See your projector manual for adjustment instructions.
7. Make sure enough space is provided between the projector and the foot brackets. This space is
required to install the projector foot bracket locks.
8
Christie Rack Mount Pedestal Installation Guide
020-100632-03 Rev. 1 (05-2013)
Installation and Setup
Install the Projector Foot Locks
1. Slide 1 projector foot lock over the projector foot
bracket.
2. Install 1 screw in each of the four projector foot
locks to secure them in position.
Configure the Rack for Side-Mounting
By default, the Christie Rack Mount Pedestal is configured for back-mounting of components.
Complete this procedure if side-mounting of components is required.
1. Remove the 1 side panel from each side of the rack:
a. Unlock the side panel.
b. Press down on the 2 panel latches and tip the
panel away from the rack.
c. Lift the panel up and out from the rack and
set aside.
d. Repeat steps a-c for the second panel.
2. Remove 2 horizontal supports from each side of
the rack:
a. Remove 2 screws from each end of the
horizontal support.
b. Set the horizontal support aside.
c. Repeat steps a-b for the remaining 3
horizontal supports.
Christie Rack Mount Pedestal Installation Guide
020-100632-03 Rev. 1 (05-2013)
9
Installation and Setup
3. Install 1 vertical support on each side of the rack using 2 screws, 2 lock washers, and 2 washers
in each of the four mounting holes.
As illustrated, make sure that both vertical supports are installed using the front or using the
back side-mounting holes. Vertical support placement determines whether components are
installed at the front or the back side-mounting location.
A
Vertical support installed in the
front mounting holes
B
Vertical support installed in the back
mounting holes
4. If required, install components.
5. Replace the side panels that were removed in step 1.
10
Christie Rack Mount Pedestal Installation Guide
020-100632-03 Rev. 1 (05-2013)
Troubleshooting
This section provides information and procedures for resolving common issues with the Christie Rack
Mount Pedestal. If you cannot resolve an issue, see the back cover of this document for contact
information for your region.
Hardware Troubleshooting
This section provides basic hardware troubleshooting.
Problem
Resolution
Projector feet do not extend or
contract.
• Make sure that the projector foot locking nut is all the way down and
loose.
The lamp power supply (LPS)
installation instructions are not
provided.
• Reference your projector user manual.
Christie Rack Mount Pedestal Installation Guide
020-100632-03 Rev. 1 (05-2013)
11
Specifications
This section provides the specifications for the Christie Rack Mount Pedestal.
Supported Projectors
Projector
Solaria One
Solaria One+
CP2210
CP2220
CP2230
CP4220
CP4230
Length
Width
Height
Weight
69.7 cm
68.8 cm
39.5 cm
57.75 kg
(27.4 in.)
(27.1 in.)
(15.6 in.)
(119 lbs)
69.7 cm
68.8 cm
39.5 cm
55.79 kg
(27.4 in.)
(27.1 in.)
(15.6 in.)
(123 lbs)
66.5 cm
68.8 cm
39.5 cm
43.5 kg
(26.2 in.)
27.1 (in.)
15.5 (in.)
(96 lbs)
117.5 cm
64 cm
48 cm
116 kg
(46.3 in.)
(25.2 in.)
(18.9 in.)
(256 lb)
119.4 cm
63.5 cm
48.3 cm
111 kg
(47 in.)
(25 in.)
(19 in.)
(245 lb)
133.9 cm
65 cm
48.3 cm
111 kg
(52.7 in.)
(25.6 in.)
(19 in.)
(245 lb)
136.9 cm
65 cm
48.3 cm
111 kg
(53.9 in.)
(25.6 in.)
(19 in.)
(245 lb)
Christie Rack Mount Pedestal Installation Guide
020-100632-03 Rev. 1 (05-2013)
Part Number
138-001102-XX
138-001113-XX
127-001102-XX
127-002103-XX
127-003104-XX
129-001102-XX
129-002103-XX
13
Specifications
Physical
Specification
Value
Height (with castors)
87.7 ~ 103.2 cm (34.5 ~ 40.6 in.)
Height (without castors)
84 ~ 103.2 cm (33 ~ 40.6 in.)
Width
67.6 cm (26.6 in.)
Length
103.4 cm (40.7 in.)
Weight
70 kg (154 lb)
14
Christie Rack Mount Pedestal Installation Guide
020-100632-03 Rev. 1 (05-2013)
Corporate offices
Worldwide offices
USA – Cypress
ph: 714-236-8610
United Kingdom
ph: +44 118 977 8000
Eastern Europe
ph: +36 (0) 1 47 48 100
Singapore
ph: +65 6877-8737
Japan
ph: 81-3-3599-7481
Canada – Kitchener
ph: 519-744-8005
France
ph: +33 (0) 1 41 21 00 36
Middle East
ph: +971 (0) 4 299 7575
Beijing
ph: +86 10 6561 0240
South Korea
ph: +82 2 702 1601
Germany
ph: +49 2161 664540
Spain
ph: + 34 91 633 9990
Shanghai
ph: +86 21 6278 7708
For the most current technical documentation, please visit www.christiedigital.com