1
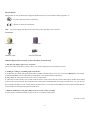
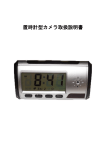
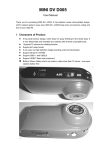
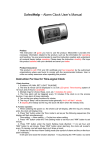
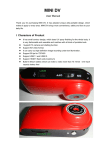
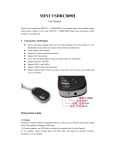
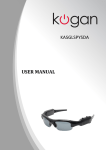
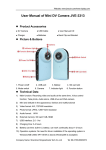
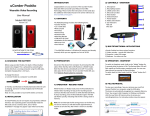
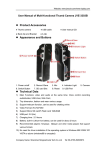
Spy Digital Alarm Clock DVR with Motion Detector (4GB)
Model # DVRMFC
Instruction Manual
Table of Contents
Preface and Product Assurance
Page 3
Instructions for use of the alarm clock
Page 3
DVR diagram
Page 4
DVR instructions
Page 5
DVR file storage instructions
Page 6
Precautions
Page 6
Relevant parameters of DVR
Page 7
Power source and fittings
Page 8
Troubleshooting
Page 8
2
Preface
Thank you for purchasing the MULTI-FUNCTION Clock DVR. This instruction manual will guide you on how to use
the product. We recommend that you read it carefully before operating the device and save it for future reference.
Product Assurance
This product meets all FCC requirements and is CE certified.
Instructions for Use of the Alarm Clock
I. Basic functions
1.
5 buttons: HR, MIN, SET, LIGHT, TALK/SNZ.
2. The hour & minute will be displayed in the LCD panel. Time can be displayed in either 12 or 24 hour format.
3.
Multiple rings for choice: beep, clock, etc. (5 melodies are available)
4. When the alarm is sounding, you can press the snooze button. The snooze function will work for only 60 minutes (6
ten-minute intervals).
5.
The ring of “Beep” will be become louder generally. And it will last 1 minute.
6.
If adopting the melody as the ring, the clock will alarm when the melody ends.
II. Function operation
Please note that there is a protective plastic screen protector on the LCD display.
or remove it.
1.
You may leave this screen protector on
When switching the power on, the whole LCD will display; after the ring of melody ends the clock will display time.
2. Pressing the “HR” button will change between 12-hour and 24-hour time. Pressing the “MIN” button will change the
alarm sound.
3. To set the time, press and hold the “SET” button until the display begins to flash. You can now release the “SET”
button. Once the display is flashing if you do not press any buttons within 10 seconds the unit will beep and the display
will stop flashing. While the display is flashing, press the “HR” button to change the hour and press the “MIN” button to
change the minutes. If you hold down the “HR” or “MIN” key for 3 seconds the numbers will advance faster. Once you
have the correct time entered, simply let the clock sit for 10 seconds.
4. To set the wake alarm, press and hold the “SET” button until the display starts to flash. Then press the “SET”
) symbol in between the “:”. While the display is flashing, press the “HR” button to
button and you will see the (
change the hour and press the “MIN” button to change the minutes. To have the alarm sound you will need to follow step
5 below.
5. To turn the on-the-hour chime and turn on the alarm, press and hold the “SET” button until the display starts to flash;
press the “SET” button two times. You will now see the on-the-hour chime symbol (
) and the alarm symbol ( )
and the ( ) flashing. Pressing the “HR” button once will set the on-the-hour chime to sound only between the hours of
7:00 am to 9:00 pm. The ( ) symbol will be displayed. Pressing the “HR” button again will turn off the on-the-hour
alarm. Pressing the “HR” button a third time will turn off the on-the-hour chime and the chime between hours of
7am-9pm. . Press the “MIN” button to turn off the wake alarm and press “MIN” again to turn the wake alarm ( ) back
on. When the wake alarm symbol is on the screen ( ) press “SET”. Pressing the “MIN” key will allow you to select
the alarm sound. If a melody is playing you can press the Talk/ Snz button to stop it early or let it play through and it
3
will end automatically.
6.
Press “LIGHT” to turn the background light on and off.
7.
Press the “TALK/SNZ” button on top at any time to hear the time.
DVR Diagram
Time-telling/ Talk/
SNZ button
I. Structure Diagram
Rotational cover
1、
、Alarm Clock
TF card
Lens
USB Port
Turn ON
Electric Clock Function Button
Turn OFF
Receiver
2、
、Remote controller
Transmitter
Switch button
Motion detection video
Take a photo
Video
Sound recording
4
III. Product Introduction
This product is a high-resolution 30-frame (640X480) remote video surveillance clock with an external TF Card. As a multifunctional
high-tech product, the product is available with multiple functions such as video, sound recording, motion detection video, take a
photo, cyber chat, electric alarm clock and file storage; with the high-capacity battery. The unit will record for 2 ½ hours on a fully
charged battery. However, you can store over 12 hours of video or over 25 hours of audio recordings on a 32GB micro SD card.. The
product can replace the high-resolution video with 2 million pixels, sound and file automatically. Meanwhile, the product is designed
with multiple languages for telling the time. It supports 32GB storage. Its TF card can be used for a long time and remote controller is
easy to use. With the best imperceptibility, this product will be your ideal assistant to prevent theft and get evidence.
IV. Instructions for Use of the DVR:
1.
Open the rotational cover on the right side of the clock. Make sure the TF card is in its slot. Slide the switch up to “ON.”
blue lamp should light and the DVR is in standby mode.
The
2.
Point the remote control at the receiver and press
lamp will turn on.
3.
When the DVR is in standby mode, press and release
to start recording video. The blue lamp flashes 3 times and then turns
off.; the device is now recording. Pressing
again will stop the recording and place the DVR in standby mode again (blue
lamp). If recording is allowed to continue, the unit will record for 20 minutes, then save the video file and continue recording until
the micro SD card is full or the battery is drained of power.
4.
While in standby mode, press and hold
to turn the DVR off. Press the button again to turn the unit on. The blue
button to start recording audio; after the blue lamp starts to flash, the unit will start
recording; Press
again to stop recording. The audio file will be saved and the unit will be placed in standby mode (blue light).
If allowed to continue recording, the unit will record audio for 20 minutes, then save the audio file and continue recording.
5.
6.
button to get in photograph mode. Pressing this button again will take a picture. When pressing this
In standby mode, press
button, the blue lamp will flash; after taking the photo, it will return to standby mode.
In standby mode, press
button activate motion detection mode. The blue lamp will begin flashing quickly. If motion is
detected, the blue lamp will flash t slowly two times and the device will start to record video. If there is no motion detected, the
blue lamp will return to flashing quickly and return to motion detection mode (the default length for the video file is 3 minutes).
7.
Web Camera Mode: To use this DVR item as a webcam you will need to install the Web camera driver
(SPCA1528_V2250_WHQL_MultLan ) located on the included CD-ROM (located in the ENGLISH user manual folder) first.
You may get a message stating the “driver has not passed Windows logo testing”. Just click on continue to finish installing the
driver. You may need to reboot your computer. Slide the switch up to “ON” and insert the DVR into an empty USB port on your
computer when the red lamp will turn on. Turn on the device by pressing
on the remote control, it will access the PC CAM
mode; If you are connecting the DVR as a web camera for the very first time you will see the Found New Hardware Wizard
screen. Make sure that the Install the software automatically is selected and select Next. (Windows will search for the standard
camera driver installed when you installed the Webcam driver (SPCA1528_V2250_WHQL_MultLan). Click on continue
anyway if prompted about the Windows logo testing. After a few minutes you should see the completing the found new
hardware wizard, click on Finish. You can now use the DVR as a web camera.
8.
Charging: When the battery’s capacity is low, the blue lamp will keep flashing or the screen display will be unclear. The battery
needs to be recharged. If the battery dies during operation, the file will be saved automatically. To charge the unit, slide the on/off
switch to the “OFF” position, plug in A/C adapter, and the red lamp will come on and remain on while charging. You will need
to charge the battery for 4 hours. You can also charge the battery by connecting this device to a computer via the USB adapter.
(
Please use only the adapters provided with the device; if the device gets hot or other unexpected situations occur while
charging, please disconnect the adapter's power source.)
9.
Reset: If the unit stops working properly, slide the switch to “OFF” and then back to “ON.” This will reset the unit.
10. Recorder Date:
To set the time and date stamp first make sure the TF card is inserted in the DVR then you will need to run the
SyncTime program located on the included CD-ROM.
The first time you want to sync the time and date stamp you will need to
install the driver SPCA1520_V1200_WHQL which is located on the included CD-ROM in the 1520 file folder (the first folder
listed on the CD-ROM).
Once you have installed the driver file slide the power switch to the OFF position. Connect the DVR to
5
an open USB port on your computer using the included USB cable.
come on.
The blue LED will come on and then the red LED will
Once the red LED is on double click on SyncTime (located on the CD-ROM).
it may take 2-3 minutes but you will see 1 device connected and Ready.
synchronize complete.
computer.
Press the power button on the remote,
At this time just click on Synchronize.
You will see
You can now remove the DVR from the computer and the time and date will be the same as your
If you do not get the 1 device connected message after 3 minutes unplug the USB cable from the DVR and reconnect
to the DVR and then follow the steps above.
V. Instructions for File Storage
When finishing video-recording and other operations, put the switch to “ON” position, connect it to your computer by USB cable. For
the best play back copy the file or cut and paste it to your computer.. Or you can remove the TF card and use a card reader to read the
data on the card. To view the recordings double click on the DCIM folder and then double click on the 100MEDIA folder.
The Media player / KM player is recommended.
USB data cable
USB port of
computer
VI. Precautions
Please note that it is the responsibly of the customer to check all state, local and federal laws governing the use of video Spy (hidden)
cameras before ordering and/or using hidden or covert video and/or audio surveillance equipment. In most states, hidden video
surveillance is legal as long as it is not done in an area where reasonable privacy is expected. These areas include, but are not limited
to, bathrooms, bedrooms and dressing rooms. In most states, video surveillance does not require the consent of parties involved.
However, in some states, the use of audio recording or surveillance requires the consent of all parties involved. There are also various
federal and state laws regulating the use, and possession, of some types of audio surveillance equipment. We recommend that you
check all state, local and federal laws regarding the use of video/audio Spy (hidden) cameras.
Software upgrade: In order to keep the device performing well, the product software will be updated continuously. The device is
designed the function to update by user itself, please claim the latest software and upgrading method towards your local dealer.
Working temperature: Please do not use this device in extreme cold or heat.
Working humidity: Please do not use the device in a damp or humid environment. This device is not water-proof.
Video luminance: Please do not point the camera at the sun or other intensive light source; otherwise, it may damage the optical
apparatus.
Cleanliness requirement: Please do not use the device in an environment full of dirt; otherwise, it may cause the lens or other parts to
become dirty and influence video effect. You can use lens wiping paper or glass-cleaning cloth.
Other precautions:
6
This device is a precision electronic product; please keep it away from intensive impact, shock, intense magnetic field or electric field.
VII. Relevant Parameters
Pixel
Resolution
Video format
Frame number
Vision angle
Induction photographing
Minimal illumination
Battery capacity
Storage time (with 32GB micro SD card)
Remote operating distance
Scope for sound recording
Power consumption
Storage temperature
working temperature
working humidity
Type of memory card
Capacity of memory card
Player software
USB Interface
Operating system
Time consumed of storage
Working Time
Charging time
2.0 megapixel
640x480(video)、1280 x 960 (photo)
AVI
30fps
72°
6 meters for Straight-line distance
1LUX
2200MA
Over 12 hours video / over 25 hours audio
15m
40m2
130MA / 3.7V
-20~80℃ (-4 to 170 F)
-10~60℃ (14 to 140 F)
15~85 % RH
Mini SD card
32GB maximum
Media player / KM player
USB1.1/2.0
WIN 2000/ XP / Vista32 / Windows 7
1GB/ 1 hour 40 minutes* Approximately
3 hours * Approximately
About 4 hours
IX. Troubleshooting
Problem
Cannot turn on
Solution
Remove the insulator
loss of Power, charge accordingly;
Replace the battery or adapter
re-start camera; low-power charging reminder;
delete redundant files from the card, put in TF
Card or replace TF Card.
Align with the receiver’s head, remove the
insulator of remote controller, replace battery or
wait for reading of the card
Replace the data cable or try different computer
Charging
Cannot charge
Blue light flashes rapidly
Remote controller is hard to use
Cannot connect with computer
Clock’s screen flashes or character is displayed
incompletely
Sound is recorded with noise or video is not clear
Other problems
Charging, replace TF card
Please contact local seller
7
Power Source
This product can only be allowed to comply the authorized power sources with the following marks, i.e.:
UL mark / American Power Certification
CE mark / UN Power Certification
Note: The power supply may get warm on the surface when operating. This is normal.
Accessories:
Compact Disc
USB Data Cable
Wall Adapter
Instructions Manual
DVRMFC Digital Alarm Clock Spy Camera DVR Basic Troubleshooting
1. Why does the display appear to be scratched?
There's most likely a thin plastic protective film cover over the display that can be peeled off or left on.
2. Nothing is working or responding right out of the box.
A. If applicable, be sure the clear plastic battery tabs extending outside the battery covers are removed from BOTH the clock's battery
compartment AND the remote control battery compartment to activate the batteries in both units.
B. Fully charge the Alarm Clock battery prior to use (see instructions).
C. TWO steps for ON and TWO steps for OFF. Slide the clock’s on/off switch to the ON position and then press the RED power button
on the remote to activate the unit. Be sure the part of the round remote with the Red button is facing toward the clock. Now you can press
the recording mode button of choice on the remote (see instructions). To turn off, press the RED power button again and then slide the
on/off switch to the OFF position on the side of the clock.
3. Windows Media Player only plays audio when I try to play a video recording.
You may need to download a CODEC to play the file or try a different media player.
Revised 5/7/2014
8