1
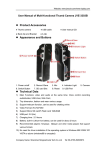
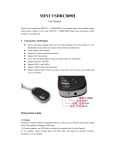
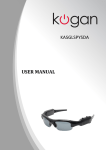
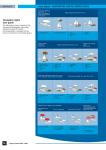
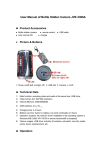
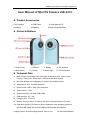
Website: www.jvecctv.com/www.viptyty.com User Manual of Mini DV Camera JVE-3313 Product Accessories ● DV Camera ● USB Cable ● Charger ● Batteries ● User Manual CD ● Back Clip and Bracket Picture & Buttons 1. Power on/off 5. Mode switch 2. USB port 6. Camera 3. Battery 7. Indicator light 4. SD card slot 8. Function button Technical Data 1) Main function: Recording video and audio at the same time, Voice control function, Take photo, Audio alone, USB drive and Web camera 2) Mini and delicate in the appearance, fashion and multifunctional 3) Video format: AVI, 720*480 resolution 4) Photo format: JPEG, 1280*1024 resolution 5) Audio format: WAV 6) External memory: SD card 1GB-16GB 7) USB interface: 2.0(Hs) 8) Charging time: 3-4 hours 9) Battery use time: built-in Li battery, can work continually about 1-2 hours 10) Operation systems: No need for driver installation if the operating system is Windows ME/ 2000/ XP/ VISTA or above (Windows98 is excepted) Company Name: Shenzhen Mingnanhuitai Tech.Co.,Ltd Tel: 86-0755-89505873 Website: www.jvecctv.com/www.viptyty.com Operation Insert Card Please insert SD card or TF card into card slot with the mental facet on the opposite direction of camera before use. Switch on/ voice control recording Push the Power on/off button to the “on” position under power off mode and press the Mode switch button shortly. the red light keeps on, it comes into voice control standby mode. (after power on, the camera comes into voice contrrol mode) The device will record automatically when the sound is above 60 DB. at this moment, the red light keeps on and blue light blinks. It will record 2 minutes and then stop and save the data. When the surrounding sound is less than 60 DB, it turns to standby mode. Recording video and audio by manual Under voice control standby mode, press the Mode switch button once, the red light is on, the blue light blinks. It starts to record, Press the Mode swtich button again, the red light is on and the blue light turns off, the video file is saved and come back to standby mode. Photo Under manual control recording standby mode, press the Mode switch button once, ( that‟ s to say, press the Mode switch button 2 times after power on). it will turns into photo mode. Press the Function button once, the red light keeps on and the blue light blinks one time, it indicates that a photo is taken and back to photo standby mode. If you want to continue to take photo, just repeat the aboved operation. Take audio alone Under photo standby mode, press the Mode swtich button once, ( that‟s to say, press the Mode switch button 3 times after power on).it will turns into audio standby mode. Press the Function button one time, the red and blue light keep on and it start to take audio alone. Press the button again, the red light is on and blue light turns off, the audio file is saved and back to standby mode. If want o continue to take audio, just repeat the aboved operation. Mode switch Voice control recording, manual recording, photo and audio alone are a recycling mode. The display of indicator light is different under different mode. If need turns into Company Name: Shenzhen Mingnanhuitai Tech.Co.,Ltd Tel: 86-0755-89505873 Website: www.jvecctv.com/www.viptyty.com a certain mode directly after power on, just press the Mode switch several times as you like. But should pause 2-3 seconds between two modes. Attention: If it‟s working under a certain mode, you‟ d better save the file at first by press the Fuction button. Then press the Mode switch button. Because if you press the Mode switch button directly under working mode, there is no time to save the file. witch off Push power on/off button to the “off” side under any mode, all lights turn off and the device will stop working. Press the Mode switch button for several seconds under any standby mode to power off. Attention: Under any mode, the file cannot be saved if push power on/off button to the “off” side directly. Reset Under incorrect operation or a certain reason, the device may stop working, at this time, need to reset the device Push the power on/ off button to the “off” side directly Dismount the battery directly to reset the device Attention: Please try to invoid to dismount the battery, because it will decrease the life-span of the device. If you need to change the battery, should be under power-off mode. Charging If it is low electricity, charge the device using the charger. The green light of the charger keeps on while being charged. The green light trurns off when it is fully charged. Playback video Connect the camera to computer via USB cable and play back video on computer. Please make sure there is playback software in the computer before connecting. Setting time When using the device for the first time, you can reset the time as follows: According to the format: The first line: [date] the second line : 2009/12/12 the third line:12:12:12 Edit the file named “TAG. txt”, then copy it to the root of the disk of the camera. When Company Name: Shenzhen Mingnanhuitai Tech.Co.,Ltd Tel: 86-0755-89505873 Website: www.jvecctv.com/www.viptyty.com starting the camera again next time, the time will be reset. Attention: Before setting time, push the Power on/off button to the “on” side then press the Mode switch button to power off. Because to the “off” side, the device is no power completely and still need to reset the time next time. Used as Web camera Insert the user manual CD into computer, find and install the web camera driver SPCA1528 PC Driver.exe, then connect the camera via USB cable to computer under power-on mode. At this time, it can be used as web camera. Connect the camera to the computer via Usb cable under power on or power off mode, it „ s used as U disk, press the Mode swtich button to web camera mode. Attention 1) There are three occations to power off automatically If it‟ s low electricity while recording, the device will save the data at first then power off automatically. When SD card is full, the indicator light blinks quickly, and save the date at first then power off automatically If no operation within 45 seconds under any standby mode, the device will power offf automatically. 2) When taking video continually, the system will automatically generate a new video file after each operation. 3) Make sure insert the SD card into the slot before use, if no card, the device will power off antomatically in 15 seconds. If no card before power on, it‟s easy to go dead. 4) Connect to computer: the time for computer with different system or configuration to identify the hardware is slightly different. During this period, please wait for a moment. If computer can‟t identify, please make sure your operating system, drivers and USB interface cable in good work order, then connect again. 5) Under a bright environment, keep camera vertical, stable and keep certain distance from the scene you want to record in order to achieve a best effect . 6) As the device has built-in high-capacity polymer lithium battery, so it has a memory effect .We advise in the first 5 times of usage, charge the battery fully after the battery is out of use, so that the battery can work with its max working hours perfectly. Company Name: Shenzhen Mingnanhuitai Tech.Co.,Ltd Tel: 86-0755-89505873