1
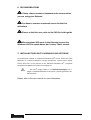
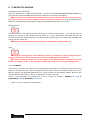
GETTING STARTED
TABLE OF CONTENTS
1.
INTRODUCTION .............................................................................. 3
2.
SECURITY WARNINGS .................................................................... 4
3.
DETAILED AND IMPORTANT SAFETY INSTRUCTIONS .................... 5
4.
IMPORTANT NOTICES .................................................................... 6
5.
REAR PANEL ................................................................................... 7
6.
RECOMMENDATIONS .................................................................... 8
7.
INSTALLING THIRD PARTY HARDWARE AND SOFTWARE .............. 8
8.
STARTING THE RHIZOME ............................................................... 9
9.
SWITCHING THE RHIZOME APPLICATION OFF (RESET) ............... 10
10. SWITCHING THE RHIZOME OFF (on the machine)....................... 11
11. SWITCHING THE RHIZOME OFF (with Windows XP).................... 11
12. FAQ LIST ....................................................................................... 12
2
1. INTRODUCTION
Dear User, thank you for choosing the Rhizome
We are very proud to count you amongst our first 100 users. This status will give you special advantages :
•
•
•
Free upgrade of the software during 2 years
Skype conference with our products specialists
A very specific attention to your needs, questions and possible problems.
Your user guide is available by download on our web site.
First of all,
think about register your product on our web site to get a full access to our OS updates !
Register process
1. go to http://en.feeltune.com/support/register-customer.html
2. fill the form
3. Enter your licence XPE (3 last chars)
4. Enter your serial number (2 last number)
-
Before using the device, carefully read the sections entitled "safety instructions" and
"important notes". These sections provide important information concerning the proper
operation of the Rhizome. The manual should be saved and kept on hand as a convenient
reference.
AFTER SALES SERVICE
+33 (0)4 84 25 20 03
[email protected]
3
2. SECURITY WARNINGS
Z
Z
CAUTION
RISK OF ELECTRIC SHOCK !
DO NOT OPEN !
X
ATTENTION
X
RISQUE DE CHOC ELECTRIQUE !
NE PAS OUVRIR
CAUTION
To avoid risks of electric shock, do not open the devices. Refer all servicing to
qualified service personnel. Servicing is required when the apparatus has been
damaged in any way.
WARNING
To avoid fire or electric shocks hazards, do not expose the device
to rain or humidity.
Z
X
This symbol is intended to alert the user to the presence of
uninsulated “dangerous voltage” within the product’s enclosure that
may be of sufficient magnitude to constitute a risk of electric shock to
persons.
This symbol is intended to alert the user to the presence of
important operating and maintenance (servicing) instructions in the
literature accompanying the product.
As per the 2002/96/CE European Directive, devices bearing this
label and sold in the countries of the European Union must be
recycled as per regulation of the country.
Technical specifications and appearance are subject to change without notice. The
information contained herein is correct at the time of printing. All trademarks are the
property of their respective owners. FEELTUNE accepts no liability for any loss which
may be suffered by any person who relies either wholly or in part upon any
description, photograph or statement contained herein. Colors and specifications may
vary slightly from product. This manual is copyrighted. No part of this manual may be
reproduced or transmitted in any form or by any means, electronic or mechanical,
including photocopying and recording of any kind, for any purpose, without express
permission of FEELTUNE. FEELTUNE is a trademark.
4
3. DETAILED AND IMPORTANT SAFETY INSTRUCTIONS
1. Read these instructions.
2. Keep these instructions.
3. Heed all warnings.
4. Follow all using instructions.
5. Do not use this device near water or any type of liquid.
6. Clean the device with a dry cloth.
7. Do not block ventilation openings of the device. Install the device as per the instructions
provided by the manufacturer.
8. Do not place the device near a heating source.
9. Never defeat the safety purpose of the bipolarized or grounding-type plugs. Groundingtype plugs have two blades and a third grounding prong provided for safety. If the provided
plug or power-supply cord do not fit into your outlet, consult an electrician for the change
of the outlet.
10. Install the power-supply cord in a way to prevent any damage, especially near plugs,
electric extension leads and device.
11. Only use accessories or additional devices specified by the manufacturer.
12. Only use with carts, stand, tripod and work surfaces recommended by the manufacturer or
supplied with the device. If a cart is used, it must be with caution to avoid injury in case of
fall.
13. Unplug the device during lightning storms or if unused for a long period of time.
14. All service operations must be done by a qualified professional. No service is necessary
expect if the device has been damaged in any way (damages on the power-supply cord or
the plug for instance) or if a liquid has been spilt inside the device or if an object has fallen
into it or if it has been exposed to rain or humidity or if it does not operate properly or if it
has been dropped.
5
4. IMPORTANT NOTICES
1. Be cautious when using rotating encoders and buttons. Rough manipulation could lead to
dysfunctions.
2. When you plug and unplug wires, hold connectors. Never pull on the cords.
3. To avoid damaging your hearing system and your sound system, heed to a reasonable sound level.
Never listen to loud music for prolonged period as it could cause deafness, especially if you use
headphones.
4. When starting the software of the Rhizome, check the master level as well as the sound system are
at their minimum levels. When listening to your track, progressively high the volume up in order to
reach the chosen sound level, without disturbing people near you and in respect of the law and
regulations pertaining to individuals’ safety.
5. In order to ventilate the device, never start the Rhizome when it is in a flat position. This position is
only for storage and transport (see. hereunder).
6. The Rhizome must be used according to the 2 last positions (see hereunder) , the first one is only
be used to the transport.
• To orientate the device, pull both spring buttons located at the top of the handles towards the outside,
while lifting the device. Once the Rhizome is in the chosen position, the handles will block automatically.
Handles blocking
buttons : pull to unlock
6
5. REAR PANEL
1. POWER PLUG
Connect the power cord included to this inlet.
2. JACK OUTPUTS (RHIZOME XE & UXE)
These jacks 6.35" output the audio signal to your amplification system or mixer.
3. D-SUB 9 PINS
Digital SPDIF and AES access with RME BO9632 or BO968 adapters (not included).
4. OPTICAL INPUT
5. OPTICAL OUTPUT
6. D-SUB 15 PINS
Analog access (2 female XLR inputs – 2 male XLR outputs – 1 female Jack 6.35" output phones) &
MIDI (1 DIN MIDI input – 1 DIN MIDI output) with included RME BO9632XLRMKH adapter.
7. USB
6 USB plugs for MIDI controllers, storage keys & disks, audio & MIDI interface, i-Lock & Synchrosoft
keys, keyboard, mouse...
8. ETHERNET RJ-45
Connect an Ethernet RJ-45 network cord to register the Rhizome online and download plug-in &
sound banks only on authorized websites.
X
For the security of your device, the Rhizome is only opened to approve audio websites and
not allowed to access the entire web.
9. FIREWIRE IEEE 1394
Connect third party audio interfaces.
10. HDMI
Connect a HDMI screen.
11. DVI-I
Connect a display screen to the Rhizome to edit some VST plugins, install your plugins and
softwares or organize your data (VGA compliance with included adapter).
12. PS2 PORT
Connect a mouse or a keyboard.
13. MOTHERBOARD AUDIO ACCESS
X These connectors are not used in the Rhizome. Do not connect anything here.
7
6. RECOMMENDATIONS
X Please, always connect a keyboard and a mousse when
you are using your Rhizome
X You have to connect an external screen for the first
utilizations
X Please, at the first uses, refer to the FAQ list in this guide
XWhen windows XPE starts in the Rhizome Screens the
Windows LOGO is upside down, don’t worry That’s normal.
7. INSTALLING THIRD PARTY HARDWARE AND SOFTWARE
As the Rhizome is based on a Microsoft Windows XP® kernel, he has the same
behaviour of a classical computer. Connect a keyboard, a mouse and a display
screen then look at the manual of the Microsoft Windows XP® compliant
hardware and software to install new components.
X
The VST® plugins folder is « C:\Rhizome\Vstplugins ».If a
plugin is installed elsewhere as this place, it will be ignored by the
Rhizome host.
Please, refer to the user manual for more information
8
8. STARTING THE RHIZOME
Installation and connections
Place your Rhizome on a stable and safe support, connect the provided RME BO9632XLRMRH adapter on
the connector D-Sub of the RME sound card (see connector 6 of the rear panel page 5).
X If you wish to use an alphanumeric keyboard or a mouse via the PS2 connector, connect it now. If
you wish to connect one or more additional screens, connect it (or them) now. Once all peripherals and
cables are connected, connect the power-supply cord (enclosed) in the specific connector.
Safety starting
The Rhizome has a first starting process referenced as "safety starting process" : you will hear the fan
working, the buttons of the transport bar will switch on in cycle, the Rhizome will switch off after 20
seconds. (If the safety starting process is not automatically operated, press once on the key [POWER], and
wait for the first switch off).
X This process will be operated at each new plug in of the power cord of the Rhizome.
Start
X During the starting process of the Rhizome or when it is switched on, never unplug the powersupply cord if the device is not turned off : this could irreversibly damage your Rhizome.
X During the starting process, do not press again on the power button if the Rhizome has not
finalized its starting process : as this could lead to hibernation mode and cause faulty starting process.
Press on [POWER].
You will hear a first beep, the buttons of the transport bar will switch on in cycle and continue to run. You
will hear a second beep, the cycle of the lighting of the buttons ceases on the button [STOP], the screen
Rhizome appears, the Rhizome application runs, various modules of the software appear. Once the five
modules Rhizome are present in zone 2, your Rhizome is ready to be used.
Access to the application by pressing one of the 3 buttons of function : [MIXER|PERF LIVE] or
[SEQUENCER|SONG] or [SAMPLER|VST EDITOR]
That's it ! You are ready to use the Rhizome.
9
9. SWITCHING THE RHIZOME APPLICATION OFF (RESET)
+
The switching off ot the Rhizome application is recommended under several
circumstances :
- When installing VST plugins
- When using another software, without adding an additional audio card
(Ableton Live, Steinberg Cubase, Propellerheads, Reason)
- When installing any other software.
- Before to start a live performance in the PERF LIVE environment
To switch the application off : from any environment, press [SHIFT] and then
button [L3| USER 6], application turns off, the blue screen Rhizome appears.
10
10.
SWITCHING THE RHIZOME OFF (on the machine)
Swith the Rhizome off
X If no additional screen has been added, the total
stop of the Rhizome is only possible from the application.
From any environment, press on [POWER], choose
« Shutdown » by pressing on the selector of column 8.
If an additional screen is connected and the Rhizome
application is turned off, you may switch off Windows using
the standard procedure via menu Start by doing : Start >
shut down.
Hibernation mode
(The hibernation mode enables the Rhizome to restart more
quickly for the next start).
From any environment, press on [POWER], choose
« Hibernate » by pressing on the selector of column .
If no additional screen is connected and the Rhizome
application is switched off, pressing on [POWER] will
automatically lead to hibernation mode.
11.
SWITCHING THE RHIZOME OFF (with Windows XP)
The Operating system of the Rhizome is Windows XPE.
When an external screen is connected, you see the Windows XPE
environment.
So it is possible to shut down the Rhizome from the task bar menu
X Please, always choose the Shutdown option and never the Restart option.
In case of a restart the Rhizome will wrongly restart and its 4 screens will be
black
Please refer to the FAQ section of this guide to cancel that problem (p13)
11
12.
FAQ LIST
1. A password message
appears (it asks to change
the password)
Step 1 : leave both fields empty and push twice the ENTER key of your keyboard,
or select OK twice, with your mouse.
Step 2: if the Rhizome application starts on the wrong window, please refer to
problem N°1 above
2. You have entered a
Password
Step 1: please, click on the link below to download the batch file
http://www.feeltune.com/download/rhizome_psw.zip
Step 2: unzip and copy/paste the "rhizome password.bat" file in a USB storage
device
Step 3: start the Rhizome and then enter your password
Step 4: push the [SEQUENCER|SONG] button : the application starts
Step 5: push the [SHIFT] button and then the [L3|USER 6] button : the
application stops
Step 6: connect the USB storage device to the Rhizome.
Step 7: double click on the "rhizome password.bat" file.
Step 8: a command window opens, do not hit a password and hit Enter, repeat
this again, the command window closes.
Step 9: push the [SEQUENCER|SONG] button : the application starts. Push the
[SEQUENCER|SONG] button : a session starts
Step 10: push the [POWER] button then select [SHUTDOWN]
Step 11: push the [POWER] button
Step 12: adjust the resolution of your external screen (please see the manual)
3. When I connect an
external screen the
resolution is low and the
Rhizome application is
disturbed
4. The Rhizome application
starts on the external
screen
Step 1: you have to configure your screen resolution (please see the manual)
Step 1 : push the [SEQUENCER|SONG] button
Step 2 : push the [SHIFT] button and then push the [L3|USER 6] button (to close
the application)
Step 3 : please check your external screen resolution configuration (please see
the manual)
Step 4 : push the [SEQUENCER|SONG] button : the application restarts in the
Rhizome display (5 icons must appear)
Step 5: push the[SEQUENCER|SONG] button : a Rhizome "empty project" is
opened
12
5. The Rhizome display is
upside-down
6. The Rhizome started but
the screen is black.
Step 1 : connect a mouse and an external monitor to the Rhizome.
Step 2 : right click on the d.screen-USB icon at the bottom right of the
notification area of the task bar then select “rotation” parameter and choose
“upside-down” (UK) or “180°" (DE).
That can happen if you choose the restart option in the start menu of the
windows XPE task bar.
Step 1: from the windows XPE task bar,do Start > Shutdown
Step 2: when the Rhizome is turned off, unplug the electricity power cable (be
careful the Rhizome has to be turned off)
Step 3: push the power button (the Rhizome has to be unplugged)
Step 4: plug the electricity power cable to the Rhizome
Step 5: push the power button : the Rhizome starts normally.
7. The Rhizome is frozen,
nothing is possible. In the
external screen a
Windows box states :
“Rhizome.exe has
encountered a problem
and needs to close. We
are sorry for the
inconvenience”
8. When you try to install a
sound card or a Windows
compatible peripheral, a
Windows box asks to
enter the Windows XP
SP3 DVD.
Step 1: press the ENTER key of your PC keyboard. The application restarts
automatically.
Step 2 : a box appears with two possible choices:
Push LOAD : to load the auto saved song
Push CANCEL : to open a new empty session
Step 1 : select the “choose folder”
Step 2 : select the HDD: System (C :)
Step 3: double click on the folder: WINDOWS
Step 4: double click on the folder: ServicePackFiles : the file that you are looking
for is shown
Step 5: select the file and click on OK
Step 6: repeat the above process if necessary.
13
9. The Rhizome sounds on
the new audio Interface
Step 1 : close the Rhizome software pushing the [SHIFT] button and then the
[L3|USER 6] button.
Step 2 : select the HDD: System (C :)
Step 3 : double click on the folder: Rhizome
Step 4 : copy the Rhizome.ini file on a USB removable support
Step 5 : connect the USB key to another computer and open the Rhizome.ini file
with a text editor
Step 6 : the parameter asio_driver is set to 0 by default. Change this value to 1.
Then close the .ini file and restart the Rhizome software by pushing the
[SEQUENCER|SONG] button.
If the message “Hardware input or output is not present or available” appears,
open the .ini again and try to increase the asio_driver value (2,3,…) until it works
with your audio interface. If it does not work, return to default value (0) and
contact the Feeltune support.
10. you installed a plugin but
you cannot see it in your
instrument list
11. A windows box states
“Hardware input or
output is not present or
available”
Step 1 : the VST was installed in the wrong repertory. Please uninstall the
plugin and choose the Rhizome VSTplugins folder (please see the manual)
Step 1 : please call your local dealer or send a message to the Feeltune support
team at [email protected].
14