1
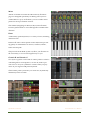
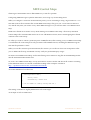
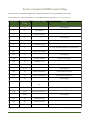
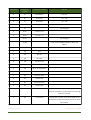
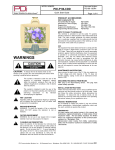
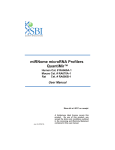
instrumental
wi-fi midi control surface
user manual
v1.0.0
Q u a n t u m C l o c k w o r k - C o n t i n e n t a l L a b o r a t o r i e s - Vi r t u a l I n s t r u m e n t D i v i s i o n
What is this?!
1
Quick Start!
3
Using Apple’s Network MIDI Session!
4
Network Troubleshooting!
5
Reducing Wi-Fi Latency!
6
Using Propellerhead Reason and Record!
8
Using GarageBand!
12
Using Random MIDI Software!
13
Configuring Presets!
14
Scale Modes!
16
Global Options!
17
MIDI Control Maps!
18
Factory Standard MIDI Control Map!
22
MIDI System Exclusive Messages!
24
Standard Text Registers!
26
Credits and Thanks!
27
Q u a n t u m C l o c k w o r k!
Instrumental User Manual
1
What is this?
Instrumental Is This
Instrumental is a Wi-FI MIDI Control surface for iPad. It is not a synthesizer or a sequencer - it does not
make any sound on its own.
Instrumental is similar to a USB Piano Keyboard that you would plug into your computer, except it’s running on your iPad and communicating with your computer via Wi-Fi, providing a virtual MIDI port that you
can use with any MIDI software.
Instrumental provides a variety of different control surfaces, each designed for a different purpose, and all
are highly configurable.
Drumming, composing, jamming, mixing, tweaking and just plain mucking around. You can do all this and
more!
Drum 4x4
16 drum pads, and space for up to 32 additional controls.
Each pad can be customized individually, from the velocity
response curve to the colour.
The drum-pad selector panel allows for access to the MIDI
controls of each individual drum.
Wicki-Hayden
The fantastic isomorphic hexagonal layout. This makes so
much more sense than the traditional Piano keyboard.
I recommend the Wikipedia article on Wicki-Hayden; Instrumental supports all the colouring schemes described
there.
Use the Instrumental Scale Modes to see how different scales
and chords look in this layout - it’s a great way wrap your
mind around the Wicki-Hayden layout.
Q u a n t u m C l o c k w o r k!
Instrumental User Manual
1
Mixer
Almost as flexible as Generic-R and Generic-S, the Mixer
page was designed specifically for Mixing. The layout accommodates for up-to 16 channels; you can sacrifice mixer
panels for more per-channel controls.
The standard mappings for Reason/Record use the Next/
Previous patch buttons to scroll through the available mixer
channels.
Piano
A full 130 key piano keyboard, at a variety of sizes, including
almost full size.
Features the same control panels used in Generic-R, providing plenty of combinations of rotaries, switches, buttons,
faders and XY pads.
The powerful Scale Mode system can show you the notes in
the current key, or can even change the key for you.
Generic-R and Generic-S
Two styles of generic surface full of control panels. Useful for
controlling effects and equalizers, can also be used to provide access to all your synthesizer controls while you play
notes on your regular USB piano keyboard.
The modular panel system lets you create new, dynamically
labelled layouts in seconds.
Q u a n t u m C l o c k w o r k!
Instrumental User Manual
2
Quick Start
Connect your iPad to your Wi-Fi network
1. Download and install Instrumental to your iPad.
2. Run Instrumental. If you have multiple devices, run it up on all of them!
!
The “TX” and “RX” lights should be blinking red. This means the server cannot be found. Don’t
panic - if you’re doing the instructions in order you haven’t installed or run the server yet.
3. Download and install the server on your Mac or Windows PC.
For best results, Instrumental uses a server running the Quantum Bome Conductor Network to provide the
virtual MIDI ports on your computer. MT Player is a free download for both Mac and Window. It is available
from the Quantum Clockwork website: http://quantumclockwork.net/instrumental-downloads
Mac users can also use Apple’s “Network MIDI Session” instead of using the Quantum-Bome Conductor
Network, but we have found that Conductor gives better latency. See later in this manual for how to configure the Apple Network MIDI Session.
4. Start the Server
Run MT-Player; you don’t need to do anything else to it just yet. You can explore the settings in MT Player
later; for now the defaults will be just fine
5. Choose your MIDI destination
Touch the “TX/RX” lights in Instrumental - this displays the list of available network sessions you can connect to.
Your computer’s name or the name you configured in the Apple Network Session should be listed here. You
may need to wait a few seconds before the server can be seen on the network.
Select it on your iPad and then go back to your computer - MT Player will be prompting you for permission
to connect. Tick the “Remember” checkbox, and allow the connection.
After a few seconds the “TX” and “RX” lights on Instrumental should stop flashing red.
If the lights keep flashing red, or your computer isn’t available on the list, there is a problem with the network connection between your iOS device and your computer. Please see the Network Troubleshooting section.
6. Run your favorite MIDI sequencer program on your computer
Depending on the sequencer program or DAW, you may need to configure the new MIDI inputs and control
mappings. See the following pages for package-specific guides; at worst you should be able to configure Instrumental as a generic MIDI Keyboard with controls.
7. Play!
Use the power button in the top-left corner to choose a surface, and off you go!
Q u a n t u m C l o c k w o r k!
Instrumental User Manual
3
Using Apple’s Network MIDI Session
In addition to Quantum-Bome Conductor, Instrumental also supports the standard Apple Network MIDI
standard.
Mac users can use this instead of downloading the MT Player Conductor server, though we recommend using Conductor for best results.
1. Run Audio MIDI Setup
This is a standard utility that is part of OSX. You can find it by typing “Audio MIDI Setup” into Spotlight.
2. Open the MIDI Window
This is available from the “Window” menu.
3. Double-click the “Network” icon to open the Network Window
4. Create a Session
Give it a unique Network Name - this is what will be displayed in the Instrumental Menu.
Also give it a good Local Name - this will be used to name the MIDI ports.
Make sure that the session is Enabled, and that the “Who May Connect to Me” is set to “Anyone”
5. Connect to the session
Press the TX/RX button in Instrumental to bring up the list of available network sessions - the session you
created should be listed. Select it, wait a few seconds, and the TX/RX lights should stop flashing red. You’re
now connected!
In the future, you won’t need to run Audio MIDI Setup to be able to connect, but you will need to run some
MIDI software before the network session will become available.
Instrumental remembers which session you used last, and will automatically keep trying to reconnect to that
session.
Q u a n t u m C l o c k w o r k!
Instrumental User Manual
4
Network Troubleshooting
If the RX & TX LEDs on Instrumental won’t stop flashing red after a few seconds, then the Wi-Fi link between Instrumental and the server is not working. Things to try:
1.
Make sure your Wireless Access Point is switched on, and that your iOS device is connected to it
with a valid IP address.
2.
Make sure the server is running, is not prompting you for permission, and is not being blocked by a
firewall on your computer.
3.
Use iTunes Remote to verify that you can communicate between your device and your computer.
!
iTunes Remote communicates with iTunes on your computer in a similar manner to Instrumental. If
iTunes Remote works, then your network should be compatible with Instrumental.
4.
Ping your device from your computer.
!
Ping is a standard utility for testing network connections. To test the link from your computer to
your iPad:
a. Get the IP address of your device from the Settings pages of your iPad. It should be a 4
part number like: 192.168.0.37
b.Open a Terminal Window on your Mac, or a DOS Command Prompt on your PC.
c. Type “ping” followed by a space and the IP address, and hit return.
!
!
!
e.g. ping 192.168.0.37
d.If ping reports timeouts, then there is no network link between your device and your
computer. You will need to fix your network before Instrumental can function properly.
6. Restart Instrumental and the server.
7. Reboot your computer, your iPad, and your Wi-Fi Router.
8. Sacrifice a goat.
9. If iTunes Remote works perfectly, you can successfully ping your iPad, and you’re absolutely sure the
server is running and not being fire-walled, email [email protected] and we’ll try to sort
you out. Please provide as much detail about your problem as you can.
Q u a n t u m C l o c k w o r k!
Instrumental User Manual
5
Reducing Wi-Fi Latency
When using Instrumental to play music, having a low latency Wi-Fi connection is essential. The network
protocols Instrumental uses are designed to provide reliable low-latency communications, but it all comes
down to the performance of the Wi-Fi.
If your setup is properly configured and your Wi-Fi connection doesn't have to contend with too much interference, you should have no perceptible delay between pressing a note on Instrumental and hearing the
sound from the DAW software running on your computer.
If you are experiencing delays, first make sure that the latency is not being introduced on the output side
(play some notes directly on the computer, for example). Sound-card drivers with high latency are very
common on Windows machines. There is a low-latency sound-driver for Windows called ASIO4All that has
worked well for me.
If you are experiencing excessive Wi-Fi latency, here are some things you can try:
• Use the QB Conductor Protocol instead of Apple's Network MIDI. Conductor's protocol gives the Wi-Fi
connection the best opportunity for low-latency performance in a noisy environment.
• Use a dedicated Wireless Router. Having other people watch streaming video using the same radio channel can only make things worse.
• Use a wired network connection for your computer. If both your computer and your iPad are using Wi-Fi
to connect to a Wi-Fi router, then your input must travel over Wi-Fi twice - once from the iPad to the
router, and then again from the router to the computer. This will double your latency -- the time taken to
send a message over the wired connection is minuscule compared to what it takes to send it over radio.
• Try an "ad-hoc" wi-fi network that doesn't use a wi-fi router at all. In this mode your iPad is transmitting
directly to the wi-fi card in your computer. Personally I find these "ad-hoc" connections a little too fiddly -wiring your computer to the wi-fi router should be virtually as fast, despite involving more equipment.
• Upgrade to a 802.11N Wireless Router. 802.11N provides a lot more bandwidth than the earlier wireless
standards, and as a side effect delivers much lower latency. It also operates at higher frequency ranges,
which may have less interference at your location.
• Disable 80211.b/g compatibility mode in the router. 802.11N routers often support the older 802.11 standards (a, b, g); supporting the old standards prevents the 802.11N from running as fast as it should, as the
router has to periodically switch modes to check for older devices.
• Disable "Automatic Channel Mode". Some Routers have a mode that automatically looks for channels with
less interference and will automatically change. While this sounds like a good idea, you will get a spike in
latency when it does change its mind about which channel it wants to use. Experiment with different
channels
Q u a n t u m C l o c k w o r k!
Instrumental User Manual
6
• Eliminate sources of interference. Malfunctioning equipment can generate a lot of RF noise. I recently had
an LCD Monitor that was causing digital-TV interference, but only figured this out when the monitor finally died, as that was when the annoying interference was gone.
• Try moving the Router to different places; closer to where the iPad is is better, a clear line of sight will help;
going through walls and appliances can only make things harder for the radio link
Q u a n t u m C l o c k w o r k!
Instrumental User Manual
7
Using Propellerhead Reason and Record
Instrumental was designed to work as seamlessly with Reason and Record as possible.
Many of Instrumental’s advanced features require the sequencer package to send MIDI data back to Instrumental. This allows Instrumental to display level meters, track and patch names, provide virtual “motorized
faders”, and much more.
The Instrumental codec for Reason and Record allows Instrumental to display the correct labels for almost
all controls, automatically. Labels update instantly when you remap them, even using “Edit Remote Override.” Control readouts can use the text from Reason/Record - this can give you readouts of “-3.2 dB” and
“12.3 Hz” instead of “3” and “63”, depending on which Reason/Record device you’re using.
If you don’t own Reason or Record, you should download the demos from Propellerhead to see what all the
fuss is about!
1. Install Instrumental, the server, and connect to it
Follow the Quick Start Guide on the previous page.
2. Download and install the Instrumental Remote Codec
http://quantumclockwork.net/instrumental-downloads
Note that the Codec and Remote Maps are designed to work with Instrumental’s Factory Standard control
map.
3. Run Reason or Record
4. Configure your new Instrumental device for use:
a. Open the Preferences Dialog
b.Select the “Keyboards and Control Surfaces” page
c. Press “Auto Detect Surfaces”
d.Reason/Record will scan all the MIDI ports for known device types.
e. Once the scan has completed, all the currently connected Instrumental devices should appear in
the Attached Surfaces list.
f. If you are using multiple devices, it is recommended to rename each device so you can tell them
apart easily. In the edit dialog you can tell which device is which from the MIDI port name.
g.For your first play, I recommend setting Instrumental as the “Master Keyboard.” Later you may
wish to use your regular keyboard as the “Master Keyboard,” and locking Instrumental to different devices (like the Mixer) by right-clicking on them and selecting “Lock Instrumental to this device”
Q u a n t u m C l o c k w o r k!
Instrumental User Manual
8
5. Play!
If you’re new to Reason/Record, this should get you going quickly:
a. Configure Instrumental as the Master Keyboard
b.From the “File Menu,” create a new project from one of the built-in templates, e.g. Empty+FX
c. From the “Create Menu,” create a Kong Drum Designer
d.Instrumental will automatically switch to the Drum surface. Play away!
e. From the “Create Menu,” create a Subtractor
f. Instrumental will switch to a keyboard. Play away!
g.Try the change track/patch buttons; you should be able to move between the two instruments you’ve created and play on either of them, all from Instrumental.
h.Turn on “Loop” in the Reason/Record transport, and record a short loop.
i. With the loop playing, right-click on the mixer device and choose “Lock Instrumental to this device”
j. Instrumental will automatically switch to a mixer surface. Mix away!
Automatic Surface & Preset Selection
Instrumental tracks the current Instrument Name, Track Name, and Patch Name, and uses these to automatically select the right surface and preset as you move focus throughout your project, or lock Instrumental
to different devices.
If you don’t like the choice it has made, change to your preferred surface/preset and Instrumental will use
your new choices to hopefully make a better automatic selection next time.
You can completely disable the automatic changing of surfaces and presets on the Global Options page.
Master Keyboard and Lock to Device
If you’re only using one input device, it should be set as the Master Keyboard. If you’re using multiple input
devices - say a USB Piano Keyboard and Instrumental together, you need to decide which one (if any) will be
the Master Keyboard.
In Reason & Record, the “Master Keyboard” is the one that is connected to whichever track you’ve selected
in the Sequencer, and is the one that changes tracks when you use the “Next Track” and “Previous Track”
buttons.
You connect the other, “non-master” Keyboards manually to Sequencer Tracks, Rack Devices, or Master Section tracks by right-clicking on the them and selecting “Lock <KeyboardName> to this Device”.
How you set this up is down to personal taste, what equipment you have, and how you’re trying to use it.
Q u a n t u m C l o c k w o r k!
Instrumental User Manual
9
For example, you can use your USB Piano as the Master Keyboard like normal, and use lock Instrumental to
the Master Mixer to use it a dedicated Mixer. Note that when Instrumental is locked to a device, the Next
Track and Previous Track buttons still apply to the Master Keyboard.
Automatic Control Labels & Readouts
The Instrumental driver for Reason/Record allows Instrumental to use labels and text readouts provided by
Reason/Record. This allows Instrumental to display accurate labels for all controls, even if you use “Edit
Remote Override Mapping” to remap controls on the fly.
When remapping controls from Instrumental, the “Remote Label” list will only show currently mapped controls, using the labels provided by Reason/Record. The Remote Map included with the Remote Lua Codec
for Reason/Record maps nearly every control for nearly every available device; it should be very easy to
customize presets that focus on your preferred controls for each device.
The standard control map should satisfy most people, but you can always modify the Remote Map to include additional controls, or to allocate them in a different way. Please contact us if you have improvements
to the standard Remote Map to contribute.
Recording Scale-Mode Changes
To record Scale-Mode chord-changes, use “Edit Remote Override” to map the “Scale Mode” in Instrumental
to the Rotary of an empty Combinator. You can then record your chord-changes to the Combinator track,
and have them play back to Instrumental regardless of which track you’ve actually got selected.
The Record Master Section
The Master Section in Record is a complex piece of virtual equipment. It has hundreds of controls, and which
ones you care about depend on what you’re doing. You can only connect Instrumental to the Master Section
when it isn’t the Master Keyboard. Right-click the rightmost Master Track, and choose “Lock Instrumental to
this Device.”
You can also lock to a specific track in the Master section, but this won’t allow you to move through the
tracks from Instrumental, or see more than one track at a time.
If you want to see and adjust the levels of many tracks at once, I recommend using the Mixer surface, either
in 8 or 16 channel mode. To get at every setting for a particular channel, like the EQ, compressor, gate, FX
Return Levels, use the presets RM-Channel or GSM-Channel for the Generic-R and Generic-S respectively.
The Master Channel has a different set of controls; to get at those use the presets RM-Master and GSMMaster.
These presets make use of 4 different remote mapping schemes in the Remote Map, controlled by the “Remote Map Variation” surface setting. Knowing this will be useful when customizing these presets to suit
your needs.
• Variation 1 maps all controls for 1 channel.
• Variation 2 maps all controls for the Master Channel.
Q u a n t u m C l o c k w o r k!
Instrumental User Manual
10
• Variation 8 maps 7 channels from the Mixer, uses channel 8 as the Master Channel, and uses the other
8 channels for FX returns.
• Variation 16 maps 15 channels from the Mixer and uses Channel 16 as the Master channel.
Effects Units - MClass, Amps, Phaser, Digital Delay, etc
Most of Reason’s effect units will work very well with the Generic-S preset GS-1. Instrumental will default to
using this preset for these units until you teach it otherwise.
MClass Equalizer & PEQ-2
The MClass Equalizer and the PEQ-2 both work well with the Generic-S preset GQ-8. Instrumental will default to using this preset for these units until you teach it otherwise.
Limitations with Reason & Record
There are a few things that are currently not possible with the system used to make drivers for Reason and
Record.
Rest assured that Propellerhead are aware of all these issues, and might fix them in future versions if enough
people complain. Hint Hint.
- Patch name bug. Some instruments do not always send the current patch name properly. Changing tracks
or patches via Instrumental fixes this.
- Some control labels are inaccessible. Some of the Propellerhead devices have controls that can have user
labels. The 4 rotaries and buttons on the Combinator for one example, the drum-pads on Kong for another.
Unfortunately these will always come through with their generic name (e.g. Button 3), instead of the patchspecific text on the control. This is a limitation of Reason/Record, not Instrumental. You can work around
this problem by assigning user labels to these controls in an Instrumental preset for each of your favorite
patches. Instrumental’s automatic preset chooser will learn how to select the correct preset automatically as
you change patches.
Q u a n t u m C l o c k w o r k!
Instrumental User Manual
11
Using GarageBand
GarageBand is a very simple sequencer package. It does not support much in the way of advanced control
surfaces. You can still use Instrumental to play on it, you just won’t be able to use any feedback features like
the Mixer Page, and you can only control a limited number of instrument parameters.
The upside to being a simple package is that there is nothing to configure:
1. Install Instrumental and connect it to your computer via Wi-Fi
Follow the Quick Start Guide on the earlier page.
2. Run GarageBand
3. Create a new Project in Garage Band
Choose a template with Software Instruments, like “Grand Piano” or “Keyboard Collection”
4. Select the GarageBand control map in Instrumental
Use the Instrumental power button to select “Global Options,” and then select GarageBand as the Midi Control Map. This will restrict the set of available controls to just those known to work with GarageBand.
5. Play!
Use the power button in the top-left corner of Instrumental to choose the Wicky-Hayden keyboard, and play!
Limitations with Garage Band
GarageBand does not support many MIDI messages, and doesn’t send any for feedback. This will prevent
the track & patch buttons from working, and you won’t see controls like Volume and Pan change on Instrumental when they get changed in GarageBand.
There are plugins for GarageBand that extend its MIDI capabilities. The free download “GarageRemote” allows GarageBand’s transport controls to be driven from MIDI. This allows you to press Play, Stop, Record,
etc, in Instrumental, and have GarageBand respond appropriately.
The “[Factory] GarageBand” MIDI Control Map uses the default MIDI messages used by GarageRemote.
If anybody has a definitive list of the MIDI messages GarageBand accepts, please send them in and I will
improve the [Factory] GarageBand control map.
We at Quantum Clockwork recommend using Propellerhead’s Reason + Record, instead.
Q u a n t u m C l o c k w o r k!
Instrumental User Manual
12
Using Random MIDI Software
Instrumental’s Standard Control Map should work out-of-the box with any MIDI software.
To get the best experience, the controls in Instrumental should be labelled, with On/Off type controls
hooked up to switches and buttons, variable controls connected to rotaries and faders, the Stop/Play buttons
should work, and all the rest.
How you go about this depends on the nature of the MIDI device you are connecting to, and how much effort you want to spend.
For complex MIDI devices where the available controls change radically depending on where you are
(DAWs like Propellerhead’s Reason & Record, for example), a driver may be required to get the best experience -- the driver allows the computer to send the labels for the current controls via MIDI SYSEX messages.
How this is implemented, or even if it is possible, depends completely on the DAW package. For more information, see the Standard Control Map, and the driver for Reason/Record. If you develop an Instrumental
driver for your favorite package, please contact us at Quantum Clockwork so we can make it available on
the website.
Most MIDI devices are much simpler, though, and have a fixed set of MIDI messages that they use. This is
much easier to deal with -- armed with the documentation for your MIDI device you need to make a text file
that lists all its controls, their MIDI messages, display ranges, etc. You then load this Control Map into Instrumental via iTunes, select it through the Global Options page, and you’re away. See the “MIDI Control
Maps” chapter towards the end of this manual for more information about Control Maps, the format of the
text file, etc.
The easiest thing of all is to simply use the Standard Control Map, and apply User Labels to controls as you
figure out/decide what they do. This works well with packages that support “learning” -- simply label a
control how you want, tell the MIDI package to “learn from input”, manipulate the control, are you’re done.
Q u a n t u m C l o c k w o r k!
Instrumental User Manual
13
Configuring Presets
Presets
Each Surface in Instrumental is highly configurable. You can change the type of every control, along with
what the control has been mapped to, its label, its colouring, and more.
All these settings are stored in a “Preset.” Instrumental provides a number of read-only factory presets for
each surface, along with some defaults to get you started.
Touch the Status Panel at the top of the screen to quickly change between presets for the current surface.
Settings Mode Basics
Touch the Gear icon to enter Settings Mode; press it again to return to the normal “Play Mode”.
When in Settings Mode, touch a control to bring up its settings. The dialog that appears depends on what
type of control you have selected. If a dialog is obscuring a control you want to select, use the X button to
close the dialog.
The Settings Mode Toolbar provides buttons to Rename, Copy, Delete and Lock the current preset. Use the
Lock on presets that you do not want to accidentally change or delete.
The Double-Diamond on the Settings Mode Toolbar brings up the Surface Settings, where you can choose
different control layouts, and other options that effect the entire surface.
Some surfaces also have a Treble-Clef on the Settings Mode Toolbar -- this lets you access the current Scale
Mode, even when you have no Scale Mode Buttons mapped in your control panels.
Mapping Controls
The Settings Dialog for most control types has three lines for mapping which underlying control in the control map this control is connected to. (You’re right, that’s a lot of controls in one sentence).
“Control” shows the name of the control in the MIDI Control Map.
“Remote Label” shows the name that has been provided remotely via a MIDI SYSEX message from a capable
DAW.
“User Label” shows the label you have provided yourself and saved into this preset.
Instrumental will display a User Label in preference to a Remote Label, and will use the Control Map Name
only if it has nothing better (and the Global Option “Default Labels” is turned on).
Pressing on each of Control, Remote Label, and User Label, will show a list of logical controls you can map
to, named accordingly. Each list only shows items that have the right type of label available. For example,
when using Reason/Record, choosing by Remote Label will list only those controls currently mapped by
Reason/Record for the current instrument. If you choose by “User Label,” only controls that have a usersupplied label in this preset will be listed.
Q u a n t u m C l o c k w o r k!
Instrumental User Manual
14
The normal list is also restricted to controls suitable for the control type you are configuring. For example, a
Button control won’t offer Pitch-Bend as a choice in its normal list. The Asterisk (*) button provides the full
list of controls, so if you really want to hook up the 14-bit Pitch Bend control to a momentary push button,
you can.
Panel Types and Control Types
The controls in Instrumental are arranged in blocks called Panels. Depending on the Surface, you can change
each panel between a number of different types, from a 2x4 block of controls to a big XYG pad.
Like the panel, each control on a panel can be changed between a number of different types -- different surfaces and panel types offer different choices. There are Rotaries, Switches, Buttons, Meters, Labels, Faders
and XYG Pads.
Sharing Presets
You can share presets with other users using the “File Sharing” section of iTunes:
Connect your iPad to iTunes and select the iPad from the Devices List,
Go to the “Apps” tab for the iPad, and scroll right down to the bottom to the “File Sharing” section.
Select Instrumental from the list of Apps, and the Documents list will display your Presets and Maps.
You can now Drag and Drop preset files to and from the Documents list, or use the Add/Save To buttons in
the iTunes GUI.
Q u a n t u m C l o c k w o r k!
Instrumental User Manual
15
Scale Modes
Both the Wicki-Hayden and Piano surfaces support “Scale Modes.”
Each preset has a bank of 17 Scale Modes that can be configured to modify the keyboard in different ways,
from transposing the output to correcting the notes into a pre-configured key signature.
You can select the current scale mode by:
• mapping “Scale Buttons” into your control surface
• pressing the “Treble Clef” icon in the Settings Mode titlebar, and changing “Mode Index”
• mapping a rotary control to “Scale Mode”
• sending MIDI messages to the “Scale Mode” control in the current MIDI Control Map.
If you set up the chords of your song into a few scale modes, you can record the chord changes from the
Scale Mode control into your track -- then when you’re working on the song the keyboard will always be
showing you the current key!
SETTING
Mode Index
DESCRIPTION
The current scale number. When editing a button, this is also the
scale number of the button. This is also the value used by the MIDI
control.
Key
Root note of the scale
Scale
One of Chromatic Scale, Major Scale, Minor Scale, Blues Scale, etc
Transpose Octaves
The keyboard output will be transposed by this number of octaves.
Transpose Semitones
The keyboard output will be transposed up or down by this number of semitones. Note that this is done on output.
Velocity Scale
All notes that are part of the selected scale in the current key “onkey”, will be played with this velocity scale applied.
Off-Key Correction
When On, any off-key note will be shifted to the closest on-key note
instead. The Off-Key velocity scale will still be applied.
Off-Key Velocity Scale
All notes that aren’t part of the selected scale & key will be played
with this velocity scale applied. You can use this to make your offkey notes quieter, silent, or even louder than your on-key ones.
Off-Key Brightness
Controls the visual brightness of the off-key keys on the keyboard.
Q u a n t u m C l o c k w o r k!
Instrumental User Manual
16
Global Options
The settings available on the Global Options page apply to the whole program - they are not stored in presets like all the other settings.
OPTION
DESCRIPTION
MIDI Control Map
The currently active list of MIDI controls available for mapping.
See the MIDI Control Map section for more information.
Automatic Surface Change
When On, Instrumental will change surfaces automatically according to the Remote Manufacturer, Remote Model, Instrument
Name, Track Name and Patch Name that are provided by MIDI
SYSEX messages.
When you choose surfaces manually, Instrumental uses this information to improve its automatic choices.
Automatic Preset Change
When On, Instrumental will change presets automatically according to the same fields that drive the Automatic Surface
Change.
When you choose presets manually, Instrumental uses this information to improve its automatic choices.
Default Labels
When On, Instrumental will use the Control Map name of a control if it does not have a Remote Label, or a User Label. This is
useful when using a setup that sends Remote Labels, as it allows
you to easily see which controls are currently mapped.
When Off, controls that do not have either a Remote Label or a
User Label will have a blank label.
QB Conductor Network Port
This is the UDP port number used for discovering services on
the QB Conductor Network. The default is 37000.
You should only need to change this if another service on your
network is already using this port. Both Instrumental and the
Server must be configured to use the same port number.
Q u a n t u m C l o c k w o r k!
Instrumental User Manual
17
MIDI Control Maps
The design of Instrumental tries to hide MIDI away as much as possible.
Configuring MIDI messages is painful and tedious, and a long way from making music.
When you configure a control in an Instrumental preset, you are connecting it using a logical name to a “virtual midi control” that is listed in the current MIDI control map. This gives you a set of named controls to
use, and the only time you need to worry about MIDI messages is if you need to make a new MIDI Control
Map.
DAW users should never need to worry about making a new MIDI Control Map -- the Factory Standard
Control Map is the recommended control set for use with DAW software; drivers and mapping files should
conform to this control map.
It’s when you want to control a particular piece of MIDI hardware that creating your own MIDI Control Map
is worthwhile: the control map lists each parameter of the MIDI hardware, including the MIDI message details and the parameter’s name.
When you use this control map in Instrumental, the controls you can choose from will correspond to what
you’ve defined in the map, all labelled correctly with your preferred display ranges.
To install a new MIDI Control Map, use the File Sharing area in iTunes to drag the .InstrumentalMap.txt file
into the Instrumental Documents area.
To create a new MIDI Control Map, use any text editor to create a text file and fill out the controls according
to the definitions below. It would be worthwhile looking at the examples available at
http://quantumclockwork.net/instrumental-downloads
All control definitions have the form
[ ControlType Control Label ]
{
!
!
Setting = Value
AnotherSetting = Another Value
}
// You can comment out lines by starting them with //
The settings available are slightly different for each control type.
An example of each is listed below:
Q u a n t u m C l o c k w o r k!
Instrumental User Manual
18
7-Bit CC
[ 7_Bit_CC Mod Wheel ]
The 7-bit Control Code is the most commonly used type of
MIDI Message. Most controls in a control map will be of this
type. Don’t use this type for On/Off type controls, though.
Use the 1-Bit CC for that.
{
!
!
Channel = 1
CC = 1
!
!
MinValue = 0
MaxValue = 127
!
}
DefaultDisplayType = 0..11
The MinValue and MaxValue default to 0 and 127 respectively, which is the maximum possible in a 7-bit value. You
don’t need to specify these if you’re happy with the defaults.
The choices available for DefaultDisplayType correspond to those you can see in the “Range” choice in the
Instrumental control settings dialog; the choice you set here is what is used when the “Range” choice is set to
“Default.”
1-Bit CC
The 1-Bit CC responds to the same type of MIDI Message as
[ 1_Bit_CC Soft Pedal ]
{
!
!
Channel = 1
CC = 67
is an On/Off type control.
!
!
OnValue = 127
OffValue = 0
Buttons and switches prefer to connect to On/Off controls,
!
}
DefaultButtonType = Momentary
the 7-Bit CC, except it lets Instrumental know that this control
and rotaries and faders prefer to connect to “variable”controls, so Instrumental uses the type information from the control map to filter the list of controls available for selection. When you use the Asterisk button to get an unfiltered choice, this type information is disregarded.
The On & Off Values of 127 & 0 are the defaults. Any value up-to but not including halfway between Off &
On will be treated as Off. For example, with the Off=0 and On=127, 0 through 63 are treated as “Off” and 64
through 127 are treated as “On”.
The DefaultButtonType specifies the type of button to use by default when using an Instrumental Button
with this control. This can be overridden in the “Action” setting for this button in the preset.
The choices are:
• Momentary - sends an On when you press, and an Off when you release.
• Toggle - sends the opposite state when you press, and does nothing when you release.
• Trigger - sends an On when you press, and does nothing when you release.
• None - does nothing when you press or release.
Q u a n t u m C l o c k w o r k!
Instrumental User Manual
19
7-Bit Program Change and 7-Bit Channel Pressure
[ 7_Bit_ProgramChange Program Change ]
These controls are similar to the 7-Bit CC controls, except they
use different MIDI messages that provide one each of these
per MIDI channel, giving a possible 16 of each type.
{
!
!
Channel = 0
MinValue = 0
!
!
MaxValue = 127
DefaultDisplayType = 0..127
}
Program Change was often used to control patches in hard-
[ 7_Bit_ChannelPressure Aftertouch ]
ware synths; Channel Pressure is also known as “Aftertouch”.
{
!
Channel = 0
!
!
!
MinValue = 0
MaxValue = 127
DefaultDisplayType = 0..127
}
14-Bit Pitch Bend
[ 14_Bit_PitchBend Pitch Bend ]
As the only commonly supported 14-Bit MIDI Message, it is a
shame to only use these controls just for pitch bend!
The standard control map puts Pitch Bend on MIDI Channel
{
!
!
Channel = 0
MinValue = 0
!
!
MaxValue = 16383
DefaultDisplayType = -100..100.0
}
0, and then defines 15 more on the remaining channels called
14-Bit Control 1-15, which you can use for anything you like.
14-Bit CC
[ 14_Bit_CC Example ]
have many more 14-bit controls than just the 16 pitch bend
{
!
!
Channel = 0
LSB_CC = 16
controls.
!
!
MSB_CC = 48
MinValue = 0
MSB_CC sets the MIDI Controller number for the Most
!
!
}
MaxValue = 16383
DefaultDisplayType = 0..100.0
By combining two 7-bit CC values together, it is possible to
Significant Byte - the “coarse” half.
LSB_CC sets the MIDI Controller number for the Least Significant Byte - the “fine” half.
The LSB and MSB must both be on the same MIDI Channel.
Instrumental will always transmit the LSB followed by the MSB; it will will accept them in whatever order
they come.
The standard control map does not use any of this control type; most packages will probably not be able to
support this.
Q u a n t u m C l o c k w o r k!
Instrumental User Manual
20
Text Registers
[ TextRegister Track Name ]
Not part of standard MIDI; Instrumental’s text registers
can be set via special MIDI SYSEX messages.
{
!
!
ID = 19
WantRemoteLabelText = false
}
It is recommended to stick to the standard set of text registers defined in the Factory Standard Control Map.
Even if you’re not expecting any MIDI SYSEX messages, it is a good idea to include the standard text registers in your control map anyway; they can then be used with custom labels in presets.
See the chapter on “MIDI System Exclusive Messages” for more information about how to send these messages to Instrumental.
SYSEX Buttons
[ SYSEX_Button Play ]
via MIDI. This is used for many things, from transferring
{
!
!
sample and patch data to messages for transport controls.
!
}
MIDI SYSEX messages allow for arbitrary data to be sent
TransmitOnMessage = F0 7D 03 F7
TransmitOffMessage = F0 77 77 F7
DefaultButtonType = Momentary
The SYSEX Button provides the ability to send two different SYSEX messages, one for turning on, and another for turning off. Both messages are optional.
Note that the SYSEX message must be specified in hexadecimal notation, must begin with F0, end with F7,
and contain no payload bytes that are higher than 7F.
Q u a n t u m C l o c k w o r k!
Instrumental User Manual
21
Factory Standard MIDI Control Map
This table lists all the MIDI assignments used by Instrumental’s factory standard control map.
Note: Channel 16 controls listed below are on MIDI channel 0, Channel 1 is on 1, 2 is on 2, etc.
CHANNEL
CONTROL
CONTROL NAME
NOTES
CODE
0
Not Mapped
0
1
Mod Wheel
0
2
Breath Controller
3
Not Mapped
0
4
Foot Controller
0
5
Portamento Time
6
Used by the MIDI Standard for Data Entry.
1-16
7
Channel X Volume
1-16
8
1-16
9
Channel X Meter
1-16
10
Channel X Pan
0
11
Expression
Not Mapped
12 - 13
Mono meter input
Not Mapped
1-16
14
Channel X Meter L
Stereo Meter left input
1-16
15
Channel X Meter R
Stereo Meter right input
16
1-10
17 - 26
Not Mapped
Channel X Control 110
27
1-10
28-31
Not Mapped
Channel X Switch 1-4
32-61
Not Mapped
1-16
62
Channel X Solo
1-16
63
Channel X Mute
0
64
Damper Pedal
On / Off
Q u a n t u m C l o c k w o r k!
Instrumental User Manual
22
CHANNEL
CONTROL
CONTROL NAME
NOTES
CODE
0
65
Portamento
On/Off
0
66
Sostenuto
On / Off
0
67
Soft Pedal
On / Off
0
68
Legato
On / Off
69
Not Mapped
0
70-79
Control 1-10
0
80-89
Switch 1-10
90-95
Not Mapped
96-101
Used by the MIDI standard for RPN and
NRPN.
0
102
Stop
0
103
Play
0
104
Record
0
105
Rewind
0
106
Fast Forward
0
107
Loop
0
108
Move To Loop Start
0
109
Move To Loop End
0
110
Previous Track
0
111
Next Track
0
112
Previous Patch
0
113
Next Patch
0
114
Refresh Patch Name
Only used when connected to a Propellerhead
program; needed to work around a known bug
in Reason/Record.
0
115
Scale Mode
Controls the currently active Scale Mode in Instrumental. See the Scale Mode section for more
information.
Q u a n t u m C l o c k w o r k!
Instrumental User Manual
23
CHANNEL
CONTROL
CONTROL NAME
NOTES
Select Map X
Sent to configure which remote map scheme is
CODE
1, 2, 4, 8, 16
116
being used by the remote sequencer. Mostly
needed to support mixer layouts that display
different numbers of channels.
117
Not Mapped
1-16
118
Select Pad X
Sent by the Drum Pad Selector.
1-16
119
Pad X Indicator
Connected to the LED on each Drum Pad.
120-127
Reserved by MIDI for Channel Mode Messages.
MIDI System Exclusive Messages
Instrumental defines a number of System Exclusive Messages to support text feedback and auto-detection.
The MIDI standard provides the “System Exclusive Message” to allow extensions to the MIDI protocol. System Exclusive Messages start with F0, have N bytes of data that all have the top bit clear, and are terminated
by F7.
All Instrumental SYSEX messages are prefixed with F0 37 51 43. (Note: All 2-digit numbers on this page are
in hexadecimal notation).
NAME
SYSEX MESSAGE
NOTES
No Op
F0 37 51 43 00 F7
No Operation
Identity Request
F0 37 51 43 01 xx yy F7
Asks Instrumental to send an Identity Response. This can be used to Auto-Detect the
Instrumental. Also sent by Instrumental to
find the identity of the driver it is talking to.
Identity Response
F0 37 51 43 02 mm vv xx yy
Sent in response to an Identity Request. xx
F7
and yy should be copied from the Identity
Request, mm and vv identify the Model and
Version.
Instrumental’s Model code is 43
Instrument Has Reset
F0 37 51 43 03 F7
Sent by Instrumental on startup and reconnection.
Set Control Code Label
F0 37 51 43 6B ch cc text... F7
Sets the Remote Label for the CC ‘cc’ on MIDI
channel ‘ch’
Q u a n t u m C l o c k w o r k!
Instrumental User Manual
24
NAME
Set Program Change La-
SYSEX MESSAGE
F0 37 51 43 6C ch text... F7
bel
Set Channel Pressure La-
Sets the Remote Label for the Program
Change control on channel ch
F0 37 51 43 6D ch text... F7
bel
Set Pitch Wheel Label
NOTES
Sets the Remote Label for the Channel Pressure control for channel ‘ch’
F0 37 51 43 6E ch text... F7
Sets the Remote Label for the Pitch Wheel
control for channel ‘ch’
Set Text Register Label
F0 37 51 43 6F reg text... F7
Sets the Remote Label for text register ‘reg’
Set Control Code Text
F0 37 51 43 7B ‘ch’ ‘cc’ text...
Sets the text readout for the CC ‘cc’ on MIDI
Value
F7
channel ‘ch’
Set Program Change Text
F0 37 51 43 7C ch text... F7
Sets the text readout for the Program Change
Value
Set Channel Pressure Text
control on channel ch
F0 37 51 43 7D ch text... F7
Value
Set Pitch Wheel Text
control for channel ‘ch’
F0 37 51 43 7E ch text... F7
Value
Set Text Register Value
Sets the text readout for the Channel Pressure
Sets the text readout for the Pitch Wheel control for channel ‘ch’
F0 37 51 43 7F reg text... F7
Q u a n t u m C l o c k w o r k!
Sets the text readout for text register ‘reg’
Instrumental User Manual
25
Standard Text Registers
In addition to the labels and text values for each control, Instrumental maintains a bank of text registers for
things that don’t have a corresponding MIDI control. These are defined in the MIDI Control Map like regular
MIDI controls.
This table lists the Text Registers defined by the Factory Standard control map. It is up to the DAW software
to send the appropriate MIDI SYSEX messages to load these registers.
REGISTER
NAME
NOTES
NUMBER
1-10
Text Register 1-10
16
Remote Manufacturer
Use for whatever you like!
Used by the Automatic Surface and Preset Chooser.
Displayed briefly on the status panel when it changes.
17
Remote Model
Used by the Automatic Surface and Preset Chooser.
Displayed briefly on the status panel when it changes.
18
Document Name
19
Track Name
Displayed on the toolbar over the Next/Previous Track
buttons.
In Reason/Record, this has been mapped to ‘Device
Name’, as Reason/Record’s ‘Track Name’ only works
for the Master Keyboard.
20
Patch Name
Displayed on the toolbar over the Next/Previous Patch
buttons.
Used by the Automatic Surface and Preset Chooser.
21
Instrument Name
22-31
Used by the Automatic Surface and Preset Chooser.
Reserved
32-47
Channel 1-16 Name
48-63
Pad 1-16 Name
Used by the Mixers
Displayed on the Drum-Pads on the Drum 4x4 surface
Q u a n t u m C l o c k w o r k!
Instrumental User Manual
26
Credits and Thanks
Instrumental was designed, programmed, pixelated and configured by Simon Bullen, Quantum Clockwork,
in Melbourne, Australia.
The Quantum-Bome Conductor Protocol was developed in collaboration with Florian Bomers of Bome Software, München, Germany. MT Player was developed by Bome Software of München, Germany.
Jody Kruger provided additional graphics and much needed visual polish.
Props to Fredrik Lundkvist of Propellerheads, Sweden for his assistance with the Lua Remote Codec.
A big thanks to Nick Kellis, Liam Rout, and Trevor Powell for their beta-testing efforts.
And finally to my family - thanks for your patience and support - I couldn’t have done it without you.
Q u a n t u m C l o c k w o r k!
Instrumental User Manual
27