1
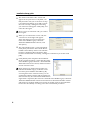
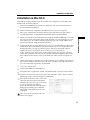
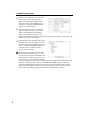
KORG Legacy Collection ANALOG EDITION 2007 Installation/Setup guide E 1 Installation/Setup guide Contents of the package KORG Legacy Collection - ANALOG EDITION 2007 includes the following items. After opening the package, please check to make sure that you have everything. If any items are missing, please contact your dealer. CD-ROM KORG Legacy Collection - ANALOG EDITION 2007 Installation/Setup guide Software License Agreement USB Key Please note • All copyrights to the software of this product are the property of Korg Corporation. • The license agreement for this product is included separately. You must read this license agreement before you install the software. Your installation of the software will be taken to indicate your acceptance of this agreement. • In order to play the software synthesizer in realtime, you will need to use a lowlatency audio interface. • In order to use the software synthesizer as a plug-in, you will need a host application that supports VST, Audio Units, or RTAS. • The software of this product is copy-protected. In order to use this product, you will need a computer that can be connected to the Internet, and that also has a USB port. • If the USB key is damaged, a fee will be charged for repair. Be careful of handling. • Korg provides no guarantee regarding a lost or stolen USB key. Keep the USB key safe, since you will have to purchase the product again if the key is lost or stolen. This product uses applied technology from ART Teknika’s CONSOLE. 2 • Mac, Mac logo and Audio Units logo are trademarks of Apple Computer, Inc., registered in the U.S. and other countries. • Windows is a registered trademark of Microsoft Corporation in the United States and other countries. • VST and ASIO are trademarks of Steinberg Media Technologies GmbH. • RTAS is a registered trademark of Avid Technology, Inc., or its subsidiaries or divisions. • All other product and company names are trademarks or registered trademarks of their respective holders. Installation in Windows XP Installation in Windows XP Installation in Windows XP Here’s how to install the software into Windows XP. 1 Insert the CD-ROM into the CD drive, and follow the on-screen instructions to proceed with the installation. 2 When installation is completed, [Exit Setup] to close the installer. 3 Start up your web browser, type “http://www.korguser.net” in the address field, and connect to the Internet. 4 When your web browser has finished accessing the “KORG USER NET” user website, a log-in screen will appear. If this is the first time you are registering as a user, click “New user.” If you have already registered, type your e-mail address and password, and click “Register another product.” 5 As directed by the on-screen instructions, enter your user information and product information. The e-mail address and password you use for user registration will be required when you log on to the Korg user website to download software updates. Be sure to write them down so that you won’t forget them. In the “Product Code” field of the product information area, type the “Product Code” that’s affixed to the CD case. You should carefully keep the Product Code that’s affixed to the CD case, since you’ll need it in order to receive support service. 6 When registration is complete, an activation code for your USB key will appear in the screen. Carefully write down this code. This activation code will also be sent to you via e-mail when registration is completed. 7 8 Close your web browser. Connect the USB key to the USB port. The “Found New Hardware Wizard” appears, choose [Install software automatically] and click [Next]. when the USB key has been installed, click [Finish] to close the wizard. The USB key must be installed separately for each USB port you use. If you connect the USB key to a USB port different than the one you used when installing the USB key, you will need to reinstall the USB key using the same procedure. 9 From the taskbar, click [Start] and then [All Programs]. From the menu, choose “Synchrosoft” - “Licence Control Center.” 10 License Control Center will start up. From the “Wizards” menu, choose “License Download.” In the screen that appears, click [Next]. 3 Installation/Setup guide 11 The “Enter Activation Code” screen will appear. In the [Activation Code] field, carefully enter the code you wrote down in step 6, and then click [Enter]. If you did not enter the code correctly, a dialog box informing you of that fact will appear. Click [OK], and enter the code again. Once you use an activation code, you cannot use it again. 12 When you’ve entered the correct code, the screen shown at the right will appear. Verify that the [License] area shows the name of the KORG Legacy Collection ANALOG EDITION 2007 software, and click [Next]. 13 The “Download License” screen will appear. Click [Start]. The license data will be downloaded to the USB key. Please wait until this has been completed. When the license data has been downloaded successfully, a dialog box will inform you of this. Click [OK]. 14 Click [Finish]. This completes the installation. In the screen that appears, verify that the names of the KORG Legacy Collection - ANALOG EDITION 2007 software are shown, and then exit the License Control Center. Demo licenses for all the software titles contained in the KORG Legacy Collection series have been pre-installed in the USB key. (By accessing the License Control Center, you can confirm the number of times and the total hours that each title may be used in Demo Mode before registration is required.) The software contained in the KORG Legacy Collection ANALOG EDITION 2007 cannot be launched once the limited number of times and total hours of Demo Mode use has been exceeded, until you download the license into the USB key according to the above-mentioned procedure. 4 Installation in Mac OS X Installation in Mac OS X To install the software in Mac OS X, be sure that your computer is connected to the Internet and proceed as follows. 1 Insert the CD-ROM into the CD drive, and follow the on-screen instructions to proceed with the installation. 2 3 When installation is completed, click [Restart] to restart your computer. 4 When your web browser has finished accessing the “KORG USER NET” user website, a log-in screen will appear. If this is the first time you are registering as a user, click “New user.” If you have already registered, type your e-mail address and password, and click “Register another product.” 5 As directed by the on-screen instructions, enter your user information and product information. The e-mail address and password you use for user registration will be required when you log on to the Korg user website to download software updates. Be sure to write them down so that you won’t forget them. In the “Product Code” field of the product information area, type the “Product Code” that’s affixed to the CD case. You should carefully keep the Product Code that’s affixed to the CD case, since you’ll need it in order to receive support service. 6 When registration is complete, an activation code for your USB key will appear in the screen. Carefully write down this code. This activation code will also be sent to you via e-mail when registration is completed. 7 8 9 10 Close your web browser. 11 The “Enter Activation Code” screen will appear. In the [Activation Code] field, carefully enter the code you wrote down in step 6, and then click [Enter]. If you did not enter the code correctly, a dialog box informing you of that fact will appear. Click [OK], and enter the code again. After your computer has restarted, start up your web browser, type “http:// Installation in Mac OS X www.korguser.net” in the address field, and connect to the Internet. Connect the USB key to the USB port. Navigate to the “Application” folder, and double-click “License Control Center.” License Control Center will start up. From the “Wizards” menu, choose “License Download.” In the screen that appears, click [Next]. Once you use an activation code, you cannot use it again. 5 Installation/Setup guide 12 When you’ve entered the correct code, the screen shown at the right will appear. Verify that the [License] area shows the name of the KORG Legacy Collection - ANALOG EDITION 2007 software, and click [Next]. 13 The “Download License” screen will appear. Click [Start]. The license data will be downloaded to the USB key. Please wait until this has been completed. When the license data has been downloaded successfully, a dialog box will inform you of this. Click [OK]. 14 Click [Finish]. This completes the installation.In the screen that appears, verify that the names of the KORG Legacy Collection - ANALOG EDITION 2007 software are shown, and then exit the License Control Center. Demo licenses for all the software titles contained in the KORG Legacy Collection series have been pre-installed in the USB key. (By accessing the License Control Center, you can confirm the number of times and the total hours that each title may be used in Demo Mode before registration is required.) The software contained in the KORG Legacy Collection ANALOG EDITION 2007 cannot be launched once the limited number of times and total hours of Demo Mode use has been exceeded, until you download the license into the USB key according to the above-mentioned procedure 6 Cautions regarding the USB key Cautions regarding the USB key ● If the KORG Legacy Collection - ANALOG EDITION 2007 software will not start even though the USB key is connected, please check the following points. •If you’re using a USB hub, try connecting the key directly to a USB port on the computer itself to see whether it will work. You can also try removing all other connected USB devices except for the key. •Download the most recent driver for the USB key. The most recent USB key drive can be downloaded from http://www.syncrosoft.com/downloads. ● If the USB key is damaged, a fee will be charged for repair. Be careful of handling. ● Don’t connect the key to a USB port or hub that supplies a voltage higher than the 5 V specified by the USB specification. If you’re using a powered USB hub, using the wrong AC adaptor may damage the USB key. If you’re using a Mac, be aware that the USB port located on the rear of the Apple display may provide excessive voltage, so avoid connecting the USB key to that port. Cautions regarding the USB key/The use Website ● Korg provides no guarantee regarding a lost or stolen USB key. Keep the USB key safe, since you will have to purchase the product again if the key is lost or stolen. The user website Registered users of this product can access the users-only website. Software updates and program data can be downloaded from the KORG USER NET users-only website. Accessing the users-only website 1 Start up your web browser, type “http://www.korguser.net” in the address bar, and connect to the Internet. 2 The user website’s log-in screen will appear. Type the e-mail address and password with which you registered. Note: If you’ve forgotten your password, you can click “Forgot your password” to obtain the password you registered. When you’ve typed the necessary information, click one of the items at the right. When log-in is completed, the page you selected will appear. Proceed as directed by the instructions in each page. 7 Installation/Setup guide Setup This chapter explains how to start up the stand-alone application after installation, and how to make preference settings so you can use it. Starting up Stand-alone application 1 2 3 Use a USB cable to connect the external MIDI device to your computer. Connect the USB-hardware key to your computer. Navigate to the “KORG” folder - “KORG Legacy” folder, and double-click the software synthesizer icon to start up the program. Windows The KORG Legacy folder is in the location you specified when installing the software. By default, it will be in the “KORG” folder within the “Program Files” folder. Alternatively, you can click the [Start] button on the task bar, then “All Programs,” and start up the program by choosing from “KORG ” folder - “KORG Legacy” folder. Mac Navigate to the “Application” folder - “KORG” folder - “KORG Legacy” folder, and double-click software synthesizer icon to startup the program. 4 From the System menu, choose “Preference.” The Preference dialog box “Audio Device” will appear. If “MIDI Setting” appears, click the “Audio Device” tab. Note: The first time you start up the software, or if the preference settings have been cleared for some reason, or if your computer system has changed, the preference dialog box will appear automatically at start-up. Audio settings 1 In “Driver type” or “Output Device,” select the type of audio driver you want to use. Windows ASIO: The ASIO driver will be used. ASIO drivers allow minimal latency, and will give you the best performance. If an ASIO driver is installed, we recommend that you use this setting. DirectSound: DirectSound will be used. Use this setting if an ASIO driver is not installed in your computer. MME: MME (Multi Media Extension) will be used. Since MME has higher latency than other settings, we recommend that you use another setting if possible. Mac If audio interface is installed in your computer, you will be able to select the driver for that audio interface. 8 Setup If audio interface is not installed, you will only be able to select “ Built-in audio controller.” Specify the audio output. Windows • If you selected ASIO in “Driver type” This will be unavailable and cannot be selected if an ASIO driver is not installed in your computer. “Driver” Select the driver (device) you will use. “Sampling Rate” Select the sampling rate you will use. The choices for “Sampling rate” will depend on the device you select for “Driver.” “Out Channel” Select the output channels. This setting will always be a pair such as 1-2 or 3-4. The choices will depend on the device you select for “Driver.” Note: Only for the MS-20’s audio settings, “Input Channels” will appear in the screen, allowing you to specify audio channels for input. This will always be a pair of channels, such as 1–2 or 3–4. The available settings will depend on the device you selected for “Driver.” “Clock Source” Select the audio clock source that you will use. The choices will depend on the device you select for “Driver.” “ASIO Control Panel” Click this to open the ASIO driver settings panel. The contents and operation in this panel will depend on the driver you are using. For details, refer to the owner’s manual for your audio interface. • If you select DirectSound or MME as the “Driver type” “In Driver” Setup 2 Select the driver (device) you will use. In some cases, the same driver may appear more than once. Select one of them. “Bit/Smpl Rate/Ch” Select the audio format you will use. The choices will depend on the device you select for “Input driver.” “Buffer Size” Specify the number of audio processing buffers. Higher settings will make operation more stable, but latency will be higher. Latency is the time from when the computer receives a note-on message until sound is produced. Latency is determined by “the number of samples” x “the number of buffers.” You should set the buffer size and the sample size in a way that minimizes latency while preserving stable operation. 9 Installation/Setup guide “Sample Size” Specify the number of samples in one buffer. Higher settings will make operation more stable, but latency will be higher. Mac “Bits/Rate/Channel” Select the audio format you will use. The choices will depend on the device you selected as the “Output Device.” “Output Channel” If you selected “Built-in audio controller” as the “Output Device,” the only available setting will be Output 1/Output 2. If audio interface is installed in your computer, you will have other choices. Note: Only for the MS-20’s audio settings, “Input Channels” will appear in the screen, allowing you to specify audio channels for input. This will always be a pair of channels, such as 1–2 or 3–4. The available settings will depend on the device you selected for “Driver.” “Buffer Size” Specify the size of the audio processing buffer. Higher settings will make operation more stable, but latency will be higher. “Latency” This indicates the latency. The latency will depend on the “Buffer Size” setting. Latency is the time from when the computer receives a note-on message until sound is produced. Latency is determined by “the number of samples” x “the number of buffers.” You should set the buffer size in a way that minimizes latency while preserving stable operation. Note: The “Latency” value is determined by the buffer size. You should set “Buffer Size” to the lowest setting for which operation is stable. Note: For details on how to make settings for your audio interface, refer to the owner’s manual for your audio interface. MIDI settings 1 2 3 Click the “MIDI Setting” tab. The various port settings will appear. For MIDI IN devices 1, 2, and 3, select the device that you will use for each port. You can use up to three MIDI IN devices simultaneously. Normally, the input from these devices will all be merged. If a multi-port device is connected, this screen may show two or more ports on the same device. In the “Clock Master” field, select the device that will be the MIDI clock master. If you don’t select a device, the internal clock will always be used. When the software instrument is operating as a plug-in, the clock of the host application will always be used. If the device you want to use does not appear in the selection for each port, check the following points. 10 Setup Win: Is the connected device driver installed? Mac:Is the connected device detected in your computer? Mac:If the device you want to use does not appear in the selection for each port, navigate to the Application folder ➝ Utility ➝ “Audio MIDI Setup,” display the “MIDI device” tab page, and check whether the connected external MIDI device has been detected. Other settings 1 Click the “Other” tab. A dialog box with settings for operation (Knob Mode) and automatic stopping will appear. 2 In the Control area, set “Knob Mode” to specify how you want the knobs to operate. Circular Edit values by moving the mouse pointer to the mark indicating a knob’s value, and dragging to turn the knob. You can also move the knob immediately by directly clicking the desired position. Relative Circular Edit values by dragging as if to turn the knob to the desired position. You will not be able to move the knob by clicking as with the “Circular” setting above. Linear 3 In the AutoStop Setting area, specify if and when you want the audio to stop automatically. The Auto Stop function automatically stops the audio depending on the CPU load of your computer. (The result is the same as when you execute the “System” menu command “Stop Audio.”) If you want to use the Auto Stop function, check the “Enable AutoStop” check box, and use the “AutoStop Rate” slider to specify the load threshold at which the audio will be stopped. If the CPU load exceeds this threshold during operation, the audio will stop. If the audio has been stopped automatically, use the “System” menu command “Play audio” to resume playing. Setup Edit values by dragging the knob upward or downward. If audio stops frequently, try lightening the load on the CPU by reducing the polyphony of the synthesizer(s). If you don’t use the Auto Stop function, the system will attempt to continue producing audio as long as possible. However, depending on the hardware you are using, you may experience problems such as the mouse becoming unresponsive when the audio load is high. 4 Click “OK” to finalize the preference settings. 11 Installation/Setup guide Support If you have questions about this product, please contact the Korg distributor for the country in which you purchased it. You can find your local distributor at http://www.korguser.net/distributors_list.htm In order to receive product support, you must have completed the product registration. Please understand that product support will not be provided if your registration cannot be verified. When Requesting Support You will need to provide the following information when requesting support. • Your name and e-mail address (they must be the same name and e-mail address you used when registering) • The Product code of your product (affixed to the CD case) • The name and version of your product (shown in the “About” window of the software) The following information is required to enable us to help you quickly and efficiently. Please have it available before you contact us for support: • Your computer system Manufacturer and model of your computer: CPU model and clock speed: Amount of installed memory: Total and remaining space on installed hard disk: Operating system and version: Audio interface model name and driver version: Other peripherals connected to your computer: • Your question (please be as specific as possible) Before you request support, please check whether your question has been answered in the KORG Legacy Collection Owner ’s Manual or in the “Users website FAQ”. We are sorry, but time does not permit us to answer questions on basic computer operation, on the basics of setting up your computer for music production, on how to create songs or sounds, or regarding products not manufactured by Korg. 12 IMPORTANT NOTICE TO CONSUMERS This product has been manufactured according to strict specifications and voltage requirements that are applicable in the country in which it is intended that this product should be used. If you have purchased this product via the internet, through mail order, and/or via a telephone sale, you must verify that this product is intended to be used in the country in which you reside. WARNING: Use of this product in any country other than that for which it is intended could be dangerous and could invalidate the manufacturer’s or distributor’s warranty. Please also retain your receipt as proof of purchase otherwise your product may be disqualified from the manufacturer’s or distributor’s warranty. 4015-2 Yanokuchi, Inagi-city, Tokyo 206-0812 Japan 2006 KORG INC.