1
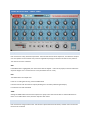
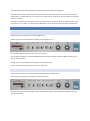
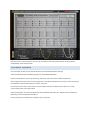
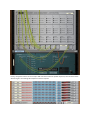
AS-16 Analog Sequencer Rack Extension for Propellerhead Reason User Manual Version 1.0 INTRODUCTION AS-16 is a fully featured CV based analog sequencer. It implements the following features: 16 CV channels with separate CV outputs Skip, Jump and Pad features for each channel Unipolar, Bipolar and Note output modes Common musical scales, with selectable root note via UI or MIDI Octave and range controls when in Note mode Normal, One Shot and Random modes Selectable slide Pattern reverse and bounce modes Synchronise with sequencer, external clock or free run Swing control Audio envelope and chopping facility CV add and multiply Chaining of devices for unlimited channels WHAT IS AN ANALOG SEQUENCER? Analog sequencers were popular before MIDI sequencing was available – they allow control of one or more CV signals using analog knobs or sliders. Being CV based, they can control pitch or any other analog input such as filter cut-off. More recently, analog sequencers are popular with modular synthesizer enthusiasts as they allow for more expressive and real time control than a MIDI sequencer or computer can. AS-16 offers all the features of hardware based sequencers, plus a lot more! LIMITATIONS Due to limitations in the current Reason Rack Extension SDK, the device cannot export MIDI notes, or offer a 'Copy Loop to Track' facility. These may be added in the future if and when the SDK allows these features. The Run button is not available for automation as this can cause problems when changing the Reason sequencer position (a work-around is available via the Reset CV input). When the Reason sequencer is stopped, AS-16 will reset to its initial position. USAGE INSTRUCTIONS – FRONT PANEL SKIP, PAD AND JUMP Each channel has a Skip, Pad and Jump button. These control the flow of the sequencer, and allow for complex non-linier patterns to be created. They can be changed whilst playing to introduce variations in the patterns. The rules for each are as follows: SKIP If the SKIP button is highlighted, then that channel will be skipped – it will not be played, and it will reduce the sequence length. This is not the same as a rest (set GW to zero for a rest). PAD The PAD button has multiple uses: It acts as a 'Landing Pad' for any previous JUMP events It set the channel and main PAD CV output (allowing for a secondary switched gate output) It controls the CV slide if enabled JUMP Setting the JUMP button will force the sequencer to jump to the next channel with an active PAD button. If there are no PAD buttons active, then the sequence will restart. CONTROL KNOB Each channel has a large control knob. This sets the output of the channel CV Out, and the main CV out when the channel is selected. A LED is used to indicate the active channel. The CV output is dependent upon the note mode, selected using Output LCD on the bottom left CV Out – gives a 0.0 to 1.0 pure CV output CV Bipolar – gives a -1.0 to 1.0 CV output Chromatic – outputs notes from the chromatic scale, with position 5 being the Root Note. Major – outputs notes from the major scale, with position 5 being the Root Note. Minor – outputs notes from the minor scale, with position 5 being the Root Note. Harmonic Minor – outputs notes from the harmonic minor scale, with position 5 being the Root Note. Dorian – outputs notes from the dorian scale, with position 5 being the Root Note. Mixolydian - outputs notes from the mixolydian scale, with position 5 being the Root Note. Blues - outputs notes from the common blues scale, with position 5 being the Root Note. The Root Note is determined using the Root-Key LCD. It can be overridden by adding a Reason Sequencer for the device and entering MIDI notes (either using a keyboard, or the Reason editor). GATE WIDTH KNOB Each channel has a smaller Gate Width (GW) knob which controls how long the Gate Out (and Pad Out) signal lasts. Setting GW to zero will mean that no gate signal is set. This is useful for setting rests in the pattern. Setting GW to 100% will mean that the gate is set continuously. This can be used to 'join' two or more channels together. Gate Width is determined as a percentage of the current timing. When the Sync switch is set to 'Clock', this will th th be derived from the main Reason tempo using the current clock setting (1/16 , 1/8 etc) . If Sync is set to 'Free', then it will be a percentage of the duration set on the Clock knob (100ms etc). If Sync is set to 'Ext', then it will also be a percentage of the duration set on the Clock knob (100ms etc). This is because the device has no knowledge of the external clock tempo. OCTAVE Octave is only used when AS-16 is run in note mode (not CV or CV Bipolar). Normally AS-16 will output notes around middle-C (MIDI note 60). This switch allows you to transpose all notes up or down 1 octave. RANGE Range is only used when AS-16 is run in note mode (not CV or CV Bipolar). Range determines how many notes are mapped to the control knob. This can be 10, 20 or 30 notes. Setting a larger range will give a larger range of notes, but be more difficult to set the exact note using the knob. MODE Mode controls how AS-16 operates: Norm: Sequencer will repeat a pattern when it gets to the end. 1Shot: Sequencer will play the pattern once and then stop. Rand: Sequencer will create a pseudo random pattern based upon the initial settings of all 16 control knobs. The random pattern will not repeat itself whilst playing, but it will be the same each time the sequencer starts. Changing the control knobs will change the 'seed' of the random number generator at start of playback. This means that your song will sound the same each time you play it providing you don't change the control knobs. SLIDE The slide feature is used to smoothly change the CV output to create musical slides or envelopes. The settings are: Off: No slide is used, CV Out will jump from one value to the next Pad: Slide is used when the PAD button is active On: Slide is active all the time, CV Out will smoothly change from one value to the next over the duration set by the GW control. Warning: Most synthesizers in Reason do not accept slides via CV – they will instead play a series of distinct notes when AS-16 outputs a slide. For this reason, slide is of most use to control non-note values. DIRECTION The Direction control determines how AS-16 plays the channels. Assuming no SKIP or JUMP buttons are set, the rules are: Up: Plays channels 16 to 1 and then repeats Both: Plays channels 1 to 16, then 16 to 1 and then repeats Down: Plays channels 1 to 16 and then repeats SYNC & CLOCK The Sync control determines how AS-16 will be clocked. The options are: Clock: Ext: Free: th Timing based on Reason master clock, the Clock knob changes the resolution (1/16 etc) Timing based upon an external input using the Clock-In input Timing duration set using Clock Knob from 10ms to 1000ms SWING The Swing knob adds a 'swing' feel to the pattern by delaying every second channel. This is useful for adding life to patterns when set to a low value, or used as a creative tool at larger values. PLAY AND AUTO The Play button will start the sequence even if the main Reason sequencer is not running. Normally AS-16 will start playing when the Reason sequencer starts, to disable this feature, toggle the Auto button. Note that the Play button cannot be automated. Use the Chain Reset CV input instead. USAGE INSTRUCTIONS – REAR PANEL CHANNEL GATE, CV & PAD OUT Each of the 16 channels will output its own gate, control value and pad status, and can be individually wired to any other CV device in Reason. Gate and Pad durations are controlled by the GW knob on the front panel. MAIN GATE, CV & PAD OUT The current gate, CV and pad signals are outputted here. When connecting to an instrument, you will normally connect Gate Out and CV Out to the appropriate Gate / CV inputs on the instrument. Optionally, you may want to connect Pad Out to another control input. TIMING – CLOCK IN The Clock In socket is used to control the timing of the AS-16 device. To use this, the Sync switch on the front must be in the 'Ext' position. The CV signal must change from zero to non-zero to step to the next channel. Clocks can be generated from devices such as the Reason Matrix Pattern Sequencer, or another AS-16. TIMING – CLOCK OUT The current clock (with swing) will be outputted on this CV socket. This can be used to sync other devices with clock inputs. TIMING – SWING IN The CV value will be added to the current Swing value set from the front panel. CONTROL – HOLD When this CV value is active, AS-16 will be held on the current channel. Any instruments attached will keep playing the same note until hold is released. CONTROL – JUMP When this CV value is active, AS-16 will act as if the Jump button was set on the current channel, and perform a jump to the next PAD, or start of the sequence if no PADs are set. CONTROL - SKIP When this CV value is active, AS-16 will act as if the Skip button was set on the current channel, and perform a skip to the next channel. CHAIN The Chaining inputs allow multiple AS-16 devices to be chained together to make patterns longer than 16 notes. When chaining multiple devices together, the general rules are: All AS-16 devices in the chain should have the same timing settings All devices except the end device should have a connection from Chain Out to Chain In The last device should connect Chain Out to Reset on the first device You will also need to connect all the CV Out, Gate Out and Pad Out connections together. This can be done using multiple Spider CV Mergers, or get the free CV-8 Rack Extension from the Propellerheads Shop which is designed for the job. CHAIN – RESET The Reset input can also be used to start the sequence playing even if playback is stopped. By connecting this to a Gate Out from another instrument, you can restart the sequence every time a note is played on the instrument for complex CV or envelopes. ADDER This is a general purpose CV Adder. It takes adds the values of CV In A and CV In B and outputs via CV Out A+B. The adder runs all the time, and is independent of the reset of the device. ADDER This is a general purpose CV Multiplier. It takes multiplies the values of CV In A and CV In B and outputs via CV Out AxB. The multiplier runs all the time, and is independent of the reset of the device. AUDIO 1 & 2 The audio section allows for modification of audio signals controlled by the sequencer. Levelled Out will take the audio signal and adjust the volume based upon the current control knob. If slide is enabled then a smooth slide from one volume to the next will occur, allowing AS-16 to be used as an advanced envelope modifier. Gated Out will output the audio signal if the current gate is active, otherwise silence. A very quick fade is used to avoid clicks. This results in a chopped audio effect which can be accurately controlled by the 16 GW knobs. APPLICATIONS SIMPLE BASS LINE FROM MIDI Create a track for AS-16 to allow it to accept MIDI input. Set the Output to be Harmonic Minor or Major, and set Root-Key to '—' Connect Main Gate and CV Out to the synth of your choice. Play the Reason sequencer, and use the MIDI keyboard to set the root note. When no MIDI is played, AS-16 will not output CV data. Change the 16 control and GW knobs to get an interesting bass line. You can now play / record your bass lines with a single key. ENVELOPE GENERATOR The AS-16 can be used as a complex envelope generator when used with Thor. Set CV output, 1Shot mode, and disable the Auto play button. Route the Thor audio outputs through Audio 1 and Audio 2 as shown. Connect Global Envelope CV out from Thor to Chain Reset. Now every time a note is played on Thor, the AS-16 sequence will start and the level of the sound will be modulated by the 16 control knobs. 128 CHANNEL SEQUENCER In this example, we will connect 8 AS-16 devices to a CV-8 Gateway with full chaining. The CV-8 Gateway device is available for free from the Propellerhead Shop. Create an AS-16 device, and set up the timing, note mode, and initial control / GW knob positions. Select 'Copy Devices and Tracks' from the popup menu, the select Paste Devices and Tracks 7 times so that you have 8 devices. Rename these devices to 'Seq 1', 'Seq 2' etc. Connect Seq 1 Chain Out to Seq 2 Chain In. Connect Seq 2 Chain Out to Seq 3 Chain In and so on. Finally, connect Seq 8 Chain Out to Seq 1 Reset. Add a CV-8 Gateway. Connect Seq 1 Gate & CV Out to Gateway Gate 1 & CVA 1. Repeat this for all 8 devices. Optionally connect the Pad Outs to CVB 1-8. Finally connect the CV-8 Gate and CV output to your instrument. Finally, change the controls on each of your 128 channels to make the perfect sequence, then minimise all the devices to get a cool looking LED sequence on the front panel! CREDITS Design and coding by Richard Harvie, DLD Technology Ltd – http://www.dldtechnology.com Graphics by Steven James, Chimera Creations - http://www.chimeracreations.co.uk Idea suggested on Reason UK Facebook page. Additional patches by Gaz Cox, Matt Hammond and Okeh.