1
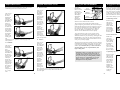
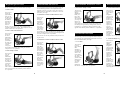
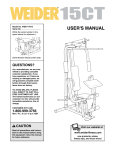
Ordering Replacement Parts
If you encounter any difficulties with this product, or if you need to order replacement parts, call the ICON Health &
Fitness, Ltd. office, or write:
ICON Health & Fitness, Ltd.
Customer Service Department
Unit 4
Revie Road Industrial Estate
Revie Road
Beeston
Leeds, LS11 8JG
UK
Model No. WLEMMC14910
QUESTIONS?
Tel:
As a manufacturer, we are committed to providing complete
customer satisfaction. If you have
questions, or if there are missing
parts, please call:
08457 089 009
Outside the UK: 0 (044) 113 387 7133
Fax: 0 (044) 113 387 7125
08457 089 009
When ordering parts, please be prepared to give the following information:
• the MODEL NUMBER of the product (WLEMMC14910)
• the NAME of the product (WESLO® AB DESIGNER)
• the KEY NUMBER and DESCRIPTION of the part(s) (see the PART LIST/EXPLODED DRAWING on page 7).
Or write:
ICON Health & Fitness, Ltd.
Customer Service Department
Unit 4
Revie Road Industrial Estate
Revie Road
Beeston
Leeds, LS11 8JG
UK
email: [email protected]
USER'S MANUAL
CAUTION
WESLO is a registered trademark of ICON Health & Fitness, Inc.
Part No. 179518 R0901A
Printed in China © 2001 ICON Health & Fitness, Inc.
Read all precautions and instructions in this manual before using this
equipment. Save this manual for
future reference.
Visit our website at
www.weslo.com
Important Precautions
Assembly
Storage and Maintenance
Follow the steps below to assemble the AB DESIGNER.
Read each step completely before beginning.
• Read all instructions before you use the
WESLO® AB DESIGNER. Use the AB
DESIGNER only as described in this manual.
1. Attach the Headrest (3) to the Headrest Tube (1) with
the Headrest Bracket (9), two Screws (10), and two
Flat Washers (11) as shown in the inset drawing.
Tighten the remaining Screw (10) and the Curved
Washer (11) into the hole in the centre of the
Headrest Tube. Make sure that the Headrest and
the Headrest Tube are oriented as shown.
• As you exercise, keep the small of your back
on the floor; it may be necessary to raise your
hips slightly.
• Keep your head on the headrest as you
exercise.
Part List/Exploded Drawing
When you are not using the AB DESIGNER, it can be
folded for storage. Follow the instructions below to fold
the AB DESIGNER.
1. Press the Spring Clips (4) in the upper ends of the
U-tubes (5). Pull the Top Tube (7) off the U-tubes.
7
• If you feel faint, dizzy, or short of breath at
any time during exercise, stop immediately
and begin cooling down.
12
9
7
• Before you begin this or any exercise program, consult your physician. This is especially important for persons over the age of 35 or
persons with pre-existing health problems.
ICON assumes no responsibility for personal
injury or property damage sustained by or
through the use of this product.
11
5
4
3
4
10
Qty.
1
2
3
4
5
6
7
8
9
10
11
12
#
1
2
1
4
2
2
1
1
1
3
2
1
1
Description
Headrest Tube
Headrest Tube Foam
Headrest
Spring Clip
U-tube
U-tube Foam
Top Tube
Top Tube Foam
Headrest Bracket
Screw
Flat Washer
Curved Washer
User’s Manual
Note: “#” indicates a non-illustrated part. Specifications
are subject to change without notice.
1
11
Key No.
5
3
4
3
4
4
4
12
8
9
1
7
• A warning decal has been placed on the AB
DESIGNER. If the decal is missing or illegible, contact our customer service department
to order a free replacement decal.
5
4
4
5
11
11
10
2. Press the Spring Clip (4) in the lower end of one of
the U-tubes (5). Rotate the U-tube toward the other
U-tube and down until it is lying on the floor.
5
4
4
3
Rotate the other U-tube (5) down in the same way.
1
2. Lay the Headrest Tube (1) on the floor in the position shown. Look at one of the U-tubes (5) and find
the longest end. Press the Spring Clip (4) in the
longest end of the U-tube, and insert the U-tube into
one side of the Headrest Tube (1) as shown. Make
sure that the Spring Clip snaps into the holes in the
Headrest Tube.
Before You Begin
Congratulations for purchasing the WESLO® AB
DESIGNER. The AB DESIGNER is specially developed to shape your upper and lower abs and obliques to
give you a firm, flat stomach, in only minutes a day. The
AB DESIGNER supports your head and neck as you
exercise, and helps you maintain correct form for maximum results. Used as part of a fitness program that
includes regular aerobic exercise and a proper diet, the
AB DESIGNER will help you to look better, feel better,
and enjoy the benefits of greater fitness.
6
3. Slide the Top Tube (7) onto the ends of both U-tubes
(5) at the same time. Press the Spring Clips (4) in the
ends of the U-tubes, and slide the Top Tube fully
onto the U-tubes. Make sure that the Spring Clips
snap into the holes in the Top Tube.
If you have additional questions, please call our Customer
Service Department at 08457 089 009. To help us assist
you, please note the product model number
(WLEMMC14910).
2
5
2
The AB DESIGNER can be wiped clean with a damp
cloth and mild, non-abrasive detergent. Do not use
solvents.
Attach the other U-tube (5) to the other side of the
Headrest Tube (1) in the same way.
Before you use the WESLO® AB DESIGNER, please
read this manual carefully.
2
7
4
4
6
Expert Exercises
Expert Exercises–Cont.
The expert exercises should be done only after you can
comfortably perform the advanced exercises.
12. Reverse Trunk
This exercise
12a
focuses on
the oblique
abdominals.
Straighten
your legs and
raise them as
shown in
photograph
12a. Curl up
to about a 45°
angle. This is
12b
the starting
position.
Lower your
legs to the
side as shown
in photograph
12b; then
return to the
starting position. Complete 10 to 15 repetitions, alternating sides
with each repetition.
10. Bicycle Ab Crunch
This exercise
10a
focuses on
the lower
abdominals.
Straighten
your legs and
hold them off
the floor as
shown in
photograph
10a. Curl up
10b
to about a 45°
angle, bending one knee
and raising it
as shown in
photograph
10b; then
return to the
starting position.
Complete 10 to 15 repetitions, alternating legs with
each repetition.
13. Scissors
This exercise
13a
focuses on
the upper and
lower abdominals. Hold
your legs in
the position
shown in
photograph
13a. Curl up
to about a 45°
13b
angle. This is
the starting
position.
Cross your
ankles as
shown in
photograph
13b; then
return to the
starting position. Complete 10 to 15 repetitions, alternately crossing
the right ankle above the left, and then the left ankle
above the right.
11. Jackknife
This exercise
targets the
lower abdominals.
Straighten
your legs and
hold them off
the floor as
shown in photograph 11a.
Curl up to
about a 45°
angle, raising
both legs as
shown in photograph 11b;
then return to
the starting
position.
Complete 10
to 15 repetitions.
11a
11b
6
Suggested Stretches
Using the AB DESIGNER
Begin and end each workout with a few minutes of
stretching. Stretching prepares the body for exercise by
increasing the body temperature, heart rate, and circulation. After exercise, stretching allows the heart rate to
return to normal and the muscles to cool down gradually. Stretching is also effective for increasing flexibility.
The correct form for three basic stretches is shown
below. Move slowly as you stretch—never bounce.
The AB
Upper
DESIGNER
Abdominals
offers a variety
of exercises
Oblique
that shape your
Abdominals
upper, lower,
and oblique
Lower
abdominals.
Abdominals
The photographs in
this manual
show the correct form for each exercise.
1. Hamstring Stretch
Extend one leg
and rest the
opposite foot
against it as
shown. Reach
toward your
toes and hold
for 15 counts.
Repeat 3 times
for each leg.
The exercises in this manual are divided into four
groups: Beginning, Intermediate, Advanced, and Expert.
Start with the beginning exercises, and progress at your
own pace. Be careful not to overdo it during the first
few weeks of your exercise program. It is better to
increase the number of repetitions you do than to
advance to more difficult exercises too quickly.
To get the most from your exercise, proper form is
important. As you perform each repetition, use your
abdominal muscles to pull yourself up, allowing the AB
DESIGNER to “roll” with you. Keep your head on the
headrest and the small of your back on the floor. If necessary, raise your hips slightly.
2. Toe Touch Stretch
Stand with
your knees
bent slightly as
shown. Relax
your back and
shoulders as
you reach
down toward
your toes. Hold
for 15 counts.
Repeat 3 times.
Always begin and end each workout with a few minutes
of stretching. Remember to keep plenty of water nearby
as you exercise, and drink periodically to avoid dehydration. If you feel faint, dizzy, or short of breath at
any time during exercise, stop immediately and
begin cooling down.
3. Quadriceps Stretch
WARNING: Before you begin this or any exercise program, consult your physician. This is
especially important for persons over the age of
35 or persons with pre-existing health problems.
ICON assumes no responsibility for personal
injury or property damage sustained by or
through the use of this product.
Place one hand
against a wall
and grasp one
foot with your
other hand as
shown. Hold
your foot as
close to your
buttocks as
possible, and
hold for 15
counts. Repeat
3 times for
each leg.
3
Beginning Exercises
Intermediate Exercises
Be sure to stretch for a few minutes before you begin.
As your abdominal muscles become stronger, and you
can comfortably perform several repetitions of the
beginning exercises, it is time to move on to the intermediate exercises. Remember to stretch for a few minutes before you begin.
1. Basic Crunch
This exercise
1
targets the
upper abdominals. Lie on
the floor with
your head on
the headrest,
hold the top
tube, and
bend your
knees as
shown. Curl up to about a 45° angle, and then lower
yourself to the starting position. This completes one repetition. Perform 10 to 15 repetitions.
4. Raised-knee Crunch with Knees Held to Chest
This exercise
4
focuses on
the upper
abdominals.
Assume the
Basic Crunch
position, but
bring your
knees toward
your chest as
shown. Curl
up to about a 45° angle, and then lower yourself to the
starting position. Keep your knees raised throughout the
exercise. Complete 10 to 15 repetitions.
2. Basic Crunch with Raised Feet
This exercise
2
focuses on
the lower
abdominals.
This exercise
should be
performed in
the same way
as the Basic
Crunch,
except your
feet should be held off the floor during the exercise.
Complete 10 to 15 repetitions.
This exercise can also be performed with your feet resting on a chair.
5. Raised-knee Crunch with Knees Lifted to Chest
This exercise
targets the
lower abdominals. The
starting position is shown
in photograph
5a. Curl up to
about a 45°
angle, bringing your
knees toward
your chest at
the same
time; then
return to the
starting position. Perform
10 to 15 repetitions.
3. Basic Oblique Crunch
This exercise
3
is for the
oblique
abdominals.
Perform this
exercise in
the same way
as the Basic
Crunch, but
turn your
knees to the
side as shown. Complete 5 to 7 repetitions, change your
knees to the opposite side, and then perform another 5
to 7 repetitions.
4
Intermediate Exercises–Cont.
Advanced Exercises–Cont.
6. Raised-knee Oblique Crunch
8. Advanced Raised-knee Crunch
This exercise
6
focuses on the
oblique
abdominals.
Bend your
knees, turn
them to one
side, and hold
your legs off
the floor as
shown. Curl
up to about a 45° angle, then return to the starting position. Hold your legs stationary throughout the exercise.
Complete 5 to 7 repetitions, change your knees to the
opposite side, and then perform another 5 to 7 repetitions.
This exercise
8a
focuses on the
lower abdominals.
Straighten
your legs and
hold them off
the floor as
shown in photograph 8a.
Curl up to
8b
about a 45°
angle, bringing your
knees toward
your chest as
shown in photograph 8b;
then return to
the starting
position.
Complete 10 to 15 repetitions.
Advanced Exercises
The following exercises are designed to further improve
your strength, tone, and flexibility. Remember to stretch
for a few minutes before you begin.
9. Advanced Oblique Leg Crunch
This exercise
9a
targets the
oblique
abdominals.
Straighten
your legs and
hold them off
the floor as
shown in photograph 9a.
Curl up to
9b
about a 45°
angle, bending your
knees and
bringing them
to the side as
shown in photograph 9b;
then return to
the starting position. Complete 10 to 15 repetitions,
alternating sides with each repetition.
7. “L”-Crunch
5a
5b
This exercise
7
is for the
upper abdominals.
Straighten
your legs and
raise them as
shown. Curl
up to about a
45° angle, and
then lower
yourself to the
starting position. Keep
your legs
raised
throughout
the exercise. Complete 10 to 15 repetitions.
5