1
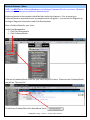
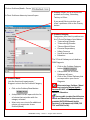
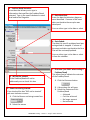
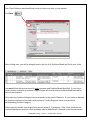
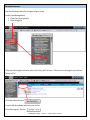
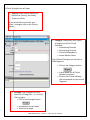
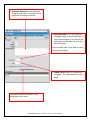
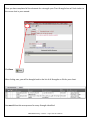
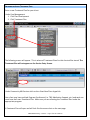
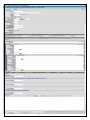
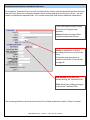
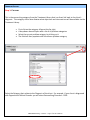
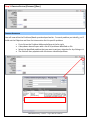
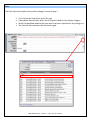
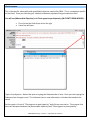
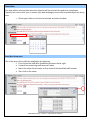
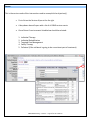
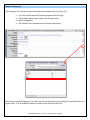
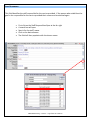
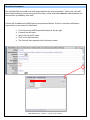
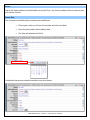
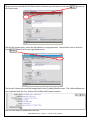
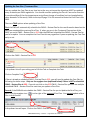
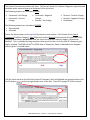
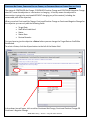
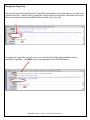
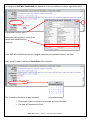
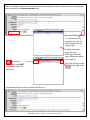
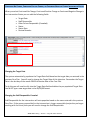
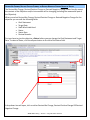
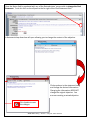
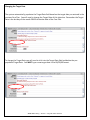
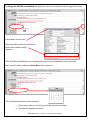
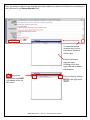
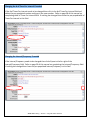
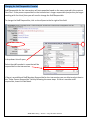
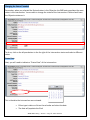
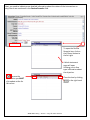
 SBHG EMR Training Phase II Care Plan/Treatment Plan User’s Guide Volume IV Release Date 2.8.09 TABLE OF CONTENTS Welcome to Phase II Training……………………………………………………………………………………………………………………..…..…4 • Enter the EMR……………………………………………………………………………………………………………………………..…....4 • Select your client………………………………………………………………………………………………………………………..………4 Entering Problems / Needs………………………………………………………………………………………………………………………….…….5 Entering Strengths...………………………………………………………………………………………………………………………………..…..……9 Entering a the Initial Treatment Plan ……………………………..……………………………………..………………………………..…..….13 • Information and Completed Information Section...…………………………………………………………………..………15 • Client Care Plan Section…………………………………………………………………………………………………..……..………..16 • Planning Section………………………………………………………………………………………………………………..……………..16 ° Problems Section……………..……………………………………………………………………………..………..……..………17 ⇒ Category…………………………………………………………………………………………………………..….………...17 ° Objective Section……………….………………………………………………………………………………………..……………18 ⇒ Problem Addressed…………………..……………………………………………………………………………..……..18 ⇒ Goal…………………………………………………..…………………………………………………………………….……..19 ⇒ Goal Statement……………………………………………………………………………………………………..…………20 ⇒ Target Date……………………………………………………………..………………………………………………..…….22 ⇒ Staff Who Established……………………………………………………………………………………………………..22 ⇒ Status……………………………………………………………………………………………………………………..……….23 ⇒ Status Date……………………………………………………………………………………………………………..……….23 ° Intervention Section……………………………………….………….……………………………………………………..………24 ⇒ Method………………..…………………………………………………………………………………………………….…..24 ⇒ Method Statement.………………………………………………………………………………………………..……...25 ⇒ Target Date……………………………………………………………..………………………………………………….….26 ⇒ Program………………………………………………………………………………………………………………….………26 ⇒ Service…………………….…………………………………………………………………………………………….……….27 ⇒ # if Times per Interval…………….………………………………………………………………………………….…..28 ⇒ Interval/Frequency………………………………………………………………………………………………….……..29 ⇒ Staff Responsible………………………………………………………………………………………………….………..30 ⇒ Other Staff Responsible…………………………………………………………………………………………….……31 ⇒ Status……………………………………………………………………………………………………………………….…….32 ⇒ Status Date…………………………………………………………………………………………………………….……….32 • Current Diagnosis…………………………………………………………………………………………………………………..…….….33 • Signatures……………………………………………………………………………………………………………………………….….……33 • Progress Note………………………………………………………………………………………………………………………….…….…34 • Care Plan Progress Note Template………………………………………………………………………………………….……….35 Saving the Care Plan / Treatment Plan…………………………………………………………………………………………………….………36 Submitting the Care Plan / Treatment Plan……………………………………………………………………………………………….…….37 BEFORE Updating the Care Plan / Treatment Plan………………………………………………………………………………….……….39 • Ending a Problem / Need………………………………………………………………………………………………………….……..39 Updating the Care Plan / Treatment Plan………………………………………………………………………………………………………..42 • Information and Completed Information Sections.…………………………………………………………………….….…47 • Client Care Plan Section…………………………………………………………………………………………………..……………...47 • Planning Section………………………………………………………………………………………………………………………………48 ° Achieving an Objective…………………………………………………………………………………………………………….48 ° Achieving an Intervention……………………………………………………………………………………………….……….51 SBHG EMR Training ~ Phase II ~ Page 2 of 83 volume IV °
°
°
Discontinuing an Objective…………………………………………………………………………………………….………..51 Discontinuing an Intervention………………………………………………………………………………………….…..…51 Continuing an Objective (no changes to the objective)……………………………………….………….……….52 ⇒ Status………………………………………………………………………………………………………………….…………52 ⇒ Changing the Target Date…………………………………………………………………………………….………..53 ⇒ Changing the Staff who Established……………………………………………………………………….………54 ⇒ Status Date…………………………………………………………………………………………………………….………54 ⇒ Review Remarks…………………………………………………………………………………………………….………55 ° Continuing an Intervention (no changes to the intervention)…………………………………………...…….56 ⇒ Changing the Target Date…………………………………………………………………………………….………..56 ⇒ Changing the Staff Responsible……..…………………………………………..……………………….…………56 ⇒ Changing Status….……………………………………………………………………………………………….…………57 ⇒ Status Date………………………………………………………………………………………………………….…………58 ⇒ Review Remarks………………………………………………………………………………………………….…………59 ° Revising an Objective (changing the objective)………….……………………………………….………….……….60 ⇒ Status…………………………………………………………………………………………………………………….………60 ⇒ Changing the Goal Statement……………………………………………………………………………….……….61 ⇒ Changing the Target Date……………………………………………………………………………………….……..62 ⇒ Changing the Staff who Established……………………………………………………………………….………63 ⇒ Status Date…………………………………………………………………………………………………………….………63 ⇒ Review Remarks…………………………………………………………………………………………………….………64 ° Revising an Intervention (changing the intervention)……………………….……………………………………..65 ⇒ Changing the Method Statement……………………………………………………………………………….….66 ⇒ Changing the Target Date……………………………………………………………………………………….……..67 ⇒ Changing the Program…………………………………………………………………………………..……………...68 ⇒ Changing the Service……………………………………………………………………………………………………..68 ⇒ Changing the # if Times per Interval………………………………………………………………………….…..69 ⇒ Changing the Interval / Frequency…………………………………………………………………………….…..69 ⇒ Changing the Staff Responsible……..…………………………………………..……………………………….…70 ⇒ Changing Status….……………………………………………………………………………………………………….…71 ⇒ Status Date……………………………………………………………………………………………………………….……71 ⇒ Review Remarks……………………………………………………………………………………………………….……72 ●
Adding Additional Problem Categories………………………………..………………………………………………….73 ●
Adding Additional Objectives…………………………………………………………………………….……………………74 ●
Adding Additional Interventions……………………………………………..………………………………………………74 ●
Current Diagnosis……………………………………………………………………………………………………………………75 ●
Signatures……………………………………………………………………………………………………………………………….75 ●
Progress Note……………………………………….…………………………………………………………………………………76 ●
Care Plan Progress Note Template…………………………….……………………………………………………….....77 Saving the Updated Care Plan / Treatment Plan…………………………………………………………………………………………...78 Submitting the Updated Care Plan / Treatment Plan………….………………………………………………………………..……….79 Completing Discharge Care Plan / Treatment Plan………………………………………………………………………………………..81 Un‐Approving / Un‐Submitting the Care Plan / Treatment Plan…………………………………………………………………….81 SBHG EMR Training ~ Phase II ~ Page 3 of 83 volume IV WELCOME TO THE PHASE II OF THE EMR TRAINING CARE PLAN/TREATMENT PLAN USERS GUIDE At the completion of training you will be able to: 1. Enter Problems/Needs 2. Enter Strengths 3. Enter a New Treatment Plan 4. Review/update a Treatment Plan ENTER THE EMR • Click the Internet Explorer icon • Click into the training environment • Login using the user name and password on the laminated login card • Click on “Return to Main” Refer to Phase I Manual for entering the EMR outside the SBHG network. SELECT YOUR CLIENT 1. Click on the Client Module 2. Click on Select Client 3. Enter Search criteria o If you do not remember how to spell the client’s name • Type in the percent symbol % which brings up all the names of client’s you have access to • Type in part of the last or first name 4. Click on your client’s name SBHG EMR Training ~ Phase II ~ Page 4 of 83 volume IV ENTERING PROBLEMS / NEEDS NOTE: You MUST enter Problems/Needs prior to building a Treatment Plan for your client. Without a problem/need on file you cannot build a treatment plan. Problems/needs are the symptoms identified that lead to the diagnosis. Prior to entering in Problems/Needs an assessment must be completed with a Diagnosis. You can find the Diagnosis by clicking on Diagnosis Information under Plan Development. Enter a Problem/Need for your client. Under Case Management 1. Click Plan Development
2. Click Problems/Needs
If there are Problems/Needs on file for your client they will list here. If there are no Problems/Needs you will see “None on file”. To add a new Problem/Need click New Manual Event SBHG EMR Training ~ Phase II ~ Page 5 of 83 volume IV Click on Problems/Needs ‐ Person A Client Problems data entry box will open. 3. Problem/Need: Lists the functional impairments / Diagnosis criteria for the Problem Category 1. Click on the Problem/Need button 2. A drop down list will open with the list of criteria that coincides with the category selected 3. Select only one criteria (for additional criteria you must enter a new Problem/Need) 1. Priority: Allows you to prioritize the problem as Primary, Secondary, Tertiary or Other. If you would like to prioritize your client’s problems click on the Priority button. 2. Problem Category: Categorizes your client’s problem into the 7 Clinical Pathways listed below: • *Internalizing Disorder • *Externalizing Disorder • *Severe Mental Illness • Chemical Dependency • Safety Concerns • Social Service Needs • Education The *Clinical Pathways are linked to a DSM Diagnosis 1. Click on the Problem Category button 2. A drop down list of Clinical Pathways will open 3. Click on the Clinical Pathway that corresponds to your clients Diagnosis When entering a Problem / Need for a client receiving Mental Health Services DO NOT select Social Service Needs or Education. You are able to select Social Service Needs and Education for those services provided OUTSIDE Mental Health Services (i.e. Wraparound, HRHN, FSP TAY and Child Youth). SBHG EMR Training ~ Phase II ~ Page 6 of 83 volume IV 4. Problem Need Narrative: A text box that allows you to type in information that qualifies the Problem/Need selected. Type in the specific behaviors noted that lead to the Diagnosis. 5. Date Identified: Enter the date the behaviors began or were identified. If unsure of the exact date use the date the care plan was developed. You can either type in the date or select 6. Date Ended: The date this specific problem/need was extinguished or stopped. If unsure of the exact end date use the date the Care Plan will be reviewed/updated. You can either type in the date or select it from the calendar. 8. Will not be treated: If the Problem/Need will not be addressed you can check this box. 9. Reason not being treated: If you checked the box “Will not be treated” you must indicate a reason. 1. Click the Reason not being treated box 7. Outcome: (use ONLY when ending a Problem/Need) This allows you to indicate the outcome of the Problem/Need. 1. Click the Outcome button 2. A drop down list will open 3. Select the Outcome of this Problem/Need o Achieved o Can’t be achieved o No longer present o Not achieved
2. Select the reason SBHG EMR Training ~ Phase II ~ Page 7 of 83 volume IV Your Client Problems box should look similar to the screen shot in your manual. Click Save After clicking save, you will be brought back to the list of all Problems/Needs on file for your client. You must follow this same process for each symptom and Problem/Need identified. If your client meets several criteria for a particular Diagnosis you will need to have a Problem/Need selected for each of the symptom. Only select the Problem Category that corresponds to the client’s Diagnosis. If you choose to develop an objective related to a Secondary and perhaps a Tertiary Diagnosis make sure to select a corresponding Problem Category. Clients typically benefit from a tight focus on only a few (2‐3) problems. After initial Problems are resolved subsequent and less critical problems may be added and Tx Planned in the Review process. SBHG EMR Training ~ Phase II ~ Page 8 of 83 volume IV ENTERING STRENGTHS You should always identify strengths of your client. Under Case Management 1. Click Plan Development
2. Click Strengths
If there are Strengths on file for your client they will list here. If there are no Strengths you will see “None of file”. Click New Manual Event A menu will drop down with only one choice Click of Strengths ‐ Person SBHG EMR Training ~ Phase II ~ Page 9 of 83 volume IV A Client Strengths box will open 1. Priority: Allows you to identify the problem as Primary, Secondary, Tertiary or Other. If you would like to prioritize your client’s strengths click on the Priority button. 2. Category: Categorizes your client’s strengths into the 4 Clinical Pathways: • Internalizing Disorder • Externalizing Disorder • Chemical Dependency • Severe Mental Illness The 4 Clinical Pathways are linked to a DSM Diagnosis • Click on the Category button • A drop down list of Clinical Pathways will open • Click on the Clinical Pathway that corresponds to your clients Diagnosis 3. Strength: The Strengths list is the same for all Categories – it is a list of 104 strengths. • Click on the Strength button • A drop down list will open • Select the strength SBHG EMR Training ~ Phase II ~ Page 10 of 83 volume IV 4. Strengths Narrative: A text box that allows you to type in information that qualifies the Strength selected.
5. Date Identified: This is the date the strengths began or were identified. If you or the caregiver is not sure of the exact date use the date the care plan was developed. You can either type in the date or select it from the calendar. 6. Ended: Do not enter an end date for strengths. This field needs to be left blank. Instrument Used for Discovery is not being used at this time. SBHG EMR Training ~ Phase II ~ Page 11 of 83 volume IV Once you have completed all the elements for a strength your Client Strengths box will look similar to the screen shot in your manual. Click Save After clicking save, you will be brought back to the list of all Strengths on file for your client. You must follow this same process for every Strength identified. SBHG EMR Training ~ Phase II ~ Page 12 of 83 volume IV ENTERING THE INITIAL TREATMENT PLAN Enter a new Treatment Plan for your client. Under Case Management 1. Click Plan Development
2. Click Treatment Plan
The following screen will appear. This is where all Treatment Plans for this client will be stored. The Treatment Plan will not appear on the Service Entry Screen. Under Community MH Services click on the <Start New Plan> hyperlink. Your client may have multiple Program Enrollments (i.e. TBS, Medication Support, etc.) and each one must have their own Treatment Plan. Make sure you are selecting the Treatment Plan under the appropriate program. A Treatment Plan will open and will look like the screen shot on the next page. SBHG EMR Training ~ Phase II ~ Page 13 of 83 volume IV SBHG EMR Training ~ Phase II ~ Page 14 of 83 volume IV INFORMATION AND COMPLETED INFORMATION SECTIONS To complete a Treatment Plan start with the Information section and Completed Information sections. You will notice there are similarities between these sections and other Service Entry forms. You will need to complete the required fields. Let’s review some fields that require additional explanation. In the Information section County ID, Status and Program auto populate. Status indicates the stage of the completion/approval process. Facility: Is equivalent to facility providing service box in the Service Entry. Follow the same procedure as located in the Phase 1 Users Guide on page 26. Date Started: Actual date you started writing the Treatment Plan. Time: Actual time of day you began to write the Treatment Plan. The remaining fields are identical to the Service Entry fields explained in detail in Phase 1 manual. SBHG EMR Training ~ Phase II ~ Page 15 of 83 volume IV CLIENT CARE PLAN SECTION This is where all problems, needs and strengths information shows including the problems/needs and strengths you entered earlier. PLANNING SECTION – PROBLEMS / OBJECTIVES (GOALS) / INTERVENTIONS We have now reached the beginning of the Treatment Plan. To begin building the Treatment Plan start in the Problems Category. It is necessary to work top down from Problems/Categories through the Goal in sequence. You must follow the steps 1 through 3 in order or you will lose information already selected. Also, if you go out of order, the system will not narrow the search for information in each section. Step 1
Step 2
Step 3
Now, let’s take a closer look at each section needed for completing the Treatment Plan. SBHG EMR Training ~ Phase II ~ Page 16 of 83 volume IV PROBLEMS SECTION Step 1: CATEGORY This is the overarching category from the Treatment Library that is a direct link back to the client’s diagnosis. This category choice also dictates what objectives and interventions will be available via the Treatment Library. • First click on the category ellipse at the far right • A drop down box will open with a list of all problem categories • Select the correct problem category by clicking on it • The field will then populate with the chosen problem category Select the Category that relates to the Diagnosis of the client. For example, if your client is diagnosed with Oppositional Defiant Disorder you will select Externalizing Disorders – ODD. SBHG EMR Training ~ Phase II ~ Page 17 of 83 volume IV Step 2: OBJECTIVE SECTION [CATEGORY] [GOAL] PROBLEM ADDRESSED You will now utilize the Problems/Needs you developed earlier. For each problem you identify, you’ll build out the Objective and then the Intervention for this specific problem. •
First click on the Problem Addressed ellipse at the far right • A drop down box will open with a list of all problems identified on file • Select the identified problem that you want to write an objective for by clicking on it • The field will then populate with the chosen identified problem SBHG EMR Training ~ Phase II ~ Page 18 of 83 volume IV GOAL The Goal is directly linked to the problem category chosen at step 1. • First click on the Goal ellipse at the far right • A drop down box will open with a list of all goals linked to the problem category • Select the identified problem that you want to write an objective for by clicking on it • The field will then populate with the chosen goal SBHG EMR Training ~ Phase II ~ Page 19 of 83 volume IV GOAL STATEMENT This is the specific, observable and quantifiable objective required by DMH. This is a statement specific to the client. Once you click the goal, a default statement populates the goal statement field. You will see (Measurable Objective) and Client agrees to participate by (IN CLIENT’S OWN WORDS)…. • First click on the Goal ellipse at the far right • A text box will open Type in the objective. Notice that prior to typing the Statement bar is blue. Once you start typing the Statement bar changes to red. This indicates there is new information in the box that needs to be saved. Set the curser in front of “Client agrees to participate by” and click on enter twice. This ensures that there will be space between the (measurable objective) and “Client agrees to participate by”. SBHG EMR Training ~ Phase II ~ Page 20 of 83 volume IV 1.
2.
Type in the client’s specific objective after the words (Measurable Objective) Then following “client agrees to participate by (IN CLIENT’S OWN WORDS)” type what the client says regarding how they will participate in meeting the objective. Enter the client statement using quotes if necessary. 3.
Once you have finished entering the objective and “client agrees to participate by” click Update. 4.
If you don’t click Update prior to closing the box you will loose the information entered. 5.
Click Close Once you close the text box the written measurable objective and client statement will now appear. SBHG EMR Training ~ Phase II ~ Page 21 of 83 volume IV TARGET DATE This date reflects a future date when this objective will be revisited for updates or completion. Typically this is the end of your six month cycle date although you are able to update objectives at any time. •
Either type in date or click on the calendar and select the date STAFF WHO ESTABLISHED This is the name of the staff who establishes the objective • First click on the Staff Who Established ellipse at the far right • A search box containing staff names will open • Search for either the last name or first name of the identified staff member • Then click on the name SBHG EMR Training ~ Phase II ~ Page 22 of 83 volume IV STATUS This will always default to Established for the Initial Plan. Any future updates of the treatment plan will indicate revised. STATUS DATE This is the date the goal was established. • Either type in date or click on the calendar and select the date • Have the participants select today’s date • The date will populate the filed Completed Objective should resemble screen shot below. SBHG EMR Training ~ Phase II ~ Page 23 of 83 volume IV Step 3: INTERVENTIONS SECTION METHOD This is directly linked to the category chosen at the beginning of this plan. This is the category of intervention, NOT the specific intervention. • First click on the Method ellipse at the far right • A drop down box will open with a list of all interventions linked to the problem category • Select the category description that you want to write an intervention for by clicking on it • The field will then populate with the chosen category description SBHG EMR Training ~ Phase II ~ Page 24 of 83 volume IV METHOD STATEMENT This is a statement that qualifies the category description (method) selected specific to the client. • First click on the Method Statement ellipse at the far right • A text box will open • Compose and type in an intervention to meet the objective for the client •
Once you have finished entering the method statement click Update •
You must click Update prior to closing the box or you will loose the information you entered •
Click Close SBHG EMR Training ~ Phase II ~ Page 25 of 83 volume IV TARGET DATE This date reflects a future date when this intervention will be revisited for updates. Typically this is the end of your six month cycle date although you are able to update interventions at any time. •
Either type in date or click on the calendar and select the date PROGRAM The program the client is enrolled in. •
•
•
•
•
First click on the Program ellipse at the far right A drop down box will open with a list of all SBHG programs Select Community MH Services This is the only Program Name you should ever choose The field will then populate with the chosen Program Name SBHG EMR Training ~ Phase II ~ Page 26 of 83 volume IV SERVICE This is the service mode of the intervention used to accomplish the objective(s). • First click on the Service ellipse at the far right • A drop down box will open with a list of all SBHG service events • One of these 5 service events listed below should be selected: 1. Individual Therapy 2. Individual Rehabilitation 3. Targeted Case Management 4. Family Therapy 5. Collateral (if the collateral is going to be a consistent part of treatment) SBHG EMR Training ~ Phase II ~ Page 27 of 83 volume IV When you click on the service ellipse a search box will open. It contains a scroll down listing of the first 100 of 188 possible SBHG services available in the company. If the service event is not listed within the first 100 possible choices you will need to narrow your search by using the first few letters of the service event name. For example, in the event name field, if you type the letters ind and click search. The search will return the following services: • Click on the appropriate service event name • The field will then populate with the chosen service event name # OF TIMES PER INTERVAL This is the frequency of how many times you will be providing the specific service event. This field auto‐populates to 0 (zero). You will need to change the 0 (zero) to the minimum number of sessions or service events you plan to provide. This field must be populated with only a whole number. You can not type in a times symbol (x), a percentage sign, decimal, fraction or dashes after the number. The interval/frequency is delineated in the next field. • Type in a number in the # of Times Per Interval field SBHG EMR Training ~ Phase II ~ Page 28 of 83 volume IV INTERVAL / FREQUENCY The frequency the intervention will be performed (example daily, monthly, etc.) • First click on the Interval/Frequency ellipse at the far right • A drop down box will open with a list of frequencies • Select a frequency • The field will then populate with the chosen frequency Select the As needed frequency only when you are not planning on providing the selected service on a regular basis. The As needed frequency should not be used as a catch‐all. SBHG EMR Training ~ Phase II ~ Page 29 of 83 volume IV STAFF RESPONSIBLE This field identifies the staff responsible for the service provided. If the person who establishes the goal is also responsible for the service provided their name must be selected again. • First click on the Staff Responsible ellipse at the far right • A search box will open • Search for the staff’s name • Click on the desired name • The field will then populate with the chosen name SBHG EMR Training ~ Phase II ~ Page 30 of 83 volume IV OTHER STAFF RESPONSIBLE This field identifies the additional staff responsible for the service provided. If there are two staff identified providing the same service with the client, a clear distinction must be made between the interventions provided by each staff. IF there will be additional staff follow the steps outlined below. If there is no other staff person responsible you can leave this field blank. • First click on the Staff Responsible ellipse at the far right • A search box will open • Search for the staff’s name • Click on the desired name • The field will then populate with the chosen name SBHG EMR Training ~ Phase II ~ Page 31 of 83 volume IV STATUS Status will always default to Established for the Initial Plan. Any future updates of the treatment plan will indicate revised. STATUS DATE This is the date the Method/Intervention was established • Either type in date or click on the calendar and select the date •
Have the participants select today’s date. •
The date will populate the filed Completed Intervention should resemble screen shot below. SBHG EMR Training ~ Phase II ~ Page 32 of 83 volume IV CURRENT DIAGNOSIS This is a view only display of the current diagnosis. It can not be edited here. If there is a need to change the Diagnosis an MHS II must complete a Change of Diagnosis form and turn it into the Center/TM Intake Coordinator. Then complete the billing for the Change of Diagnosis in the EMR. SIGNATURES The signature section can not be edited. They are place holders for signatures when printed. When you print the Care Plan to bring to the Caregiver and client to obtain their signatures make sure that you obtain ALL the signatures listed above. Sometimes when the Care Plan is printed some of the signature lines will end up on a separate printed page. You are REQUIRED to obtain ALL relevant signatures including the Client’s Initials indicating they have received a copy of the Care Plan. SBHG EMR Training ~ Phase II ~ Page 33 of 83 volume IV PROGRESS NOTE For the Initial Care Plan and Annual update you would select the Care Plan PN template. NOTE: For the 6‐month update you would type in the progress note field “completed client care plan”. • To select the Care Plan PN template click on the template icon (circled below) • Click on Care Plan PN Template SBHG EMR Training ~ Phase II ~ Page 34 of 83 volume IV CARE PLAN PROGRESS NOTE TEMPLATE The following headers will populate the Progress Note field. Type appropriate information under each header. You do not need to enter or complete the Confidentiality Statement, Participants or Tasks/Schedules tabs. SBHG EMR Training ~ Phase II ~ Page 35 of 83 volume IV SAVING THE CARE PLAN / TREATMENT PLAN After ALL required (bolded) fields are complete you are ready to save the Care Plan/Treatment Plan. You MUST save the Care Plan first before you can submit it to your supervisor or designee; notice the “submit” button is not available. At the top of the Care Plan/Treatment Plan click on the button. The Care Plan/Treatment Plan will close and you will be brought back to the Treatment Plan page. You can now see the Care Plan/Treatment Plan in draft format indicated by the (pencil) to the left of the Care Plan. If you have missed any of the bolded (required) fields, you will receive an error message indicating what information must be complete before you can save. Below you can see an example of the error message you will get if you did not complete the “Other Time” field. SBHG EMR Training ~ Phase II ~ Page 36 of 83 volume IV SUBMITTING THE CARE PLAN / TREATMENT PLAN In order to submit the Care Plan to your supervisor or to the designee you MUST open up the Care Plan again. Do NOT leave the Care Plan in Draft status after its due date. A Care Plan in draft status will not be billed and is not considered a final Care Plan until the supervisor approves it. To open the Care Plan again, click on the words “CMHS – Initial Plan” or “Review Plan”. The Care Plan will open in Draft format. At the top of the Care Plan the button is now available; Click on it. You will receive this message asking you if you are sure you want to proceed with submitting the Care Plan. Click . SBHG EMR Training ~ Phase II ~ Page 37 of 83 volume IV The Care Plan will now show in a format that is not editable. Click the button to return to the Treatment Plan screen. You will now see the Care Plan listed with an envelope to the left of the service in the Treatment Plan screen. When your supervisor or designee APPROVES the Care Plan you will see a green check mark to the left of the service. Also notice the eyeglass icon to the right of the service. The eyeglass icon indicates the Care Plan can be updated. SBHG EMR Training ~ Phase II ~ Page 38 of 83 volume IV BEFORE UPDATING THE CARE PLAN / TREATMENT PLAN STOP: Before updating the Care Plan ask yourself the following two questions: First, Is your client displaying any new Problems‐Needs and/or Strengths? ° If yes, then PRIOR to updating the Care Plan, you MUST first add the Problems‐
Needs and/or Strengths (see pages 5 – 12 in this manual on how to add new Problems‐Needs and/or Strengths). ° If not, then ask yourself the next question. Second, Did any of the current Problems‐Needs END during the previous 6‐months? ° If yes, then you will need to add an END date to the specific Problem‐Need. To end a Problem‐Need; follow the instructions in the next section of this manual. ° If not, then you can skip to page 42 of this manual on how to Update the Care Plan. ENDING A PROBLEM/NEED See page 3 of this manual on where Problem‐Needs are located. To add an End Date to a current Problem‐Need click on the pencil icon at the right hand corner. SBHG EMR Training ~ Phase II ~ Page 39 of 83 volume IV The Problem‐Need box will open. The system will allow you to edit ANY field of the Problem‐Need, but the ONLY two fields you should edit are the Date Ended and the Outcome. DO NOT EDIT/CHANGE the:
• PRIORITY • PROBLEM CATEGORY • PROBLEM/NEED • PROBLEM/NEED NARRATIVE • DATE IDENTIFIED • WILL NOT BE TREATED • REASON NOT BEING TREATED. Doing so will cause problems. Remember that you have already written objectives with this Problem/Need identified. Date Ended: The date this specific problem/need was extinguished or stopped. If unsure of the exact end date use the date the Care Plan will be reviewed/updated. You can either type in the date or select it from the calendar.
Outcome: (use ONLY when ending a Problem/Need) This allows you to indicate the outcome of the Problem/Need. ° Click the Outcome button ° A drop down list will open ° Select the Outcome of this Problem/Need o Achieved o Can’t be achieved o No longer present o Not achieved SBHG EMR Training ~ Phase II ~ Page 40 of 83 volume IV When you have entered the End Date and the Outcome you will need to click Save at the top left hand corner. The box will remain open, notice the Save button is now grayed out. You will then have to click the Close button at the top right hand corner. The box will close and you will be brought back to the Problem/Needs screen. The Problem/Need you just ended will look like this. Notice the End Date and Outcome section. You are now ready to Update the Care Plan. SBHG EMR Training ~ Phase II ~ Page 41 of 83 volume IV Updating the Care Plan / Treatment Plan You can update the Care Plan at any time but at the very minimum the objectives MUST be updated every 6‐months per DMH regulations. You should consider updating the Plan of Care earlier than the 6‐month workflow if the client experiences a significant change of condition (such as hospitalization, other dramatic Tx‐life event). Refer to the top of page 13 in this manual to locate the Care Plan in the EMR. There are TWO options when updating a Care Plan: First, the EMR will automatically schedule the CMHS – Review Plan for the next 6‐months based on the date you completed the previous Care Plan. If, when you are in the Treatment Plan section of the EMR, you see a CMHS – Review Plan in RED then the EMR had scheduled the CMHS – Review Plan for you to complete. You can complete the Care Plan this way regardless if you are updating the Care Plan early or not. Click on the CMHS – Review Plan in RED A drop down list will open asking you to Edit the Task or Complete the Task Click on Complete Task If there is already a scheduled CMHS – Review Plan in RED, you will need to update the Care Plan by following the above steps. Only use the eyeglass icon (explained below) if there is NOT a scheduled CMHS – Review Plan in RED. If you do not click on the RED CMHS – Review Plan you will see multiple scheduled CMHS – Review Plans the next time you update a Care Plan. Second, if the EMR did not schedule the CMHS – Review Plan for you to Update the Care Plan, you MUST click the eyeglass icon to the right of the approved Care Plan. You can not update a Care Plan in draft format. A drop down box will open. Click on the CMHS – Review Plan. SBHG EMR Training ~ Phase II ~ Page 42 of 83 volume IV The Service Plan Review Item box will open. This box will show ALL Problem Categories, objectives and methods with a status of open and closed on file for the client. The following statuses are considered OPEN: •
•
Continued – No Change Continued – Positive Change •
Continued – Negative Change • Revised – No Change •
•
•
Revised – Positive Change Revised – Negative Change Established The following statuses are considered CLOSED: •
•
Discontinued Achieved Notice the status column to the right of the objective and method. If the Status of the Area of Treatment (Problem Category), Goal (Objective) and/or Method (Intervention) fall under the OPEN category listed above, you will not have the choice to drop the Problem Category, Objective or Method. This is indicated by the grayed out check marks to the left of the Area of Treatment, goal and/or method. The EMR will NOT let OPEN Area of Treatment, Goals or Methods to be dropped without given it a closed status. Left
Right
If all the check marks to the left of the Area of Treatment, Goal and Method are grayed out then click the OK button at the top right hand corner of the box. Then SKIP to page 47 of this manual. SBHG EMR Training ~ Phase II ~ Page 43 of 83 volume IV Based on the closed status of the Problem Categories, objectives and/or interventions you will be able to “drop” the Area of Treatment, goal and/or method from the Care Plan you are about to Update OR you have the option to make them active again. In the screen shot example below notice the Status column to the right of the Area of Treatment, Goal and Method, they all indicate Discontinued. This means that all the Area of Treatment, Goals and Methods are closed. Notice to the left of the Area of Treatment, Goal and Method. The check boxes are not grayed out. You now have the ability to un‐check an Area of Treatment, Goal and/or Method. •
The Area of Treatment is the Problem Category (remember the problem category is the clinical pathway linked to the diagnosis – i.e. Internalizing Disorder – Dysthymic) • The Goal Based on Category as Parent is the Objective • The Method is the Intervention Left
Right
If you would like to make an objective previously discontinued or achieved active again you should leave the Area of Treatment (Problem Category) checked. If you do not want the discontinued or achieved objective to show on your updated Care Plan then you MUST uncheck the AREA OF TREATMENT that corresponds to that objective. For instance, I do not want the first objective to show on my updated Care Plan so I would need to uncheck the AREA OF TREATMENT that corresponds to the first objective. SBHG EMR Training ~ Phase II ~ Page 44 of 83 volume IV If you uncheck only the objective that corresponds to an AREA OF TREATMENT then when you update the Care Plan the AREA OF TREATMENT will show and not the objective. You will then be REQUIRED to add another objective under that AREA OF TREATMENT. If this happens and you did not want that AREA OF TREATMENT to show you will be required to start your Care Plan over again and loose any data you entered. You also have the option of making an AREA OF TREATMENT and GOAL active again and not the METHOD. To do this, uncheck the METHODS you do not want to show on the updated Care Plan. When you have checked or unchecked ALL the Area of Treatment, Goals and/or Methods you would like to have on the updated Care Plan you are ready to click at the top right hand corner. The Care Plan page will open showing the objectives with a open status AND those closed objectives not unchecked (see next page). SBHG EMR Training ~ Phase II ~ Page 45 of 83 volume IV SBHG EMR Training ~ Phase II ~ Page 46 of 83 volume IV The Care Plan looks exactly the same as the first Care Plan with the exception of the objectives. The Review Care Plan will list the problem categories, objectives and interventions either in an OPEN status or what you have indicated you wanted to show on the Care Plan for the client. Let’s review each section of the Review Care Plan. To complete a Treatment Plan start with the Information section. You will notice there are similarities between this section and other Service Entry forms. You will need to complete the required fields. INFORMATION AND COMPLETED INFORMATION SECTIONS Refer to page 15 of this manual or pages 20 – 24 of Phase I manual if you need assistance in completing the information and Completed Information sections. CLIENT CARE PLAN SECTION This is where all Problems/Needs and Strengths information currently on file for the client shows. SBHG EMR Training ~ Phase II ~ Page 47 of 83 volume IV PLANNING SECTION ACHIEVING AN OBJECTIVE You MUST give a Status to EVERY objective listed in order to Review the Care Plan. If the client has achieved the Objective and the Objective will not be continued you need to select Achieved under the status field. When selecting Achieved you will be required to complete the following fields under both the Objective and Intervention: •
•
•
Status Status Date Review Remarks Click the ellipses button to the left of the Status field. A drop down box will open, click on Achieved. SBHG EMR Training ~ Phase II ~ Page 48 of 83 volume IV Next, you will need to indicate a Status Date of the objective. This is the date the objective was reviewed. •
Either type in date or click on the calendar and select the date •
The date will populate the filed SBHG EMR Training ~ Phase II ~ Page 49 of 83 volume IV Next, you need to indicate more detailed information about the status of the objective on why/how it was achieved in the Review Remarks field. To save the information you MUST click update at the far left corner. A completed objective section should look like this: SBHG EMR Training ~ Phase II ~ Page 50 of 83 volume IV To open the Review Remarks box, click on the Ellipses button to the far right. A blank statement page will open allowing you to free type information about the objective.
Close the box by clicking in the right hand corner.
ACHIEVING AN INTERVENTION Notice that when you selected Achieved under the Objective Status, the system auto‐populated Achieved under the Status field of the Intervention. You are able to change the status of the Intervention if desired and leave the Objective status as is. To do so, click on the ellipses button to the far right of the Intervention status and select a different status. Follow the same process for the Intervention Status date and Review Remarks as you did with the Objective Status date and Review remarks (refer to the previous three pages if needed). A completed Intervention section should look like this: DISCONTINUING AN OBJECTIVE Follow the same steps outlined on pages 48 – 50 with the only difference being that you select Discontinued in the Status field. DISCONTINUING AN INTERVENTION Follow the same steps outlined on this page for Invention Status date and Review Remarks as you did with the Objective Status date and Review remarks. REMEMBER that Achieving or Discontinuing an Objective will CLOSE the objective. SBHG EMR Training ~ Phase II ~ Page 51 of 83 volume IV CONTINUED‐NO CHANGE, CONTINUED‐POSITIVE CHANGE, OR CONTINUED‐NEGATIVE CHANGE OBJECTIVE STATUS The status of CONTINUED‐No Change, CONTINUED‐Positive Change and CONTINUED‐Negative Change does NOT mean the objective or intervention is changing. It literally means the objective or intervention is going to be continued WITHOUT changing any of the content (including the measurable part of the objective). When you select Continued‐No Change, Continued‐Positive Change or Continued‐Negative Change for the objective you can only edit the following fields: •
•
•
•
•
Target Date Staff Who Established Status Status Date Review Remarks First you have to give the objective a Status before you can change the Target Date or Staff Who Established. To select a Status, click the ellipses button to the left of the Status field. A drop down box will open, click on either Continued‐No Change, Continued‐Positive Change OR Continued –Negative Change. SBHG EMR Training ~ Phase II ~ Page 52 of 83 volume IV Changing the Target Date The system automatically populates the Target Date field based on the target date you entered in the previous Care Plan. You will need to change the Target Date of this objective. Remember the Target Date is the last day of the month PRIOR to the due date of the Care Plan. To change the Target Date you will need to click into the Target Date field and delete the pre‐
populated Target Date. You MUST type a new target date in the 00/00/00 format. SBHG EMR Training ~ Phase II ~ Page 53 of 83 volume IV To change the Staff Who Established the Objective, click on the ellipses to the far right of the field. A drop down list will open. Select the staff member’s name of the person who established the objective. If the Staff Who Established has not changed, leave the pre‐populated name in the field. Next, you will need to indicate a Status Date of the objective. This is the date the objective was reviewed. •
Either type in date or click on the calendar and select the date •
The date will populate the filed SBHG EMR Training ~ Phase II ~ Page 54 of 83 volume IV Next, you need to indicate more detailed information about the status of the objective on why/how it was continued in the Review Remarks field. To open the Review Remarks box, click on the Ellipses button to the far right. A blank statement page will open allowing you to free type information about the objective.
To save the information you MUST click update at the far left corner. Close the box by clicking in the right hand corner.
A completed objective section should look like this: SBHG EMR Training ~ Phase II ~ Page 55 of 83 volume IV CONTINUED‐NO CHANGE, CONTINUED‐POSITIVE CHANGE, OR CONTINUED‐NEGATIVE CHANGE INTERVENTION STATUS When you select Continued‐No Change, Continued‐Positive Change or Continued‐Negative Change in the intervention Status you can edit the following fields: • Target Date • Staff Responsible • Other Person Responsible (if needed) • Status • Status Date • Review Remarks Changing the Target Date The system automatically populates the Target Date field based on the target date you entered in the previous Care Plan. You will need to change the Target Date of this objective. Remember the Target Date is the last day of the month PRIOR to the due date of the Care Plan. To do this you will need to click into the Target Date field and delete the pre‐populated Target Date. You MUST type a new target date in the 00/00/00 format. Changing the Staff Responsible if needed Staff Responsible for the intervention will auto‐populate based on the name entered in the previous Care Plan. If the person responsible for the intervention is longer responsible (maybe they no longer working with the client) then you will need to change the Staff Responsible. SBHG EMR Training ~ Phase II ~ Page 56 of 83 volume IV To change the Staff Responsible, click on the ellipses to the far right of the field. A drop down list will open. Select the staff member’s name that will be responsible for the intervention. If there is an additional Staff Responsible for the intervention you are able to select them in the Other Person Responsible field by following the same steps. If the Staff Responsible has not changed then leave the pre‐populated name in this field. Changing the Status if needed Remember, when you selected the Continued status in the Objective the EMR auto‐populates the same status in the Intervention. You are able to change the status of the Intervention if desired and leave the Objective status as is. To do so, click on the ellipses button to the far right of the Intervention status and select a different status. SBHG EMR Training ~ Phase II ~ Page 57 of 83 volume IV Status Date Next, you will need to indicate a “Status Date” of the intervention. This is the date the intervention was reviewed. •
Either type in date or click on the calendar and select the date •
The date will populate the filed SBHG EMR Training ~ Phase II ~ Page 58 of 83 volume IV Next, you need to indicate more detailed information about the status of the intervention on why/how it was continued in the Review Remarks field. To open the Review Remarks box, click on the Ellipses button to the far right. A blank statement page will open allowing you to free type information about the objective.
To save the information you MUST click update at the far left corner. Close the box by clicking in the right hand corner.
A completed Intervention section should look like this: SBHG EMR Training ~ Phase II ~ Page 59 of 83 volume IV REVISED‐NO CHANGE, REVISED‐POSITIVE CHANGE, OR REVISED‐NEGATIVE CHANGE OBJECTIVE STATUS The Revised‐No Change, Revised‐Positive Change or Revised‐Negative Change Status literally means the content of the Objective and/or Intervention will be changing (including the measurable part of the Objective). When you select Revised‐No Change, Revised‐Positive Change or Revised‐Negative Change for the objective you can edit the following fields: •
•
•
•
•
•
Goal Statement Target Date Staff Who Established Status Status Date Review Remarks First you have to give the objective a Status before you can change the Goal Statement and Target Date. To select a Status, click the ellipses button to the left of the Status field. A drop down box will open, click on either Revised‐No Change, Revised‐Positive Change OR Revised‐
Negative Change. SBHG EMR Training ~ Phase II ~ Page 60 of 83 volume IV Once the Status field is populated with any of the Revised status’ you are able to change the Goal Statement. To do this click on the ellipses to the far right of the Goal Statement field. A Statement drop down box will open allowing you to change the content of the objective. Click anywhere in the statement box and change the desired information. Changing the information DOES NOT change the original objective. You are now creating a revised objective.
Click Update to save the changes. SBHG EMR Training ~ Phase II ~ Page 61 of 83 volume IV Changing the Target Date The system automatically populates the Target Date field based on the target date you entered in the previous Care Plan. You will need to change the Target Date of this objective. Remember the Target Date is the last day of the month PRIOR to the due date of the Care Plan. To change the Target Date you will need to click into the Target Date field and delete the pre‐
populated Target Date. You MUST type a new target date in the 00/00/00 format. SBHG EMR Training ~ Phase II ~ Page 62 of 83 volume IV To change the Staff Who Established the Objective, click on the ellipses to the far right of the field. A drop down list will open. Select the staff member’s name of the person who established the objective. If the Staff Who Established is not changing then leave the pre‐populated name in this field. Next, you will need to indicate a Status Date of the objective. This is the date the objective was reviewed. •
Either type in date or click on the calendar and select the date •
The date will populate the filed SBHG EMR Training ~ Phase II ~ Page 63 of 83 volume IV Next, you need to indicate more detailed information about the status of the Objective on why/how it was continued in the Review Remarks field. To open the Review Remarks box, click on the Ellipses button to the far right. A blank statement page will open allowing you to free type information about the objective.
To save the information you MUST click update at the far left corner. Close the box by clicking in the right hand corner.
SBHG EMR Training ~ Phase II ~ Page 64 of 83 volume IV A completed Objective section should look like this: REVISED‐NO CHANGE, REVISED‐POSITIVE CHANGE, OR REVISED‐NEGATIVE CHANGE INTERVENTION STATUS When you select Revised‐No Change, Revised‐Positive Change or Revised‐Negative Change in the intervention Status you can edit the following fields: •
•
•
•
•
•
•
•
•
•
•
Method Statement Target Date Program Responsible Service # of Times Per Interval Interval / Frequency Staff Responsible Other Person Responsible (if needed) Status Status Date Review Remarks SBHG EMR Training ~ Phase II ~ Page 65 of 83 volume IV Changing the Method Statement Changing the Method Statement is necessary if the Intervention is changing. To change the Intervention details, click on the ellipses to the far right of the Method Statement field. A drop down Statement box will open with the detailed information from the previous Method Statement.
Close the box by To save the clicking information you MUST in the right hand click update at the far corner.
left corner. Delete the previous information and type in the new Intervention in the Statement box.
SBHG EMR Training ~ Phase II ~ Page 66 of 83 volume IV Changing the Target Date The system automatically populates the Target Date field based on the target date you entered in the previous Care Plan. You will need to change the Target Date of this objective. Remember the Target Date is the last day of the month PRIOR to the due date of the Care Plan. To do this you will need to click into the Target Date field and delete the pre‐populated Target Date. You MUST type a new target date in the 00/00/00 format. SBHG EMR Training ~ Phase II ~ Page 67 of 83 volume IV Changing the Program if needed (not likely) If you need to change the Program that the service will be provided under you will need to click the ellipses to the right of the Program field. Changing the Program is NOT likely in which case you will leave Community Mental Health pre‐populated in this field. Changing the Service if needed If the mode of Service to be used in the Intervention is going to be changed, you will need to click the ellipses to the far right of the Service field. Refer to page 27 – 28 of this manual on selecting mode of service. If nothing has changed then leave the pre‐populated mode of Service in this field. SBHG EMR Training ~ Phase II ~ Page 68 of 83 volume IV Changing the # of Times Per Interval if needed If the # of Times Per Interval needs to be changed then click in the # of Times Per Interval field and delete the pre‐populated number and type in the new number. Refer to page 28 of this manual on completing the # of Times Per Interval field. If nothing has changed then leave the pre‐populated # of Times Per Interval in this field. Changing the Interval/Frequency if needed If the Interval/Frequency needs to be changed then click ellipses to the far right of the Interval/Frequency field. Refer to page 29 of this manual on completing the Interval/Frequency field. If nothing has changed then leave the pre‐populated Interval/Frequency in this field. SBHG EMR Training ~ Phase II ~ Page 69 of 83 volume IV Changing the Staff Responsible if needed Staff Responsible for the intervention will auto‐populate based on the name entered in the previous Care Plan. If the person responsible for the intervention is longer responsible (maybe they no longer working with the client) then you will need to change the Staff Responsible. To change the Staff Responsible, click on the ellipses to the far right of the field. A drop down list will open. Select the staff member’s name that will be responsible for the intervention. If there is an additional Staff Member Responsible for the intervention you are able to select them in the “Other Person Responsible” field by following the same steps. If there is no other staff responsible, leave this field blank. SBHG EMR Training ~ Phase II ~ Page 70 of 83 volume IV Changing the Status if needed Remember, when you selected the Revised status in the Objective the EMR auto‐populates the same status in the Intervention. You are able to change the status of the Intervention if desired and leave the Objective status as is. To do so, click on the ellipses button to the far right of the Intervention status and select a different status. Status Date Next, you will need to indicate a “Status Date” of the intervention. This is the date the intervention was reviewed. •
Either type in date or click on the calendar and select the date •
The date will populate the filed SBHG EMR Training ~ Phase II ~ Page 71 of 83 volume IV Next, you need to indicate more detailed information about the status of the intervention on why/how it was continued in the Review Remarks field. To open the Review Remarks box, click on the Ellipses button to the far right. A blank statement page will open allowing you to free type information about the objective.
To save the information you MUST click update at the far left corner. Close the box by clicking in the right hand corner.
SBHG EMR Training ~ Phase II ~ Page 72 of 83 volume IV A completed Intervention section should look like this: ADDING ADDITIONAL PROBLEM CATEGORIES You have the ability to add additional problem categories for clients who have Axis l primary and secondary diagnoses. To do so: • Click on New • A drop down box will open • Select Problems •
•
A new Problem, Objective and Intervention section will open Follow the same process as when you completed the first Problem SBHG EMR Training ~ Phase II ~ Page 73 of 83 volume IV ADDING ADDITIONAL OBJECTIVES You have the ability to add additional objectives under this problem category. To do so: •
•
•
Click on New A drop down box will open Select Objectives •
•
A new Objective and Intervention section will open Follow the same process as when you completed your first Objective ADDING ADDITIONAL INTERVENTIONS You have the ability to add additional Interventions under this problem category. To do so: •
•
•
Click on New A drop down box will open Select Interventions •
•
A new Intervention section will open Follow the same process as when you completed your first Intervention SBHG EMR Training ~ Phase II ~ Page 74 of 83 volume IV CURRENT DIAGNOSIS This is a view only display of the current diagnosis. It can not be edited here. If there is a need to change the Diagnosis an MHS II must complete a Change of Diagnosis form and turn it into the Center/TM Intake Coordinator. Then complete the billing for the Change of Diagnosis in the EMR. SIGNATURES The signature section can not be edited. They are place holders for signatures when printed. When you print the Care Plan to bring to the Caregiver and client to obtain their signatures make sure that you obtain ALL the signatures listed above. Sometimes when the Care Plan is printed some of the signature lines will end up on a separate printed page. You are REQUIRED to obtain ALL relevant signatures including the Client’s Initials indicating they have received a copy of the Care Plan. SBHG EMR Training ~ Phase II ~ Page 75 of 83 volume IV PROGRESS NOTE For the Initial Care Plan and Annual update you would select the Care Plan PN template. NOTE: For the 6‐month update you would type in the progress note field “completed client care plan”. • To select the Care Plan PN template click on the template icon (circled below) • Click on Care Plan PN Template SBHG EMR Training ~ Phase II ~ Page 76 of 83 volume IV CARE PLAN PROGRESS NOTE TEMPLATE The following headers will populate the Progress Note field. Type appropriate information under each header. You do not need to enter or complete the Confidentiality Statement, Participants or Tasks/Schedules tabs. SBHG EMR Training ~ Phase II ~ Page 77 of 83 volume IV SAVING THE UPDATED CARE PLAN / TREATMENT PLAN After ALL required (bolded) fields are complete you are ready to save the Care Plan/Treatment Plan. You MUST save the Care Plan first before you can submit it to your supervisor or designee; notice the “submit” button is not available. At the top of the Care Plan/Treatment Plan click on the button. The Care Plan/Treatment Plan will close and you will be brought back to the Treatment Plan page. You can now see the Care Plan/Treatment Plan in draft format indicated by the (pencil) to the left of the Care Plan. If you have missed any of the bolded (required) fields, you will receive an error message indicating what information must be complete before you can save. Below you can see an example of the error message you will get if you did not complete the “Other Time” field. SBHG EMR Training ~ Phase II ~ Page 78 of 83 volume IV SUBMITTING THE UPDATED CARE PLAN / TREATMENT PLAN In order to submit the Care Plan to your supervisor or to the designee you MUST open up the Care Plan again. Do NOT leave the Care Plan in Draft status after its due date. A Care Plan in draft status will not be billed and is not considered a final Care Plan until the supervisor approves it. To open the Care Plan again, click on the words “CMHS – Initial Plan” or “Review Plan”. The Care Plan will open in Draft format. At the top of the Care Plan the button is now available; Click on it. You will receive this message asking you if you are sure you want to proceed with submitting the Care Plan. Click . SBHG EMR Training ~ Phase II ~ Page 79 of 83 volume IV The Care Plan will now show in a format that is not editable. Click the button to return to the Treatment Plan screen. You will now see the Care Plan listed with an envelope to the left of the service in the Treatment Plan screen. When your supervisor or designee APPROVES the Care Plan you will see a green check mark to the left of the service. Also notice the eyeglass icon to the right of the service. The eyeglass icon indicates the Care Plan can be updated. Repeat the Update process for each subsequent Care Plan update. SBHG EMR Training ~ Phase II ~ Page 80 of 83 volume IV COMPLETING THE DISCHARGE CARE PLAN When discharging a client you MUST update the Care Plan and complete the outcome for each objective on file for the client. In the EMR the outcome is a combination of the status date, status and review remarks for the objective and intervention AND ending the Problems / Needs on file for the client. Ending Problems / Needs at the time of Discharge: follow the instructions on pages 39 – 40. Updating the Care Plan at the time of Discharge: follow the instructions on pages 42 – 51 and 76 – 80 of this manual. ●
Exception to the Date Started in the Updated Care Plan °
If you are completing an Administrative D/C you need to use the Last Billable Date of Service as the Date Started AND enter 0 (zero) minutes in both Face‐to‐
Face AND Other Time (doing this will prevent a problem with discharging the client in the EMR and prevent the service from being billed) °
If you are NOT completing an Administrative D/C refer to page 15 of this manual for a definition of Date Started ●
Under Status, select either Discontinued OR Achieved and then follow the instructions on pages 49 – 51 of this manual UN‐APPROVING / UN‐SUMBITTING THE CARE PLAN / TREATMENT PLAN IF you make a mistake on the Care Plan, depending on the status of the Care Plan, you need to do the following: Draft status (indicated by the pencil icon to the left of the service): •
You are able to click into the Care Plan and change the information at anytime. SBHG EMR Training ~ Phase II ~ Page 81 of 83 volume IV Submitted status (indicated by the envelope icon to the left of the service): • Contact your supervisor and request they UN‐SUBMIT the Care Plan back to you to make the needed corrections. Once the Care Plan is un‐submitted it will show in draft status. Approved status – single Care Plan (indicated by the green check mark to the left of the service): •
Contact your supervisor and request them to UN‐APPROVE and UN‐SUBMT the Care Plan back to you to make the needed corrections. • Once the Care Plan is un‐approved AND un‐submitted it will show in draft status. SBHG EMR Training ~ Phase II ~ Page 82 of 83 volume IV Approved status – multiple Care Plans (indicated by the green check mark to the left of the service): • Once a Care Plan (either the Initial or Review Plan) has been approved AND you started the next Review Plan, the previous Care Plan(s) ‐ either the Initial or Review Plan ‐ are a PERMANENT part of the client’s record and CAN NOT be changed. Your supervisor will not have the option to un‐approve / un‐submit the care plan. • The ONLY way to correct mistakes on an approved Care Plan in this situation is to Discontinue the Objective or Intervention on the next Review Plan and add a new Area of Treatment, Goal or Method with the correct information. If you have any questions about the Care Plan, contact your QA Manager/Coordinator. SBHG EMR Training ~ Phase II ~ Page 83 of 83 volume IV


![[1 ] Oracle® Fusion Middleware](http://vs1.manualzilla.com/store/data/005867961_1-9a6cb85523fc7e3a2bcbfd437b088639-150x150.png)