1
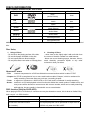
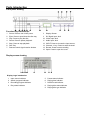
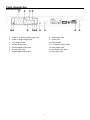
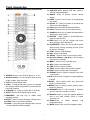
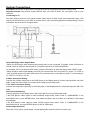
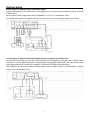
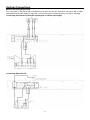
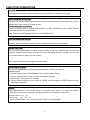
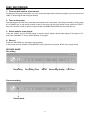
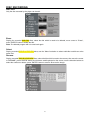
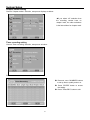
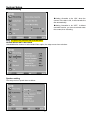
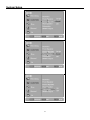
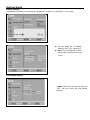
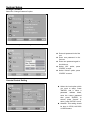
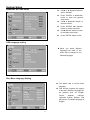
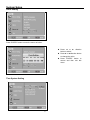
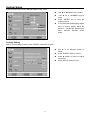
CONTENTS
Safety Warning
---------------------------------------------------------------------------------- 2
Product Features -------------------------------------------------------------------------------- 3
Discs Information
------------------------------------------------------------------------------ 4
Parts Introduction -------------------------------------------------------------------------------- 5
System Connection
---------------------------------------------------------------------------- 8
Function Operations -------------------------------------------------------------------- 12
Disc Recording ------------------------------------------------------------ 16
System Setup ------------------------------------------------------------------------------------ 21
Trouble Shooting
----------------------------------------------------------------------------- 38
Specifications ------------------------------------------------------------------------------------ 39
1
SAFETY WARNING
WARNING: To reduce the risk of fire
or electric shock , DO NOT expose
this product to rain or moisture !
The lighting Flash with arrowhead symbol within a triangle, Alerts the user to “dangerous
Voltage” which could cause electric shock.
The exclamation point within a triangle indicates to the user to read important operating
and maintenance instructions in the manual
IMPORTANT FOR LASER PRODUCTS
Precaution Notes:
1. CLASS 1 LASER PRODUCT
1) Read this manual carefully before use this product.
2. DANGER
2) Keep this manual for late reference.
Visible laser radiation when open and
3) Heed all warnings, and follow all instructions.
interlock failed or defeated. Avoid direct
4) Do not place this apparatus near water.
exposure to beam.
5) Clean only with dry cloth.
3. CAUTION
6) Do not block any ventilation openings. Install it in
Do not open the top cover. There are no
accordance with the manufacturer’s instructions.
user service-able parts inside the unit,
7) Do not install this product near any heat sources
leave all servicing to qualified service
such as radiators, heat registers, stoves, or other
personnel.
apparatus (including amplifiers) that produce heat.
8) Do not defeat the safety purpose of the polarized
or grounding-type plug. A polarized plug has two
blades with one wider than the other. A grounding type plug has two blades and a third grounding prong.
The wide blade or the third prong are provided for your safety. If the provided plug does not fit into your
outlet, consult an electrician for replacement of the obsolete outlet.
9) Protect the power cord from being walked on or pinched particularly at plugs, convenience receptacles,
and the point where they exit from the apparatus.
10) Only use accessories specified by the manufacturer.
11) Use only with the cart, stand, tripod, bracket, or table specified by the manufacturer, or sold with the
apparatus. When a cart is used, use caution when moving the cart/apparatus combination to avoid injury
from tip-over.
12) Unplug this apparatus during lightning storms or when unused for long periods of time.
13) Refer all servicing to qualified service personnel. Servicing is required when the apparatus has been
damaged in any way, such as power supply cord or plug is damaged, liquid has been spilled or objects
have fallen into the apparatus, the apparatus has been exposed to rain or moisture, does not operate
normally, or has been dropped.
14) Apparatus shall not be exposed to dripping or splashing and no objects filled with liquids, such as vases,
shall be placed on the apparatus.
2
PRODUCT FEATURES
Main features of product :
ƽ
ƽ
ƽ
ƽ
ƽ
ƽ
ƽ
ƽ
Fully compatible with DVD/VCD/CD/MP3/ PICTURE-CD/CD-R/CD-RW/DVD-R/DVD-RW/DVD+R/
DVD+RW/HDCD
Compatible with MPEG4/DivX3.11/ DivX4/DivX5 and Xvid,
Build-in Dolby AC-3 decoder
Advanced MDDi TM Progressive scan output
Full function remote control
Automatic screen protection
PAL/AUTO/NTSC optional
Universal power supply:AC110-240V 50/60HZ
Operation Functions:
ƽ
ƽ
ƽ
ƽ
ƽ
ƽ
ƽ
Up to 32 language subtitles and 8 different sound languages
Memory stopping, A-B play function
Magnified and mobile picture, High clarity multi-level picture zoom
Multi -grade fast or slow motions, Multi-angle play
Adjustable screen aspect ratio(4:3 or 16:9)
FWD/FFD, slow motion and single-step play
Resume/memory play function
Special Functions:
ƽ
DV mode record
Immediate manual record DV digital camera and other input signal. Automatic and time record of outside
signal input. Setup multi-disc edit selection of multi-period of time, multi-quality grade and user
individuation.
ƽ
Full frequency TV receiver
With TV full frequency you can select channel through channel scan, and storage. Setup frequency
amendment menu, use to revise channel information that have received. If revised channel name᧨channel
frequency is changed little. Setup the channel compositor menu to adjust the sequence of program.
Output Terminals:
ƽ
ƽ
ƽ
ƽ
Video/S-video/YUV output
Coaxial and optical output
5.1 channel output
VGA connector
Input Terminals:
ƽ
ƽ
ƽ
ƽ
ƽ
DV digital camera input
2 Composite video input
2 audio input
S-video input
Cable TV input
Accessories
1,
2,
3,
4,
5,
6,
DVD Player
Remote Control
User’s Manual
AAA Battery
AV Cable
Warranty Certificate
1 PC
1 PC
1 PC
1 Pair
1 Pair
1 PC
3
DISCS INFORMATION
DISC FORMATS SUPPORTED BY THIS PLAYER
Disc Sort
Disc Logo
DVD
CD
Disc Contents
Disc Size
Video
(Active Picture)
12cm
Audio
MP3
12cm
8cm
12cm
JPEG
Audio
Video
(Static Picture)
SVCD
Audio+Video
MPEG4
Audio+Video
12cm
DVD+R
Can use just once
12cm
DVD+RW
Can repeated use
12cm
12cm
12cm
ƹSoftware maker specifies the operation method of some DVD discs ,please refer to the instruction manual of
disc.
Disc Using
1. Using of Discs
- Do not touch the playing surface of the disc.
- Do not stick paper and label on the disc.
- Do not expose discs to direct sunlight.
- Do not place discs near water or in dusty place.
2. Cleaning of Discs
- when clean a disc, lightly wipe it with soft cloth from
the center of the disc outward in a radial manner.
-Never use record cleaning sprays, benzene, thinner,
static electricity prevention liquids or any other
solvents to clean your discs.
About Disc Terms
- Title:
contents compressed on a DVD are divided into several sections which is called “TITLE”
- Chapter: the TITLE is comprised of one or more small sections called “Chapter”, which is numbered for
easily searching. But some discs may not have a recording chapter.
- Track:
- Scene:
a segment of contents on a SVCD,VCD or CD. Each track is numbered for easily searching.
contents in a VCD with playback control function be divided into certain portion is called scene, and
every scene will be showed on screen menu with a scene number, which can be easily searching
while playing. A scene usually is formed with one or several tracks
PBC function (Only for SVCD,VCD)
When playing SVCD or VCD discs, a content menu may be showed on screen, this is what we Called “Play
back control “ viz. PBC function.
Disc sort
Functions
VCD without PBC function (1.1 version)
Exhibiting both music and images.
SVCD/VCD with PBC function
The repeat playback can be performed to super VCD or
(2.0 version)
VCD2.0 only when the PBC is OFF.
4
Parts Introduction
Front panel drawing
Function Key introduction:
1
Power: Press to turn on/off power.
8
Display Screen.
2
Eject: Press to open/close the disc tray.
9
DV Signal Input Jack
3
Play: Press to play the disc.
10
Video Input Jack
4
Pause: Press to pause playback.
11
Audio Input Jack
5
6
7
Stop: Press to stop playback.
Disc Tray
Remote control signal receive window.
12
13
14
INPUT: Press to choose the input source.
Channel -/+ key: Press to select channel.
Record: Press to start recording
15
Open: Press to open the cover.
Display screen drawing
Display Logo introduction
1
Input source indicator
5
Pause status indicator
2
Search progress indicator
6
Playing time indicator
3
Recording progress indicator
7
DOLBY mark indicator
4
Play status indicator
8
Playing disc status indicator
9
Playing disc type indicator
5
Parts Introduction
Rear panel drawing
1. Cable TV or Antenna signal Input Jack
8.
VGA Output Jack
2. Cable TV Signal Output Jack
9.
Power Cord
3. YUV Output Jacks
10. Power Switch
4. S-video Output Jack
11. 5.1CH Audio Output Jacks
5. Coaxial Digital Output Jack
12. Video Output Jack
6. S-video Input Jack
13. 2CH Audio Input Jacks
7. Optical Digital Output Jack
14. Video Input Jack
6
Parts Introduction
Remote control function key introduction
11. SUBTITLE-When playing DVD disc, press to
select a subtitle language.
12. ANGLE -Press to access various camera
angles.
13. PROG -Press to set the Disc in programming
play mode.
14. Volume +/- -Press to increase or decrease the
DVD volume level slightly.
15. P/N-Press to shift PAL/AUTO/NTSC Mode.
16. EJECT -Press to open or close the disc tray.
17. SEARCH-Allows you to select the desired disc
starting time, track or title.
18. DISC/OP - When playing a DVD+R/RW disc
press it to edit the disc.
19. EDIT-Press it to exit the chapter edit menu
when playing a DVD+R/RW disc.
20. PAUSE/STEP –Press one time as pause, press
again as step; During recording process, press
to stop the recording.
21. STOP -Press to stop playback.
22. REC- Press to recording.
23. ENTER - Press to enter or get into play mode.
24. Direction Buttons (///) -Use to select
menu items or settings.
25. MENU – Press to turn on/off the menu.
26. REV -Press to fast backward.
27. FWD –Press to search forward.
28. PREV -Press to skip to the previous chapter.
29. NEXT -Press to skip to the next chapter.
30. REPEAT-Press to repeat a chapter, track, title,
or all content.
31.A-B-Press to mark a segment to repeat between
A and B.
32.ZOOM - When playing DVD disc, press this
button to activate zoom.
33.MARK-Press to memory some playing frame,
stored for selecting.
34. BROWSE-Press to look through in advance
and can select the content you want.
35. DISPLAY-Press to show the elapsed playback
time or the track number, press to cancel
onscreen text.
36. VIDEO-Press
to
switch
Interlace
and
Progressive Mode.
37. MUTE-Press to turn on/off the speaker output.
1. POWER -Press to turn the DVD player on or off.
2. Number Buttons - 0-9 are used for direct access
of title, chapter ,track and time.
3. TITLE -Press to display titles.
4. CHAP - In chapter edit menu, press it to separate
the chapter, repeat the operation to divide the title
into multi-chapters.
5. CHANNEL +/- -Press to choose the TV channel.
6. INPUT -Press to shift different input source.
7.TIMER/REC– Use this key to realize timer
recording function.
8.SETUP -Press to access the player’s Setup menu.
9.SLOW -Press to slow down playback.
10.AUDIO – when play multi language disc, press it
to select different audio language.
7
System Connections
Precaution: Do not turn on the power of the player before all connections have been correctly done.
Important Remark: The pictures maybe different from your DVD PLAYER ,the connections only for your
reference.
Connecting to TV
The video output connector of the player include: Video output, S-video output, and component output, VGA
output, you can select any one of them to connect refer to your connecting apparatus correspondingly. Correct
connection way as shown in the figure below:
Setup DVD Player Video Output Mode
-Setup your DVD player video output mode correctly refer to your connected TV system, Press P/N button on
remote control to select the same mode as TV system mode such as “PAL/AUTO/NTSC”.
For example: if the TV system is NTSC mode, press the P/N button to setup the player under “NTSC” mode.
-Setup the player video output display size refer to the screen size of the connected TV, set the “TV TYPE” to
“16:9” in system setup menu when wide screen TV connected, when connected to normal TV ,set the player’s
TV TYPE to “4:3 PS” or “4:3 LB”.
S-Video Connection Setting
Connect the S-Video output jack on the DVD Player to the Display device’s S-video input jack with a S-video
cable. Under this mode ,there is no need to do the setting in the setup menu.
Y U V Video Connection Setting
Connect the component output jack on the DVD player to the Display device’s component input jack with YUV
cable.
VGA Connection Setting
Connect the player to the display device with VGA cable if you want VGA output mode.
If the DVD player’s video output is under interlaced output mode, select “VGA” in ”COMPONENT” in the
Audio/Video menu, press ENTER button ,and restart the player, then the video out is shifted to VGA output
automatically.
If the DVD player’s video output is under Y/Pb/Pr output mode, select “VGA” in ”COMPONENT” in the
Audio/Video menu ,the press ENTER button to shift to VGA output.
Audio Output Connector
There are 5.1CH output ,optical output, coaxial digital audio output for Audio connection use.
8
System Setup
Connecting to an Amplifier with 5.1CH Audio Output
Connect the player’s 5.1CH output to the 5.1CH amplifier’s 5.1CH input connector with Audio cable, as shown
in below figure.
Set the player’s Audio output mode as the “DOWNMIX” to “5.1CH” in “Audio/Video” menu.
The default audio output set is Stereo, then you can enjoy the 5.1CH home theatre system sound effect.
Connecting to an Amplifier with Dolby Digital Decoder by Optical and Coaxial Jack
To enjoy HiFi sound effect ,you can also connect the player to an amplifier by using the player’s Optical output
connector or Coaxial digital output jack correspondingly. Optical digital output jack’s can keep the raw audio
signal high quality when connect to the amplifier .To assure a HiFi Dolby sound enjoyment.
After finished connection set the player’s Audio output mode as “SPDIF Output” to “SPDIF/RAW” in “SPDIF
Output ” in the Audio/Video menu.
9
System Connections
Exterior Recording Signal Input
The front panel of the player with Audio/Video input jacks and the DV input jack, rear panel with S-Video,
Audio/Video input jacks. Cable TV input jack ,you can connect the relevant jack as your need of recording.
Connecting with exterior Audio/Video Input Signal or S-Video Input Signal
Connecting With Cable TV:
10
System Connections
Connecting With Antenna
Connecting With DV
11
FUNCTION OPERATIONS
Load Discs
After correctly connect the Player to other apparatus, turn on the player, then follow below steps.
1. Turn on the player
3. Load the disc
Press the POWER button. then the player will
search for the disc automatically.
Put the disc in the tray
as shown in the right
figure.
2. Open Disc tray
Press the EJECT button to open the disc tray.
4. Press the EJECT button to close the disc
tray and begin playing.
NOTE: Please check the Disc condition before putting it in the tray, bad quality or damaged discs will
damage the pickup inside the player, and shorten its working time.
Function Operation Instruction
ENTER
Press the ENTER button to start playback. Press the POWER button on remote control to enter
standby status, and press it again to resume playback status. If there is no operation for a long time,
the player will automatically enter screen saver status and then enter standby status.
STOP
During playback, press the STOP button on remote control to stop playback. For DVD discs, after
pressing the STOP button once, if you press the ENTER button, then the player will play from the
stopped point.
PAUSE
Press the PAUSE/STEP button on remote control to pause, and press it repeatedly to achieve
frame-by-frame playback.
REPEAT
1. Use the REPEAT button to repeat a title, a chapter, a track and a disc respectively according to
different discs, and also to cancel repeat.
2. Use the A-B button to repeat section A to B. Press it once to set the starting point A, twice to set
the ending point B, and the third time to cancel repeat.
(NOTE: Some discs do not support repeat function. )
12
FUNCTION OPERATIONS
VOLUME
During playback, press the VOL+ button to turn up, press the VOL- button to turn down.
FAST FORWARD & REVERSE
Press the and buttons to activate fast reverse or forward function, Continually press to select
different times fast reverse or forward function.
SLOW FORWARD & REVERSE
Press the SLOW button to activate slow forward or reverse, Continually press to select different
times slow forward or reverse function.
Note: There is no slow playback function for CD and MP3 discs.
DISC INFORMATION DISPLAY
Press the DISPLAY button on remote control to display the relevant disc information.
SEARCH BY TIME
You can use the GOTO button to search by time, namely to play from a specific time. During DVD
playback, press the GOTO button once and TV screen will display the title or chapter, then you can
use number buttons to select any one of them.
Note: Some DVD discs do not support search function.
PROGRAM PLAYBACK
Use the PROGRAM button to activate program playback of DVD and CD discs.
Operation steps:
1. At STOP status, press the PROGRAM button to enter program status.
2. Use the number buttons to input contents according to prompts.
3. Repeat step 2 to program more contents.
4. Use the direction buttons to move cursor to “START” and then press the ENTER button to begin
the program playback.
ZOOM
Press ZOOM button on the remote control, to activate zoom, zoom in or Zoom out function.
Continually press the zoom button will change the zoom rate accordingly. Zoom rate is:
Zoom out rate: ×2, ×3 , ×4 ;
Zoom in rate: ×1/2, ×1/3, ×1/4;
Press the ZOOM button on the remote control to resume normal playback.
13
FUNCTION OPERATIONS
DVD PLAYBACK
MENU
When playing DVD disc, Generally it will appear a menu for further selection, you can use the
direction buttons to highlight the item you would like and press the ENTER button to confirm.
TITLE & CHAPTER
Generally there are several titles in a DVD disc, and several chapters under a title. You can select
any of them quickly by using the Number buttons to enter the number of the chapter.
LANGUAGE
There are up to 8 kinds of audio languages in a DVD disc. When you play a multi-language DVD
disc, press the AUDIO button on remote control to select a different audio language.
(Note: This function is only available for discs that have several audio bit streams.)
SUBTITLE
The DVD player can support up to 32 kinds of different subtitles. When you play a multi-subtitle
discs, press the SUBTITLE button on remote control to select different subtitle.
(Note: This function is only available on the audio bit streams recorded discs.)
ANGLE
The DVD player supports multi-angle function. Press the ANGLE button continuously to view
different angles of the DVD movie.
(NOTE: This function is only available for the multiple angle shooting discs. Multi-angle means that a
scene is shot from more than one angle so that audience can watch from different angle.)
14
FUNCTION OPERATIONS
MP3 PLAYBACK
MP3 is the third audio compression format of international standard MPEG. The audio signal is
compressed at the rate of 12:1. using MP3 format, one disc can record more than 600 minutes
music, the timbre of which is similar with that of CD discs.
There are many different formats for storing MP3 songs. Usually, one MP3 disc includes many
folders (directories) and every folder includes several files (songs).
At stop status, use the “/” button to move the cursor to “PLAY MODE” column, and use the
“/” button to select the play mode. Press the “/” button to confirm. Similarly, use the “/”
button to select the directory you want and press the ENTER button to enter it. Press the PLAY
button to play the song you selected.
at playing status, you can use the and buttons to select other songs. The player can only
output stereo audio signal when playing MP3 discs. There is no search function during MP3
playback. Hundreds of pictures or MP3 songs can be stored in a disc in this format.
CD PLAYBACK
The player will play all tracks for CD discs continuously in default status. You can press the and
(PREV/NEXT SKIP) buttons or number buttons to select a certain track.
PICTURE CD PLAYBACK
JPEG picture playback operation
1. Normal Playback
When Playing JPEG format Disc, “SMART NAVI” and “ROOT” will be displayed on the screen.
The left column is the menu for last level, and the right is the menu for next level. Use the ENTER
button and the / button to select submenus, Use the / button to select the different
contents in the menu.
2. Picture Rotation
the picture can be rotated when playing, when another picture is selected, it will be cancelled
automatically. There are two rotation modes: left Rotation & right Rotation. You can use direction
buttons to select:
“” Left button
-----
“” Right button -----
Rotate left
Rotate right
3. Zoom
Press ZOOM button to activate Zoom, Zoom in and out function. After activation, use the and
buttons to adjust zoom proportion, and you can use/,/ key to move it. press Zoom
again to resume the picture back, then press the MENU button to return to the root menu.
(NOTE: some JPEG format discs may not support Picture Rotation and zoom function.)
15
DISC RECORDING
RECORD OPERATION
1. Connect whit exterior input source
According to the system connection you can connect the player with exterior input signal, you can connect the
cable TV output signal with the player directly.
2. Turn on the power
Start the player at the first time, press the power switch on the rear panel, if the player at stand by mode, press
the “POWER” key on the remote control to start it, the player get into start screen mode, press the “EJECT”
key on the remote control to open the tray, load the recordable DVD+R/RW disc and close the tray.
3. Select exterior input signal
Press the “INPUT” key on the front panel or remote control, select relevant input signal; if the signal is TV,
press the “CHANNEL-/+” key to select different TV program.
4. Record
Press the “RECORD” key, the player start recording.
In the record process, press the “PAUSE/STEP” key to pause record, press “STOP” key to stop record.
RECORD GUIDE
Recording
Recording
Recording Time
INPUT
Pause recording
Pause mode
16
Recording Quality Left Time
DISC RECORDING
Stop recording
Stop recording mode
Input source
The DVD recorder with 5 group input jack: front AVǃrear AVǃ rear S-Video ǃdigital camera ǃTV.
One key recording
While recording you can choose record time, press “RECORD” button each time it can record 30 minutes, if
the recording time over 30 minutes, you can decide the press times according to the recording time, if the
record program time is longer than the preset time, you can press the “RECORD” button to prolong the record
time; Before record you should select the relevant input source and record quality.
Manual recording
At input status, press “RECORD” button to enter manual record mode directly, at this time you can use the
“SETUP MENU” to change the settings. Press “PAUSE” button to enter pause record status, press “STOP”
button to stop record.
Timer recording
You can setup Timer recording at “SETUP MENU” or press “TIMER/REC” button to enter “timer setup menu” to
setup directly; it can save 8 timer recording message at one time, if you want the DVD recorder enter standby
mode after recording, you should let the player enter standby mode after finishing setup the timer recording.
ƹ If the player at playback status, 5 minutes before the timer recording start, the system will show a image to
remind “Timer recording will start…….”; If the player at “pause” status, the system will start and enter
recording mode 2 minutes before the preset record time.
17
DISC RECORDING
DISC EDIT
Only the disc recorded by the player can be edit.
Erase
Playing the recorded DVD+RW discs, select the title which is need to be deleted, move cursor to “Erase”,
press “ENTER” button to delete the title.
Note: The deleted program will not come back again.
Select
Playing recorded DVD+R or DVD+RW discs, use the “Select” selection to select multi-title to edit them at the
same time.
Rename
Playing recorded DVD+R or DVD+RW discs, select the title which is need to be rename, then move the cursor
to “RENAME”, press “ENTER” button and it show a small keyboard on the screen, use the direction buttons to
select the numbers or letters, press “ENTER” button to ensure. Show as the image:
18
DISC RECORDING
Chapter edit
You can increaseǃdeleteǃhideǃedit the content of DVD+R/RW disc.
Index
Playing recorded DVD+R or DVD+RW discs, select the title which is need to index, move the cursor to “Index”,
press “ENTER” button to enter index image mode, press “REC” button to setup index image, press “STOP”
button to exit index image mode.
Divide
Playing recorded DVD+RW disc, select the title which is need to be partitioned, move the cursor to “Divide”,
press “ENTER” button to enter partition title mode, press “REC” button to setup partition title, press “STOP”
button to exit partition title mode.
Finalize
The operation only effective for DVD+R discs; After the operation of “Finalize”, the recorded content can’t
append new content, if the recorded content haven’t operate the “Finalize” then it can append new content, but
other common DVD can’t play the recorded content.
Protect
Playing recorded DVD+R or DVD+RW discs, select the title which is need to protect, move the cursor to
“Protect”, press “ENTER” button to protect the title, after protect operation, the title can’t be edit, if you want to
unprotect the title, select the protected title, move the cursor to “Unprotect”, press “ENTER” button to unprotect
the title.
Format
Playing recorded DVD+RW
DVD+
+RW d
discs, move the cursor to “Format”, press “ENTER” button to format the disc. After
format operation the content will not come back again.
DISC OPERATION MENU
Playing recorded DVD+R or DVD+RW discs, Press “DISC OP” button, the screen will show a DISC
OPERATION MENU as below:
19
DISC RECORDING
Disc info
In disc operation menu, move the cursor to “Disc info”, it will show the disc information(Label, Title No,
Remainder, Media, StatusĂ)
Protect
In disc operation menu, move the cursor to “Protect”, press “ENTER” button to protect the disc, after protect
operation, the disc can’t be edit, select the “unprotect” and press the “ENTER” button to unprotect the disc.
Make Comp
In disc operation menu, move the cursor to “Make Comp”, Press “ENTER” button to do the operation of
compatible of the disc, after the Make Compatible operation, some of the common DVD may can’t play the
disc.
Adapt
In disc operation menu, move the cursor to “Adapt”, Press “ENTER” button to do the operation of adapt for the
DVD+RW disc which is not recorded by this recorder.
Note: Some special DVD+RW disc may can’t be adapted.
COMPATIBLE FORMAT&MODE
Playable format
Compatible off DVD-Video
DVD-Videoǃ
oǃD
DVD+R ǃD
DVD+RW ǃCD-R ǃCD-RWǃ MP3ǃCDǃVCDǃHDCDǃPicture- CD ǃ
MPEG4 discs.
Recordable format
DVD+RǃDVD+RW
DVD+R
RǃD
DVD+RW discs can be recorded.
Keyboard lock
The player with keyboard lock function, you can operate as following:
Press “SETUP” button and ”DISPLAY” button on the remote control, then the buttons on the panel or remote
control become no function. If you want to unlock the keyboard, repeat the lock operation to unlock the buttons.
20
System Setup
SYSTEM SETUP
Press the “SETUP” button on the remote control, it displays a setup menu on the screen as below:
ƹPress “SETUP” button to exit.
RECORDING SETTING PAGE
Use theǃdirection button on the remote control to select “Recording”, press “ENTER” button to enter
submenu, press direction button to return to higher level menu, press “SETUP” button to exit.
Recording quality setup
Select “Recording quality setup” selection, the menu display as below, press “ENTER” or direction button to
enter.
ƹUse ǃ direction button to select.
ƹPress “ENTER” button to ensure.
ƹPress direction button to return to
higher level menu
ƹPress “SETUP” button to exit.
Note: we suggest setting the Recording Quality as “SP”.
The relation between Recording quality and time show as below:
Recording Quality
HQ
SP
LP
EP
SLP
Recording Time
60Min
120Min
180Min
240Min
360Min
21
System Setup
Chapter marker setting
Choose “Chapter marker” selection, setup menu displays as below:
ƹIf you select “off” selection then
the recording content have no
chapter mark, the other selections
is the interval time for chapter mark.
Timer recording setting
Choose “Timer recording” selection, setup menu as below:
Press “ENTER” button to enter setup menu:
ƹ Press ǃ or “NUMBER” buttons
to set up time or quality and so on.
ƹ Press “ENTER” button to ensure
the setting.
ƹ Press “Timer/REC” button to exit.
22
System Setup
Overwrite setting
ƹ Setting Overwrite to be “ON”, when the
content of the disc is full, it will overwrite the
disc automatically.
ƹSetting Overwrite to be “OFF”, it without
overwrite function, you have to manual erase
the content, then recording.
Note: The option only effective with DVD+RW discs.
AUDIO/VIDEO SETTING PAGE
Use/direction buttons to select Audio/Video option, the setup menu show as below:
Speaker setting
The setup menu of speak show as below:
23
System Setup
24
System Setup
Speakers setup instruction
NAME
OPTION
LT/RT
Dowminx
Stereo
OFF
OPERATION
“OFF” means select 5.1CH output
“Stereo” means select left and right
channel audio output
If the amplifier allows 2CH input
then you can choose the “LT/RT”
mode to output 2CH audio to
amplifier
for
processing
on
background.
LRG
LRG means complete frequency
audio speaker.
SML
SML means
speaker.
Front speaker
middle
frequency
LRG
Center speaker
SML
With “Downmix” OFF you can
setup the Center speaker.
OFF
LRG
Rear speaker
SML
With “Downmix” OFF you can
setup the Rear speaker.
OFF
ON
Subwoofer
OFF
25
With “Downmix” OFF you can
setup the Subwoofer.
System Setup
SPDIF Setting
Choose “SPDIF 2XWput” option, setup menu show as below:
ƹ SPDIF/RAW: The non-decoded discs
digital signal output.
ƹSPDIF/PCM: Decoded discs PCM digital
signal output.
Post DRC Setting
ƹ Dynamic compress output can
lower volumes processing sound
effect under the conditions of within
speakers max output. The item is
divided into “ on, off ,Auto”
26
System Setup
Quality Setting
In Quality Setting option you can setup the “Brightness, Contrast, Hue, Saturation ” as you wish.
TV Display Setting
ƹ You can setup the TV Display
output as “PS”, “LB”, “Wide:16:9”.
ƹ Note: The TV Display also relate
with the disc recording mode and
TV set.
Scan Mode Setting
ƹNote: When the component is set to be
“OFF” you can’t enter the Scan Mode
selection.
27
System Setup
Component Setting
ƹ YUV, VGA are different video output
mode, if choosing “OFF” then it
have no Component video output
signal.
DISC SETTING PAGE
ƹ Use or direction button to
select “Disc” setup menu.
ƹ Press “ENTER” or direction
button to enter.
ƹ Use or direction button to
select the items ;
ƹ Press “ENTER” or direction
button to confirm and enter .
ƹ Use direction button to return
to the higher level menu;
ƹ Press ”SETUP” button to exit.
Password Setting
Choose “password” option, the setup menu show as below:
ƹ The initial password is “810500”.
ƹ Select “ON” the password work, if you
select “OFF” then the password doesn’t
work, you can change the parental lock
control level with out enter the
password.
28
System Setup
Change Password
Select the “Change Password” option:
Press “ENTER” key to enter Change Password setup menu:
ƹ Enter old password in the first
row.
ƹ Enter new password in the
first row.
ƹ Enter new password again in
the third row.
ƹ Select “OK” option, press
“ENTER” to enter
ƹ Select “Cancel” option, press
“ENTER” to return.
Parental Control Setting
ƹ Select the level option which
you want to setup, Press
“ENTER” and it show a
password validate blank,
enter the correct password
then press “ENTER” to
ensure, press “Cancel” to
return, press “SETUP” to exit.
ƹ Attention: This setting should
be done in STOP, NO DISC
or OPEN status.
29
System Setup
Angle Mark Setting
ƹ Playing multi-angle discs, set it
to be “ON”, the screen will
display angle mark, if set it to
be “OFF” then the screen will
not display angle mark.
Last Memory Setting
ƹ Set “Last Memory” to be “ON”,
While playing a disc, you open
the tray or enter stand-by mode
the player will remember the
position, next time when it read
this disc again, it will start from
the last memory position, if set
Last Memory to be ”OFF” then
the player without this function.
Closed Captions Setting
ƹ This setting aims to NTSC mode
TV and the discs with “close
subtitle” function, use this setting
to display or close captions.
ƹ Note: Closed Caption function
need the TV and disc support to
realize the function.
30
System Setup
GENERAL SETTING PAGE
ƹ Use or direction button to
select “General”.
ƹ Press “ENTER” or direction
button to enter into general
setup menu.
ƹ Use or direction button to
select the items ;
ƹ Press “ENTER” or direction
button to confirm and enter .
ƹ Use direction button to return
to the higher level menu;
ƹ Press ”SETUP” button to exit.
OSD Language setting
ƹ When you select different
languages the word on the
menu will be changed to the
selected language.
Disc Menu Language Setting
ƹ The option used to set the discs’
language.
ƹ This function requires the support
of the discs. Different language can
be selected such as: English,
French,
Spanish,
Chinese,
Japanese, Korean, Russian, Thai
and others. The default language is
English.
31
System Setup
Audio Setting
ƹ The option used to set the
audio’s language.
ƹ This function requires the
support of the discs. Different
language can be selected such
as: English, French, Spanish,
Chinese, Japanese, Korean,
Russian ,Thai and others. The
default language is English.
Subtitle Setting
ƹ This function requires the
support of the discs. Different
language can be selected such
as: English, French, Spanish,
Chinese, Japanese, Korean,
Russian ,Thai and others. The
default language is English.
TV Type Setting
32
System Setup
Clock Setting
Press “ENTER” button to enter the menu as below:
ƹ Press or direction
button to select.
ƹ Press or direction button
to change the value.
ƹ Press “ENTER” button to
ensure and then exit this
menu.
Time System Setting
33
System Setup
Screen Saver Setting
ƹ Set the Screen saver to be
“ON” ˈ when the player at
“NO DISC” or “STOP”
status ,a few minutes later the
player start the screen saver
automatically.
Auto goto DV Setting
ƹ Set Auto goto DV to be “ON”,
when the 1394 line connect to
the player, it will detect the
DV automatically, Set “OFF”,
you
need
to
manual
operation.
User Default
ƹ Use or direction
button to select “Enter” or
“cancel”.
ƹ Select “Enter” to set default
ƹ Select ”Cancel” to Exit.
ƹ After setting User Default,
the player will recover the
default values, enter the
initial setup menu to set the
time and language.
34
System Setup
TV SETTING PAGE
Edit Channel List Setting
Press “ENTER” to enter Edit Channel List setup menu:
ƹ Use or direction button to select
the TV program, press “ENTER”
button to ensure
ƹ Select“ Ė ” or “ Ę ” option, use
“ENTER” button to set the order.
ƹ Select “SKIP” then press “ENTER” to
choose “ON” or “OFF”.
ƹ Select
“Rename”
then
press
“ENTER” button to rename the
channel
ƹ Select “Exit” to return to higher level
menu.
Note: When the “SIKP” option is set to “ON”, switch the channel, it will skip the channel and enter the next
channel automatically.
35
System Setup
Automatic Search Setting
Press “ENTER” button to enter “Automatic Search” menu:
The player scan all the channels, store the channels with signal and order them;
The number in the first row shows the rate of scan progress, the number in the second row show the found
channels.
Press “Cancel” to stop scan.
Manual Search Setting
36
System Setup
Press “ENTER” key to enter “Manual Search” setup menu:
ƹ
ƹ
Use or direction key to select.
Use ǃ or “NUMBER” keys to
setup.
ƹ Press “ENTER” key to save the
setting and exit.
ƹ If the searched broadcasting station
have no sound, please adjust the
Secam-L ǃSecam-BGǃSecam-DKor
PAL-I ǃ PAL-BG ǃ PAL-DK sound
mode.
Country Setting
Select “Country setting” option, press “ENTER” or button to enter
ƹ Use or direction button to
select.
ƹ Press “ENTER” button to ensure.
ƹ Press button to return to higher
level menu.
ƹ Press “SETUP” button to exit.
37
TROUBLE SHOOTING
Symptom
What to check
The player cannot play.
-If disc is loaded in.
-If disc is loaded upside down.
-If disc is dirty or warped.
-If the player’s region code is the same as region code of DVD disc.
-If water condensation has occurred.
The player cannot record
-If the disc is loaded in.
-If the disc is in right format.
-If the content of the disc already full.
-If the recording is finish.
-If the exterior input source is connected.
-If the right exterior input source is selected.
-If the exterior input source is at work status.
There is no sound.
-If system connection is correct.
-If the power of speakers is turned on.
-If the sound setup of DVD disc is correct.
-If disc is dirty or warped.
-If it occurs, clean it or press it.
There is no picture.
-If TV is turned on and is in correct video mode.
-If system connection is correct.
Poor AV performance.
-If disc is dirty, warped or damaged.
Cannot continue to play and
play a section repeatedly.
-If it is in A-B repeat status.
-If it is true, press A-B button to cancel it.
-If disc is dirty or damaged.
-If it is true, clean it or skip the section.
The remote control does not
work.
-If there are obstructions between the remote control and the
player.
-If the remote control is pointing at the player.
-If batteries are inserted or the polarity is correct.
-If batteries are weak.
-If it is true, replace them.
Others: Static or other external interfere may cause the abnormity of the player. At this circumstance, unplug
the power-supply cord from the outlet and plug it in again to reset the player so that the normal operation will
be resumed. If you are still having problems, then please disconnect the power and consult your service center
or a qualified technician.
38
SPECIFICATIONS
Laser Wavelength
Wavelength: 780/650nm
Video System
PAL/AUTO/NTSC
Frequency Response
20Hz̚20kHz
Audio Signal-to-noise Rate
85dB
Audio distortion + noise
-70dB˄1kHz˅
Channel Separation
70dB ˄1kHz˅
Dynamic Range
80dB ˄1kHz˅
Analog Audio Out
Audio Out
Digital Audio Out
±2.5 dB
Out Level: 2V±0.0
1.0
Load: 10k
Coaxial: Out Level 0.5VP-P,Load: 75
Optical: -21 dBm̚-15 dBm
Video Output
Out Level:1V P-P±0.2, Load:75 Unbalanced Negative
Video
S-Video Output
Out Level: Y : 1V P-P, C: 0.286V P-P
Output
Component
Interlace
Y: 1.0V P-P, Cb/Cr: 0.7V P-P, Load: 75
Video
Progressive
Y: 1.0V P-P, Pb/Pr: 0.7V P-P, Load: 75
Power
AC110̚240Vˈ50/60Hz
Power Consumption
25W
Weight
About 3kg
DESIGN AND SPECIFICATIONS ARE SUBJECT TO CHANGE WITHOUT NOTICE
Manufactured under license from Dolby Laboratories.
“Dolby” and the double-D symbol are trademarks of Dolby Laboratories.
Confidential unpublished works. © 1992 -1997 Dolby Laboratories.
All rights reserved.
Copyright
This manual contains information protected by copyright law. No part of this document may be
used or reproduced in any form or by any means, or stored in a database/retrieval system
without prior written permission from Linophir International Pty Ltd.
The information of this manual is base on the current version of the product, we reserve the
rights for the improvement without prior notice.
All brand names in this manual are the property of their respective owners.
39