1
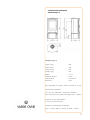
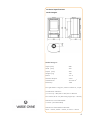
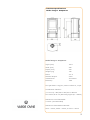
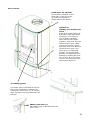
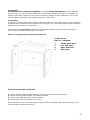
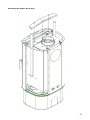
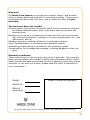
Varde Fuego
Installation— and
User guide
Revision 02
1
Congratulation on the purchasing your new stove
Varde Ovne A/S is a Danish company specialising in functional, environmentally
friendly quality stoves in attractive designs.
Index
Welcome and contents
Technical specifications Fuego 1
Technical specifications Fuego 2
Technical specifications Fuego 1 Soapstone
Regulations and certifications
Flooring and distances
Chimney
Air supply
Operation
List of accessories
Vermiculite
How to choose the wood
How to light and stoke a fire
Maintenance
Troubleshooting
Spare parts
Fresh air supply
Installation of the AirBox (extra)
Test certificate from RWE
Test certificate from the Danish Technological Institute
Warranty
Page
Page
Page
Page
Page
Page
Page
Page
Page
Page
Page
Page
Page
Page
Page
Page
Page
Page
Page
Page
Page
2
3
4
5
8
9
10
11
12
13
14
15
16
17
18
19
20
21
22
23
24
2
Technical Specification
Varde Fuego 1
Model Fuego 1
Hight (mm)
993
Wide (mm)
500
Depth (mm)
405
Weight (kg)
125
Effect
3-7 w
Nominal Output
5 Kw
Heated area
30-105 m2
Efficiency
75%
Flue gas data: 5.5 g/sec, 340°C ved 20°C, 11 pa.
Combustion chamber:
(H x W x D): 260/380 x 200/300 x 260mm
Flue outlet Ø 15 cm (Mounting hight top: ~98cm)
Distance to non-flammable:
5-10cm (recommended)
Distance to flammable materials:
Rear = 20cm, Sides = 20cm, In front = 80cm
3
Technical Specifications
Varde Fuego 2
Model Fuego 2
Hight (mm)
885
Wide (mm)
500
Depth (mm)
405
Weight (kg)
122
Effect
3-7 w
Nominel Output
5 Kw
Heated area
30-105 m2
Efficiency
75%
Flue gas data: 5.5 g/sec, 340°C ved 20°C, 11 pa.
Combustion chamber:
(H x W x D): 260/380 x 200/300 x 260mm
Flue outlet Ø 15 cm (Mounting hight top: ~87cm)
Distance to non-flammable:
5-10cm (recommended)
Distance to flammable materials:
Rear = 20cm, Sides = 20cm, In front = 80cm
4
Tekniske specifications
Varde Fuego 1 Soapstone
Model Fuego 1 Soapstone
Hight (mm)
1014
Wide (mm)
520
Depth (mm)
410
Weight (kg)
140
Effect
3-7 w
Nominel Output
5 Kw
Heated area
30-105m2
Efficiency
75%
Flue gas data: 5.5 g/sec, 340°C ved 20°C, 11 pa.
Combustion chamber:
(H x W x D): 260/380 x 200/300 x 260mm
Flue outlet Ø 15 cm (Mounting hight top: ~98cm)
Distance to non-flammable:
5-10cm (recommended)
Distance to flammable materials:
Rear = 20cm, Sides = 20cm, In front = 80cm
5
Important!
Before installing and lighting your new Varde
Ovne stove for the first time, we recommend
that you first take a couple of minutes to read
this installation and user guide.
Regulations
All local regulations, including regulations
referring to national and European standards,
should be adhered to when installing your
stove.
Inspection of installation
It is very important that the installation is inspected by a qualified chimney sweeper before
the stove is used for the first time.
Note: All Varde Ovne stoves are closed fireplaces.
This Varde Ovne stove has been certified in
accordance with European Standard EN 13240,
German Stufe II and Norwegian Standards (NS),
and has therefore been proved to be an environmentally friendly product.
Professional installation
We recommend that you consult with the
dealer who sold you the stove or another
competent installer, as there may be specific
things to consider during the installation. You
should also receive the applicable rules for
installing the stove and follow them.
The stoves are designed for intermittent
combustion and can be connected to a chimney used by other fireplaces.
Note:
Compulsory registration
You are required by law to register your stove with your local chimney sweeper.
Store the stove in a dry place at room temperature until installation. Moisture will damage the
stove. Be aware that an existing chimney is not necessarily effective enough for a new modern
stove
.
EC declaration of confirmaty.
MANUFACTURER
Name:
Adress
Pejse Inspektion
Name:
Adress:
Varde Ovne A/S
Kongevej 246, DK-6510 Gram, Danmark
RWE Power AG
Dürner strasse 92, 50226 Frechen, Germany
Notified body Number: 1427
Product
Product type
Type code
Standard
Varde Fuego 1 and 2
Fuego
Wood-burning stove, suitable for intermittent combustion
Construction products (89/106/EEC/), standard used: EN
13240
Application
Fuel
Special conditions
Residential Heating
Wood
None
CE-Markning
Issued
Nominal Output
Fuel type
Fluegas temperature
Efficiency
Co-release
2012
5 kW
Wood
340 °C
75 %
0,08 %
6
Flooring
If the floor on which the stove is to be placed is flammable, the floor must be covered with a non
-flammable material, such as a steel or glass plate, floor tiles or artificial slate, covering an area
of at least 15 cm on each side of the stove and at least 30 cm at the front. For the front, however, we recommend 50 cm. In addition, the floor construction must be capable of carrying the
combined weight of stove and chimney.
Steel
With Soapstone
Varde Fuego 1
125 kg
145 kg
Varde Fuego 2
122 kg
-
Weight
Installation distances
If the walls are made of a non-flammable material, the stove can be placed right up against the
wall. We nevertheless recommend a minimum distance of 5 – 10 cm to allow for cleaning behind
the stove. The cleanout door must be accessible.
Optimal combustion requires a constant supply of fresh air, which is something you have to keep
in mind. The best way to provide a steady flow of fresh air is by installing one or two air vents in
the room where the stove is situated (one on each side of the room).
Installation of wood stoves – distance to flammable material
Stoves must always be placed with the following minimum distance between the outer edge of
horizontal/vertical flue pipes and any flammable material: 225 mm.
According to current rules and regulations,
the stove must comply with the following
minimum distances from flammable walls
and materials:
Varde Fuego
A
200 mm
C
200 mm
B
225 mm
D
800 mm
Sides : 20 cm
Rear : 20 cm
Distance to furniture : 80 cm
7
The chimney
Always use a chimney with a diameter of at least 15 cm. This corresponds to a bore of 175 cm2.
Make sure the chimney is of sufficient height, that it draws well and that the smoke does not
bother your neighbours.
We recommend that you fit your chimney with a damper, allowing for draft control. This may
prove particularly important on windy days. Note: the damper must never shut off draught completely – always allow at least 20 cm2 free passage through the chimney.
With nominal usage the stove has tested a flue gas flow of 5.5 g/second, with a flue gas temperature of 340°C and at a room temperature of 20°C.
Varde Ovne stoves are always fitted with a smoke deflector plate which redirects smoke to
make its way to the chimney as effective as possible. This ensures that the heat from the smoke
is emitted inside your home rather than outside it. The smoke deflector plate is moveable and
placed in the combustion chamber. You should make sure that it is pushed all the way back
against the back wall of the combustion chamber.
Draught conditions
Consult your local chimney sweeper about how best to adjust the draught in your chimney.
Height of chimney
If in doubt, contact your local chimney sweeper. He will be able to inform you of the correct
height.
Connection of Flue pipe
Information about the new cast iron adapter, part no. 134
Your stove is equipped with the new cast iron adapter from Varde Ovne. The adapter is suitable
for standard flue pipes with an inner diameter of 150 mm.
It is now possible for you to make a condensate drain hole in the adapter if your stove is directly
connected to a steel chimney:
Carefully punch a chisel or the like through the bottom of the outer groove (at the
arrow mark). This way you can establish a condensate drain hole in the adapter if
Arrow mark for drain hole.
Carefully punch a hole with a
chisel or the like.
Now the condensate drain
hole is ready.
8
Fresh air supply
A continual supply of fresh air is required in the
room in which the stove is situated. This can be
achieved by installing ventilation grids in the walls
and making sure they cannot be blocked. The
quantity of air used for combustion is approx.
14 m³/h.
Ignition air
Combustion air
damper
Push the damper
towards the right to
open.
Combustion air
damper
Push the damper
towards the left to
close.
Max height of firewood
When the upper low handel is pushed
towards left you open the ignition air.
This option is only used for lightning up.
As soon as the fire has a good grip—
rembermber to close again.
Combustion /secondary air
Pre-heated air for the combustion process
(secondary air). The amount of air can be
adjusted according to needs. A high level
of chimney draught requires a lesser intake of combustion air.
Tertiary air
Constantly added air, which makes the
stove burn even cleaner while lowering the
content of tar and soot in the combustion
process to an absolute minimum. At optimum combustion settings, glass and combustion chamber will be burnt completely
clean, and the amount of ash remaining
will be minimal.
Overheating
Occurs if too much wood is placed in the
stove or if too much air is added to the
combustion process.
9
How it works
Combustion Air Throttel
The Handle is situated on the
right side, on top of the stove. Push the Throttel towards right for Air Access.
3
2
Ignition air
Lighting your Varde Ovne
stove
Push all air supply levers (1,
2 and 3) to the right as far
as they go. Your stove is
now in ignition position.
Once the fire has caught
properly, push lever 1 to the
left as far as it goes. Wait
until the fire burns evenly,
and then push lever 2 to the
left as far as it goes. Your
stove is now in operating
position. In the operating
position you adjust the fire/
heating by shifting the position of lever 3; to the right
to let in more air and to the
left to shut off the air.
1
The shaking grate
The shake grate is situated at the bottom of the combustion chamber. By
pushing the lower lever (1) to left and
right, the ashes will be pushed into the
ash pan.
2
1
Shake grate lever (1)
The shake grate is operated with the
lower lever.
10
Operation
7
6
5
8
3
9
2
1
4
12
10
1.
2.
3.
4.
5.
6.
7.
8.
9.
10.
11.
12.
Shake grate
Wood catch
Vermiculit plates
Ash pan
Cast iron Door
Cast iron Top
Cast iron cover
Airbox kit(Extra)
Combustion air lever
Ignition air Lever
Shakegrate lever
Stove base
11
11
Vermiculite
The plates in the combustion chamber are called vermiculite plates and will eventually
become worn, as will the smoke guide plate. Accidental breakage of a plate, for instance by
hitting it hard with a piece of wood, will not affect the quality of the combustion. You do not
need to replace the plate until the gap is approx. 5 mm wide.
Vermiculite
A special, non-flammable material that looks like chipboard. The plates act as insulation and at
the same time protect the stove against wear and tear. The vermiculite plates and the deflector
plate are not covered by the warranty.
Vermiculite is a very porous material and should be handled with care. When refilling the
stove, stoke the wood carefully and use a glove.
Only use original parts from Varde Ovne A/S
Vermiculit set,
Item no.: 2223506
1
1.
2.
3.
4.
Smoke guide plate
Left side plate
Right side plate
Rear plate
2
4
3
How too replace the Vermiculite
1.
2.
3.
4.
Lift
Lift
Lift
Lift
the
the
the
the
smoke deflector plate slightly, tilt the rear end forward and remove.
left side plate slightly and rotate outwards.
right side plate and rotate outwards.
rear plate up and out of the stove.
When fitting the new vermiculite plates, begin with the rear plate and repeat the steps in the
reverse order, finishing with step 1
12
What kind of wood is best?
Generally, beech wood is considered the best
type of wood for burning. It burns evenly without producing much smoke, and ashes are
clean and take up little space. Ash, birch and
maple are good alternatives.
How big should the logs be?
Split firewood with a diameter larger than 10
cm. Use firewood measuring 20 – 25 cm in
length. The use of larger quantities of fuel than
recommended in the table below will overload
the stove and result in increased temperatures
in the chimney and reduced efficiency. This may
cause damage to both chimney and stove and
will invalidate the warranty.
Kindling
Length: 20 – 25 cm
Width 3 x 3 cm
Normal amount: 10 – 15 sticks (approx. 1 kg)
The new stove
The first time you light up the stove, the
enamel will temper and give off some smoke
and a slightly burnt smell. We recommend
that you leave doors and windows open, as
airing the room will make the smell disappear.
This tempering softens the enamel, making it
susceptible to damage. Therefore exercise
caution and avoid touching the enamel. We
also recommend opening the door to the
stove at regular intervals during the first
couple of hours to prevent the rope seal from
sticking to the enamel.
What to burn
This Varde Ovne stove has been tested and
approved for the burning of wood. Use only
dry wood with a moisture content of max.
21% and a size that fits into the combustion
chamber. The burning of moist wood will result in an increased amount of tarry soot,
pollution and poor fuel economy. Newly
chopped wood contains about 60 – 70% moisture, which makes it completely unsuitable as
fuel. Allow newly chopped firewood to dry in
an open shed for at least one year before
using it in the stove.
Do not use – consider the environment!
Also, never use toxic materials such as chipboard, painted or impregnated wood. Firing
with this type of unsuitable material would
alter the combustion properties of the stove,
affect its efficiency and potentially result in
overheating of the stove and invalidation of
the warranty.
Top-down lighting of the fire
Do not stack the firewood beyond the height
shown on page 11.
Logs
Length: 25 – 30 cm
Diameter: max. 10 cm
Normal amount: 3 – 4 logs (approx. 2 kg)
The following optimal register and fuel quanitty settings are recommended(in case of similar chimney
draught):
Fuel Quantity
[kg]
Primary Air
open
[%]
Combustion
Air open
[%]
Nominal
Output
[kW]
Chimney
Draught
[PA]
Efficiency
[≥ i %]
Refill interval at
nominal output
[minuts]
1,2
0 (closed)
ca. 80 (almost
open)
5,0
12
75%
ca. 45
13
How to light and stoke a fire
The first time you light up the stove, the enamel will temper and give off some smoke and a
slightly burnt smell. We recommend that you leave doors and windows open, as airing the room
will make the smell disappear.
This tempering softens the enamel, making it susceptible to damage. Therefore exercise caution
and avoid touching the enamel. We also recommend opening the door to the stove at regular
intervals during the first couple of hours to prevent the rope seal from sticking to the enamel.
Never use highly flammable liquids such as methylated spirit or petrol for lighting up!
We recommend using ‘top-down’ lighting, where you light the wood at the top of the combustion
chamber and not at the bottom. This is the most environmentally friendly method to light a fire.
The method will also help keep the glass clean. Place four small logs in a cross on the bottom
plate of the combustion chamber (approx. 1.5 – 2 kg) with a small distance between each log.
Place 8 – 12 smaller sticks (0.5 – 1 kg) in a cross on top of the logs, and 2 – 3 firelighters at the
top and in between the sticks.
A thin layer of ash at the bottom of the stove makes it easier to light the fire.
Before lighting the stove, open the shaking grate by pulling the small lever under the combustion chamber completely towards the right. Pull the lever underneath to the right as well to allow
the ignition air to enter and pull the combustion air damper towards the right until it is completely open.
Once the fire burns, remember to close the ignition air vent and shaking grate again. Otherwise,
the stove and chimney might become overheated, which would invalidate the warranty.
Once the kindling has reduced to embers, we recommend opening the door slightly for a couple
of seconds to neutralise the negative pressure in the combustion chamber before opening the
door completely.
Place 3 – 4 logs in a cross on top of the embers (approx. 2 kg) and close the door again. To
make sure the wood ignites quickly, we recommend briefly opening the ignition air vent and
make sure you remember to close it again once the fire gets going. You can then adjust the
combustion air according to your heating requirements.
Take care not to shut off the air supply completely, otherwise the fire will die. The fire should
always burn bright and clear.
In most instances, however, you will have to identify the best combustion air settings yourself, as the height and draught of your chimney as well as the quality of the firewood are decisive factors in determining the best settings for your particular stove.
If the nominal heat output of your stove is too high compared to your heating requirements, you
can reduce the output as follows:
- Stoke a smaller amount of wood than usual, for example 1.2 – 1.3 kg, preferably consisting of
3 – 4 smaller pieces of wood. Apply full air to ignite the wood properly before reducing the combustion air, perhaps down to approx. 60%. Be careful not to reduce the air supply to the point
that the fire dies. The fire should always burn bright and clear.
With this method it is possible, depending on the chimney, wood quality, etc., to reduce the
stove’s heat output from a nominal 5 kW down to perhaps 3 – 3.5 kW.
Please be aware that it can lead to poor combustion if you reduce the combustion air too much,
resulting in a lower efficiency and increased emission levels (increased pollution).
You may wonder why your stove is fitted with a gap in the rear vermiculite plate in the combustion chamber, with small holes through the back steel plate, but these holes are an important
part of the combustion system. We refer to these air ducts as the ‘tertiary air’. They are an
important part of a clean-burning stove.
When refilling the stove with wood, we recommend opening the stove door once only embers
are left in the combustion chamber. Opening the door while flames are still burning and producing smoke and gas might cause smoke to escape into the room.
If you have problems lighting or operating the stove, see the section on Troubleshooting.
14
Maintenance
Like any piece of equipment in daily use, your stove needs maintenance.
The stove should only be cleaned when cold. Use a dry cloth for cleaning the exterior of the
stove.
Clean the interior regularly by removing ashes, soot and tar from the combustion chamber. The
smoke deflector plate should be removed for cleaning, as the reverse side will be covered in dirt
and soot. Finally check that the smoke pathway through the flue pipe and chimney is completely
clear. You should also inspect the rope seals in the door and ash pan for signs of wear. Replace
them if they no longer seal properly. Also, remember to lubricate the door hinges as required.
Glass pane
The glass pane should be cleaned using Varde Glas Cleaner, which is available at all DIY centres
selling Varde Ovne stoves.
Empty the Ash pan regularly. It can be emptied into your dustbin, as long as you make sure it
does not contain any hot embers. If in doubt about how to clean your stove, contact the dealer
where you bought your stove, or your chimney sweeper.
It is especially important to check the stove and the chimney for blockages after a long period of
non-use.
The enamelled surface of the stove may wear down in certain places if the stove is overheated. Worn surfaces can, however, be repaired with a special Senotherm® spray paint, available
from your local dealer.
The plates in the combustion chamber are vermiculite plates and will eventually become
worn, as will the smoke deflector plate. Accidental breakage of a plate, for instance by hitting it
hard with a piece of wood, will not affect the quality of the combustion. You do not need to replace the plate until the gap is 5 mm wide.
Only use original parts from Varde Ovne A/S
The door is equipped with a spring, which pulls the gate closed. This is a legal requirement in
many countries. The spring is fitted to the hinged side of the door but can be removed if you
prefer the door not to be spring-loaded.
Do not make any unauthorised changes to the stove.
All external parts of the stove become hot during use, and you should therefore exercise due caution.
IMPORTANT!!
Chimney fires
Should your chimney catch fire, cut off the air supply to the stove’s combustion chamber and
contact the emergency service. (The majority of fires die out after the oxygen supply is cut off.)
You should subsequently contact your chimney sweeper, who will check your stove and chimney
for damage
15
Troubleshooting
Smoke enters the room
• Not enough draught in the chimney.
• Inspect the flue pipe or the chimney for blockage.
• Make sure the height of the chimney is correct.
The glass or the chimney soots up
• The wood is too moist.
• Not enough secondary air is supplied to the combustion process.
• You may have shut off the supply of ignition air too soon when lighting the stove.
• There should be clear flames in the combustion chamber at all times.
No heat is emitted from the stove
• The wood is too moist (all energy is spent on drying it) or of a poor quality.
• Inspect the position of the smoke deflector plate and make sure there is free passage for the
smoke.
• The amount of combustion (secondary) air is insufficient.
Combustion is too intense
• Rope seals in the door or the ash pan are no longer tight and need replacement.
• The chimney draught is too strong; install a damper in the chimney.
• Check that the ignition air is shut off.
The shaking grate is stuck
• Inspect the grate for jammed wood, nails or the like.
• Make sure the lever is placed correctly.
Recycling
Packaging
For environmental reasons, the packaging should be disposed of together with household waste.
The packaging is 100% recyclable.
Ceramic glass
Ceramic glass should be deposited at the local recycling centre (together with pottery and porcelain).
Vermiculite
Vermiculite plates from the stove should be deposited at the local recycling centre.
16
Spare parts
The following spare parts are available if the need arises:
Vermiculite set, part no. 2223506
Coloured glass, part no. 1771503
Clear glass, part no. 1772503
Rope seal, door, part no. 10014+10008
Door handle, part no. 17706124
Door (black), part no. 1770526
Door (grey), part no. 1770526G
Shake grate, part no. 65
Ash pan (black), part no. 1770555
Ash pan (grey), part no. 1770555G
Glass spring with screws, part no. 10024
Wood catch, part no. 85
Locking system, part no. 1770565
Spring for door, part no. 17706318
AirBox kit, part no. 1770100
17
Fresh air supply
A continuous supply of fresh air is required in the room in which the stove is situated. This can
be achieved by installing one or two vents in the walls, ensuring that they cannot be blocked.
Combustion air supply (extra)
When a stove is installed in a room, the requirements to air supply increase. The air can be supplied through a vent in the outer wall or through a duct from the outside that is attached to the
connector underneath the stove. The quantity of air needed for combustion is approx. 14 m3/h.
The connector has an outer diameter of 63 mm. The pipe diameter has to be increased to 100
mm for ducts longer than one metre and a larger wall vent chosen to match.
Installation options
Indirectly through the exterior wall
Through the floor and foundation
Through the exterior wall
Through the floor and crawl space
18
Mounting the Airbox Kit (Extra)
19
20
21
Warranty
All Varde Ovne stoves go through strict quality control, and we take
pride in always delivering products of a consistent quality. This being so,
manufacturing faults may still occur, and on these we offer a 5-year
warranty.
The warranty does not include:
Wearing parts, such as the vermiculite plates in the combustion chamber,
the smoke deflector plate, glass, rope seals, cast iron bottom and
shaking grate
Damage occurring as a consequence of incorrect use, such as overheating, incorrect installation, missing or incorrect maintenance, etc. (see
instructions above)
Damage caused by external influence of a physical character
Cost of transportation in connection with warranty repairs
Assembling/reassembling in connection with warranty repairs
Compensation for consequential damage, including damage to other objects.
Warranty conditions
These instructions for use are also your proof of warranty. The warranty
does not take effect until a dealer’s stamp and information about model,
serial number and date of purchase (invoice if possible) have been provided below. In the event of a claim, please take this proof of warranty to
your local dealer.
Model:
Dealer’s stamp and signature
Serial.no.:
Date of
purchase:
Kongevej 246, 6510 Gram, Danmark, Tel. +45 7482 0003. vardeovne.dk
22