1
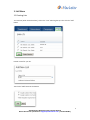
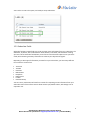
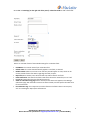
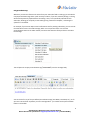
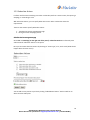
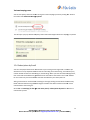
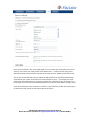
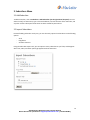
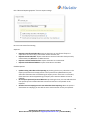
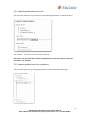
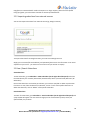
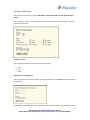
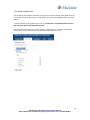
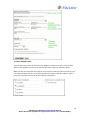
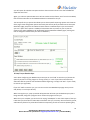
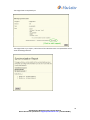
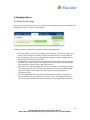
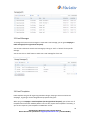
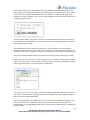
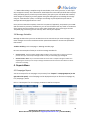
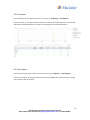
User Documentation Guide
Webvisions Pte Ltd
Contact: [email protected]
http://webvisions.com/emarketer
Table of Contents:
1. List Menu --------------------------------------------------------------------------------- Page 3
• 1.1 Creating Lists
• 1.2 List Settings
i. Subscriber Fields
ii. List Segments
iii. Subscriber Actions
iv. Subscriptions by Email
• 1.3 Other List Settings
i. Email Confirmation Sets
ii. Bounce Settings
2. Subscribers Menu ---------------------------------------------------------------------- Page 15
• 2.1 Add Subscriber
• 2.2 Import Subscribers
i. A File
ii. Copy/Paste
iii. An External Service
• 2.3 View /Search Subscriber
• 2.4 Export Subscribers
• 2.5 Excluded Subscribers
• 2.6 Batch Actions
• 2.7 Database Sync
3. Campaigns Menu ---------------------------------------------------------------------- Page 27
• 3.1 Create Campaign
• 3.2 View Campaign
• 3.3 Email Messages
• 3.4 Email Templates
• 3.5 Message Variables
4. Reports Menu ------------------------------------------------------------------------- Page 34
• 4.1 Campaign Reports
• 4.2 List Reports
• 4.3 User Reports
• 4.4 Trend Reporting
i. Read Trends
ii. Email Client Trends
2
eMarketer by Webvisions Pte Ltd User Manual
Please direct user questions to [email protected] (+65 67739387)
1. List Menu
1.1 Creating Lists
To create lists (which hold subscribers), click on the "Lists" tab along the top. Then click the "Add"
button:
Provide a name for your list:
Then hit the "Add" button at the bottom:
3
eMarketer by Webvisions Pte Ltd User Manual
Please direct user questions to [email protected] (+65 67739387)
Your new list is now in the system, and ready to accept subscribers:
1.2.1 Subscriber Fields
Subscriber fields are custom fields you create to obtain more information from your subscribers. The
eMarketer, by default, will include fields for Email Address, First Name, and Last Name. Creating
your own custom subscriber fields allows you to fine-tune the subscriber experience to your exact
needs, while obtaining necessary information to enhance your objectives and goals.
Depending on what type of information you want from your subscribers, you have many different
form controls to choose from:
•
•
•
•
•
•
•
•
Text Field
Text Box
Checkbox
Radio Button
Dropdown
Hidden Field
List Box
Checkbox Group
You can use any combination of these form controls for requesting certain information from your
subscribers. Each of these form controls allow custom input, default values, and settings such as
required or not.
4
eMarketer by Webvisions Pte Ltd User Manual
Please direct user questions to [email protected] (+65 67739387)
Go to Lists > List Settings (on the right side of the panel) > Subscriber Fields to add or edit fields:
Here is an overview of each of the available settings for a subscriber field:
•
•
•
•
•
•
•
•
Field Name: The internal name of your subscriber field
Default Value: The value that automatically appears in the field, or selected.
Bubble content: When a user hovers over this field, text will appear in a box, which can be
used to provide further information regarding the fields' purpose.
Required: When checked, users will be forced to provide a value for this field.
Label Justification: The label for the field resides either above the actual field, or to it's left.
For use in: Choose which lists the field will show up for.
Show on subscriber listing page: When checked, a new column will appear on the Manage
Subscribers page, with the fields' name as the column header, and the specific value will show
for each subscriber.
Personalization Tag: This unique text is used to reference this fields' value in various spots,
such as in messages or Opt-In/Out confirmations.
5
eMarketer by Webvisions Pte Ltd User Manual
Please direct user questions to [email protected] (+65 67739387)
Using personalization tags
Whenever you need to reference the values from your subscriber fields in mailings, just include the
unique personalization tag where you'd normally include it, if you were manually writing it. The tag
will then be dynamically replaced when the mailing is sent, so it's specifically tailored for each
subscriber, allowing you to quickly create maililngs using a standard "template," and letting the
system fill in the details.
For example, if you have an Opt-In email confirmation sent for pending subscribers, you can include
the subscribers name in the email message, which is a nice personal touch. Just click the
personalization button in the editor toolbar, and select the subscriber field you'd like to include in
the message:
This will place the unique personalization tag (%FIRSTNAME%) into the message body:
You can do this for any of the pre-defined personalization tags (First Name, Last Name, etc.), or for
your own custom fields. Anywhere you see a message editor - you should see the personalization
button in the toolbar.
6
eMarketer by Webvisions Pte Ltd User Manual
Please direct user questions to [email protected] (+65 67739387)
1.2.2 List Segments
eMarketer allows you to create multiple lists, which you can use to keep your subscribers organized.
However, many people wish to divide up their subscriber lists even further. This is known as "list
segmenting." List segmenting allows you to send specific, targeted campaigns to small groups of
subscribers, based on certain subscriber data, such as geographical location, gender, interests, etc -a powerful marketing strategy.
Creating A Segment
Go to Lists > List Settings (on the right side of the panel) > List Segments to create list segments
Once you are on the List Segments page, click Add to add a new segment. You will be asked to
choose which list(s) the segment should be used on, and you will also be asked to type a name for
the segment, by which to reference it later.
Match Type
The "Match Type" option gives you two settings to choose from -- "subscribers who match ALL of the
following groups," or "subscribers you match ANY of the following groups." A segment can be
composed of multiple groups of conditions, and it is up to you if you want subscribers who meet at
least one of these conditions to be a part of the segment, or if you want only subscribers who meet
every condition to be a part of the segment.
Groups & Conditions
By default, your segment will have one group. Groups can contain one or more conditions, and you
can decide whether or not all conditions should be met for a group to be matched, or if only one of
the conditions needs to be met for a group to be matched. Your groups and conditions can be as
simple or complex as you need.
Conditions can be based on default subscriber fields (such as Name, Subscription Date, etc), custom
fields that you have added (such as City, Zip Code, Interests, etc), or actions that a subscriber has
taken in the past (such as opened a specific campaign, clicked a specific link, etc).
You can click "Add another condition" to add multiple conditions to your group, and click the red "X"
to the right to remove conditions. Similarly, you can click "Add another group of conditions" to add
multiple groups.
7
eMarketer by Webvisions Pte Ltd User Manual
Please direct user questions to [email protected] (+65 67739387)
Click "Add" on the bottom of the page when you are finished adding groups and conditions, to save
your segment.
Once you have saved your segment, you will be brought back to the main List Segments page, where
you can edit your segment, or view its matching subscribers.
Example Segments
Below is an example segment, where any subscribers whose City field (a custom field) is set to
"Detroit" or "Chicago" are matched.
This segment has one group, and either one of the conditions in that group can be true for the
segment to be matched (the subscriber can live in Chicago OR Detroit to be a part of the segment).
Using Your Segment
Once you have created a segment, you can send a new campaign, only to subscribers who match
that segment. To do this, simply click Create New Campaign as usual. On the second step of the
campaign creation process, you will be asked to choose which list(s) the campaign should be sent to.
As soon as you click on a list, you will see an option appear below, which says "Segment my selected
list(s)." Click this option, and you will see a list of segments you have already created, plus you will
see the option to create a new segment on the fly.
8
eMarketer by Webvisions Pte Ltd User Manual
Please direct user questions to [email protected] (+65 67739387)
Once you have chosen your segment, continue on with the campaign creation process as normal. On
the summary page at the end, before you click Send Now, you will see the name of the list, the name
of the segment you are using, and the number of subscribers the campaign will be sent to.
9
eMarketer by Webvisions Pte Ltd User Manual
Please direct user questions to [email protected] (+65 67739387)
1.2.3 Subscriber Actions
It's often useful to have something occur when a subscriber performs a certain action, like opening a
campaign, or subscribing to a list.
With Subscriber Actions, you can specify what actions occur when a subscriber meets the
requirements.
There are two areas to specify Subscriber Actions:
1. The Subscriber Actions management page
2. During the Create Campaign process
Subscriber Actions management page
Go to Lists > List Settings (on the right side of the panel) > Subscriber Actions to collectively view
and maintain all subscriber actions in the system.
Here you can create subscriber actions by choosing an "action type," a list, and a result (what should
happen when the event occurs):
You can add as many results as you like by clicking "Add additional action." Each one will be run
when the event takes place.
10
eMarketer by Webvisions Pte Ltd User Manual
Please direct user questions to [email protected] (+65 67739387)
The Create Campaign process
You can also specify subscriber actions during the create campaign process by clicking the "Actions"
link underneath Additional Message Options:
Options
This will open a pop-up window to specify results that should happen when the campaign is opened:
1.2.4 Subscriptions by Email
You can have people subscribe or unsubscribe to your mailing lists through email. To do this you
would have to set up separate POP accounts for subscribing
subscribing and unsubscribing. You can set up any
number of POP accounts for subscribing or unsubscribing. When a person subscribes through email,
their name and email address are grabbed from the information contained in the “From” address.
For this reason only the email address and name are added to your subscription list.
Asking a subscriber to unsubscribe to a mailing list through sending an email works the same way.
Name and email address are grabbed through the header information and the subscriber is the
then
unsubscribed to the mailing list.
panel > Subscriptions by Email to
o su
subscribe or
Go to Lists > List Settings (on the right side of the panel)
unsubscribe by email.
11
eMarketer by Webvisions Pte Ltd User Manual
Please direct user questions to [email protected] (+65 67739387)
Click on “Add” to add a POP account for subscribing or unsubscribing, and then fill in the following
fields to add the POP account successfully.
POP Email Address
Used in Lists
Action
( subscribe / unsubscribe)
Type
(POP3 Account)
POP Port (Default 110)
POP Host
POP Username
POP Password
Finally, click on “Add” to save this POP account.
1.3.1 Email Confirmation Set
When users subscribe and/or unsubscribe from your lists you can choose to require their
confirmation by email.
Creating a new confirmation set
Go to Lists > List Settings (on the right side of the panel) > Email Confirmation Sets and click "add"
to create a new confirmation set.
You can now enter the information for both the opt-in and opt-out emails.
Both messages should contain the text "%CONFIRMLINK%" This tag is where the link to confirm the
opt-in or opt-out will go. If you want a link that has some text to confirm you can insert HTML like
"<a href="%CONFIRMLINK%">Click here to confirm</a>
Turing off opt-in and/or opt-out
If you wish to disable one or both confirmations simply choose the "No" radio button by the
"Confirm Opt-In" and/or "Confirm Opt-Out" sections. Please note that you should keep the opt-in
on at most times to comply with email sending laws.
12
eMarketer by Webvisions Pte Ltd User Manual
Please direct user questions to [email protected] (+65 67739387)
1.3.2 Bounce Settings
A “bounce” email is an email message that was not delivered to its recipient properly, and was then
returned to the original sender. This typically happens when an email address or domain name
doesn’t exist, or the email inbox of the recipient was full or offline. eMarketer provides automatic
bounce email processing. This feature will track which emails “bounced” in each of your campaigns,
and this feature can even automatically remove any subscriber who has bounced too many times.
This is a very valuable feature, as it can help keep your subscriber list clean, and free of old or nonworking email addresses. You can also view reports to see which of your subscribers did not receive
your message, and why.
There are three methods of dealing with bounced emails as the result of sending a campaign:
1. Extract from a POP3 email account
2. PIPE email to a script
3. Return to sender (this is the default options, and with this option enabled, bounces will not be
tracked in the software)
Extracting Email From a POP Account
This is usually the easiest method of setting up bounce management. This method requires that you
create an email account on your server, which is used only for processing bounces. Most users
would create an email account such as “[email protected]” for this purpose. All messages that
bounce back from your campaigns will be sent to this bounce email address — and our software will
periodically check the account, and clear out the bounces.
Go to Lists > List Settings (on the right side of the panel) > Bounce Settings to add a new bounce
connection, or edit an existing one. On the add/edit page, make sure you select “Use POP3 Account.”
When this option is selected, you will see the option to enter in your POP host name, user name,
password, etc:
Please refer to the server configuration e-mail sent to you for the information needed to fill in those
fields.
13
eMarketer by Webvisions Pte Ltd User Manual
Please direct user questions to [email protected] (+65 67739387)
Once you have entered in your correct POP details, you can choose how many emails to process at
one time. This number can usually be left at the default value — it represents how many emails
should be checked and cleared from your POP account each time our software checks the account
You can also choose how many times an address should soft bounce or hard bounce before being
removed from your system. A soft bounce is usually a temporary error — for example, the email
could not be delivered because the recipient’s inbox was full. A hard bounce is a permanent error —
for example, the email could not be delivered because the recipient’s email address no longer exists.
If you have created more than one bounce connection in your software, you will also see the option
to select which list(s) should use this specific bounce connection
14
eMarketer by Webvisions Pte Ltd User Manual
Please direct user questions to [email protected] (+65 67739387)
2. Subscribers Menu
2.1 Add Subscriber
To add a subscriber, click on Subscribers > Add Subscriber (on the right side of the panel). You can
select the list(s) to subscribe to, type in the email address, first and last name of the subscriber, and
any other custom subscription fields which has been created for particular list.
2.2 Import Subscribers
Instead of adding subscriber one-by-one, you can also easily import the subscribers via the following
options:
-
A File
Copy/Paste
An External Service
Using the Subscriber Import Tool, you can import as many subscribers as you’d like, and designate
which lists, status, and other options get applied to those subscribers.
15
eMarketer by Webvisions Pte Ltd User Manual
Please direct user questions to [email protected] (+65 67739387)
Click “Advanced Importing Options” for more import settings:
Here is an overview of each setting:
Import As:
•
•
•
•
Import As Unconfirmed Subscriber: Imports subscribers as unconfirmed. If Opt-In is
required for the chosen list(s), confirmation emails should be sent.
Import As Active Subscriber: Imports subscribers as active. If subscribers have previously
unsubscribed, they will not be re-added as active.
Import As Unsubscribed Subscriber: Imports subscribers as unsubscribed.
Import As Excluded Email Address: Imports subscribers as excluded.
Checkbox Options:
•
•
•
Update existing subscribers while importing: By checking this box, any subscribers in this
import process which are already present in the system will be updated with any new
subscriber information that is found during the import process. If this box is not checked,
those subscribers will be skipped during the import (their subscriber details will not be
updated).
Do not import previously bounced addresses: By checking this box, all e-mail addresses that
have previously been unsubscribed due to numerous bounces in the past will not be
imported.
Send the last sent campaign to each new subscriber when importing: When this option is
checked the last campaign you sent will be sent to each subscriber as they are imported.
16
eMarketer by Webvisions Pte Ltd User Manual
Please direct user questions to [email protected] (+65 67739387)
2.2.1 Importing subscribers from a file
You can import subscribers from a CSV file by visiting Manage Subscribers > Import Subscribers.
Click "Browse..." and choose the file from your hard drive.
Please note: your file should be in comma-separated format. It does not, however, have to be
saved with a .csv extension.
2.2.2 Importing subscribers from copy/paste
You can import subscribers by copying/pasting directly into the Subscriber Import page:
17
eMarketer by Webvisions Pte Ltd User Manual
Please direct user questions to [email protected] (+65 67739387)
Copy/paste is recommended for small-scale imports. For larger imports, please use a file upload.
Using copy/paste, your subscribers should be in comma-separated format
2.2.2 Importing subscribers from external sources
You can also import subscribers from external sources (eg. Google contacts)
To import subscribers from Google Contacts, you must have a Google account.
Supply your username (full email address), and password (please note: this information is not saved
anywhere on your server - you have to re-enter each time you conduct an import).
2.3 View / Search Subscribers
View Subscribers
To view subscriber, go to Subscribers > View subscribers (on the right side of the panel) and select
the subscribers by List or Status (Subscribed / Unsubscribed / Active / Unconfirmed / Bounced / All
Subscribers).
Once all the subscribers are listed as per selection, you can then view/edit or delete any subscriber
from here. To view / edit the details of a subscriber, click on “view” of the specific subscriber. To
delete the subscriber, click on “Delete” of the specific subscriber.
Search Subscribers
To search for subscribers, go to Subscribers > Search subscribers (on the right side of the panel) and
a pop window will appear. You can search through your list of subscribers by name, email, and
optional fields, lists, statuses.
18
eMarketer by Webvisions Pte Ltd User Manual
Please direct user questions to [email protected] (+65 67739387)
2.4 Export Subscribers
You can export subscribers by going to Subscribers > Export Subscribers (on the right side of the
panel).
You can export to a file, or to a new mailing list. Choose which fields you'd like to export, as well as
the scope of how many:
Exporting to a file
You can export subscribers to any of the following file types:
•
•
•
CSV
XLS
XML
Exporting to a new mailing list
You can perform an "export then import" by choosing "New List" under Format. This will take you to
a new pop-up:
As expected, all subscribers under the "How Many" scope will be instantly imported into the new list.
19
eMarketer by Webvisions Pte Ltd User Manual
Please direct user questions to [email protected] (+65 67739387)
2.5 Excluded Subscribers
You can add any email address that does not want to ever receive a mailing into a global exclusion
list. This will remove the possibility of a mailing from any of your lists being delivered to that email
address.
To add an address to your global exclusion list, go to Subscribers > Excluded Subscribers (on the
right side of the panel under Advanced Options).
You can exclude subscribers that “exactly matches”, “begins with” or “ends with” the keyword
entered. Also, you can select the list / lists to exclude these subscribers from.
20
eMarketer by Webvisions Pte Ltd User Manual
Please direct user questions to [email protected] (+65 67739387)
2.6 Batch Actions
Batch removal allows you to clear all addresses from the list you are currently working on. All list
settings will be retained even as you remove all addresses that are subscribed to the list.
Go to Subscribers > Batch Actions (on the right side of the panel) under Advanced Options.
You can remove specific email addresses using the batch actions page. Select the lists that you would
like to perform this removal action, paste the email addresses to be removed into the text box and
click on "Delete addresses listed in above text box".
There are also other options to remove all non-confirmed subscribers from these lists or remove all
subscribers from these lists.
Warning: once you remove all addresses using "delete all addresses in this list", it cannot be
undone.
21
eMarketer by Webvisions Pte Ltd User Manual
Please direct user questions to [email protected] (+65 67739387)
2.7 Database Sync
Database Sync allows you to directly connect to an external database to automatically import
subscribers in to your eMarketer. It allows you to connect to external MySQL databases, MSSQL
databases, or PostgreSQL databases. It will connect to your external database, and using the criteria
and conditions you supply, it will find subscribers and import them into the eMarketer system, into
the subscriber list you choose.
Similar to the standard import feature, Database Sync will not import subscribers who have
unsubscribed or bounced in the past, and if it finds a pre-existing subscriber, that subscriber will be
updated or skipped, depending on your preferences.
It is important to note that Database Sync is essentially an import function -- it will never change any
data in your external database, it will only select subscribers from the external database and import
them into eMarketer.
You can follow the instructions below to create a Database Sync.
1. Create a New Database Sync
Go on Subscribers > Database Sync (on the right side of the panel under Advanced Options) and
click the button that says "Add Sync."
2. Database Info and Basic Configuration
You will see options to name your sync (this will be the name you use to reference this sync later on),
choose the type of database you are connecting to, and enter in your database connection details.
You will also be able to choose which list you want to import these subscribers into, and what the
subscribers' statuses should be. If you are importing the subscribers as Active, you will also see some
options pertaining to Autoresponders.
22
eMarketer by Webvisions Pte Ltd User Manual
Please direct user questions to [email protected] (+65 67739387)
3. Choose database table
The next step of the process will connect to your database, and then show you a list of all of the
tables in your database. Here you can choose the table which holds your subscriber details.
(NOTE: You will also notice that on the right, there is an option to add your own custom query. This
is an advanced option that you can use if you already have a specific subscriber "SELECT" query in
mind, which you want to use to select your subscriber information.)
23
eMarketer by Webvisions Pte Ltd User Manual
Please direct user questions to [email protected] (+65 67739387)
4. Select Fields to Sync
The next step will show you a list of all of the fields/columns from the table you selected in your
external database. These fields are shown on the left. On the right, you will see a drop-down menu
next to each field. Using this drop-down menu, choose what each field from your external databases
represents in your eMarketer. For example, if you have a field in your external database called
"email," which holds your subscribers' email addresses, make sure that that field is matched up to
the "Email Address" option. If you have other data fields in your external database that you would
like to import as well, such as First Name or Last Name, you can do so on this step as well. Any
custom fields you have created in the Email Marketing software can be populated during Database
Sync.
Please note that the only field that is required by default when syncing data using Database Sync is
the "Email Address" field. If you have created other custom fields and marked them as "Required,"
those fields will be required during Imports and Syncs as well.
Also, please note that you cannot match up more than one field in your external database to the
same field in the eMarketer.
5. Rules and Configuration
The last step allows you to create "rules" for your Database Sync. Rules are an advanced, optional
feature. You can use rules to add specific logic conditions to the sync. (If you are familiar with writing
database queries, the rules are what will be added as the "WHERE" part in the SELECT query. If you
have already used your own custom query previously, then you will not need to add rules here.)
For example, if you only want to import subscribers from your external database where the 'id'
column is greater than 1, or where 'username' is not left blank, etc, you would use the rules feature
to accomplish this. You can add multiple rules to the same sync as well. In the image example below,
a rule has been added saying "where username does not equal 'test'" which basically means that the
24
eMarketer by Webvisions Pte Ltd User Manual
Please direct user questions to [email protected] (+65 67739387)
sync will import all subscribers except ones where the username column in the external database
equals the word "test."
Again, sync rules are optional. Most users will not need to use this feature, and if no rules are added,
then all of the subscribers in the database table will be selected for the sync.
The last step of the sync process also allows you to choose specific importing options on the bottom
of the page. These configuration options are exactly the same as what you would see on the Import
Subscribers page, except for the "Delete all items that are not affected by the sync each time the
sync runs" option. If this option is enabled, all subscribers who are present in your list, but not
present in the external database, will be deleted from the eMarketer software (Again, nothing will
ever be changed or deleted from your external database.)
6. Save, Test, or Run the Sync
You're done configuring your Database Sync. Now you can click "Add" to save the sync (choose this
option if you plan on running it again or running it later), or "Test" if you'd like to see how many
subscribers will be synced or test the features before beginning, or simply click "Run" if you're ready
to start the sync right away.
If you click "Add" to save the sync, you can return to the main Database Sync page at any time to
edit, delete, or run the sync directly.
When running the sync, a pop-up module will appear that will show you the database query that is
being executed, along with a progress bar to monitor the progress of the sync.
When the sync is complete, you can click a link saying "View Report" to see a basic report of the sync.
It will show you the number of subscribers selected for the sync, how many were successfully synced,
and how many failed. If any subscribers failed to be imported, you will see a reason explaining why.
25
eMarketer by Webvisions Pte Ltd User Manual
Please direct user questions to [email protected] (+65 67739387)
This image shows a completed sync:
This image shows a sync report, in which two of the subscribers were not imported due to the
'email' field being left blank:
26
eMarketer by Webvisions Pte Ltd User Manual
Please direct user questions to [email protected] (+65 67739387)
3. Campaigns Menu
3.1 Create New Campaign
Once you have lists with subscribers, you are ready to send campaigns! Click on the “Campaigns” tab
along the top, and then “Create a new Campaign”:
You have the option to choose from a number of different campaign types:
•
•
•
•
•
One-Time Mailing - This is a great campaign type to start with. This can be used when you
want to send a mailing once and do not require any special timing or recurring features.
Recurring Mailing - Choose this campaign type if you want to create a campaign that will
keep sending at a specific interval of days.
AutoResponder - An autoresponder is an email that will send out after a specific period of
time (after a subscribe subscribes) This allows you to setup an email to be sent instantly
upon subscription, 24 hours later, 3 weeks after that, etc..
Split Testing - This type of campaign allows you to test a number of messages (by sending
to a certain percent of your list) and then the software will determine the best message
(based on read & link click through rates) and send that winning message to the
remainder of the list.
Subscriber Date Based Emails - Allow you to send emails for birthdays, anniversary's or
any date specific event you want to send out to your clients. Any subscriber fields that
you use must have a default value that corresponds to one of the following date formats:
27
eMarketer by Webvisions Pte Ltd User Manual
Please direct user questions to [email protected] (+65 67739387)
For simple, one-time campaigns, choose “One-Time Campaign,” and provide an internal name (this
name only appears internally – you’ll have the option to provide an email subject later).
Next, choose the list that you’d like to send the campaign to:
The next step lets you create your email message. Choose from a blank email (start from scratch), or
a stock template. All of your templates will appear here (if you create new ones later on):
28
eMarketer by Webvisions Pte Ltd User Manual
Please direct user questions to [email protected] (+65 67739387)
Once you choose a template (or blank email), you will be able to edit the message contents, as well
as Subject, From, and additional email headers:
When you are ready to save your email message, hit “Next” or “Save” along the bottom.
After hitting “Next,” you will be on the page that show options to include or do not include
unsubscription message.
29
eMarketer by Webvisions Pte Ltd User Manual
Please direct user questions to [email protected] (+65 67739387)
Warning: Kindly note that all outgoing mails need to include an unsubscription link.
Click “Next” and you will be on a page for you to select if you would like send out campaign
immediately or set a data & time for the campaign to be sent out.
Click “Next” and you will be on a page that provides the summary of the campaign. Click “Send Now”
to initiate the campaign sending process.
30
eMarketer by Webvisions Pte Ltd User Manual
Please direct user questions to [email protected] (+65 67739387)
3.2 View Campaign
You can go to Campaigns > View Campaigns (on the right side of the panel) to view all the existing
campaigns you have created.
You can view the campaigns by list filters, campaign types or status. Once the campaigns are listed,
you can choose to resend the specific campaign, view reports of the specific campaign or even
delete the specific campaign.
31
eMarketer by Webvisions Pte Ltd User Manual
Please direct user questions to [email protected] (+65 67739387)
3.3 Email Messages
To manage all the save e-mail messages or create new e-mail message, you can go to Campaigns >
Email messages (on the right side of the panel).
You can edit or delete the saved e-mail message by clicking on “edit” or “delete” for the specific
message.
You can also click on “Add” button to add a new e-mail message for future use.
3.4 Email Templates
Email templates are great for organizing newsletter designs, keeping a consistent look across
campaigns, or getting a custom-designed email prepared really quick.
When you go to Campaigns > Email Templates (on the right side of the panel), you will see a list of
templates which have been added by default. You can edit / export these templates if necessary, or
you can also import any new templates into eMarketer as well.
32
eMarketer by Webvisions Pte Ltd User Manual
Please direct user questions to [email protected] (+65 67739387)
If you decide to design your own HTML template using a different HTML editing program, or you
may already have an HTML email template that a web designer has created for you. You can easily
use your own, pre-existing HTML templates within the eMarketer. To do this, first create a new
template by clicking “Campaigns,” then clicking “Email Templates” on the right. Once you are on the
Templates page, click “Add.”
The next step will allow you to type in a name for the template, and choose which lists you would
like the template to be available for. It will also allow you to choose the format (HTML or Text) and
start composing your message.
The Template Name field can be anything you want, so you should type in the name that the
template should be called. This is the name you will see when you are choosing which template you
would like to use when composing a message, or any time you are referencing the template later on.
Since you are adding an HTML template, be sure that the “format” option is always set to “HTML.”
Beneath these options, you will see a large text box, where you can begin composing your template.
You will notice that there are two tabs at the top of the text box, one saying “Visual Editor,” and the
other saying “Code Editor.” Click the tab that says “Code Editor.”
This is the area in which you can enter in your own pre-existing HTML code. Be sure to first remove
any “default” HTML code that is already present in the Code Editor view, and completely replace it
with your own pre-existing HTML code.
After you copy and paste in your HTML code, you can easily click the Visual Editor tab again to see a
visual representation of the template, and you will also be able to make quick changes to the
template easily, using the WYSIWYG (“what you see is what you get”) options that are included with
the Visual Editor.
33
eMarketer by Webvisions Pte Ltd User Manual
Please direct user questions to [email protected] (+65 67739387)
* * * NOTE: When editing a template using the Visual Editor, some colors, font sizes, or other styles
may not appear correctly. This is because the Visual Editor has its own CSS style sheet that it employs
during the editing process, which may override some of the styles in your own HTML code. However,
these changes are temporary, and only appear during the editing process. Previewing the message
using the “Inbox Preview” option, or sending a test message to yourself will show you how the
message will actually appear when it is sent.
Once you have named the template, chosen the list options (if applicable), and pasted in your HTML
code and made any necessary modifications, you can click the button that says “Add” on the bottom
of the page to save the template. You can easily make changes later on by returning to the main
Templates page, and clicking the link that says “Edit” next to your template.
3.4 Message Variables
Message variables allow you to set variables that can be inserted into your email messages. When
these messages are sent the variables would be replaced with whatever content was specified for
that variable.
To add a variable go to the Campaigns > Message Variables page.
Here are some examples of what you could use message variables for:
•
A product name - Instead of typing "Widget ABC 123.483.2" every single time you want to insert the
product name you could setup a message variable so that you could simply type %widgeta%
•
A block of text or html - Do you use similar blocks of text or html in multiple messages? Rather than
duplicating the content you can setup a message variable that would insert the entire block of content
at the time of sending.
4. Reports Menu
4.1 Campaigns Report
You can view report for the campaigns sent previously from “Reports” > Campaign Reports (on the
right side of the panel). A list of campaigns will be displayed and you can filter these campaigns by
List / Campaigns / Status.
Click on “View Reports” for the campaign you want to view for the reports.
34
eMarketer by Webvisions Pte Ltd User Manual
Please direct user questions to [email protected] (+65 67739387)
4.2 List Reports
If you would like to have reports for the lists, you can go to “Campaigns” > “List Reports”.
From the reports, you can get information like total number of confirmed subscribers, unconfirmed
subscribers, Unsubscribed, Bounces, emails sent, average sent per day of individual list.
4.3 User Reports
If you would like have report for the user account, you can go to “Reports” > “User Reports”.
From the user reports, you can get information like total campaigns sent, total emails sent, average
sent per day by the user account.
35
eMarketer by Webvisions Pte Ltd User Manual
Please direct user questions to [email protected] (+65 67739387)
4.4 Trend Reporting
4.4.1 Read Trends
With our opens by time/day trend report you can see what time of the day receives the most
opens. You can look across all your lists, for a specific list, or a specific campaign.
You can also see what day of the week achieves the highest opens. By using this data you can find
out the optimal day of the week and time of the day to send future campaigns.
4.4.2 Email Client Trends
eMarketer automatically tracks the email clients your subscribers are using. You will be able to view
the top email clients for a list and/or a specific campaign.
To view email client trends, go to “Reports” > “Email client Trends” (on the right side of the panel).
36
eMarketer by Webvisions Pte Ltd User Manual
Please direct user questions to [email protected] (+65 67739387)
37
eMarketer by Webvisions Pte Ltd User Manual
Please direct user questions to [email protected] (+65 67739387)