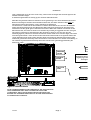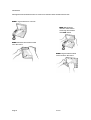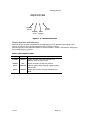
1
Thrane & Thrane A/S TT-3060A Capsat Mobile Telephone Users Manual Document number: TT 98-107770 Revision: B Date: January 6, 1998 Author: Per Sindholt Signature: Date: Approved: Signature: Copyright Thrane & Thrane A/S ALL RIGHTS RESERVED . TT-3060A Capsat Mobile Telephone Users Manual . " TELEFAX Warranty Registration Congratulations with your new satellite telephone. In order to registrate in our warranty database please send this form to Thrane & Thrane, Fax: +45 39 55 88 88. As an additional benefit we will keep you updated on enhancements and other news from Thrane & Thrane. Name: _________________________________________________________ Company:______________________________________________________ Company Fax Number___________________________________________ Company Address ______________________________________________ Company Telephone Number ____________________________________ POSITION (please tick off) General Management Line Management Project Manager Site Manager Engineer, journalist, or photographer Others: BUSINESS Estimated number of Capsat-M users Governmental Aid & Rescue Telecom Manufacturing Transport Media Security Mining & Drilling Construction Tourism Finance Trade Agriculture 1 1-4 5 - 10 11 - 20 20 - 100 > 100 Other: . Thrane & Thrane A/S TT-3060A Capsat Mobile Telephone Users Manual Copyright Thrane & Thrane A/S ALL RIGHTS RESERVED Information in this document is subject to change without notice and does not represent a commitment on the part of Thrane & Thrane A/S. © 1996 Thrane & Thrane A/S. All rights reserved. Printed in Denmark. Document Number TT-98-107770A Release Date: 15Oct99 SAFETY SUMMARY The following general safety precautions must be observed during all phases of operation, service and repair of this equipment. Failure to comply with these precautions or with specific warnings elsewhere in this manual violates safety standards of design, manufacture and intended use of the equipment Thrane & Thrane A/S assumes no liability for the customers failure to comply with these requirements. MICROWAVE RADIATION HAZARDS During transmission this telephone radiates Microwave Power from the front side of the antenna unit (the side pointed towards the satellite). This radiation may be hazardous if exposed directly to human close to the antenna. During transmission, make sure that nobody gets closer than the recommended minimum safety distance. GROUND THE EQUIPMENT If the equipment is equipped with a three-terminal AC power connector, please observe the following: The power cable must either be plugged into an approved three contact electrical outlet, or used with a three-contact to two-contact adapter with the grounding wire firmly connected to an electrical ground (safety ground) at the power outlet. KEEP AWAY FROM LIVE CIRCUITS Operating personnel must not remove equipment covers. Component replacement and internal adjustment must be made by qualified maintenance personnel. Do not replace components with the power cable or battery connected. Under certain conditions, dangerous voltages may exist even with the power cable removed. To avoid injuries, always disconnect power and discharge circuits before touching them. DO NOT SERVICE OR ADJUST ALONE Do not attempt internal service or adjustments unless another person, capable of rendering first aid resuscitation, is present. RECHARGEABLE BATTERY The product that you have purchased contains a rechargeable battery. The battery is recyclable. At the end of it's useful life, under various state and local laws it may be illegal to dispose a Ni-Cd battery into municipal waste stream. Check with your local solid waste officials for details in your area for recycling option or proper disposal. Do not try to disassemble the battery. Ni-Cd Introduction TABLE OF CONTENTS 1 Introduction ........................................................................................ Error! Bookmark not defined. Satellite Telephone Communication............................................. Error! Bookmark not defined. 2 Installation........................................................................................... 5 System Components ..................................................................... 5 Precautions ................................................................................... 5 Battery Pack .................................................................................. 6 Antenna......................................................................................... 6 Antenna Pointing........................................................................... 9 Terminal Operations..................................................................... 9 3 Getting Started.................................................................................... 12 Handset......................................................................................... 12 Display Symbols and Indicators ................................................ 13 Keypad Functions ...................................................................... 15 Locate Ocean Region.................................................................... 16 SIM Card insertion........................................................................ 16 Power ON...................................................................................... 16 Terminal Set-up ............................................................................ 17 4 Call Types ........................................................................................... 20 Numbers ....................................................................................... 20 Number Formats ........................................................................ 20 Examples Of Telephone Dial Formats ....................................... 21 Voice Calls.................................................................................... 24 Receiving Handset Calls ............................................................ 24 Receiving Auxiliary Phone Calls................................................ 25 Making Handset Calls................................................................ 26 Making Auxiliary Telephone Calls ............................................ 28 Key Entries After Connection .................................................... 30 Microphone ............................................................................... 30 Call Transfer .............................................................................. 30 Fax Calls ....................................................................................... 30 15Oct99 Page i Introduction Receiving Fax Calls.................................................................... 31 Making Fax Calls........................................................................ 31 Making Fax Calls From The Handset ......................................... 32 Data Calls ...................................................................................... 33 Receiving Data Calls .................................................................. 33 Making Data Calls ...................................................................... 34 Making Data Calls From The Handset........................................ 36 Data Modes ................................................................................ 36 AT Command Set ....................................................................... 37 5 Menu System ....................................................................................... 39 Help Desk...................................................................................... 39 Phone Book ................................................................................... 39 Accessing The Phone Book ........................................................ 40 The Phone Book Display ............................................................ 40 Direct Short Code Selection....................................................... 41 Add Entry................................................................................... 41 Edit Entry ................................................................................... 42 Delete Entry ............................................................................... 42 Print Phone Book........................................................................ 43 Prepaid.......................................................................................... 43 Area............................................................................................... 43 Default LES .................................................................................... 43 Mailbox ......................................................................................... 44 Call log.......................................................................................... 44 Calls Total ..................................................................................... 45 PIN Codes ..................................................................................... 46 PIN1 setting ................................................................................ 48 PIN1............................................................................................ 48 PIN2............................................................................................ 48 CONFIG PIN ............................................................................... 48 SIM Lock PIN .............................................................................. 48 Config ........................................................................................... 48 Aux/ Fax Configuration.............................................................. 48 Voice carrier.............................................................................. 48 Page ii 15Oct99 Introduction Sleep Mode (not Capsat® Maritime Telephone) ....................... 48 Data Setup.................................................................................. 48 Contrast ..................................................................................... 49 Ring Setup.................................................................................. 49 Key Beep.................................................................................... 49 Antenna Beep............................................................................. 49 Set Time ..................................................................................... 49 Ocean Registration .................................................................... 50 LES ............................................................................................. 50 Route IDs.................................................................................... 52 Allowed Dial .............................................................................. 53 PhBook Dial................................................................................ 53 Auto Prefix ................................................................................. 54 Bar Service................................................................................. 54 Help Desk .................................................................................. 54 SIM Lock .................................................................................... 54 Prepaid ...................................................................................... 55 STU............................................................................................. 55 Log to Prn................................................................................... 55 Noise Immun .............................................................................. 55 Antenna...................................................................................... 56 Accessories................................................................................ 56 Status............................................................................................. 57 C/No .......................................................................................... 58 Battery........................................................................................ 58 Transceiver................................................................................ 58 SIM Card .................................................................................... 58 RF Block ..................................................................................... 58 Bulletin ....................................................................................... 59 Antenna...................................................................................... 59 Print ........................................................................................... 61 Alarm Log ..................................................................................... 62 Delete Alarms ............................................................................ 62 Print Alarm Log.......................................................................... 62 Spot Beam ..................................................................................... 63 15Oct99 Page iii Introduction Tel. Numbers................................................................................. 63 6 Technical Reference............................................................................ 65 Equipment List .............................................................................. 65 Technical Specifications................................................................ 66 Power Requirements..................................................................... 67 TT-3007A, Mini M – Patch Antenna ............................................... 67 Antenna Cables............................................................................. 68 Handset ......................................................................................... 70 Battery Pack Handling................................................................... 71 Charge Indicator........................................................................... 71 Fast Charge................................................................................ 71 Standard Charge........................................................................ 72 Interface ........................................................................................ 72 Solar Panel Interface / Light Weight Power Supply Connector, X1 .................................................................................................. 72 DC Input / Fast Charge Power Supply Connector, X2.................. 74 Antenna Cable plug, X3................................................................ 74 DTE Interface, X4 .......................................................................... 75 Phone/Fax Connectors, X5 ........................................................... 76 Handset Connector, X6 and X7..................................................... 77 TT-3007A Patch Antenna connector, X8........................................ 78 Appendix A - List of Abbreviations................................................ A-80 Appendix B - Antenna Azimuth & Elevation ......................................B-1 Appendix C - List of Land Earth Stations.......................................... C-1 Appendix D - 2-Digit Service Codes................................................ D-1 Appendix E - Tone Signals ................................................................E-1 Appendix F - List of Cause Codes.....................................................F-1 Appendix G - List of System Errors.................................................. G-1 Appendix H - Trouble Shooting ....................................................... H-1 Appendix I - Extended Error Codes ..................................................I-1 Appendix J - Search Algorithms.........................................................J-1 Appendix K - AT Command Set ........................................................K-1 Appendix L Spot Beam Coverage ................................................... L-19 Page iv 15Oct99 Introduction C:\Manual\TT-3060A\ch1-intr.doc C:\Manual\TT-3060A\ch2-3060.doc C:\Manual\TT-3060A\ch3-gett.doc C:\Manual\TT-3060A\ch4-call.doc C:\Manual\TT-3060A\ch5-menu.doc \\NTMAIN\PROJECT\3060\adm\DOC\MANUAL\Tt-3060\980106\ch6tech.doc 15Oct99 Page v Introduction C:\Manual\TT-3060A\appendix.doc Page 2 15Oct99 Introduction 1 I NTRODUCTION This manual describes the Capsat® Telephone. The Capsat® Telephone is a mobile Inmarsat-phone mini-M terminal which provides access to international telephone, facsimile and data networks. S ATELLITE T ELEPHONE C OMMUNICATION Operating the Capsat® Telephone is much the same as making direct international telephone calls from an ordinary telephone. The difference is that the Capsat® Telephone communicates directly with a satellite and therefore does not rely on a local telephone operator to route the call to the desired destination. Instead, the calls to/from the satellite are routed by designated Land Earth Stations (LESs) which also communicates with the same satellite as the telephone terminal. The necessary requirements to operate a satellite telephone is that a) the terminal is registered by a service provider (i.e. payment arrangements). b) the location where the telephone is located is covered by a satellite, and c) there is a free line of sight from the antenna of the terminals to the satellite. The satellite system used by the Capsat® Telephone is operated by the international organisation, Inmarsat. The system consists of four satellites which combined guarantee world-wide coverage (see appendix B for coverage maps). When working with the Inmarsat-phone mini-M system, the following abbreviations are often used: MES Mobile Earth Station. This is the name that Inmarsat uses for terminals. E.g. the Capsat® Telephone is a MES. Mobile refers to the fact that the terminals are relocatable. Earth Station is a satellite communication term. LES Land Earth Station. The LES is located at the "other" end of the MES's satellite link. The LES connects to the local telephone networks and manages calls to and from the MES. NCS Network Co-ordination Station. The NCS is responsible for assigning communication channels to the MESs. In case of NCS failure the MESs will switch to "Stand-Alone" mode. In Stand-Alone mode designated LESs in each ocean region will act as NCS. 15Oct99 Page 3 Introduction Page 4 15Oct99 Installation 2 I NSTALLATION Please read trough Technical Reference section before installing the equipment. S YSTEM C OMPONENTS Operator Handset Electronics Unit Light Weight Power Supply NiCd Battery Pack Compass Antenna Cable 0.15 m SMB Patch Antenna Antenna Cable 5.0 m SMB Figure 2 - 1 : TT-3060A Capsat Mobile Telephone P RECAUTIONS The antenna unit radiates RF signals during a telephone call with the strongest radiated signal on the focal line of the antenna and drops off fairly quickly. Therefore allow a safety passage distance of 1 meter around the antenna. Below is shown a safety guidance labels which must be observed carefully. Warning ! The TT-3007A Antenna radiates microwave signals. Keep 1 meter of safety distance from the antenna 15Oct99 Page 5 Installation B ATTERY P ACK Proper handling of the Battery Pack is important to obtain maximum talk and listen time. It is also a requirement for the warranty to cover the Battery Pack. To ensure proper handling follow the steps below: I. Discharge the battery completely on regular basis, e.g. after 5 - 10 partial discharges. This will prevent the so called "memory effect" in the battery cells which reduces their capacity. II. Avoid exposing the Battery Pack to direct sunlight, as high temperatures will reduce battery lifetime. III. In cold environment (0° Celsius and below) preheat the Battery Pack if possible to e.g. body temperature before making calls. A cold battery has less useful capacity than a warm battery (hence longer talk time are obtained by preheating the battery). IV. Disconnect the small AC adapter when the Battery Pack is completely recharged. Continuos over-charging of the Battery Pack causes its temperature to rise. This will on the long term damage the Battery Pack. The procedure to discharge the Battery Pack is : a) Disable the Telephone's sleep mode (see chapter 5). b) Disconnect the Power Supply. c) Leave the telephone on until the green POWER LED turns off. When completely discharged then reconnect the Power Supply, recharge the Battery Pack completely and re-enable the sleep mode. If the Battery Pack continues to discharge rapidly, it may help to repeat the discharge/recharge cycle an additional 2-5 times. Refer to the Technical Reference in chapter 6 for more information on battery handling and alternative power supplies. The battery indicator in the handset display shows an estimate of the remaining battery capacity. The remaining capacity is estimated by monitoring battery over a period of time. In sleep mode the battery is not monitored, therefore the capacity estimate immediately after a sleep mode deactivation is incorrect. The estimate will approach the correct value in approximately one minute. A NTENNA The TT-3060A's antenna (TT-3007A) resides naturally on top of the Electronics Unit. It is kept in place by two vertical guide pins located on the rear top of the electronics unit and is connected with a short (0.15 m) antenna cable to the Electronics Unit. The antenna can be used directly on the Electronics Unit by rotating the entire unit until its rear end points toward the satellite (the azimuth angle) and then by opening the antenna Page 6 15Oct99 Installation (like a lid hinged on to the rear of the unit), until it forms an angle with vertical equal to the satellite elevation angle. A detailed explanation for setting up the antenna will follow later. With the long antenna cable the antenna can be placed up to 5 m from the Electronics Unit. Before removing the antenna from the Electronics Unit, the short antenna cable must be disconnected from the antenna. It may otherwise be damaged. On the bottom / back side of the antenna is a frame which serves as a foot for the antenna when placed separately from the Electronics Unit. The frame is hinged to the same tube which fits over the guide pins in the Electronics Unit. When the antenna is mounted on the Electronics Unit, the frame is fixed to the antenna by a small pin opposite the tube. To open the frame it must first be released from the antenna by lifting it over the pin (see the following figures). Before the antenna and frame can be tilted to the correct angle, the frame must be opened until a 'click' is heard. How much the frame needs to be opened before the 'click' depends on the angle of the antenna when removed from the Electronics Unit: If the antenna is positioned vertically when removed the 'click' should occur almost immediately, if the antenna is positioned horizontally the frame needs to be opened approximately 90° before the 'click'. ANTE LOCK ANTENNA FRAME ANTENNA STAND FRICTION TUBE To release the ante stand from the frame slightly up in the sta and open. ANTENNA JA GUIDE PINS Figure 2 - 2 Antenna Frame NOTE: WHEN RETURNING THE ANTENNA TO THE ELECTRONICS UNIT, MAKE SURE THAT TUBE COVERS THE GUIDE PINS COMPLETELY AND IS FLUSH WITH THE ELECTRONICS UNIT BEFORE ANY ATTEMPTS ARE MADE TO ROTATE THE ANTENNA TO HORIZONTAL POSITION. 15Oct99 Page 7 Installation The figures below illustrates how to remove the antenna from the Electronics Unit. STEP 1 Open antenna to vertical. STEP 2 Disconnect antenna cable before removing the antenna with both hands. STEP 3 Release the antenna stand from the frame. STEP 4 Open antenna stand until it locks to the frame. Page 8 15Oct99 Installation A NTENNA P OINTING Once the satellite has been located, the antenna should be directed towards the satellite. Follow the directions below: • Use the enclosed 5m antenna cable TT 37-104481 if you want to place the antenna separate from the Electronics Unit. • Find the selected Area on the antenna maps and read the approximate azimuth (0-360 degrees) to the satellite from your present geographical position. • Turn the dial on the compass for the correct azimuth angle e.g. 40 degrees points to the arrow marked 'Read bearing here'. • Turn the compass without changing the dial until the red needle (North) coincides with the big arrow inside the compass dial (Figure 2 -1). Figure 2 - 1 Compass • • • • The arrow marked 'Read bearing here' on the compass is now pointing towards the satellite in horizontal direction. Adjust the antenna into this direction. NOTE: AVOID USING THE COMPASS IN THE VICINITY OF MAGNETIC MATERIAL (E.G. IRON, FERRO-CONCRETE ETC.) IT CAN OFFSET THE BEARING SIGNIFICANTLY ! The antenna must be pointed at the satellite with a free line-of-sight. line-of-sight Now read the approximate elevation (0-90 degrees) to the satellite from your present geographical position using the antenna maps. The antenna can be tilted into any vertical angle. There are no readings on the antenna for the elevation angle. When setting the elevation angle start with the antenna in vertical position and then tilt it the number of degrees equal to the elevation angle. (Hint: The compass can aid finding the correct antenna angle a) set the dial to the elevation angle b) position the compass vertical with the "READ BEARING" arrow pointing up c) look at the parallel lines within the dial, they have the correct angle.) T ERMINAL O PERATIONS The TT-3060A Capsat Mobile Telephone has three modes of operations relating to its power consumption. In the POWER OFF mode the terminal is turned off and no power is used. In this mode the terminal will not detect any calls or messages sent to it. 15Oct99 Page 9 Installation In the POWER ON mode the terminal is capable of making outgoing calls and receiving incoming calls. The power consumption is moderate to high depending on the state of the terminal. Data and FAX calls consume more power than voice calls. If no FAX or auxiliary telephone are connected to the mini-M phone, the power consumption can be reduced further by disabling the AUX/FAX interface completely1 When the terminal is left unused for 60 seconds it will automatically go into SLEEP-mode, unless the feature is disabled1. SLEEP mode - In this mode the terminal will power up in short intervals to check for incoming calls. The green POWER LED lights up in short bursts. The transition to SLEEP-mode is made from POWER ON either when commanded by the user with the LOCK command (GK), or when the handset has been idle for 60 seconds duration. The terminal returns to POWER ON mode if a) an incoming call is detected, or b) a key is pressed on the keypad. In this mode outgoing calls cannot be initiated from the AUX PHONE /FAX interface. The terminal must first be brought into POWER ON by activating the handset. 1 See the description of the configuration option in chapter 5. Page 10 15Oct99 Getting Started 15Oct99 Page 11 Getting Started 3 G ETTING S TARTED This section describes how to set up the Capsat® Telephone to make and receive telephone calls for the first time. All operation of the telephone is performed at the handset which briefly will be introduced below. H ANDSET The handset is equipped for full operation and access of the Capsat® Telephone terminal. It contains indicators, LCD display and keypad together with microphone, ear-piece and adjustable volume. The handset is illustrated below. DISPLAY SYMBOLS Y Z \qqqq rqqqq V O L U M E ] ^ _ ` a b [ More entries above More entries below Signal strength Battery capacity (Only portable) 2nd-button pressed Security enabled Alpha mode on Toggle field Speaker on Hook off New message Figure 3 - 1 : Handset Display Symbols Page 12 15Oct99 Getting Started INDICATORS POWER SYNC (green) (green) ALARM RING (red) (yellow ) Figure 3 - 2 : Handset Indicators Display Symbols and Indicators The state of the terminal is signalled in the LCD display on the handset. The display has 2 lines of 12 characters for textual messages and 11 special symbols. The description for the individual LED's are found in Table 1. Table 2 contains the description for the LCD display symbols. Table 1 User Indicator LEDs NAME COLOUR POWER GREEN ALARM RED RING YELLOW SYNC GREEN 15Oct99 DESCRIPTION Lights steadily when the terminal is on. Flashes when in sleep-mode. Lights red when an alarm is present Flashes yellow when ringing. Lights steadily during call. Lights green when in synchronisation with NCS. Page 13 Getting Started Table 2 User Display Symbols SYMBOL Y Z \qqqqq NAME More Entries Above More Entries Below Signal Strength rqqqq Battery Capacity ] 2nd-Button Pressed ^ Security Enabled Alpha Mode On _ ` a b [ Page 14 Toggle Field Speaker On Hook Off New Messages DESCRIPTION Indicates that additional entries are available above and can be accessed by pressing the B key. Indicates that additional entries are available below and can be accessed by pressing the E key. Indicates the strength of the received signal. When tuned to a satellite this indicator is updated approximately once each second. When searching for a satellite to tune to it may take up to 11 seconds before it is updated. Only Capsat® Mobile Telephones. Shows the current capacity of the battery. For a fully charged battery all four bars should be lit. Indicates that the G button was pressed and the 2nd function of the next key pressed will be interpreted. E.g. when ] is lit and the O key is pressed then the Mute function is executed. When lit, the terminal can only be accessed by entering a valid PIN code. Indicates that the keypad is in alpha mode and expects alphanumeric words to be entered. Used to indicate that the current input field is changed by pressing the B or E keys. The speaker in the Electronic Unit is on. The handset is off the hook. A recorded message for the terminal/SIM is waiting at a LES to be heard. 15Oct99 Getting Started Keypad Functions The keys on the keypad have multiple functions. Which of the functions of the key that are activated when pressed depends on the mode of the keypad. The current mode of the keypad is signalled by the ] and _indicators in the display (see Table 3). Table 3 Keypad Mode INDICATOR MODE (none) NORMAL _ ALPHA ] 2ND ]+_ 2ND In Table 4 all keypad functions are listed. In ALPHA MODE the different symbols for the numeric keys (J-R) are selected by pressing the same key repeatedly until the desired symbol is displayed. The cursor will automatically advance to the next position 2 seconds after the key is pressed. If an error is detected in the entered string of symbols the clear key, D, must be pressed until the symbol can be re-entered. Table 4 Keypad Functions KEY H A C D B F G E I J K L M N O P Q R S T U 1 NORMAL MODE Power on/off. Must be held for 3 seconds to switch off. Exit Menu / Cancel selection Accept selection Delete / Back space Move one selection up Enable Alpha Mode Enable 2nd Mode Move one selection down Toggle Hook 1 2 3 4 5 6 7 8 9 * 0 # ALPHA MODE 2ND MODE Delete / Back space Insert entry Edit entry Delete entry Disable 2nd Mode Print Topic1 Disable Alpha Mode Enable 2nd Mode -?!,.:"'$()+ / 1 ABC2 DE F3 GHI4 JKL5 MNO6 PQRS7 TUV8 WXYZ9 Activate Main Menu Lock / Sleep mode Area Selection Fax Call R (re-route call) Mute Data Call Toggle SPEAKER Toggle antenna beep (Force cursor move) <space> Help Desk The topic printed is determined by current menu 15Oct99 Page 15 Getting Started L OCATE O CEAN R EGION The Inmarsat mini-M system is based on four satellites to provide global coverage. Each satellite has a coverage area which is defined as the area on the surface of the earth where it can "see" the Inmarsat-phone mini-M terminals in a free line of sight. The coverage maps for the satellites are placed in appendix L, and the antenna maps for azimuth & elevation are placed in appendix B of this manual. The maps show the individual coverage areas, corresponding to the four satellites for the following areas / ocean regions: • • • • Atlantic Ocean Region West (AORW) Atlantic Ocean Region East (AORE) Pacific Ocean Region (POR) Indian Ocean Region (IOR) SIM C ARD INSERTION The Capsat® Telephone may require a INMARSAT SIM Card inserted before it will be operational. The SIM Card contains ID's and additional information (phone books). The SIM Card can be inserted or removed at any time without damaging the transceiver by removing the SIM Card cover located at the side of the telephone, however as the operation changes the identity of the Capsat® Telephone, calls in progress will be terminated and the transceiver will be initialised. When inserted the following data will be retrieved from and stored on the SIM card : phone book, call log, tel. numbers, LES lists, PIN1 and PIN2. The SIM Card is inserted with the golden contact area pointing down and heading towards the Electronic Units SIM Card Slot, refer to Figure 3 -3. SIM CARD Capsat® Telephone without the protective cover Insert the SIM Card with the Gold contact area pointing downwards and into the SIM Card slot Figure 3 - 3 : SIM Card insertion P OWER ON Once the equipment is installed then power up the terminal by pressing the H key on the handset. The normal sequence for the handset on power-up is: • The whole LCD display is filled with solid blocks, all indicators and symbols in LCD display are turned On for about 2 seconds. • Writes 'Initialising' for some seconds. • Writes 'PIN code'. This step is omitted if PIN 1 is disabled. Enter your PIN code. Only Capsat® Mobile Telephones (see appendix J for further information). Page 16 15Oct99 Getting Started • • • Writes 'Search for satellite'. Move the antenna/Capsat® Telephone until the handset writes '<Area> Accept ?', where <Area> is the name of the Area/Ocean Region wanted. Press C to accept the found and wanted Area/Ocean Region. Only Capsat® Disc and Maritime Telephones (see appendix J for further information). • The Capsat® Telephone will find the satellite automatically. While searching the handset writes messages as 'Full skyscan started', 'Initial skyscan started', 'Re. skyscan started' and 'Step track. started'. Please see appendix J for further information. • Writes one of the following texts. 1) If no Bulletin Board has been received the handset will display the currently selected Area/Ocean region and the text 'Wait for NCS' as an indication that the Capsat® Telephone is still waiting for the Bulletin Board to arrive. IOR: Wait for NCS (note: If no bulletin board arrive after a while, proceed with the "Terminal Set-Up" section below and try another Area/Ocean Region) 2) If the Bulletin board has been received the handset will display the currently selected Area/Ocean Region and the name/LES Access Code of the default selected LES. IOR:PTT TELE _ The Bulletin Board contains information needed for operation in the Inmarsat-phone miniM network system. Without the Bulletin Board no operations like telephone calls etc. can be done. The Capsat® Telephone will automatically update the display from 1) to 2) when the Bulletin Board is received. If the antenna has been connected after power-up or if it is not connected at all you will get an alarm message. Check that the antenna is connected correctly. The alarm message can be removed pressing the A-key. The Capsat® Telephone is now in Idle Mode. Mode NOTE (Only Capsat® Disc Telephones): The vehicle must NOT be turning during the first 5 seconds after switching on the system. This period is used to calibrate the initial gyro offset. The total change in vehicle direction during this period should be less than 5 degrees. T ERMINAL S ET - UP Before the Capsat® Telephone can go into operation an Area/Ocean Region must be selected. • Select the Area that you want to operate in. The current selected Area is marked with an '*' in the Area list. 15Oct99 Page 17 Getting Started If you want to use the already selected Area press the A-key and return to Idle Mode without making any changes. Enter the Area list GL Choose an Area BE Accept selection C • • If the new Area is successfully selected the Capsat® Telephone will write an acknowledge message. Otherwise an error message will be displayed. The Capsat® Telephone will perform an initial sky-scan search and will obtain synchronisation with the Network Co-ordinating Station (NCS) within a short time. Wait for the green sync indicator on the handset. Furthermore the Bulletin Board is received. Wait until the handset display is updated as specified in the previous section. First time an Area is selected for operation a random LES is selected as default. When you are making e.g. an outgoing satellite call the default LES is used for that call unless another LES specifically has been chosen for the call. If you are using the selected Area for the first time select a default LES. The current default selected LES is marked with an '*' in the LES list. If you want to use the already selected LES press the A-key and return to Idle Mode without making any changes. Enter the Main Menu GJ Scroll and select Default LES Choose a LES Accept selection BE-C BE C If the new default LES is successfully selected the Capsat® Telephone will write an acknowledge message. Otherwise an error message will be displayed. The Capsat® Telephone is now ready for operation. Page 18 15Oct99 Getting Started 15Oct99 Page 19 Call Types 4 C ALL TYPES The Capsat® Telephone distinguishes between three types of telephone calls: • Voice Calls • Fax Calls • Data Calls Each of the three types of calls are routed to a separate connector on the terminal: Call Type Destination Voice HANDSET, or AUX/FAX connector FAX AUX/FAX connector Data DCE port If the PIN1 security key is enabled and the Capsat® Telephone is in sleep mode it is required to login on the terminal handset, prior to making calls from an auxiliary telephone, a fax machine or the data interface. However, it is always possible to receive calls. N UMBERS There are four types of numbers which can be dialled from the Capsat® Telephone: • Subscriber Numbers Ordinary telephone numbers of subscribers. • Short Codes Two digit codes which refer to entries in the telephone book. The short code numbers must always be preceded by S when entered. • Service Codes Also two digit codes (but not preceded by S) which refers to optional services provided by the Land Earth Stations. See Appendix D for a list. • Local Numbers With an auxiliary telephone connected to the AUX/FAX port it is possible to make local calls from the handset to the auxiliary telephone and vice versa. The local call codes are one digit numbers. Dialling numbers is simple once connected with a LES: From the handset just enter the telephone number and press either I, C or U to initiate the call. On the auxiliary telephone use the pound button U to initiate the call. NOTE: When dialling short codes pressing U once the telephone number will be displayed and a second press is required to initiate the call. Number Formats In the following the general dial formats for telephone numbers described. All mandatory fields are marked <field>. All optional fields are marked [field]. All the fields must be separated with S. Leading optional fields may be left out completely, but if other optional fields are left out you still have to enter an S to indicate an empty field. Page 20 15Oct99 Call Types The dial formats are shown for auxiliary telephone calls where the off-hook key I and C is unavailable. On the handset all trailing pound-buttons can be substituted by a single I or C press, i.e. the sequence UU can be substituted by I or C. The fields that make up the number are: • The Terrestrial Network ID (TNID) field holds a 3-digit value and specifies the telephone network to be used. • 0 Terrestrial Network unspecified (default value) • 1..255 Terrestrial Network ID 1..255 In most countries only one telephone network exists. • The LES field holds a 3-digit value and specifies the LES Access Code that shall be used for the actual telephone call. If no LES field is specified the default LES will be used. • The Type field holds a 1-digit value and specifies the type of call: • 0 for AUX Phone calls • 1 for AUX FAX calls The value of the type field will over • The Phone number field specifies the subscriber number to be called including call prefix for automatic calls (00) and country code (e.g. 45 for Denmark). It holds up to 22 digits. Subscriber Number Format: Handset: [Terr. Network IDl] [Lesl]<Phone number>n Aux.Phone: [Terr. Network IDl] [Lesl][Typel]<Phone number>n OR <Phone number>n Short Code Format : Handset: l[Terr. Network IDl] [Lesl]<Short code>n Aux.Phone: l[Terr. Network IDl] [Lesl][Typel]<Short code>n OR l<Short code>nn Service Code Format: <2 Digit Service Code>n Local Call Format: <1 Digit Local Code>n Examples Of Telephone Dial Formats Manual Telephone Calls Enter call prefix for automatic calls Enter country code Enter telephone number Start the call 15Oct99 TT MN LRNNQQTT U Page 21 Call Types A telephone number can be called entering the telephone number and accepted using the n-key. The telephone number may not exceed 22 digits including call prefix for automatic calls and country code. The default LES will be used for the call. Telephone Call On A Fax Interface Enter type as voice Enter separator Enter call prefix for automatic calls Enter country code Enter telephone number Start the call T S TT MN LRNNQQTT U If the 2-wire phone/fax port is used mainly as a fax interface it is normally set to fax in the configuration menu (Config, Aux/Fax conf., Fax). When dialling a number, the terminal will then assume that the call is a fax call. However, it is possible to overrule this setting from the 2-wire phone/fax and make a voice call by dialling: 0*<number>. The call must be accepted using the U-key. The telephone number may not exceed 22 digits including call prefix for automatic calls and country code. Telephone Call Of Last Number Dialled Enter short code for last number dialled Retrieve a list of the last telephone numbers dialled Select a number in the list To accept a number press Start the call T U BE C U The short code ‘0’ represents the last telephone number dialled. Pressing the U-key once will display a list of the last up to 20 numbers dialled. It is now possible to scroll through the list and select a number by pressing the C-key. You can accept it with a second press on the U-key or you may change the number. Local Call Enter local call code Start the call K U A local call is a call between the Capsat® Telephone and auxiliary phone. Calls can be initiated from both ends. Different from other types of calls it is not necessary to be in synchronisation with the NCS to make a local call. A local call will not be stored in the call log. Any key between J and R can be used as local call code.. Telephone Call Of 2-Digit Code Enter 2-digit code Start the call JJ U All 2-digit service codes are described in appendix D. A call to a 2-digit code service is normally made entering the 2-digit code and accept it using the U-key. However some 2-digit code services require an appended string with telephone number, credit card number etc. The 2-digit code represents special services such as operator assistance, commissioning etc. supported by the LESs. The services supported depends on the LES. Page 22 15Oct99 Call Types Telephone Call From Telephone Book Enter the Phonebook Choose a subscriber Select and display the subscriber telephone number Start the call E BE C U The telephone book can be entered using the B or E-key. Inside the telephone book a particular subscriber may be selected and displayed using the C-key. You may change the number or simply accept using the U-key. Telephone Call Using Short Code Enter short code prefix Enter short code Display the corresponding telephone number Start the call S JM U U Refer to section 'Phonebook' in chapter 5 for general information about short codes. The short code prefix in front of the short code must be entered. If not the call will be recognised as a 2-digit code call or a local call. The first press on the U-key will display the telephone number corresponding to the entered short code. The telephone number may be changed or accepted with a second press on the U-key. 15Oct99 Page 23 Call Types V OICE C ALLS Telephone calls can only be made or received if • Bulletin Board has been received from NCS e.g. the display shows 'IOR:PTT TELE'. • Capsat® Telephone is in synchronisation with NCS, i.e. the green sync indicator lights steadily Receiving Handset Calls In the following an incoming call to the handset is described. The handset will ring and the yellow RING indicator will flash. The call can be answered in two ways: 1. Press the I-key This will establish the connection and enable the microphone and ear-piece. If the handset is in the cradle the speaker in the terminal will also be enabled. The RING indicator lights steadily during the connection. 1. Lift handset out of the cradle This will establish the connection and enable the microphone and ear-piece. The RING indicator lights steadily during the connection. During the call you can use the volume control at the side of the handset to control the speech level. The GQ-key combination enables/disables the speaker in the terminal. The a-symbol shows whether the speaker is On/Off. To mute the microphone press GO. When muted the Off-hook indicator b will flash in the display. Calls are cleared in two ways. 1. Pressing the I-key. 2. Place the handset in the cradle when the speaker is Off ( i.e. the a indicator is off). If you place the handset in the cradle with the speaker On you will not clear the call. You will have to press the I key. If the call is cleared by the calling subscriber or cleared in an abnormal way you will hear a congestion tone in the ear-piece/speaker as an indication of a call clearing. If you do not press the I-key within 10 seconds the handset will go on-hook automatically. Refer to appendix E for more information about the tone signals. An error message will be displayed if the call is cleared in an abnormal way. Land mobile and maritime terminals have some additional capabilities which are described in the Accessories paragraph in Chapter 5. Page 24 15Oct99 Call Types Receiving Auxiliary Phone Calls In the following an incoming call to the auxiliary telephone connected to the AUX/FAX connector, x5, is described. NOTE: The text in brackets specify actions taken by the user. The messages in boxes specify the status of the auxiliary phone call displayed in the handset. These messages are only displayed if the handset is out of the menu system. Phone is ringing Phone ringing (Answer the call) Phone connected with subscriber Clear the call Phone-Phone connected (Place phone on-hook) If the call is cleared by the calling subscriber or cleared in an abnormal way you will hear a congestion tone as an indication of a call clearing. The phone must be placed on-hook before a new call can be established. Refer to appendix E for more information about the tone signals. An error message will be displayed if the call is cleared in an abnormal way. Note: Due to the power saving scheme, devices connected to the X5 Phone/Fax Connector cannot wake the Capsat® Telephone up from sleep mode. 15Oct99 Page 25 Call Types Making Handset Calls NOTE: The messages in boxes specify the status of the handset call displayed in the handset. These messages are only displayed if the handset is out of the menu system. Apart from local calls and 2-digit "short code" calls (see below), handset calls can be separated into two kinds of calls: 1. Calls To Ordinary Telephone Numbers 1. Calls To Other Inmarsat-Phone Mini-M Terminals Procedure To Call Ordinary Enter call prefix for automatic call Enter country code Enter telephone number Start the call Handset is calling Telephone Numbers TT MN LRNNQQTT U Handset calling Handset connected with LES Handset-LES connected Handset connected with subscriber Handset-Ph. connected Enable/Disable speaker Clear the call GQ I Call logged 0:02:24 Procedure To Call Other Inmarsat-Phone Mini-M Terminals TT Enter call prefix for automatic call QPT Enter country code Ppppppppp Enter IMN U Start the call Handset is calling Handset calling Handset connected with LES Handset-LES connected Handset connected with subscriber Handset-Ph. connected Enable/Disable speaker Clear the call GQ I Call logged 0:02:24 Page 26 15Oct99 Call Types The international codes (“country code”) to the Areas/Ocean Regions are listed in Table 5. Using the 870 country code (Single Network Access Code, SNAC) automatically routes the call to the Mini-M terminal via the proper Area/Ocean Region. Table 5 Ocean Region Access Codes Ocean Region SNAC Atlantic Ocean East Region Pacific Ocean Region Indian Ocean Region Atlantic Ocean West Region International Access Code 870 871 872 873 874 If the call is accepted by the Capsat® Telephone it will start the call procedure and display the message 'Handset calling'. When the Capsat® Telephone has established the call to the LES the message 'Handset-LES connected' will be displayed. The LES now calls the subscriber. When the subscriber answers the call the message 'Handset-Ph. connected' will be displayed. The RING indicator lights steadily during the connection. The billing of the call starts when the subscriber answers the call and there is an end-to-end connection between the Capsat® Telephone and the subscriber. Note that only outgoing satellite calls are billed. Outgoing calls are cleared identically to incoming calls. If the call is billed, payment information is stored in the call log and the call duration is displayed for some seconds in the display. 15Oct99 Page 27 Call Types Making Auxiliary Telephone Calls NOTE: The texts in brackets specify actions taken by the user. The messages in boxes specify the status of the auxiliary phone call displayed in the handset. These messages are only displayed if the handset is out of the menu system. As for handset calls, auxiliary calls are also grouped into regular calls and calls to other Inmarsat-phone mini-M terminals. Calling Ordinary Telephone Number From The Auxiliary Telephone • Auxiliary phone call to an ordinary telephone number connected to the national PSTN. TT Enter call prefix for automatic call MN Enter country code LRNNQQTT Enter telephone number U Start the call Telephone is calling Phone calling Telephone connected with LES Phone-LES connected Telephone connected with subscriber Phone-Phone connected Clear the call (Place phone on-hook) Call logged 0:02:24 Calling Other Inmarsat-Phone Mini-M From The Auxiliary Telephone TT Enter call prefix for automatic call QPT Enter country code Ppppppppp Enter IMN U Start the call Telephone is calling Phone calling Telephone connected with LES Phone-LES connected Telephone connected with subscriber Phone-Phone connected Clear the call (Place phone on-hook) Call logged 0:02:24 Page 28 15Oct99 Call Types The international codes (“country code”) to the Areas/Ocean Regions are listed in Table 5. Using the 870 country code (Single Network Access Code) automatically routes the call to the Mini-M terminal via the proper Area/Ocean Region. If the call is accepted by the Capsat® Telephone it will start the call procedure and display the message 'Phone calling'. When the Capsat® Telephone has established the call to the LES the message 'Phone-LES connected' will be displayed. The LES now calls the subscriber. When the subscriber answers the call the message 'Phone-Phone connected' will be displayed. The billing of the call starts when the subscriber answers the call and there is an end-to-end connection between the Capsat® Telephone and the subscriber. Note that only outgoing satellite calls are billed. If the call is cleared by the calling subscriber or cleared in an abnormal way you will hear a congestion tone in the telephone as an indication of a call clearing. The phone must be placed on-hook before a new call can be established. Refer to appendix E for more information about the tone signals. The Capsat® Telephone will display an error message if the call is cleared in an abnormal way. If the call is billed, payment information is stored in the call log and the call duration is displayed for some seconds in the display. 15Oct99 Page 29 Call Types Key Entries After Connection During an end-to-end connection (incoming or outgoing satellite call) between the Capsat® Telephone and the subscriber, additional key entries might be necessary for direct dialling through PABX systems, voice response systems etc. The tones generated from pressing the keys are called DTMF tones. The handset must be out of the menu system to invoke DTMF tones. The keys which generate DTMF tones are the number, pound, and the asterisk keys (T-R, U and S). For the auxiliary telephone simply press the m-k, l and n-keys to invoke the DTMF tone. Microphone During an end-to-end connection (incoming or outgoing satellite call) between the Capsat® Telephone and a subscriber the microphone in the handset can be muted. Press GO on the handset to mute the microphone. Subsequently a press of any handset key will set the microphone back to normal again. The handset will display the messages ‘Microphone Off’ when the microphone is muted and ‘Microphone On’ when the microphone is back to normal. The handset has to be out of the menu system to show these messages. Call Transfer During an end-to-end connection (incoming or outgoing satellite call) between the Capsat® Telephone and the subscriber it is possible to transfer the call between the handset and the auxiliary telephone connected to the terminal. The call transfer is activated by pressing the ‘R’ -key. On the handset the ‘R’-key is generated with the combination GN. Below an example is given: AUXILIARY TELEPHONE HANDSET Satellite call established o (Local call of handset) Ringing I Talk Place phone on-hook Talk Satellite call established The unit having the satellite call can take back the satellite call at any time during the procedure pressing the o-key a second time. Technically, the o-key makes an On-hook, Off-hook with a maximum spacing of 150 ms. If the auxiliary phone does not have a o-key and is of good quality it might be possible to simulate the key, flashing the hook switch. If the call is billed each part of the call will be stored separately in the call log. The example above will give two entries in the call log, one for auxiliary phone call and one for handset call. F AX C ALLS Fax calls can only be made or received if • The AUX/FAX port is configured to FAX. Page 30 15Oct99 Call Types • Bulletin Board has been received from NCS • The Capsat® Telephone is synchronised with the NCS. Not two fax machines work identically. Therefore this description may not be complete. Additional information may be obtained from your fax manual supplied with the fax machine. Receiving Fax Calls In the following an incoming fax call to a fax machine connected to the AUX/FAX connector, x5, is described. A fax call is normally answered and cleared automatically. NOTE: The texts in brackets specify automatic actions taken by the fax machine. The messages in boxes specify the status of the fax call displayed in the handset. These messages are only displayed if the handset is out of the menu system. Fax is ringing Fax ringing (Answer the call) Fax connected with subscriber Fax-Fax connected Negotiating Negotiating Receiving page x Receiving page 1 Page x confirmed Page 1 confirmed Receive successful Receive successful Clear the call (Fax placed on-hook) An error message is displayed if the call is cleared in an abnormal way. Making Fax Calls If the fax machine has a keypad the dial number can be entered directly from this keypad. The texts in brackets specify automatic actions taken by the fax machine. The messages in boxes specify the status of the fax call displayed in the handset. These messages are only displayed if the handset is out of the menu system. Procedure To Call Ordinary Press Hook-key to get proceed-to-dial tone Enter call prefix for automatic call Enter country code Enter fax number Start the call 15Oct99 FAX Numbers TT MN LRNNQQQQ U Page 31 Call Types Press Start-key to send fax Fax is calling Fax calling Fax connected with LES Fax-LES connected Fax connected with subscriber Fax-Fax connected Negotiating Negotiating Sending page x Sending page 1 Page x confirmed Page 1 confirmed Sending successful Sending successful Clear the call (Fax placed on-hook) Call logged 0:02:24 Press the Hook-key on the fax keypad to get a proceed-to-dial tone. Secondly the dial number must be entered and ended with the U-key to start the call. If the call is accepted by the Capsat® Telephone it will start the call procedure and display the message 'Fax calling'. When the Capsat® Telephone has established the call to the LES the message 'Fax-LES connected' will be displayed. The LES now calls the subscriber fax. When the called fax answers the call the message 'Fax-Fax connected' will be displayed. Press the Start-key before or when you get connection with the called fax machine. Some fax machines only allow 5 or 6 ringing sequences from the Start-key is pressed and until the call must be answered. In this case you must wait to press the Start-key until the call is being answered. If the Start-key is not pressed the message ‘Press Start on fax’ will be displayed. If the Startkey is not pressed immediately after this message the fax call will be cleared. The billing of the call starts when the called fax machine answers the call and there is an endto-end connection between fax machine on the Capsat® Telephone and the called fax machine. The fax machine will automatically clear the connection when the fax message has been sent. If the call is billed, payment information is stored in the call log and the call duration is displayed for some seconds in the display. The fax number has identical dial format as mentioned for voice calls. It is not necessary to use the U-key twice for short codes. Using the U-key once will be enough. Making Fax Calls From The Handset If the fax machine does not have a keypad the handset can be used to start the fax call. The general procedure in this case is as follow: Page 32 15Oct99 Call Types Enter call prefix for automatic calls Enter country code Enter fax number Start the fax call from handset Press Start-key on fax machine to send fax TT MN LRNNQQQQ GM It is required that the fax machine generates an Off-hook when the Start-key on the fax machine is pressed. But since some fax machines does not automatically go Off-hook when the Start-key is pressed it may be necessary to press the Off-hook-key before pressing the Start-key. The remaining part of the procedure is similar to fax machines having a keypad as described above. D ATA C ALLS Data calls can only be made or received if • DTE equipment is attached to the DCE port. • Bulletin Board has been received from NCS. • Capsat® Telephone is in synchronisation with NCS. The data service is a facility which is used to transfer letters, documents, programs etc. People who are already familiar with data modems will find it easy to use the Capsat® Telephone data service. The Capsat® Telephone works almost like an ordinary data modem. The differences are caused by the medium of transfer and therefore some modem features e.g. tone dialling are irrelevant. However, it is possible to specify tone-dialling for compatibility with ordinary data modem but this information is not used. A PC or other terminal device (DTE) running an asynchronous communication program has to be connected to the Capsat® Telephone (DCE), plug X4. The factory setting for the DCECapsat® Telephone interface is as follow: - 9600 baud. - auto-detection of the following character framings: * 7N2 (7 data bits, no parity, 2 stop bits) * 7E1 (7 data bits, even parity, 1 stop bit) * 7O1 (7 data bits, odd parity, 1 stop bit) * 7M1 (7 data bits, mark parity, 1 stop bit) * 7S1 (7 data bits, space parity, 1 stop bit) * 8N1 (8 data bits, no parity, 1 stop bit). The baudrate setting can be changed from the handsets Menu System. To test if there is contact with the Capsat® Telephone please enter the command ‘AT<Enter>‘ from the DTE. The Capsat® Telephone will respond with ‘OK’. Receiving Data Calls In the following it is described how incoming data calls are received at the DTE connected to the Capsat® Telephone . 15Oct99 Page 33 Call Types NOTE: The text in brackets are responses from the Capsat® Telephone to the DTE. The text not in brackets are commands given by the user at the DTE to the Capsat® Telephone . The messages in boxes specify the status of the data call displayed in the handset. These messages are only displayed if the handset is out of the menu system. Capsat® Telephone is ringing Capsat® Telephone is ringing Manual answer of the call Capsat® Telephone connected with subscriber Capsat® Telephone enters Data Mode Capsat® Telephone connected with subscriber Switch from Data Mode to Online Command Mode Clear the call Data ringing (RING) ATA<Return> Data-Data connected CONNECT 2400 ARQ (CONNECT 2400 ARQ) +++ ATH<Return> The data call may be answered automatically by the Capsat® Telephone . Please refer to the description of the S0 register. The message e.g. 'CONNECT 2400 ARQ' will be displayed in the handset when the Capsat® Telephone enters the Data Mode. If the 3 escape characters (+++) are entered the Capsat® Telephone will change from Data Mode into Online Command Mode. In the Online Command Mode the command ATH or ATH0 can be given to clear the connection. Making Data Calls In the following it is described how outgoing data calls are made from the DTE. The text in brackets are responses from the Capsat® Telephone to the DTE. The text not in brackets are commands given by the user at the DTE to the Capsat® Telephone . The messages in boxes specify the status of the data call displayed in the handset. These messages are only displayed if the handset is out of the menu system. Apart from 2-digit code calls, data calls can be separated into 2 types of data calls: 1. Calls to ordinary data numbers connected to national PSTNs. 1. Calls to other Inmarsat-phone mini-M data modems. . Procedure To Call Ordinary Data Numbers Enter AT command for ATD dialling Enter call prefix for 00 automatic call Enter country code 45 Enter data number Start the call Page 34 39661010 <Return> 15Oct99 Call Types Capsat® Telephone is calling Data calling Capsat® Telephone connected with LES Data-LES connected Terminal connected with subscriber Data-Data connected Capsat® Telephone enters Data Mode CONNECT 2400 ARQ Capsat® Telephone connected with subscriber Switch from Data Mode to Online Command Mode Clear the call (CONNECT 2400 ARQ) +++ ATH<Return> Call logged 0:02:24 Procedure To Call Other Inmarsat-Phone mini-M Data Modems Enter AT command for ATD dialling Enter call prefix for 00 automatic call Enter country code 870 Enter IMN Start the call Capsat® Telephone is calling 7XXXXXXXX <Return> Data calling Capsat® Telephone connected with LES Data-LES connected Capsat® Telephone connected with subscriber Capsat® Telephone enters Data Mode Data-Data connected Capsat® Telephone Connected with subscriber Switch from Data Mode to Online Command Mode Clear the call 15Oct99 CONNECT 2400 ARQ (CONNECT 2400 ARQ) +++ ATH<Return> Page 35 Call Types Call logged 0:02:24 Refer to Table 5 for a list of the international codes (“country code”) for the Areas/Ocean Regions. Using the 870 country code (Single Network Access Code) automatically routes the call to the Mini-M terminal via the proper Area/Ocean Region. Enter the command ATD followed by a dial number from the DTE. The command is finished with a press on the <return> button. If the call is accepted by the Capsat® Telephone it will start the call procedure and display the message 'Data calling' in the handset. When the Capsat® Telephone has established the call to the LES the message 'Data-LES connected' will be displayed in the handset. The LES now calls the subscriber data modem. When the called data modem answers the call the message 'Data-Data connected' will be displayed in the handset. The message e.g. 'CONNECT 2400 ARQ' will be displayed in the handset when the Capsat® Telephone enters the Data Mode. The billing of the call starts when the data modem at the LES and the subscriber data modem have finished negotiating and there is an end-to-end connection between Capsat® Telephone and the called data modem. If the 3 escape characters (+++) are entered the Capsat® Telephone will change from Data Mode into Online Command Mode. In the Online Command Mode the command ATH or ATH0 can be given to clear the connection. If the call is billed, payment information is stored in the call log and the call duration is displayed for some seconds in the display. The data number has a dial format similar but not equal to the dial format for voice and fax calls. The dial format for data numbers are as follow: ATD<Data number><Return> ATDl<Short code><Return> Leading optional fields may be left out. Making Data Calls From The Handset A data call can also be started from the handset. There may be situations where it is not possible to start a data call with an ordinary ATD command from the normal DTE interface, plug X4 on the Capsat® Telephone e.g. when running with encrypted data. The following procedure can be used: Enter call prefix for automatic calls Enter country code Enter data number Start the data call from handset TT MN LROTJTJT GP The remaining call procedure is as described above for ordinary data calls. Data Modes Command Mode At Power On the Capsat® Telephone will be in Command Mode. When no dial command is in progress and no connection with a remote modem has been established the Capsat® Telephone will also be in Command Mode. In Command Mode all the AT commands described below can be given. Page 36 15Oct99 Call Types Data Mode The Capsat® Telephone will enter the Data Mode when a connection is established with a remote modem. In Data Mode data can be transferred between the Capsat® Telephone and the remote modem. Online Command Mode When the Capsat® Telephone is in Data Mode the Online Command Mode can be entered, still keeping the connection, using the command ‘+++’ described below. The Data Mode can be re-entered with the command ‘ATO’. In Online Command Mode all the AT commands described below can be given. AT Command Set The commands which can be given to the Capsat® Telephone are specified in the PCCA STD-101 and the ITU-T V.25ter standards. These standards consist of provisions and references based on the popular AT Command Set described in the standards: ANSI/TIA/EIA-602 and ANSI/TIA/EIA-615 together with some extended AT+I, AT+G and AT+W Command Sets. All command lines entered at the DTE must start with the letters ‘AT’. All command lines must end with a press on the <return> key or more precisely the value specified in the S3 register (see below). Several commands can be given in one command line. All available commands are listed in Appendix K along with response codes. 15Oct99 Page 37 Call Types Page 38 15Oct99 Menu System 5 M ENU S YSTEM This section contains detailed description of the features accessible from the menu. The menu system provides the possibility to control and manage the Capsat® Telephone. The menu system is organised as in many popular computer programs. The main menu is the main entrance of the menu system. From there the menu system spreads with submenus etc. The following keys are used to navigate in the menu system: Enter the Main Menu press Scroll up or down Accept selection Return without any update or selection Delete character or whole display (hold for 2 seconds) Toggle between alpha mode and numeric mode GJ BE C A D F In order to ease the use the Capsat® Telephone has two built-in phone books, the help desk and the users own phone book. Both phone books are accessed from the users menu. H ELP D ESK The “Help Desk" contains telephone numbers which can be dialled in emergency situations, regardless of configuration. Insertion and editing of the emergency phone book is done from the configuration menu and requires access to the MES PIN2 code. “Help desk” calls are always billed to the terminal. NOTE: Help desk calls can not be performed with a SIM card inserted in the terminal. From this menu item the user can initiate a call to a subscriber from a predefined list of numbers previously entered by a user having the MES PIN2 authorisation code. Note that it is always possible to call the numbers listed in the Help Desk. Even if the phone is blocked with PIN1 or SIM lock. In this situation the Help Desk can be activated by pressing GT. P HONE B OOK The "Phone Book" is managed by the user. When using a SIM card the phone book will be stored on the card, otherwise it is stored in the terminal. The following operations are possible in the phone book: • Insert new entries • Delete entries • Edit/Change entries • Print all entries • Initiate call via number. If phone book dial is enabled only the user having the CONFIG PIN can insert, delete or change an entry. 15Oct99 Page 39 Menu System The phone book contains 99 locations in which 99 subscribers may be stored. Each entry/subscriber is stored with the following information. • Dial string • Name of subscriber. • Short number (two digit code). The dial string contains the subscriber’s telephone number including call prefix for automatic calls and country code. The telephone number can hold up to 22 digits. The dial string may include a Terrestrial network ID and a LES Access Code as defined in appendix C. The subscriber’s name can hold up to 16 characters. It may be omitted. If the phone book is stored on a SIM card, then the SIM card may allow less than 16 characters to be stored. A SIM card phone book may also have less than 99 entries. The short code specifies the location in which the subscriber is stored. It can be used for quick access of the entry when dialling. The list of entries in the phone book is sorted according to Short Code. An entry in the list is displayed with: • Short code and subscriber’s name or • Short code and dial string. Accessing The Phone Book The phone book can only be entered when non-empty. There are two ways to enter the phone book from outside the menu system. 1. Main Menu Enter the Main Menu Move to Phone Book Select Phone Book 2. Short Cut Enter the Phone Book GJ E C E Both methods will enter the phone book from the top. The Phone Book Display Each line in the handset display represents an entry in the phone book. An entry can be displayed in one of the two following layouts: 1. Short code and subscriber’s name. (Alpha mode is ON) If the size of the line is beyond the length of the display only the first characters of the name are displayed. 01 TLF T+T 02 FAX T+T 2. Short code and dial string. (Alpha mode is OFF) Page 40 15Oct99 Menu System If the size of the line is beyond the length of the display only the last characters of the dial string are displayed. 01 539558800 02 539558888 Toggling the alpha mode (pressing F) also toggles between the two display modes. Direct Short Code Selection Inside the phone book it is possible to jump directly to a certain entry without using the arrows E or B. This is done by simply entering the short code of the entry, e.g. 14. Short codes in the range 1-9 must have a leading zero. Ensure that the alpha mode is Off before pressing the short code. Example: The following example will cause a jump to the entry with short code 14 (the entry stored in location 14). 01 REBECCA 04 FRANK Deselect Alpha Mode Enter short code F Select Alpha Mode F JM 14 THRANE 15 JOHN Add Entry There are 3 ways to insert an entry into the phone book. It can be inserted directly from outside the menu system, or it can be inserted from within the menu system either at the top level or from the sub menu of the phone book. For the latter two cases the procedure is the same. 1. Insert Directly TTMNLRNNQQT Enter Number T Select Insert Function GD Enter Subscriber THRANEC Name JMC Enter Short Code 2. From Menu GJ Enter Main Menu EC Enter Phone Book GD Select Insert Function TTMNLRNNQQT Enter Number T Accept Number C Enter Subscriber THRANEC Name JMC Enter Short Code If phone book dial is enabled, then the CONFIG PIN must be entered before editing the phone book. The Capsat® Telephone displays the message 'Access denied' for unauthorised use. 15Oct99 Page 41 Menu System If the entry is successfully inserted the Capsat® Telephone displays the message 'Entry stored'. Otherwise an error message is displayed. NOTE: The phone book cannot be accessed if empty. The first entry must therefore be inserted directly. Edit Entry The Edit-function can be used to display, update or overwrite an entry. The procedure is much the same as above for inserting entries and the CONFIG PIN must be entered if phone book Dial is enabled. BE First select the entry to be modified in the phone book GB Then select the EDIT function C To accept the displayed field press D To delete it press Modify the field and then: C To accept the new value press To restore the old value press A If the short code has been modified to an already existing short code, then the display will show Entry exists until a key is pressed and prompt for an overwrite accept: Overwrite No To toggle between Yes and No press To accept selection press To restore the old value press BE C A You can display an entry after having selected the Edit-function simply by using the C-key or the BE-keys without making any change to the contents. The entry will only be updated if changes really are made. If you make any change of the contents the entry will be updated and stored. The Capsat® Telephone displays the message 'Entry stored'. Otherwise an error message is displayed. Delete Entry How to delete an entry from the phone book : BE Select Entry to delete GF Select Delete-function The Capsat® Telephone Delete entry displays No To toggle between Yes and No press Confirm selection with or cancel delete Page 42 BE C A 15Oct99 Menu System If phone book dial is enabled, then the CONFIG PIN must be entered before entries can be deleted. The Capsat® Telephone displays the message 'Access denied' for unauthorised use. Print Phone Book A printout of the contents of the entire phone book can be send to a serial printer connected to the DCE port of the telephone. It is not possible to print a single entry. GE Select Print-function P REPAID On a prepaid terminal this menu displays the prepaid counters. The counters are only used for outgoing calls. Incoming calls do not change the prepaid counters. The following information is displayed: • The number of minutes remaining. • The number of minutes used. • The total number of prepaid minutes on this terminal. A REA From this menu a new Area/Ocean Region is selected. The Area/Ocean Region 'Automatic' is only available for Capsat® Mobile Telephones (see appendix J for further information) Table 6 Ocean Regions Ocean Region Automatic Atlantic Ocean Region West Atlantic Ocean Region East Pacific Ocean Region Indian Ocean Region Spare 1 Spare 2 Spare 3 Spare 4 Name AORW AORE POR IOR Spare 1 Spare 2 Spare 3 Spare 4 Use the arrow keys to find the new ocean region and press 'OK' to accept the new choice. The currently selected Area/Ocean Region is marked with an '*'. If the selection fails an error message is displayed. After having changed the Area it is necessary to go through the same settings as described under 'Getting started'. • New azimuth/elevation setting of the antenna. • Wait for Synchronisation with NCS. • Wait for Bulletin Board from NCS. • Possible new setting of default LES. D EFAULT LES From this menu the default land earth station is selected. With SIM card inserted this menu item handles the default LESs of the SIM card and operations are made on the SIM card LESs. 15Oct99 Page 43 Menu System Otherwise this menu item handles the LESs of the terminal and operations are made on these. This menu item makes it possible to select a default LES. All outgoing calls of any kind (voice, fax, data) will be routed through this default LES unless specified directly in the dial string. An Inmarsat Service Provider can dictate which LESs are allowed including default LESs in each ocean region. If the allowed or preferred LES list consists of one or more valid LESs located in the currently selected Area/Ocean Region - these LESs will be displayed with the order specified in the allowed or preferred LES list. The allowed LES list takes precedence over the preferred LES list. Finally, if there are no valid LESs in neither the preferred LES list nor the allowed LES list, then the LESs received from the Bulletin Board, that is operating in the currently selected Area/Ocean Region, are displayed for selection. The following operations are possible in default LES menu. • Select a LES C • Leave LES list A • Edit LES name GB M AILBOX The mailbox feature handles the alert messages being sent from LESs. When a land subscriber makes an incoming call to a terminal which is busy, switched off, etc. the LES may offer the facility to record a short message. When the terminal again becomes operational an alert message is sent indicating that the LES has recorded a short message for the terminal. The [ symbol in the handset display indicates the presence of unchecked messages. Alert entries contain the following information: • LES Access Code • Service type (voice, fax, data). The following operations are possible: • View entries • Delete entries. NOTE: If a terminal can operate with and without SIM cards, one should be careful to check for new messages before removing the SIM card. Mailbox messages received with the SIM card inserted will be deleted when the card is removed from the terminal. With SIM card inserted only alert messages for the SIM card are displayed. Otherwise only alert messages for the Capsat® Telephone are displayed. However, all alert messages are stored in the terminals static RAM (i.e. never on the SIM cards). C ALL LOG The call log contains an entry for each call made from the Capsat® Telephone Page 44 15Oct99 Menu System With SIM card inserted the menu entry handles the call log of the SIM card and operations are made on the SIM card call log. Otherwise the menu entry handles the call log of the terminal and operations are made on that. The terminal can support up to 100 entries in the call log, if a SIM card is inserted the number of entries is limited by storage capacity on the SIM card. Only information related to successful outgoing calls (voice, fax, data) are stored. Call log entries contain the following information: • Dialled number • Text string (the string shall contain duration, LES access code etc.). The following operations are possible: • View entries • Delete entries (protected by config PIN) • Print entries. When browsing the entries each line in the display will show the duration of a call followed by the last 6 digits of the dialled number. Pressing C will display the entire telephone number followed by the text string. The format of the text string is: • CALL DURATION • CALL TYPE • OCEAN REGION • LES ACCESS CODE • • • TERRESTRIAL NETWORK ID CALL DATE CALL TIME Displayed as either minutes and seconds (05M23 ), or hours and minutes (01H15). Voice : V Fax :F Data : D Atlantic Region West : W Atlantic Region East :E Pacific Ocean Region : P Indian Ocean Region : I The 3 digit access code of the LES which routed the call. One digit Displayed as year-month-day . Displayed in hour:minute format. Example: 03M45VW012:0 1996-11-13 22:35 This log is for a successful voice call lasting 3 minutes and 45 seconds. The call was made in the Atlantic Ocean Region West and was routed by the LES with access code 012. The call was made on November 13th 1996 at 22:35. C ALLS T OTAL This entry displays or resets the total call duration. The value contains the accumulated duration for all calls in the call log. The format is hours:minutes:seconds. 15Oct99 Page 45 Menu System PIN C ODES Access to the terminal is controlled by personal identification numbers, PINs. The intention is that PIN1 is for end users, PIN2 is for service providers such as distributors and config PIN is for organisations and companies. SIM PIN1/MES PIN1: PIN1 is used to control general access to the terminal. If PIN1 is enabled, the user will be prompted for PIN1, when the terminal is turned on. The help desk can be used without entering PIN1. If a SIM card is inserted in the terminal, PIN1 on the SIM card will be used. SIM PIN2/MES PIN2: PIN2 is used to control features there needs stricter control than PIN1 can provide. If a SIM card is inserted in the terminal, PIN2 on the SIM card will be used, except when editing the help desk, where MES PIN2 always will be used. CONFIG PIN: Config PIN is used to control access to configuration parameters. Only the configurations parameters listed in Error! Reference source not found. will be protected by this pin code. SIM-Lock PIN: SIM lock PIN is used to control access to the SIM lock feature. SIM lock PIN code must be entered every time SIM lock is either enabled or disabled. SIM unblock PIN1/PIN2 These pin codes are used to unblock SIM PIN1/PIN2. SIM PIN1/PIN2 will be blocked after 3 incorrect attempts to enter SIM PIN1/PIN2. There will be allowed 10 attempts to unblock SIM PIN1/PIN2, after that, the SIM card will be blocked and the SIM card must be returned to the service provider. MES unblock PIN1/PIN2 These pin codes are used to unblock MES PIN1/PIN2. MES PIN1/PIN2 will be blocked after 3 incorrect attempts to enter MES PIN1/PIN2. There will be allowed an unlimited number of attempts to unblock MES PIN1/PIN2. Table 7 SIM - Terminals PINs PIN Name Type SIM PIN1 SIM PIN2 SIM Unblock PIN1 SIM Unblock PIN2 MES PIN1 MES PIN2 MES Unblock PIN1 MES Unblock PIN2 CONFIG PIN SIM Lock PIN 4-8 DIGITS 4-8 DIGITS 8 DIGITS 8 DIGITS 4-8 DIGITS 4-8 DIGITS 8 DIGITS 8 DIGITS 4-8 DIGITS 10 DIGITS User Configurable YES YES NO NO YES YES NO NO YES YES Storage SIM SIM SIM SIM Terminal Terminal Terminal Terminal Terminal Terminal With SIM card inserted the menu entry operates with the PIN1 and PIN2 code for the SIM card. Otherwise the PIN1 and PIN2 for the terminal. The CONFIG PIN and the SIM Lock PIN are always stored in the terminal. Page 46 15Oct99 Menu System The Thrane & Thrane factory setting for the MES PIN1 and PIN2 is set to the respective unblock PIN code. The factory setting for the two MES unblock PINs are delivered together with the terminal. The config PIN and the SIM lock PIN is programmed as empty from the factory, so these PIN code must be programmed in the pin code menu before use. When asked for the old PIN code just press C. The following table shows which security keys are necessary to access which features in the terminal. The column labelled TT-SPECIAL includes both the SIM-LOCK and a special STU key. The STU-key is used only once to enable the STU-feature of the terminal. STU is an option which must be purchased separately. Refer to the chapter on the menu system for details on configuring the Capsat® Telephone. Table 8 Capsat® Telephone Security Key Overview. ALLOWED LES STD. ALLOW LES PIN 2 HELP DESK PIN CONFIG ROUTE IDs ALLOWED DIAL PH BOOK DIAL AUTO PREFIX BAR SERVICE SIM LOCK STU ENABLE PIN 2 X X X X1 CONFIG TT-Special X X X X X X X2 X3 Before updating PIN codes it is necessary to enter the old PIN code and then enter the new PIN code twice before the result message is displayed. The messages are: < PINxx> > - updated The PIN code <PINxx> was successfully updated. PIN code - too short The new PIN code is too short. PIN codes - mismatch The two entries of the new PIN code were not identical. PIN update - failed The old PIN code was incorrect. PIN1 - not enabled PIN1 must be enabled before the PIN1 string can be modified. The PIN code menu contains a submenu with the following items: • PIN1 setting • PIN1 • PIN2 • CONFIG PIN • SIM Lock PIN. 1 Can only be modified with MES PIN2. To change this field the SIM lock security key must be entered. SIM lock mode can also be entered with GS at start-up in an illegal mode (e.g. when configured to SIM-ONLY mode and the SIM card is absent at start-up). 3 To enable the STU facility the STU security key must be entered. 2 15Oct99 Page 47 Menu System PIN1 setting This menu item disables or enables use of PIN1. PIN1 This menu item changes the PIN1 to a new string. The old PIN1 must be known and enabled before a new PIN1 can be chosen. PIN2 This menu item changes the PIN2 to a new string. The old PIN2 must be known before a new PIN2 can be chosen. CONFIG PIN This menu item changes the CONFIG PIN to a new string. The old CONFIG PIN must be known before a new CONFIG PIN can be chosen. SIM Lock PIN This menu changes the SIM Lock PIN to a new string . The old SIM Lock PIN must be known before a new SIM Lock PIN can be chosen. C ONFIG This menu item handles various configuration parameters which can be set by the user. The configuration parameters can only be set if the actual PIN code protecting the menu item is not empty. It has a submenu containing the items listed below: Aux/ Fax Configuration This menu item selects what service type to use at the auxiliary connector. The options are: • NONE To disable the auxiliary connector. • AUX PHONE To use voice services. • AUX FAX To use FAX services NOTE: To achieve maximum talking time the auxiliary connector should be disabled in order to save power in the listening and talking modes. In sleep mode the connector is always disabled. Voice carrier This menu item is used to enable / disable voice carrier activation. The default setting is “Voice activated” which means that the terminal will transmit only when voice is detected. This reduces power consumption significantly during voice calls. If “Always” is selected the terminal will transmit continuously during voice calls. Sleep Mode (not Capsat® Maritime Telephone) This menu item is used to enable / disable the sleep mode time-out. If enabled the Capsat® Telephone will go into sleep mode after being idle for 60 seconds. Data Setup This menu item is used to configure the data interface to the terminal. This menu contains following entries. • Baudrate Page 48 The baudrate for the DCE interface is selected in 15Oct99 Menu System • Flow control • ‘+++’-mode • Result codes • ARQ mode this entry. It is possible to select between 1200, 2400, 4800 and 9600 baud. The flow control for the DCE interface is selected in this entry. It is possible to select between hardware, XON/XOFF and none. When this feature is enabled, then it is possible to switch from data mode to on-line command mode with the key sequence ‘+++’. When this feature is enabled, the terminal will give positive or negative acknowledge (OK/ERROR) to AT commands. If enabled, the terminal will establish an end to end error correction protocol. However it requires, that the land line supports the V.42 standard. For more details about AT commands refer to appendix K Contrast The contrast in the handset display can be changed. The contrast can be adjusted from one to eight '*' in the bottom line of the display. Ring Setup This menu item is used to configure the ring signal generated during incoming calls to the handset. The ring signal is comprised of two alternating tones. This menu contains following entries: • Ring volume • • • Tone 1 Tone 2 Slow Fast The ringer volume is adjusted in this entry. A setting to “Silent” will inhibits the ring signal. The first tone is adjusted in this entry The second tone is adjusted in this entry The alternation speed between the 2 tones is adjusted in this entry. Key Beep Beep when key is pressed may be disabled/enabled. The volume level is pre-set from factory and cannot be modified Antenna Beep This feature applies only for Capsat® Mobile Telephones and Capsat® Big Dish Telephones. Antenna beep can be disabled/enabled. The antenna beep is an audible tone emitted from the antenna. The repetition rate of the beep increases with the strength of the received satellite signal. The stronger the signal, the faster the beeps. The feature is useful to adjust the antenna position for optimal signal strength. For easy access the feature is mapped to the function key GR. Set Time The system time in the Capsat® Telephone is set from here. With this option it is possible to specify a local time co-ordinate as an offset in hours:minutes east or west of the universal time co-ordinate, UTC. When specifying an east offset, the local time is UTC + offset, and for west offsets it is UTC offset. 15Oct99 Page 49 Menu System The procedure to select Universal Time Co-ordinates is: a) Select the Time-zone: UTC. b) Enter the new UTC time (hours:minutes) and press C to accept. c) Correct the date (yyyy-mm-dd) or press C to accept. The procedure to specify a local time is: a) Select the Time-zone: East or West. b) Enter the offset from UTC (hours:minutes). c) Enter the new local time (hours:minutes) and press C to accept. d) Correct the date (yyyy-mm-dd) or press C to accept. Ocean Registration When a terminal is powered ON, it will register itself with the NCS. This information is used by the NCS to route incoming calls to the terminal. The registration is an optional Inmarsat feature and can be enabled / disabled. The default value is enabled. LES With SIM card inserted this menu item handles the LESs of the SIM card and operations are made on the SIM card LESs. Otherwise this menu item handles the LESs of the terminal and operations are made on these LESs. The menu item contains a submenu with the following items: • Default LES • Preferred LES • Allowed LES • Default stand-alone LES • Preferred stand-alone LES • Allowed stand-alone LES. When selecting one of the LES lists, the user first has to select the ocean are to deal with. Default LES This menu item is identical to the item in the upper level of the main menu. Preferred LES This menu item provides the possibility to operate on the preferred LES list. The preferred LES list are the group of LESs which the user uses most frequently. They are displayed when selecting a default LES. Upon entry of this menu item a list of LESs will be displayed with the preferred LESs at the top followed by the remaining LESs in the Bulletin Board listed in ascending order according to the LES Access Code. All preferred LESs are marked with a number 01-XX, where XX is the number of preferred LESs. The remaining LESs in the Bulletin Board are unnumbered. Each entry has the following information: • LES Access Code • Terrestrial Network ID (0 if only one available). The following operations are possible: • Accept changes made C • Insert entries GD Page 50 15Oct99 Menu System • Delete entries • Print entries. GF GE Inserting a LES which is already numbered (part of the preferred LES list) will make this LES to be number 01 (first in list) and the rest of the LESs in the preferred LES list will be renumbered. Inserting a LES which is not numbered (not part of the preferred LES list) will add this LES at the end of the preferred LES list and number it accordingly. A Terrestrial Network ID to be used together with the selected LES must be entered. Deleting a LES which is already numbered (part of the preferred LES list) will leave it unnumbered in the end of the list. Allowed LES This menu item provides the possibility to operate on the allowed LESs. The allowed LESs are the group of LESs which the service provider offers to the user. If the allowed LES list is in use will it overrule the preferred LES list. This menu item is protected by PIN2. If the SIM card is inserted the terminal will operate on the allowed LESs on the SIM card only. If the SIM card is not inserted the terminal will operate on the allowed LESs in the terminal only. Upon entry of this menu item a list of LESs will be displayed with the allowed LESs at the top followed by the remaining LESs in the Bulletin Board listed in ascending order according to the LES Access Code. All allowed LESs are marked with a number 01-XX, where XX is the access code of the allowed LESs. The remaining LESs in the Bulletin Board are unnumbered. Each entry has the following information: • LES Access Code • Terrestrial Network ID (0 if only one available). The following operations are possible: • Accept changes made C • Insert entries GD • Delete entries GF • Print entries. GE Inserting a LES which is already numbered (part of the allowed LES list) will make this LES to be number 01 (first in list) and the rest of the LESs in the allowed LES list will be renumbered. Inserting a LES which is not numbered (not part of the allowed LES list) will add this LES at the end of the allowed LES list and number it accordingly. A Terrestrial Network ID to be used together with the selected LES must be entered. Deleting a LES which is already numbered (part of the allowed LES list) will leave it unnumbered in the end of the list. 15Oct99 Page 51 Menu System Std Def LES This menu item provides the possibility to operate on the stand-alone default LESs. The stand-alone default LESs are the group of LESs which the user in case of NCS failure uses per default. • If the "Std Alw LES" list contains valid entries access is denied. • If the "Std. Pref LES" list contains valid entries only these will be listed. • Otherwise, the located and operational LESs in the Bulletin Board for the current Area / Ocean Region will be listed. The operations are the same as for the menu item Default LES. Std Prf LES This menu item provides the possibility to operate on the stand-alone preferred LESs. The stand-alone preferred LESs are the group of LESs which the user in case of NCS failure uses most frequently. The operations are the same as for the menu item Preferred LES. Std Alw LES This menu item provides the possibility to operate on the stand-alone allowed LESs. The stand-alone allowed LESs are the group of LESs which the user is forced to use in case of NCS failure. This menu item is protected by PIN2. If the SIM card is inserted the terminal will operate on the STD allowed LESs on the SIM card only. If the SIM card is not inserted the terminal will operate on the STD allowed LESs in the MES only. The operations are the same as for the menu item Allowed LES. Route IDs It is possible to assign four Inmarsat Mobile Numbers (IMN) to an Inmarsat-phone mini-M with pre-determined destinations: • Handset Voice • AUX Voice • AUX Fax • Data. When a MES has two phone numbers, it is possible to route calls. • Outgoing calls from the aux. phone can be billed on the handset phone number account. Normally when using a MES with two phone numbers, the auxiliary phone is billed on its own phone number (default), but can optionally be billed on the handset phone number account (option). Bill AUX Ph. as AUX Phone Bill AUX Ph. as Handset (default) (option) Use BE to select AUX Phone or Handset account. Page 52 15Oct99 Menu System • Incoming calls to the handset number can be routed to the AUX phone. A MES with two phone numbers will by default route incoming calls to the handset number. It is possible to redirect the call to the auxiliary phone (option). Route H.Call to Handset Route H.Call to AUX Phone (default) (option) Use BE to select AUX Phone or Handset as destination. • Incoming calls to Aux phone number can be routed to the handset. Call to the auxiliary phone number is by default routed to the auxiliary phone. As an option it is possible to redirect a call to the handset instead. Route A.Call to AUX Phone Route A.Call to Handset (default) (option) Use BE to select AUX Phone or Handset as destination. Allowed Dial This menu item provides the possibility to enter a list of numbers or prefix-numbers that are mandatory for the user to use in calls. If the list is empty the user has a free choice. An example of a list can be: - 0045 for all numbers in Denmark. - 0044 171 728 1000 only Inmarsat in England. Whenever a user dials a number either manually or by selecting it from the phone book, the number is checked against the allowed dial list and the call will only be initiated if a match is found. Following operations are possible on the allowed dial list: • Insert new entry GD • Delete an entry GF • Edit an entry GB • Accept changes C • Exit without modifications A • Print list GE Protected by CONFIG PIN. PhBook Dial This menu item makes it possible to disable/enable mandatory dial of numbers from the phone book. When enabled the user will only be allowed to make calls from numbers in the phone book, therefore only short-codes can be used when making calls from an auxiliary telephone, a connected fax or the DCE port. The options are: • Disabled • Enabled for terminal only (MES Only) • Enabled for both terminal and SIM cards (MES/SIM). Protected by CONFIG PIN. 15Oct99 Page 53 Menu System NOTE: It is possible to update the phone book on a SIM card from another terminal where either the feature is disabled or not implemented. Therefore this feature is only safe for MES Only mode. Auto Prefix This menu item is used to define a prefix number to be automatically set in front of all dialled numbers. It is only possible to dial numbers starting with this prefix number. Example: If the prefix number is defined as 004539558 then it is only possible to dial numbers at Thrane & Thrane. Following key sequence will dial the switch board at Thrane&Thrane jmmn, which full number is 004539558800. NOTE: It is not possible to dial the special 2 digit Inmarsat service codes if auto prefix is enabled. These numbers will also get the prefix number added in front. Bar Service This menu item provides the possibility to bar one or several of the services in the terminal. There must always be at least one operable service left: - Voice - Fax - Data. Each service can be barred in both incoming and outgoing direction separately. Protected by CONFIG PIN. Help Desk This menu entry handles the help desk phone book of the terminal. The following operations are possible: • Insert new entries • Delete entries • Edit/Change entries • Print entries. An help desk entry consists of a telephone number (max. 22 digits), a LES access code (max. 3 digits) and a Terrestrial Network ID (max. 3 digits). Protected by MES PIN2. SIM Lock This menu item specifies whether the Capsat® Telephone is locked to operate with SIM cards only. When locking the terminal to use SIM cards, then a SIM card ID must be specified. The options are: • Disable • ICC ID The Inmarsat defined SIM card serial number which includes the identity of the service provider. With this option the service provider’s identity number should be entered. Page 54 15Oct99 Menu System • GID 1 This option requires SIM cards which in addition to the Inmarsat specification also supports the GID 1 file as defined in the coming GSM standard, GSM 02.22 section 6. • Semi lock Enabling this feature makes it possible to use the terminal either without a SIM card or with a SIM card but only from a specific service provider. The feature can only be enabled after entering a GID1 or ICCID. Protected by SIM Lock PIN. If this option is enabled and you don’t have the SIM card, then can this menu item be accessed by following key sequence: Gl Prepaid On a prepaid terminal this menu item provides the possibility to upload more minutes to the terminal. To upload more minutes a 20-digit prepaid code is entered here. The prepaid code is given by the service provider. On a non-prepaid terminal this menu item is also used to activate the prepaid function. This is done by entering a unique 20-digit prepaid code. This must only be done by the service provider. STU This item enables/disables the STU facility. Protected by a special constructed Thrane & Thrane PIN code. Log to Prn This menu item is used to control the way the call log is printed. The options are: • Manual No automatic call log printing. The call log can be printed out manually from the call log menu. • Full log The call log is printed automatically to the serial interface when the log becomes full (for every 100 calls). • Each call A single line printout is made to the serial interface after each call. The format is: Date Time Phone number 03-Jul-1997 15:31 +4539558800 Call LES Duration VOICE 012 02min 23sec Noise Immun When this feature is enabled, the MES is put into a mode that is less sensitive to background noise. It is recommended that the Noise Immun feature only is enabled, when the MES is operating in a noisy environment, because it has an impact on the voice quality when operating in a normal environment. 15Oct99 Page 55 Menu System Antenna Sync Lost Tm For Maritime and Land Mobile antennas the time-out for the long-term interruption of the satellite signal (permanent loss of signal) can be defined. The default value is 60 seconds. A value between 30-300 seconds can be defined. Using the Capsat® Telephone in areas with long blockages (mountains etc.) a high time-out is recommended and opposite in areas with almost no blockages. If the signal is permanently lost, the Capsat® Telephone will start a new sky scan (see appendix J for further information). Compass Cal (only Capsat® Maritime Telephones) This menu item contains two sub menu items: • Start compass calibration This submenu starts the compass calibration. The vertical and horizontal components of the magnetic field must be entered and on successful start of the compass calibration the handset will go out of the menu system. A status message saying ‘Calibration initiated’ will be displayed. Having started the compass calibration the procedure described in the installation chapter must be performed. • Stop compass calibration Use C to stop the compass calibration. The quality of the compass calibration can be controlled by the compass “calscore” parameter also described in the installation chapter. Accessories The accessories menu is only available in land Capsat® Disc and Maritime Telephones. Handsfree Handsfree must be enabled when an external microphone is connected. It is then possible to carry out a conversation with the handset in the cradle; a handsfree call. The external microphone and speaker will then be used. If the handset is lifted off the cradle an automatic switch back to handset microphone and ear-piece is performed. If the speaker symbol is then pressed (GQ) the speaker is switched on. If the handset is then placed back into the cradle an automatic switch back to handsfree mode is performed, and the external microphone and speaker are used. Call Answer Offers a number of different ways an incoming call can be answered. It will typically be used in connection with handsfree operation. The options are: • Normal The call can be answered by either taking the handset out of the cradle or by pressing the off-hook symbol. • Any key The call can be answered in the same way as in “normal” but any key can be pressed to answer the call. • 1 ring .. 7 ring The call will be answered automatically after the specified number of rings. Page 56 15Oct99 Menu System The “Call Answer” facility can be used regardless of the mode of “handsfree”. If “handsfree” is disabled the microphone in the handset will be used. Radio mute If enabled an output from the terminal is activated during incoming and outgoing calls. This can typically be used to mute a radio in the vehicle. During an incoming call the output is activated just before the terminal starts to ring. During an outgoing call the output is activated when the terminal goes off-hook. Output is deactivated again upon on-hook or when the terminal stops ringing in the case of an incoming unanswered call. Ext. ringer If enabled an output from the terminal is alternately activated and deactivated according to the ringing signal during incoming calls. This can be used to control an external ringer. Ignition If enabled an external input can be used to power the terminal on and off. The input is typically connected to the ignition system on a vehicle. The terminal will then power on and off according to the ignition signal. If the ignition is turned off during a call the terminal will stay powered on until the call is cleared by the user. If sleep mode is enabled the terminal will go into sleep mode instead of powering off. This does only apply to Capsat® Disc Telephones. Ignit. timer The ignition timer is used together with the ignition facility described above. The default value is zero which means that the terminal is powered off the moment the ignition signal goes off. If a timer value other than zero is used the terminal will power off the specified amount of minutes after the ignition signal goes off. S TATUS This menu item displays various status parameters. It has a submenu containing the following items: • C/No (Carrier Noise Ratio) • Battery • Transceiver • SIM card • RF Block • Bulletin • Antenna • Print. 15Oct99 Page 57 Menu System C/No The Carrier/Noise level defines the quality of the antenna signal. The higher value the better signal. The C/No level updates automatically every 1 second. Good C/No levels are in the range of 43 dBHz and above. Bad C/No levels are in the range of 40 dBHz and below. C/No= 45.6 dBHz Battery The battery status contains the following information • Capacity • Voltage • Temperature Transceiver The transceiver status contains the following information: • Release Date • Unit Type • Thrane & Thrane Serial Number of the Capsat® Telephone • Inmarsat Serial Number (ISN) of Capsat® Telephone • Print Circuit Board (PCB) number • Forward ID of the Capsat® Telephone • Main CPU software version • Prepaid version • Frame Processor software version • Voice Codec DSP software version • Fax DSP software version • STU IIB and STU III (2400 baud) software version • Handset software version • BOOT software version. SIM Card Status on the SIM card interface: NONE = SIM card is not used. VALID = SIM card is used. RF Block The status of the RF Block contains the following information: • Channel number • Rx frequency (MHz) • Tx frequency (MHz) • Frequency offset (Hz) • Accumulated offset (Hz) • AGC/Gain • Tx level (mV) • LO1Vtune (mV) • LO3Vtune (mV). Page 58 15Oct99 Menu System Bulletin • The Bulletin Board is received from the NCS. The information of available LESs in the Areas has already been mentioned earlier. The following Bulletin Board status is displayed: • Area Contains the currently selected Area (Atlantic Ocean Region West etc.). • NSR state Contains the Network Status Record state. The state must be valid before any call can be made but it may be invalid for short intervals during bulletin board updates, set-up of call, clearing of call etc. The options are: - Initialised - Invalid - Valid. • Page 1 Contains the issue number (1-31) of page 1. If the page 1 is not up to date it is displayed as invalid. • Page 2 Contains the issue number (1-31) of page 2. If the page 2 is not up to date it is displayed as invalid. • Page 3 Contains the issue number (1-31) of page 3. If the page 3 is not up to date it is displayed as invalid. • Page 4 Contains the issue number (1-31) of page 4. If the page 4 is not up to date it is displayed as invalid. • Page 5 Contains the issue number (1-31) of page 5. If the page 5 is not up to date it is displayed as invalid. • Spot Beam ID (Invalid, or ID 1-63) Contains the Spot Beam ID (1-63) automatically selected by the Capsat® Telephone. It will be displayed as invalid if not found yet. No calls can be made if the Spot Beam ID is invalid. • Last Signal Unit Completion Code received Contains the hexadecimal completion code last received in a Signal Unit on the satellite channel. Code ‘0000’ means not defined. • Last Signal Unit Completion Code sent Contains the hexadecimal completion code last sent in a Signal Unit on the satellite channel. Code ‘0000’ means not defined. Antenna The status of the antenna is separated in FrontEnd status and Platform status. Platform status is only available for the Capsat® Disc and Maritime Telephones. FrontEnd • FrontEnd ID Contains the FrontEnd types: - Portable - Rod - OmniPless Land Mobile - Omnipless Maritime - KVH Land Mobile - KVH Maritime. 15Oct99 Page 59 Menu System • Version Contains the version number of the FrontEnd. • Mode Contains the current mode of the FrontEnd: - SCPC (call) - Burst (anything else but call). • Power Contains the EIRP reduction (0-6 dB) of the FrontEnd. • Link alarm Specifies whether the serial link between the FrontEnd and the Capsat® Telephone is down (On) or up (Off). If the link is down and does not come up by itself, check the antenna cable or contact your agent. • Heat alarm Specifies whether a heat alarm is present (On) or not (Off). Switch Off the power of the Capsat® Telephone and wait until the FrontEnd is cold before turning On the power. If the alarm is still present contact your agent. • Burst alarm (On/Off) Specifies whether a burst alarm is present (On) or not (Off). Burst alarm means that the FrontEnd has registered a carrier when sending in burst mode for more than 250 ms. If the problem comes again contact your agent. • Power alarm (On/Off) Specifies whether a power alarm is present (On) or not (Off). Switch Off the power of the Capsat® Telephone and wait until the FrontEnd is cold before turning On the power. If the alarm is still present contact your agent. Platform (only Capsat® Disc and Maritime Telephones) • Platform ID Contains the Platform types: - OmniPless Land Mobile - OmniPless Maritime - KVH Land Mobile - KVH Maritime. • Version Contains the version number of the Platform. • State Contains the state of the Platform: - Reset (Platform making initialisation and self test). - Ready (Platform is idle and ready for new commands). - Error (Platform has detected a software error which is reported as an alarm to the handset. See also the alarm log section below). - Sky Scan (Platform searching the sky for a channel). - Step track. (Platform is optimising the azimuth/elevation angle based on Carrier/Noise measurements). - Fine Tuning (used in elevation calibration, see above). - Compass cal. (used in compass calibration, see above). • No. skyscan Contains the full number of sky scans (0-90 degrees elevation) made by the Platform. • Alarm mask Contains the hexadecimal alarm mask where each bit defines a specific alarm. A bit (0-15) is On if equal to 1. Otherwise Off. See also the alarm log section below. - bit 0 (LSB): Inclinometer failure - bit 1: Magnetometer failure - bit 2: Motor failure - bit 3: Motor thermal failure Page 60 15Oct99 Menu System • • • • • • - bit 4: Ambient light error - bit 5: Gyro failure - bit 6: Gyro heater failure - bit 7: Serial memory failure - bit 8: Flash memory failure - bit 9: Endstop sensor failure - bit 10: Vehicle turning at start-up - bit 11-15: Reserved. HW stat msk Contains the hexadecimal hardware status mask where each bit defines a specific hardware status. A bit (0-15) is On if equal to 1. Otherwise Off. - bit 0 (LSB): Compass calibration active - bit 1-7: Reserved - bit 8: Reset caused by H/W reset - bit 9: Reset caused by S/W reset - bit 10: Reset caused by watchdog - bit 11: Reset caused by illegal address - bit 12-15: Reserved. Roll inc. (only Capsat® Maritime Telephone) Contains the Roll inclinometer measurement in 0.1 degrees resolution. Pitch inc. (only Capsat® Maritime Telephone) Contains the Pitch inclinometer measurement in 0.1 degrees resolution. Cal. score (only Capsat® Maritime Telephone) Contains the compass calscore which defines the quality of the compass calibration last made. Elevation Contains the elevation angle in 0.1 degrees resolution. 0 means horizontal direction and 900 means vertical direction. 999 means elevation angle unknown. The elevation angle does not comply to the Land Mobile Platform. Azimuth Contains the azimuth angle in 0.1 degrees resolution. 0 means Maritime Platform pointing magnetic north or Land Mobile Platform pointing in the forward direction of the car. 900 means Maritime Platform pointing magnetic east or Land Mobile Platform pointing to the right relative to the forward direction of the car. 9999 means azimuth angle unknown. LM heading (only Capsat® Disc Telephone) The LM (Land Mobile) heading defines the angle between the pointing direction of the Land Mobile antenna and the forward direction of the car on which the Land Mobile antenna is placed. The angle is defined as 1 o’clock to 12 o’clock. 12 o’clock means the antenna pointing in the forward direction of the car and 3 o’clock means the antenna pointing to the right relative to the car. The LM heading updates automatically every 5 seconds. Print The status of the terminal will be sent to a printer connected to the DCE port. 15Oct99 Page 61 Menu System A LARM L OG This menu item handles the alarm log. When an alarm, e.g. like antenna link-down occurs, an event is stored in the alarm log. Active alarms will be displayed with an asterisk ‘*’. The following operations are possible: • View Entries • Delete Entries • Print Entries. The alarm log has a predefined location for every alarm type in the Capsat® Telephone . A new activation of an alarm therefore overwrites the contents of that location rather than creating a new alarm. All alarms are stored in the Capsat® Telephone. Important alarms are displayed as popup windows in the handset display. Serious alarms responsible for failure in the Capsat® Telephone operation will activate the alarm indicator on the handset and an audio alarm signal (4 short beeps) is generated. The alarm signal is repeated every 60 seconds for as long as the alarm is present or until the user acknowledges the alarm by pressing a key on the handset. Each alarm is stored with the following information: • Type • Active • Time/Date • Text The Type field defines what kind of alarm is stored. The following alarm types exist in the Capsat® Telephone: • Rx tune failure • Tx tune failure • RF Block limit • Antenna failure • MSR invalid (Message Status Record) • MIDR invalid (MES ID Record) • NSR invalid (Network Status Record) • SVR invalid (Scrambling Vector Record) • DSP failure. The Active field specifies whether the alarm is still activated or not. The Time/Date field contains time and date when the alarm was discovered. The Text field contains a number of text lines describing the reason for the alarm. Delete Alarms To delete a single alarm from the list, first select the alarm with the arrow keys (B,E) and then choose the delete function (GF). Press C on the prompt "Delete Entry?". To delete all entries choose the delete function and then use the arrow keys to get the prompt : "Delete All entries?" before pressing C. If the entry/all entries are successfully deleted the Capsat® Telephone displays the message 'Entry deleted'. Otherwise an error message is displayed. Print Alarm Log With the print function (GE) the entire alarm log is printed. Page 62 15Oct99 Menu System S POT B EAM To manually initiate a new spot beam selection choose this item. The procedure will block the terminal for up to 7 minutes in which incoming calls will not be detected. A new spot beam selection is initiated to find a spot with a stronger signal, e.g. if the current spot starts failing (many fax and data calls errors) or the C/No is low. It is primarily in the perimeter of a spot beam that the signal strength can vary. Automatic spot beam selection is performed: a) When terminal is powered on. b) When a new Area/Ocean Region is selected. c) With 8 hour intervals if the terminal is in listen or sleep mode. T EL . N UMBERS The 9-digit International Mobile Numbers (IMN) of the terminal itself can be entered for later reference using this menu. The menu has 4 entries: Handset, Fax, Data and Aux. The number associated with each entry can be displayed by changing from ABC mode with F-key. The numbers are pre-set to “000000000” from factory. It is up to the service provider or user to enter the correct numbers. To enter a number select an entry using the B and E keys and press GB. The displayed number can now be edited using the D-key and the number keys on the handset. After editing press C. This will display the associated text field. It is now possible to either edit the text field and/or accept it by pressing C. The entry is then saved. If a SIM card is inserted the numbers associated with the SIM card are displayed instead. It is not possible to edit the entries. 15Oct99 Page 63 Menu System Page 3-64 15Oct99 Technical Reference 6 TECHNICAL REFERENCE The TT-3060A Capsat Mobile Telephone provides telephony satellite services between fixed land users and mobile stations. Capsat Mini M also offers CCITT Group-III facsimile at 2400 baud and full duplex data services up to 2400 baud. The TT-3060A Capsat Mobile Telephone can be powered from several different sources, an external AC adapter, a DC source, a Solar Panel or the internal NiCd Battery Pack, providing a high degree of portability and independence of specific power sources. The TT-3007A Patch Antenna is normally attached to the top of the TT-3034A Electronics Unit, connected via a short Antenna Cable. The Patch Antenna can be placed at a distance if the short Antenna Cable is replaced. E QUIPMENT L IST Your TT-3060A Capsat Mobile Telephone is supplied with the following standard equipment: • TT-3034A, Mini M – Electronics Unit. • TT-3007A, Mini M – Patch Antenna. • TT-3620B, Mini M – Operator Handset. • TT-3686A, NiCd Battery Pack. • TT46-201357-360, Compass. • Manuals. • TT37-107486, Antenna Cable 0.15 m SMB plug. • TT37-107487, Antenna Cable 5 m SMB plug. • TT-3682A, Power Supply (Mains adapter) – Light Weight Your TT-3060A Capsat Mobile Telephone can be supplied with the following optional equipment: • Option 202, Softbag TT-3060A • TT-3682B, Power Supply (Mains adapter) – Fast Charge • Option 942, Antenna Cable 10 m SMB plug • Option 944, Antenna Cable 20 m SMB plug • Option 920, Bracket (Patch Antenna wall mount) 15Oct99 Page 4-65 Technical Specifications 7 TECHNICAL S PECIFICATIONS General : Meets or exceeds current and proposed INMARSAT specifications for the Inmarsat-phone spot-beam operation. Antenna : G/T EIRP Antenna Cable Rx freq. band Tx freq. band Channel Spacing Rx Modulation Tx Modulation Voice Async. Data Rate : : : : : : : : : : Directional RHCP Patch Array with ±15° horizontal and ±15° vertical beam width. Completely waterproof. Min. -17 dB/K 11-17 dBW in 2 dB steps. SMB plug/SMB plug, max. cable loss 10 dB at L-Band, 0.7 Ω at DC 1525.0 MHz to 1559.0 MHz. 1626.5 MHz to 1660.5 MHz. 1.25 kHz. 5.6 kbps O-QPSK SCPC (voice/fax/data), 6 kbps BPSK TDM. 5.6 kbps O-QPSK SCPC (voice/fax/data), 3 kbps BPSK TDMA. 4.8 kbps AMBE (3.6 kbps voice/1.2 kbps FEC). Max. 2.4 kbps. Phone Interface : Fax Interface : Data Interface : Printer Interface SIM Card Power Supply : : : Solar Panel interf. : Battery Capacity : Light Weight AC Adapter Fast Charge AC Adapter Ambient Temp. Rel. Humidity Two 2-wire 600 Ω CCITT Rec. G.473, standard DTMF telephones, RJ-11 jacks. 2-wire 600 Ω CCITT Rec. G.473, T.30 Group-III Fax, max. 2.4 kbps, RJ11 jack. Serial EIA standard RS-232E, Hayes compatible, max. 19.2 kbps, DB-9 female connector. Serial EIA standard RS-232E, max. 19.2 kbps, DB-9 female connector. GSM like operation, ISO-7816 10.5-18.5 Vdc, typical 380 mW listen mode, 8 W talk mode and 20 W in fax/data mode. 15-25 V dc input (2-3 W solar panel with idle voltage at 15-25 V) Typical listen time 48 hours, typical talk time 180 min. and fax/data time 55 minutes. : 90-265 Vac, 40-70 Hz, 5-10V, charge time 5-10 hours. : 90-265 Vac, 40-70 Hz, 55 W, charge time approx. 2 hours. : : -25°C to +55°C operating, -40°C to +80°C storage. 95% non-condensing at +40°C. EMC Emission and EMC Immunity : prETS 300 339: Fixed, Mobile and Portable equipment. Vibration Survival: Shock : Random 5-20 Hz 0.05g2/Hz, 20-150 Hz -3 dB / octave (1.7g rms.). Half sine, 20 g/11 msec. TT-3060A Dimensions Weight H×W×D, 52 mm × 270 mm × 200 mm. 2.2 kg (incl. handset, Battery Pack and antenna) Page 4-66 : : 15Oct99 Technical Specifications Note: Our products are under continuous research and development. Any information may therefore be changed without prior notice. P OWER R EQUIREMENTS The TT-3060A Capsat Mobile Telephone system is designed to be powered from many different sources: • DC Input, connector X1 15.0 Vdc ± 0.3% (line regulation), min. 5 W max. 10 W TT3682A Light Weight Power Supply (standard equipment): In: 90-265 Vac, 40-70 Hz Out: 15.0 Vdc / 10 W Connects to the X1 Connector Solar Panel Interface, Connector X1 Open Circuit Voltage (VOC) min. 15 V max. 25 Vdc Short Circuit Current (ISC ) max. 350 mA. • DC Input, Connector X2 10.5 V- 18.5 Vdc, min. 55 W The start voltage is min 10.5 V (however, 9.5 V is sufficient to guarantee reliable operation after start ) Connects to the X2 Connector TT-3682B Fast Charge Power Supply (option) is recommended: In: 90-265 Vac, 40-70 Hz Out: 18 Vdc 55W Connects to the X2 Connector • Battery Pack TT3686A NiCd Battery Pack (standard equipment) Capable of delivering power for 48 hours listen time and 2.5 hours talk time when fully charged. Resides in the Battery Pack slot in the Electronics Unit TT-3007A, M INI M – P ATCH A NTENNA The TT-3007A Patch Antenna resides naturally on top of the Capsat Mini M Electronics Unit, where a short coax cable connects the Antenna and the Electronics Unit. It is possible to place the TT-3007A Patch Antenna at a distance from the Electronics Unit when the short Antenna Cable (0.15 m) is replaced with the supplied Cable of 5 m or longer Antenna Cables: 10 m - option 942 or 20 m - option 944. Contact Sales Department if even longer Antenna Cables are desired (up to 70 m). The Patch Antenna has a stand which in unfold condition can hold the Patch Antenna in correct angle for transmission, alternately when the stand is fold up it can be fastened to a Bracket (option 920). Note the cut in the frame which is intended to support the Antenna Cable when the frame is fold up for the relief of the Plug. The Patch Antenna is completely water tight and sealed for outdoor operation. The Patch Antenna has acoustic signal strength indicator, which beep with increased repetition rate as the signal received via the Antenna becomes stronger. 15Oct99 Page 4-67 Technical Specifications The acoustic signal strength indicator is enabled / disabled via the handset User Menu or the keypad function Ant (GR). It is recommended to seek the strongest possible signal because it reduces the amount of power required for transmission. Figure 7 - 1 The above label is attached to the TT-3007 Patch Antenna Warning ! The TT-3007A Patch Antenna radiates microwave signals. Keep minimum 1 metre of safety distance in front of the Patch Antenna Figure 7 - 2 : TT-3007A Patch Antenna, Warning A NTENNA C ABLES If the standard antenna cable is insufficient for your TT-3060A Capsat Mobile Telephone application, additional antenna cables of different lengths can be purchased as options: • Option 942: TT-41-107188-942, Antenna Cable, SMB plugs, 10 m. • Option 944: TT-41-107188-944, Antenna Cable, SMB plugs, 20 m. For extension cables up to 70 m please contact the sales department. The antenna cable used must comply with the following specifications: Cable RF loss Page 4-68 : Less than 10 dB at 1.6 GHz. 15Oct99 Technical Specifications Cable DC resistance : Less than 0.7 Ω. Figure 7 - 3 : SMB jack and SMB plug Caution: Suppliers of SMB Connectors do not use a common name convention. The SMB plug attached to the cable has a hole and not a tap in its very centre. 15Oct99 Page 4-69 Technical Specifications H ANDSET The handset is standard equipment in the TT-3060A Capsat Mobile Telephone. A 2.5 m cable inserted in connectors X6 and X7, connects the handset to the Electronics Unit. To the right is shown the layout of the handset. Handset Specifications: Display : 2 * 12 Alpha, plus additional symbols. Background light. Keypad : 4 * 3 Numeric keypad 3 * 3 Function keypad. Volume Control : Power Supply : 5.2 V / 120 mA. Dimensions : L×W×H, 198×52×32 mm. Weight : Approx. 320 g. Connector : X7, 8 pole RJ-11 connector. Page 4-70 Att. range > 20 dB. 15Oct99 Technical Specifications B ATTERY P ACK H ANDLING NiCd batteries are sensitive to how they are charged and discharged. To keep the battery capacity high, the battery should be fully discharged occasionally, to avoid memory effects. Generally it is sufficient to discharge the Battery Pack completely when the Battery Pack has been partly discharged and charged 5 to 10 times. Avoid exposing the Battery Pack to direct sunlight, as high temperature will reduce battery lifetime. Continuos charging with the Light Weight Power Supply, when the transceiver is turned off serve no purpose, in fact the higher Battery Pack temperature reduce Battery Pack Life Time. Pull the Battery Pack out before long-time storage (months), as this action prevents Battery Pack degradation. The Battery Pack is inserted in the right side of the Electronics Unit, and can be released from the Electronics Unit simply by pressing a finger down on the top free end of the Battery Pack. C HARGE I NDICATOR The Battery Pack charge status is shown on a green LED located just left of the entrance to the Battery Pack slot. The green LED have the following interpretation: LED Green On Blinking slow - short flash approx. 1.5 sec between flash on off Blinking fast approx. 4 times pr. second Status Fast Charge (approx. 2 hours) Slow or no charge. If the Battery Pack temperature exceed +55°C the charge is suspended. If the Battery Pack temperature is between -25°C and 0°C the Battery Pack is charged slowly (10-20 hour) Maintenance Charge on off Off Battery Error / No connection Table 9: TT-3060A Battery Charger Status The Capsat Mini M Battery Pack can be charged in two different ways: Fast Charge and Standard Charge. Fast Charge Fast Charge is the most advanced and fastest way to charge the Battery Pack. The green LED is dedicated to inform about the Fast Charge process. Fast Charge is only possible when the X2 connector is supplied with sufficient power. The optional equipment: TT-3682B Fast Charge Power Supply deliver enough power for the Fast Charge process independent of how the TT-3060A Capsat Mobile Telephone is used. The Fast Charger will charge the NiCd Battery Pack within approx. 2 hours, indicated by turning the green LED on continuously unless the Battery Pack is fully charged (the green LED is blinking fast), or the Battery Pack is too cold or too hot (the green LED blinks slowly). 15Oct99 Page 4-71 Technical Specifications If the Battery Pack is defective or not properly inserted, the condition is indicated by turning the green LED off. The Fast Charge Circuit is designed to optimise the lifetime of the NiCd Battery Pack by suspending the charge process if the Battery Pack is too hot (temperature exceeds +55°C), and by slowing down the charge process (10-20 hours) if the temperature is too cold (-25°C… 0°C). Standard Charge Standard Charge occurs when the Battery Pack is inserted and either the TT-3682A Light Weight Power Supply (standard) or a solar panel delivers power through the X1 Connector. Standard Charge does not use any light indicators and it takes up to approx. 8 hours to complete if the TT-3060A Capsat Mobile Telephone is powered down. Standard Charge takes approx. 1-2 hours extra if the TT-3060A Capsat Mobile Telephone is charging in listen mode. Standard charging does not supply enough power to prevent the Battery Pack from being drained if the TT-3060A Capsat Mobile Telephone is used in talk mode or data/fax mode. I NTERFACE • • • • • • • • X1, 1.3 mm Ø DC+, Solar Panel Interface / Light Weight Power Supply Connector. X2, 2.5 mm Ø DC+, 10-18Vdc Input / Fast Charge Power Supply Connector. X3, SMB jack, Antenna Cable connector. X4, DB9, DTE Interface. X5, 6 pole RJ11, 2 Wire Fax/Phone Interface. X6, 8 pole RJ11, Handset Connector under the Electronics Unit. X7, 8 pole RJ11, Handset Connector at the bottom of the Handset. X8, SMB jack, TT-3007A Patch Antenna connector at rear side of Antenna. Figure 7 - 5 : Connector X1, X2, X3,X4 and X5 placement S OLAR P ANEL I NTERFACE / L IGHT W EIGHT P OWER S UPPLY C ONNECTOR , X1 The X1 connector is a DC Power input for Standard charging the Battery Pack. The connector is a 1.3 mm Ø DC+ connector with positive centre polarity, and is designed to handle two sources of power, which are specified differently. When the X1 is used as Solar Panel Interface, the Solar Panel shall have Open Circuit Voltage (VOC) between 15 and 25 Vdc, and the Short Circuit Current (ISC ) must not exceed 350 mA. When the X1 is used with the TT-3682A Power Supply (Mains adapter) - Light Weight AC adapter or similar DC voltage source, this source shall deliver 15.0 Vdc and be able to deliver min. 5 W and max. 10 W. The X1 input provides the standard way to charge the Battery Pack. Page 4-72 15Oct99 Technical Specifications The charging process through the connector X1 is rather slow and therefore referred to as Standard Charge. The time to make a complete Standard Charge varies from 5 to10 hours (8 hours typically), provided that the TT-3060A Capsat Mobile Telephone is powered down. If the TT-3060A Capsat Mobile Telephone is Standard Charging and left in listen mode, then additional 20% charge time shall be expected. When the TT-3060A Capsat Mobile Telephone is in talk mode or data mode the Standard Charge process cannot deliver the amount of power taken from the Battery Pack. The X1 input is protected against most common fault conditions such as Power Supply with wrong polarity or over voltage conditions, but the input may need 2-3 minutes to recover. Do not use adapters or equivalent voltage sources with other than the specified: +15.0 Vdc and 5 W-10 W power. In general it is not recommended to apply power through both the X1 and the X2 connectors, as this may shorten the lifetime of the Battery Pack. Ground +Vdc Figure 7 - 6 : X1, Small DC Power input Connector 15Oct99 Page 4-73 Technical Specifications DC I NPUT / F AST C HARGE P OWER S UPPLY C ONNECTOR , X2 The DC Input connector is a 2.5 mm Ø DC+ Power connector with positive centre polarity. Supply Voltage: 10.5-18.5 Vdc min 55 W (Start Voltage min 10.5 V, Operating Voltage min 9.5 V) Power consumption: 380 mW 8W-9W 16 W - 24 W 0-15 W average in listen mode average in talk mode, depends on strength of the satellite link average in data mode, depends on strength of the satellite link average fast charger Note. Worst case operation requires minimum a 55 W supply. The Fast Charge Power Supply is a 18 Vdc 55 W Power Supply allow for unlimited use of the TT-3060A Capsat Mobile Telephone and simultaneous Fast Charge (approx. 2 hours charge). The X2 input is protected against most common fault conditions such as Power Supply with wrong polarity or over voltages, but the input may need 2-3 minutes to recover. As a rule do not apply power through both the X1 and X2 connectors, as this may reduce lifetime of the Battery Pack. Ground +10.5.. +18.5Vdc Figure 7 - 7 : X2, Large DC Power input Connector A NTENNA C ABLE PLUG , X3 The connector X3 is a SMB jack connector located at the rear side of the TT-3034A Electronics Unit and has to be connected to the X8, SMB jack connector on the TT-3007A Patch Antenna via an Antenna Cable for correct function (the error message “LINK ERROR” typically indicates an Antenna Cable problem). The X3 - X8 connection needs an Antenna Cable with two SMB plugs. When plugging the short (0.15 m) Antenna Cable into the Electronics Unit (X3 Connector), choose the Angled Plug end, as this will minimise the stress of the cable. Figure 7 - 8 : X3, Antenna Cable plug Page 4-74 15Oct99 Technical Specifications DTE I NTERFACE , X4 A serial EIA standard RS-232E I/O port is available on the TT-3060A Capsat Mobile Telephone. A Data Terminal, e.g. a computer with a serial communication program can be connected. Maximum baud rate is 9.6 kbps. It is also possible to configure the X4, DTE Interface connector as a Hayes compatible modem port. The DTE interface is a 9-pole female Sub-D connector (DB9). The X4 pin assignments and the pin functions are described in the Figure 7 -9 and Table 10 below: Figure 7 - 9 : X4, DTE Interface connector X4, DTE Interface connector Pin Number Pin Function 1 DCD 2 RXD 3 TXD 4 DTR 5 Ground 6 DSR 7 RTS 8 CTS 9 RI Signal Direction Output Output Input Input Output Input Output Output Table 10: X4 Pin Assignments 15Oct99 Page 4-75 Technical Specifications P HONE /F AX C ONNECTORS , X5 Two 2-wire 600 Ω 6 pole RJ-11 Phone/Fax connectors are available on the TT-3060A Capsat Mobile Telephone. A fax machine, e.g. the optional TT-3612A G-3 Fax Machine and/or a standard 2-wire DTMF telephone can be connected to X5. The Phone/Fax interface complies with CCITT Rec. G.473 and CCITT Rec. T.30 Group-III fax. The X5 pin assignments and the pin functions are described in the Figure 7 - 11 and table 12 below: Figure 7 - 11: 11: Phone/Fax Connector, X5 X5 Phone/Fax connectors Pin no. Pin Function 1 Not used 2 Not used 3 Signal A (Ring) 4 Signal B (Tip) 5 Not used 6 Not used Signal Direction Input / Output Input / Output Table 12: X5 Pin Assignments. Note: Due to the power saving scheme, devices connected to the X5 Phone/Fax Connector cannot wake the TT-3060A up from sleep mode. Page 4-76 15Oct99 Technical Specifications H ANDSET C ONNECTOR , X6 AND X7 The TT-3620B Operator Handset, which is standard equipment on the TT-3060A Capsat Mobile Telephone, is connected from X6 under the Electronics Unit to the X7 on the Handset. Audio signals, serial communication, and power supply for the Handset are supplied via the X6. The X6 - X7 pin assignments and the pin functions are described in the table 13 below. Refer to Figure 7 -13. Figure 7 - 13: 13: Handset Connector, X6, X7 X6 and X7, Handset connectors Pin no. Pin Function X6 / X7 1 RX In / Out 2 GND In / Out 3 TX Out / In 4 +5.2 V Out / In 5 ON In / Out 6 Ear Piece Out / In 7 GND 8 MIC In / Out Table 13: X10 Pin Assignments 15Oct99 Page 4-77 Technical Specifications TT-3007A P ATCH A NTENNA CONNECTOR , X8 The X8 is a SMB jack connector located at the rear side of the Patch Antenna. Refer to Figure 7 -15. The X8 connector has to be connected to the X3, SMB jack connector on the TT-3034A Electronics Unit via an Antenna Cable for correct function (the error message “LINK ERROR” typically indicates an Antenna Cable problem). The X3 - X8 connection needs an Antenna Cable with two SMB plugs and are indifferent to interchange. When plugging the short (0.15 m) Antenna Cable into the Patch Antenna X8 Connector, choose the straight Plug end, as this will minimise the stress of the cable. Page 4-78 15Oct99 Appendix A - List of Abbreviations 15Oct99 Page -79 Appendix A - List of Abbreviations A PPENDIX A - L IST OF A BBREVIATIONS AORE AORW CPU Codec DCE DSP DTE DTMF I/F Inmarsat I/O IMN IOR LCD LES MES MIDR MIR MSR NCS NMI NSR OID DID PABX PC PCB PIN POR PSU PSTN SCPC SNAC SMB SVR TNID UTC Page A-80 Atlantic Ocean Region East Atlantic Ocean Region West Central Processing Unit Speech encoder/decoder Data Circuit-terminating Equipment Digital Signal Processing Data Terminal Equipment Dual Tone Multi Frequency InterFace International Maritime Satellite Organisation Input/Output Inmarsat Mobile Number Indian Ocean Region Liquid Crystal Display Land Earth Station Mobile Earth Station MES ID Record MES Initialisation Record MES Status Record Network Co-ordinating Station Non Maskable Interrupt Network Status Record Originating Identification Digits Destination Identification Digits Private Automatic Branch eXchange Personal Computer Printed Circuit Board Personal Identification Number Pacific Ocean Region Power Supply Unit Public Switched Telephone Network Single Channel Per Carrier Single Network Access Code SubMiniature coaxial connector Scrambling Vector Record Terrestrial Network ID Universal Time Co-ordinated. 15Oct99 Appendix B - Antenna Azimuth & Elevation A PPENDIX B - A NTENNA A ZIMUTH & E LEVATION Figure 7 - 1 : Atlantic Ocean Region - West 15Oct99 Page B-1 Appendix B - Antenna Azimuth & Elevation Figure 7 - 2 : Atlantic Ocean Region - East Page B-2 15Oct99 Appendix B - Antenna Azimuth & Elevation Figure 7 - 3 : Pacific Ocean Region 15Oct99 Page B-3 Appendix B - Antenna Azimuth & Elevation Figure 7 - 4 : Indian Ocean Region Page B-4 15Oct99 Appendix C - List of Land Earth Stations A PPENDIX C - L IST OF L AND E ARTH S TATIONS The following Land Earth Stations are planned or already in operation. A TLANTIC O CEAN R EGION - W EST Operator Comsat BT KDD Telenor OTE France Telecom ST12 IDB Morsviazsputnik T-Mobil Telstra Italia Telecom 15Oct99 LES Access Code 001 002 003 004 005 011 012 013 015 111 222 555 Name Southbury Goonhilly Burum Eik Thermopylae Laurentides Burum Laurentides Laurentides Laurentides Laurentides Fucino Page C-1 Appendix C - List of Land Earth Stations A TLANTIC O CEAN R EGION - E AST Operator LES Access Code Comsat 001 BT 002 KDD 003 Telenor 004 France Telecom 011 Station 12 012 IDB 013 Morsviazsputnik 015 Saudi Telecom 025 T-Mobil 111 Hong Kong Telecom 118 Telstra 222 Page C-2 Name Southbury Goonhilly Burum Eik Aussaguel Burum Laurentides Laurentides Jeddah Raisting Laurentides Laurentides 15Oct99 Appendix C - List of Land Earth Stations P ACIFIC O CEAN R EGION Operator LES Access Code Comsat 001 BT 002 KDD 003 Indosat 007 France Telecom 011 ST12 012 IDB 013 Morsviazsputnik 015 T-Mobil 111 Singapore Telecom 210 Telstra 222 15Oct99 Name Santa Paula BT Pacific Yamaguchi Jatiluhur Aussaguel Yamaguchi Perth Perth Perth Sentosa Perth Page C-3 Appendix C - List of Land Earth Stations Indian Ocean Region Operator Comsat KDD Telenor Indosat France Telecom ST12 IDB Morsviazsputnik Malaysia Telecom T-Mobil Singapore Telecom Telstra VSNL Page C-4 LES Access Code 001 003 004 007 011 012 013 015 060 111 210 222 306 Name Comsat Eurasia Yamaguchi Eik Jatiluhur Perth Burum Perth Perth Kuantan Raisting Sentosa Perth Arvi 15Oct99 Appendix D - 2-Digit Service Codes A PPENDIX D - 2-D IGIT S ERVICE C ODES Below are listed the 2-digit service codes which may be supported by individual LESs in the Inmarsat-M system, depending on their policy. 2-digit code Service 00 Automatic calls 11 International Operator 12 International Information 13 National Operator 14 National Information 17 Telephone Call Booking 20 Access to a Maritime PAD 23 Abbreviated dialling 24 Post fax 31 Maritime Enquiries 32 Medical Advice 33 Technical Assistance 34 Person-to-Person call 35 Collect call 36 Credit Card call 37 Time and Duration 38 Medical Assistance 39 Maritime Assistance 41 Meteorological Reports 42 Navigational Hazards and Warnings 43 Ship Position reports 57 Retrieval of mailbox messages 6x Administration, specialised use 70 Databases 91 Automatic Line Test 92 Commissioning tests 15Oct99 Page D-1 Appendix D - 2-Digit Service Codes . Page D-2 15Oct99 Appendix E - Tone Signals A PPENDIX E - TONE S IGNALS In the following the tone signals in the Inmarsat-M system are defined. 1 2 3 4 5 6 7 Proceed-to-dial Ringing Busy Congestion Out-of-Service Figure 7 - 5 : Tone signals The proceed-to-dial tone consists of 2 continuous tones with frequencies of respectively 350 Hz and 440 Hz. The ringing tone is used when the telephone by the called subscriber is ringing. The ringing tone is used in an outgoing satellite call only. It is a frequency of 425 Hz, 1.0 seconds ON, 4.0 seconds OFF, 20% duty cycle. Please do not mix the ringing tone together with the tone used for an incoming call. The tone for an incoming call is not a part of the Inmarsat-M system. It is completely designed by the customer. The busy tone is used if the called subscriber is busy. It is a frequency of 425 Hz, 0.5 seconds ON, 0.5 seconds OFF, 50% duty cycle. The congestion tone is used if the Inmarsat-M network is congested. It is a frequency of 425 Hz, 0.25 seconds ON, 0.25 seconds OFF, 50% duty cycle. The out-of-service tone is used if the called number is not available. It is a continuous tone with a frequency of 425 Hz. 15Oct99 Page E-1 Appendix E - Tone Signals . Page E-2 15Oct99 Appendix F - List of Cause Codes A PPENDIX F - L IST OF C AUSE C ODES This appendix lists the cause codes used in relation to incoming/outgoing voice/fax/data calls. In case of - abnormal clearing of a call by the Capsat® Telephone. - abnormal clearing of a call by the LES or the NCS. an error message is displayed in the handset. In many cases (but not all!) this error message is a translated text of a Cause Code sent to/received from the satellite. In the menu system (Main Menu - Status - Bulletin - SU CC sent/SU CC rec) on the handset the actual hexadecimal Cause Codes sent to/received from the satellite are displayed. Below is a list of the Cause Codes and their corresponding text displayed in the handset. The Cause Codes are defined by Inmarsat. By experience we know that you might receive other Cause Codes from the LESs not defined by Inmarsat. In this case the Cause Code is displayed as the 4-digit hexadecimal value in the handset. Auth. check failed (1197) Call cleared by the LES because the authentication check (SIM card check) has failed during the call setup. Auth. query not received (14C2) Call cleared by the MES because the authentication query has not been received from the LES (first message from LES to MES). Auth. SSU not received (15C2) Call cleared by the MES because an expected supplementary service has not been received from the LES. Auth. reply invalid (14A5) Call cleared by the LES because of an invalid authentication reply (SIM card check data) from the MES. 15Oct99 Page F-1 Appendix F - List of Cause Codes Auth. reply not received (19C5) Call cleared by the LES because an authentication reply (SIM card check data) has not been received from the MES. Call Cleared (110F) Call cleared at terrestrial side due to a normal on-hook (hangup). Call failed circuit fail (116F) Call cleared at terrestrial side due to a circuit failure. Call failed terr. clear (126F) Call cleared at terrestrial side due to an early clear during call setup. Call interrupted (1263) Call cleared by MES. Synchronisation with the LES was lost for more than 16.7 seconds maybe due to blockage etc. Call preempt at LES (1145) Call cleared by LES. A higher priority call arriving at the LES causes this call to be cleared. Call preempt at MES (1541) Call cleared by MES due to an early user clear during the call setup. Called party busy (111F) Call cleared by LES. Called number is busy. Can't accept present (1192) Call cleared by the MES because incoming calls are not allowed (barred) or due to an invalid spot beam ID in the MES. Insufficient digits (12D1) Call cleared by LES. Insufficient number of digits in the dialled number. Invalid country code (15D1) Call cleared by the LES because an invalid country code has been specified in the called number. Invalid MES ID (11A8) Call cleared by the NCS because the NCS cannot accept the MES IDs (MES has not been commissioned ?). Page F-2 15Oct99 Appendix F - List of Cause Codes Invalid scrambling (12D2) Call cleared by LES. Invalid scrambling vector sent during call setup. Invalid service (12A5) Call cleared by LES. Service not authorised at this LES. Invalid service address (13D1) Call cleared by LES. Dialled number is invalid. LES clear unspecified (11B5) Call cleared by LES for unspecified reason. LES congested (1155) Call cleared by LES. No channel available. LES congested (1156) Call cleared by LES. No channel unit available. LES congested (1254) Call cleared by LES. No channel and circuit available. LES long interruption (1166) Call cleared by the LES because the LES has lost the synchronisation with the MES for a long period. Les No assignment (11C5) Call cleared by LES. LES time-out due to no assignment received from NCS during call setup. LES time-out (112F) Call cleared by LES. LES time-out due to no answer received from MES. LES time-out (12C5) Call cleared by LES. LES time-out due to no dialled number received from MES during call setup. LES time-out (13C5) Call cleared by LES. LES time-out due to no scrambling vector received from MES during call setup. LES time-out (14C5) Call cleared by LES. LES timeout due to no dialled number and no scrambling vector received from MES during call setup. MES busy (1110) Call cleared by MES. MES busy with another call. 15Oct99 Page F-3 Appendix F - List of Cause Codes MES busy (1210) Call cleared by MES. MES in progress establishing an incoming call as user makes an off-hook. MES busy (1110) Incoming call cleared by the MES because the MES is already busy with another call. MES can't accept (1182) Call cleared by MES. MES cannot accept incoming call due to invalid parameters in call setup from NCS or due to unsupported service at MES. MES clear unspecified (11B2) Call cleared by MES for unspecified reason. MES not authorised (11A5) Call cleared by LES. MES not authorised at this LES. MES still transmitting (11E5) Call cleared by the LES because the MES is still transmitting 5 seconds after having cleared the call itself. MES time-out (1120) Call cleared by MES. MES time-out due to no response from NCS in initial call setup (MES not commissioned at NCS ?) NCS reject MES busy (1118) Call cleared by the NCS because the MES according to the NCS is already in progress with a call (is busy). NCS reject of call (11B8) Call cleared by the NCS for unspecified reason. NCS reject same LES (11E8) Call cleared by the NCS because the MES according to the NCS is already in progress with a call and is trying to make a new call through the same LES already used. New call is being set-up (12D5) Call cleared by LES. New call is being set-up from MES. No MES connect (17C5) Call cleared by LES. LES time-out due to no MES connect (offhook) received from MES during call setup. Page F-4 15Oct99 Appendix F - List of Cause Codes No MES response (11C8) Call cleared by the NCS because no MES response was received at the NCS during the call setup. No terr. answer (13C2) Call cleared by MES. MES time-out due to no answer (off-hook) from called number within 185 seconds. No SCPC carrier (12C6) Call cleared by the LES because no SCPC carrier was detected from the MES during the call setup. Not installed (1180) Incoming call cleared by the MES because the call was address to a terminal (different from handset, aux phone, fax, data) not available by the MES. Premature call clear (1641) Call cleared prematurely by the user (on-hook, hang-up) while setting up the SCPC channel. Repoint antenna (1363) Call cleared by the MES because the user commands the MES/antenna into another ocean region. SCPC channel not avail. (1158) Call cleared by the NCS because no SCPC channels are currently available. Service not available (1185) Call cleared by LES. Service not provided at this LES. Service not available (1195) Call cleared by LES. Service temporarily not available at this LES. SIM PID conflict (16D1) Call cleared by the LES because the SIM card has a different identify than expected (replace of SIM card with another without LES knowing ?). SIM PID invalid (15A5) Call cleared by the LES because the SIM card is not authorised for any service at this LES. SIM service invalid (16A5) Call cleared by the LES because the SIM card is not authorised for the requested service at this LES. 15Oct99 Page F-5 Appendix F - List of Cause Codes Spot beam id invalid (11D2) Call cleared by NCS. Spot beam ID in call setup invalid. Terr. i/f congested (1154) Call cleared by LES. Terrestrial circuits are congested. Page F-6 15Oct99 Appendix F - List of Cause Codes Below is a list of cause codes used internally in the MES. They are not defined by Inmarsat and they are not sent to/received from the satellite. Call Cleared (0007) Call cleared by MES due to a normal user on-hook (hang-up). Call rejected (0008) Call rejected by MES because it is not idle (Bulletin Board not received etc.) Call spacing too short (0009) Call rejected by MES because there is too little space (seconds) between the previous and the present initiating of a call. Congestion (0002) Call rejected by MES because a call is already in progress. Data out is barred (0116) Call rejected by MES. Outgoing data calls are not allowed. Fax out is barred (0115) Call rejected by MES. Outgoing fax calls are not allowed. Invalid phone number (010B) Call rejected by MES because of a fault in the dial string format or because a check against the Allowed Dial list fails. MES time-out (0004) Call rejected by MES because more than 45 seconds have been used to enter the subscriber number. No Prepaid minutes left (0113) Call rejected by MES. No prepaid minutes left in MES for call. No sync from NCS (000D) Call rejected by MES. No synchronisation from NCS. Phone out is barred (0114) Call rejected by MES. Outgoing voice calls are not allowed. Unknown LES (0015) Call rejected by MES because the LES called is not in the Bulletin Board or does not support the service required. 15Oct99 Page F-7 Appendix G - List of System Errors A PPENDIX G - L IST OF S YSTEM E RRORS In the following the system errors that may occur during a Capsat-M start-up are defined. A system error e.g. 'System error 01 FC00:1325' is displayed with an error code in hex and an execution address. The Capsat-M will stop any further execution. Please contact your agent/manufacturer. Error code Text 00h No error 01h Watchdog time-out 02h Overflow 03h Array bounds 04h Illegal opcode 05h Numeric escape 06h Divide error 07h Memory error 08h BIOS checksum error 09h No user program installed 0Ah Illegal NMI encountered 0Bh Unexpected interrupt 0Ch Single step 0Dh Breakpoint 0Eh Watch not advancing 0Fh EEPROM r/w test failed 10h EEPROM read test failed 11h Memory error (not 512KB) 12h IIc bus conflict 13h RxTxIIc bus conflict 14h Unknown error code 15h Last err 15Oct99 Page G-1 Appendix G - List of System Errors . Page G-2 15Oct99 Appendix H - Trouble Shooting A PPENDIX H - TROUBLE S HOOTING This appendix gives explanations and hints for trouble shooting. System errors If a system error occurs during start-up it will be written in the display, e.g. 'System error 01 FC00:1325'. Please write down the error code and contact your agent. A complete list of system errors is listed in appendix G. No synchronisation with NCS Please check that the antenna has a free line of sight. Also check Area selected, azimuth/elevation angle for antenna and beeps from the antenna beeper. Additionally you can use the calculated Elevation and Azimuth values and the Carrier/Noise value under the status menu to adjust and fine adjust the antenna. Handset display not updated to e.g. 'IOR:PTT TELE' Press the A-key until the text 'Wait for NCS' appears in the display. Normally the Bulletin Board will be up to date quickly but if it has been changed since last update you may have to wait for some minutes. Antenna alarm If the antenna is not connected or connected after power-up you will get an antenna alarm. If you continuously get antenna alarms each time the Capsat-M is powered and you are sure about following the antenna set-up procedures please make a printout of the alarm log and the status and contact your agent. If you do not have a printer the alarms in the alarm log and the status must be written manually. Other alarms If you continuously get alarms each time the Capsat-M is powered please make a printout of the alarm log and the status and contact your agent. If you do not have a printer the alarms in the alarm log and the status must be written manually. 15Oct99 Page H-1 Appendix H - Trouble Shooting .. Page H-2 15Oct99 Appendix I - Extended Error Codes A PPENDIX I - E XTENDED E RROR C ODES This appendix lists the defined extended error codes (and associated text) for the AT+WQ command (refer to chapter 4, ‘Data Modem’) Numeric Text 100 Syntax Error 101 Invalid parameter 102 Missing mandatory parameter 103 Too many parameters 104 Invalid parameter length 200 Facility unavailable 201 No call announcement 202 Not connected 300 MES busy 301 MES unavailable 302 MES not responding 400 Satellite not found 401 Invalid LES 402 Invalid TNID 15Oct99 Page I-1 Appendix I - Extended Error Codes . Page I-2 15Oct99 Appendix J - Search Algorithms A PPENDIX J - S EARCH A LGORITHMS Automatic search (only Capsat® Mobile Telephone) The automatic search makes it easy for the user to search the sky for a valid signal from a satellite without knowing the position of the satellite. Power On At power on the Capsat® Telephone will start searching the sky for a valid signal from a satellite. The message "Search for - satellite" is displayed in the handset while the user is moving the antenna. If a signal is found the user will be prompted on the handset with a message e.g. "Atlantic East - Accept ?". If the user uses the C-key the found Area/Ocean Region will be selected and the Capsat® Telephone will exit the automatic search mode. After a few seconds the normal message e.g. "AORE:ST12" will be displayed in the handset meaning that calls can now be made. If the user uses the A-key the Capsat® Telephone will also exit the automatic search mode but it will select the Area/Ocean Region last chosen. If the last chosen Area/Ocean Region is not equal to the Area/Ocean Region found by the Capsat® Telephone the user will have to find the signal from this Area/Ocean Region manually before calls can be made. If the signal is lost the message "Search for - satellite" will once again be displayed in the handset meaning that no signal is available. To ease the handling of fixed positioned Capsat® Telephones one exception exists. If the Capsat® Telephone finds immediate signal of the Area/Ocean Region last chosen on power on the user will not be prompted for an accept, but the Capsat® Telephone will 15Oct99 Page J-1 Appendix J - Search Algorithms automatically select the Area/Ocean Region and exit the automatic search mode. Selecting Area/Ocean Region When the Capsat® Telephone is not operating in automatic search mode an extra entry "Automatic" is added to the Area menu (see the chapter "Menu System"). If the entry "Automatic" is selected the Capsat® Telephone will enter the automatic search mode as described above. If an Area/Ocean Region is selected the Capsat® Telephone will exit the automatic search mode if active. Page J-2 15Oct99 Appendix J - Search Algorithms Search algorithm for Maritime antenna The search algorithm controls the maritime antenna and gives a quick and reliable tracking of the Area/Ocean Region selected. Power On At power on the maritime antenna will make some internal initialisation before it is ready for use (up to 1 minute). The gyro will compensate for any movements of the maritime antenna immediately when it is ready. After the maritime antenna becomes ready the Capsat® Telephone will position the maritime antenna to azimuth and elevation angles last stored in the Capsat® Telephone. If a valid signal above the stored signal threshold level is found at this position the maritime antenna is commanded into step tracking. After a few seconds the normal message e.g. "AORE:ST12" will be displayed in the handset meaning that the Capsat® Telephone is now ready for calls. During the idle period where no activity is made on the Capsat® Telephone the azimuth and elevation angles of the antenna together with the signal threshold level will be stored with regular intervals in the Capsat® Telephone and used at next power on. If above conditions are not fulfilled the Capsat® Telephone will start either an initial skyscan or a full skyscan. Full skyscan will be made the very first time the Capsat® Telephone is power on. Short algorithm description Position antenna -> Step tracking -> Ready Selecting Area/Ocean Region Selecting an Area/Ocean Region from the Area menu (see the chapter "Menu System") always activates a full skyscan. This also applies to a reselection of the current selected Area/Ocean Region. 15Oct99 Page J-3 Appendix J - Search Algorithms Short algorithm description Full skyscan -> Position antenna -> Step tracking -> Ready Permanent loss of signal If the Capsat® Telephone loses the signal permanently it will start a reacquisition skyscan. For setting of the permanent loss of signal time-out, see the section "Sync Lost Tm" in chapter "Menu System". Short algorithm description Reacquisition skyscan -> Step tracking -> Ready Description of the various scan algorithm Full skyscan The full skyscan searches the whole sky (0-360 degrees in azimuth, 090 degrees in elevation) for the best signal from the satellite belonging to the Area/Ocean Region currently selected. The message "Full skyscan - started" will be displayed in the handset. One channel (one frequency) is used at a time. If no signal is found during the first full scan the next channel (frequency) belonging to the selected Area/Ocean Region is used for the next full scan etc. If however a signal is found during the full scan a signal threshold level based on the best received signal is stored in the Capsat® Telephone together with the azimuth and elevation angles of the best received signal. The Capsat® Telephone will now position the maritime antenna to these azimuth and elevation angles and follow the description mentioned at power on. Please note that if a full skyscan has been made with success once it is not performed anymore unless • the Area/Ocean Region is changed • the signal is lost or below the signal threshold level for a very long time (app. 15 minutes). Page J-4 15Oct99 Appendix J - Search Algorithms Initial skyscan The initial skyscan searches the sky (0-360 degrees in azimuth, 0-90 degrees in elevation) for the first signal from the satellite belonging to the Area/Ocean Region currently selected. The message "Init skyscan - started" will be displayed in the handset. One channel (one frequency) is used at a time. If no signal is found during the first full scan the next channel (frequency) belonging to the selected Area/Ocean Region is used for the next full scan etc. If however a signal is found which is above the signal threshold level the Capsat® Telephone will command the antenna into step tracking and follow the description mentioned at power on. Reacquisition skyscan The reacquisition skyscan searches a part of the sky for the first signal from the satellite belonging to the Area/Ocean Region currently selected. A part of the sky may be 360 degrees turn in azimuth with fixed elevation angle or a circle of 20-30 degrees around the current azimuth/elevation position. The message "Re. skyscan - started" will be displayed in the handset. If no signal is found within app. 15 minutes a full skyscan will be performed. If however a signal is found which is above the signal threshold level the Capsat® Telephone will command the antenna into step tracking and follow the description mentioned at power on. Step tracking The step tracking fine-tunes the antenna position towards the satellite. The message "Step track. - started" will be displayed in the handset. The Capsat® Telephone sends continuous signal information to the maritime antenna. The step tracking will takes place also when making calls although the update rate will be slower. 15Oct99 Page J-5 Appendix J - Search Algorithms Search algorithm for Land Mobile antenna The search algorithm controls the land mobile antenna and gives a quick and reliable tracking of the Area/Ocean Region selected. Power On At power on the land mobile antenna will make some internal initialisation before it is ready for use (a few seconds). NOTE: The land mobile antenna may NOT be turned within the first 5 seconds after power on because these 5 seconds are used for gyro adjustments. After the land mobile antenna becomes ready the Capsat® Telephone will check the current position of the land mobile antenna. If a valid signal above the stored signal threshold level is found at the current position the land mobile antenna is commanded into step tracking. After a few seconds the normal message e.g. "AORE:ST12" will be displayed in the handset meaning that the Capsat® Telephone is now ready for calls. During the idle period where no activity is made on the Capsat® Telephone the signal threshold level will be stored with regular intervals in the Capsat® Telephone and used at next power on. If above conditions are not fulfilled the Capsat® Telephone will start a reacquisition skyscan. NOTE: During the first reacquisition skyscan after power on the gyro will not compensate for any movements of the land mobile antenna. The land mobile antenna will scan the sky with a fixed scan rate (degrees pr. second) relative to the surface where the antenna is mounted. After 60 seconds in step tracking the gyro will come in effect. Short algorithm description Page J-6 15Oct99 Appendix J - Search Algorithms Check position -> Step tracking -> Ready Selecting Area/Ocean Region Selecting an Area/Ocean Region from the Area menu (see the chapter "Menu System") always activates a full skyscan. This also applies to a selecting of the current selected Area/Ocean Region. NOTE: During the fine tuning the land mobile antenna may not be moved. Short algorithm description Full skyscan -> Fine tuning -> Reacquisition skyscan -> Step tracking -> Ready Permanent loss of signal If the Capsat® Telephone loses the signal permanently it will start a reacquisition skyscan. For setting of the permanent loss of signal time-out, see the section "Sync Lost Tm" in chapter "Menu System". Short algorithm description Reacquisition skyscan -> Step tracking -> Ready Description of the various scan algorithm Full skyscan The full skyscan searches the whole sky (0-360 degrees in azimuth, 090 degrees in elevation) for the best signal from the satellite belonging to the Area/Ocean Region currently selected. The message "Full skyscan - started" will be displayed in the handset. One channel (one frequency) is used at a time. If no signal is found during the first full scan the next channel (frequency) belonging to the selected Area/Ocean Region is used for the next full scan etc. 15Oct99 Page J-7 Appendix J - Search Algorithms If however a signal is found during the full scan a signal threshold level based on the best received signal is stored in the Capsat® Telephone. When a signal above this signal threshold level is found during the next scan the Capsat® Telephone will command the land mobile antenna into fine tuning. Please note that if a full skyscan has been made with success once it is not performed anymore unless • the Area/Ocean Region is changed • the signal is lost or below the signal threshold level for a very long time (app. 15 minutes). Fine Tuning The fine tuning finds the best elevation angle of the land mobile antenna. The Capsat® Telephone sends continuous signal information to the land mobile antenna during the fine tuning. NOTE: During the fine tuning the land mobile antenna may not be moved. Reacquisition skyscan The reacquisition skyscan searches the sky for the first signal from the satellite belonging to the Area/Ocean Region currently selected. The search is made as a 360 degrees turn in azimuth with the fixed elevation angle found during the last fine tuning. The message "Re. skyscan - started" will be displayed in the handset. If no signal is found within app. 15 minutes a full skyscan will be performed. If however a signal is found which is above the signal threshold level the Capsat® Telephone will command the antenna into step tracking and follow the description mentioned at power on. Step tracking The step tracking fine-tunes the antenna position towards the satellite. The message "Step track. - started" will be displayed in the handset. The Capsat® Telephone sends continuous signal information to the land mobile antenna. The step tracking will takes place also when making calls although the update rate will be slower. Page J-8 15Oct99 Appendix J - Search Algorithms 15Oct99 Page J-9 Appendix K - AT Command Set A PPENDIX K - AT C OMMAND S ET The commands listed below are described without the preceding ‘AT’ letters. Basic AT Commands When a command that requires a value is given without a value the value is assumed to be 0, e.g. ATH is similar to ATH0. The factory setting values for the commands are printed in bold text. A Manual answer of incoming call. For automatic answering of a data call refer to the description of the S0-register. Other commands specified after the A command will not be executed. AT Appears at the beginning of every command line. If it is specified without any successors the Capsat® Telephone will respond with an ‘OK’ result message. Can be used to check if you have contact with the Capsat® Telephone from the DTE. D_ Dial command. Only the digits 0-9 following this command will be bypassed in the dial string. The characters ‘A’-’D’ can be specified for compatibility with ordinary data modems but are not used. P Pulse dialling. Not used but can be specified for compatibility with ordinary data modems. T Touch-tone dialling. Not used but can be specified for compatibility with ordinary data modems. S=<n> Short number from handset phone book. This command will dial a phone number stored in the phone book in the handset. The phone number is identified by the short number <n>, max. 2 digits. 15Oct99 Page K-1 Appendix K - AT Command Set E_ H_ E0 E1 H0 H1 L_ L0 L1 L2 L3 M_ M0 M1 M2 O P Q_ Q0 Q1 S T Page K-2 This specification will also restrict the use of the dial format described in the section above: ‘Making data calls’. Echo commands at DTE. Commands are not echoed at the DTE. Commands are echoed at the DTE. Force Capsat® Telephone Off/On-hook. Force Capsat® Telephone On-hook (hang up). Force Capsat® Telephone Off-hook (make busy). May be followed by a dial command. Set volume of speaker. Not used but can be specified for compatibility with ordinary data modems. Low speaker volume. Low speaker volume. Medium speaker volume. High speaker volume. Setting of internal speaker. Not used but can be specified for compatibility with ordinary data modems. Internal speaker Off. Inter speaker On until carrier detected. Internal speaker always On. Return to Data Mode. Other commands specified after the O command will not be executed. Set pulse dialling as default. Not used but can be specified for compatibility with ordinary data modems. Responses sent by Capsat® Telephone. Capsat® Telephone sends responses. Capsat® Telephone does not send responses. Set and display S-register values. See the section describing these registers below. Set touch-tone dialling as default. 15Oct99 Appendix K - AT Command Set V_ X_ V0 V1 X0 X1 X2 X3 X4 Z_ Z0 Z1 +++ 15Oct99 Not used but can be specified for compatibility with ordinary data modems. Format of responses from Capsat® Telephone Numeric responses. Word responses. Connect result code format. CONNECT result code entering Data Mode dial tone and busy detection are disabled. CONNECT <text> result code entering Data Mode dial tone and busy detection are disabled. CONNECT <text> result code entering Data Mode dial tone is enabled, busy detection is disabled. CONNECT <text> result code entering Data Mode dial tone is disabled, busy detection is enabled. CONNECT <text> result code entering Data Mode dial tone and busy detection are enabled. Retrieve profile 0 or 1 as active configuration. Other commands specified after the Z command will not be executed. This command will change the DTE-DCE baudrate as in the retrieved profile. Retrieve profile 0 as active configuration. Retrieve profile 1 as active configuration. Switch from Data Mode to Online Command Mode. After the 3 escape sequence characters have been received a time-out specified in the S12-register must run out before the new mode is granted with an ‘OK’ result code from the Capsat® Telephone to the DTE. The S2-register contains the ASCII value of the escape character. Page K-3 Appendix K - AT Command Set Extended AT& Commands When a command that requires a value is given without a value the value is assumed to be 0, e.g. AT&Y is similar to AT&Y0. The factory setting values for the commands are printed in bold text. &C_ Data Carrier Detect (DCD) signal behaviour. &C0 DCD always On. &C1 DCD changes in accordance with protocol. &D_ Data Terminal Ready (DTR) signal behaviour. &D0 DCE ignores DTR. &D1 Online Command Mode entered upon On-> Off. &D2 Clearing of call upon On->Off. &F Reset active configuration to factory defaults. This command will leave the DTE-DCE baudrate (refer to +IPR commands) specified in the active configuration unchanged. &V Display active configuration, profile 0 and 1. &W_ Store active configuration as profile 0 or 1. &W0 Store active configuration as profile 0. &W1 Store active configuration as profile 1. &Y_ Choose profile 0 or 1 upon Power On or reset. &Y0 Choose profile 0 upon Power On or reset. &Y1 Choose profile 1 upon Power On or reset. Page K-4 15Oct99 Appendix K - AT Command Set S-register AT Commands The S-register AT commands display and set the S-registers inside the Capsat® Telephone. The command syntax is described for each command. S0 Auto-Answer Ring. Specifies the number of rings that must occur before the Capsat® Telephone automatically answers an incoming call. This function is disabled with a value of 0. Factory setting 0 Auto-Answer Ring disabled Valid range of values 0 Auto-Answer Ring disabled 1-255 S0=<n> Set value of register. S0? Display current value of register. S1 Ring Counter. Records the number of incoming rings when the Capsat® Telephone rings. When this value equals the value in S0 and is greater than 1 the Capsat® Telephone will go Off-hook. Factory setting 0 Valid range of values 0-255 S1=<n> Set value of register. S1? Display current value of register. S2 Escape Code Character. Specifies the ASCII value which is used as escape code character. A value greater than 127 disable the escape feature and prevent from returning to the Command Mode. Factory setting 43 15Oct99 Page K-5 Appendix K - AT Command Set S2=<n> S2? S3 S3=<n> S3? S4 S4=<n> S4? S5 Page K-6 Valid range of values 0-255 Set value of register. Display current value of register. Carriage Return Character. Specifies the ASCII value of the carriage return (end of line) character. All command lines must end with this value in order to give a successful handling of the lines. Factory setting 13 Valid range of values 0-127 Set value of register. Display current value of register. Line Feed Character. Specifies the ASCII value of the line feed character. It is used when formatting output for result codes, info text etc. from Capsat® Telephone to DTE. Factory setting 10 Valid range of values 0-127 Set value of register. Display current value of register. Backspace Character. Specifies the ASCII value of the backspace character. It is both the character created by pressing the <BS> key and the character echoed to move the cursor to the left. It is strongly recommended not to set the value between 33 and 126. Factory setting 8 Valid range of values 0-127 15Oct99 Appendix K - AT Command Set S5=<n> S5? S6 S6=<n> S6? S7 S7=<n> S7? S8 S8=<n> S8? 15Oct99 Set value of register. Display current value of register. Dial Tone Wait Time. Specifies how many seconds the Capsat® Telephone should wait after going Off-hook before dialling the first digit in the Dial command. Not used but can be specified for compatibility with ordinary data modems. Factory setting 2 Valid range of values 0-255 Set value of register. Display current value of register. Remote Carrier Wait Time. Specifies how many seconds the Capsat® Telephone should wait for connection with the modem called. Not used but can be specified for compatibility with ordinary data modems. Factory setting 45 Valid range of values 1-255 Set value of register. Display current value of register. Comma Pause Time. Specifies how many seconds to pause for each comma ‘,’ it encounters in the Dial command line. Not used but can be specified for compatibility with ordinary data modems. Factory setting 2 Valid range of values 0-255 Set value of register. Display current value of register. Page K-7 Appendix K - AT Command Set S9 S9=<n> S9? S10 S10=<n> S10? S11 S11=<n> S11? Page K-8 Carrier Detect Response Time. Specifies how long in tenths of a second the DCD signal at the modem called must be present for the Capsat® Telephone to recognise it. Not used but can be specified for compatibility with ordinary data modems. Factory setting 6 Valid range of values 0-255 Set value of register. Display current value of register. Carrier Loss Time. Specifies how long in tenths of a second before the Capsat® Telephone disconnects the line after having detected loss of DCD signal at the modem called. Not used but can be specified for compatibility with ordinary data modems. Factory setting 14 Valid range of values 0-255 Set value of register. Display current value of register. Touch-tone Dialling Speed. Specifies the time in milliseconds between each DTMF tone in the Dial command. Not used but can be specified for compatibility with ordinary data modems. Factory setting 95 Valid range of values 50-255 Set value of register. Display current value of register. 15Oct99 Appendix K - AT Command Set S12 S12=<n> S12? 15Oct99 Escape Character Guard Time. Specifies the timeout in 1/50 of a second after having received the escape sequence characters, before the Capsat® Telephone sends an ‘OK’ result code to the DTE. Factory setting 50 Valid range of values 10-255 Set value of register. Display current value of register. Page K-9 Appendix K - AT Command Set Extended AT+I, +G and +W Commands The extended AT+I, AT+G and AT+W commands are non-standard features compared with ordinary data modems. Some of the commands are specially designed for the Inmarsat-phone mini-M system. All the extended commands must end with a ‘;’. The factory setting values for the commands are listed in bold. +GCAP This command returns the major classes of extensions supported by the Capsat® Telephone. +GCAP Display classes +GCAP=? Return OK result code +GMI This command displays an identification of the manufacturer. +GMM This command displays an identification of the model. +GMR This command displays the revision number. +IFC This command specifies the local flow control between the DTE and the Capsat® Telephone (DCE). The <DCE-DTE> parameter specifies how the DTE controls the flow of data from the Capsat® Telephone. If the parameter is omitted the factory setting <DCEDTE>=2 will be used. The <DTE-DCE> parameter specifies how the Capsat® Telephone controls the flow of data from the DTE. If the parameter is omitted the value specified by <DCE-DTE> will be used. +IFC=[<DCE-DTE>[,<DTE-DCE>]] Set flow control +IFC? Display current settings +IFC=? Display available settings <DCE-DTE> 0 No flow control 1 XON/XOFF (software flow control) 2 RTS (hardware flow control) <DTE-DCE> 0 No flow control 1 XON/XOFF (software flow control) 2 CTS (hardware flow control) Page K-10 15Oct99 Appendix K - AT Command Set This command specifies the data rate at which the Capsat® Telephone will accept commands. The <rate> parameter specifies the rate in bits per second at which the DTE-Capsat® Telephone interface will operate. If the parameter is omitted the factory setting <rate>=9600 will be used. +IPR=<rate> Set data rate +IPR? Display current setting +IPR=? Display available setting <rate> 1200 2400 4800 9600 +W This command returns the extensions to the PCCA STD-101 supported by the Capsat® Telephone. +W Display extensions +W=? Return OK result code +WKSIZE This command sets the maximum ARQ window size for subsequent data calls using ARQ mode. The <n> parameter specifies the maximum ARQ window size. If the parameter is omitted the factory setting <n>=15 will be used. +WKSIZE=[<n>] Set window size +WKSIZE? Display current setting +WKSIZE=? Display available setting <n> 1-63 factory setting: 15 +WINMARSAT This command returns all the “+W<text>“ commands for use with +WS46=11 (the only valid value). +WINMARSAT Display commands +WINMARSAT=? Return OK result code +WLES This command selects the LES for the next outgoing data call. The <nnn> parameter specifies the LES Access Code and must consist of three digits and be available in the Bulletin Board. If the parameter is omitted the +IPR 15Oct99 Page K-11 Appendix K - AT Command Set default LES Access Code selected from the handset is used. +WLES=[<nnn>] Select LES Access Code +WLES? Display selected LES +WLES=? Display available LESs <nnn> 001-255 +WOR This command make a permanent change of Ocean Region/Area. No command may follow +WOR=<n> on the same command line. The <n> parameter specifies the Area. +WOR=<n> Select Ocean Region/Area +WOR Display selected Area +WOR=? Display available Areas <n> 0 Atlantic Ocean Region West 1 Atlantic Ocean Region East 2 Pacific Ocean Region 3 Indian Ocean Region 4 Spare 1 5 Spare 2 6 Spare 3 7 Spare 4 +WPRI This command selects the priority for the next outgoing data call. The <n> parameter specifies the priority. The factory setting is <n>=0. +WPRI=<n> Select priority +WPRI Display selected priority +WPRI=? Display available priorities <n> 0 Routine 1 Safety 2 Urgency +WQ This command displays an extended result code/cause code of the last action taken. If the last action taken was a call clearing the cause code for Page K-12 15Oct99 Appendix K - AT Command Set this call will be displayed. Otherwise an extended result code will be displayed. Please refer to appendix F for a list of cause codes and appendix I for a list of the extended result codes. The <n> parameter specifies the format of the information returned. +WQ=<n> Select format +WQ Display result code/cause code +WQ=? Display available formats <n> 0 Use numeric format <extended result code> or <cause code> 1 Use verbose format +WQ:<extended result code>,<text> or +WQ:<cause code>,<text> +WXR This command controls the format of a CONNECT response from the Capsat® Telephone. The <n> parameter specifies the format to use. If the parameter is omitted the factory setting <n>=0 will be used. +WXR=[<n>] Select format +WXR? Display selected format +WXR=? Display available formats <n> 0 CONNECT <DTE-DCE rate> 1 +WXSR:<satellite rate>,<ARQ|NARQ> +WXTR:<terrestrial rate>,<ARQ|NARQ> +WXKR:<ARQ window size> CONNECT <DTE-DCE rate> 2 CONNECT <DCE-DCE rate> <ARQ|NARQ> 3 CONNECT <DCE-DCE rate> +WRATE This command sets the satellite data rate and the requested maximum terrestrial data rate used for the outgoing data calls. 15Oct99 Page K-13 Appendix K - AT Command Set The <sat_rate> parameter specifies the data rate to use over the satellite channel. The <ter_rate> parameter specifies the data rate to use on the terrestrial modem. If the parameter is omitted the value specified by <sat_rate> will be used. +WRATE=<sat_rate>[,<ter_rate>] Select data rate +WRATE? Display selected rates +WRATE=? Display available rates <sat_rate> 2400 <ter_rate> 1200 2400 4800 9600 14400 +WRTL This command sets the lower and upper threshold levels in bytes of the buffer used in direction LES>Capsat® Telephone. The <low> parameter specifies the lower threshold level. If the parameter is omitted the factory setting <low>=132 will be used. The Capsat® Telephone will issue an RR (Receiver Ready) packet signalling that it is ready to receive data from the LES. The <high> parameter specifies the upper threshold level. If the parameter is omitted the factory setting <high>=235 will be used. The Capsat® Telephone will issue an RNR (Receiver Not Ready) packet signalling that it is not ready to receive any more data from the LES. +WRTL=[<low>[,<high>]] Select threshold levels +WRTL? Display threshold levels +WRTL=? Display available levels <low> 66-169 factory setting: 132 <high> 235-537 factory setting: 235 Page K-14 15Oct99 Appendix K - AT Command Set This command sets the requested satellite and terrestrial error correction scheme for data calls. The <n> parameter specifies the error correction to use. If the parameter is omitted the factory setting <n>=1 will be used. +WS45=[<n>] Select error correction +WS45? Display current setting +WS45=? Display available setting <n> Sat. ec Terr. ec End-to-End 0 non-ARQ non-V.42 NARQ 1 ARQ V.42 ARQ 200 non-ARQ V.42 NARQ 201 ARQ non-V.42 NARQ +WS46 This command specifies the standard to be used for data communication. The <n> parameter specifies the standard to be used. If the parameter is omitted the factory setting <n>=11 will be used. +WS46=[<n>] Select standard +WS46? Display standard +WS46=? Display available standards <n> 11 Inmarsat +WTNID This command selects the terrestrial network ID for the next outgoing data call. The <nnn> parameter specifies the terrestrial network ID. If the parameter is omitted the factory setting <nnn>=0 will be used. +WTNID=[<nnn>] Select TNID +WTNID? Display selected TNID +WTNID=? Return OK result code <nnn> 000 Terrestrial Network ID unspecified 001-255 +WS45 15Oct99 Page K-15 Appendix K - AT Command Set This command sets the lower and upper threshold levels in bytes of the buffer used in direction DTE>Capsat® Telephone. The <low> parameter specifies the lower threshold level. If the parameter is omitted the factory setting <low>=66 will be used. The Capsat® Telephone will issue an XON/raise the CTS line signalling that it is ready to receive data from the DTE. The <high> parameter specifies the upper threshold level. If the parameter is omitted the factory setting <high>=136 will be used. The Capsat® Telephone will issue an XOFF/lower the CTS line signalling that it is not ready to receive data from the DTE. +WTTL=[<low>[,<high>]] Select threshold levels +WTTL? Display threshold levels +WTTL=? Display available levels <low> 66-75 factory setting: 66 <high> 76-136 factory setting: 136 +WTTL Page K-16 15Oct99 Appendix K - AT Command Set Responses While in Command State and Online Command State the Capsat® Telephone will send a response of the last command given in the AT command line. If the execution of a command results in an error the remainder of the command line is ignored and the ERROR result code is issued. OK Capsat® Telephone has successfully executed a command. CONNECT Capsat® Telephone has made a connection with a remote modem. Please also refer to the description of the +WXR command above. RING Capsat® Telephone has detected an incoming call. NO CARRIER A dial command has failed. ERROR Capsat® Telephone has found an error in the AT command line. NO DIALTONE Setting the Capsat® Telephone Off-hook was not granted. BUSY Capsat® Telephone has detected that the remote modem is occupied. NO ANSWER The remote modem has not responded within a given time. 15Oct99 Page K-17 Appendix K - AT Command Set This page is blank! Page K-18 15Oct99 Appendix L Spot Beam Coverage A PPENDIX L S POT BEAM C OVERAGE The figures in this appendix show the surface covered by the spot beams in each of the four ocean regions. Use these maps to determine : a) if a location is covered by a spot beam, and b) towards which satellite to point the antenna. Figure 7 - 6 : Atlantic Ocean Region - West (March '97) 15Oct99 Page L-19 Appendix L Spot Beam Coverage Figure 7 - 7 : Atlantic Ocean Region - East Page L-20 15Oct99 Appendix L Spot Beam Coverage Figure 7 - 8 : Indian Ocean Region 15Oct99 Page L-21 Appendix L Spot Beam Coverage Figure 7 - 9 : Pacific Ocean Region (December '96) Page L-22 15Oct99