1
Samsung Security Manager
User Manual
overview
CONTENTS
OVERVIEW
2
Contents
2
4
Introduction on Samsung Security Manager
7
Main features Samsung Security Manager
7
Terms frequently used
INSTALLATION
8
Installation
GETTING STARTED
13
Checking installed installation
13
13
Getting Started with Samsung Security Manager
14
Log In / Out
16
SSM Console Screen Composition
LIVE VIEWER
19
Names and Functions of Live Viewer
19
21
Names and Features of Screen Indicators
22
Device
25
Camera List
26
Alarm Out and Control
27
Selecting Tile Pattern
27
Monitor Expansion
31
PTZ Control
34
Event List
35
Playing Recorded Events
38
Live Video Screen
43
Digital Zoom
8
2_ overview
46
Names and Functions of Event Viewer
46
47
Event Search
SEARCH VIEWER
51
Names and Functions of Search Viewer
51
57
Smart Search
58
Folder Search
58
POS Search
59
Backup
SCHEDULE BACKUP
60
Starting SSM Schedule Backup
60
60
SSM Schedule Backup Screen
61
Scheduling Backups
SETTINGS
62
Site/User
62
65
Device
72
Screen
77
Event
81
Console
84
Service Manager
APPENDIX
87
Product Specification
87
90
Open Source License Notification on the Product
SSM SERVICE MANAGER
84
English _3
● OVERVIEW
EVENT VIEWER
overview
INTRODUCTION ON SAMSUNG SECURITY MANAGER
Samsung Security Manager is an application software that enables the accessing and controlling Samsung’s
network devices from a remote PC.
Using this program, you may access and control your network devices via the Internet from anywhere, as well as
monitoring connected camera.
It provides users with remote access and playback/search an environment for remote monitoring that employs ease
and effectiveness.
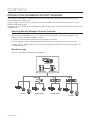
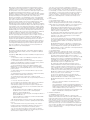
Samsung Security Manager Structure Overview
Samsung Security Manager consists of a Console "the client application" and the Server programs that
include the System Manager and Media Gateway.
• Console : Console provides monitoring and controlling user interface.
• System Manager : System Manager provides administration on all devices and users of the system.
• Media Gateway : Media Gateway's role is as the centralized relay server for the transmitting of video, PTZ
control and events.
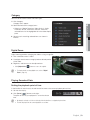
Standalone type
All server components Installed onto one computer.
Console (PC)
System Manager
Media Gateway
ENCODER
DVR
NVR
ALARM
HDD
NETWORK
BACKUP
REC
REC
CH1
CH2
CH3
CH1
CH1
1
2
3
4
5
6
7
8
9
0
ALARM
ZOOM
CH2
TELE
WIDE
VIEW
MODE
AUDIO
ALARM
AUDIO OUT
VIDEO IN
IP cameras
CH3
CH4
NETWORK
BACKUP
REC
MENU
Analog cameras
USB
RETURN
NETWORK
VIDEO RECORDER SRN-1670D
DVD
RECORDER
USB
DVD RECORDER
OPEN/CLOSE
OPEN/CLOSE
SRN - 1670D
Analog cameras
IP cameras
4_ overview
NETWORK
NETWORK
PRESET
DIGTAL VIDEO RECORDER
RESET
AUDIO IN
HDD
FREEZE BACKUP SEARCH
CH4
USB
NETWORK VIDEO RECORDER
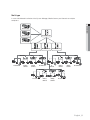
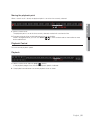
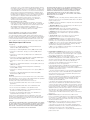
Multi type
In case of distributed installation of the System Manager, Media Gateway and Console on multiple
computers:
● OVERVIEW
Console (PC)
Console (PC)
System Manager
Console (PC)
Media Gateway
ENCODER
CH1
DVR
CH2
CH3
Media Gateway
ENCODER
NVR
CH4
CH1
CH1
CH1
Media Gateway
CH2
DVR
CH2
CH3
AUDIO OUT
VIDEO IN
IP cameras
CH2
RESET
CH3
CH4
NETWORK
Analog
cameras
NVR
CH4
CH1
CH1
RESET
AUDIO IN
AUDIO IN
AUDIO OUT
VIDEO IN
Analog
cameras
IP cameras
ENCODER
CH1
CH2
CH3
IP
cameras
Analog
cameras
DVR
NVR
Analog
cameras
IP cameras
CH4
CH1
CH1
CH3
CH4
NETWORK
CH2
RESET
AUDIO IN
AUDIO OUT
VIDEO IN
IP cameras
CH3
CH4
NETWORK
Analog
cameras
Analog
cameras
IP cameras
English _5
overview
Supported Products
DVR
SRD-1670(D/DC)/1650(D/DC)/870(D/DC)/850(D/DC)/470(D)/440, SRD-1630(D)/1610(D)/830(D),
SRD-1652D/852D, SRD-480D, SVR-1670/3200/1680(C)/1660(C)/1645/960(C)/945/480,
SHR-2000/5000/6000/7000/8000 series, SVR-1650E/1640A/950E, SRD-1640/840/1641P/841P, SRD-442
Network Camera
SNB-7000/5000/3000/2000/1000/1001/3002, SNZ-5200, SNO-7080R/5080R/1080R,
SNC-B2335/B2331/M300/1300/550/570, SND-7080/5080(F)/3080(F)/3080C(F)/1010/1080/1011/3082,
SNV-7080/5080/3080/5010/3120/5080R/3082/1080/1080R, SND-560/460V, SNC-B5368/B5399,
SNP-5200(H)/3430H/3370(TH)/3301(H)/3120(V/VH)/3302(H), SNC-C6225/C7225/C7478,
SNP-3300A/1000A/3750/3350, SNB-5001/7001/7002
NVR
SRN-6450/3250, SNR-6400/3200, SRN-1670D/470D, SRN-1671, SNS-SF064/032/016/008/004,
SRN-1000
Encoder
SPE-400/100/101, SPE-1600R, SNS-400/100
Controller
SPC-2000
System Requirements
Item
Minimum
Recommended
CPU
Intel Core 2 Duo 2.83 GHz
Intel i7 (Sandy bridge)
RAM
2 GB or more
4 GB or more
HDD
More than 20 GB of free space for installation
- For operation, the system log database requires 10 GB or more free space.
VGA Memory
512 MB or more
OS
Console : Windows XP 32bit, Windows 7 32bit, Windows 7 64bit
System Manager, Media Gateway : Windows XP 32bit, Windows 7 32bit, Windows 7 64bit,
Windows Server 2003, Windows Server 2008
1 GB or more
Configurable monitoring systems according to the system performance:
• Minimum Specifications : Allows access to 16 channels, with monitoring 16 channels at CIF resolution.
• Recommended Specifications : Allows access to 64 channels, with monitoring 64 channels at 4CIF
resolution.
6_ overview
MAIN FEATURES SAMSUNG SECURITY MANAGER
• Live Viewer
- One footage file can save up to 1 hours worth of video
- Supports full-screen mode
- Place video feed at any desired tile using drag-n-drop
- A simple double-click adds a video feed to the video screen
- Supports sequenced automatic source switching
• Event Viewer
- Provides search function for events and real-time logs
- Provides 1-channel playback for events
- Provides methods of acknowledging, recording, and search on an event
• Search Viewer
- Up to 16 videos can be played simultaneously
- Supports periodic backup (self-executable footage)
- Search by event types and play video data recorded by DVR
• Schedule Backup
- Video feeds from the registered recording device are backed up by a PC
- Configurable schedule for backup
• Settings
- Management features for user’s login account and privilege based accessibility
- Supports device grouping for access control
- Supports exporting device configuration onto a file
- SSM Console configuration can be saved as a file
• Updating
- Supports remote updating of software using update server
TERMS FREQUENTLY USED
• Tree : Display area that shows a list of registered objects and their hierarchy.
• Context Menu : Pop-up menus that appears when right mouse button is clicked.
• Device : Includes DVR, NVR, Video Server, and Network Camera.
• Tile : Unit screen cell that displays video.
• Object : Means device, camera, site, layout, alarm and other entities.
• SSM : Abbreviation of Samsung Security Manager.
English _7
● OVERVIEW
- Supports simultaneous video display of up to 64 monitoring tiles per monitor, maximum 4 monitors for 100
monitoring tiles
installation
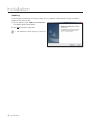
INSTALLATION
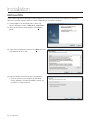
Run the Samsung Security Manager installer program on a local PC to install the Samsung Security Manager.
Software installation requires about 20 minutes, depending on installation conditions.
1. Use provided CD or download and run Samsung
Security Manager installer, "SSM_vx.xx_xxxxxx.exe".
2. When the installation screen appears, click [Next >]
button.
3. Check license agreement and then click [Next >] button
to proceed to the next step.
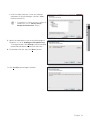
4. Choose whether to install all or partial components.
• Install all features in this computer (Standalone) :
System Manager, Console and Media Gateway are
installed on a single computer.
8_ installation
• Install in multiple computer : Installs only selected
components of System Manager / Console / Media
Gateway onto the PC.
M
For information on complete structure according to the
● INSTALLATION
installation type, refer to "Samsung Security
Manager Structure Overview". (Page 4)
5. Specify the folder path to save the installation program.
By default, it is set to "C:₩Program Files₩Samsung".
- To change the path, click [Change...] button and enter
the desired path directly or browse to select one.
6. To proceed to the next step, click [Next >] button.
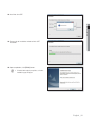
7. Click [Install] button to begin installation.
English _9
installation
8. Samsung Security Manager begins its installation.
9. When prompted with .NET Framework license
agreement, agree and proceed to the next step.
10. DirectX installation package, agree to the license
agreement and click [Next >] when prompted with
license agreement.
11. Upon completion of DirectX installation, click [Finish] to
proceed.
10_ installation
12. Install the Java JRE.
● INSTALLATION
13. Please wait for installation wizard to finish JRE
installation.
14. Upon completion, click [Finish] button.
M
If installed with required prerequisites, no further
installation popup will appear.
English _11
installation
Updating
If Samsung Security Manager is already installed, you may update the application by running the update
program to the latest version.
1. Run the update installer "SSM_vx.xx_xxxxxx.exe".
The Update dialog should appear.
2. Click [Next >] button to proceed.
M
After updating the software application, restart the PC.
12_ installation
getting started
CHECKING INSTALLED INSTALLATION
Check whether the Samsung Security Manager installation has been successfully installed.
1. Click <Start> Windows menu.
M
● GETTING STARTED
2. If Samsung Security Manager has been successfully installed,
SSM submenu should show 3 items of <SSM Console>,
<SSM Schedule Backup> and <SSM Service Manager>.
For distributed installation, only those menu items selected in
installation will appear. Refer to the "Installation" section. (Page 8)
GETTING STARTED WITH SAMSUNG SECURITY MANAGER
In case of Standalone installation
1. Click <SSM Service Manager> shortcut icon or expand
and click "Start > Samsung > SSM > SSM Service
Manager".
• SSM Service Manager : A software program that
manages server software products. To use SSM
Console, the server should be ready.
2. Double click <SSM Service Manager> icon on the task tray or click right mouse button on it to open
context menu and click <View Service Status>.
3. Click <Start Service> button.
If successfully installed, each installed program
component should show its <Status> as <Started>.
4. Double click <SSM Console> icon on the desktop or
click right mouse button on the task tray icon of SSM
Service Manager to open the context menu and select
<Start the SSM Console>.
The SSM Console program runs.
English _13
getting started
In case of multi installation
A Media Gateway server computer can connect to only 1 System Manager. A System Manager accepts
connections from multiple Media Gateway servers. A System Manager accepts connections from multiple
Console clients.
1. Run the Service Manager on the computer installed with
the System Manager. (Page 84)
2. Click <Start Service> button.
If successfully installed, the System Manager should show its
<Status> as <Started>.
3. Run the Service Manager on the computer installed with
the Media Gateway. (Page 84)
4. On the Media Gateway server, set the IP address and port
number of the computer installed with the System
Manager. (Page 85)
5. Run the Service Manager on the computer installed with
the Media Gateway and click <Start Service> button.
If successfully installed, the Media Gateway should show its <Status> as <Started>.
6. Double click <SSM Console> on the desktop of client computer that is installed with the Console, or click
<Start> <SSM Console> icon.
The SSM Console program runs.
LOG IN / OUT
Logging In
Once the program is started, a user must log in for correct use of the SSM Console.
1. Click SSM Console icon.
The Login dialog should appear.
2. <LIVE>, <EVENT> and <SEARCH> viewer types are
shown when viewer selection tab is clicked. Select one
and log in to start the selected viewer.
3. Enter the user ID and password.
- Default ID : admin
- Default Password : 4321
J
The default ID and password can be exposed to a hacking
threat, so it is recommended to change the ID and password after installing the product.
Please note that any security matters caused by using default information is user’s responsibility.
14_ getting started
M
In case of distributed installation, you need to provide the System Manager server computer’s IP address and port number
by pressing the [Settings (
)] button below the login button of login dialog.
Select <Save Login ID> to avoid account input from the next login.
Set <Auto Login> in Settings to log in automatically upon starting the program.
< If entered unregistered user ID >
< If entered password does not match >
Logging Out
For safer use of SSM Console, please log out when the work period is finished.
Logging out saves the last screen composition and then closes all windows, and returns to the login prompt.
1. On the main window, click [Logout (
The Logout dialog should appear.
)] button.
2. On the dialog, click [Yes] button.
It logs out.
Terminating SSM Console automatically logs out the user.
English _15
● GETTING STARTED
In the cases below, login will fail and the user will be prompted with login information.
getting started
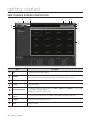
SSM CONSOLE SCREEN COMPOSITION
c
b
Item
Description
ID
Shows the User ID currently logged in.
b
UI LOCK
Locks the user interface.
When attempted to use the program while locked, password dialog appears to unlock.
c
S/W Title
Shows the software title.
Logout
Logs out and exits.
Selecting the Viewer
You may select and run a desired viewer from <LIVE>, <EVENT> and <SEARCH>, or you can add
a shortcut link to external program.
Added external shortcut is shown in a list.
Check the System
Status
You may check the system status of computers installed with each program component.
Settings
Opens the system settings menu screen.
Close
Exits the program.
16_ getting started
Item
Description
Help
Shows the SSM Console application’s information.
Menu Bar
Loaded with executable menu buttons.
Display Pane
Shows the screen according to the selected viewer.
● GETTING STARTED
Check the System Status
You may check the status of the computers installed with each program component.
1. Click [Check the System Status (
SSM Console.
)] on the top side of
2. Check each component’s IP address and its status from
the popped Health Check window.
Help
Click Help button to display program version and date
information window.
Registering Media Gateway and Devices
1. Run Settings. (Page 62)
2. Add <Media Gateway>. (Page 65)
3. Select a Media Gateway and add devices. (Page 67)
English _17
getting started
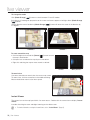
Checking up Console Configurations
The Console consists of Live, Search, Event and Schedule Backup.
Understand the role of each component and run the appropriate one as required.
Console Structure
• Live Viewer : Provides real-time video and event information for monitoring, as well as PTZ control interface.
• Event Viewer : Provides viewing of real-time events and the searching / playing of device’s events.
< Live Viewer >
< Event Viewer >
• Search Viewer : You can search and play video footage stored in your local computer or in the device.
• Schedule Backup : You can schedule to backup recorded data from a device.
< Search Viewer >
18_ getting started
< Schedule Backup >
live viewer
Provides real-time video and event information for monitoring, as well as PTZ control interface.
Select [LIVE] menu of the viewer selection tab on the top right side of SSM Console.
Initially, SSM Console’s default viewer is set to the Live Viewer.
● LIVE VIEWER
NAMES AND FUNCTIONS OF LIVE VIEWER
b c m n q
r
B
t
A
Item
Description
List Menu
Shows registered devices and their connection status.
b
Full Screen
Fills the monitor’s full area with video screen.
c
Multi Monitor
Enables expanded monitor configuration for monitoring.
Change Tile Pattern
Selects the split screen mode of the live viewer’s video area.
Deletes the video tile.
Deletes all open video tiles.
Sequence
Screen switches its display layout mode automatically in order and interval defined in "Settings >
Screen > Monitor > Sequence".
English _19
live viewer
Item
Description
OSD On/Off
Show or hide displayed indicators.
Initialize Events
Clears out all event indicators from all video tiles.
Capture
Captures the selected video tile’s current screen as an image file.
Print
Prints out the selected video tile’s current screen.
Record
Starts or stops recording of the selected video tile.
Device REC
Starts or stops recording with connected device remotely.
Speaker
Turns on or off the speaker.
Volume
Adjusts audio volume.
n
Talk
If supported by the connected device, activates microphone to talk.
Zoom In/Out
Enlarges or reduces video size using digital zoom.
Original Size
Resizes zoomed screen to its original 100% size.
q
Brightness
Adjusts the current video tile’s brightness.
r
Contrast
Adjusts the current video tile’s contrast.
Display Pane
Shows the Live Viewer screen.
t
Event List
Shows events occurred on connected devices.
A
Event Filter
You can select event types to be displayed on the event list.
B
Show/Hide Tools
Use these buttons to show or hide menu pane and control buttons.
m
Camera status indicator
Indicators shown on the video tile tells the connected camera’s input status.
< Video Loss >
20_ live viewer
< Disconnected >
< Exceeded max
user >
< Camera Off or
Covert >
NAMES AND FEATURES OF SCREEN INDICATORS
Camera01(192.168.0.128:4520)
2012-05-10 06:30:27
● LIVE VIEWER
b
c
Item
Description
Camera Name
Shows the name and IP address of camera connected to the corresponding video tile.
If <Use Device’s Default Name> is set, the name registered to the device is shown as the camera
name.
b
Date & Time
Shows the video’s date and time information.
Shows the device supports PTZ control.
Display the status of audio output.
Display the status of using the microphone.
Appears when an alarm is generated.
c
Icon
Appears if motion event is detected by the corresponding camera.
Appears if a video analysis event has occurred on the corresponding camera.
Appears if audio event is detected by the corresponding camera.
Shows that recording is in progress on the computer running SSM Console.
Shows that recording is in progress on a remotely connected device.
English _21
live viewer
DEVICE
Add a networked device and allocate a registered camera to the user’s device list. Select the device to view the in a
tile.
In registration step, set to <Connect> to display the device in the list as connected.
Connecting Devices
1. Select a device to be connected to.
2. Right mouse click on it.
Upon the context menu, select <Connect>.
M
For further information on adding devices, refer to "Settings >
Device". (Page 65)
If logged out while connected to a device, logging in again
revives previously connected devices and groups automatically.
If you select a list and enter text (keyword), only those groups
and devices that contain the text will be displayed in the search
result. This is useful if you do the search for a long list of devices or groups.
Disconnecting Devices
1. Select a device to be disconnected.
2. Right mouse click on it.
Upon the context menu, select <Disconnect>.
22_ live viewer
Device Properties
1. Select a device.
● LIVE VIEWER
2. Right mouse click on it.
Upon the context menu, select <Device Properties>.
3. Check the device information.
Device Webpage
Runs the device on a web viewer.
1. Select a device.
2. Right mouse click on it.
Upon the context menu, select <Device Webpage>.
3. Enter the access information to the device, ID and
password.
4. Moves to the connected device’s web viewer starter page.
English _23
live viewer
Device Context Menu
Right mouse click on an empty area within the device list to
open device context menu.
Finding Objects
You may find a device by name from the registered devices.
1. From the context menu, select <Find Object>.
2. Once the Find Object window appears, select the
searching direction.
3. Enter the keyword for name and click [Next] button.
M
[Ctrl]+[F] also brings the find object window.
Find object opens only when the object tree has the focus (highlighted).
The [Next] button is activated only if a keyword exists.
Sort by Name
From the context menu, select <Sort by Name> to sort devices by name.
Sort by Type
From the context menu, select <Sort by Type> to sort devices by type, while the device tree collapses.
Sort by Connected
From the context menu, select <Sort by Connected> to sort devices by the order of connection
establishment.
Expand/Collapse Tree
From the context menu, select <Expand Tree> or <Collapse Tree> to show or hide tree list of registered
devices.
Show / Hide Devices
From the context menu, select <Hide Device> to hide registered devices.
If hidden, the menu switches to <Show Device> automatically, and selecting it reveals the hidden devices.
24_ live viewer
CAMERA LIST
If connecting to the device was successful, a list of connected cameras appears.
● LIVE VIEWER
Camera Indicators
Indicators that appear by each camera in the list show the
camera’s status information.
•
: General camera
•
: Camera supports PTZ control
•
: In recording
•
: Camera disconnected by a user
•
: Camera is disconnected / unreachable
Camera Context Menu
From the device list, select a camera and right click on it to
open the camera context menu.
Find Tile
Highlights the selected camera’s video tile.
Add Video
Selected camera’s video is displayed on an unoccupied tile.
Remove Tile
Select a camera and open context menu to select <Remove Tile> to remove the corresponding tile.
Camera Properties
Select a camera and open context menu to select <Camera
Properties> to display the camera’s properties.
English _25
live viewer
ALARM OUT AND CONTROL
Once a device’s connection is established successfully, the device appears in the Alarm Out list.
You may turn on or off each device’s alarm.
Alarm Out Context Menu
Select an alarm and right click on it to open its context menu
that enables alarm control.
Turning On Alarm Out
Select an alarm and open context menu to select <Alarm
Out On> to turn on the selected alarm’s alarm output.
Turning Off Alarm Out
Select an alarm and open context menu to select <Alarm
Out Off> to turn off the selected alarm’s alarm output.
Turning On / Off Alarm Beep
For devices supporting Alarm beep speaker, <Alarm Beep
On> or <Alarm Beep Off> menu appears.
Upon such device’s alarms, you can turn on or off beep
sound output.
26_ live viewer
SELECTING TILE PATTERN
You can set the video pane’s split-screen mode.
• 4:3 screen modes : 1/4/6/8/9/10/13/16/17/21/25/36/49/64
● LIVE VIEWER
• 16:9 screen modes : 6/12/20/30
M
While in multi-monitor environment, layouts and split modes for
less than 100 channels will be available.
Other modes will be disabled.
Modes having more splits than the number defined in <Split Screen> will be disabled. (Page 75)
MONITOR EXPANSION
You can configure SSM software to display in multiple monitoring devices with defined layout.
From the top side menu, select [Multi Monitor (
)] button then select a desired multi monitor type, and
configure the layout as preferred on the expanded monitor.
Applying Layout to the Monitor Expansion
Selecting the Monitor Expansion
1. From the top side menu, click [Multi Monitor (
button.
)]
2. Select the number of monitors.
As many monitors as specified are displayed on the
screen.
3. Select a monitor to be applied with the layout settings by
clicking arrows beside the monitor name.
M
Monitor #1 is the default monitor, and Monitor #2 and others
are expanded monitors.
You can set expanded monitor in "Screen > Monitor". (Page 75)
English _27
live viewer
Setting the Tile Pattern for the expansion monitor
1. Click a tile of an expansion monitor to activate the corresponding monitor.
2. From the top side menu, click [Change Tile Pattern (
)] button.
3. Select a desired tile pattern to apply it.
Applying Layout
Select a monitor and then double click the desired layout.
The selected monitor is applied with the layout.
To add a layout
You can add multiple layouts to a desired monitor.
You can add layouts in "Screen > Layout" of the Settings
menu.
For further information on adding layouts, refer to "Setting
Layouts". (Page 72)
< Camera Layout >
28_ live viewer
< Map Layout >
Using Map Layout
Selecting Split View Mode for Map Layout
● LIVE VIEWER
When selecting a Map Layout, up to 10 split view modes are
available for the corresponding.
Utilizing the Map Layout
In the split view mode, a desired layout can be applied
quickly.
• The Free mode places the video right upon the camera
icon when the icon on the map layout is clicked.
• The other 9 modes place the camera’s video on the first
unoccupied tile when clicked the camera icon.
• To delete the selected video, press the [Delete] key on the
keyboard.
• To exit Map Layout mode, click [
] button.
2D / 3D View
You can change the 2D or 3D viewing of the map layout screen.
Place mouse cursor on the top right side of the map layout to display control window that provides screen
mode changing and viewing angle adjustment.
< Initial Screen >
< When mouse cursor hovers >
English _29
live viewer
To change the mode
)] button to switch between 2D and 3D modes.
Click [Mode Change (
Switching to 3D mode gives perspective to the screen and arrows appear on left/right side of [Mode Change
)] button.
(
Clicking direction arrows beside the [Mode Change (
45 degrees.
)] button will rotate the screen in the direction by
< 2D Mode >
< 3D Mode >
To move around the map
• Click the bright circle around the [Rotate (
the map in the direction.
)] button to move
• Click palm icon to relocate the map layout to the default.
• Right click and drag the map to move around as desired.
< Initial >
< When pressed >
To zoom in/out
Use zoom control bar to zoom in/out the current map screen.
To zoom in/out, click the control bar in the middle and drag.
Mouse wheel button zooms in/out the map too.
Instant Viewer
The camera icon on the map layout blinks if an event occurs. Double click the camera icon to display "Instant
Viewer".
It enables checking the event and digital zooming on the video screen.
M
For further information on using the Instant Viewer, refer to "Instant Viewer". (Page 35)
30_ live viewer
PTZ CONTROL
If the connected device supports PTZ functions, you can control PTZ camera remotely.
Depending on camera model used, PTZ control may not be supported. For further information, refer to the camera’s user
manual.
Names and Functions of PTZ Control Window
n
b
c
m
Item
Description
Area Zoom
Controls PTZ to fill in tile with the dragged area on the video.
b
Go to 1x Zoom
Restores the original 1x zoom from Area Zoom screen.
c
PTZ Sensitivity
Controler
Adjusts the PTZ ball control sensitivity to faster or slower.
PTZ Ball
While operating PTZ, click and hold the ball and drag to desired direction to adjust the camera’s
framing.
English _31
● LIVE VIEWER
M
live viewer
Item
Description
Adjusts the camera’s focus manually.
Focus Adjustment
Focus Near : Adjusts the focus range to closer distance.
Focus Far : Adjusts the focus range to farther distance.
Zooms in / out with controllable zooming speed.
Zooming activates only if clicked at the speed set by speed slider.
Zoom Adjustment
Patrol
This is to call a group and its presets in order for monitoring.
You can only activate or deactivate the <Tour> option of the camera.
Swing/Autopan
Sets the camera to repeat swinging from a certain position to another.
According to the configuration, you can set to rotate or swing.
You can only activate or deactivate <Autopan> option of the camera.
Group/Scan
Controls the camera according to the added preset groups in order, where a preset group can be of
multiple presets.
You can only activate or deactivate <Scan> option of the camera.
Trace/Pattern
Moves and zooms the camera with a predefined settings automatically.
You can only activate or deactivate <Pattern> option of the camera.
Preset
You can save specific camera’s view as a preset, or recall a preset to set camera framing.
Zoom Speed Slider : Sets the zooming speed out of 1 – 100 range.
Zoom In : Zooms in to enlarge the image.
Zoom Out : Zooms out to reduce the image.
Controls the amount of light travels through the lens.
Iris Control
m
Camera Menu Traversal
/ PTZ Control
While opening the camera menu, adjust the selected position. / Controls PTZ operation.
n
Switch to the Menu
Mode
Moves to the connected camera’s settings menu screen.
Exit the Menu Mode
Exits the menu setup.
Close Iris : Sets to bigger F number for less light exposure, resulting in darker image.
Open Iris : Sets to smaller F number for more light exposure, resulting in brighter image.
Using the Camera Menu
Click Camera Menu button to toggle display of the connected camera’s menu on the screen.
1. Using the PTZ Ball up/down/left/right control button, move to a desired menu.
2. To select the menu, click PTZ ball control.
3. To exit camera menu mode, click [Exit the Menu Mode (
32_ live viewer
)] button.
Preset Control
Click [Preset (
)] button to display saved list of presets.
Select one from the list to set the camera’s view to the
saved location.
● LIVE VIEWER
M
Up to 127 presets can e saved in Settings menu.
For further information on preset, refer to "Setting Presets".
(Page 77)
English _33
live viewer
EVENT LIST
Lists up device events in real-time.
Viewing Real-time Events
You can check device events from all connected devices in the list.
Filter the events by selecting type of events for the Event List.
b
c
Item
Description
Status
Shows the event status.
b
Type
Shows occurred event’s type as icon.
c
Device
Shows the device type.
User
In SSM system, it shows the current SSM user’s account information.
For general device-related events (motion detection, sensor, etc.), the user ID who
acknowledged the event is shown.
Time (PC)
Shows the event time.
Confirmed Time
Shows the time acknowledged.
Description
Describes the meaning of the event.
Scroll Lock
Locks the list not to automatically scroll.
Clear List
Fully clears out the event list.
Event List
Shows real-time events of the device selected in the left pane.
Double click a listed item to open "Instant Viewer" pop-up window.
Right mouse clicking on an item opens context menu of "Instant Viewer" and "Instant
Player".
34_ live viewer
Selecting displayed items
You can select items to be displayed in the event list.
● LIVE VIEWER
1. Select the title on top of the event list, and right click on
it.
2. Select event items to be displayed in the list, by
checking the checkbox.
Items such as event time (device), measures taken and
alert history can be listed additionally.
PLAYING RECORDED EVENTS
Select an event item from the list and right click on it to open
context menu of <Instant Viewer> and <Instant Player>.
Select either one of them to check the video.
M
The <Instant Player> is playable only if the corresponding device contains saved data.
Instant Viewer
Double click a listed item to open "Instant Viewer" pop-up window.
You can confirm the event, record event remarks and end the event status.
Selecting the Camera
Display Pane
Zoom In/Out
Reset to original
Event Descriptions
Alarm Type
Input field for remarks
Confirm
English _35
live viewer
Instant Player
Select an event item from the list and right click on it to open context menu and click <Instant Player> to
open it and play the corresponding camera’s video image.
Names and Functions of the Instant Player
b
c
Item
Description
Display Pane
Shows the video.
b
Video control buttons
Controls the current event playback.
c
Time Selection
Plays video of the selected time.
Event Information
Shows the event information.
Input field for remarks
Enter the measures taken or remarks regarding the occurred event.
Confirm
Confirms and acknowledges the event.
Alarm Details
You can selectively record alarm event’s type when confirming the event.
Playback by time
Moves to the selected time.
36_ live viewer
Item
Description
Video Control
Controls digital zooming of the player screen.
Linked Camera
You can select one from list of cameras linked to the alarm.
Exit
Closes and exits the Instant Player. If [Confirm] button is not clicked, exiting the player does
not confirm the event.
J
Recorded video footage can be played with Event Viewer, Search Viewer and Instant Player. Note that one saved footage
cannot be played with multiple viewers at the same time.
Names and Functions of Video Control Buttons
b
c
Step by frames
b
Forward/backward fast play
c
Play from event time (reset to event time)
Pause
Play
Video Control / Zoom In / Zoom Out Buttons
Zoom In
Original Size
Zoom Out
English _37
● LIVE VIEWER
live viewer
LIVE VIDEO SCREEN
Live feed from the connected device is displayed in the selected tile.
Monitoring by Selecting Cameras
To display video feed from a camera on an unoccupied tile:
• Double click a camera from the device tree to display its
video feed on the first unoccupied tile.
• Select a tile, and open the context menu to select <Add
Video>.
M
In case of using multiple monitors, it is added to the monitor
which is activated.
When there’s no empty tile, the video is displayed on the
focused (selected) tile.
To display video feed from a camera on a specific tile:
1. Select a camera from the device tree.
2. Drag it and drop on a desired tile.
To change the video tile:
1. Select a tile.
2. Drag it and drop on a desired tile.
Selected two tile’s video display swaps each other.
To remove video feed from a tile:
1. Select a tile or camera to delete and right click on it.
Or, press the [Delete] key of the keyboard to promptly delete.
2. From the context menu, select <Remove Tile>.
The selected camera’s video is removed from the tile
and it becomes unoccupied.
3. To remove all video feeds from every tile, click
[Deletes the video tile. (
)] button on top of video
pane.
Entire tiles become unoccupied.
38_ live viewer
Using the Tile Context Menu
● LIVE VIEWER
Select a video tile from the video pane and right click on it
to open the context menu.
Click to select desired ones from the appeared list of
available menu items.
Remove Tile
Removes the video from the selected tile.
OSD
Sets whether to display on-screen display menu and icons
on the video screen, such as date, camera name and other
information.
It acts the same to that of the [OSD On/Off (
on top side of video pane.
M
)] button
To configure OSD information items, check desired items to
be displayed in <OSD Display> of "Console >
Environment". (Page 81)
English _39
live viewer
Capture
Captures and saves the currently selected tile’s video image
in the specified destination file path.
It acts the same to that of the [Capture (
)] button on
top side of video pane.
To save the captured screen:
1. Select a tile to be captured.
"Capture" window appears.
Depending on system configuration, saves immediately without
displaying the screen capture setup step.
2. In <Display Information>, check to select information
items to be saved with the captured image.
• Camera Name : If checked, saved capture contains
the camera name at the top of the image.
• Date/Time : If checked, saved capture contains the
time captured at the top of the image.
• Description : If checked, saved capture contains the
description recorded in the Description text field.
Up to 50 characters can be entered.
• Path : Sets the destination file path of the captured file.
3. When done with setup, click [OK] button.
A popup saying save completed appears.
4. To check saved capture file, click [Open Folder] button.
M
If <Popup an additional information dialog.> option in
"Capture > Path" is selected, every capturing prompts with
file path and image information on the popup dialog.
If not selected, capturing directly saves the captured image
without prompting with additional information dialog and
completion dialogs appears.
40_ live viewer
Print
● LIVE VIEWER
Prints out the selected tile’s current video image to the
printer connected with your computer.
It acts the same to that of the [Print (
)] button on top
side of video pane.
To print the screen:
1. Select a tile to be printed.
"Screen Print Information" window appears.
2. In <Display Information>, check to select information
items to be printed with the screen image.
3. Click [OK].
Print window of the printer connected to your computer
appears.
M
For further details on <Display Information>, refer to
"Capture". (Page 40)
Record
Starts and stops recording of the currently selected tile.
It acts the same as the [Record (
)] button on top side of video pane.
To start recording:
1. Click <Record>.
The "Record" window appears.
Depending on system configuration, records immediately without
displaying the record setup step.
2. Set the file path and click [OK] button.
The record indicator appears on the tile and starts
recording.
3. To stop recording, click <Record> again.
A "Warning" dialog appears.
4. Click [OK].
Unchecking the checkbox in front of <Record> stops
the recording.
M
If <Popup an additional information dialog.> option in
"REC > Path" is selected, every recording prompts with file
path on the popup dialog.
English _41
live viewer
Device REC
Starts or stops recording onto the device connected to the tile’s camera.
It acts the same as the [Device REC (
)] button on top side of video pane.
Speaker
Transmits or stops Transmiting sound from the selected camera.
It acts the same to that of the [Speaker (
)] button on top side of video pane.
Microphone
Produces sound through the microphone at a remote device.
It acts the same to that of the [Talk (
)] button on top side of video pane.
Instant Player
Displays the Instant Player window for the selected channel.
M
Only playable if the device contains recorded footage data.
For further use of the Instant Player, refer to "Instant Player". (Page 36)
Keep Aspect Ratio
Keeps original video’s aspect ratio.
If not selected, the video is filled into the video pane.
< Variable Aspect Ratio >
< Keep Aspect Ratio >
Original Size
If selected, the video is reset to the original size.
If the video's size is bigger than the screen, you can move it with mouse dragging.
42_ live viewer
Deinterlacing
Sets or cancels deinterlacing of the tile’s video.
● LIVE VIEWER
Flip
Flips the video vertically.
Properties
Shows the selected camera’s property information in a
pop-up window.
DIGITAL ZOOM
Digital zooming allows the enlarging of the video as if using a magnifier.
It works on the displayed image by enlarging it digitally, which is different than optical zooming of lens.
Digital zooming provides magnification up to 16 times of the original.
Setting Digital Zoom Area
1. From the top side menu, click [Zoom In (
)] button.
It switches to digital zooming mode, and every clicking
magnifies the image by 50%.
2. Click a desired video and then drag it or click Zoom In
button for further zooming.
Enlarged image is centered by the point you clicked.
When an area is selected by dragging, the selection fills the screen.
English _43
live viewer
Digital Zooming Out
1. From the top side menu, click [Zoom Out (
)] button.
2. Click a video.
Reduced image is centered by the point you clicked.
Every clicking of Zoom Out button reduces the image by
50%.
Exiting Digital Zoom
1. From the top side menu, click [Original Size (
)] button.
2. Digital zooming ends, and the video is reset to the original.
Moving Video Area with Pan Cursor
1. While in digital zooming, click on the zoomed area marker shown near the bottom of digital zoom screen.
2. While holding mouse button, drag to move it to a desired area.
< In Digital Zooming >
M
< Released Digital Zooming >
If clicked Zoom In/Out button, it resizes by 50%.
Restoring to the Original Size exits digital zooming.
Switching to Full Screen Mode
1. From the top side menu, click [Full Screen (
Only the video pane fills the screen.
)] button.
2. To exit the full screen mode, press [Esc] on the keyboard.
44_ live viewer
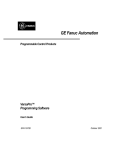
Running Sequence
This function enables an automatic sequence display of channels in a pre set time.
Used when there are more connected channels than the current screen splits. It switches to the next set of
channels according to the current screen split mode.
● LIVE VIEWER
)] button.
1. From the top side menu, click [Sequence (
Runs sequenced display in the current split screen mode.
2. To exit sequence mode, click [Sequence (
M
)] button again.
While in sequence mode, Map Layout becomes unavailable.
The Sequence mode supports split screen mode up to 16-splits. If you configure Sequence mode to include a layout
having more than 16 splits, actual Sequence mode operation limits playback to 16-split mode.
You can define the order of layouts and their dwell time for sequence mode in "Settings > Screen > Monitor". (Page 75)
Ex) In case of using 2 DVRs where 16 cameras are connected to DVR 1 and 8 cameras are connected to
DVR 2, and your screen is in 9-split mode, the sequence mode repeats:
Camera 1~9 of DVR 1 Camera 10~16 of DVR 1 and Camera 1~2 of DVR 2 Camera 3~8 of DVR 2
CH16
CH15
CH14
CH13
CH12
CH11
CH10
CH9
CH8
CH7
CH6
CH5
CH4
CH3
CH2
CH1
CH13
16
CH14
CH9
CH10
CH5
CH6
CH15
CH1
CH8
CH4
1
Single Screen
CH1
CH12
CH7
CH3
CH10
CH16
CH2
CH11
4-splits
13-16
9-12
5-8
1-4
CH11
CH2
CH13
CH4
CH12
CH3
CH14
CH15
CH5
CH6
CH8
CH9
CH16
CH7
10-16
1-9
9-splits
English _45
event viewer
It provides viewing of real-time events and searching / playing events of devices.
Select [EVENT] menu of the viewer selection tab on the top right side of SSM Console.
Or, select [EVENT] viewer on login screen of SSM Console.
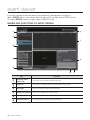
NAMES AND FUNCTIONS OF EVENT VIEWER
b
c
Item
Description
Live Event / Event
Search Tabs
Select either one of real-time event and event search.
b
Device List
Select a device to display events of the selected device in the event list.
c
Event Type
Shows selected type of events only in the event list.
Default Search Settings
Defines search settings for the event search list.
Manual Report
Shows events corresponding to the search criteria.
Scroll Lock, Clear List
Locks the list not to scroll, and clears all events listed.
46_ event viewer
Item
Description
Event List
Shows events, click column header to sort events by the selected one.
Event Details
Shows detailed information of the selected event along with the event video.
Confirm
When clicked after confirming the event searched, acknowledges the event.
All events other than log, SSM (User, System) and Device (System, Alarm Out) can be
confirmed as cleared event.
History
Shows the event history of the selected.
EVENT SEARCH
Viewing Live Events
You can check real-time events in the event list.
M
For further details on checking events, refer to "Searching Events". (Page 48)
English _47
● EVENT VIEWER
event viewer
Searching Events
Click Event Search tab to display event search menu.
You can specify event type and time for search.
1. Select desired event types by checking the checkboxes.
• SSM : User, System
• Device : System, Camera, Sensor, Alarm Out
- Camera : Video Loss, Motion Detection, Audio Detection, Passing, Entering, Exiting, Disappearing
(Appearing), Tampering, Tracking, Face Detection
2. Filter by time to search logs.
• Time (PC) : You can search for occurred time.
• Time (Device) : You can run event search based on the
device time.
• Confirmed Time : You can run event search based on
the confirmed time.
3. Use calendar to specify search date.
4. Specify the start time and end time.
5. Click the [Search (
)] button.
Events match the search criteria are listed.
M
Recorded video footage can be played with Event Viewer, Search Viewer and Instant Player. Note that one saved footage
cannot be played with multiple viewers at the same time.
48_ event viewer
Viewing the Manual Report
Manual report can show all events and their statistics.
1. After setting <Device>, <Event Type> and <Search
)] button.
Settings>, click [Search (
● EVENT VIEWER
2. Once event search found matches, click [Manual Report]
button.
3. As needed, use shortcut buttons on the top side of the
report to print, or save the report as excel / PDF / MS
Word document file.
Confirming Events
You can check details of event searched in the list, and confirm it to end the event situation.
1. Double click an event to see its details from the list.
In the event details pane, the event video is played as well
as its details.
Or, select an event and right click on it to open <Instant Viewer>.
For further information on playback control, refer to "Instant
Player". (Page 36)
2. Check event details and set <Alarm Details> to either
one of <Normal>, <Abnormal> and <Etc>.
3. Describe the measures taken.
4. Click [Confirm] button.
Once confirmed, it is marked in the list.
English _49
event viewer
History
For confirmed events, you can see the confirmed details of the selected event from the list.
1. Select an event to see its history from the list.
2. Click [History] button.
3. Check event confirmation details.
M
If user A described intrusion path in the Alarm Measures for an event, and user B added notes on further details of taken
measure and confirmed that event, such process of alarm measure can be checked afterwards with History function.
50_ event viewer
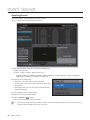
search viewer
You can search and play footages stored in your local computer or in the device.
Select [SEARCH] menu of the viewer selection tab on the top right side of SSM Console.
Or, select [SEARCH] viewer on login screen of SSM Console.
b
c
Item
Description
Device List
Shows devices that can be searched over.
b
Category
Shows available event types for search.
c
Date/Time
Dates with found matches from the selected device is marked on the calendar.
Timeline
Sets the search result list to timeline format.
List
Sets the search result to a list of events sorted by events.
Backup
Sets the time period for backing up searched data.
Detailed Timeline
Use this timeline slider to move selected search result’s specific moment, or zoom in/out the
timeline.
English _51
● SEARCH VIEWER
NAMES AND FUNCTIONS OF SEARCH VIEWER
search viewer
Item
Description
Playback Control
Playback controls for playing back search result.
Display Pane
Shows the video of searched result.
Change Search Mode
Select either one of Basic, Smart, Folder and POS search mode.
M
The context menu appeared when right clicked on each menu item is the same to that of Live Viewer.
Device List
From the device list, you can select desired device for your search.
1. Search desired device from registered devices.
2. Refine your search by checking checkboxes of groups or
devices.
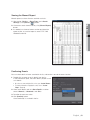
Date Search
If selected device contains recorded data on a date, it is marked on the calendar.
1. Select a device and click [Load (
)] button.
2. Select year and month for your search.
If a date has recorded data, it is marked in color.
3. Click to select a date to be searched.
Detailed time period of recorded data is shown in the
search result area.
52_ search viewer
Category
You can set the search criteria with event types.
● SEARCH VIEWER
1. Click Category.
Category items appear.
2. Select desired search category items.
• Video Loss, Motion Detection, Video Analysis, Audio
Detection, Sensor, Continuous, Manual : Searches
selected items for the highlighted tile in the video display
pane.
3. Search results matching selected items are shown in
timeline.
Digital Zoom
Digital zooming provides enlarging the video as using a magnifier.
1. Click a desired camera’s video.
2. Use digital zoom button to magnify/reduce desired portion
of the video.
3. Brightness and contrast can be adjusted too.
Click [Original Size (
M
)] button to reset to the original.
For further details on using digital zoom, refer to "Digital
Zoom". (Page 43)
Playing Searched Data
Setting the playback point of time
In the timeline of search result, the red vertical line means the current playback point of time.
1. Set the time to play.
2. Click [Go to (
)] button on the right.
The point of time for your playback is set to the chosen
time.
M
Or, drag the red strip or click on a desired point in the timeline to set playback point of time.
The time display shows the current playback’s record time.
English _53
search viewer
Selecting Camera for Playback
By default, the search result shows 5 channels in the list. You can resize it to show more or scroll down it.
Video playback supports up to 16 simultaneous channels.
1. Double click desired camera in the search result.
2. Selected camera’s video fills the first unoccupied video tile.
M
Or, drag a camera from the search result to a tile and drop in the video display pane to add the selected channel’s video
to the tile.
Enlarging the Timeline Scale
< 24 Hours >
< 1 Hour >
1. Click [Enlarge (Timeline) (
)] button in the top right corner of the search result area.
2. It enlarges the timeline scale of searched data from 24 hours to 5 minutes, the button becomes disabled
when the maximum limit is reached.
Reducing the Timeline Scale
1. Click [Reduce (Timeline) (
)] button in the top right corner of the search result area.
2. It reduces the timeline scale of searched data from 5 minutes up to 24 hours, the button becomes
disabled when the minimum limit is reached.
54_ search viewer
Moving the playback point
When a search result is found, the playback point is set to the time currently selected.
2. Drag the red vertical line to a desired point of time in the timeline.
When in enlarged timeline, you can use <Move ( , )> arrows on both ends of the timeline to move
backward/forward.
Playback Control
Pause or control playback speed.
Playback
1. Select a search result and click [Play (
)] button.
In the playback progress bar, the current playback speed is indicated.
2. Use playback control buttons to control playback faster or slower.
English _55
● SEARCH VIEWER
1. Select a search result.
The playback point is set to the time currently selected, marked with a red vertical line.
search viewer
Names and Functions of Playback Controls
b
c
b
Start / stop playback, Pause
Faster forward / backward playback
Sets the forward/backward playback speed to x1, x2, x4, x8, x16, x32, x64, and then x1 again on every click.
When in paused, it switches to slower forward / backward playback button.
c
Step Forward / Backward
Moves the video frame by frame. While in playback, these buttons are disabled.
Skip Forward / Backward
Skips to previous or next event. While in playback, these buttons are disabled.
Selecting the Search Mode
Click Search Mode icon to select among Smart, Folder and POS search modes.
Folder Search
Basic Search
Smart
Search
56_ search viewer
Pos
Search
SMART SEARCH
You can run a time-based search over devices, which will show results in thumbnails.
Searching in Smart Search Mode
● SEARCH VIEWER
1. Set to Smart Search mode and select devices from
<Device> list.
2. Set search year and month, and click [Load (
)]
button.
Dates with recorded data are marked in the calendar.
Select one to display data in timeline list.
3. In the timeline list, select a desired data item.
4. Use timeline bar to control preview display.
5. Specify the start time and end time for thumbnail view.
Up to 60 minutes can be assigned with start and end times.
6. Set the time interval.
In case the selected device supports motion detection, check <Motion Search> checkbox for motion search. For other
devices not supporting motion search, the button is disabled.
7. Click [Go to (
)] button.
8. Select a searched thumbnail to start playback in preview
screen automatically.
English _57
search viewer
FOLDER SEARCH
You can run a search over folders storing recorded footages from the local computer running SSM Console.
Searching Folders
1. Set to Folder Search mode and select a folder from
<Folder> list.
Resulting footages are automatically listed in the timeline
list.
2. Select a desired data from the timeline list.
3. Use playback control to play selected data.
POS SEARCH
You can search POS records based on time and text keyword.
M
Search is enabled only for DVRs supporting POS functions.
Searching POS data
1. Set to POS Search mode and select date and time for
your search.
2. Enter a search <Keyword>.
3. Set the search condition.
• Find whole words : If not selected, blanks between
keywords act as AND operator.
Ex) If entered "Cash 2500", finds data contains both
"Cash" and "2500" from the database.
• Match case : If selected, the search becomes case
sensitive, distinguishing upper and lowercase letters.
4. Click [Search (
58_ search viewer
)] button.
BACKUP
You can back up the search data onto the computer that is running the program.
Backing Up Search Data
● SEARCH VIEWER
You can back up searched footage of selected period into a desired folder.
)] button.
1. Click [Backup (
The backup pop-up appears.
Backup is only available for devices currently connected.
2. Select a channel from the backup window.
3. Click [Backup Path (
)] button to browse and set
the desired backup storage path.
4. Specify the start time and end time.
5. Set the backup file format.
Backup supports "*.sec" and "*.avi" formats.
• AVI : A general video format. Can be played with Windows Media Player.
• SEC : Samsung’s proprietary format. Embeds self-executable video player with data.
M
The Microsoft Windows Media Player does not support AVI files having resolutions higher than 3Mega pixels. For highresolution videos of more than 3 Mega pixels, SEC backup is recommended.
6. Click [Backup] button to start backing up.
7. Click [Stop] button to stop backup in the middle.
8. To end backup, click [Close] button.
The backup stops and saves the file backed up at the moment, and closes the backup window.
English _59
schedule backup
You can schedule to backup recorded data of a device.
STARTING SSM SCHEDULE BACKUP
1. Click <SSM Service Manager> shortcut icon or expand
and click "Start > Samsung > SSM > SSM Schedule
Backup".
The Login dialog should appear.
2. Enter the ID and password, and click [Login] button.
- Default ID : admin
- Default password : 4321
SSM SCHEDULE BACKUP SCREEN
Backup
Progress
Bar
Device /
channel
information
Device List
Select Data
Backup
Time
Backup
Time Table
Backup Start / Stop
Select Data Backup Time
Select desired recorded section of the device data.
Backup Time Table
Sets on what time of a day the weekly backup from the device to the computer starts.
60_ schedule backup
Apply updated
backup time
table
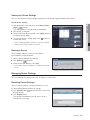
SCHEDULING BACKUPS
With storage devices among listed devices registered to the console, you can backup recorded data stored into a
specific file location.
● SCHEDULE BACKUP
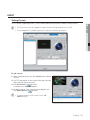
Setting the Backup Schedule
1. Click [Backup Options] button to set backup settings.
• Set Auto Delete : You can set to delete outdated files
automatically, based on time elapsed and remaining free
disk space.
- Automatically remove recording files every : If you
specify the file retention period, the recorded data
older than the specified period will be automatically
deleted.
• Backup data location : Sets the destination path for
backup data storage.
• Backup File Format Type : Sets the file format for
backups.
For further details on backup formats, refer to "Backing up Search Data". (Page 59)
• Backup Data Type : Select event types for backup.
• Force Connect : Since simultaneous access of one device is limited, a problem may occur if the target
device is occupied by another users. For such cases, this option sets to override and disconnect other
user's access to continue the backup.
• Auto execution when starting Windows : Sets whether to start the program when the installed computer
has been started.
2. Select a device to be backed up from the list of devices.
3. Select channels by checking checkboxes from the
channel selection window.
4. Select time cells for backup in the backup data time
selection.
5. Click [Start Backup] button.
The <Status> on the top side shows the backup
progress.
6. To display backup logs, click [Log] button.
The "Log" pop-up window appears.
English _61
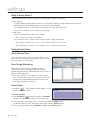
settings
In Settings, you can configure the SSM Console for user accounts, device registration and
event related settings.
)] menu of the viewer selection tab on the top right side of SSM Console.
Select [Settings (
Settings menu screen with tabs according to the corresponding function appears.
SITE/USER
In SSM, user accounts are administered for each Site where a site is considered to be a physical administrative unit.
User groups can be added to a site and all users should belong to user groups.
Using Site/User
• Administration by locations grouped by Sites
• Permission management for viewer functions
• Site Management (Add / Edit / Delete)
- Name, Description
• User Group Management (Add / Edit / Delete)
- Name, Description, Permission
• User Account Management (Add / Edit / Delete)
- ID, Password, Name, Phone number, Address, E-mail, Description
Managing Sites
In the logical tree, a site can group camera and alarm out by location and it can help easier locating desired
camera if there are many camera devices.
Delete selected Site / Group / User
Add User Group
Add Site
Add User
62_ settings
Site, Group
and User
Information
J
The default topmost site is created in program installation process, which is not to be deleted.
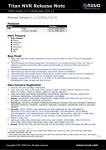
Using Site/User Group
• Site
Administrator Group
HQ
Factory
Storage
Disaster Prevention Center
Chief Disaster Officer
Security Dept
Front Gate Security
Rear Gate Security
Parking Tower
Lobby
Secretary
CEO Room
Disaster Prevention
Disaster_Monitor1
Disaster_Monitor2
Security Dept
Factory_Front_Security
Security Dept
Storage_Front_Security
Setting a Site
To add a site:
1. Click [Add Site (
)] button.
2. Enter the site name and description in the right pane.
To edit a site:
1. Select a site from the tree.
2. Edit site name and information on the right.
3. When finished, click [Apply] button.
To delete a site:
1. Select a site from the tree.
2. Click [Delete (
)] button.
English _63
● SETTINGS
You can configure a site and user groups at your preference.
Ex.) Below sample construction shows sites of "HQ", "Factory" and "Storage", where each site includes user
groups of "Disaster Prevention" and "Security Dept", and added with users of "Chief Disaster Officer", "Front
Gate Security" and "Rear Gate Security".
settings
Setting a User Group
To add a User Group:
1. Select a site in the tree and click [Add User Group (
button.
)]
2. Once a user group is created under a site, enter the group
name and description, and set the privilege.
3. When done, click [Apply] button.
J
The default "Administrator Group" is created in program
installation process, which is not to be deleted.
To edit User Group privilege:
1. Select a user group under a site from the tree.
2. Edit the user group’s information on the right pane.
3. Select allowed privileges by checking checkboxes.
J
For "Administrator Group", changing privilege is not allowed.
Setting privilege is only available in user group information.
Live Viewer is allowed by default, and cannot be disallowed.
4. When done, click [Apply] button.
To delete a User Group:
Select a user group to be deleted, and click [Delete (
button.
)]
To add a User:
Select a user group in the tree, and click [Add User (
)]
button. A new user is created under the selected user group.
J
The default "admin" account is created in program installation
64_ settings
process, which is not to be deleted.
To edit user:
1. Select a user from a user group in the tree.
2. Edit user ID, password, name and other fields on the right pane.
J
The "Administrator Group" has all privileges, and users in the "Administrator Group" are allowed with all privileges
accordingly.
To delete a user:
You can select users registered to a group to delete.
Select a user to be deleted, and click [Delete (
)] button.
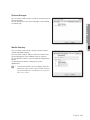
DEVICE
Device Registration
Shows devices registered by users.
Adding device is enabled when <MediaGateway> is selected from the tree menu.
Delete selected Media Gateway / Device
Register Device (Auto)
Add Media Gateway
Media Gateway
/ Device
Information
Register Device
(Manual)
Device setup page
Import / Export
Device configurations
Device Firmware
Update
English _65
● SETTINGS
3. When done, click [Apply] button.
settings
M
The Media Gateway connects to cameras, DVRs and other devices and relays media communication. Proper Media
Gateway should be selected when registering device to the Console since a Console should be connected to the Media
Gateway for communication instead of connecting to actual devices.
Setting the Media Gateway for Standalone Installation
To add a Media Gateway:
1. Select a site from the tree.
2. Click [Add Media Gateway (
)] button.
3. Select a desired Media Gateway from the list and click
[Register] button.
4. To finish registration and close the window, click [Close]
button.
To edit Media Gateway information:
The right pane shows information on the Media Gateway selected from the tree menu, which is available to
edit.
1. Click on a desired Media Gateway to be edited.
2. Edit name and description of the selected Media Gateway.
M
IP address and port is only for viewing, not editable.
To delete a Media Gateway:
Select a Media Gateway to be deleted, and click [Delete (
66_ settings
)] button.
Setting the Media Gateway for Distributed Installation
1. Run the Service Manager on the computer installed with the System Manager. (Page 84)
2. Run the Service Manager on the computer installed with the Media Gateway. (Page 84)
To add a Media Gateway
1. Select a site from the tree.
2. Click [Add Media Gateway (
)] button.
3. The list of available Media Gateways added to the System
Manager to where the Console is connected appears.
4. Select a desired Media Gateway from the list and click
[Register] button.
5. To finish registration and close the window, click [Close]
button.
Adding Devices
To add a device automatically:
You can search add a device connected to your local network automatically.
)] button.
1. Click [Register Device (Auto) (
All discovered devices from the local network are shown in
the "Register Device (Auto)" list.
2. Select desired device to be registered from the list.
3. Enter the ID and password, and click [Register] button.
M
The User ID and password should be the account registered to
the corresponding device.
If connection encounters error, corresponding message of
cause is displayed in the status tab.
4. Once registered, it is marked as "Registered" in status
tab, and added under the Media Gateway list.
5. To finish registration and close the window, click [Close]
button.
English _67
● SETTINGS
3. On the Media Gateway server, set the IP address and port number of computer installed with the System
Manager. (Page 85)
settings
To add device manually:
Device can be registered manually by a user, by directly entering required information.
)] button.
1. Click [Register Device (Manual) (
"Register Device (Manual)" window should appear.
2. Select the desired device’s model name.
3. Select the address type.
Available types are static IP, URL, SamsungDDNS, S1 DDNS, and
iPOLiS DDNS.
Available address type can be different depending on the device.
4. Provide required information for connection to the device.
Required information is dependant to the set address type.
5. Enter the ID and password.
The User ID and password should be the account registered to the corresponding device.
6. Click [Register].
If connection encounters error, corresponding message of cause is displayed.
M
When registered a device, it is assigned to the Administrator Group automatically.
Editing Device Information
You can edit information of a device registered.
To edit device information:
1. Select a desired device to be edited.
2. In the right information pane, edit the device information.
3. When finished, click [Apply] button.
To use the device’s default name
Check <Use Device’s Default Name> option to name the
device as its default, which will be displayed in the device list
or on the screen.
68_ settings
Viewing the Device Settings
You can see the device related settings information on the Settings Page provided by each device.
To edit device settings:
● SETTINGS
1. Near the bottom of the tree menu, click [Device setup
page (
)] button.
The selected device’s settings page should appear.
2. Edit settings as required.
3. When finished with device settings, click [Apply] button of
the device settings page.
4. To close the device’s settings page, click [
the top right corner.
] button on
Device settings page differs from devices connected. For further
details, refer to the user manual of each device.
Deleting a Device
You can delete a device, camera or alarm objects.
Actual deletion is made by device.
1. Select a device to delete from the tree.
2. Click [Delete (
)] button.
3. When confirmation prompts, click [Yes].
If the related camera is in playback or recording, it automatically
aborts.
Managing Device Settings
You can import device settings from a file, or export it in *.dat format.
Exporting Device Settings
You can save your device’s settings information as a file.
1. Select desired device to export its settings.
2. Click [Search Path (
desired file path.
)] button to browse and set the
3. Click [Export] button.
The settings are exported into a file, and its result is
displayed as a message.
English _69
settings
Importing Device Settings
You can import device’s settings information from a file.
1. Click [Search Path (
desired file path.
)] button to browse and set the
2. Select a settings file.
3. Click [Import] button.
4. Imports the settings from the selected file.
M
If checked <Including Network Settings>, imports network
environment settings too.
Importing for multiple devices is allowed, where exporting limits
to one device at a time.
Updating the Device Firmware
In Update window, only devices currently connected are displayed.
1. Select a device to update.
2. Click [Search Path (
)] button to select update
software of newer version.
3. Click [Update] button.
4. During the updating, the progress bar shows the
progress.
70_ settings
Assigning Cameras
Assign devices and cameras allowed to user group.
A list of devices allowed to the selected user group appears.
Select devices to add to the list for a group to allow accessing.
● SETTINGS
To add allowed camera:
1. Select a user group to be assigned with the camera.
2. From the device list, select devices to be added.
3. Click [Register Device (
)] button.
4. Click [Release Device (
)] button to cancel assigned camera.
M
After assigning devices to a user group, you can set individual camera’s availability.
English _71
settings
SCREEN
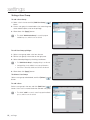
Setting Layouts
You can edit the screen to display desired cameras in one screen.
Create a layout, and check cameras included in the layout and view the site composition.
You can create and manage multiple layouts tailored for each monitoring location for easier access.
Adding Layouts
1. Select a user group in the tree which is to be added with
)] button.
new layout and click [Add Layout (
2. Select either one of camera layout and map layout, name
the layout and click [OK] button.
• Camera Layout : The layout consists of video screens of
cameras selected from the device list.
• Map Layout : The layout is made from a map registered,
by locating desired camera and sensors on the map.
Map Layout
Create a Map Layout, and click [Search Path (
)]
button to add a map image to the layout. Click [Add Link
(
)] button to add links between map layouts.
72_ settings
To add a map and place links:
1. Select a user group to be added with a map layout, and
)] button to create one.
click [Add Layout (
● SETTINGS
2. Click [Split Screen] button and select a desired layout
split mode.
In the split screen selection pane, the tile marked with sky blue is
the destination tile of added map image.
3. Select the newly created map.
4. Click [Search Path (
desired map image file.
5. Click [Add Link (
)] button to browse and set the
)] button.
6. Once the "Add Link" window appears, name the map to
be linked and click [OK] button.
7. A link icon is added onto the map, and clicking it on the
viewer’s map layout moves to the linked map.
M
Place mouse cursor on the top right corner of the map layout to
display screen adjustment dialog.
For further details screen adjustment on map layout, refer to
"Monitor Expansion". (Page 27)
English _73
settings
To add devices to a map:
1. Once completed with adding a map, click devices to be
added from the device list.
In the device list, devices included in the group to where the layout
is registered.
2. Click a device and drag it onto the desired position on the
map, and release the mouse.
You can add any device of camera, alarm or sensor.
• Camera
- You can distinguish cameras, and identify whether the
camera is connected to the network.
- You can identify cameras with events.
- You can identify camera names.
- Camera information can be viewed.
• Alarm
- You can distinguish alarms, and identify whether the
alarm device is connected to the network.
- You can identify alarm device names.
- You can turn ON/OFF alarm.
3. Click device icon with your left mouse button.
Green ball that controls camera framing appears.
4. Click the green ball, and it turns red. While in red, drag
and drop the ball to adjust camera’s viewing direction.
Click a camera, drag and drop while holding to move the camera’s
position.
5. When done with setup, click [Apply] button.
Camera Layout
Create a Camera Layout, and place the cameras in the
desired tile of split screen to compose various layouts.
The device list only shows devices available for adding to the
layout currently being edited, in a tree format.
74_ settings
To add a camera layout:
1. Select a user group to be added with a camera layout,
and click [Add Layout (
)] button to create one.
● SETTINGS
2. Click [Split Screen] button and select a desired layout
split mode.
3. Drag a desired device from the device list, and drop in
onto a tile.
4. When done, click [Apply] button.
Deleting Layouts
Select layout to be deleted, and click [Delete (
)] button.
Monitor
The monitor layout can display up to 100 channels on a maximum of 4 monitors.
Multi Monitor
Up to 4 monitors can be connected.
Split Screen
Sets the split screen mode for each viewer / monitor.
The available split screen modes differ by maximum number
of channels and connected monitors.
J
The default settings may not be appropriate to your
configurations; user must configure the system appropriately for
proper operations.
English _75
settings
Sequence
Distributes camera feeds to fit the selected split screen mode
in sequenced order automatically, at the specified duration.
M
Sequenced mode is available only for a camera layout.
To define sequence:
1. Click [Sequence Setup (
corner of the target monitor.
)] button on the top right
2. To add a layout, click [Add (
)] button. To delete a
layout, click [Delete (
)] button.
3. Click <Dwell Time>’s [
of each layout added.
] button and set the dwell time
4. When done with setup, click [OK] button.
5. To apply the sequence mode, check the checkbox in front
of the sequence setup button.
Using I-Frame
Set the number of channels, the I-Frame mode will be applied for more than the specified channels.
It is applied to each monitor of each viewer.
It is used to avoid system overload of multi-channel video monitoring.
M
What is I-Frame?
Video compression methods hiring H.264 and MPEG4 codecs produces compressed video of one base frame (Intra-frame)
and multiple predictions (predicted frames) only containing differences between each frame’s previous one.
Resolution
Set the number of channels, low-resolution will be applied for more than the specified channels for better
communication.
It is applied to each monitor of each viewer.
• Show Intelligent Video Analysis Rules : Sets whether to display Intelligent Video Analysis Rule applied for the
video.
• Stop video being receid from other channels in [Expand Tile] mode. : Sets whether to receive video from
channels other than the expanded when viewing one channel in [Expand Tile] mode of Live Viewer.
76_ settings
EVENT
Setting Presets
M
The PTZ preset screen becomes available for settings, only when a PTZ supporting camera is selected.
You can distinguish PTZ controllable cameras by icon appeared on the device list. (Page 25)
To add a preset:
1. Select a desired camera from the <Device List> to define
a preset.
2. Use PTZ controller to set the camera framing to a desired
point, and enter the preset name.
3. Click [Save Preset (
)] button.
In the preset list, added one appears.
4. To delete a preset, select the preset to be deleted, and
click [Delete Preset (
)] button.
M
For further information on PTZ controller, refer to "PTZ
Control". (Page 31)
English _77
● SETTINGS
For PTZ control supporting cameras, you can add or delete preset positions for direct camera framing.
settings
What is Event Action?
The event action defines how the system acts (output) upon a specific event (input).
• Event Settings
- A single monitoring setting. Upon an event, the Live Viewer monitoring screen automatically switches to
Single mode with the event-generating channel for the specified period.
- For specified interval (5~60 seconds), system ignores the same continuing event.
- You can set whether to use the device’s event settings.
• Event Action
- Event Action Management (Add / Edit / Delete)
Name, Description, Event (Input), Action (Output)
- You can define various system actions (output) for events (input) from devices.
Event (input) types: Motion Detection, Video Loss, Video Analysis, Audio Detection and Sensor
Action (output) types: Instant Viewer, Preset, Alarm Out, Pop-up, Sound and E-mail notification
Setting Event Action
Event Discard Time
If the same event occurs within a short time period, such
events can be caused by one actual event. You can set the
time to discard such same events.
Event Single Monitoring
Upon an event, the Live Viewer monitoring screen
automatically switches to Single mode with the eventgenerating channel for the specified period, which returns to
previous mode afterwards.
• Map Layout Auto link : If this option is set and an event
occurs while viewing a map layout, the view automatically
switches to the corresponding map which contains the
event-generating device’s icon on it.
Event Action
• Schedule (
) : The scheduler window appears, set the
time to run the event action.
To set the schedule
1. Click [Schedule (
)] button to open the "Schedule"
window, then edit event schedules for each event type.
2. Click and drag to select time cells in a schedule tab, and click [Apply] button.
To deselect time cells, click and drag to select again and click [Delete] button.
3. To finish settings and close the "Schedule" window, click [Confirm] button.
78_ settings
• Sound (
) : Set the sound device for the event, and
how the sound repeats.
● SETTINGS
• E-mail (
) : The recipient will receive an event
notification mail and its repeating interval. Set the
recipient’s E-mail address, sender’s address and repeating
interval for event notification mails.
To set the E-mail notification:
1. To add E-mail addresses of recipient or copied recipients,
)] button.
click [Search Path (
2. Once the "Add Item to the Mailing List" pop-up
appears, select recipients and [Add Selected] button.
3. To add a recipient other than listed, enter the E-mail
address manually and click [Add] button.
4. To delete items from existing recipients, select one and
click [Delete Selected] button.
5. When done, click [Apply] button.
6. In "E-mail" window, complete entering E-mail address
and repeating interval, and click [OK] button.
English _79
settings
• Instant Viewer (
) : If selected <Instant Viewer>, set
the maximum number of simultaneous instant viewers
allowed and minimum dwell time of event pop-up dialog.
To add an event action:
You can add/edit event actions.
Select event type, device of action, and specify action details accordingly.
1. Click [Add Event Action (
)] button.
2. Click [Edit Event Action (
)] button.
The "Event Action" setup window appears.
3. <Use Event Action Settings> sets whether to use event
actions defined.
4. Enter the name and description of the event action added.
5. In the <Event Type>, select devices and their event types
by checking the checkboxes.
• Video Loss : If the video recording is interrupted, an
event is generated.
• Motion Detection : If the device detects a motion, an
event is generated.
• Video Analysis : Runs video analysis and recognizes
events from the result.
• Audio Detection : If the device detects sound, an event is generated.
• Sensor : Generates an event upon signal input from sensor device.
6. Set the action device and action method of an event type.
• Instant Viewer : Opens the "Instant Viewer" window in the Live Viewer, which shows the occurred
event’s video.
• Preset : Runs selected preset on the selected camera.
• Popup : Automatically selected along with Instant Viewer option. If selected individually without selecting
Instant Viewer, an empty Instant Viewer having no video displayed upon an event only for reacting to the
occurred event.
• Sound : Generates sound alarm upon events.
• E-mail : Sends out event notification e-mail upon events.
7. To finish settings and close the window, click [OK] button.
Defined event action is listed in the <Event Type> and <Event Action> lists.
To delete an event action:
Select an event action to be deleted, and click [Delete Event Action (
80_ settings
)] button.
CONSOLE
Environment
● SETTINGS
OSD Display
Sets whether to display on-screen display menu and icons on the video screen, such as date, camera name
and other information.
Date/Time
Set the date and time format displayed on OSD.
Date / Time indication is based on the time of running the pop-up window.
• Date formats
2010-04-19 (yyyy-mm-dd)
04-19-2010 (mm-dd-yyyy)
19-04-2010 (dd-mm-yyyy)
• Time formats
08:06:04 (hh:mm:ss)
08:06 (hh:mm)
English _81
settings
Capture
You can set the captured image file’s path.
• Path : Shows the current file path, click [Search Path (
)] button to set to another file location.
Click <Popup an additional information dialog.> to display saved path and additional capturing information on a popup
window separately when capturing a monitoring window.
REC
Set the selected recording data’s file path and recording interval.
• Path : Shows the current file path, click [Search Path (
)] button to set to another file location.
• Recording Interval : Sets how long the recording will continue.
• Format : Sets the file format for recording.
Click <Popup an additional information dialog.> to display saved path and additional recording information on a popup
window separately when recording a monitoring window.
Startup
Configures the screen display and its settings when the program is started.
• Display full screen : On the program’s startup, it fills the entire screen automatically.
• Load Last Settings : When restarting, it loads the last displayed camera’s video layout.
Language
Sets the language used for Samsung Security Manager’s user interface.
UI Auto Lock
If there is no keyboard or mouse action for the specified period, it locks user interface automatically which
prevents unintended access.
Logout
If there’s no keyboard or mouse action for the specified period, it logs out automatically to prevent unintended
access.
82_ settings
System
● SETTINGS
Log
You can set the log retention period, which sets to delete expired log files automatically.
Backup/Restore
You can back up the current settings or restore the SSM Console setups from a saved file.
• Backup : Selecting this item disables the button. Set the backup file path and click [Backup] button to start
backup into the specified file path.
• Restore : Selecting this item disables the button. Set the restoration file path and click [Restore] button to
load setup from the specified backup file.
Restore the Default
Initializes SSM Console program’s setup to the default settings.
English _83
SSM service manager
You can check SSM related services, and stop them.
The Service Manager should run while the Samsung Security Manager is running at the same
time, and an icon appears in the task tray.
SERVICE MANAGER
Resides in the task tray, and provides access to Samsung Security Manager services.
Managing the Services
Select the icon and right mouse click.
Service menu should appear.
You can start or stop services.
• Start the SSM Console : Runs SSM Console program.
• Start Service : Starts Media Gateway and System Manager
services.
• Stop Service : Stops Media Gateway and System Manager
services.
Service Status
Click [Service Status] to open SSM Service Manager
information dialog.
• Start Service : Disabled if the service is running.
• Stop Service : Disabled if the service is stopped.
• OK : Applies the changes, and closes the window.
• Cancel : Does not applies the changes, and closes the
window.
84_ SSM service manager
System Manager
● SSM SERVICE MANAGER
You can check or edit the port number for connecting to the
System Manager.
Port for connection to the System Manager, for distributed
installation type.
Media Gateway
You can check or edit the NIC settings and port number
used by the Media Gateway.
You can check or edit IP address and Port number of the
System Manager to where a Media Gateway connects.
For standalone installation, they are properly configured by
default.
For distributed installation, configure these items
appropriately.
J
For distributed installation, the System Manager and Media
Gateway may require exception setup for firewalls if involved.
If an active firewall blocks communication ports, the Console
fails to access servers.
English _85
SSM service manager
Time Settings
You can set the computer installed with SSM to be the NTP
time server, and its checking frequency.
About
Shows the Service Manager’s version information.
86_ SSM service manager
appendix
PRODUCT SPECIFICATION
Features
Audio
Live
Monitoring
Search & Playback
H.264, MPEG-4, MJPEG
Supported resolution
Depending on the device
Supported Audio
Compression Format
G.711 μ-law (PCM), G.723, G.726 (ADPCM)
Functions
Bi-directional audio (Listen/Talk)
Multi-monitor
Up to 4 monitors
(Follow the recommended system requirement)
Screen-split mode
4:3 screen modes : 1/4/6/8/9/10/13/16/17/21/25/36/49/64
16:9 screen modes : 6/12/20/30
Full screen mode
* While in multi-monitor environment, layouts and split modes for less than 100
channels will be available.
Sequence mode
up to 16-splits per monitor
PTZ Control
Area Zoom, Go to 1x zoom, PTZ Sensitivity, Focus, Zoom, Patrol, Swing/Autopan,
Group/Scan, Trace/Pattern, Preset, Iris control
Map monitoring
Split View Mode for Map Layout, 2D/3D View, Zoom in/out, video popup(Instant
viewer), Camera/Sensor/Alarm icons on the map
Simple Recording
Recording of the selected video tile during 1hour
Functions
OSD On/Off, Snapshot / Prints Image, Brightness/Contrast control, Keep Aspect
Ratio/Original size, Deinterlacing, Flip, Digital zoom
Search mode
Date, Event, Smart Search, POS Search based on DVR, NVR, Local folder
Screen-split mode
Up to 16 footages can be played simultaneously
Video Control
Start/stop, Pause, Faster/Slower forward/backward,
Step Forward/Backward, Skip Forward/Backward
Functions
Snapshot / Prints Image, Digital zoom
Backup
Local storage, back up format(AVI, SEC)
Configurable schedule for backup (*supported model only)
● APPENDIX
Video
Supported Video
Compression Format
English _87
appendix
Features
Event Monitoring
Real-time event list
Shows real-time event list of the device(event status, type, device, user, time(PC)),
Viewing instant video image
Searching events
- SSM : User, System
- Device : System, Camera, Sensor, Alarm Out
- Camera : Video Loss, Motion, Passing, Entering, Exiting, Disappearing (Appearing),
Tampering, Tracking, Face Detection, Audio Detection
Reporting
Manual report (show events and statistics)
print & Save function, format(excel, PDF, word)
Confirming
set alarm details Normal/Abnormal/Etc, confirm action
History
the confirmed details of the selected event from the list
Instant Viewer
Display the selecting camera. Confirm the event, record event remarks and end the
event status.
Instant Player
Plays the corresponding camera’s video image
Event Action
Define various system actions (output) for events (input) from devices, action (output)
types: Instant Viewer, Preset, Alarm Out, Pop-up, Sound and E-mail notification
Configuration
Site/User management
Site/User group/User account management, Permission management for viewer
functions
Device management
Automatic device IP scanning, Viewing the device settings(Device webpage),
Exporting/Importing devices settings, Updating the device firmware
Screen
management
Layouts
Setting/Adding/Deleting Layouts, Map/Video Layout
Monitor
Multi Monitor, Split Screen, Sequence, Using I-Frame,
Using low-resolution
Environment
OSD display, Date/Time, Capture, Recording, Sartup, Language, UI auto lock, Log
System settings
Backup/Restore SSM setups, Restore the devault settings
Time synchronization
NTP Server, Client
Update
Automatic self upgrade(Connection to Samsung upgrade server)
General
Supported devices
Samsung's N/W Camera, Encoder, DVR/NVR
Maximum number of Media Gateways per system
Default 4 Media Gateway
Maximum number of Free NET-i ware per system
1 NET-i ware
Maximum number of cameras per Media Gateway
N/W Camera 72channels or DVR/NVR 288channels(36)
Maximum number of clients per Media Gateway
5 Clients
Modules
System Manager, Media Gateway, Console, Service Manager, Schedule backup
88_ appendix
Configuration
Language
Recommended
CPU Intel i7 (Sandy bridge) above
RAM 4 GB above, Video memory 1GB above, HDD More than 20 GB of free space
for installation. (For operation, the system log database requires 10 GB or more free
space.), DirectX 8.1 above. Display resolution : 1,280 x 1,024 above, OpenGL
compatible
Minimum
CPU Intel Core 2 Duo 2.83 GHz above, RAM 2GB above, Video memory 512MB
Operating System
- Console (Windows XP 32bit, Windows 7 32bit, Windows 7 64bit)
- System Mananger, Media Gateway (Windows XP 32bit, Windows 7 32bit,
Windows 7 64bit, Windows Server 2003, Windows Server 2008)
System Requirement
English _89
● APPENDIX
Total 23 languages support
English, French, German, Spanish, Italian, Russian, Chinese, Japanese, Korean,
Turkish, Polish, Czech, Serbian, Romanian, Portuguese, Dutch, Croatian, Hungarian,
Greek , Swedish, Danish, Finnish, Norwegian
OPEN SOURCE LICENSE NOTIFICATION ON THE PRODUCT
The software included in this product contains copyrighted software that is licensed under the BSD 2.0/MIT License 2.0/Apache License 2.0/Boost
Software License/EPL 1.0/CDDL 1.1/Code Project Open 1.02 License.
• BSD 2.0 : googlemock
• MIT License : dotNetInstaller: setup bootstrapper for Windows, facebook-java-api
• Apache License 2.0 : Apache ActiveMQ, fiskidagur
• Boost Software License : Boost C++ Libraries – boost
• EPL 1.0 : Dog 2.x – Domotic OSGi Gateway, Eclipse Equinox, Eclipse Trader
• CDDL 1.1 : GlassFish, Java Platform, Enterprise Edition (Java EE, J2EE), OpenSSO Enterprise, Web Services Interoperability Technologies (WSIT)
• Code Project Open 1.02 License : Code Project – AlphaBlendTextBox – A transparent/translucent textbox for .NET, Code Project – Animating
Windows Forms, Code Project – BarTender – Group your contents, Code Project – Cabinet File (*.CAB) Compression and Extraction, Code Project
– Data Encryption/Decryption using RijndaelManaged and PasswordDeriveByt, Code Project – How to skin scrollbars for Panels, in C#, Code
Project – Simple Movie Database in C# using Microsoft Access, Code Project – Simplest PDF Generating API for JPEG Image Content, Code
Project – Sinking connection points in C++ objects, Code Project – Windows Management Instrumentation (WMI) Implementation
BSD 2.0
Apache License 2.0
Copyright 2008, Google Inc.
All rights reserved.
Redistribution and use in source and binary forms, with or without
modification, are permitted provided that the following conditions are
met:
• Redistributions of source code must retain the above copyright
notice, this list of conditions and the following disclaimer.
• Redistributions in binary form must reproduce the above copyright
notice, this list of conditions and the following disclaimer in the
documentation and/or other materials provided with the distribution.
• Neither the name of Google Inc. nor the names of its contributors
may be used to endorse or promote products derived from this
software without specific prior written permission.
THIS SOFTWARE IS PROVIDED BY THE COPYRIGHT HOLDERS AND
CONTRIBUTORS "AS IS" AND ANY EXPRESS OR IMPLIED
WARRANTIES, INCLUDING, BUT NOT LIMITED TO, THE IMPLIED
WARRANTIES OF MERCHANTABILITY AND FITNESS FOR A
PARTICULAR PURPOSE ARE DISCLAIMED. IN NO EVENT SHALL
THE COPYRIGHT OWNER OR CONTRIBUTORS BE LIABLE FOR ANY
DIRECT, INDIRECT, INCIDENTAL, SPECIAL, EXEMPLARY, OR
CONSEQUENTIAL DAMAGES (INCLUDING, BUT NOT LIMITED TO,
PROCUREMENT OF SUBSTITUTE GOODS OR SERVICES; LOSS OF
USE, DATA, OR PROFITS; OR BUSINESS INTERRUPTION) HOWEVER
CAUSED AND ON ANY THEORY OF LIABILITY, WHETHER IN
CONTRACT, STRICT LIABILITY, OR TORT (INCLUDING NEGLIGENCE
OR OTHERWISE) ARISING IN ANY WAY OUT OF THE USE OF THIS
SOFTWARE, EVEN IF ADVISED OF THE POSSIBILITY OF SUCH
DAMAGE.
We used the Apache ActiveMQ in our application and we did not modify
the source code.
Copyright (c)
• Apache ActiveMQ (2005-2008, The Apache Software Foundation)
http://www.apache.org/licenses/
TERMS AND CONDITIONS FOR USE, REPRODUCTION, AND
DISTRIBUTION
1. Definitions.
"License" shall mean the terms and conditions for use, reproduction,
and distribution as defined by Sections 1 through 9 of this document.
"Licensor" shall mean the copyright owner or entity authorized by the
copyright owner that is granting the License.
"Legal Entity" shall mean the union of the acting entity and all other
entities that control, are controlled by, or are under common control with
that entity. For the purposes of this definition, "control" means (i) the
power, direct or indirect, to cause the direction or management of such
entity, whether by contract or otherwise, or (ii) ownership of fifty percent
(50%) or more of the outstanding shares, or (iii) beneficial ownership of
such entity.
"You" (or "Your") shall mean an individual or Legal Entity exercising
permissions granted by this License.
"Source" form shall mean the preferred form for making modifications,
including but not limited to software source code, documentation
source, and configuration files.
"Object" form shall mean any form resulting from mechanical
transformation or translation of a Source form, including but not limited
to compiled object code, generated documentation, and conversions to
other media types.
"Work" shall mean the work of authorship, whether in Source or Object
form, made available under the License, as indicated by a copyright
notice that is included in or attached to the work (an example is
provided in the Appendix below).
"Derivative Works" shall mean any work, whether in Source or Object
form, that is based on (or derived from) the Work and for which the
editorial revisions, annotations, elaborations, or other modifications
represent, as a whole, an original work of authorship. For the purposes
of this License, Derivative Works shall not include works that remain
separable from, or merely link (or bind by name) to the interfaces of, the
Work and Derivative Works thereof.
"Contribution" shall mean any work of authorship, including the original
version of the Work and any modifications or additions to that Work or
Derivative Works thereof, that is intentionally submitted to Licensor for
inclusion in the Work by the copyright owner or by an individual or Legal
Entity authorized to submit on behalf of the copyright owner. For the
purposes of this definition, "submitted" means any form of electronic,
verbal, or written communication sent to the Licensor or its
representatives, including but not limited to communication on
electronic mailing lists, source code control systems, and issue tracking
systems that are managed by, or on behalf of, the Licensor for the
purpose of discussing and improving the Work, but excluding
communication that is conspicuously marked or otherwise designated
in writing by the copyright owner as "Not a Contribution."
"Contributor" shall mean Licensor and any individual or Legal Entity on
behalf of whom a Contribution has been received by Licensor and
subsequently incorporated within the Work.
MIT License
Copyright (c)
• dotNetInstaller: setup bootstrapper for Windows (2009, Davide Icardi,
Vestris Inc. and Contributors)
• Facebook-java-api (2007 Facebook, Inc.)
Permission is hereby granted, free of charge, to any person obtaining a
copy of this software and associated documentation files (the
"Software"), to deal in the Software without restriction, including without
limitation the rights to use, copy, modify, merge, publish, distribute,
sublicense, and/or sell copies of the Software, and to permit persons to
whom the Software is furnished to do so, subject to the following
conditions:
• The above copyright notice and this permission notice shall be
included in all copies or substantial portions of the Software.
THE SOFTWARE IS PROVIDED "AS IS", WITHOUT WARRANTY OF
ANY KIND, EXPRESS OR IMPLIED, INCLUDING BUT NOT LIMITED TO
THE WARRANTIES OF MERCHANTABILITY, FITNESS FOR A
PARTICULAR PURPOSE AND NONINFRINGEMENT. IN NO EVENT
SHALL THE AUTHORS OR COPYRIGHT HOLDERS BE LIABLE FOR
ANY CLAIM, DAMAGES OR OTHER LIABILITY, WHETHER IN AN
ACTION OF CONTRACT, TORT OR OTHERWISE, ARISING FROM,
OUT OF OR IN CONNECTION WITH THE SOFTWARE OR THE USE
OR OTHER DEALINGS IN THE SOFTWARE.
2. Grant of Copyright License. Subject to the terms and conditions of
this License, each Contributor hereby grants to You a perpetual,
worldwide, non-exclusive, no-charge, royalty-free, irrevocable copyright
license to reproduce, prepare Derivative Works of, publicly display,
publicly perform, sublicense, and distribute the Work and such
Derivative Works in Source or Object form.
3. Grant of Patent License. Subject to the terms and conditions of this
License, each Contributor hereby grants to You a perpetual, worldwide,
non-exclusive, no-charge, royalty-free, irrevocable (except as stated in
this section) patent license to make, have made, use, offer to sell, sell,
import, and otherwise transfer the Work, where such license applies
only to those patent claims licensable by such Contributor that are
necessarily infringed by their Contribution(s) alone or by combination of
their Contribution(s) with the Work to which such Contribution(s) was
submitted. If You institute patent litigation against any entity (including a
cross-claim or counterclaim in a lawsuit) alleging that the Work or a
Contribution incorporated within the Work constitutes direct or
contributory patent infringement, then any patent licenses granted to
You under this License for that Work shall terminate as of the date such
litigation is filed.
4. Redistribution. You may reproduce and distribute copies of the
Work or Derivative Works thereof in any medium, with or without
modifications, and in Source or Object form, provided that you meet the
following conditions:
1. You must give any other recipients of the Work or Derivative Works
a copy of this License; and
2. You must cause any modified files to carry prominent notices stating
that You changed the files; and
3. You must retain, in the Source form of any Derivative Works that You
distribute, all copyright, patent, trademark, and attribution notices
from the Source form of the Work, excluding those notices that do
not pertain to any part of the Derivative Works; and
4. If the Work includes a "NOTICE" text file as part of its distribution,
then any Derivative Works that You distribute must include a
readable copy of the attribution notices contained within such
NOTICE file, excluding those notices that do not pertain to any part
of the Derivative Works, in at least one of the following places: within
a NOTICE text file distributed as part of the Derivative Works; within
the Source form or documentation, if provided along with the
Derivative Works; or, within a display generated by the Derivative
Works, if and wherever such third-party notices normally appear.
The contents of the NOTICE file are for informational purposes only
and do not modify the License. You may add Your own attribution
notices within Derivative Works that You distribute, alongside or as
an addendum to the NOTICE text from the Work, provided that
such additional attribution notices cannot be construed as modifying
the License. You may add Your own copyright statement to Your
modifications and may provide additional or different license terms
and conditions for use, reproduction, or distribution of Your
modifications, or for any such Derivative Works as a whole, provided
Your use, reproduction, and distribution of the Work otherwise
complies with the conditions stated in this License.
5. Submission of Contributions. Unless You explicitly state otherwise,
any Contribution intentionally submitted for inclusion in the Work by You
to the Licensor shall be under the terms and conditions of this License,
without any additional terms or conditions. Notwithstanding the above,
nothing herein shall supersede or modify the terms of any separate
license agreement you may have executed with Licensor regarding such
Contributions.
6. Trademarks. This License does not grant permission to use the
trade names, trademarks, service marks, or product names of the
Licensor, except as required for reasonable and customary use in
describing the origin of the Work and reproducing the content of the
NOTICE file.
7. Disclaimer of Warranty. Unless required by applicable law or agreed
to in writing, Licensor provides the Work (and each Contributor provides
its Contributions) on an "AS IS" BASIS, WITHOUT WARRANTIES OR
CONDITIONS OF ANY KIND, either express or implied, including,
without limitation, any warranties or conditions of TITLE, NONINFRINGEMENT, MERCHANTABILITY, or FITNESS FOR A
PARTICULAR PURPOSE. You are solely responsible for determining the
appropriateness of using or redistributing the Work and assume any
risks associated with Your exercise of permissions under this License.
8. Limitation of Liability. In no event and under no legal theory,
whether in tort (including negligence), contract, or otherwise, unless
required by applicable law (such as deliberate and grossly negligent
acts) or agreed to in writing, shall any Contributor be liable to You for
damages, including any direct, indirect, special, incidental, or
consequential damages of any character arising as a result of this
License or out of the use or inability to use the Work (including but not
limited to damages for loss of goodwill, work stoppage, computer failure
or malfunction, or any and all other commercial damages or losses),
even if such Contributor has been advised of the possibility of such
damages.
9. Accepting Warranty or Additional Liability. While redistributing the
Work or Derivative Works thereof, You may choose to offer, and charge
a fee for, acceptance of support, warranty, indemnity, or other liability
obligations and/or rights consistent with this License. However, in
accepting such obligations, You may act only on Your own behalf and
on Your sole responsibility, not on behalf of any other Contributor, and
only if You agree to indemnify, defend, and hold each Contributor
harmless for any liability incurred by, or claims asserted against, such
Contributor by reason of your accepting any such warranty or additional
liability.
END OF TERMS AND CONDITIONS
APPENDIX: How to apply the Apache License to your work
To apply the Apache License to your work, attach the following
boilerplate notice, with the fields enclosed by brackets "[]" replaced with
your own identifying information. (Don't include the brackets!) The text
should be enclosed in the appropriate comment syntax for the file
format. We also recommend that a file or class name and description of
purpose be included on the same "printed page" as the copyright
notice for easier identification within third-party archives.
Copyright [yyyy] [name of copyright owner]
Licensed under the Apache License, Version 2.0 (the "License");
you may not use this file except in compliance with the License.
You may obtain a copy of the License at
http://www.apache.org/licenses/LICENSE-2.0
Unless required by applicable law or agreed to in writing, software
distributed under the License is distributed on an "AS IS" BASIS,
WITHOUT WARRANTIES OR CONDITIONS OF ANY KIND, either
express or implied.
See the License for the specific language governing permissions
and limitations under the License.
Boost Software License
Copyright(c) 2002, John Maddock
Boost Software License - Version 1.0 - August 17th, 2003
Permission is hereby granted, free of charge, to any person or
organization obtaining a copy of the software and accompanying
documentation covered by this license (the "Software") to use,
reproduce, display, distribute, execute, and transmit the Software, and
to prepare derivative works of the Software, and to permit third-parties
to whom the Software is furnished to do so, all subject to the following:
The copyright notices in the Software and this entire statement,
including the above license grant, this restriction and the following
disclaimer, must be included in all copies of the Software, in whole or in
part, and all derivative works of the Software, unless such copies or
derivative works are solely in the form of machine-executable object
code generated by a source language processor.
THE SOFTWARE IS PROVIDED "AS IS", WITHOUT WARRANTY OF
ANY KIND, EXPRESS OR IMPLIED, INCLUDING BUT NOT LIMITED TO
THE WARRANTIES OF MERCHANTABILITY, FITNESS FOR A
PARTICULAR PURPOSE, TITLE AND NON-INFRINGEMENT. IN NO
EVENT SHALL THE COPYRIGHT HOLDERS OR ANYONE
DISTRIBUTING THE SOFTWARE BE LIABLE FOR ANY DAMAGES OR
OTHER LIABILITY, WHETHER IN CONTRACT, TORT OR OTHERWISE,
ARISING FROM, OUT OF OR IN CONNECTION WITH THE SOFTWARE
OR THE USE OR OTHER DEALINGS IN THE SOFTWARE.
EPL 1.0
As we did not modify the Dog 2.x-Domotic OSGi Gateway, Eclipse
Equinox, and Eclipse Trader module, we have no obligation to distribute
the source code.
Copyright (c)
• Dog 2.x – Domotic OSGi Gateway (2007, Cognos Incorporated, IBM
Corporation and others. All Rights Reserved.)
• Eclipse Equinox (2007, IBM Corporation and others. All Rights
Reserved.)
• Eclipse Trader (2007, IBM Corporation and others. All Rights
Reserved.)
THE ACCOMPANYING PROGRAM IS PROVIDED UNDER THE TERMS
OF THIS ECLIPSE PUBLIC LICENSE ("AGREEMENT"). ANY USE,
REPRODUCTION OR DISTRIBUTION OF THE PROGRAM
CONSTITUTES RECIPIENT'S ACCEPTANCE OF THIS AGREEMENT.
1. DEFINITIONS
"Contribution" means:
a) in the case of the initial Contributor, the initial code and
documentation distributed under this Agreement, and
b) in the case of each subsequent Contributor:
i) changes to the Program, and
ii) additions to the Program;
where such changes and/or additions to the Program originate from
and are distributed by that particular Contributor. A Contribution
'originates' from a Contributor if it was added to the Program by such
Contributor itself or anyone acting on such Contributor's behalf.
Contributions do not include additions to the Program which: (i) are
separate modules of software distributed in conjunction with the
Program under their own license agreement, and (ii) are not derivative
works of the Program.
"Contributor" means any person or entity that distributes the Program.
"Licensed Patents" mean patent claims licensable by a Contributor
which are necessarily infringed by the use or sale of its Contribution
alone or when combined with the Program.
"Program" means the Contributions distributed in accordance with this
Agreement.
"Recipient" means anyone who receives the Program under this
Agreement, including all Contributors.
2. GRANT OF RIGHTS
a) Subject to the terms of this Agreement, each Contributor hereby
grants Recipient a non-exclusive, worldwide, royalty-free copyright
license to reproduce, prepare derivative works of, publicly display,
publicly perform, distribute and sublicense the Contribution of such
Contributor, if any, and such derivative works, in source code and
object code form.
b) Subject to the terms of this Agreement, each Contributor hereby
grants Recipient a non-exclusive, worldwide, royalty-free patent
license under Licensed Patents to make, use, sell, offer to sell, import
and otherwise transfer the Contribution of such Contributor, if any, in
source code and object code form. This patent license shall apply to
the combination of the Contribution and the Program if, at the time
the Contribution is added by the Contributor, such addition of the
Contribution causes such combination to be covered by the Licensed
Patents. The patent license shall not apply to any other combinations
which include the Contribution. No hardware per se is licensed
hereunder.
c) Recipient understands that although each Contributor grants the
licenses to its Contributions set forth herein, no assurances are
provided by any Contributor that the Program does not infringe the
patent or other intellectual property rights of any other entity. Each
Contributor disclaims any liability to Recipient for claims brought by
any other entity based on infringement of intellectual property rights
or otherwise. As a condition to exercising the rights and licenses
granted hereunder, each Recipient hereby assumes sole responsibility
to secure any other intellectual property rights needed, if any. For
example, if a third party patent license is required to allow Recipient
to distribute the Program, it is Recipient's responsibility to acquire
that license before distributing the Program.
d) Each Contributor represents that to its knowledge it has sufficient
copyright rights in its Contribution, if any, to grant the copyright
license set forth in this Agreement.
3. REQUIREMENTS
A Contributor may choose to distribute the Program in object code form
under its own license agreement, provided that:
a) it complies with the terms and conditions of this Agreement; and
b) its license agreement:
i) effectively disclaims on behalf of all Contributors all warranties and
conditions, express and implied, including warranties or conditions
of title and non-infringement, and implied warranties or conditions
of merchantability and fitness for a particular purpose;
ii) effectively excludes on behalf of all Contributors all liability for
damages, including direct, indirect, special, incidental and
consequential damages, such as lost profits;
iii) states that any provisions which differ from this Agreement are
offered by that Contributor alone and not by any other party; and
iv) states that source code for the Program is available from such
Contributor, and informs licensees how to obtain it in a reasonable
manner on or through a medium customarily used for software
exchange.
When the Program is made available in source code form:
a) it must be made available under this Agreement; and
b) a copy of this Agreement must be included with each copy of the
Program.
Contributors may not remove or alter any copyright notices contained
within the Program.
Each Contributor must identify itself as the originator of its Contribution,
if any, in a manner that reasonably allows subsequent Recipients to
identify the originator of the Contribution.
4. COMMERCIAL DISTRIBUTION
Commercial distributors of software may accept certain responsibilities
with respect to end users, business partners and the like. While this
license is intended to facilitate the commercial use of the Program, the
Contributor who includes the Program in a commercial product offering
should do so in a manner which does not create potential liability for
other Contributors. Therefore, if a Contributor includes the Program in a
commercial product offering, such Contributor ("Commercial
Contributor") hereby agrees to defend and indemnify every other
Contributor ("Indemnified Contributor") against any losses, damages
and costs (collectively "Losses") arising from claims, lawsuits and other
legal actions brought by a third party against the Indemnified
Contributor to the extent caused by the acts or omissions of such
Commercial Contributor in connection with its distribution of the
Program in a commercial product offering. The obligations in this
section do not apply to any claims or Losses relating to any actual or
alleged intellectual property infringement. In order to qualify, an
Indemnified Contributor must: a) promptly notify the Commercial
Contributor in writing of such claim, and b) allow the Commercial
Contributor to control, and cooperate with the Commercial Contributor
in, the defense and any related settlement negotiations. The Indemnified
Contributor may participate in any such claim at its own expense.
For example, a Contributor might include the Program in a commercial
product offering, Product X. That Contributor is then a Commercial
Contributor. If that Commercial Contributor then makes performance
claims, or offers warranties related to Product X, those performance
claims and warranties are such Commercial Contributor's responsibility
alone. Under this section, the Commercial Contributor would have to
defend claims against the other Contributors related to those
performance claims and warranties, and if a court requires any other
Contributor to pay any damages as a result, the Commercial
Contributor must pay those damages.
5. NO WARRANTY
EXCEPT AS EXPRESSLY SET FORTH IN THIS AGREEMENT, THE
PROGRAM IS PROVIDED ON AN "AS IS" BASIS, WITHOUT
WARRANTIES OR CONDITIONS OF ANY KIND, EITHER EXPRESS OR
IMPLIED INCLUDING, WITHOUT LIMITATION, ANY WARRANTIES OR
CONDITIONS OF TITLE, NON-INFRINGEMENT, MERCHANTABILITY
OR FITNESS FOR A PARTICULAR PURPOSE. Each Recipient is solely
responsible for determining the appropriateness of using and
distributing the Program and assumes all risks associated with its
exercise of rights under this Agreement , including but not limited to the
risks and costs of program errors, compliance with applicable laws,
damage to or loss of data, programs or equipment, and unavailability or
interruption of operations.
6. DISCLAIMER OF LIABILITY
EXCEPT AS EXPRESSLY SET FORTH IN THIS AGREEMENT, NEITHER
RECIPIENT NOR ANY CONTRIBUTORS SHALL HAVE ANY LIABILITY
FOR ANY DIRECT, INDIRECT, INCIDENTAL, SPECIAL, EXEMPLARY,
OR CONSEQUENTIAL DAMAGES (INCLUDING WITHOUT LIMITATION
LOST PROFITS), HOWEVER CAUSED AND ON ANY THEORY OF
LIABILITY, WHETHER IN CONTRACT, STRICT LIABILITY, OR TORT
(INCLUDING NEGLIGENCE OR OTHERWISE) ARISING IN ANY WAY
OUT OF THE USE OR DISTRIBUTION OF THE PROGRAM OR THE
EXERCISE OF ANY RIGHTS GRANTED HEREUNDER, EVEN IF
ADVISED OF THE POSSIBILITY OF SUCH DAMAGES.
7. GENERAL
If any provision of this Agreement is invalid or unenforceable under
applicable law, it shall not affect the validity or enforceability of the
remainder of the terms of this Agreement, and without further action by
the parties hereto, such provision shall be reformed to the minimum
extent necessary to make such provision valid and enforceable.
If Recipient institutes patent litigation against any entity (including a
cross-claim or counterclaim in a lawsuit) alleging that the Program itself
(excluding combinations of the Program with other software or
hardware) infringes such Recipient's patent(s), then such Recipient's
rights granted under Section 2(b) shall terminate as of the date such
litigation is filed.
All Recipient's rights under this Agreement shall terminate if it fails to
comply with any of the material terms or conditions of this Agreement
and does not cure such failure in a reasonable period of time after
becoming aware of such noncompliance. If all Recipient's rights under
this Agreement terminate, Recipient agrees to cease use and
distribution of the Program as soon as reasonably practicable. However,
Recipient's obligations under this Agreement and any licenses granted
by Recipient relating to the Program shall continue and survive.
Everyone is permitted to copy and distribute copies of this Agreement,
but in order to avoid inconsistency the Agreement is copyrighted and
may only be modified in the following manner. The Agreement Steward
reserves the right to publish new versions (including revisions) of this
Agreement from time to time. No one other than the Agreement
Steward has the right to modify this Agreement. The Eclipse Foundation
is the initial Agreement Steward. The Eclipse Foundation may assign the
responsibility to serve as the Agreement Steward to a suitable separate
entity. Each new version of the Agreement will be given a distinguishing
version number. The Program (including Contributions) may always be
distributed subject to the version of the Agreement under which it was
received. In addition, after a new version of the Agreement is published,
Contributor may elect to distribute the Program (including its
Contributions) under the new version. Except as expressly stated in
Sections 2(a) and 2(b) above, Recipient receives no rights or licenses to
the intellectual property of any Contributor under this Agreement,
whether expressly, by implication, estoppel or otherwise. All rights in the
Program not expressly granted under this Agreement are reserved.
This Agreement is governed by the laws of the State of New York and
the intellectual property laws of the United States of America. No party
to this Agreement will bring a legal action under this Agreement more
than one year after the cause of action arose. Each party waives its
rights to a jury trial in any resulting litigation.
CDDL 1.1
As we did not modify the GlassFish, Java Platform Enterprise Edition,
and OpenSSO Enterprise module, we have no obligation to distribute
the source code.
Copyright (c) 2000-2010, Oracle and/or its affiliates. All rights reserved.
1. Definitions.
1.1. "Contributor" means each individual or entity that creates or
contributes to the creation of Modifications.
1.2. "Contributor Version" means the combination of the Original
Software, prior Modifications used by a Contributor (if any), and the
Modifications made by that particular Contributor.
1.3. "Covered Software" means (a) the Original Software, or (b)
Modifications, or (c) the combination of files containing Original
Software with files containing Modifications, in each case including
portions thereof.
1.4. "Executable" means the Covered Software in any form other
than Source Code.
1.5. "Initial Developer" means the individual or entity that first makes
Original Software available under this License.
1.6. "Larger Work" means a work which combines Covered
Software or portions thereof with code not governed by the terms of
this License.
1.7. "License" means this document.
1.8. "Licensable" means having the right to grant, to the maximum
extent possible, whether at the time of the initial grant or
subsequently acquired, any and all of the rights conveyed herein.
1.9. "Modifications" means the Source Code and Executable form
of any of the following:
A. Any file that results from an addition to, deletion from or
modification of the contents of a file containing Original
Software or previous Modifications;
B. Any new file that contains any part of the Original Software or
previous Modification; or
C. Any new file that is contributed or otherwise made available
under the terms of this License.
1.10. "Original Software" means the Source Code and Executable
form of computer software code that is originally released under this
License.
1.11. "Patent Claims" means any patent claim(s), now owned or
hereafter acquired, including without limitation, method, process,
and apparatus claims, in any patent Licensable by grantor.
1.12. "Source Code" means (a) the common form of computer
software code in which modifications are made and (b) associated
documentation included in or with such code.
1.13. "You" (or "Your") means an individual or a legal entity
exercising rights under, and complying with all of the terms of, this
License. For legal entities, "You" includes any entity which controls,
is controlled by, or is under common control with You. For purposes
of this definition, "control" means (a) the power, direct or indirect, to
cause the direction or management of such entity, whether by
contract or otherwise, or (b) ownership of more than fifty percent
(50%) of the outstanding shares or beneficial ownership of such
entity.
2. License Grants.
2.1. The Initial Developer Grant.
Conditioned upon Your compliance with Section 3.1 below and
subject to third party intellectual property claims, the Initial Developer
hereby grants You a world-wide, royalty-free, non-exclusive license:
(a) under intellectual property rights (other than patent or
trademark) Licensable by Initial Developer, to use, reproduce,
modify, display, perform, sublicense and distribute the Original
Software (or portions thereof), with or without Modifications,
and/or as part of a Larger Work; and
(b) under Patent Claims infringed by the making, using or selling
of Original Software, to make, have made, use, practice, sell,
and offer for sale, and/or otherwise dispose of the Original
Software (or portions thereof).
(c) The licenses granted in Sections 2.1(a) and (b) are effective
on the date Initial Developer first distributes or otherwise makes
the Original Software available to a third party under the terms
of this License.
(d) Notwithstanding Section 2.1(b) above, no patent license is
granted: (1) for code that You delete from the Original Software,
or (2) for infringements caused by: (i) the modification of the
Original Software, or (ii) the combination of the Original Software
with other software or devices.
2.2. Contributor Grant.
Conditioned upon Your compliance with Section 3.1 below and
subject to third party intellectual property claims, each Contributor
hereby grants You a world-wide, royalty-free, non-exclusive license:
(a) under intellectual property rights (other than patent or
trademark) Licensable by Contributor to use, reproduce, modify,
display, perform, sublicense and distribute the Modifications
created by such Contributor (or portions thereof), either on an
unmodified basis, with other Modifications, as Covered
Software and/or as part of a Larger Work; and
(b) under Patent Claims infringed by the making, using, or
selling of Modifications made by that Contributor either alone
and/or in combination with its Contributor Version (or portions of
such combination), to make, use, sell, offer for sale, have made,
and/or otherwise dispose of: (1) Modifications made by that
Contributor (or portions thereof); and (2) the combination of
Modifications made by that Contributor with its Contributor
Version (or portions of such combination).
(c) The licenses granted in Sections 2.2(a) and 2.2(b) are
effective on the date Contributor first distributes or otherwise
makes the Modifications available to a third party.
(d) Notwithstanding Section 2.2(b) above, no patent license is
granted:
(1) for any code that Contributor has deleted from the
Contributor Version;
(2) for infringements caused by: (i) third party modifications of
Contributor Version, or (ii) the combination of Modifications
made by that Contributor with other software (except as part
of the Contributor Version) or other devices; or
(3) under Patent Claims infringed by Covered Software in the
absence of Modifications made by that Contributor.
3. Distribution Obligations.
3.1. Availability of Source Code.
Any Covered Software that You distribute or otherwise make
available in Executable form must also be made available in Source
Code form and that Source Code form must be distributed only
under the terms of this License. You must include a copy of this
License with every copy of the Source Code form of the Covered
Software You distribute or otherwise make available. You must
inform recipients of any such Covered Software in Executable form
as to how they can obtain such Covered Software in Source Code
form in a reasonable manner on or through a medium customarily
used for software exchange.
3.2. Modifications.
The Modifications that You create or to which You contribute are
governed by the terms of this License. You represent that You
believe Your Modifications are Your original creation(s) and/or You
have sufficient rights to grant the rights conveyed by this License.
3.3. Required Notices.
You must include a notice in each of Your Modifications that
identifies You as the Contributor of the Modification. You may not
remove or alter any copyright, patent or trademark notices
contained within the Covered Software, or any notices of licensing
or any descriptive text giving attribution to any Contributor or the
Initial Developer.
3.4. Application of Additional Terms.
You may not offer or impose any terms on any Covered Software in
Source Code form that alters or restricts the applicable version of
this License or the recipients' rights hereunder. You may choose to
offer, and to charge a fee for, warranty, support, indemnity or liability
obligations to one or more recipients of Covered Software. However,
you may do so only on Your own behalf, and not on behalf of the
Initial Developer or any Contributor. You must make it absolutely
clear that any such warranty, support, indemnity or liability obligation
is offered by You alone, and You hereby agree to indemnify the Initial
Developer and every Contributor for any liability incurred by the Initial
Developer or such Contributor as a result of warranty, support,
indemnity or liability terms You offer.
3.5. Distribution of Executable Versions.
You may distribute the Executable form of the Covered Software
under the terms of this License or under the terms of a license of
Your choice, which may contain terms different from this License,
provided that You are in compliance with the terms of this License
and that the license for the Executable form does not attempt to
limit or alter the recipient's rights in the Source Code form from the
rights set forth in this License. If You distribute the Covered Software
in Executable form under a different license, You must make it
absolutely clear that any terms which differ from this License are
offered by You alone, not by the Initial Developer or Contributor. You
hereby agree to indemnify the Initial Developer and every Contributor
for any liability incurred by the Initial Developer or such Contributor
as a result of any such terms You offer.
3.6. Larger Works.
You may create a Larger Work by combining Covered Software with
other code not governed by the terms of this License and distribute
the Larger Work as a single product. In such a case, You must
make sure the requirements of this License are fulfilled for the
Covered Software.
4. Versions of the License.
4.1. New Versions.
Oracle is the initial license steward and may publish revised and/or
new versions of this License from time to time. Each version will be
given a distinguishing version number. Except as provided in Section
4.3, no one other than the license steward has the right to modify
this License.
4.2. Effect of New Versions.
You may always continue to use, distribute or otherwise make the
Covered Software available under the terms of the version of the
License under which You originally received the Covered Software. If
the Initial Developer includes a notice in the Original Software
prohibiting it from being distributed or otherwise made available
under any subsequent version of the License, You must distribute
and make the Covered Software available under the terms of the
version of the License under which You originally received the
Covered Software. Otherwise, You may also choose to use,
distribute or otherwise make the Covered Software available under
the terms of any subsequent version of the License published by the
license steward.
4.3. Modified Versions.
When You are an Initial Developer and You want to create a new
license for Your Original Software, You may create and use a
modified version of this License if You: (a) rename the license and
remove any references to the name of the license steward (except
to note that the license differs from this License); and (b) otherwise
make it clear that the license contains terms which differ from this
License.
5. DISCLAIMER OF WARRANTY.
COVERED SOFTWARE IS PROVIDED UNDER THIS LICENSE ON
AN "AS IS" BASIS, WITHOUT WARRANTY OF ANY KIND, EITHER
EXPRESSED OR IMPLIED, INCLUDING, WITHOUT LIMITATION,
WARRANTIES THAT THE COVERED SOFTWARE IS FREE OF
DEFECTS, MERCHANTABLE, FIT FOR A PARTICULAR PURPOSE
OR NON-INFRINGING. THE ENTIRE RISK AS TO THE QUALITY
AND PERFORMANCE OF THE COVERED SOFTWARE IS WITH
6.
7.
8.
9.
YOU. SHOULD ANY COVERED SOFTWARE PROVE DEFECTIVE
IN ANY RESPECT, YOU (NOT THE INITIAL DEVELOPER OR ANY
OTHER CONTRIBUTOR) ASSUME THE COST OF ANY
NECESSARY SERVICING, REPAIR OR CORRECTION. THIS
DISCLAIMER OF WARRANTY CONSTITUTES AN ESSENTIAL
PART OF THIS LICENSE. NO USE OF ANY COVERED SOFTWARE
IS AUTHORIZED HEREUNDER EXCEPT UNDER THIS
DISCLAIMER.
TERMINATION.
6.1. This License and the rights granted hereunder will terminate
automatically if You fail to comply with terms herein and fail to cure
such breach within 30 days of becoming aware of the breach.
Provisions which, by their nature, must remain in effect beyond the
termination of this License shall survive.
6.2. If You assert a patent infringement claim (excluding declaratory
judgment actions) against Initial Developer or a Contributor (the Initial
Developer or Contributor against whom You assert such claim is
referred to as "Participant") alleging that the Participant Software
(meaning the Contributor Version where the Participant is a
Contributor or the Original Software where the Participant is the
Initial Developer) directly or indirectly infringes any patent, then any
and all rights granted directly or indirectly to You by such Participant,
the Initial Developer (if the Initial Developer is not the Participant) and
all Contributors under Sections 2.1 and/or 2.2 of this License shall,
upon 60 days notice from Participant terminate prospectively and
automatically at the expiration of such 60 day notice period, unless if
within such 60 day period You withdraw Your claim with respect to
the Participant Software against such Participant either unilaterally or
pursuant to a written agreement with Participant.
6.3. If You assert a patent infringement claim against Participant
alleging that the Participant Software directly or indirectly infringes
any patent where such claim is resolved (such as by license or
settlement) prior to the initiation of patent infringement litigation, then
the reasonable value of the licenses granted by such Participant
under Sections 2.1 or 2.2 shall be taken into account in determining
the amount or value of any payment or license.
6.4. In the event of termination under Sections 6.1 or 6.2 above, all
end user licenses that have been validly granted by You or any
distributor hereunder prior to termination (excluding licenses granted
to You by any distributor) shall survive termination.
LIMITATION OF LIABILITY.
UNDER NO CIRCUMSTANCES AND UNDER NO LEGAL THEORY,
WHETHER TORT (INCLUDING NEGLIGENCE), CONTRACT, OR
OTHERWISE, SHALL YOU, THE INITIAL DEVELOPER, ANY
OTHER CONTRIBUTOR, OR ANY DISTRIBUTOR OF COVERED
SOFTWARE, OR ANY SUPPLIER OF ANY OF SUCH PARTIES, BE
LIABLE TO ANY PERSON FOR ANY INDIRECT, SPECIAL,
INCIDENTAL, OR CONSEQUENTIAL DAMAGES OF ANY
CHARACTER INCLUDING, WITHOUT LIMITATION, DAMAGES FOR
LOSS OF GOODWILL, WORK STOPPAGE, COMPUTER FAILURE
OR MALFUNCTION, OR ANY AND ALL OTHER COMMERCIAL
DAMAGES OR LOSSES, EVEN IF SUCH PARTY SHALL HAVE
BEEN INFORMED OF THE POSSIBILITY OF SUCH DAMAGES.
THIS LIMITATION OF LIABILITY SHALL NOT APPLY TO LIABILITY
FOR DEATH OR PERSONAL INJURY RESULTING FROM SUCH
PARTY'S NEGLIGENCE TO THE EXTENT APPLICABLE LAW
PROHIBITS SUCH LIMITATION. SOME JURISDICTIONS DO NOT
ALLOW THE EXCLUSION OR LIMITATION OF INCIDENTAL OR
CONSEQUENTIAL DAMAGES, SO THIS EXCLUSION AND
LIMITATION MAY NOT APPLY TO YOU.
U.S. GOVERNMENT END USERS.
The Covered Software is a "commercial item," as that term is
defined in 48 C.F.R. 2.101 (Oct. 1995), consisting of "commercial
computer software" (as that term is defined at 48 C.F.R. § 252.2277014(a)(1)) and "commercial computer software documentation" as
such terms are used in 48 C.F.R. 12.212 (Sept. 1995). Consistent
with 48 C.F.R. 12.212 and 48 C.F.R. 227.7202-1 through 227.72024 (June 1995), all U.S. Government End Users acquire Covered
Software with only those rights set forth herein. This U.S.
Government Rights clause is in lieu of, and supersedes, any other
FAR, DFAR, or other clause or provision that addresses Government
rights in computer software under this License.
MISCELLANEOUS.
This License represents the complete agreement concerning
subject matter hereof. If any provision of this License is held to be
unenforceable, such provision shall be reformed only to the extent
necessary to make it enforceable. This License shall be governed by
the law of the jurisdiction specified in a notice contained within the
Original Software (except to the extent applicable law, if any,
provides otherwise), excluding such jurisdiction's conflict-of-law
provisions. Any litigation relating to this License shall be subject to
the jurisdiction of the courts located in the jurisdiction and venue
specified in a notice contained within the Original Software, with the
losing party responsible for costs, including, without limitation, court
costs and reasonable attorneys' fees and expenses. The application
of the United Nations Convention on Contracts for the International
Sale of Goods is expressly excluded. Any law or regulation which
provides that the language of a contract shall be construed against
the drafter shall not apply to this License. You agree that You alone
are responsible for compliance with the United States export
administration regulations (and the export control laws and
regulation of any other countries) when You use, distribute or
otherwise make available any Covered Software.
10. RESPONSIBILITY FOR CLAIMS.
As between Initial Developer and the Contributors, each party is
responsible for claims and damages arising, directly or indirectly, out
of its utilization of rights under this License and You agree to work
with Initial Developer and Contributors to distribute such
responsibility on an equitable basis. Nothing herein is intended or
shall be deemed to constitute any admission of liability.
NOTICE PURSUANT TO SECTION 9 OF THE COMMON
DEVELOPMENT AND DISTRIBUTION LICENSE (CDDL)
The code released under the CDDL shall be governed by the laws of
the State of California (excluding conflict-of-law provisions). Any litigation
relating to this License shall be subject to the jurisdiction of the Federal
Courts of the Northern District of California and the state courts of the
State of California, with venue lying in Santa Clara County, California.
Code Project Open 1.02 License
Copyright (c)
• Code Project – AlphaBlendTextBox – A transparent/translucent
textbox for .NET (2003, Bob Bradley)
• Code Project – Animating Windows Forms (2006, Robert Rohde)
• Code Project – BarTender – Group your contents (2006, Robert
Rohde)
• Code Project – Cabinet File (*.CAB) Compression and Extraction
(2012, Elmue)
• Code Project – Data Encryption/Decryption using RijndaelManaged
and PasswordDeriveByt (2006, Nidheesh T Mani)
• Code Project – How to skin scrollbars for Panels, in C# (2006, Greg
Ellis)
• Code Project – Simple Movie Database in C# using Microsoft Access
(2008, Ivan Svogor)
• Code Project – Simplest PDF Generating API for JPEG Image
Content (2008, Hao Hu)
• Code Project – Sinking connection points in C++ objects (2002, Len
Holgate)
• Code Project – Windows Management Instrumentation (WMI)
Implementation (2002, Paul Li)
Preamble
This License governs Your use of the Work. This License is intended to
allow developers to use the Source Code and Executable Files provided
as part of the Work in any application in any form.
The main points subject to the terms of the License are:
• Source Code and Executable Files can be used in commercial
applications;
• Source Code and Executable Files can be redistributed; and
• Source Code can be modified to create derivative works.
• No claim of suitability, guarantee, or any warranty whatsoever is
provided. The software is provided "as-is".
• The Article accompanying the Work may not be distributed or
republished without the Author's consent
This License is entered between You, the individual or other entity
reading or otherwise making use of the Work licensed pursuant to this
License and the individual or other entity which offers the Work under
the terms of this License ("Author").
License
THE WORK (AS DEFINED BELOW) IS PROVIDED UNDER THE TERMS
OF THIS CODE PROJECT OPEN LICENSE ("LICENSE"). THE WORK IS
PROTECTED BY COPYRIGHT AND/OR OTHER APPLICABLE LAW.
ANY USE OF THE WORK OTHER THAN AS AUTHORIZED UNDER
THIS LICENSE OR COPYRIGHT LAW IS PROHIBITED.
BY EXERCISING ANY RIGHTS TO THE WORK PROVIDED HEREIN,
YOU ACCEPT AND AGREE TO BE BOUND BY THE TERMS OF THIS
LICENSE. THE AUTHOR GRANTS YOU THE RIGHTS CONTAINED
HEREIN IN CONSIDERATION OF YOUR ACCEPTANCE OF SUCH
TERMS AND CONDITIONS. IF YOU DO NOT AGREE TO ACCEPT
AND BE BOUND BY THE TERMS OF THIS LICENSE, YOU CANNOT
MAKE ANY USE OF THE WORK.
1. Definitions.
a. "Articles" means, collectively, all articles written by Author which
describes how the Source Code and Executable Files for the Work
may be used by a user.
b. "Author" means the individual or entity that offers the Work under
the terms of this License.
c. "Derivative Work" means a work based upon the Work or upon
the Work and other pre-existing works.
d. "Executable Files" refer to the executables, binary files,
configuration and any required data files included in the Work.
e. "Publisher" means the provider of the website, magazine,
CD-ROM, DVD or other medium from or by which the Work is
obtained by You.
f. "Source Code" refers to the collection of source code and
configuration files used to create the Executable Files.
g. "Standard Version" refers to such a Work if it has not been
modified, or has been modified in accordance with the consent of
the Author, such consent being in the full discretion of the Author.
h. "Work" refers to the collection of files distributed by the Publisher,
including the Source Code, Executable Files, binaries, data files,
documentation, whitepapers and the Articles.
i. "You" is you, an individual or entity wishing to use the Work and
exercise your rights under this License.
2. Fair Use/Fair Use Rights. Nothing in this License is intended to
reduce, limit, or restrict any rights arising from fair use, fair dealing,
first sale or other limitations on the exclusive rights of the copyright
owner under copyright law or other applicable laws.
3. License Grant. Subject to the terms and conditions of this License,
the Author hereby grants You a worldwide, royalty-free, nonexclusive, perpetual (for the duration of the applicable copyright)
license to exercise the rights in the Work as stated below:
a. You may use the standard version of the Source Code or
Executable Files in Your own applications.
b. You may apply bug fixes, portability fixes and other modifications
obtained from the Public Domain or from the Author. A Work
modified in such a way shall still be considered the standard version
and will be subject to this License.
c. You may otherwise modify Your copy of this Work (excluding the
Articles) in any way to create a Derivative Work, provided that You
insert a prominent notice in each changed file stating how, when
and where You changed that file.
d. You may distribute the standard version of the Executable Files
and Source Code or Derivative Work in aggregate with other
(possibly commercial) programs as part of a larger (possibly
commercial) software distribution.
e. The Articles discussing the Work published in any form by the
author may not be distributed or republished without the Author's
consent. The author retains copyright to any such Articles. You may
use the Executable Files and Source Code pursuant to this License
but you may not repost or republish or otherwise distribute or make
available the Articles, without the prior written consent of the Author.
Any subroutines or modules supplied by You and linked into the
Source Code or Executable Files of this Work shall not be
considered part of this Work and will not be subject to the terms of
this License.
4. Patent License. Subject to the terms and conditions of this
License, each Author hereby grants to You a perpetual, worldwide,
non-exclusive, no-charge, royalty-free, irrevocable (except as stated
in this section) patent license to make, have made, use, import, and
otherwise transfer the Work.
5. Restrictions. The license granted in Section 3 above is expressly
made subject to and limited by the following restrictions:
a. You agree not to remove any of the original copyright, patent,
trademark, and attribution notices and associated disclaimers that
may appear in the Source Code or Executable Files.
b. You agree not to advertise or in any way imply that this Work is a
product of Your own.
6.
7.
8.
9.
c. The name of the Author may not be used to endorse or promote
products derived from the Work without the prior written consent of
the Author.
d. You agree not to sell, lease, or rent any part of the Work. This
does not restrict you from including the Work or any part of the
Work inside a larger software distribution that itself is being sold. The
Work by itself, though, cannot be sold, leased or rented.
e. You may distribute the Executable Files and Source Code only
under the terms of this License, and You must include a copy of, or
the Uniform Resource Identifier for, this License with every copy of
the Executable Files or Source Code You distribute and ensure that
anyone receiving such Executable Files and Source Code agrees
that the terms of this License apply to such Executable Files and/or
Source Code. You may not offer or impose any terms on the Work
that alter or restrict the terms of this License or the recipients'
exercise of the rights granted hereunder. You may not sublicense
the Work. You must keep intact all notices that refer to this License
and to the disclaimer of warranties. You may not distribute the
Executable Files or Source Code with any technological measures
that control access or use of the Work in a manner inconsistent with
the terms of this License.
f. You agree not to use the Work for illegal, immoral or improper
purposes, or on pages containing illegal, immoral or improper
material. The Work is subject to applicable export laws. You agree
to comply with all such laws and regulations that may apply to the
Work after Your receipt of the Work.
Representations, Warranties and Disclaimer. THIS WORK IS
PROVIDED "AS IS", "WHERE IS" AND "AS AVAILABLE", WITHOUT
ANY EXPRESS OR IMPLIED WARRANTIES OR CONDITIONS OR
GUARANTEES. YOU, THE USER, ASSUME ALL RISK IN ITS USE,
INCLUDING COPYRIGHT INFRINGEMENT, PATENT
INFRINGEMENT, SUITABILITY, ETC. AUTHOR EXPRESSLY
DISCLAIMS ALL EXPRESS, IMPLIED OR STATUTORY
WARRANTIES OR CONDITIONS, INCLUDING WITHOUT
LIMITATION, WARRANTIES OR CONDITIONS OF
MERCHANTABILITY, MERCHANTABLE QUALITY OR FITNESS
FOR A PARTICULAR PURPOSE, OR ANY WARRANTY OF TITLE
OR NON-INFRINGEMENT, OR THAT THE WORK (OR ANY
PORTION THEREOF) IS CORRECT, USEFUL, BUG-FREE OR FREE
OF VIRUSES. YOU MUST PASS THIS DISCLAIMER ON
WHENEVER YOU DISTRIBUTE THE WORK OR DERIVATIVE
WORKS.
Indemnity. You agree to defend, indemnify and hold harmless the
Author and the Publisher from and against any claims, suits, losses,
damages, liabilities, costs, and expenses (including reasonable legal
or attorneys’ fees) resulting from or relating to any use of the Work
by You.
Limitation on Liability. EXCEPT TO THE EXTENT REQUIRED BY
APPLICABLE LAW, IN NO EVENT WILL THE AUTHOR OR THE
PUBLISHER BE LIABLE TO YOU ON ANY LEGAL THEORY FOR
ANY SPECIAL, INCIDENTAL, CONSEQUENTIAL, PUNITIVE OR
EXEMPLARY DAMAGES ARISING OUT OF THIS LICENSE OR THE
USE OF THE WORK OR OTHERWISE, EVEN IF THE AUTHOR OR
THE PUBLISHER HAS BEEN ADVISED OF THE POSSIBILITY OF
SUCH DAMAGES.
Termination.
a. This License and the rights granted hereunder will terminate
automatically upon any breach by You of any term of this License.
Individuals or entities who have received Derivative Works from You
under this License, however, will not have their licenses terminated
provided such individuals or entities remain in full compliance with
those licenses. Sections 1, 2, 6, 7, 8, 9, 10 and 11 will survive any
termination of this License.
b. If You bring a copyright, trademark, patent or any other
infringement claim against any contributor over infringements You
claim are made by the Work, your License from such contributor to
the Work ends automatically.
c. Subject to the above terms and conditions, this License is
perpetual (for the duration of the applicable copyright in the Work).
Notwithstanding the above, the Author reserves the right to release
the Work under different license terms or to stop distributing the
Work at any time; provided, however that any such election will not
serve to withdraw this License (or any other license that has been,
or is required to be, granted under the terms of this License), and
this License will continue in full force and effect unless terminated as
stated above.
10. Publisher. The parties hereby confirm that the Publisher shall not,
under any circumstances, be responsible for and shall not have any
liability in respect of the subject matter of this License. The Publisher
makes no warranty whatsoever in connection with the Work and
shall not be liable to You or any party on any legal theory for any
damages whatsoever, including without limitation any general,
special, incidental or consequential damages arising in connection
to this license. The Publisher reserves the right to cease making the
Work available to You at any time without notice
11. Miscellaneous
a. This License shall be governed by the laws of the location of the
head office of the Author or if the Author is an individual, the laws of
location of the principal place of residence of the Author.
b. If any provision of this License is invalid or unenforceable under
applicable law, it shall not affect the validity or enforceability of the
remainder of the terms of this License, and without further action by
the parties to this License, such provision shall be reformed to the
minimum extent necessary to make such provision valid and
enforceable.
c. No term or provision of this License shall be deemed waived and
no breach consented to unless such waiver or consent shall be in
writing and signed by the party to be charged with such waiver or
consent.
d. This License constitutes the entire agreement between the parties
with respect to the Work licensed herein. There are no
understandings, agreements or representations with respect to the
Work not specified herein. The Author shall not be bound by any
additional provisions that may appear in any communication from
You. This License may not be modified without the mutual written
agreement of the Author and You.
SALES NETWORK
SAMSUNG TECHWIN CO., LTD.
Samsungtechwin R&D Center, 701, Sampyeong-dong, Bundang-gu, Seongnam-si, Gyeonggi-do, Korea, 463-400
TEL : +82-70-7147-8740~60 FAX : +82-31-8018-3745
SAMSUNG TECHWIN AMERICA Inc.
100 Challenger Rd. Suite 700 Ridgefield Park, NJ 07660
Toll Free : +1-877-213-1222 Direct : +1-201-325-6920
Fax : +1-201-373-0124
www.samsungcctvusa.com
www.samsungtechwin.com
www.samsungsecurity.com
www.samsungipolis.com
SAMSUNG TECHWIN EUROPE LTD.
Samsung House, 1000 Hillswood Drive, Hillswood Business
Park Chertsey, Surrey, UNITED KINGDOM KT16 OPS
TEL : +44-1932-45-5300 FAX : +44-1932-45-5325