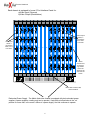
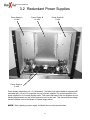
1
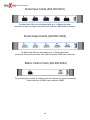
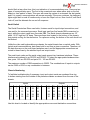
Product Handbook
Lightwave Communications, Inc.
100 Washington Street Milford, CT 06460 USA
(800) 871-9838 ? (203) 878-9838 ? Fax: (203) 874-0157
Email: [email protected] ? Internet: www.lightwavecom.com
LCI Asia/Pacific
120 Collins Street Melbourne, Victoria 3000 Australia
61-39-652-7226 ? Fax: 61-39-652-7512
Email: [email protected] a Internet: www.lightwavecom.com.au
LCI Europe
Prinzregentenplatz 15 Munich D81675 Germany
49-89-306-3810 ? Fax: 49-89-306-3812
Email: [email protected] a Internet: www.lightwave.de
Matrix Hub User Manual - 08 January 2002
Copyright 1998 by Lightwave Communications, Inc.
100 Washington Street, Milford, CT 06460, U.S.A.
All rights reserved. No part of this copyrighted material may be reproduced in any form or by any means without
prior written permission from Lightwave Communications, Inc.
Printed in the U.S.A.
Product Handbook
Table of Contents
1.0 Matrix-Hub System Overview . . . . . . . . . . . . . . . . . . . . . . . . . . . . . . . . . . . . . . . .1
2.0 Matrix-Hub Hardware . . . . . . . . . . . . . . . . . . . . . . . . . . . . . . . . . . . . . . . . . . . . . .2
3.0 Matrix-Hub Video Chassis . . . . . . . . . . . . . . . . . . . . . . . . . . . . . . . . . . . . . . . . . .3
3.1 Electroluminescent (EL) Display . . . . . . . . . . . . . . . . . . . . . . . . . . . . . . . . . . .5
3.2 Redundant Power Supplies . . . . . . . . . . . . . . . . . . . . . . . . . . . . . . . . . . . . . .6
4.0 Video Cards . . . . . . . . . . . . . . . . . . . . . . . . . . . . . . . . . . . . . . . . . . . . . . . . . . . . .7
5.0 Video Chassis Connections . . . . . . . . . . . . . . . . . . . . . . . . . . . . . . . . . . . . . . . . .9
6.0 Chassis Integration . . . . . . . . . . . . . . . . . . . . . . . . . . . . . . . . . . . . . . . . . . . . . . .10
7.0 Matrix-Hub Keyboard/Mouse Chassis . . . . . . . . . . . . . . . . . . . . . . . . . . . . . . . . . .11
7.1 Electroluminescent (EL) Display . . . . . . . . . . . . . . . . . . . . . . . . . . . . . . . . . . .13
7.2 Redundant Power Supplies . . . . . . . . . . . . . . . . . . . . . . . . . . . . . . . . . . . . . .14
8.0 Keyboard/Mouse Cards . . . . . . . . . . . . . . . . . . . . . . . . . . . . . . . . . . . . . . . . . . . .15
9.0 Keyboard/Mouse Chassis Connections . . . . . . . . . . . . . . . . . . . . . . . . . . . . . . . . .17
10.0 Chassis Integration . . . . . . . . . . . . . . . . . . . . . . . . . . . . . . . . . . . . . . . . . . . . . .18
11.0 Matrix-Hub Serial Chassis . . . . . . . . . . . . . . . . . . . . . . . . . . . . . . . . . . . . . . . . .19
11.1 Electroluminescent (EL) Display . . . . . . . . . . . . . . . . . . . . . . . . . . . . . . . . .21
12.0 Serial Cards . . . . . . . . . . . . . . . . . . . . . . . . . . . . . . . . . . . . . . . . . . . . . . . . . . . .27
13.0 Matrix-Hub Components . . . . . . . . . . . . . . . . . . . . . . . . . . . . . . . . . . . . . . . . . . .29
14.0 Matrix-Hub User Interface . . . . . . . . . . . . . . . . . . . . . . . . . . . . . . . . . . . . . . . . .32
15.0 Matrix-Hub Sample Session . . . . . . . . . . . . . . . . . . . . . . . . . . . . . . . . . . . . . . . .45
Appendix A . . . . . . . . . . . . . . . . . . . . . . . . . . . . . . . . . . . . . . . . . . . . . . . . . . . . . . . .A-1
Product Handbook
1.0 Matrix-Hub System Overview
The Matrix-Hub is a matrix switch for the entire desktop. The switch may be comprised of
up to four rack-mounted chassis, each of which supports a unique user interface. These
chassis are for video, keyboard/mouse, serial devices, and audio. Each chassis may be used
independently or be integrated to operate together. The primary function of the device is to
permit up to 30 attached users or destinations to gain access to up to 30 computers or
sources. When used with the VDE/200 extension system from Lightwave, a versatile and
highly flexible "topology" may be created which can maximize the effectiveness of both
creative and high performance computer resources.
Each chassis include redundant power supplies, on-board cooling fans, and a front panel
Electroluminescent display for quick references to Matrix-Hub diagnostics and connection
activity.
Each customer may decide how and by whom the Matrix-Hub will be controlled. Through
imple serial connections the switch may be connected to a network, an attached server,
industry-standard controller (Dataton), or ASCII terminal. The switch is capable of routing
RGB video and audio, signals to any number of destinations simultaneously while
keyboard/mouse and serial information is routed to one destination at a time.
The Matrix-Hub Video chassis and keyboard/mouse chassis may be configured according to
customer requirements in increments of 5 ports (input/sources or output/destinations).
Additional ports may be added as needed up to the capacity of each chassis (30 x 30). The
serial chassis may be configured according to customer requirements in increments of 5 ports
(input/sources or output/destinations) to a maximum of (35X35).
The following manual has been organized according to chassis components: video,
keyboard/mouse, serial, audio. A final section will be dedicated to integrating the chassis
together. Operation using Dataton equipment will not be discussed in this manual.
1
Product Handbook
2.0 Matrix-Hub - Hardware
The Matrix-Hub is designed to be a customized, flexible solution. Each Matrix-Hub chassis is configured according to customer needs, complete with input and output cards. Four chassis, configured
together, incorporate the Matrix-Hub. Chassis may be used alone or in sync with other chassis:
1. Video, Digital Audio
2. Keyboard and Mouse
3. Serial and Peripherals
4. Analog Audio
The video and keyboard/mouse chassis are equipped with an Electro Luminescence panel, displaying
the matrix connections and status messages. Buttons below the Electro Luminescence will take the
display out of screen-saver mode.
Should access be needed to the inner workings of the Hub, the front panel can be opened via three
screws at the top of the Matrix-Hub.
NOTE! To avoid electrical shock, make sure that the Hub
is powered down before opening the front panel!
2
Product Handbook
3.0 Matrix-Hub Video Chassis
400.000.1000
The Video chassis consists of five major components.
a) Electroluminescent Display (section 3.1)
b) Fan Assembly
c) Redundant Power Supply Assemblies (section 3.2)
d) R, G, and B Switch Cards (section 4)
e) Control Card (section 4)
FAN Assembly - The video chassis is equipped with 6 fans located in the bottom of the unit. Both the
top cover and bottom cover are louvered to provide adequate ventilation for the unit. Should the temperature begin to rise, it would be advisable to check for proper air flow in the cabinet.
3
Product Handbook
Each chassis is equipped to house 5 Port Interface Cards for:
a)Video Input (Sources)
b)Video Output (Destinations)
Video Output
Cards, 5
connections
each, from 1
to 6 cards.
Video Input
Cards, 5
connections
each, from 1
to 6 cards.
Matrix
Control Card,
for connecting chassis
and to the
serial port for
control of the
switch.
Matrix Switch Cards, Red,
Green and Blue.
Redundant Power Supply - The Matrix-Hub video chassis is equipped with dual redundant power
supplies (4 power supplies, needing only two to operate). Keep both on/off switches in the “on”
position to ensure that, in the event a failure of a power supply, the Hub continues to operate.
4
Product Handbook
3.1 Electroluminescent (EL) Display
Electroluminescent (EL) Display:
The EL Display has a screen saver mode that moves the Matrix-Hub logo around the screen
to prevent latent image “burn-in.” To view the display depress either of the two front panel
switches. The left hand switch, when depressed, displays the active connections in the chassis. The first switch closure displays one half of the possible connections i.e. 1-15 sources to
1-15 destinations. The second switch closure displays the second half with the possible connection i.e. 16-30 sources to 16-30 destinations.
Matrix-Hub Video Chassis
Serial Settings: 9600,n,8,1
Options: 08 Y
Installed Cards
Inputs
P
O
R
T
S
1 6
2 7
3 8
4 9
5 10
Chassis: 1
RGB
11
12
13
14
15
16
17
18
19
20
21
22
23
24
25
26
27
28
29
30
I
I
I
I
I
The EL displays the status of
the Power Supplies (see
section 3.2). Two supplies
makeup the 'A' supply system
and two supplies to make up
the 'B' supply system. Both
"A" supplies or both "B"
supplies can fail without
interruption of operation.
When any power supply fails,
the EL is updated with a
'Failed' message. Should
one fail, contact Lightwave
for a replacement.
II
II
II
II
II
Outputs
26
27
28
29
30
21
22
23
24
25
16
17
18
19
20
11
12
13
14
15
6
7
8
9
10
1
2
3
4
5
Matrix-Hub Video Chassis
Power Supply A +5V: OK
Power Supply A -5V: OK
Power Supply B +5V: OK
Power Supply B -5V: OK
Temperature: R 82o G 82o B 82 o
Active Connections
Chassis: 1
Output>>
1
2
3
1 2 3 4 5 6 7 8 9 0 1 2 3 4 5 6 7 8 9 0 1 2 3 4 5 6 7 8 9 0
1
1
2
2
3
3
4
4
5
5
6
6
7
7
8
8
9
9
10
10
11
11
12
12
13
13
14
14
15
15
5
Product Handbook
3.2 Redundant Power Supplies
Power Supply A
+5 volts
Power Supply B
+5 volts
Power Supply B
-5 volts
Power Supply A
-5 volts
Power Supply Assemblies (+5v, -5v, Redundant) - The Matrix-Hub video chassis is equipped with
redundant sets (+5v and -5v comprises one set) of power supplies. The normal operation of the
power supplies run in a current sharing mode. This means that each of the four supplies are contributing approximately one half of the required current for the load. This insures that the voltage
remains constant even in the advent of a power supply failure.
NOTE! When replacing a power supply, the Matrix-Hub must be powered down.
6
Product Handbook
4.0 Video Cards
All Matrix-Hub cards are hot-swapable. Add, remove or replace cards to your system without
powering down and without interrupting attached devices.
The video chassis (part number 400.000.1001) is comprised of the following cards:
Input (part number 400.000.1001) and Output (part number 400.000.1002) Interface Cards
- Video Input Cards (Sources) use the 13W3 video connector for connection from the
video source to the Matrix-Hub. The three video signals (RGB) present on the Input
connector are routed to the appropriate Switch Card and are then routed to the desired
Output (destination) 13W3 connector. In addition to the three video signals present on
the 13W3 connector attached to the source, horizontal, vertical and composite sync. are
routed as well as four "sense lines" for monitor ID from the destination display.
Matrix Switch Cards (part number 400.000.1003) - The video routing system is comprised
of three independent switch cards. One each for Red, Green and Blue video signals.
These cards are installed at the factory and have no user settings or adjustments. Each
Video Switch Card is capable of routing the signal to any or all of the output cards from
the input cards. This feature is useful when broadcasting (or "salvoing") a video source
to multiple destinations. The routing takes place by entering simple commands through
an ASCII terminal or other serial connection. Each of the three Switch Cards has a
temperature monitor on-board and displays the local card temperature on the front
panel EL display.
Matrix Control Card (part number 400.000.1004) - The Control Card uses an ASCII
terminal or other serial command device to make connections for source(s) to
destination(s). The Control Card accepts simple commands from its serial port and
creates the necessary binary string to connect the Red, Green and Blue input(s) to the
desired output(s). A secondary function of the Control Card is to allow other chassis
(ie. keyboard/mouse, serial, audio) to be controlled from a simple entry point. Commands
for these devices are integrated by the Control Card and passed along in the appropriate
format to the other chassis.
7
Product Handbook
Video Input Card (400.000.1001)
The Hub can be configured with up to 6 input cards, each containing 5 connections.
Video Output Card (400.000.1002)
The Matrix-Hub can also handle up to 6 output cards, containing 5 connections each.
Matrix Switch Card (400.000.1003)
There are three matrix switch cards, one each for red, green and blue.
Matrix Control Card (400.000.1004)
For connecting from chassis to chassis and to the serial port for control of the switch.
8
Product Handbook
5.0 Video Chassis Connections
Output #1
Input #1
Connect to
next Hub
chassis.
DB9
Connection to
Serial Device.
Configure your Matrix-Hub input/output connections
from the outside in, from the top down. Each card
shown here would house the connections for
input/output numbers 1-5.
9
Product Handbook
6.0 Chassis Integration
Chassis are integrated using DB9
connections from chassis to
chassis. The “Matrix Control”
card houses these connections.
NOTE! Your control device
(terminal, dataton controller, etc.)
must be connected to the video
chassis. The configuration of the
other chassis connections does
not affect the Matrix-Hub’s
performance.
NOTE: A cascade cable is included with every chassis
Video
Keyboard/
Mouse
Serial
Audio
Control Cards
ASCII Terminal
Dataton Controller
Other
10
Product Handbook
7.0 Matrix-Hub Keyboard/Mouse Chassis
400.000.2000
The Video chassis consists of five major components.
a) Electroluminescent Display (section 3.1)
b) Fan Assembly
c) Redundant Power Supply Assemblies (section 3.2)
d) Keyboard and Mouse Switch Cards (section 4)
e) Control Card (section 4)
FAN Assembly - The video chassis is equipped with 6 fans located in the bottom of the unit. Both the
top cover and bottom cover are louvered to provide adequate ventilation for the unit. Should the temperature begin to rise, it would be advisable to check for proper air flow in the cabinet.
11
Product Handbook
Each chassis is equipped to house 5 Port Interface Cards for:
a) Keyboard/Mouse Input (Sources)
b) Keyboard/Mouse Output (Destinations)
Keyboard/Mouse Input Cards, 5
sets of
connections each, from 1 to 6 cards.
Keyboard/
Mouse Output
Cards, 5
sets of
connections
each, from 1
to 6 cards.
Matrix Control
Card, for connecting chassis and to the
serial port for
control of the
switch.
Matrix Switch Cards, Keyboard
and Mouse.
Redundant Power Supply - The Matrix-Hub serial chassis is equipped with redundant power supplies.
Keep both on/off switches in the “on’ position to ensure, that in the event of a power supply failure, the
serial chassis continues to operate.
12
Product Handbook
7.1 Electroluminescent (EL) Display
Electroluminescent (EL) Display:
The EL Display has a screen saver mode that moves the Matrix-Hub logo around the screen
to prevent latent image “burn-in.” To view the display depress either of the two front panel
switches. The left hand switch, when depressed, displays the active connections in the chassis. The first switch closure displays one half of the possible connections i.e. 1-15 sources to
1-15 destinations. The second switch closure displays the second half with the possible connection i.e. 16-30 sources to 16-30 destinations.
Matrix-Hub K/M Chassis
Serial Settings: 9600,n,8,1
Options: 06 N
Installed Cards
Inputs
P 1 6
O 2 7
R 3 8
T 4 9
S 5 10
11
12
13
14
15
16
17
18
19
20
21
22
23
24
25
26
27
28
29
30
The EL displays the status
of the Power Supplies (see
section 3.2). Two supplies
makeup the 'A' supply system and two supplies to
make up the 'B' supply system. Both "A" supplies or
both "B" supplies can fail
without interruption of operation. When any power
supply fails, the EL is updated with a 'Failed' message.
Should one fail, contact
Lightwave for a replacement.
MK
I I
I I
I I
I I
I I
Chassis: 2
26
27
28
29
30
Outputs
21 16 11
22 17 12
23 18 13
24 19 14
25 20 15
6
7
8
9
10
1
2
3
4
5
Matrix-Hub K/M Chassis
Power Supply A 5V: OK
Power Supply A 12V: OK
Power Supply B 5V: OK
Power Supply B 12V: OK
Active Connections
Chassis: 2
Output>>
1
2
3
1 2 3 4 5 6 7 8 9 0 1 2 3 4 5 6 7 8 9 0 1 2 3 4 5 6 7 8 9 0
1
1
2
2
3
X
3
4
4
5
X
5
6
6
7
7
8
8
9
9
10
10
11
11
12
12
13
13
14
14
15
15
13
Product Handbook
7.2 Redundant Power Supplies
Power Supply A
5 volts
Power Supply A
12 volts
Power Supply B
5 volts
Power Supply A
12 volts
Power Supply Assemblies (5v, 12v, Redundant) - The Matrix-Hub keyboard/mouse chassis is
equipped with redundant sets (5v and 12v comprises one set) of power supplies. The normal operation of the power supplies run in a current sharing mode. This means that each of the four supplies
are contributing approximately one half of the required current for the load. This insures that the voltage remains constant even in the advent of a power supply failure.
NOTE! When replacing a power supply, the Matrix-Hub must be powered down.
14
Product Handbook
8.0 Keyboard/Mouse Cards
All Matrix-Hub cards are hot-swapable. Add, remove or replace cards to your system without
powering down and without interrupting attached devices.
The keyboard/mouse chassis (part number 400.000.2000) is comprised of the following
cards:
Input (part number 400.000.2001) and Output (part number 400.000.2002) Interface Cards
- Keyboard/Mouse Input Cards (sources) use the PS/2 connector for connection from the
source to the Matrix-Hub. The keyboard and mouse signals are sent to the appropriate
Switch Card and are then routed to the desired Output (destination) PS/2 connector.
Matrix Switch Cards (part number 400.000.2003) - The keyboard/mouse routing system is
comprised of two independent switch cards. One each for keyboard and mouse signals.
These cards are installed at the factory and have no user settings or adjustments. Each
Switch Card is capable of routing the signal to any of the output cards from the input
cards. Each Switch Card has a temperature monitor on-board and displays the local card
temperature on the front panel EL display.
Matrix Control Card (part number 400.000.2004) - The Control Card uses an ASCII terminal or other serial command device to make connections for source(s) to destination(s).
The Control Card accepts simple commands from its serial port and creates the necessary
binary string to connect the keyboard and mouse input(s) to the desired output(s). A secondary function of the Control Card is to allow other chassis (ie. video, serial, audio) to be
controlled from a simple entry point. Commands for these devices are integrated by the
Control Card and passed along in the appropriate format to the other chassis.
Matrix input and output cards can be purchased separately and added at any time for chassis
that are not fully configured.
15
Product Handbook
Keyboard/Mouse Input Cards (400.000.2001)
The Matrix-Hub can be configured with up to 6 input cards,
each containing 5 sets of keyboard/mouse connections.
Keyboard/Mouse Output Cards (400.000.2002)
The Matrix-Hub can also handle up to 6 output cards, containing 5 sets of
keyboard/mouse connections.
Matrix Switch Cards (400.000.2003)
There are two matrix switch cards, one each for keyboard and mouse.
Matrix Control Card (400.000.2004)
For connecting from chassis to chassis and to the serial port for control of the switch.
16
Product Handbook
9.0 Keyboard/Mouse Chassis: Connections
Input #1
Keyboard
Output #1
Keyboard
Input #1
Mouse
Output #1
Mouse
Connect to
next Hub
chassis.
DB9
Connection
to Serial
Device.
s
17
Product Handbook
10.0 Chassis Integration
Chassis are integrated using DB9
connections from chassis to
chassis. The “Matrix Control”
card houses these connections.
NOTE! Your control device
(terminal, dataton controller, etc.)
must be connected to the video
chassis. The configuration of the
other chassis connections does
not affect the Matrix-Hub’s
performance.
Video
Keyboard/
Mouse
Serial
Audio
Control Cards
ASCII Terminal
Dataton Controller
Other
18
Product Handbook
11.0 Matrix-Hub Serial Chassis
400.00.3000
The serial chassis consists of four major components.
a) Electroluminescent Display
b) Fan Assembly
c) Redundant Power Supply Assemblies
d) Control Card
Redundant Power Supply - The Matrix-Hub serial chassis is equipped with redundant power supplies.
Keep both on/off switches in the “on’ position to ensure, that in the event of a power supply failure, the
serial chassis continues to operate.
19
Product Handbook
The serial chassis slot addresses are shown below. Because there are no switch cards in the
serial chassis, the chassis can accept a total of fourteen Input/Output cards.
Each slot has a unique address, the Input cards have addresses ascending from 1-70 as
viewed from the rear of the chassis, while output addresses descend from 70-1 as viewed
from the rear of the chassis.
Unlike the Video and Keyboard/Mouse chassis, an Input or Output card can reside in any
card slot. For ease of configuration, it is recommended that Inputs be placed in the left hand
side of the chassis and Output cards be placed in the right hand side of the chassis. Use this
diagram for reference when programming Input/Outputs.
Fan assembly
20
Product Handbook
11.1 Electroluminescent (EL) Display
Electroluminescent (EL) Display:
The EL Display has a screen saver mode that moves the Matrix-Hub logo around the screen
to prevent latent image “burn-in.” To view the display depress either of the two front panel
switches. The left hand switch, when depressed, displays the active connections in the chassis. The right hand switch displays the inventory of installed cards
Refer to the appendix for
Options List. Depressing right
hand switch will
display a complete serial chassis with Input/Output cards
installed.
I=Input
O=Output
Columns indicate addresses of
each card slot
Matrix-Hub Serial Chassis v. x.xx
Serial Settings: 9600,n,8,1
Options: 0C N
Installed Cards
1
2
3
4
5
6
7
8
9
10
11
12
13
14
15
16
17
18
19
20
21
22
23
24
25
26
27
28
29
30
31
32
33
34
35
Chassis: 3
31
32
33
34
35
26
27
28
29
30
21
22
23
24
25
16
17
18
19
20
11
12
13
14
15
6
7
8
9
10
1
2
3
4
5
Matrix-Hub Serial Chassis v x.xx
Power Supply A 5V: OK
Power Supply A 12V: OK
Power Supply B 5V: OK
Power Supply B 12V: OK
The EL displays the status
of the Power Supplies .
Two supplies makeup the
'A' supply system and two
supplies to make up the 'B'
supply system. Both "A"
supplies or both "B" supplies can fail without interruption of operation. When
any power supply fails, the
EL is updated with a
'Failed' message. Should
one fail, contact Lightwave
for a replacement.
Active Connections
Chassis: 3
Output>>
1
2
3
In
1 2 3 4 5 6 7 8 9 0 1 2 3 4 5 6 7 8 9 0 1 2 3 4 5 6 7 8 9 0 1 2 3 4 5
1
1
2
2
3
3
4
4
5
5
6
6
7
7
8
8
9
9
10
10
11
11
12
12
13
13
14
14
15
15
Depressing left hand switch,displays 1 of ten pages of connection information. Continuing to depress the switch will show all ten
pages of information. This display shows 1-35 Output and 1-15 Input
connections.
21
Product Handbook
Matrix-Hub Serial Chassis v x.xx
Power Supply A 5V: OK
Power Supply A 12V: OK
Power Supply B 5V: OK
Power Supply B 12V: OK
Active Connections
Chassis: 3
Out>>
1
2
3
In
1 2 3 4 5 6 7 8 9 0 1 2 3 4 5 6 7 8 9 0 1 2 3 4 5 6 7 8 9 0 1 2 3 4 5
16
16
17
x
17
18
18
19
19
20
20
21
21
22
22
23
23
24
24
25
25
26
26
27
27
28
28
29
29
30
30
This display shows Output connections 1-35 and Input connections 1630. The “x” indicates an active connection. In this example, Input “17” is
connected to Output “3” using RS-232 interface.
Matrix-Hub Serial Chassis v x.xx
Power Supply A 5V: OK
Power Supply A 12V: OK
Power Supply B 5V: OK
Power Supply B 12V: OK
Active Connections
Chassis: 3
Out>>
1
2
3
In
1 2 3 4 5 6 7 8 9 0 1 2 3 4 5 6 7 8 9 0 1 2 3 4 5 6 7 8 9 0 1 2 3 4 5
31
31
32
32
33
33
34
34
35
35
36
36
37
37
38
38
39
39
40
4
40
41
41
42
42
43
43
44
44
45
45
This display shows Output connections 1-35 and Input connections 3145. In this example, Input “40” is connected to Output “8” using RS-422
interface. To connect the Input to an Output using RS-422 interface, the
connection would be Input port “140” to Output port “108”. When the
system detects an address in the “100” range, it opens the connection
with the RS-422 interface.
22
Product Handbook
Matrix-Hub Serial Chassis v x.xx
Power Supply A 5V: OK
Power Supply A 12V: OK
Power Supply B 5V: OK
Power Supply B 12V: OK
Active Connections
Chassis: 3
Out>>
1
2
3
In
1 2 3 4 5 6 7 8 9 0 1 2 3 4 5 6 7 8 9 0 1 2 3 4 5 6 7 8 9 0 1 2 3 4 5
46
46
47
47
48
48
49
49
50
50
51
51
52
52
53
53
54
54
55
55
56
56
57
57
58
58
59
59
60
60
This display shows Output connections 1-35 and Input connections
46-60.
Matrix-Hub Serial Chassis v x.xx
Power Supply A 5V: OK
Power Supply A 12V: OK
Power Supply B 5V: OK
Power Supply B 12V: OK
Active Connections
Chassis: 3
Out>>
1
2
3
In
1 2 3 4 5 6 7 8 9 0 1 2 3 4 5 6 7 8 9 0 1 2 3 4 5 6 7 8 9 0 1 2 3 4 5
61
61
62
62
63
63
54
64
65
65
66
66
67
67
58
68
69
69
70
70
This display shows Output connections 1-35 and Input connections
61-70.
23
Product Handbook
Matrix-Hub Serial Chassis v x.xx
Power Supply A 5V: OK
Power Supply A 12V: OK
Power Supply B 5V: OK
Power Supply B 12V: OK
Active Connections
Chassis: 3
Out>>
4
5
6
7
In
6 7 8 9 0 1 2 3 4 5 6 7 8 9 0 1 2 3 4 5 6 7 8 9 0 1 2 3 4 5 6 7 8 9 0
1
1
2
2
3
3
4
4
5
5
6
6
7
7
8
8
9
9
10
10
11
11
12
12
13
13
14
14
15
15
This display shows Output connections 36-70 and Input connections
1-15.
Matrix-Hub Serial Chassis v x.xx
Power Supply A 5V: OK
Power Supply A 12V: OK
Power Supply B 5V: OK
Power Supply B 12V: OK
Active Connections
Chassis: 3
Out>>
4
5
6
7
In
6 7 8 9 0 1 2 3 4 5 6 7 8 9 0 1 2 3 4 5 6 7 8 9 0 1 2 3 4 5 6 7 8 9 0
16
16
17
17
18
18
19
19
20
20
21
21
22
22
23
23
24
24
25
25
26
26
27
27
28
28
29
29
30
30
This display shows Output connections 36-70 and Input connections
16-30.
24
Product Handbook
Matrix-Hub Serial Chassis v x.xx
Power Supply A 5V: OK
Power Supply A 12V: OK
Power Supply B 5V: OK
Power Supply B 12V: OK
Active Connections
Chassis: 3
Out>>
4
5
6
7
In
6 7 8 9 0 1 2 3 4 5 6 7 8 9 0 1 2 3 4 5 6 7 8 9 0 1 2 3 4 5 6 7 8 9 0
31
31
32
32
33
33
34
34
35
35
36
36
37
37
38
38
39
39
40
40
41
41
42
42
43
43
44
44
45
45
This display shows Output connections 36-70 and Input connections
31-45.
Matrix-Hub Serial Chassis v x.xx
Power Supply A 5V: OK
Power Supply A 12V: OK
Power Supply B 5V: OK
Power Supply B 12V: OK
Active Connections
Chassis: 3
Out>>
4
5
6
7
In
6 7 8 9 0 1 2 3 4 5 6 7 8 9 0 1 2 3 4 5 6 7 8 9 0 1 2 3 4 5 6 7 8 9 0
46
46
47
47
48
48
49
49
50
50
51
51
52
52
53
53
54
54
55
55
56
56
57
57
58
58
59
59
60
60
This display shows Output connections 36-70 and Input connections
46-60.
25
Product Handbook
Matrix-Hub Serial Chassis v x.xx
Power Supply A 5V: OK
Power Supply A 12V: OK
Power Supply B 5V: OK
Power Supply B 12V: OK
Active Connections
Chassis: 3
Out>>
4
5
6
7
In
6 7 8 9 0 1 2 3 4 5 6 7 8 9 0 1 2 3 4 5 6 7 8 9 0 1 2 3 4 5 6 7 8 9 0
61
61
62
62
63
63
54
64
65
65
66
66
67
67
58
68
69
69
70
70
This display shows Output connections 36-70 and Input connections
61-70.
26
Product Handbook
12.0 Serial Cards
All Matrix-Hub cards are hot-swappable. Add, remove or replace cards to your system without
powering down and without interrupting attaches devices.
The serial chassis (part number 400.000.3000) is comprised of the following cards:
Serial input card (part number 400.000.3001)- Serial Input card has five DB9 female
connectors. The interface is capable of supporting either RS-232 or RS-422.
Serial output card (part number 400.000.3002)- Serial Output card has five DB9 male
connectors. The interface is capable of supporting either RS-232 or RS-422.
Matrix Control Card (part number 400.000.2004) - The Control Card uses an ASCII terminal or other serial command device to make connections for source(s) to destination(s).
The Control Card accepts simple commands from its serial port and creates the necessary
binary string to connect the keyboard and mouse input(s) to the desired output(s). A secondary function of the Control Card is to allow other chassis (ie. video, serial, audio) to be
controlled from a simple entry point. Commands for these devices are integrated by the
Control Card and passed along in the appropriate format to the other chassis.
The Serial chassis supports both RS-232 and RS-422 interfaces. The selection of the inter face or mode, i.e. RS-232 or RS-422, is determined by how you specify the port number. If
you connect input or output ports 1-70 , they are opened as RS-232 ports. If you connect
input or output port 101-170 they are opened as RS-422 ports. Notice that 100 has been
added to the port number to open it in RS-422 mode. This means that port 1 and port 101 is
the same physical port connection and only differs in the mode of operation. When a RS-422
connection is made the front panel EL Display shows a '4' instead of an 'X' in the connected
position. A connection i.e. input and output must be of the same mode of operation or the
chassis will return an error.
The Serial chassis has no switch cards in the chassis. The actual switching is done on the
individual Input/Output cards. Figure X.XX shows the unique address for each card slot. The
chassis will accept any combination of Input to Output cards within the range of 1 input to 13
output cards or 13 inputs to 1 output card or any combination in between. From left to right,
as viewed from the rear of the chassis, the Input addresses or port #'s increment from 1-5 to
66-70. The output addresses or port #'s increment from the right to the left from 1-5 to 66-70.
The serial chassis supports the stereo emitter used in 3D video. To accomplish this, the
Matrix Hub serial port must be in RS-422 mode.
Refer to the appendix for A Male/Female pinouts and application drawings.
27
Product Handbook
Serial Input Cards (400.000.3001)
The Matrix-Hub 3000 can be configured with up to 13 Serial input cards,
(must have at least one output card); each Input Card has 5 DB9 female connectors.
Serial Output Cards (400.000.3002)
The Matrix-Hub 3000 can also handle up to 13 Serial output cards,
(must have at least one input card); each Output Card has 5 DB9 male connectors.
Matrix Control Card (400.000.2004)
For connecting from chassis to chassis and to the serial port for control of the switch.
Output connector is DB9M, Input connector is DB9F.
28
Product Handbook
13.0 Matrix-Hub Components
General Chassis Information
Each chassis has two AC power sockets. This allows the system to be run from different
circuits in the facility. All chassis have redundant power supplies for all the circuitry including
the fans. Each chassis has sensors to report the status of the power supplies, while the video
chassis can report the temperature in the chassis.
All chassis have an Electro Luminescence (EL) display to show the installed cards,
temperature (in the case of the video chassis), power supply status and Baud rate settings
for communication.
The EL Display has a screen saver mode that moves the Matrix-Hub logo around the screen
to prevent latent image "burn-on". To view the display, depress either of the two front panel
switches. The left switch, when depressed, displays the active connections in the chassis.
The first switch closure displays one half of the possible connections i.e. 1-15 sources to 1-15
destinations. Pressing the switch a second time displays the second half with the possible
connection i.e. 16-30 sources to 16 - 30 destinations.
All cards in the entire system are 'Hot Swappable', This means that additional cards can be
added to the system without powering the system down. The mechanical design incorporates
the new IEEE standard 1101.10. This standard uses injector/ejector hardware for ease of card
installation. Communication from one chassis to another is made using a DB9 male/female
serial cable.
The Matrix Hub consists of four components that constitute the switching system. These
components can be used together, or can operate in a 'stand alone' environment. The four
components are:
1) The Video Switch
2) Keyboard/Mouse Switch
3) Serial Switch
4) Audio Switch
Video Switch Chassis
The Video Chassis has sixteen card slots, six slots for video inputs signals, six slots for video
output signals, three slots for video signal routing, and one slot for the Control card. The
input card uses five 13W3 connectors for video input signals, and the output card uses five
13W3 for video output signals. The digital lines that are used for monitor ID and composite,
horizontal and vertical sync are also switched in the video chassis. The video chassis
dimensions are 19" width, 15.75" high and 18" deep. There are six fans coated in the
bottom of the chassis that provide cooling for the electronics. For optimum cooling, the
bottom of the unit should not be blocked.
29
Product Handbook
Three slots are used for the video signal routing switch to route a single color. The control
card sends a string of information to the three video switch cards and they simultaneously
make the appropriate connections. Once these connections have been established, the video
signals inputs are connected to the video outputs. The hardware in the video switch allows
one input to be connected to many outputs. This feature is called 'broadcasting', which means
that the video switch is non-blocking. Temperature sensors located on each of the three
switch cards which allows the system administrator to monitor the temperature to insure that
the system is being adequately cooled.
Each video control card has two processors. One processor is the 'Front End Processor'
(FEP) while the second is the command processor. The 'FEP' accepts commands from the
user and creates the appropriate command strings to be passed to each of the chassis's in
the system. For example, a Macro can be created to switch the video, keyboard/mouse, serial
and audio connections of a source computer to any destination. When the Macro is run, the
'FEP' will send a string of commands to each of the chassis's in the system. Each chassis
has it's own unique identification or ID. The FEP will append the chassis's ID to commands
that are associated with that chassis. When a chassis receives an incoming string, it compares the ID in the string to its ID, and if the ID's match, the Command Processor in the chassis will execute the command and return status to the FEP. If the ID's do not match, then the
string is sent to the next chassis and the ID's are compared for a match. If the chassis ID
cannot be found, an error message is returned.
Keyboard/Mouse Switch
The Keyboard/Mouse Chassis has fifteen card slots, six slots for Keyboard/Mouse input signals, and six slots for Keyboard/Mouse output signals. The input and output cards use the
industry standard six pin mini-din connectors. There are two slots for the Keyboard/Mouse
signal switches. One card switches the Keyboard signals, while the second switch card handles the mouse signals. The last card in the chassis is the control card. This card is the
Command Processor. The Keyboard/Mouse chassis dimensions are 19" width, 12.25" high
and 18" deep. There are three fans located in the bottom of the chassis that provide cooling
for the electronics. For optimum cooling, the bottom of the unit should not be blocked.
Communication between the keyboard/mouse link is verified using a form of error checking
known as 'CRC'. Each packet of data creates a unique character that is appended to the
transmitted packet. At the receiving end of the link, the identical process is used to create a
'CRC' character. Once this character is created, it is compared against the character that was
transmitted. If the 'CRC' characters match, the transmission is error free. If the 'CRC' characters do not match, then the transmission was not error free and the receiving end will ask the
transmitting end to send the packet again. There will be three attempts by the receiving unit
to get the packet before a communications error published. This form of communications will
detect almost 100% of the communications errors.
When a Keyboard is not connected to any of the available inputs, the 'Num Lock', "Caps
Lock', and the 'Scroll Lock' lights on the Keyboard will flash on and off. This indicates that
the keyboard is not connected. When a connection is established, these lights should follow
the state that the CPU last established when connected to another keyboard. If these lights
30
Product Handbook
should flash at any other time, this is an indication of a communications error. There are two
types of communication error. The first is the occasional error where either side on the link
detects a bad 'packet' of data. This error will cause the system to re-transmit the last packet,
and if it is correct, communications will resume normally. If the error continues, the keyboard
lights might flash on and off continuously or have the Caps Lock on, Num Lock off, and Scroll
Lock off, and the alternate the on and off sequence.
Serial Switch
The Serial Chassis has fifteen card slots, fourteen cards for input/output connections, and
one card for the command processor. Each input card has five female DB9 connectors for
input, while the output cards have five male DB9. The Serial chassis dimensions are 19"
width, 12.25" high and 18" deep. There are three fans located in the bottom of the chassis
that provide cooling for the electronics. For optimum cooling, the bottom of the unit should not
be blocked.
Unlike the video and keyboard/mouse chassis, the serial chassis has no switch cards. With
typical serial communications, data flows both to and from a given connection. Therefore, all
the data lines are on the multi-layer backplane card, and the appropriate connections are
routed to these lines by the selected input and output cards.
The serial input cards and the serial output cards support two hardware interfaces. These
interfaces are referred to as RS-232 and RS-422. To select the appropriate hardware interface, ports 1-65 are RS-232 and ports 101- 165 are RS-422.
The maximum number of DB9 connections is 35X35. The combinations of inputs to outputs
can be 5X65 or 65X5 or any combination in between.
Chassis Numbering
To facilitate troubleshooting if necessary, input and output cards are numbered from top
to bottom starting from the outside of the particular chassis as viewed from the rear of the
chassis.
1
2
3
4
5
6
7
8
9
10
Inputs
11
16
12
17
13
18
14
19
15
20
21
22
23
24
25
26
27
28
29
30
26
27
28
29
30
21
22
23
24
25
Outputs
16
11
17
12
18
13
19
14
20
15
6
7
8
9
10
1
2
3
4
5
Use this chart to located or identify the appropriate source and destination connections.
31
Product Handbook
14.0 Matrix-Hub User Interface
Commands to the Matrix-Hub are entered on the terminal attached to the Matrix-Hub video
chassis control port. The following section describes how the user can configure and use the
Matrix-Hub effectively.
Matrix-Hub Connection Commands
You can change or modify the connections of sources (src) to destinations (dst) through connection commands. These commands allow you to add and delete different destinations
and/or sources to your system configuration.
?, (H)
Displays the Matrix-Hub System Help
(C) <chassis-id> <port#> to <port#>
Connects a src port on a particular chassis to a dst
port.
(B) <chassis-id> <src port#> to <dst port#>[,] [<dst port#>]
Broadcast a src port on a particular chassis to
multiple dst ports
Connects a src entity to a dst entity (see Entity
commands)
(C) <src entity> to <dst entity>
(D) <chassis-id> <port#> to <port#>
Disconnect a src port on a particular chassis from a
dst port.
(D) [<chassis-id>] ALL
Disconnect all connections on a particular chassis
or on all chassis if chassis id is omitted. (can be
restored)
(LO)
Log off system
CLEAR
Clear Current connections (cannot be restored)
RESTORE
Restore previous connections
Manual commands to create connections between sources and destinations are very simple.
Use the table above to manually create connections.
A sample connection as follows:
Enter C 1 1 1
The system responds with:
1C1,1
success
This example connects Chassis #1 with source port #1 to destination port #1.
A sample disconnect is as follows:
Enter D 1 1 1
32
Product Handbook
The system responds with:
1D1,1
success
This example disconnects Chassis #1 source port #1 and destination port #2.
The broadcast command is a useful command when it is necessary to display a single video
source to many video destinations. The command would be as follows:
Enter B 1 1 1-10
The system responds with:
1B1,1,2,3,4,5,6,7,8,9,10
success
This example connects Chassis #1 , source port#1 to destination ports#1,2,3,4,5,6,7,8,9,10.
Matrix Hub Entity Commands
The Matrix Hub uses what is called Entity Commands. An Entity is defined as source input or
a destination output to the Matrix Hub. The Front End Processor recognizes five Entity com mands:
EH
EL [<Entity>]
EN <Entity>
ED <Entity>
ES <Entity>
Entity Help
List entities <Entity> definition
Create new Entity
Delete Entity
Entity status
EL Command - Listing Entities
EN Command - Creating a New Entity
Here's an example of how to create an Entity:
An Onyx2 needs to be connected to a computer lab. The Onyx2 has two video outputs, one
keyboard/mouse and one serial connection. An Entity must be created that will describe the
Onyx2 and its connections. This would be the source Entity. The lab in this case would be
the destination Entity. When creating entities, it is necessary to specify the name of the entity
and either src or dst. If either of these parameters are omitted the system will respond with
the following:
New entity name and type missing (<name> [SRC | DST]).
33
Product Handbook
Here are the steps to create the source Entity:
1. Define the new source Entity by entering the EN command.
NOTE: This command is not case sensitive.
Enter the Entity source name, which is the ONYX2.
Enter EN Onyx2 SRC
The system will respond with:
Enter Entity item (chassis-id, port #):
2. Enter the first chassis-id and port #.
NOTE: Each chassis must be identified by a specific id. In this case there are 3 different
chassis, a video chassis, a keyboard/mouse chassis, and a serial chassis. A video chassis
typically has an id of 1, a keyboard/mouse chassis has an id of 2, a serial chassis has an id
of 3 and an audio chassis has an id of 4. The id enables the system to identify what type of
chassis is connected. There can be more than one type of each chassis in a system. For
example, in an environment where many serial chassis are connected to many sources, a
second serial chassis might be needed.
The port # is the physical port that the source (or destination) is connected to.
Enter the first chassis-id and port #. In this case it would be the video source which is connect to port 1. Enter Entity item (chassis-id, port #): 1,1 (Video source connect to port 1)
Enter 1,1
3. Enter the second chassis-id and port #. In this case the Keyboard/Mouse source is connected to port 1. Enter Entity item (chassis-id, port #): 2,1- (Keyboard/Mouse Source connected to port 1)
Enter 2,1
4. Enter the third chassis-id and port #. In this case the Video source is connected to port 2.
Enter Entity item (chassis-id, port #): 1,2- (Video Source connected to port 2)
Enter 1,2
Since this is the last entry press Enter to return back to the prompt.
5. To view the source Entity that was just created:
Enter EL Onyx2
34
Product Handbook
The system returns the following:
Chassis: 1 Port: 1
Chassis: 2 Port: 2
Chassis: 1 Port: 2
This Entity is now stored in non-volatile memory in the Front End Processor (FEP). The next
step would be to continue creating any other source entities or to create a destination Entity.
In this case the destination is the lab.
Here are the steps to create the destination Entity:
1. Define the new destination Entity by entering the EN command.
NOTE: This command is not case sensitive.
Enter the Entity source name.
Enter EN LAB DST
The system will respond with:
Enter Entity item (chassis-id, port #):
2. Enter the chassis-id's and port #'s.
Enter 1,1
Enter Entity item (chassis-id, port #): 1,1 (Video source connect to port 1)
Enter 2,1
Enter Entity item (chassis-id, Port #): 2,1 (Keyboard/Mouse Source connected to port 1)
Enter 1,2
Enter Entity item (chassis-id, Port #): 1,2 (Video Source connected to port 2)
Enter Entity item (chassis-id, Port #):
NOTE: At this point there are two Entities that have been created. The EL command will
show the type and name of each.
Enter EL
The system returns the following:
35
Product Handbook
Entity type name: SRC(Source), Onyx2
Entity type name: DST(Destination), LAB
3. To view the destination Entity that was just created:
Enter EL LAB
The system returns the following:
Chassis: 1 Port: 1
Chassis: 2 Port: 2
Chassis: 1 Port: 2
Having created both a SRC and DST Entity, they can now be connected or routed.
ES Command - Entity Status
In order to check on the Entity Status you must use the ES command. This will report on the
status of the Entity connections. . When using the status command, it is necessary to specify
the name of the entity. If the name is omitted the system will respond with the following:
No entity names defined
To check the Entity Status of the Onyx2 source:
Enter ES Onyx
The system returns the following:
Entity connected
ED Command - Delete Entity
You can delete an Entity using the ED command. This will delete the connections associated
with that Entity.
Enter ED LAB
The system returns the following:
Are you sure (Y/N):
Enter Y
The system returns:
Success
36
Product Handbook
EH
EL [<entity>]
EN <entity>
ED <entity>
ES [<entity>]
Entity help command. Using this command lists all of the
available commands associated with Entities.
Entity list command. Using this command with an Entity name
will display the chassis and ports that are associated with that
Entity name.
Create a new Entity. The EN command requires an Entity name
and type (either source - SRC or destination - DST).
Delete an existing Entity. The ED command requires an Entity
name. When using this command the system will prompt the
user to make certain the Entity is to be deleted.
Request the connection status of an Entity. The ES command
requires an Entity name.
Entity Command Review
Matrix-Hub Macro Commands
If you perform a task repeatedly you can automate the task using a macro. A macro is a
series of commands and instructions that you group together as a single command to accom plish a task automatically. A user can simply run a macro instead of manually performing a
series of time consuming, repetitive actions. A typical use for a macro would be to connect
MH
MR <macro>
ML[<macro>]
MN<macro>
MD<macro>
Macro help
Run a macro
List current macro, list <macro> definition
Create new macro
Delete macro
and disconnect sources and destinations. In this case a single macro can be run to make
many connections.
The Front End Processor recognizes five Macro commands:
MN Command - Create New Macro
Once you have set up Entities, you can create a Macro connecting the source Entity and the
destination Entity. The MN command allows you to create a new Macro.
Here's an example of how to create a new Macro:
An Onyx2 (sample Source Entity Name) needs to be connected to the computer lab.
37
Product Handbook
Define the Macro connection by entering the name of the Macro and the Entities that will be
connected. In this case CON1 will be the name of the Macro connecting the Onyx2 and the
computer lab. When using the MN command, macro name is required. If no name is specified, the system responds with the following:
Macro name is invalid
Enter MN CON1
The system responds with:
Enter macro item
Enter C Onyx2 LAB
The system responds with:
Enter macro item
Press Enter
The system responds with:
Success
NOTE: This macro could contain any number of Entities or connections (chassis and ports)
required configure the Matrix Hub.
ML Command - List Current Macro
The ML command allows you to view the Macro list and check on the status of the connections.
1. To view the new Macro that was just created:
Enter ML
The system responds with:
Macro: CON1
2. In order to view the connection status, enter ML followed by the macro name, CON1.
Enter ML CON1
38
Product Handbook
The system responds with:
Connect Onyx2 to LAB
MR Command - Run Macro
The MR command allows you to run the Macro once it has been created. This command will
automatically execute the Macro.
To run the Macro that was just created, enter MR followed by the Macro name. When using
the MR command, macro name is required. If no name is specified, the system responds with
the following:
Macro name is invalid
Enter MR CON1
The system responds with:
(MR CON1) 1 B1, 1
2, B1, 1
1 B2, 1
(MR CON1) End Macro
Macro Complete
MD Command - Delete Macro
The MD command allows you to delete a Macro from a list.
Enter MD followed by the macro name, MD CON1.
Enter MC CON1
The system responds with:
Are you sure (Y/N)
Enter Y
The system responds with:
success
39
Product Handbook
MH
MR
ML
MN
MD
is the macro help command. This command lists all of the
available commands associated with macro.
is the run a macro command. This command will execute
the macro named in the command.
Will list the current macro and the connection information.
is the command used to create a new macro.
is the command to delete a macro. This command will delete
the macro name, as well as all the connection information
Macro Command Review
Matrix-Hub Password Commands
The Matrix Hub is shipped with two passwords already installed. They are mh1 and mh2
(lower case). Passwords are case sensitive (they recognize upper and lower case characters).
WARNING: These passwords should be changed as soon as possible to avoid any unauthorized use of the system.
Access Levels
The password structure has two levels of access. Level 1 allows for total system access,
whereas level 2 imposes limited access.
A total of ten passwords can be stored in the system. There is no limit how many need to be
identified as level 1 or 2. A user could have six level 1 passwords and only four level 2 passwords.
To Begin
1. The first screen will be prompt you to enter a password.
'Lightwave Communications Matrix Hub Console Copyright 1998'
Version: x.xx
please wait for initialization...
Enter password:
Enter password mh1. This allows total access with the ability to create new passwords.
Enter mh1
The system responds with:
40
Product Handbook
Matrix Hub #.
NOTE: The # sign represents level 1 access, if you were to type in mh2 it would look like this
Matrix Hub $, the $ sign represents level 2 access.
PN Command - Create Passwords & PD Command Delete Passwords
NOTE: In order to add or delete a password, a user must be logged in at level 1 access. If
you are logged in at level 2 access you must log off and log back on at level 1.
Enter log off
The system responds with
Enter password
Enter mh1
The system responds with
Matrix Hub #
1.To create a new password for level 1 access:
Enter PN 1
When using the PN command it is required that the access level follow this command. If the
access level is missing, the system will respond with the following:
Access level missing
The system responds with:
Enter new password
Enter your password.
The system will prompt you to re-enter the password.
NOTE: A maximum of eight alpha-numeric characters can be entered to create a password.
2.To create a new password for level 2 access:
Enter PN 2
Repeat the steps for level 1 access.
41
Product Handbook
3. To delete a password:
Enter PD
The system responds with:
Enter password to delete
Enter the password you want to delete.
The system will prompt you to re-enter the password.
The system responds with:
Success
NOTE: Passwords can be deleted only if the password is known.
PL Command - List the number of passwords
If you would like to know how many passwords are currently in the system:
Enter PL
The system responds with:
Number of passwords defined: X
PH
is the password help command. Use this command to list all of the
available commands associated with Passwords.
PL
is the Password command used to display the number of pass
words in the system.
PD
is the Password command used to delete existing passwords.
PN
is the Password command used to generate new passwords and
password lists.
Password Command Review
Matrix-Hub Chassis Commands
You can change the system configuration through Chassis commands. These commands
allow you to review chassis connection information, power supply status, and internal video
chassis temperature.
42
Product Handbook
CH
CL
CP <chassis-id>
CS <chassis-id>
This command lists all the available commands associated with
chassis.
Lists all chassis including card inventory
Used to display power supply status and temperature for the video
chassis.
Displays connection information for a given chassis.
The following is an example of the CL command. This command lists the chassis number,
command is a report, the version of the software, and the installed cards in the system. For
example, 1rv, states that the report is for chassis number one and it is a video chassis denoted by the letter v in the report. It also states that there are four video cards installed on the
input side, and four cards installed on the output side. In addition to the input and output
cards, the report also states that there are three switch cards installed, Red, Green and Blue
switch. Upper case letters are used to denote installed cards and lower case letters are used
to denote card slots that are not occupied.
MatrixHub# cl
Chassis-id List
--------------1rV, V1.43B,IIIIiiRGBooOOOO
2rK, V1.43B,IIIIiiMKooOOOO
3rS, V1.43B,IIxxxxxxxxxxOO
success
The above report shows three chassis, all running software version 1.43B and the inventory
of installed cards.
The following is an example of the CP command for chassis number one. This command lists
the chassis number, power supply status, and temperature information where applicable.
MatrixHub# cp 1
1PP1,Power Supply A +5V: OK
1PP1,Power Supply A -5V: OK
1PP1,Power Supply B +5V: OK
1PP1,Power Supply B -5V: OK
1PT 85_F
1PT 89_F
1PT 87_F
success
The above report shows that both the power sets of power supplies are within the normal
operating range. 1PP1 states that chassis number one power supplies are running. If the
response were to return 1PP0, it would indicate that a power supply had failed and only one
set of supplies would be working.
43
Product Handbook
The following is an example of the CP command for chassis number two. Notice that there is
no temperature information when it is not a video chassis.
MatrixHub# cp 2
2PP1,Power Supply A
2PP1,Power Supply A
2PP1,Power Supply B
2PP1,Power Supply B
success
5V: OK
12V: OK
5V: OK
12V: OK
The following is an example of the CP command. Chassis status returns the chassis number
followed by the ports that are connected.
MatrixHub# cs 3
3S 1 TO 1
3S 6 TO 6
success
44
Product Handbook
15.0 Matrix-Hub Sample Session
Lightwave Communications Matrix Hub Console Copyright 1998
Version: 1.00
...please wait for initialization...
Enter password: ***
MatrixHub# help
+===================== MaxtriX-Hub System Help======================+
| ?,(H)elp
- display this help
| (C)onnect <chassis-id> <src port#> to <dst port#>
| (B)roadcast <chassis-id> <src port#> to <dst port#> [,] [<dst port#>]
| (C)onnect <src entity> to <dst entity>
| (D)isconnect <chassis-id> <src port#> from <src port#>
| (D)isconnect [<chassis-id>] ALL - disconnect all (can be restored)
| (LO)goff
- log off system
| CLEAR [<chassis-id>] - Clear current connections (cannot be restored)
- specifying chassis-id clears only that chassis
| RESTORE [<chassis-id>] - Restore previous connections
|
specifying chassis-id restores only that chassis connections
|
| (VER)SION - display version information
|- Entity Commands ------------------------------------------------| EH
- Entity Help
| EL [<entity>] - List entities, list <entity> definition
| EN <entity> - create New entity
| ED <entity> - Delete entity
| ES [<entity>] - Entity Status
|- Macro Commands -------------------------------------------------| MH
- Macro Help
| MR <macro> - Run a macro
(press any key to continue)
| ML [<macro>] - List current macros, list <macro> definition
| MN <macro> - create New macro
| MD <macro> - Delete macro
|- Passwords ------------------------------------------------------| PH - Password Help
| PL - List number of passwords defined
| PD - Delete a password
| PN <access level> - New password
|- Chassis -------------------------------------------------------| CH
- Chassis Help
| CL
- list all chassis including card inventory
| CP <chassis-id> - Display chassis power (& temperature info if
avail) |
45
Product Handbook
| CS <chassis-id> - show connection info for a chassis
+======================================================================
+
success
MatrixHub# cl
Chassis-id List
--------------1rV, V1.43B,IIIIiiRGBooOOOO
2rK, V1.43B,IIIIiiMKooOOOO
3rS, V1.43B,IIxxxxxxxxxxOO
success
MatrixHub# ver
Firmware version 1.00 09/10/98 09:23:30
Text ROM version 1.00
success
MatrixHub# cp 1
1PP1,Power Supply A +5V: OK
1PP1,Power Supply A -5V: OK
1PP1,Power Supply B +5V: OK
1PP1,Power Supply B -5V: OK
1PT 85_F
1PT 89_F
1PT 87_F
success
MatrixHub# cp 2
2PP1,Power Supply A 5V: OK
2PP1,Power Supply A 12V: OK
2PP1,Power Supply B 5V: OK
2PP1,Power Supply B 12V: OK
success
MatrixHub# cp 3
3PP1,Power Supply A 5V: OK
3PP1,Power Supply A 12V: OK
3PP1,Power Supply B 5V: OK
3PP1,Power Supply B 12V: OK
success
MatrixHub# cs 1
success
MatrixHub# cs 2
success
MatrixHub# cs 3
success
MatrixHub# connect 1 1 1
1C1,1
success
MatrixHub# cs 1
1S 1 TO 1
success
46
Product Handbook
MatrixHub# connect 2 1 1
2C1,1
success
MatrixHub# cs 2
2S 1 TO 1
success
MatrixHub# connect 3 1 1
3C1,1
success
MatrixHub# cs 3
3S 1 TO 1
success
MatrixHub# c 3 6 6
3C6,6
success
MatrixHub# cs 3
3S 1 TO 1
3S 6 TO 6
success
MatrixHub# d 3 1 1
3D1,1
success
MatrixHub# cs 3
3S 6 TO 6
success
MatrixHub# c 3 101 101
3C101,101
success
MatrixHub# cs 3
3S 101 TO 101
3S 6 TO 6
success
MatrixHub# c 3 2 102
Error>> 08; 3C2,102
Chassis error (08)
MatrixHub# cs 3
3S 101 TO 101
3S 6 TO 6
success
MatrixHub# d all
1I
2I
3I
success
MatrixHub# cs 1
success
MatrixHub# cs 2
success
47
Product Handbook
MatrixHub# cs 3
success
MatrixHub# restore
Restoring connections, please wait...
1I
2I
3I
1C1,1
2C1,1
3C6,6
3C101,101
success
MatrixHub# cs 1
1S 1 TO 1
success
MatrixHub# cs 2
2S 1 TO 1
success
MatrixHub# cs 3
3S 101 TO 101
3S 6 TO 6
success
MatrixHub# clear
Are you sure (y/n):Y
1I
2I
3I
success
MatrixHub# restore
No connections to restore
MatrixHub# b 1 1 1-16
1B1,1,2,3,4,5,6,7,8,9,10,11,12,13,14,15,16
success
MatrixHub# cs 1
1S 1 TO 1, 2, 3, 4, 5, 6, 7, 8, 9, 10, 11, 12, 13, 14, 15, 16
success
MatrixHub# b 2 1 1-16
2B1,1,2,3,4,5,6,7,8,9,10,11,12,13,14,15,16
success
MatrixHub# cs 2
2S 1 TO 16
success
MatrixHub# b 3 1 1-10
3B1,1,2,3,4,5,6,7,8,9,10
success
MatrixHub# cs 3
3S 1 TO 10
success
48
Product Handbook
MatrixHub#
MatrixHub# eh
+=================== MaxtriX-Hub System Help =======================+
|- Entity Commands ------------------------------------------------| EH
- Entity Help
| EL [<entity>] - List entities, list <entity> definition
| EN <entity> - create New entity
| ED <entity> - Delete entity
| ES [<entity>] - Entity Status
+===================================================================+
success
MatrixHub# el
Entity List
----------No entity names defined
MatrixHub# en onyx2 src
Enter entity item (chassis-id, port #): 1,1
Enter entity item (chassis-id, port #): 2,1
Enter entity item (chassis-id, port #): 3,1
Enter entity item (chassis-id, port #):
success
MatrixHub# el
Entity List
----------Entity type, name: SRC, ONYX2
success
MatrixHub# el onyx2
Entity List
----------Entity name: ONYX2
Entity type: SRC
Chassis: 1 port: 1
Chassis: 2 port: 1
Chassis: 3 port: 1
success
MatrixHub# en conf_room_1 dst
Enter entity item (chassis-id, port #): 1,1
Enter entity item (chassis-id, port #): 2,1
Enter entity item (chassis-id, port #): 3,1
Enter entity item (chassis-id, port #):
success
MatrixHub# el
Entity List
----------Entity type, name: SRC, ONYX2
49
Product Handbook
Entity type, name: DST, CONF_ROOM_1
success
MatrixHub# el conf_room_1
Entity List
----------Entity name: CONF_ROOM_1
Entity type: DST
Chassis: 1 port: 1
Chassis: 2 port: 1
Chassis: 3 port: 1
success
MatrixHub# es
Entity Status
------------success
MatrixHub# connect onyx2 conf_room_1
1B1,1
2B1,1
3B1,1
success
MatrixHub# es
Entity Status
------------ONYX2
TO CONF_ROOM_1
success
MatrixHub# cs 1
1S 1 TO 1
success
MatrixHub# cs 2
2S 1 TO 1
success
MatrixHub# cs 3
3S 1 TO 1
success
MatrixHub# en octaine src
Enter entity item (chassis-id, port #): 1,2
Enter entity item (chassis-id, port #): 2,2
Enter entity item (chassis-id, port #): 3,2
Enter entity item (chassis-id, port #):
success
MatrixHub# en eng_lab src
Enter entity item (chassis-id, port #): 1,2
Enter entity item (chassis-id, port #): 2,2
Enter entity item (chassis-id, port #): 3,2
Enter entity item (chassis-id, port #):
success
MatrixHub# el
Entity List
----------50
Product Handbook
Entity type, name: SRC, ONYX2
Entity type, name: DST, CONF_ROOM_1
Entity type, name: SRC, OCTAINE
Entity type, name: SRC, ENG_LAB
success
MatrixHub# ed eng_lab
Are you sure (y/n):Y
success
MatrixHub# en eng_lab dst
Enter entity item (chassis-id, port #): 1,2
Enter entity item (chassis-id, port #): 2,2
Enter entity item (chassis-id, port #): 3,2
Enter entity item (chassis-id, port #):
success
MatrixHub# el
Entity List
----------Entity type, name: SRC, ONYX2
Entity type, name: DST, CONF_ROOM_1
Entity type, name: SRC, OCTAINE
Entity type, name: DST, ENG_LAB
success
MatrixHub# en o2 src
Enter entity item (chassis-id, port #): 1,3
Enter entity item (chassis-id, port #): 2,3
Enter entity item (chassis-id, port #): 3,3
Enter entity item (chassis-id, port #):
success
MatrixHub# en softw_lab dst
Enter entity item (chassis-id, port #): 1,3
Enter entity item (chassis-id, port #): 2,3
Enter entity item (chassis-id, port #): 3,3
Enter entity item (chassis-id, port #):
success
MatrixHub# el
Entity List
----------Entity type, name: SRC, ONYX2
Entity type, name: DST, CONF_ROOM_1
Entity type, name: SRC, OCTAINE
Entity type, name: DST, ENG_LAB
Entity type, name: SRC, O2
Entity type, name: DST, SOFTW_LAB
success
MatrixHub# c octaine eng_lab
1B2,2
2B2,2
3B2,2
success
51
Product Handbook
MatrixHub# c o2 softw_lab
1B3,3
2B3,3
3B3,3
success
MatrixHub# es
Entity Status
------------ONYX2
TO CONF_ROOM_1
OCTAINE
TO ENG_LAB
O2
TO SOFTW_LAB
success
MatrixHub# cs 1
1S 1 TO 1
1S 2 TO 2
1S 3 TO 3
success
MatrixHub# cs 2
2S 1 TO 1
2S 2 TO 2
2S 3 TO 3
success
MatrixHub# cs 3
3S 1 TO 1
3S 2 TO 2
3S 3 TO 3
success
MatrixHub# d octaine eng_lab
1D2,2
2D2,2
3D2,2
success
MatrixHub# es
Entity Status
------------ONYX2
TO CONF_ROOM_1
O2
TO SOFTW_LAB
success
MatrixHub# cs 1
1S 1 TO 1
1S 3 TO 3
success
MatrixHub# cs 2
2S 1 TO 1
2S 3 TO 3
success
MatrixHub# cs 3
3S 1 TO 1
52
Product Handbook
3S 3 TO 3
success
MatrixHub# c onyx2 softw_lab
1B1,3
2B1,3
3B1,3
success
MatrixHub# es
Entity Status
------------ONYX2
TO SOFTW_LAB
success
MatrixHub# cs 1
1S 1 TO 3
success
MatrixHub# cs 2
2S 1 TO 3
success
MatrixHub# cs 3
3S 1 TO 3
success
MatrixHub# c o2 conf_room_1
1B3,1
2B3,1
3B3,1
success
MatrixHub# es
Entity Status
------------ONYX2
TO SOFTW_LAB
O2
TO CONF_ROOM_1
success
MatrixHub# cs 1
1S 1 TO 3
1S 3 TO 1
success
MatrixHub# cs 2
2S 1 TO 3
2S 3 TO 1
success
MatrixHub# cs 3
3S 1 TO 3
3S 3 TO 1
success
MatrixHub# c 3 110 110
3C110,110
success
MatrixHub# es
53
Product Handbook
Entity Status
------------ONYX2
TO SOFTW_LAB
O2
TO CONF_ROOM_1
3, 110 TO 110
success
MatrixHub# cs 1
1S 1 TO 3
1S 3 TO 1
success
MatrixHub# cs 2
2S 1 TO 3
2S 3 TO 1
success
MatrixHub# cs 3
3S 1 TO 3
3S 3 TO 1
3S 110 TO 110
success
MatrixHub# clear
Are you sure (y/n):Y
1I
2I
3I
success
MatrixHub# es
Entity Status
------------success
MatrixHub# mh
+=================== MaxtriX-Hub System Help======================+
|- Macro Commands -------------------------------------------------| MH
- Macro Help
| MR <macro> - Run a macro
| ML [<macro>] - List current macros, list <macro> definition
| MN <macro> - create New macro
| MD <macro> - Delete macro
+===================================================================+
success
MatrixHub# ml
Macro List
---------No macros defined
MatrixHub# mn setup_1
Enter macro item: c onyx2 eng_lab
Enter macro item: c octaine softw_lab
Enter macro item: c o2 conf_room_1
Enter macro item:
54
Product Handbook
success
MatrixHub# ml
Macro List
---------Macro: SETUP_1
Success
MatrixHub# ml setup_1
Macro List
---------Macro name: SETUP_1
CONNECT ONYX2 TO ENG_LAB
CONNECT OCTAINE TO SOFTW_LAB
CONNECT O2 TO CONF_ROOM_1
success
MatrixHub# es
Entity Status
------------success
MatrixHub# cs 1
success
MatrixHub# cs 2
success
MatrixHub# cs 3
Success
MatrixHub# mr setup_1
(mr SETUP_1) 1B1,2
2B1,2
3B1,2
(mr SETUP_1) 1B2,3
2B2,3
3B2,3
(mr SETUP_1) 1B3,1
2B3,1
3B3,1
(mr SETUP_1) END MACRO
Macro completed
MatrixHub# es
Entity Status
------------ONYX2
TO ENG_LAB
OCTAINE
TO SOFTW_LAB
O2
TO CONF_ROOM_1
success
MatrixHub# cs 1
1S 1 TO 2
1S 2 TO 3
1S 3 TO 1
success
55
Product Handbook
MatrixHub# cs 2
2S 1 TO 2
2S 2 TO 3
2S 3 TO 1
success
MatrixHub# cs 3
3S 1 TO 2
3S 2 TO 3
3S 3 TO 1
success
MatrixHub# mn setup_2
Enter macro item: c onyx2 softw_lab
Enter macro item: c octaine conf_room_1
Enter macro item: c o2 eng_lab
Enter macro item:
success
MatrixHub# ml
Macro List
---------Macro: SETUP_1
Macro: SETUP_2
success
MatrixHub# mn setup_3
Enter macro item: c onyx2 conf_room_1
Enter macro item: c octaine eng_lab
Enter macro item: c o2 softw_lab
Enter macro item:
success
MatrixHub# ml
Macro List
---------Macro: SETUP_1
Macro: SETUP_2
Macro: SETUP_3
Success
MatrixHub# mr setup_2
(mr SETUP_2) 1B1,3
2B1,3
3B1,3
(mr SETUP_2) 1B2,1
2B2,1
3B2,1
(mr SETUP_2) 1B3,2
2B3,2
3B3,2
(mr SETUP_2) END MACRO
Macro completed
MatrixHub# es
56
Product Handbook
Entity Status
------------ONYX2
TO SOFTW_LAB
OCTAINE
TO CONF_ROOM_1
O2
TO ENG_LAB
Success
MatrixHub# cs 1
1S 1 TO 3
1S 2 TO 1
1S 3 TO 2
success
MatrixHub# cs 2
2S 1 TO 3
2S 2 TO 1
2S 3 TO 2
success
MatrixHub# cs 3
3S 1 TO 3
3S 2 TO 1
3S 3 TO 2
success
MatrixHub# mr setup_3
(mr SETUP_3) 1B1,1
2B1,1
3B1,1
(mr SETUP_3) 1B2,2
2B2,2
3B2,2
(mr SETUP_3) 1B3,3
2B3,3
3B3,3
(mr SETUP_3) END MACRO
Macro completed
MatrixHub# es
Entity Status
------------ONYX2
TO CONF_ROOM_1
OCTAINE
TO ENG_LAB
O2
TO SOFTW_LAB
Success
MatrixHub# cs 1
1S 1 TO 1
1S 2 TO 2
1S 3 TO 3
success
MatrixHub# cs 2
2S 1 TO 1
2S 2 TO 2
57
Product Handbook
2S 3 TO 3
success
MatrixHub# cs 3
3S 1 TO 1
3S 2 TO 2
3S 3 TO 3
success
MatrixHub# ph
+================= MaxtriX-Hub System Help =========================+
|- Passwords -----------------------------------------------------| PH - Password Help
| PL - List number of passwords defined
| PD - Delete a password
| PN <access level> - New password
+===================================================================+
success
MatrixHub# pl
Number of passwords defined: 2
Success
MatrixHub# pn 1
Enter new password: *****
Re-enter password: *****
Success
MatrixHub# pl
Number of passwords defined: 3
Success
MatrixHub# pd
Enter password to delete: *****
Re-enter password: *****
success
MatrixHub# pl
Number of passwords defined: 2
Success
MatrixHub# pd
Enter password to delete: ***
Re-enter password: ***
Cannot delete current password
MatrixHub# logoff
success
Enter password:
Enter password: ***
MatrixHub$ c 1 30 30
Command not allowed for current access level
MatrixHub$ b 1 1 1-30
Command not allowed for current access level
MatrixHub$ d 1 1 1
Command not allowed for current access level
MatrixHub$ clear
58
Product Handbook
Command not allowed for current access
MatrixHub$ restore
Command not allowed for current access
MatrixHub$ ver
Firmware version 1.01 09/11/98 11:02:36
Text ROM version 1.00
success
MatrixHub$ ch
Command not allowed for current access
MatrixHub$ cl
Command not allowed for current access
MatrixHub$ cp 1
1PP1,Power Supply A +5V: OK
1PP1,Power Supply A -5V: OK
1PP1,Power Supply B +5V: OK
1PP1,Power Supply B -5V: OK
1PT 86_F
1PT 90_F
1PT 87_F
success
MatrixHub$ cs 1
Command not allowed for current access
MatrixHub$ eh
Command not allowed for current access
MatrixHub$ el
Command not allowed for current access
MatrixHub$ en etest src
Command not allowed for current access
MatrixHub$ ed onyx2
Command not allowed for current access
MatrixHub$ es
Command not allowed for current access
MatrixHub$ c onyx2 conf_room_1
1B1,1
2B1,1
3B1,1
success
MatrixHub$ d onyx2 conf_room_1
1D1,1
2D1,1
3D1,1
success
MatrixHub$ mh
Command not allowed for current access
MatrixHub$ mr setup_1
(mr SETUP_1) 1B1,2
2B1,2
3B1,2
level
level
level
level
level
level
level
level
level
level
level
59
Product Handbook
(mr SETUP_1) 1B2,3
2B2,3
3B2,3
(mr SETUP_1) 1B3,1
2B3,1
3B3,1
(mr SETUP_1) END MACRO
Macro completed
MatrixHub$ ml
Command not allowed for current
MatrixHub$ mn mtest
Command not allowed for current
MatrixHub$ md setup_1
Command not allowed for current
MatrixHub$
MatrixHub$ ph
Command not allowed for current
MatrixHub$ pl
Command not allowed for current
MatrixHub$ pd rossc
Command not allowed for current
MatrixHub$ pn 1
Command not allowed for current
MatrixHub$ lo
success
Enter password:
access level
access level
access level
access level
access level
access level
access level
60
Product Handbook
Appendix
Matrix Control: In Port Connector Pinouts
Matrix Control: In Port
DB9 Female
PIN
1
2
3
4
5
6
7
8
9
SIGNAL NAME
RD
TD
DTR
GND
DSR
RTS
CTS
-
DESCRIPTION
Receive Data
Transmit Data
Data Terminal Ready
Signal Ground
Data Set Ready
Request to Send
Clear to Send
-
A-1
INPUT/OUTPUT
NC
Output
Input
Input
N/A
Output
Input
Output
NC
Product Handbook
Matrix Control: Out Port Connector Pinouts
Matrix Control: Out Port
DB9 Male
PIN
SIGNAL NAME
1
2
RD
3
TD
4
DTR
5
GND
6
DSR
7
RTS
8
CTS
9
-
DESCRIPTION
Receive Data
Transmit Data
Data Terminal Ready
Signal Ground
Data Set Ready
Request to Send
Clear to Send
-
A-2
INPUT/OUTPUT
NC
Input
Output
Output
N/A
Input
Output
Input
NC
Product Handbook
Serial Input Port Connector Pinouts
Serial Input (RS-232)
Port DB9 Female
PIN
SIGNAL NAME
1
DCD
2
RD
3
TD
4
DTR
5
GND
6
DSR
7
RTS
8
CTS
9
RI
DESCRIPTION
Carrier Detect
Receive Data
Transmit Data
Data Terminal Ready
Signal Ground
Data Set Ready
Request to Send
Clear to Send
Ring Indicator
INPUT/OUTPUT
Output
Output
Input
Input
N/A
Output
Input
Output
Output
DESCRIPTION
(Carrier Detect)
Receive Data Low
Transmit Data Low
Transmit Data High
Signal Ground
Receive Data High
Handshake Output
Handshake Input
(Ring Indicator)
INPUT/OUTPUT
Output
Output
Input
Input
N/A
Output
Input
Output
Output
Serial Input (RS-422)
PIN
1
2
3
4
5
6
7
8
9
SIGNAL NAME
(DCD)
RXDL
TXDL
TXDH
GND
RXDH
HSKOA
HSKIA
(RI)
A-3
Product Handbook
Serial Output Port Connector Pinouts
Serial Output (RS-232)
Port DB9 Male
PIN
1
2
3
4
5
6
7
8
9
SIGNAL NAME
DCD
RD
TD
DTR
GND
DSR
RTS
CTS
RI
DESCRIPTION
Carrier Detect
Receive Data
Transmit Data
Data Terminal Ready
Signal Ground
Data Set Ready
Request to Send
Clear to Send
Ring Indicator
INPUT/OUTPUT
Input
Input
Output
Output
N/A
Input
Output
Input
Input
DESCRIPTION
(Carrier Detect)
Receive Data Low
Transmit Data Low
Transmit Data High
Signal Ground
Receive Data High
Handshake Output
Handshake Input
(Ring Indicator)
INPUT/OUTPUT
Input
Input
Output
Output
N/A
Input
Output
Input
Input
Serial Output (RS-422)
PIN
1
2
3
4
5
6
7
8
9
SIGNAL NAME
(DCD)
RXDL
TXDL
TXDH
GND
RXDH
HSKOA
HSKIA
(RI)
A-4
Product Handbook
Video Matrix Control Card
SW3 Option
Settings
SW2 Comm
Settings
SW1 Chassis
ID
A-5
Product Handbook
Keyboard/Mouse/Serial Control Card
SW3 Option
Settings
SW2 Comm
Settings
SW1
Chassis ID
A-6
Product Handbook
SW1 - Chassis ID
Position
Chassis ID
1
2
3
4
1
on
off
on
off
2
off
on
on
off
3
off
off
off
on
4
off
off
off
off
5
off
off
off
off
6
off
off
off
off
7
off
off
off
off
8
off
off
off
off
5
off
off
off
off
6
off
off
off
off
7
off
on
off
on
8
off
off
on
on
Chassis Type
video
keyboard/mouse
serial
audio
SW2 - Communication Settings
Position
Baud Rate
19,200
9600 *
4800
2400
1
off
off
on
off
2
off
off
on
off
3
off
off
off
on
4
off
off
off
off
* default
SW3 - Option Settings
Position
1*
o
2
3
4
5-7
8*
off
Display Temperature in
F
No echo of characters
from the control In port
No message is sent to the
control In port if chassis
determines an error
No line feed character
added to an outputed
carriage return on the control
In port
Not used
Disable diagnostic commands
* only on video chassis
A-7
o
on
Display Temperature in
C
Echo characters from the
control In port
Send error message back to
control In port if chassis
determines an error
Add a line feed character
to an outputed carriage return
on the control In port
Not used
Enable diagnostic command
allow command channel
commands to be entered after
a “~” character
Product Handbook
Video Output
Video Input
13W3
13W3
A1
Analog Inputs
A2
A3
3
TTL Inputs
4
5
2
TTL Outputs
6
Red
Green
Blue
A1
A2
Analog Outputs
A3
3
Composite
Sync
4
Horizontal
Sync
Vertical Sync
TTL Outputs
5
2
Monitor ID 0
6
Monitor ID 1
TTL Inputs
7
1
7
Monitor ID 3
1
Monitor ID 3
8
8
9
9
10
10
A-8
Product Handbook
SGI/Stereo Device Connection Diagram
A-9
Product Handbook
SGI Stereo Port with Matrix Hub and VDE
A-10
Product Handbook
Serial Port with Matrix Hub and VDE AES
A-11