1
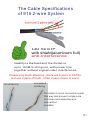
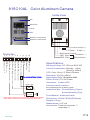
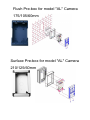
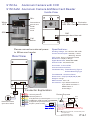
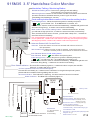
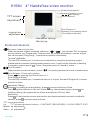
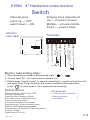
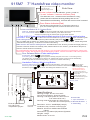
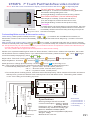
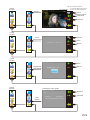
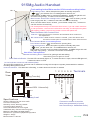
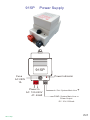
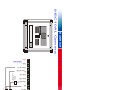
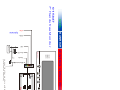
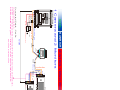
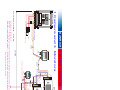
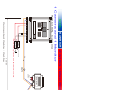
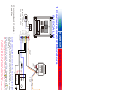
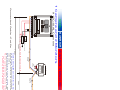
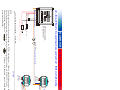
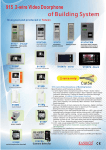
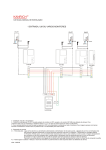
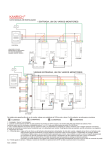
915 2-wire video doorphone system User Manual Villa Type The Cable Specifications of 915 2-wire System CAT 5e STP with shield(aluminum foil) anti-interference Quality is the best and the distance up to 100M is still good ,with power line together without signal/video interference. Please pay much attention , there are 4 pairs in CAT5e , just use 2 pairs of them , other 2 pairs never to use it . no soldering completed soldering To solder 2 cores connection point , this way can prevent single core is broken and make the wire connection is stable . P1 915C10AL Color Aluminum Camera Inside View Mic. White LED CCD SPK. Resident 1 Call Button Resident 2 Call Button SW1 open door time(No.1) ← 15 sec. Terminals 3 4 5 6 In/Out main line + FGND main line 一 D1(Door NO) open door contact D2(Door COM) open door contact A1(Aux NO) open door contact A2(Aux NO) open door contact 7 8 9 10 GND Ground wire Video Out 2 GND PT (for door lock) 1 The sensor of door unlock 2 sec. → BAL (never touch) Clockwise + MIC. Gain SPK. Gain anticlockwise ─ Specifications : Working Voltage : DC 15V from PH-915P Current Consumption: Standby 60mA Working 250mA CCD: Color Sony 1/3” Board Camera Resolution: 510(H) x 492(V) Signal Noise Rate : More than 48db Picture Pixels: 270,000 Pixels Ilumination : 4 white LEDs Door Lock Communication Interface : the modulated carrier wave signal + Installation Way : Flush Mounting Type or Power for door lock (The power of door lock must be an independent power, door phone power can’t share power with door lock.) Surface Mounting Type Front Material : Aluminum Panel Dimensions : 200(H)/120(W)/55(H) mm Weights: 570 gs Measurement: 0.07 cuft Accessories: Terminal connector * 1 screw bag *1 2011 Sep. P12 Flush Pre-box for model "AL" Camera 175/105/60mm Surface Pre-box for model "AL" Camera 210/125/60mm 915CAL Aluminum Camera with CCD 915CALM Aluminum Camera & Mifare Card Reader Inside View Mic. White LED SVR1 MIC. Gain Clockwise SVR2 SPK. Gain anticlockwise The sensitive area of card reader Color CCD SVR1 SVR2 SPK. SW1 open door time set Call Button 2 sec. Please connect an external power to Mifare card reader Rear View 15 sec. Specifications : Working Voltage : DC 15V from PH-915P Current Consumption: Standby 110mA Working 320mA CCD: Color Sony 1/3” Board Camera Resolution: 510(H) x 492(V) Signal Noise Rate : More than 48db Picture Pixels: 270,000 Pixels Ilumination : 2 white LEDs Communication Interface : Installation Way : Flush Mounting Type or Surface Mounting Type Front Material : Aluminum Panel Dimensions : 200(H)/120(W)/55(H) mm Weights: 570 gs Measurement: 0.07 cuft Accessories: 2-pin white connector*1 6-pin white connector*1 diode N4007 *1 Screw bag*1 Connector Explanation Black Blue Red Black Yellow Green External connect open door switch Brown Blue + - In/Out System In/Out System N.O(Door N.O) normal open COM(Door COM.)normal open N.C(Door N.C)normal close PT(PT+) door lock PT The sensor of door unlock Protect Purpose Door Lock 1N4007 + Power for door lock (DC18V) (The power of door lock must be an independent power, door phone power can’t share power with door lock.) - If door lock is close, connect this point to open door. Connect this N.C. Point to open door. P14-1 The user guide of Card Reader For CALM - Villa Type To add new cards: 1.To add cards: By Master REG (The Master Card for registering a new card or cards) Steps: To swipe Master REG one time--beep-- green light flashing --swipe new card(or cards)--beep in twice Successfully register new card (or cards), if you want to stop adding cards, just swipe Master REG one time --beep-- green light off --finish. 2.To delete cards: By Master DEL (The Master Card for deleting a new card or cards) Steps: To swipe Master DEL one time--beep-- red light flashing --swipe the card(or cards) want to be deleted--beep in twice Successfully delete a card (or cards), if you want to stop deleting cards, just swipe Master DEL one time --beep-- red light off --finish. Mifare Key Tag Mifare Card Please add "00" before the 8-digit number to be 10-digit. P14-2 915M35 3.5” Handsfree Color Monitor Handsfree Talking / Monitoring Button Handsfree Talking button : Press it for getting a call and talking . After talking press it again for finish. Monitoring button : Press it to start monitor screen and monitor door camera situation and also to talk with camera ,press it again for finish. The talking time limitation is 180 sec. . Code setting button/Main monitor & Sub monitor setting button Code setting button : When doorphone system is standby and press " + ", you will hear "Du" on 915M35 and on camera ,too. Please enter "monitor code"on camera immediately , 915M35 will get this call and send "Ding-Dong" , it means a successful code setting . Main monitor-Sub monitor setting button : Hold this button 8 sec. at least , you will hear a high-pitch “Du", it means to set main monitor successfully. Then, hold this button 8 sec. at least , you will hear a deep "Du" , it means to set sub monitor successfully. PS. One apartment only can set one main monitor, if you set 2 main monitors in one apartment , camera can't call monitor normally ,the doorphone system will happen problem ,camera can't make a call to this apartment . Intercom Button/ NO Contact Point Intercom Press this button to intercom and talk with other monitors in this apartment . NO Contact Point When monitor screen is started , press this button and drive this contact point in camera then to start other devices. Mic. SPK. Calling Tone Adj. Brightness Color Door Release Button / Code setting button Door Release Press " " this button for opening door. Code setting button : When doorphone system is standby and press " + ", you will hear "Du" on 915M35 and on camera ,too. Please enter "monitor code"on camera immediately , 915M35 will get this call and send "Ding-Dong" , it means a successful code setting . Door Status Indicator : The red LED constantly lights on , it means the door is open, the red LED lights off , it means the door is close . “In Use" indicator / Intercom call Indicator(Red): The red LED constantly on, it means one of residents is using this doorphone system, please wait this resident finishing talking then to use it . Intercom Indicator : This indicator is flashing , it means intercom function is started. Power Indicator : The Blue LED constantly lights on. REAR VIEW 1 2 ON ↑ Dummy Load OFF↓ GND External bell switch 2011 Sep. Bell Video Out GND External SPK FGND system line 一 In/Out system line + Monitor Accessories 1. 7-pin connector 1 2. Bracket 1 To connect all monitors 3. Screw bag 1 in the same house. N0.1 No Function Specifications : Working Voltage : DC 15V from 915P Current Consumption: Standby 40mA Working 300mA Resolution: color 3.5” 320(H) x 240(V) Communication Interface : the modulated carrier wave signal Installation Way : Surface Mounting Type Front Material : ABS Dimensions : 189.5(H)/129.5(W)/30(H) mm Weights: 310 gs Measurement: 0.3 cuft P15 915Mi 4" Handsfree video monitor Code setting button/ Indicator(system in use) video dummy Door Release 2 TFT screen adjustment Door Release 1/ Resident Code setting button / Door Status Indicator ringing tone adjustment Handsfree Talking / Monitoring Buttons/Indicators Resident Code setting button When doorphone system is standby and press " + ", you will hear "Du" on monitor and on camera ,too. Please enter "monitor code" on camera immediately , monitor will get this call and send "Ding-Dong" , it means a successful code setting . "in use" indicator The red LED constantly on, it means one of residents is using this doorphone system, please wait this resident finishing talking then to use it .If you find this indicator is flashing in operation ,please press " " twice , let system return to "standby" status . Door Release 2 When monitor screen is started , press " " for opening another door lock of another door. Door Release 1/Code setting button Press for opening door lock of door no. 1 . Door Status Indicator The red LED constantly on , it means the door no.1 is open, the red LED lights off ,it means the door is close . Handsfree Talking Press for getting a call and talking , press one more time for off line. The talking time limitation is 180 sec. If after talking , the resident forgot to press for finishing talking, the system will be off line automatically 180 sec. later . Monitoring Press to start monitor screen and monitor door camera situation and also to talk with camera , press one more time for finish. TFT screen adjustment Up : TFT screen adjustment buttons---CONTRAST / BRIGHTNESS / COLOR / RESET / EXIT Middle : adjustment + Down : adjustment + - 2011 Sep. - P18 915Mi 4" Handsfree video monitor Switch Ringing Tone Adjustment Up --- volume increase Middle --- volume middle Down --- volume down Video Dummy swich up ----OFF switch down ---ON Monitor rear view Terminals GND ground ground external SPK. external door bell switch 7 7 Bell 6 6 Video Out 5 5 GND 4 4 ESPK 3 3 FGN D syste m wire 一 2 2 In/O ut syste m wire + 1 1 Speaker Monitor code setting steps : 1. When doorphone system is standby and press " "+" ". 2. You will hear "Du" on monitor and on camera ,too. 3. Please enter "monitor code" on camera immediately , monitor will get this call and send "Ding-Dong" as well as the screen is started at the same time, press " " to close screen. It's a successful code setting . Specifications Working Voltage: DC15V from 915P Current Consumption : Stand-by 40mA, Working 300mA Resolution: Color 4” 960(H)x234(V) Communicating Interface: the modulated carrier wave signal Installation way: Surface mounting type Material: ABS heat-resistant plastic Dimensions: (H)140mm/(W)170mm/(D)35mm Weights : 300gs Measurement: 0.2 cuft 2011 Sep. Accessories 1. Green terminal connector 1 2. Monitor Bracket 1 3. Screw Bag 1 P19 915M7 7” Handsfree video monitor Calling Tone Volume Knob Color Adj. Knob Brightness Adj. Knob ↑+ Side View ↓- Power Indicator Power Indicator - green - power on "in use" indicator / Intercom Indicator (Red) This indicator is on - It means one of residents is using , please wait this resident finishing talking then to use . Green/Red mutual flashing, it means intercom function is started. spk. mic. Door Status Indicator(Red) The red LED constantly lights on , it means the main door is open, the red LED lights off ,it means the main door is close . Intercom Button/ N.O. Contact Point Intercom Press this button to intercom and talk with other monitors in this apartment . N.O. Contact Point When monitor screen is started , press this button and drive this contact point in camera then to start other devices. Call 915CC/Code setting button/Main monitor & Sub monitor setting button Call 915CC : Press “ " + " " to call control center and talk to the guard ; press “ Code setting button : When doorphone system is standby and press " + “ again for finishing talk. ",you will hear "Du" on 915M7 and on camera ,too. Please enter "monitor code"on camera immediately , 915M7 will get this call and send "Ding-Dong" , it means a successful code setting . Main monitor-Sub monitor setting button : Hold this button 8 sec. at least ,you will hear a high-pitch “Du", it means to set main monitor successfully.Then, hold this button 8 sec. at least , you will hear a deep "Du",it means to set sub monitor successfully. PS. One apartment only can set one main monitor, if you set 2 main monitors in one apartment ,camera can't call monitor normally ,the doorphone system will happen problem ,camera can't make a call to this apartment . Door Release Button / Code setting button Door Release Press “ " to open the door. Code setting button : When doorphone system is standby and press " this button + code setting button ", you will hear "Du" on 915M 7 and on camera ,too. Please enter "monitor code"on camera immediately , 915M 7 will get this call and send "Ding-Dong" , it means a successful code setting . Handsfree Talking / Monitoring Button Handsfree Talking button : Press for getting a call and talking . After talking press again for finish. Monitoring button :Press to start monitor screen and monitor door camera situation and also to talk LCD screen power setting with camera ,press again for finish. The talking time limitation is 180 sec. Please pay attention to the direction of short pin. The LCD screen power is from the main line ( for single house project) The LCD screen power is from external DC12V power (for apartment project) Dummy Load 2011 Sep. External door bell switch External power for LCD screen in apartment project. Bell Monitor Video Out ESPK External SPK. GND +DC12V FGND System Line 一 In/Out System Line + DC 12V OFF REAR VIEW ON Specifications Working Voltage: DC15V from 915P Current Consumption : Stand-by 40mA, Working 170mA(the power of LCD screen is Accessories from external DC12V) 1. 7-pin connector 1 Working 450mA(the power of LCD screen is 2. Monitor Bracket 1 from main line of doorphone) 3. Screw Bag 1 For Intercom Resolution: Color 7” 800RGB(H)x480(V) Installation way: Surface mounting type function Material: Aluminum & ABS heat-resistant Plastic Dimensions: (H)150mm/(W)235mm/(D)28mm Weights : 700gs Measurement: 0.35 cuft P20 915M7b 7” Touch Pad Handsfree video monitor Clock when the screen on and time is display, access to toolbar and choose for adjusting time. "in use" indicator / Intercom Indicator (Red) 2012/ 12/ 12 The red light on - It means one of residents is using ,please wait this resident finishing talking then to use . The red light flashing, it means intercom function is started. 12: 12: 12 Door Status Indicator / picture indicator(Red) The red light on constantly, it means the main door is open, the red light off, it means the main door is close . The red light flashing, it means the new picture coming. SPK. Touchpad MIC. Calling Tone Volume Knob Talking Volume Knob In standby status,only the first key(top one) has indicator, just touch it on touch area, all 5 touch keys with 5 indicators on and screen on immediately. Please touch the touch key according to icon(on the left view of touchpad). Code setting/Main monitor & Sub monitor setting Code setting : When system is standby and touch " + ",you will hear "Du" on 915M7b and on camera ,too. Please enter "monitor code"on camera immediately , 915M7b will get this call and send "Ding-Dong" , it means a successful code setting . Main monitor-Sub monitor setting : Keep touching 8 sec. at least ,you will hear a high-pitch “Du", it means to set main monitor successfully.Then, keep touching 8 sec. at least , you will hear a deep "Du",it means to set sub monitor successfully. PS. One apartment only can set one main monitor, if you set 2 main monitors in one apartment ,camera can't call monitor(You can hear “Ding-Dong” on monitor but no video). The same problem will be happened when the system is no “main monitor” setting . Monitor on or operate something then return to “Home Screen”, within 10 sec. without next operation, the screen will be off and return to standby status. If you need further information, please access to , touch and get more informaton(next pages) by touch and . Adjust clock : The clock is on the upper left side , access to and touch Adjust brightness : Access to and touch for adjusting brightness . for adjusting time . Check pictures or change picture quantity : Access to , touch SD for choosing 0/1/3 . PS.1. The period of taking picture, all buttons are locked temporarily till finish taking picture. 2. Automatically take picture set "3" - "go out" mode - one call , take 3 pictures ; set "1" - "at home" mode - one call, take 1 picture ; set "0" - "no picture" mode , no tate picture. 3. Due to the period of taking picture, all buttons are locked temporarily. When camera call monitor and start to take a picture, you have to wait till finish "take a picture" then talk with monitor . The waiting time is about 12 sec. from calling to finish taking a picture. ON OFF Bell +DC12V GND External door bell switch Video Out GND ESPK External SPK. FGND System Line 一 In/Out System Line + rear view DC 12V External power Monitor For Intercom function Specifications Dummy Load Accessories 1. 6-pin connector 1 2. 2-pin connector 1 3. Monitor Bracket 1 4. Screw Bag 1 Working Voltage: DC15V from 915P Current Consumption : Stand-by 200mA Working 600mA Resolution: Color 7” 800RGB(H)x480(V) Installation way: Surface mounting type Material: ABS heat-resistant plastic Dimensions: (H)155mm/(W)256mm/(D)27mm Weights : 500gs Measurement: 0.35 cuft P21 Home Screen Handsfree Talking On Line OFF Off Line Open Door 2 Open Door 1 shooting in manual mode screen stop about 3 sec. then return Home Screen Intercom Intercom Inter-Call Inter-Call Home Screen Off Line Call control center 915M7b 2012 10月 P22 Home Screen Picture SD Picture 2012/ 12/ 12 12:12:12 PS. "0" no take a picture / "1" one call, take one picture/ Q'ty "3" one call, take 3 pictures 200 3 0/1/3 different choice Rearward Forward 2012/ 10/ 10 10: 10:10 Picture Time Home Screen SD Choice Time Adjustment Plus 2012/ 12/ 12 12:12:12 Minus Home Screen 2012/ 12/ 12 SD Brightness Adjustment Home Screen 12:12:12 Plus Brightness : 10 Minus the page of user guide 2012/ 12/ 12 SD 12:12:12 Rewind Info Forward User Guide Mode No. :PH915M7B Power dissipation: DC12V/0.6V P23 915M3 Audio Handset Resident Code Setting / Main Handset & Sub-Handset Setting 1. Resident Code Setting When doorphone system is standby and press " + ", you will hear "Du" on 915M3 and on camera , too. Please enter " resident code" on camera immediatel y, 915M3 will get this call and send "Ding-Dong" , it means a successful code setting . 2. Main Handset or Sub-Handset Setting Press this button 8 sec. at least and you will hear a high-pitched “Du”, this handset is set as main handset . Press this button 8 sec. at least and you will hear a low-pitched “Du”, this handset is set as sub-handset . To identify the “Du” is high-pitched or “low-pitched” as main or sub handset. If there are 2 monitors(915M) or “monitor(915M) + audio handset” in one house, it is necessary to set main monitor and sub-monitor(handset) because one house only allow one main monitor, other monitors(handsets) are sub-monitors(handsets). Intercom / Door Release - 2 1. Intercom Pick up the handset and press this button and talk with another monitor(or handset), the talking time is 3 min. Hang up the handset and finish talking. 2. Door Release - 2 When a calling is from camera, pick up the handset and press this button to open the 2nd door . Door Release -1 / Resident Code Setting 1. Door Release - 1 When a calling is from camera, press this button and pick up the handset to open the 1st door. 2.Resident Code Setting When doorphone system is standby and press " + ", you will hear "Du" on 915M3 and on camera , too. Please enter " resident code" on camera immediatel y, 915M3 will get this call and send "Ding-Dong" , it means a successful code setting . Handset P ick up the handset and talk with camera or other monitors w hen you hear the ringing tone, the tal king time limitation is 180 sec. When you are talking with camera, an intercom call coming, please hang up the handset first then pick up the handset again for getting this intercom call. Rear View of Front Cover Power Indicator On - Green In Use / Intercom Indicator On - Red : System in using , after Led off then to use . Flashing - Red : Intercom in using , after Led off then to use . Door Status Indicator On - Red Door is Open PCB DUMMY Dummy Load Switch Set “ON” ←ON OFF→ 6 5 4 3 2 1 Specifications In/Out Main Line + FGND Main Line 一 No Function Inside View of Base GND Ground Wire T3 No Function JP1 6 5 4 3 2 1 Bell External Door Bell Switch (Intercom) UP Button Switch Working Voltage: DC15V from 915P Current Consumption : Stand-by 40mA, Working 150mA Communicating Interface: the modulated carrier wave signal Installation way: Surface mounting type Material: ABS heat-resistant plastic Dimensions: (H)206mm/(W)92mm/(D)58mm Weights : 400gs Measurement: 0.5 cuft Connect to other monitors(Handsets) in the same house. 2011 Sep. P24 915Mg Audio Handset Code setting button/Main monitor & Sub monitor setting button Mic. Code setting button : When doorphone system is standby and press " + ", you will hear "Du" on 915Mg and on camera ,too. Please enter "915Mg code"on camera immediately , 915Mg will get this call and send "Ding-Dong" , it means a successful code setting . Main monitor-Sub monitor setting button : Hold “ “ 8 sec. at least ,you will hear a high-pitch “Du", it means to set main monitor successfully. Then, hold this button 8 sec. at least , you will hear a deep "Du" , it means to set sub monitor successfully. PS. One apartment only can set one main monitor, if you set 2 main monitors in one apartment , camera can't call monitor normally ,the doorphone system will happen problem ,camera can't make a call to this apartment . Intercom Button/ NO Contact Point Intercom Press this button to intercom and talk with other monitors in this apartment . NO Contact Point When monitor screen is started , press this button and drive this contact point in camera then to start other devices. Door Release Button / Code setting button Door Release Press " " this button for opening door. Code setting button : When doorphone system is standby and press " + ", you will hear "Du" on 915M35 and on camera ,too. Please enter "monitor code"on camera immediately , 915M35 will get this call and send "Ding-Dong" , it means a successful code setting . SPK. Power Indicator Handsfree Talking Button Handsfree Talking button : Press it for getting a call and talking . After talking press it again for finish. Door Status Indicator : The red LED constantly lights on , it means the door is open, the red LED lights off , it means the door is close . “In Use"indicator / Intercom call Indicator(Red): The red LED constantly on, it means one of residents is using this doorphone system,please wait this resident finishing talking then to use it . Intercom Indicator : This indicator is flashing , it means intercom function is started. + Rear View 1 2 3 4 5 6 Terminals VR2 VR2 OFF (intercom) Bell external bell switch External SPK. Volume Adj. useless VR3 GND VR3 S1 EXSPK external SPK . - FGND 一 + 1 2 3 4 5 6 In/Ou t + Calling Tone Adj. ON S1 - Dummy Load Specifications Working Voltage: DC15V from 915P Current Consumption : Stand-by 40mA, Working 150mA Communicating Interface: the modulated carrier wave signal Installation way: Surface mounting type Material: ABS heat-resistant plastic Dimensions: (H)210mm/(W)94mm/(D)40mm Weights : 300gs Measurement: 0.08 cuft switch Connect to monitor to monitor when one apartment(or house) has 2 monitors(or handsfree audio). P25 2011 Sep. 915P Power Supply 915P Fuse AC 250V 1A Power Indicator Power In AC 100-240V 47- 63HZ In / Out System Main Line + FGND System Main Line Power Output DC 15V /1500mA 2011 Sep. P27 In/Out + FGND 一 2 D1(Door lock N.O.) 3 D2(Door lock COM) 4 A1(Aux N.O.) 5 A2(Aux COM) 6 PT (door lock PT) 7 GND 8 Video Out 9 GND 10 Door lock SPK gain MIC gain clockwise counterclockwise- + SW1 door open time(D1 D2) ←15 sec. 2 sec.→ BAL ( do not adjust. ) Inner side 915 KANRICH 2 wires video doorphone system 915C10AL Camera KANRICH 1 door open signal feedback - door lock power independent power + System wires MIC Rear View ON Default is ON OFF Dummy Load The LCD screen power is from the main line ( for single house project),this is default. LCD screen power setting Please pay attention to the direction of short pin. 915 KANRICH 2 wires video doorphone system 915M7 7" Handsfree Monitor GND Extra . SPK Bell extra door bell Monitor connect to other monitors within one house (intercom connection) In/Out + FGND 一 System wires Video Out 4 KANRICH 3 5 6 7 8 9 10 2 Cat.5e Cable 915P AC 230V Cat.5e Cable 2 2 orange/ orange white blue/ b lue white ON Dummy Load Monitor 915 KANRICH 2 wires video doorphone system 2 blue/ b lue white Door lock orange/orange white 2 1 Camera and 1 Monitor 1 door open signal feedback power - door lock + 100M anothert power for this door lock Connected Cable :Cat.5e MIC 4 KANRICH 3 5 6 8 9 10 915P AC 230V 2 orange/orange white 2 Cat.5e blue/ Cable blue white Dummy Load OFF 2 2 blue/ blue white Load Cat.5e Cable ON orange/ orange white Dummy Monitor 915M7 915M7 MIC PS : 1. When you connect 2 monitors at least , please set one of monitors to be main monitor(this is default), other monitor(monitors) is(are) set to be sub-monitor. 2. How to set main monitor and sub-monitor ? Hold this button " "+" " 8 sec. at least ,you will hear a high-pitch “Du",it meansto set main monitor successfully. Then, hold this button 8 sec. at least ,you will hear a "low &deep "Du", it means to set sub monitor successfully. Monitor MIC 915 KANRICH 2 wires video doorphone system 7 2 blue/ b lue white 2 orange/orange white Door lock Cat.5e Cable 1 Camera and 2 Monitors 2 915C10AL 1 door open signal feedback power - door lock + anothert power for this door lock 100M Connected Cable :Cat.5e Intercom function : 915M7 — Please connect terminal #7 between monitor and monitor. 915M35/Mi/M7b/Mg/M3 — Please connect terminal #6 between monitor and monitor . PS. One apartment only can set one main monitor, if you set 2 main monitors in one apartment , camera can't call monitor normally ,the doorphone system will happen problem ,camera can't make a call to this apartment . 4 KANRICH 3 5 7 8 9 10 915P AC 230V 2 2 Dummy Load OFF 2 2 Cat.5e Cable 2 Dummy Load 2 blue/ blue white Monitor MIC MIC Monitor Monitor 915M7 Dummy Load ON orange/ orange white Cat.5e Cable orange/ OFF orange white blue/ blue white blue/ blue white 915P AC 230V The 2 wires are the shorter,the better. Cat.5e Cable orange/orange white 100M PS : 1. When you connect 2 monitors at least , please set one of monitors to be main monitor(this is default), other monitor(monitors) is(are) set to be sub-monitor. 2. How to set main monitor and sub-monitor ? Hold this button " "+" " 8 sec. at least ,you will hear a high-pitch “Du", it meansto set main monitor successfully. Then, hold this button 8 sec. at least , you will hear a "lower deep "Du", it means to set sub monitor successfully. 915M7 PS. One apartment only can set one main monitor, if you set 2 main monitors in one apartment , camera can't call monitor normally ,the doorphone system will happen problem ,camera can't make a call to this apartment . MIC 915 KANRICH 2 wires video doorphone system 6 blue/ b lue white 2 orange/orange white 2 Door lock Cat.5e Cable 1 Camera and 3 Monitors 2 915C10AL 1 door open signal feedback door lock power anothert power for this door lock Connected Cable :Cat.5e Intercom function : 915M7 — Please connect terminal #7 between monitor and monitor. 915M35/Mi/M7b/Mg/M3 — Please connect terminal #6 between monitor and monitor . 5 6 7 8 9 10 Cat.5e Cable 915P AC 230V Cat.5e Cable 2 2 ON Dummy Load 2012/ 12/ 12 12:12:12 915M7b Monitor 915 KANRICH 2 wires video doorphone system 4 KANRICH 3 2 1 Camera and 1 Monitor 2 915C10AL Camera 1 2 Door Lock - door lock power +another power for this door lock 100M Connected Cable : Cat.5e Red Blue Brown Green Yellow Black Blue Cat.5e Cable 2 915P AC 230V 1N4007 + - Cat.5e Cable 2 2 door lock PT A EL door lock power (DC18V) Dummy Load OFF 2012/ 12/ 12 Extra power for door lock only Code setting/Main monitor & Sub monitor setting 2 12: 12: 12 ON Dummy Load 2012/ 12/ 12 915P AC 230V 915 KANRICH 2 wires video doorphone system 1 Camera and 2 Monitors 915M7b 915CALM KANRICH Black External connect door open button Connected Cable : Cat.5e 915M7b 12:12:12 Code setting : When system is standby and touch " + ",you will hear "Du" on 915M7b and on camera ,too. Please enter "monitor code"on camera immediately , 915M7b will get this call and send "Ding-Dong" , it means a successful code setting . Main monitor-Sub monitor setting : Keep touching 8 sec. at least ,you will hear a high-pitch “Du", it means to set main monitor successfully.Then, keep touching 8 sec. at least , you will hear a deep "Du",it means to set sub monitor successfully. PS. One apartment only can set one main monitor, if you set 2 main monitors in one apartment ,camera can't call monitor(You can hear “Ding-Dong” on monitor but no video). The same problem will be happened when the system is no “main monitor” setting . 4 KANRICH 3 5 6 7 8 9 10 2 Cat.5e Cable 915P AC 230V Cat.5e Cable 2 2 Dummy Load OFF 2012/ 12/ 12 12:12:12 ON Dummy Load AC 230V 915M7b Monitor 2012/ 12/ 12 12:12:12 915P 915 KANRICH 2 wires video doorphone system 915M7b Monitor 1 Camera and 2 Monitors 2 915C10AL Camera 1 2 Door Lock 30M Code setting/Main monitor & Sub monitor setting 160M - door lock power +another power for this door lock 100M Connected Cable : Cat.5e Code setting : When system is standby and touch " + ",you will hear "Du" on 915M7b and on camera ,too. Please enter "monitor code"on camera immediately , 915M7b will get this call and send "Ding-Dong" , it means a successful code setting . Main monitor-Sub monitor setting : Keep touching 8 sec. at least ,you will hear a high-pitch “Du", it means to set main monitor successfully.Then, keep touching 8 sec. at least , you will hear a deep "Du",it means to set sub monitor successfully. PS. One apartment only can set one main monitor, if you set 2 main monitors in one apartment ,camera can't call monitor(You can hear “Ding-Dong” on monitor but no video). The same problem will be happened when the system is no “main monitor” setting . Cat.5e blue/blue white 915P AC 230V 915P AC 230V Dummy Load OFF ON Dummy Load 915M7b Monitor 915 KANRICH 2 wires video doorphone system 2-button Camera and 2 Monitors KANRICH 2 2 915C10AL 2-button Door lock orange/orange white 1 2 3 4 5 6 7 8 9 10 door open signal feedback door lock power anothert power for this door lock Connected Cable :Cat.5e 100M MIC 915M7b Monitor MIC PS : All monitors or handsets in 915 system , their defaults are to call the right button of 915C10AL . So, please do the following set steps to set the left button of 915C10AL . Hold this button " "+" " 8 sec. at least ,you will hear a high-pitch “Du", it meansto set main monitor successfully.