1
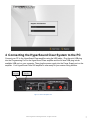
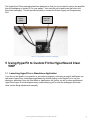
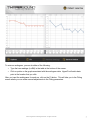
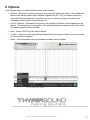
HyperSound Clear™ 500P HyperFit Desktop Fitting Guide for HyperSound Clear 500P TM ©2015 Turtle Beach Corporation. All rights reserved. Introduction to this booklet This booklet guides you in how to custom fit the HyperSound Clear 500P using the HyperFit PC application. Much like modern hearing aids, the HyperSound Clear 500P can be uniquely adjusted and optimized by a Hearing Care Professional to a patient’s hearing capabilities. The HyperSound Clear 500P has a six-band equalizer that can be adjusted for one or two specific patients’ hearing capabilities. Two separate custom profiles can be saved so that two different people can use the system. A standard setting is also available with a normal response for when people without hearing loss want to listen to the system. HyperFit is compatible with the Noah 4 application. If you are a Noah 4 user, you will be able to launch the HyperFit application directly from Noah. Patient audiograms will be automatically imported into HyperFit from Noah and a log of the custom fitting will be saved in Noah. If you have additional questions about using the HyperFit application please contact HyperSound Hearing Solutions at (888) 496-8001. Important information Please see the HyperSound 500P User Guide for Important Safety Information including excessive volume possible from a system programmed for hearing loss. We recommend fitting without hearing aids. In those situations where you custom fit HyperSound audio to a patient with hearing aids, they may need to decrease the volume or sensitivity of the hearing aids if the fitted sound is too loud or they experience any acoustic feedback (squeal or whistle sound) or any other sound artifacts. Custom fitting of the HyperSound Clear 500P and your patient’s hearing aid may be required to find the optimal settings. ©2015 Turtle Beach Corporation. All rights reserved. 2 Table Of Contents 1 2 3 4 5 ITEMS INCLUDED IN THE CUSTOM FITTING SYSTEM ...................................................................................................... 4 System Requirements ..................................................................................................................................................... 4 Application Installation ................................................................................................................................................... 4 Connecting the HyperSound Clear System to the PC ...................................................................................................... 5 Using HyperFit to Custom Fit the HyperSound Clear 500P ............................................................................................. 6 5.1 Launching HyperFit as a Standalone Application ..................................................................................................... 6 5.2 Launching HyperFit Using Noah ............................................................................................................................... 8 5.3 Manually adjusting the fitting parameters ............................................................................................................... 9 5.4 Storing the profile onto the HyperSound Clear 500P ............................................................................................. 10 6 Options .......................................................................................................................................................................... 11 7 For more information: ................................................................................................................................................... 12 ©2015 Turtle Beach Corporation. All rights reserved. 3 1 ITEMS INCLUDED IN THE CUSTOM FITTING SYSTEM The HyperFit custom fitting system consists of: • A USB cable for attaching a Windows PC to the HyperSound Clear 500P amplifier via the custom fitting port. • A power supply for powering up the HyperSound Clear 500P amplifier during the custom fitting session. This allows the Hearing Health Care Professional to load the custom fitting into the amplifier while the entire system is still in the box. • HyperFit PC application. This can be downloaded from the HyperSound website at http://hypersoundhearing.com/hyperfit • This manual. 2 System Requirements Windows PC with the minimum specifications: Item Processor / clock speed System RAM Free hard drive space Operating System Requirement 2 GHz (or higher) 2 GB 100 MB Windows 7 64 bit (except for Windows 7 Starter version) Windows 8 and 8.1 (does not support Windows RT versions) Screen resolution 1024 x 768 (or higher) USB Minimum one available USB port 3 Application Installation • Download the HyperFit application from http://hypersoundhearing.com/hyperfit • Launch the installer by double clicking on the installer icon. • Select Agree after reading and when presented with the Software Licensing Agreement. • Register your installation on your computer. After registered as an authorized HyperSound dealer, you will receive a Welcome email from the HyperSound Network which contains your Registration Key. Copy and paste or type that key into the Registration Number field then select New Token. • You will then be sent another email that contains your specific token. Copy and paste that token into the Token field and present Enter. This will authorize and register your copy of HyperFit. You will only need to do this once per computer that you install HyperFit. ©2015 Turtle Beach Corporation. All rights reserved. Figure 1 -‐ Registration Window 4 Connecting the HyperSound Clear System to the PC Connect your PC to the HyperSound Clear amplifier using the USB cable. Plug the mini-USB plug into the Programming Port on the HyperSound Clear amplifier and the full size USB plug into an available USB port on your computer. Then plug the power supply into the Power Supply port on the amplifier. Your HyperSound Clear 500 amplifier is now ready for your custom fitting session. Power&from& Power&Supply& Programing&Port& (Mini&USB)& Figure 2 -‐ Back of Amplifier Unit ©2015 HyperSound Hearing Solutions. All rights reserved. The HyperSound Clear packaging has been designed so that you do not need to remove the amplifier from the packaging to custom fit it to your patient. Just open the top lid and locate the hole in the Styrofoam packaging. This will provide the ability to access the Power Supply and Programming Port. Power& Supply& USB&Cable& from&PC& Figure 3 -‐ Programming Connections in Packaging 5 Using HyperFit to Custom Fit the HyperSound Clear 500P 5.1 Launching HyperFit as a Standalone Application If you do not use Noah in your practice or you want to program a unit using a specific audiogram you can launch HyperFit as a standalone application by double clicking on the HyperFit icon on your desktop or selecting it from the Start Menu or Applications list (just as you do for other applications). HyperFit will open on the Audiogram entry screen allowing you to enter the audiogram and make other custom fitting adjustments manually. ©2015 HyperSound Hearing Solutions. All rights reserved. Figure 4 -‐ Audiogram Entry Window To enter an audiogram, you can do either of the following: • Type the loss readings (in dBH) in the table at the bottom of the screen. • Click on points on the graph associated with the audiogram data. HyperFit will add a data point at the location that you click. After you input the audiograms for each ear, click on the Fit button. This will take you to the Fitting screen where you can make manual adjustments to the Fitting parameters. ©2015 HyperSound Hearing Solutions. All rights reserved. 5.2 Launching HyperFit Using Noah If you use Noah in your practice, after you install HyperFit, a HyperFit icon will show up on the top of your Noah tool bar. Clicking on that icon will automatically launch HyperFit. The patient that was selected in Noah at the time of launch will be automatically imported into HyperFit. The patient’s name will appear at the top of the window and their audiogram will be presented in the window. The equalizer settings will be adjusted to the best fit based on the audiogram for each ear. Figure 5 -‐ Fit Window ©2015 HyperSound Hearing Solutions. All rights reserved. 5.3 Manually adjusting the fitting parameters The HyperFit application utilizes the NAL-R algorithm to do an initial fit of the HyperSound Clear equalizers for the six bands to provide an initial profile. Then the Hearing Health Care professional should adjust any of those settings based on patient preferences using the Fitting screen. The following figure shows all the displays and controls on the Fitting Window. Figure 6 -‐ Fitting Window Displays and Controls The fitting screen offers a variety of methods to adjust the fitting parameters to adjust and optimize the system to the patient’s personal hearing capabilities and preferences: • The individual equalizer settings can be changed by moving the sliders up and down to add or reduce the amount of amplification in each frequency band. • The individual equalizer settings can also be adjusted in 1 dB increments by pressing the Fine Adjustment arrows. • The overall volume of all the equalizers can be adjusted by pressing the Master Volume up and down buttons. ©2015 HyperSound Hearing Solutions. All rights reserved. 5.4 Storing the profile onto the HyperSound Clear 500P Once the hearing health care professional is pleased with the settings he / she can save those settings to the HyperSound Clear 500P by pressing the Save To Device button. This will cause the custom fitting settings to be downloaded and saved into the HyperSound Clear. Several progress bars will pop up indicating that the HyperSound Clear is being programmed. Once they complete, the device has been successfully programmed to the desired custom fitting settings. Figure 7 -‐ Saving To Device Window If you want to program a 2nd Personal Program, repeat the audiogram entry steps or select a new patient in Noah. Then click on the Personal Setting button and select Personal Setting 2. ©2015 HyperSound Hearing Solutions. All rights reserved. 6 Options In the Options menu you will find several useful tools including: • Restore – Allows you to restore settings from a previously backed up setting. The settings are saved by the serial number of the individual HyperSound unit. So if you want to program a new unit to the same settings of a previous unit, you can do so by using this function and entering the serial number of the previous unit. • Factory Defaults – Restores the unit back to the settings it had when it was shipped from the factory. This deletes any stored profiles. This will also update the firmware on the unit if there is a newer firmware version available. • Help – Opens a PDF file of the User’s Manual. • Contact – Takes you to the HyperSound Hearing Solutions support website so you can contact us if you have any problems. • About – Gives information about the software including version number. Figure 8 -‐ Options Menu Window ©2015 HyperSound Hearing Solutions. All rights reserved. 7 For more information: HyperSound Hearing Solutions, an operating unit of Turtle Beach Corporation 12220 Scripps Summit Drive, Suite 100 San Diego CA 92131 888-‐496-‐8001 www.hypersoundhearing.com © 2015 Turtle Beach Corporation (“TBC”). All rights reserved. HYPERSOUND ClearTM 500P and the HyperSound logo are proprietary trademarks of TBC. All other trademarks are properties of their respective owners. UG0100 – Rev A October 1, 2015 ©2015 HyperSound Hearing Solutions. All rights reserved.