1
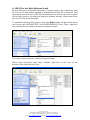
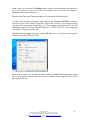
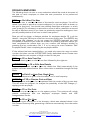
Excalibur
GA1001 AUDIOMETER
USER MANUAL
Windows™
Castle Group Ltd
Salter Road, Scarborough, North Yorkshire, YO11 3UZ
Tel: +44 (0) 1723 584250, Fax: +44 (0) 1723 583728
Email: [email protected] Internet: http://www.castlegroup.co.uk
2
EXCALIBUR AUDIOMETER
Windows Version
INTRODUCTION
The Castle Group GA1001 Excalibur audiometer software includes the
Hughson-Westlake testing routine and has a windows user interface,
which makes it attractive and easier to use than almost any other
screening audiometer.
This manual describes the default settings in the program, the
recommended steps in normal usage, and it gives a more detailed
description of all the menu facilities, which are provided in the program.
SPECIAL NOTICE
Please note it is recommended that when running the ASRA testing program
under Windows XP™ or Vista™, for best results it should be operated in the
Windows 2000™ compatibility mode.
This is necessary due to differences in Windows XP and Vista operating
environments that may occasionally cause update errors to the user interface
while the test is running. If this happens, you may notice while the test runs
normally for the person being tested, the screen display may stop updating,
giving the impression that the program has ‘frozen’ until the end of the test, at
which point the display will return to normal.
To prevent this from happening, simply follow the instructions shown below.
To run the ASRA software in compatibility mode install the software as
described in the Windows Installation section and then: 1) Using the mouse pointer right-click on the Asra Audiometer icon in the
program group or desktop – depending on how you start the program.
2) Select Properties, Compatibility, and then the tick box for compatibility mode.
3) Select Windows 2000 compatibility.
4) Click on Apply and then OK.
Castle Group Ltd
Salter Road, Scarborough, North Yorkshire, YO11 3UZ
Tel: +44 (0) 1723 584250, Fax: +44 (0) 1723 583728
Email: [email protected] Internet: http://www.castlegroup.co.uk
3
1) EXCALIBUR INSTALLATION
The Castle Group GA1001 Excalibur is an audiometer which can be used in
manual mode under full operator control, in semi-automatic mode, with a
combination of operator and program control, or fully automatically where
the test process follows one of a number of pre-set protocols.
HARDWARE SETUP
SERIAL CONNECTION
Communication between the PC and Excalibur is by means of cables linking a
standard 9-pin PC serial port to the corresponding socket on the back of the
GA1001. The Excalibur software needs to be told which ports are being used
and this is done by editing the file AUDW32.INI (see FILE EDITING below) to
match the physical links you have used.
The ASRA software will default to COM1 for standard use. If COM1 is in use
by another application, and COM2, 3, or 4 is available, then the unit should be
connected as such, and the AUDW32.INI file be set accordingly.
USB CONNECTION
If the PC or laptop hosting the ASRA software is not equipped with a serial
port connection, the use of an USB-to-serial adapter will be required. To
install the adapter, please follow the instructions supplied with the device,
ensuring that the supplied drivers are correctly installed.
It is important to note the physical USB port selected as this must always be
used when running the Excalibur. The COM number assigned to the USBserial adapter may now be set using the Windows Control Panel or Device
Manager dependent on which version of Windows is installed. COM1
matches the default setting in the ASRA software, but if this is not available
then another number must be assigned and the AUDW32.INI file set edited
to match.
POWER SUPPLY CABLE
Ensure the green Power LED on the upper-right side of the Excalibur fascia is
illuminated when mains power is switched on.
RIGHT (RED) EARPHONE PLUG
If used as a ‘stand-alone’ system, connect the red earphone plug into the
socket marked Right on the rear of the Excalibur. If used in conjunction with
an audiometric screening booth, link the socket marked Right on the rear of
the Excalibur to the red socket on the outside of the booth, and connect the
red earphone plug to the corresponding socket within the booth.
LEFT (BLUE) EARPHONE PLUG
If used as a ‘stand-alone’ system, connect the blue earphone plug into the
socket marked LEFT on the rear of the Excalibur. If used in conjunction with
an audiometric screening booth, link the socket marked Left on the rear of
Castle Group Ltd
Salter Road, Scarborough, North Yorkshire, YO11 3UZ
Tel: +44 (0) 1723 584250, Fax: +44 (0) 1723 583728
Email: [email protected] Internet: http://www.castlegroup.co.uk
4
the Excalibur to the blue socket on the outside of the booth, and connect the
blue earphone plug to the corresponding socket within the booth.
RESPONSE BUTTON
If used as a ‘stand-alone’ system, connect the plug from the hand held
response button into the socket marked Response on the rear of the
Excalibur. If used in conjunction with an audiometric screening booth, link the
socket marked Response on the rear of the Excalibur to the black socket on
the outside of the booth, and connect the plug from the hand held response
button to the corresponding black socket within the booth. Operation of the
response button may be tested by ensuring that the Response LED
illuminates when the button is pressed.
SOFTWARE INSTALLATION
Note: To be able to use this software, your computer should have Windows
98, 2000, NT (with appropriate user permissions), ME, XP, or Vista already
installed and have an unassigned port available for connection (see above for
port connections).
WINDOWS INSTALLATION
The ASRA software program is supplied on a CD-ROM matched exactly to
your Excalibur. The CD is marked with the serial number of the Excalibur and
carries vital calibration data exclusive to that unit. If you have purchased
more than one Excalibur it is imperative that you ensure the correct software
disk is installed on the associated PC or laptop intended for use with that
unit.
To install from the CD, insert the disk into the appropriate drive, and using
the Windows navigation window, select the SETUP.EXE icon and double-click
using the left mouse button to initialise the program.
The ASRA program files will be ‘unpacked’ and installed on the C-drive in a
folder called Audio. If required, the files may be transferred to a network
drive.
Care should be taken in installations where a number is users will have
access to the program, or where multiple logon profiles may be used, to
ensure that each user has access to the ASRA programs. It is
recommended that the icons for the testing program (AUDW32.EXE) and
the batch-utility program (AUDPRW32.EXE) are made available on the users’
desktop. You may wish to customise the icons’ descriptions to read as noted
above.
Once the programs are installed, refer to the chapter on FILE EDITING.
Castle Group Ltd
Salter Road, Scarborough, North Yorkshire, YO11 3UZ
Tel: +44 (0) 1723 584250, Fax: +44 (0) 1723 583728
Email: [email protected] Internet: http://www.castlegroup.co.uk
5
The software may also be supplied on two floppy disks. If this is the case please follow
the instructions below: ¾ Insert ‘DISK 1’ (Audiometer Program) into drive A.
¾ Open the navigation window for drive A, and double-click on the SETUP.EXE icon.
¾ When installation is complete remove DISK 1 from drive A and replace it
¾ with DISK 2 (Batch Utility Program).
¾ Open the navigation window for drive A, and double-click on the SETUP.EXE icon.
¾ When installation is complete remove DISK 2 from drive A and refer to the chapter
on FILE EDITING.
FILE EDITING
The following files should be edited after installing the Audiometer Software.
This can be achieved using “Text Editors” such as Notepad or Edit.
To find these files click on the “My Computer” icon and then on the drive
where you installed Audiometer Software. Then open the Audio folder and
double click on files to be changed.
The three files to be changed are noted below: 1. AUDW32.INI
Open this file to set the com port value to the correct number and to add title
lines 2 and 3 for your company name and department respectively.
OPTIONS
DEFAULT VALUE
MaximumResponseTime=1500
Maximum Response Time 0 to 4000 ms
0 to 4000 mS
ToneLength=1000
Tone Length
1,2,3,4
COMPort=1
COM Port
1,2,3,4
FrequencyList=1
Frequency List (kHz)
1 = 1,2,3,4,5,6,8,0.5.
2 = 1,2,3,4,6,8,0.5,0.25.
3 = 1,1.5,2,3,4,6,8,12,0.75,0.5,0.25,0.125.
4 = 1,2,1
0 = Off, 1 = On
PulseOnOff=0
Pulsed Tone
0 = Off, 1 = On
Categories678=1
Categories 6, 7, 8
ASRA AUDIOMETER
Title 1
Insert the name of your company
Title 2
and address.(or Occ. Health Dept.)
Title 3
Network Folder Address
C:\AUDIO\RESULTS
Save Directory
Network Folder Address
C:\AUDIO\RESULTS
Passive Directory
2. AUDLETR.TXT
Open this file to replace XXXXXXXX with the employees’ company name and
to add a relevant Nurses/Doctors name beside last line of letter. For more
information on this option, see ‘Print Letter’ section later in this manual.
3. AUDPRW32.INI
Open this file to add your company name at PrintHeader2, and address or
department at PrintHeader3. The Display of categories 6, 7, and 8 can also
be switched off, if required, as shown in the AUDW32.INI file table above.
Castle Group Ltd
Salter Road, Scarborough, North Yorkshire, YO11 3UZ
Tel: +44 (0) 1723 584250, Fax: +44 (0) 1723 583728
Email: [email protected] Internet: http://www.castlegroup.co.uk
6
4. HELP (For Use With Windows Vista)
Due to changes in Windows Vista that no longer support the ‘traditional’ help
file format, an alternative method of accessing the help file is required. This
alternative method uses a PDF file format which can be set up to act in place
of the Help function by setting a keyboard access ‘hot-key’ combination that
will ‘call’ the file when activated.
To establish the Help File hot-key, open the Audio folder as described above
and locate the AUDHELP.PDF and AUDPRW32.HLP files. Then, right-click
the selected file to create a shortcut as shown below:-
This will produce a shortcut within the same folder.
When both shortcuts have been created: right-click on the first of the
shortcut files and left-click Copy.
Castle Group Ltd
Salter Road, Scarborough, North Yorkshire, YO11 3UZ
Tel: +44 (0) 1723 584250, Fax: +44 (0) 1723 583728
Email: [email protected] Internet: http://www.castlegroup.co.uk
7
Next, close or minimise the Audio folder, move to the desktop and right click
on it to produce a menu box. Click on Paste from the menu to create a
desktop copy of the shortcut.
Repeat this Copy and Paste operation for the second shortcut file.
To set up the hot-key operation, right-click on the desktop AUDHELP shortcut
and from the menu click Properties. Place the cursor in the Shortcut Key
dialogue box and select by clicking in it. Then press and hold the Ctrl and Alt
keys and press the H key. This will appear as “CTRL+ALT+H” in the dialogue
box. Click on Apply and then OK.
Repeat this operation for the audprw32 shortcut, but when entering the
shortcut key use CTRL+ALT+B.
Once this is done this, you will be able to call the ASRA testing program help
file at any time by typing Ctrl+Alt+H or the batch-utility program help file by
typing Ctrl+Alt+B
Castle Group Ltd
Salter Road, Scarborough, North Yorkshire, YO11 3UZ
Tel: +44 (0) 1723 584250, Fax: +44 (0) 1723 583728
Email: [email protected] Internet: http://www.castlegroup.co.uk
8
NORMAL OPERATION
The menu selections described in the section “INITIALISATION” should be
made immediately after switching on the audiometer, to allow setting of
the relevant parameters in the program.
Underlined characters will activate the procedure when the menu
containing them is visible. Keys on the right are hot-keys, which will
activate the procedure without going through the menu stage.
These instructions assume that you are following the recommended
procedures for the storage of batches of audiograms, namely -- store in
one directory all the files from one company taken in the course of a
testing program covering one or several days. Assign a different directory
for the same company when the next batch of tests on the same staff is
done 1 year later. Assign a different directory for each company, even if
more than one company is tested on the same day.
In the above, particular circumstances may make it desirable to modify the
directory arrangement, e.g. you may replace the word “company” with the
words “department” or “branch”, but this could be inconvenient if there is
a transfer of employees between departments. The principal to bear in
mind is that, when you are performing one set of tests on a batch of
employees, it is most convenient if the previous tests on these employees
are all in one other directory.
If you have doubts on the most convenient arrangement in your particular
circumstances, please discuss the situation with your supplier or with
Castle Group Ltd. using the contact details below.
Castle Group Ltd
Salter Road, Scarborough, North Yorkshire, YO11 3UZ
Tel: +44 (0) 1723 584250, Fax: +44 (0) 1723 583728
Email: [email protected] Internet: http://www.castlegroup.co.uk
9
NORMAL TEST SEQUENCE
INITIALISATION
File: Set Save Dir (Ctrl+D)
Select the directory into which you wish to save the current audiograms of
employees whom you are about to test. This directory applies when you
perform a Save and Name operation, which is the recommended way of
using the system (see below).
Passive: Set Passive Directory (Ctrl+S)
Select the directory where, on a previous occasion (say 1 year ago), you
stored audiograms for the employees which you are now about to re-test.
You will be able to use these audiograms to determine if the category 1
applies to each employee.
Note:
The ASRA operating software for the GA1001 Excalibur user interface
incorporates a series of short-cut icons located below the main menu bar.
These icons are intended to allow smoother operation by acting as fasttrack connections to their listed function.
Where a short cut icon represents a standard function, for example,
NEW, it will be noted in the manual as an icon box next to the heading as
shown below.
NEW
or Ctrl+N or File: New
Castle Group Ltd
Salter Road, Scarborough, North Yorkshire, YO11 3UZ
Tel: +44 (0) 1723 584250, Fax: +44 (0) 1723 583728
Email: [email protected] Internet: http://www.castlegroup.co.uk
10
FOR EACH EMPLOYEE
The following short cut icon or menu selections should be made at the start of
the test on each employee, to allow the test procedure to be performed
satisfactorily: -
NEW
or Ctrl+N or File: New
This menu item is used at the start of the test for each employee. You will be
asked if you wish to save the current audiogram (i.e. the one which is drawn on
the grid at this time). You should have already saved this audiogram, in which
case, press N. (Do not save it a second time, since it will be resaved in a second
file with a different name). If you have not previously saved the audiogram, then
you will possibly wish to do so now, in which case press Y.
Next you will be shown a dialogue window for employee details. Fill in all the
details -- using the TAB key to move from one entry to the next. The <ENTER> key
terminates this dialogue, so do not press the <ENTER> key until you have
completed all entries. If you make the mistake of pressing <ENTER> before you
have completed the entries then you can re-enter the dialogue window by
pressing the key combination Ctrl + E or by using the menu selection ‘Edit:
Employee Details’, then completing the employee details.
IF the subject has been tested before, you need only enter the name or works
number and then use the AUTODETAILS facility described below. Please note
that the date format requires a 4-digit number for the year
RUN
or F2 or Auto-Test: Run
Conduct a hearing test; on the left ear first, followed by the right ear.
AUTODETAILS or F4 or Edit: Auto Details
For use by advanced users to have the details box filled automatically if the
subject has been tested before. More information is available through the Help
Menu.
SINGLE
or Ctrl+F or Auto-Test: Single Freq
Allows the subject to be given a familiarisation run on one frequency.
PASSIVE or F10 or Passive: Find and Open
Load a previous audiogram, for comparison with the results of the current test.
This will allow the program to analyse the possibility of the HSE Category 1
applying to this employee.
PRINT or F5 or File: Print
Prints the current audiogram on the system printer. This printout will include
passive audiograms that are displayed, employee details, and HSE
categorisation results.
SAVE
or F6 or File : Save
Save the current audiogram in the directory, which was selected above in the
Set Passive Directory step, generating a filename automatically from the works
number.
Castle Group Ltd
Salter Road, Scarborough, North Yorkshire, YO11 3UZ
Tel: +44 (0) 1723 584250, Fax: +44 (0) 1723 583728
Email: [email protected] Internet: http://www.castlegroup.co.uk
11
MENU ITEMS
Underlined characters will activate the procedure when the menu
containing them is visible. Keys on the right of some items are hot-keys
which will activate the procedure without going through the menu stage.
FILE
New (Ctrl+N)
Start a new audiogram with a new employee. The existing audiogram,
passive audiograms, employee details, results and comments are all
deleted.
Open (Ctrl+O)
Open an existing audiogram file from disk. You will use the conventional
windows dialogue box, to select drive, directory, file type, and filename.
Save As
Save the current audiogram to a disk file which will be named by the
operator. You will use the conventional windows dialogue box, to select
drive, directory, file type and filename.
Set Save Dir (Ctrl+D)
Set the name of the directory, which will be used in the Save routine (the
next item in this list). A conventional windows dialogue box will be offered
to permit this selection.
Save (F6)
Save the current audiogram in the directory that was selected using the
Set Save Dir menu item. The filename will be generated automatically from
the works number. This filename takes the first 6 characters of the works
number, or the whole works number if there are 6 or less characters in
the works number. If there are less than 6 characters in the works
number, then the ASRA program will insert ‘0’ characters to make a total
of 6 characters in all cases. The digits ‘00’ are then added to the filename
as 7th and 8th characters, and the directory is examined to see if this 8
character filename already exists. If the filename does already exist, then
the ‘00’ characters are replaced with ‘01’ and the directory is reexamined to see if this 8 character filename already exists. If this filename
again does exist then the final two characters are replaced with ‘02’, ‘03’,
etc. in turn until a filename is found which does not already exist. If no
filename is found with any characters up to ‘99’ then the system invites
you to type a filename yourself.
Print Audiogram (F5)
Print the current audiogram grid on the system printer. This printout will
include passive audiograms which are displayed on the screen, employee
details, and HSE categorisation results.
Castle Group Ltd
Salter Road, Scarborough, North Yorkshire, YO11 3UZ
Tel: +44 (0) 1723 584250, Fax: +44 (0) 1723 583728
Email: [email protected] Internet: http://www.castlegroup.co.uk
12
Print Letter (F8)
Print the file audletr.txt on the system printer. (See later)
Exit (Alt+F4)
Terminate the audiometer program and return to windows.
PASSIVE
Open
Present the normal windows dialogue box to allow selection of drive,
directory, file type and filename. The selected file is then loaded into the
passive area in the program.
Set Passive Directory (Ctrl+S)
Present the normal windows dialogue box to allow the selection of drive
and directory. This drive and directory are subsequently used for the
selection of files which are offered for loading as passive audiograms. It
should be the directory which contains the files which were taken 1 year
ago for the employees which are about to be re-tested.
Find and Open (F10)
A search is made of the Set Passive Directory (i.e. the directory which has
been selected because it has the files taken 1 year ago for the employees
which are about to be re-tested) for files which contain the same works
number as the current audiogram. Up to 10 such files are offered for
loading as passive files. In normal usage, only one such file should be
present in any one directory.
AUTO-TEST
Run (F2)
Run a hearing test on the current employee, following the order of ears
and the list of frequencies, which have been set in the options menu. The
default order is the left ear first, followed by the right ear. The default list
of frequencies if 1kHz, 2kHz, 3kHz, 4kHz, 6kHz, 8kHz, 0.5kHz in that order.
Six of these frequencies (not including 8kHz) are used to calculate and
Health and Safety Executive categories.
Right Ear
Run a hearing test on the current employee on the right ear only.
Left Ear
Run a hearing test on the current employee on the left ear only.
Single Freq (Ctrl+F)
A dialogue box is presented to allow selection of either the left or right ear,
plus one of the 12 frequencies available in the system. When the OK
button is pressed, the program proceeds to a standard hearing threshold
test on the selected ear and frequency.
Castle Group Ltd
Salter Road, Scarborough, North Yorkshire, YO11 3UZ
Tel: +44 (0) 1723 584250, Fax: +44 (0) 1723 583728
Email: [email protected] Internet: http://www.castlegroup.co.uk
13
At the end of the test, the previous threshold on this ear and frequency (if
there is one) is still presented as an X or O, while the new threshold is
presented as a diamond (if these two thresholds are the same then one
may obscure the other). A dialogue box is presented to invite the operator
to accept the new threshold value, or reject it in favour of the previous
value. Whichever is accepted is now plotted as an X or O with appropriate
lines joining it to adjacent thresholds, and the rejected threshold is
deleted.
Talk Right (F7)
Talk to the employee from a microphone to the right earphone. Within this
facility the sound level of the speech can be increased in 5dB steps by
pressing the ‘y’ key or pressing the mouse button when the arrow is on
the Yes button. The sound level of the speech can be decreased in 5dB
steps be pressing the ‘n’ key or pressing the mouse button when the
arrow is on the No button. The ESCAPE key or pressing the mouse button
when the arrow is on the Cancel button, will exit from this facility.
Talk Left
Talk to the employee from a microphone to the left earphone. See the
previous item for a description of the facilities for increasing and
decreasing the sound level and for exiting from this facility.
EDIT
Employee Details (Ctrl+E)
Edit the employee details for the current test.
Fill in all the details -- using the TAB key to move from one entry to the next.
The <ENTER> key terminates this dialogue, so do not press the <ENTER>
key until you have completed all entries. If you make the mistake of
pressing <ENTER> before you have completed the entries then re-enter
the dialogue window as above and complete the employee details.
Auto Details (F4)
For use by advanced users to have the details box filled automatically if the
subject has been tested before. More information is available through the
Help Menu.
Comments (Ctrl+C)
Fill in any comments, which you wish on the current test or the current
employee. The <ENTER> key terminates this dialogue, so do not press the
<ENTER key until you have completed the comments. If you make the
mistake of pressing <ENTER> before you have completed the entries then
re-enter the dialogue window as above and complete your comments.
Delete (DEL)
Delete the current audiogram.
Castle Group Ltd
Salter Road, Scarborough, North Yorkshire, YO11 3UZ
Tel: +44 (0) 1723 584250, Fax: +44 (0) 1723 583728
Email: [email protected] Internet: http://www.castlegroup.co.uk
14
Delete Passive
Delete all passive audiograms, which are presently in the system.
Update Categories
Re-calculate the HSE categorisation and display the new results in the
result box.
Note that this operation is performed automatically at the end of all the
automatic threshold tests, which are described above.
VIEW
Result
Toggle between viewing and not viewing the results box.
Details
Toggle between viewing and not viewing the employee details box.
Current Audiogram
Toggle between viewing and not viewing the current audiogram.
Passive Audiograms (F9)
Toggle between viewing and not viewing the passive audiograms which
have been loaded into the program.
MANUAL
Go Manual (F3)
Enable the manual mode operations, and disable the automatic threshold
test operations Run, Left Ear, Right Ear and Auto (single freq.). Put a test
point indicator on the screen at 60dB, 1kHz on the left ear.
Exit Manual (Ctrl+X)
Remove the test point indicator from the screen and disable all the
operations within manual mode. Enable the automatic threshold test
operations Run, Left Ear, Right Ear and Auto (single freq).
Plot Point (Ctrl+P)
Depending on whether the test point indicator is on the left ear or the
right ear, plot an X or an O at the position of the test point indicator, and
draw joining lines to adjacent thresholds as appropriate.
Incr hl (Down Arrow)
Increase the position of the test point indicator by 5dB.
Decr hl (Up Arrow)
Decrease the position of the test point indicator by 5dB.
Castle Group Ltd
Salter Road, Scarborough, North Yorkshire, YO11 3UZ
Tel: +44 (0) 1723 584250, Fax: +44 (0) 1723 583728
Email: [email protected] Internet: http://www.castlegroup.co.uk
15
Incr freq (Right Arrow)
Increase the position of the test point indicator to the next higher
frequency. If the indicator was on the right ear and the previous frequency
was 12kHz, then move the indicator to 125Hz on the left ear.
Decr freq (Left Arrow)
Decrease the position of the test point indicator to the next lower
frequency. If the indicator was on the left ear and the previous frequency
was 125Hz, then move the indicator to 12kHz on the right ear.
Generate Tone (space)
Present a tone at the hl and frequency of the test point indicator, on the
selected ear. The length of the tone is as set in the options menu. Pulsed
tones may also be selected in the options menu.
OPTIONS
Test Settings
Select to test the left ear followed by the right ear, or the right ear
followed by the left ear. This selection applies when the Run command is
subsequently selected. The default is left ear followed by right ear.
Set the Wait time on the slider. The Wait time is the maximum time the
system will wait for a response timed from the start of the tone. The
default value is 0.8 seconds.
Set the Tone length, which is the time for which the tone is presented. The
default Tone length is 0.5 seconds.
Select the mode where the tone is continuous during the time of the tone
length, or the mode where a sequence of short tone pulses is generated
during the time of the tone length.
Frequencies
Select the list of frequencies, which are to be tested. The system works
through the frequencies in the list, which are selected, in the order in
which they appear in the list. The presently available lists are:1.
1, 2, 3, 4, 6, 8, 0.5 kHz
2.
1, 2, 3, 4, 6, 8, 0.5, 0.25 kHz
3.
1, 1.5, 2, 3, 4, 6, 8, 12, 0.5, 0.25, 0.125 kHz
4.
1, 2, 3 kHz
The HSE categories are calculated on the basis of the frequencies, which
are in list 1 (excluding 8kHz), which is therefore the favoured list to be
used.
Ports
Select the serial (COMM) port which is to be used for communication with
the audiometer.
Castle Group Ltd
Salter Road, Scarborough, North Yorkshire, YO11 3UZ
Tel: +44 (0) 1723 584250, Fax: +44 (0) 1723 583728
Email: [email protected] Internet: http://www.castlegroup.co.uk
16
STANDARD WINDOWS CONVENTIONS
When setting up the directory for automatic saving or the directory for
searching files for passive loading, it will be necessary to use normal
windows conventions to select the required directory. This is done within
the dialogue box which is presented. All the necessary selections, of drive,
and directory may be made using the computer mouse. However if the
operator wishes to use the keyboard then it is important to note that the
Alt key is generally used in all these commands. Thus the box for selecting
the required drive is entered by typing Alt+V, then the up and down arrow
keys allow highlighting of the required drive. Similarly, Alt+D selects the
box within which the directory is selected. If the required directory is not
visible at first, it may be necessary to highlight a parent directory or even
the root directory, then press <ENTER> to show the contents of that
directory and to show its subdirectories. From there you can work down
through the hierarchy of directories to the one you wish to use.
You can set up an icon in the Program Manager, to make it very easy to
run the audiometer program. When in the program manager, select File:
New. Select that you wish to enter a new item, then enter the command
line which will run your program, starting with the drive and working down
the directory structure to your audiometer program name. Also enter the
working directory. The system will look in this directory for the files
audw.ini and cal.cal. You should fill in the other fields in this dialogue box,
but the others are not absolutely essential to the operation of the system.
Press the button to select an icon and search for a suitable one which is
not already in use.
File cal.cal
This file contains calibration constants and constants which limit the
maximum output permitted from the audiometer at each frequency.
These constants must not be changed without expert knowledge and
specialised equipment.
The audiometer must be recalibrated at specified intervals. The date when
this recalibration is due, is given in this file. The file also has a record of the
earphones which were used when the calibration was performed. It is
essential that only these earphones are used when hearing threshold
tests are performed using the audiometer.
If the file cal.cal is not found when the program starts to run, then a
warning is given to the operator. Default calibration constants and
maximum output constants will be loaded by the program, to allow tones
of approximately correct hearing level to be generated. But it is absolutely
essential that no hearing threshold tests be conducted without the
correct calibration file loaded.
Castle Group Ltd
Salter Road, Scarborough, North Yorkshire, YO11 3UZ
Tel: +44 (0) 1723 584250, Fax: +44 (0) 1723 583728
Email: [email protected] Internet: http://www.castlegroup.co.uk
17
Print Letter (F8)
Print the file xxxxxxxx.txt on the system printer. This file can contain certain
codes which allow information about the current employee and the
current audiogram to be included in the printout. The file xxxxxxxx.txt
should be an ASCII text file, such as can be prepared on the windows utility
NOTEPAD. The file must not be a formatted word processor file. It could
be prepared on a word processor, but then must be stored on disk as a
text file. Apart from the special codes noted below, the file is printed “as
is”, with all characters, spaces and new lines transferred directly to the
printer.
When the program detects a back slash character ‘\’ in the file, the
program never prints this character. The program immediately reads the
following character, which is again not printed but is used as a code to
select a string from the audiogram. This string is then printed. The
following sequences are recognised and printed. The strings should have
been entered as ‘employee details’ before the current test or they were
determined from the thresholds obtained in the current test.
\m: the employee’s name;
\w: the employee’s works number;
\b: the employee’s date of birth;
\a: the date of the current audiogram i.e. today’s date if you are printing
immediately following the test;
\c: the H.S.E. categorisation of the audiogram.
The user may edit the file audletr.txt (supplied with the software) to suit
their needs. Particular note should be made of the following points when
editing: When one of the above code sequences is detected, it is replaced by a
string which may be significantly longer than the code itself, and may
result in the line extending beyond the full width of the paper. This is
important in all cases, but is particularly important in the case of the
employee’s name, which can extend to over 20 characters. It is of even
greater importance in the case of H.S.E. categorisations where the insert
may extend to a significant part of a line of output. It is therefore strongly
recommended that the \c code should only be used at or near the
beginning of a line, and should not be followed by further words on the
same line unless the total space required for these words is very small.
Castle Group Ltd
Salter Road, Scarborough, North Yorkshire, YO11 3UZ
Tel: +44 (0) 1723 584250, Fax: +44 (0) 1723 583728
Email: [email protected] Internet: http://www.castlegroup.co.uk
18
ERROR MESSAGES & PROBLEM SOLVING
In the event of a problem arising when running the Excalibur a dialog box
will show on the screen in which advice on the problem will appear.
The most commonly encountered messages are:ERROR MESSAGE
SERIAL PORT FAILURE
REASON
a) Serial lead is disconnected.
b) The COM port specified in either options/ports or
in AUDW32.INI is not a valid port, or has already
had a mouse driver loaded on it.
c) A double click on the RUN button has caused a
crash.
Screen correct, Sound output incorrect
If the unit appears to work but does not change frequency or intensity in
the earphones (screen might look OK) then the serial cable may be in an
active COM port but not the one specified in options/ports.
If again screen function looks OK but tones are not correct check that the
parallel port is a standard bi-directional port and not an extended
capability port. If this is the wrong type software reconfiguration is
normally possible within your computer.
Printout appears with very small text
The print driver for some HP laser units does not respond correctly to the
ASRA software. One solution is to use the HP laserjet or laserjet plus
driver supplied with Windows or alternatively alter the resolution of the
printer to 300 DPI. This can be done by entering the SETTINGS and
PRINTER area in Windows.
Castle Group Ltd
Salter Road, Scarborough, North Yorkshire, YO11 3UZ
Tel: +44 (0) 1723 584250, Fax: +44 (0) 1723 583728
Email: [email protected] Internet: http://www.castlegroup.co.uk
19
MAINTENANCE
Advice on routine maintenance is included in the H&SE document MS26.
In essence someone who is familiar with the equipment should make a
daily check on levels on both ears. This is most easily done entering semiautomatic mode and doing a test on selected frequencies on each ear.
The results obtained can be saved for future reference and comparison.
It is recommended that an on site check using traceable calibration
equipment to measure output levels is carried out as part of a minimum
maintenance program. A full laboratory calibration is the preferred
method and should certainly be performed at least every 2 years to
coincide with HSE guidance.
CAUTIONS
The Castle GA1001 Excalibur is a medical instrument, which is classified
as a Class 1 Type B device. The rating label on the instrument shows the
symbol, which denotes this type of unit.
A Class 1 Type B device categorisation is used to describe an instrument
which:a) Does not rely on basic insulation only to provide protection against
electrical shock but is constructed in such a way that accessible metal
parts cannot become live in the event of failure of the basic insulation and
b) Applied parts offer protection to the subject against electrical shock
and in the event of a single fault condition arising, leakage current will be
limited to less than 0.5mA.
Any incident which results in actual or potential injury or death to a subject
while using the Excalibur should be immediately communicated to Castle
Group Limited at the address below.
The Excalibur should not be used in the presence of flammable agents.
Castle Group Ltd
Salter Road, Scarborough, North Yorkshire, YO11 3UZ
Tel: +44 (0) 1723 584250, Fax: +44 (0) 1723 583728
Email: [email protected] Internet: http://www.castlegroup.co.uk
20
The Excalibur should only be connected to other devices such as
computers or printers, which comply with EN 60950. Unless computers
and printers built to EN60950 are used patient safety might be
compromised.
Non medical equipment such as computers or printers should be kept out
of reach of subjects being tested as such equipment does not comply with
medical safety standards.
The Excalibur should not be used in an area where electromagnetic
interference may be encountered as this may affect the accuracy of the
test by introducing unwanted noise in the earphones. Sources of such
interference include mobile phones, radio transmitters etc.
CLEANING
The earphones and response handset can be cleaned with an alcohol wipe
or a soft damp cloth and soap solution. They must not be immersed or
doused in a liquid as liquid ingress could compromise safety and
performance.
STORAGE
The Excalibur and its accessories should be stored within the following
temperature and humidity range:Temperature
Humidity
-40C to +60C
20 to 80% RH non condensing
Castle Group Ltd
Salter Road, Scarborough, North Yorkshire, YO11 3UZ
Tel: +44 (0) 1723 584250, Fax: +44 (0) 1723 583728
Email: [email protected] Internet: http://www.castlegroup.co.uk
21
TECHNICAL INFORMATION
SPECIFICATION
Mains supply voltage
Power
Frequencies tested
Frequency accuracy
Harmonic distortion
Hearing level range
Hearing level accuracy
Linearity
Step size
Transducers
Standards
110 to 240 volts 50/60 HZ
10 watts
Select from
125, 250, 500, 750 Hz
1, 1.5, 2, 3, 4, 6, 8, 12 kHz
Better than ±0.1%
Less than 1%
-20dB to + 120dB
±1dB
±1%
5dB
TDH39 with MOD51 cushion
Audiometry
BS EN 60645-1:2001
Electrical
BS EN 60601-1-1:2001
Assessment
H&SE 2005 Document
EMC
BS EN 60601-1-2:2002
CE
Marked - Class 2A
Safety
Size
Warm up time
Operating temp range
Operating humidity range
Audiometer type
Duty cycle
Automatic limitation of SPL
27 x 5 x 30 cm
10 minutes
+15.0 to +35.0°C
30% to 90%
Type 4
Continuous
Circuit diagrams are available on request but servicing and calibration can only be
performed by Castle Group Limited approved and authorised persons.
Castle Group Ltd
Salter Road, Scarborough, North Yorkshire, YO11 3UZ
Tel: +44 (0) 1723 584250, Fax: +44 (0) 1723 583728
Email: [email protected] Internet: http://www.castlegroup.co.uk
22