1
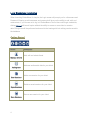
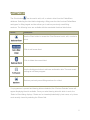
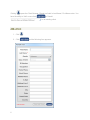
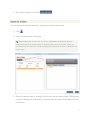
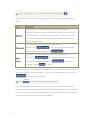
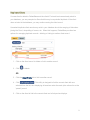
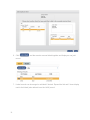
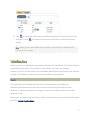
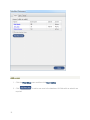
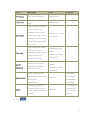
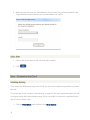
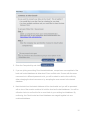
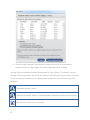
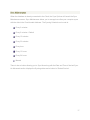
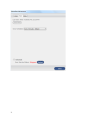
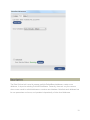
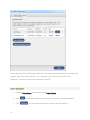
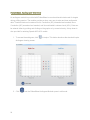
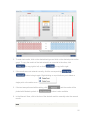
User’s Manual i Table of Contents PatientBase Overview ................................................................................................................ 3 Local Standalone Installation ..................................................................................................... 4 Getting Started ........................................................................................................................... 4 Manage Clients .......................................................................................................................... 5 PatientBase Menu.....................................................................................................................11 Users .................................................................................................................................11 Sync - Connect to the Cloud ..............................................................................................14 Data Options ......................................................................................................................19 Sync Now...........................................................................................................................22 Change Password..............................................................................................................22 Web Administration ............................................................................................................23 Help ...................................................................................................................................23 PatientBase Audiogram Overview .........................................................................................24 ii PatientBase Overview PatientBase is a client database designed to provide Inspire users a free, intuitive interface in which to store and retrieve patient data and fitting information. PatientBase is integrated into Inspire so that the user does not need to exit Inspire to add or select a different patient or audiogram. Data is stored in a local database that, if desired, can be synced to a database hosted in the Cloud. PatientBase is a replacement for the ProHear32 or ProHear.NET launcher. Data can be imported directly to PatientBase from a ProHear32 database. Data from a ProHear.NET database requires assistance from our conversion team. 3 Local Standalone Installation When launching PatientBase for Inspire, the Login screen will prompt you for a Username and Password. Entering a valid username and password will give you the ability to add, edit, and retrieve data. If you choose not to log in to PatientBase or do not have valid login credentials, clicking Cancel will launch Inspire without the ability to access or save client or session data. Fittings can still be performed and saved to the hearing aids but nothing can be saved to the database. Getting Started Button Manage Clients Audiograms New Sessions Open Sessions Save Sessions 4 Description Add, edit and select clients. Add new audiometric data for your client. Add a new session for your client. Retrieve saved sessions for your client. Save a new session for your client. Manage Clients The Client button can be used to add, edit, or select a client from the PatientBase database. Selecting the client before beginning a fitting uses the client’s stored PatientBase audiogram for fitting targets and also allows you to retrieve previously saved fitting sessions. The following icons are available with the associated functions listed below: Button Description Use the Client button to access the Client Browser to add, edit, or select a Select a Client Add a New client. Click to add a new client. Client Delete a Client Click to delete the current client. Use the Audiogram button to add new audiometric data. The most recent Audiogram Sessions audiogram will always appear. Retrieve previously saved fitting sessions for a client. If a programmer is present and hearing aids are detected, the 'Devices Detected' screen will appear displaying the aids available. Once you select hearing aids with which to work, the 'Select a Client dialog displays. Clients can be viewed alphabetically by last name, or by those most recently viewed by selecting the 'Recent' tab. 5 Clicking opens the Client Browser. Clients are listed in Last Name / First Name order. You have the ability to 'Add' a new client or 'Search' for an existing client. Add a Client 1. Click 2. Click 6 . and the following form appears: 3. Enter client information and click . Search for a Client You can also use the Search function by beginning to enter the client name. 1. Click . 2. Enter the client's name or birthdate. Tip: When entering the client's name, as you type, PatientBase automatically begins to narrow the search to the selected group of clients as shown in the form below. Typing ‘sm’ into the search field, returned 4 records containing that combination of letters in either the First or Last name. 3. Select the desired client by clicking on the record in the left viewing panel. The right side of the form displays the client details. The client name and date of birth display at the top of the panel. 7 Tip: There is also a trash can icon available to delete the selected record . 4. The table below describes the tabs displaying the client sessions, comments, and profile. Tab Description Sessions consist of saved Fitting, Ordering, and Audiogram actions. The Sessions tab is updated when sessions from Inspire are Sessions saved. Click the or double click on the session date to expand the tree. Each session is a link and can be accessed by clicking on the desired session to view. The Comments form is where comments may be Comments entered. Click to add comment information. When finished editing the comment, click . The Client Profile tab contains the contact information for the to open the Add/Edit Client form. Edit Client client. Click Profile the information as desired and click changes, or click to save the to discard. 5. There are 2 ways to select a client for use with Inspire. You can either double-click on the client’s record in the viewing panel, or click once to highlight the record and click at the bottom of the panel. Tip: Click to leave the form without selecting a client. 6. If you wish to open a saved session, click once on the client, then on the Sessions panel, click on the session you wish to retrieve. The retrieved fitting session is launched in Inspire. For an Audiogram session, clicking on the session launches the Audiogram Viewer, which is used to view historical audiograms. 8 Duplicate Clients If a new client is added to PatientBase and the client’s First and Last name already exists in your database, you are prompted on Save that this may be a potential duplicate. If the client does not exist in the database, you may continue saving the client record. Unwanted duplicate client records may exist in your database due to the merging of data when joining the Cloud, misspelling of names, etc. When this happens, PatientBase provides two options for managing duplicate records: deleting or linking to another client record. 1. Click on the client record to delete or link to another record. 2. Click to delete. OR 3. Click the Client Profile tab to link to another record. 4. Click . This utility is designed to link the current client with one selected from the list, thus displaying all sessions under the main (also referred to as the 'parent') record. 5. Click on the client to link to the current client and a link preview displays. 9 6. Click and the records are now linked together and display as one joint record. 7. Linked records can be merged or unlinked if desired. Expand the link and 2 icons display next to the linked (also referred to as the 'child') record. 10 8. Click to merge the child's record sessions with the parent record and remove the duplicate, or click to unlink the records and revert back to 2 individual records if desired. Note: Merging client records deletes the child record once the merge is complete and this process cannot be undone. PatientBase Menu All user functions for PatientBase are located in the Menu for PatientBase. The following options are available: User Options, Sync Options, Data Options, Sync Now, and Change Password. The first 3 options launch the PatientBase Maintenance Utility screen, each with their own tab. The remaining 2 options are functions that will be discussed later. Users The Users tab is only available to those users with Administrative rights within the database. Administrators have the ability to add and edit user records within the local database. If Syncing is enabled, the changes to users will be updated in the Cloud-hosted database as well. Active users are listed on the User tab by default. Inactive users may be included by clicking the check box Include Inactive Users. 11 Add a User 1. Click the PatientBase menu and then click User Options. 2. Click required. 12 to add a new user to the database. All fields with an asterisk are Field Description Type Required First Name Enter user’s first name. Alphanumeric Alphanumeric Enter the user’s last Last Name name. Enter a unique user name for the employee. A suggestion is to use the user's initials (e.g., JD) or User Name the initial of the first name Alphanumeric - Case neutral field. followed by the last name (e.g., jdoe). Enter a password. When adding a new user or resetting a password, the Password system requires a 6 character password. Re-enter the password Confirm identically as entered in Password the Password field Alphanumeric and Special Characters. Spaces not allowed. Alphanumeric and Special Characters. Spaces Administrator. (Initial user defaults to an Conditional At least one Administrator is required. The Active flag can be Conditional - record. New users default to Active. 3. Click Check Box Administrator.) changed when editing a Active not allowed. Check if the user is an Administrator Check Box At least one user must be Active. . 13 4. When the new user logs into PatientBase for the first time, they will be prompted for the Target Audience and Locale they use for PatientBase and Inspire. Edit a User 1. Click on the user's name to edit. All fields can be edited. 2. Click . Sync - Connect to the Cloud Initiating Syncing If you would like database syncing to the Cloud, the Sync tab provides an opportunity to perform this task. To connect the Cloud, a unique ‘Computer Key’ is required. This key is generated when you add a computer on the Web Administration page. A link is provided for users with a qualified login to their Pro site to obtain a key. 1. Click the PatientBase menu and then click Sync Options. 14 2. Enter the Computer Key and click . 3. If you are joining an existing Cloud-hosted database, comparisons are completed of the local and hosted databases to determine if User conflicts exist. If users with the same user name but a different password exist, you will be asked to resolve the conflict by either changing the local user name or by accepting the user account in the hosted database. 4. Next the data from the hosted database will be downloaded and you will be presented with a view of the records contained in both the local and hosted databases. You will be offered a choice to confirm this list or revert back to your existing local database. By confirming, the Cloud-hosted and local databases are merged together into one combined database. 15 5. Once the data is merged, PatientBase for Inspire will need to be closed and relaunched! When you log in again, the new merged data will be available. Syncing will be performed periodically as scheduled in Sync Options. (The default is every 5 minutes.) When connected to the Cloud, the client icon will display the syncing status. Hovering on the icon gives you details on your syncing status as well as a link to initiate a sync of the database. Scheduled syncing is active. Syncing is not active. Either no Internet access or schedule syncing is set to manual. Syncing failed. Service is not available. 16 Sync Maintenance When the database is already connected to the Cloud, the Sync Options will launch the Sync Maintenance screen. Sync Maintenance allows you to manage how often your computer syncs with the data in the Cloud-hosted database. The Syncing Schedule can be set at: Every 2 minutes Every 5 minutes - Default Every 15 minutes Every 30 minutes Every hour Every 12 hours Every 24 hours Manual There is also a button allowing you to Sync Now along with the Date and Time of the last Sync. An Advanced section displays the Syncing status and a button to ‘Restart Service’. 17 18 Data Options The Data Options tab is used to manage multiple PatientBase databases, create a new database, or import an existing ProHear32 database. Generally, there are very few reasons when a user needs to switch databases or create a new database. Note that each database has its own parameters and users, and operates independently of other local databases. 19 Each database listed in the Manage Data table will display the database name, the date it was created, when it was last modified, if it is connected to the Cloud, and the size of the database. The status of the current database is 'IN USE'. Use a Database 1. Click the PatientBase menu and then click Data Options. 2. Click 3. Click 20 to select the database for use and a confirmation message displays. and a message that Inspire must be restarted displays. Tip: Click 4. Click to cancel using the selected database and return to Data Options. to close Inspire. 5. Re-launch PatientBase and the selected database is changed to 'IN USE'. Add a Database 1. Click to create a new database. 2. Enter the Database name. 3. Click and a message that the new database has been created displays. 4. Click and a message that Inspire must be restarted displays. 5. Click to close Inspire. 6. Re-launch PatientBase to begin using this new database. Note: Once you select to use a new database, there is no way to reverse the process without logging into the selected database and then re-selecting the original database. Import ProHear32 Data As mentioned earlier, PatientBase is a replacement for the ProHear32 launcher. If you did not import ProHear32 data earlier, it can be done at any time by clicking . If data is imported, Inspire will need to be closed and re-launched in order to complete the task. See Import ProHear32 Data for instructions. 21 Sync Now If PatientBase is joined to the Cloud, the syncing schedule is set on the Sync tab in PatientBase Maintenance. Depending on the setting in the schedule, you may want to periodically invoke a database sync to synchronize the local database with the hosted database. 1. Click the PatientBase menu and then click Sync Now. OR 2. Click the PatientBase menu and then click Sync Options. 3. Click . OR 4. Click in the button. Change Password You can change a password from multiple places in PatientBase. All users can change a password from links on the login screen, or in the menu PatientBase>Change Password. Administrators can also change a password from the Users tab in PatientBase Maintenance. 1. Click the PatientBase menu and then click Change Password. All fields are required. 22 2. Click . Web Administration Web Administration launches the PatientBase Web Administration webpage to manage your PatientBase account. To log in, you will need a qualified Pro site Login to access PatientBase Web Administration. Help Documents like this one provide detailed information on the functionality of PatientBase. 23 PatientBase Audiogram Overview An audiogram module is provided with PatientBase to record audiometric data used for targets during a fitting session. The module provides a clear, easy way to enter and view audiometric data. Threshold data can be entered for Air Conduction (AC) unmasked and masked, Bone Conduction (BC) unmasked and masked, and Uncomfortable Loudness Level (UCL). Data can be entered either by pointing and clicking on the graphs or by numerical entry. A drop down is also provided for entering Speech MCL/UCL results. 1. To access the audiogram, click in Inspire. This button launches the standard Inspire Audiogram viewing screen. 2. Click 24 and the PatientBase Audiogram Module opens in edit mode. 3. To enter test results, click on the desired test type and click on the desired points on the graph. To copy the results of the test entered from one side to the other, click to copy right to left, or click to copy left to right. 4. If the results were not entered correctly, click the corresponding or button to begin again. Right-clicking on a point allows you to delete a single point or the entire curve 5. If the test was performed with masking, click plotted with Masked symbols. A . and the results will be button is also available. 6. In the Numeric View, click in the box of the desired result to manually enter the numeric results. Note: As test results can only be displayed on the graph at 5 dB intervals, numeric results are 25 rounded to the nearest 5 dB. 7. To enter a ‘Masked’ response, enter the decibel level in the box and then click out of the box. Click back in the box, press the letter ‘m’ and an ‘M’ appears signifying Masked . To enter a ‘No Response’ result, enter the decibel level tested in the box and then click out of the box. Click back in the box, press the letter ‘n’ and an ‘NR’ appears signifying No Response . 8. A drop down is provided for Speech Testing. To enter results, click in the box desired and enter the results. 9. Click to save the audiogram. Audiograms are always saved as a new audiogram. Note: Clicking ‘Save as New’ saves an entry in the Sessions tab of the Client listed under the current date. The user name of the person that entered the audiogram along with a date stamp are listed in the session 10. Click to print the audiogram. Tip: Edit the audiogram header in the Report Preferences in Inspire. 26 . 11. The Audiogram prints your Report Header and the Client's Name, Birthdate, and Date of Test. A field for the Tester's name is available to be handwritten. 27