1
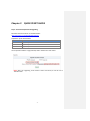
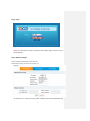
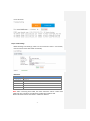
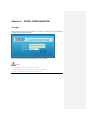
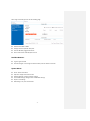
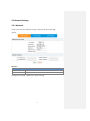
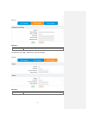
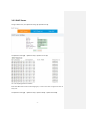
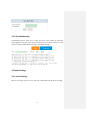
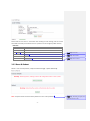
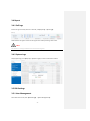
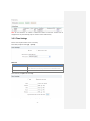
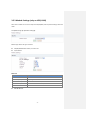
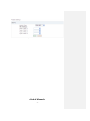
-1- Contents Chapter 1 BRIEF INTRODUCTION ................................................................................................... 3 Chapter 2 QUICK START GUIDE ...................................................................................................... 4 Chapter 3 DETAIL CONFIGURATION ............................................................................................... 7 3.1 Login .................................................................................................................................... 7 3.2 Network Settings ................................................................................................................. 9 3.2.1 Network.................................................................................................................... 9 3.2.2 DHCP Server ........................................................................................................... 11 3.2.3 Troubleshooting ..................................................................................................... 12 3.3 Node Settings .................................................................................................................... 12 3.3.1 Local Settings.......................................................................................................... 12 3.3.2 Reset & Reboot ...................................................................................................... 13 3.4 Report................................................................................................................................ 14 3.4.1 Call Logs.................................................................................................................. 14 3.4.2 System Logs ............................................................................................................ 14 3.5 PBX Settings....................................................................................................................... 14 3.5.1 User Management.................................................................................................. 14 3.5.2 Time Settings .......................................................................................................... 15 3.5.3 Module Settings (only on U50/U100) .................................................................... 16 -2- Chapter 1 BRIEF INTRODUCTION Explanation CTMC: Cloud Telephony Management Center CTN: Cloud Telephony Node CooVox: IP PBX Series developed by ZYCOO, including U20, U50, U60 and U100. CTN is Cloud Telephony Note expanded based on ZYCOO CooVox IP PBX Series, applicable to CTMC management and operation remotely and centrally. For now, the upgrade is available for U20, U50 & U100. U60 will be subsequently supported in next version. -3- Chapter 2 QUICK START GUIDE Step 1: Firmware Preparation & Upgrading Download the CTN firmware on ZYCOO website: http://www.zycoo.com/html/Download.html Unpack the zip file downloaded: Model Firmware File CooVoxU20 E.g.:uImage-md5.u20.node.v1.0 CooVoxU50 E.g.:uImage-md5.u50.node.v1.0 CooVoxU100 E.g.:uImage-md5.u100.node.v1.0 Use respective firmware to upgrade U20, U50 or U100 to the node mode. Note: After the upgrading, clear browser cache and reboot, IP will be set as 192.168.1.100. -4- Step 2: Login Default Username & Password: admin/admin Note: once the mode is chosen, the option won’t appear again, unless it’s set to factory default. Step 3: Network Settings Please configure IPv4 Settings for quick start here; Detail network settings can be found in Chapter 3.2. To make sure it is connected to the public network, please click Troubleshooting -5- to test as below: Step 4: Local Settings Make following Local Settings, make sure the connection status is “Connected”, then the CTN connects with CTMC successfully. Reference: Item Enable Server IP Server Contact Address Device Name Explanation Enable CTN CTMC IP Default 8505, CTMC access port Contact of device Address of device Device name Note: After connecting with CTMC, the CTN’s extensions will be created from CTMC and other operations to CTN will be handled from CTMC as well. Detail information will be introduced in CTMC User Manual. -6- Chapter 3 DETAIL CONFIGURATION 3.1 Login After connected the system to local network, run a browser on a local PC. Enter the IP (default IP of WAN is http://192.168.1.100:9999: Enter Username & Password (default admin/admin) , then【Login】 Note 1) Please use IE (V7.0 or higher), or Firefox browser 2) Always make sure the PC is in a same IP segment as the system 3) After one minute’s idleness, the system will time-out -7- When login succeeded, you will see the following page: Network: IP & MAC of WAN Storage: Disk total space & used space Slot Info: Module plugged information Device Info: Device model & system version Resident Buttons: Logout: logout the GUI Activate Changes: once configure made and saved, click this button to activate System Menu: Home: Device information Operator: display extensions & trunks Network Settings: configure network settings Cloud Node Settings: configure basic CTN & CTMC settings Report: record & logs PBX Settings: user, time and modules -8- 3.2 Network Settings 3.2.1 Network Configure IP of WAN, click【Network Settings】->【Network】->【IPv4 Settings】: Reference: Item IP Assign Virtual Interface Explanation Static, DHCP, or PPPoE Assign virtual interface for WAN Click【Network Settings】->【Network】->【IPv6 Settings】: -9- Reference: Item Enable Explanation Enable IPv6, and assign IPv6 address, gateway or DNS server Click【Network Settings】->【Network】->【VLAN Settings】: Reference: Item Enable Explanation Enable VLAN, and assign VLAN address & ID - 10 - 3.2.2 DHCP Server Configure DHCP server, click【Network Settings】->【DHCP Server】: Click【Network Settings】->【DHCP Server】->【DHCP Client List】: This is for displaying DHCP client details. Bind node’s MAC with IP when DHCP assigning IPs, to ensure the node is assigned the same IP every time. Click【Network Settings】->【DHCP Server】->【Static MAC】->【New Static MAC】: - 11 - 3.2.3 Troubleshooting Troubleshooting section allows you to confirm the status of the network by performing simple diagnostics including, ping to other network devices or Traceroute command to trace network routings, click【Network Settings】->【Troubleshooting】: 3.3 Node Settings 3.3.1 Local Settings Make the local settings of CTN to connect with CTMC, click【Node Settings】->【Local Settings】 : - 12 - Please make the sure status is “Connected”. After finishing the local settings, CTN will connect with CTMC successfully. And CTN extensions or operations can be managed by CTMC remotely. Reference: Item Enable Server IP Server Contact Address Device Name Explanation Enable CTN CTMC IP Address Default 8505, CTMC access port Contact of device Address of device Device name 批注 [lf1]: Server Port 批注 [lf2]: Administrator 批注 [lf3]: Name of device 3.3.2 Reset & Reboot Reboot or reset to factory default, click【Cloud Node Settings】->【Reset & Reboot】: Note: The system will be resumed to factory default once click “Factory defaults”. 批注 [lf4]: ; Rebooting the system will terminate all active calls! - 13 - 3.4 Report 3.4.1 Call Logs Search call logs of node by caller ID or callee ID, click【Report】->【Call Logs】: CTMC reserves the right to search the call logs of each node by searching node’s name. Note: Call duration in call logs is different from the actual billing time. 3.4.2 System Logs Display system logs, click【Report】->【System Logs】. It’s able to download or delete. 3.5 PBX Settings 3.5.1 User Management Check extensions of CTN, Click【PBX Settings】->【User Management】: - 14 - Note: All the extensions are created or edited from CTMC. The extension numbers will be displayed here only automatically; they are unable to edit or delete actually. 3.5.2 Time Settings Set the time of system via NTP server or manually. Select NTP, click【Time Settings】->【NTP】: Reference: Item Explanation NTP Server Specify an NTP server, that could be IP or domain, remote or local. Default is pool.ntp.org. Please ensure a valid NTP server Time Zone Select a time zone in drop-down list Select manual, click【Manual Time Set】: Enter each blank, save and activate, or click 【Sync】to synchronize with your PC. - 15 - 3.5.3 Module Settings (only on U50/U100) When other modules are in service except for FXO/FXS/GSM, some respective settings need to be made. Click【PBX Settings】->【Module Settings】: Module Type: Select the type of module FXS/FXO/GSM Module: default, no need to set E1/T1 Module Reference: Item Mode E1 or T1 mode Signaling Signaling of module Framing “D4” or “ESF” on T1 mode, “CAS” or “CCS” on E1 mode Coding “AMI” or “B8ZS” on T1 mode, “AMI” or “HDB3” on E1 mode CRC4 Explanation Enable CRC4 verification ISDN BRI Module - 16 - Choose NT or TE mode on each port <End of Manual> - 17 -