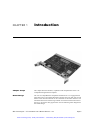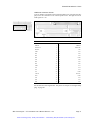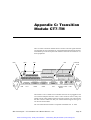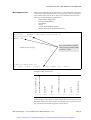
1
Artisan Technology Group is your source for quality
new and certified-used/pre-owned equipment
• FAST SHIPPING AND
DELIVERY
• TENS OF THOUSANDS OF
IN-STOCK ITEMS
• EQUIPMENT DEMOS
• HUNDREDS OF
MANUFACTURERS
SUPPORTED
• LEASING/MONTHLY
RENTALS
• ITAR CERTIFIED
SECURE ASSET SOLUTIONS
SERVICE CENTER REPAIRS
Experienced engineers and technicians on staff
at our full-service, in-house repair center
WE BUY USED EQUIPMENT
Sell your excess, underutilized, and idle used equipment
We also offer credit for buy-backs and trade-ins
www.artisantg.com/WeBuyEquipment
InstraView REMOTE INSPECTION
LOOKING FOR MORE INFORMATION?
Visit us on the web at www.artisantg.com for more
information on price quotations, drivers, technical
specifications, manuals, and documentation
SM
Remotely inspect equipment before purchasing with
our interactive website at www.instraview.com
Contact us: (888) 88-SOURCE | [email protected] | www.artisantg.com
CT7
Pentium PC/AT Compatible 6U CompactPCI®
Single Board Computer with HotSwap
Hardware User’s Manual
Revision 1.3.2
Artisan Technology Group - Quality Instrumentation ... Guaranteed | (888) 88-SOURCE | www.artisantg.com
Copyright (c) 2002, 2004 SBS Technologies. All rights reserved.
CT7 Hardware User’s Manual
This manual applies to the CT7 Pentium PC/AT Compatible 6U CompactPCI® Single Board Computer with HotSwap
revision 1.0 and above, until superseded.
Revision
Date
1.0
1.0
1.1
1.2
1.3
1.3.2
05-05-2000
20-03-2001
20-10-2001
09-04-2002
04-06-2003
08-01-2004
Chapter
Comments
7
Initial release.
Second release. All chapters revised.
Draft edition with extensive layout changes.
Third release (final). All chapters revised.
Updated U.S. Branch Address.
Updated Placement Plan Drawings
All information contained in this document has been carefully checked and is believed to be entirely reliable and consistent with
the product that it describes. However, no responsibility is assumed for inaccuracies. SBS Technologies assumes no liability due
to the application or use of any product or circuit described herein; no liability is accepted concerning the use of SBS Technologies
products in life support systems. SBS Technologies reserves the right to make changes to any product and product documentation
in an effort to improve performance, reliability, or design. Software described herein is provided on an “as is” basis without warranty. SBS Technologies assumes no liability for incidental or consequential damages arising from the use of this software. This
disclaimer of warranty extends to SBS Technologies licencees, to licensees transfers, and to licencees customers or users and is
in lieu of all warranties expressed, implied, or statutory, included implied warranties of saleability or fitness for a particular purpose.
The information contained in this document is of a proprietary nature and is not to be reproduced without the express prior written
consent of SBS Technologies.
SBS is a trademark of SBS Technologies, Inc. CompactPCI is a registered trademark of PCI Industrial Computer Manufacturers
Group (PICMG). Intel, the Intel logo, Celeron, i386, i486, Intel386, Intel486, Intel Inside, the Intel Inside logo, MMX, the MMX logo,
OverDrive, Pentium, Pentium II Xeon, and Pentium III Xeon are trademarks or registered trademarks of Intel Corporation or its
subsidiaries in the United States and other countries. AMD and K-6 are registered trademarks of Advanced Micro Devices, Inc.
IBM, PC/XT, PC/AT, and AT are trademarks or registered trademarks of IBM Corporation in the United States and other countries.
AMIBIOS is a trademark of American Megatrends, Inc. DOS, Windows, Windows 95, and Windows NT are trademarks or registered trademarks of Microsoft Corporation in the United States and/or other countries. QNX is a registered trademark of QNX Software Systems Ltd. Tundra and Universe are trademarks of Tundra Semiconductor Corporation. VxWorks and Tornado are
registered trademarks of Wind River Systems, Inc.
Document Revision: 1.3.2
Release Date: January 2004
SBS Technologies GmbH & Co. KG
Memminger Strasse 14
86159 Augsburg
Germany
Phone +49 (821) 5034-0
Fax +49 (821) 5034-119
E-Mail [email protected]
SBS Technologies, Inc.
2400 Louisiana Blvd. NE, Suite 5-600
Albuquerque, NM 87110
U.S.A.
Phone (505) 875-0600
Fax (505) 875-0400
E-Mail [email protected]
SBS Technologies on the Web: http://www.sbs.com
Artisan Technology Group - Quality Instrumentation ... Guaranteed | (888) 88-SOURCE | www.artisantg.com
Welcome
The CT7 CompactPCI Single Board Computer is a fully IBM-AT compatible
stand-alone PC equipped with numerous functions and add-on features on a
minimized board size. This technical manual is designed to provide information regarding the general use and application of the CT7 CompactPCI Single
Board Computer, as well as detail the hardware design. Software methods and
programming information are also provided.
Chapter 1 of his manual gives a brief overview over the functions, features and
devices of the CT7. Chapter 2 and 3 illustrate unpacking and installation procedures. Chapter 4 describes all onboard and panel interfaces with pin assignments. Chapter 5 contains notes on system resources, chapter 6 lists details of
software interfaces. Electrical and environmental specifications can be found
in chapter 7.
A number of expansion and add-on products is available for the CT7. The ET7
extension module, the CTM10 and CT7-TM transition modules are described
in appendices to this manual.
Please observe all safety instructions when handling SBS products as given in
the unpacking and installation chapters.
The following documents also cover items relevant to the CT7 CompactPCI
Single Board Computer. Both documents are included as files on the distribution CD-ROM.
Q
Q
AMI-BIOS for CT7 User’s and Programmer’s Manual
IPMI Board Management Support Hardware / Software Manual
SBS Technologies — CT7 Hardware User’s Manual Revision 1.3.2
Artisan Technology Group - Quality Instrumentation ... Guaranteed | (888) 88-SOURCE | www.artisantg.com
Page 3
Typographic
Conventions
The following conventions are used throughout this manual:
—
—
—
Support, Service,
and Warranty
The use of an “H” suffix before a number indicates hexadecimal (base
sixteen) notation.
The use of a “\” (backslash) suffix to a signal indicates an active low
signal. The signal is either true when it is a logic zero level or the
signal initiates actions on a high-to-low transition.
Text in Courier font indicates a command entry or output from a
SBS embedded PC product using the built-in character set.
The manufacturer grants the original purchaser of SBS products a warranty of
24 months from the date of delivery. For details regarding this warranty refer
to Terms & Conditions of the initial sale.
Please see chapter “Support, Service, and Warranty Information” on page 91
for further details on repairs and product support.
For support on the web and product information, visit our website at
http://www.sbs.com
Contact Information
Europe
USA & World
SBS Technologies GmbH & Co. KG
Memminger Strasse 14
86159 Augsburg
Germany
SBS Technologies, Inc.
2400 Lousiana Blvd. NE, Suite 5-600
Albuquerque, NM 87110, U.S.A.
U.S.A.
Sales
Phone +49 (821) 5034-0
Fax +49 (821) 5034-119
E-Mail [email protected]
Phone (505) 875-0600
Fax (505) 875-0400
E-Mail [email protected]
Technical Support
Phone +49 (821) 5034-170
Fax +49 (821) 5034-119
E-Mail [email protected]
Phone (505) 875-0600
Fax (505) 875-0400
E-Mail [email protected]
SBS Technologies — CT7 Hardware User’s Manual Revision 1.3.2
Artisan Technology Group - Quality Instrumentation ... Guaranteed | (888) 88-SOURCE | www.artisantg.com
Page 4
Contents
Chapter 1
Introduction
9
Board Design
9
Design Features
Chapter 2
Chapter 3
Chapter 4
Unpacking and Inspection
11
14
ESD
14
Unpacking and Handling
15
Initial Inspection
15
Available Options and Accessories
16
Installation
17
Advisories
17
Minimum System Requirements
18
Installation
19
Initial Power-On Operation
20
Entering the BIOS SETUP
21
Interfaces
22
IO-Diagram
23
Front Panel Interfaces
23
SBS Technologies — CT7 Hardware User’s Manual Revision 1.3.2
Artisan Technology Group - Quality Instrumentation ... Guaranteed | (888) 88-SOURCE | www.artisantg.com
Page 5
Chapter 5
Chapter 6
CT7 Connectors
24
CPCI connector reference
24
CompactPCI bus Connector P7201 and P7202
25
I/O Connector P7203, P7204, and P7205
26
IDE Connector P1800
28
Keyboard and PS/2 Mouse Interface P2000
29
Ethernet Interface 10BaseT and 100BaseTX P5100 and P5700
29
Serial Port COM1 P2200
30
VGA Interface P2400
30
USB Interfaces P1700
31
PMC Connectors P7001, P7002, and P7003
32
PMC-I/O Connector P7004
32
Resources
33
Memory Map
33
Register Set
34
Standard Register Set
34
Plug and Play Devices
34
Interrupts
35
Function Blocks
36
Standard AT Devices
36
DMA Controller
36
Interrupt Controller
36
Timer
36
Real Time Clock
37
Keyboard and Mouse Controller
37
EIDE/ATAPI Interface
37
Serial Interfaces
38
Parallel Interfaces
38
Floppy Controller
38
Graphics Controller
38
SCSI Interface
41
PMC Interface
43
IPMI
43
SBS Technologies — CT7 Hardware User’s Manual Revision 1.3.2
Artisan Technology Group - Quality Instrumentation ... Guaranteed | (888) 88-SOURCE | www.artisantg.com
Page 6
Chapter 7
Appendix A:
Appendix B:
Ethernet Interface
44
Additional devices
44
Specifications
48
Dimensions
48
Power Consumption
48
Environment Conditions
49
Electrical Characteristics
51
Placement Plan
52
Extension Board ET7
56
ET7 Connectors
57
CPCI connector reference
57
CompactPCI P301 and P302
58
I/O Connector P303 and P305
59
PMC Connectors P201, P202, P203, P211, P212, and P213
60
PMC-I/O connector (P204, P214)
60
Assembly ET7 to CT7
61
Placement Plan
62
Transition Module CTM10
64
CTM10 Interfaces
65
IDE Connector P1800
65
Ethernet Interface 10BaseT and 100BaseTX P5100 and P5700
66
Parallel Interface LPT1 P2002
67
Serial Interfaces COM1 P2200 and COM2 P2201
68
VGA Interface P4300
69
Floppy connector P2003/2004
70
LCD/Panel connector P4100
71
Ultra Wide SCSI connector P6001
72
SCSI connector P6000
73
PMC-I/O connector P7400
73
Misc. connector P2000
74
Placement Plan
75
Mechanical Data
75
SBS Technologies — CT7 Hardware User’s Manual Revision 1.3.2
Artisan Technology Group - Quality Instrumentation ... Guaranteed | (888) 88-SOURCE | www.artisantg.com
Page 7
Appendix C:
Appendix D:
Appendix E:
Transition Module CT7-TM
76
CT7-TM Interfaces
77
Ethernet RJ1 and RJ2
77
VGA J9
78
COM1 J7 and COM2 J8
79
LPT1 J10
80
USB J11
80
SCSI J16
81
UW-SCSI J17
82
IDE J12
83
Floppy Disk Drive J14
84
LCD J15
85
PMC
86
Placement Plan
88
Specifications
88
PCI Mezzanine Card (PMC)
89
Electrical characteristics
89
Assembly PMC to ET7
90
Support, Service, and Warranty Information
SBS Technologies — CT7 Hardware User’s Manual Revision 1.3.2
Artisan Technology Group - Quality Instrumentation ... Guaranteed | (888) 88-SOURCE | www.artisantg.com
91
Page 8
CHAPTER 1
Introduction
Chapter Scope
This chapter describes features, capabilities and compatibilities of the CT7
CompactPCI Single Board Computer.
Board Design
The CT7 is a fully IBM-AT compatible stand-alone PC. It is equipped with
many functions a conventional Personal Computer can only offer with several
add-on cards. Extension boards can be connected via the CPCI interface. The
minimized board size and the large number of interfaces and functions allow
the CT7 to be used in many applications. See the following block diagram for
the boards design.
SBS Technologies — CT7 Hardware User’s Manual Revision 1.3.2
Artisan Technology Group - Quality Instrumentation ... Guaranteed | (888) 88-SOURCE | www.artisantg.com
Page 9
INTRODUCTION
Intel 82440GX
Chipset
Please note that the ET7 is an optional extension board. It is sold separately and
not required for basic operations of the CT7.
SBS Technologies — CT7 Hardware User’s Manual Revision 1.3.2
Artisan Technology Group - Quality Instrumentation ... Guaranteed | (888) 88-SOURCE | www.artisantg.com
Page 10
INTRODUCTION
Design Features
The CT7 CompactPCI Single Board Computer features:
Microprocessor
Intel® Celeron™ processor 566 MHz
Intel® Pentium III processor 700, 850 MHz, 1 GHz
Intel® Mobile Pentium III processor 500, 700 MHz
Cache RAM
Processor
level 1
level 2
Celeron
32 KB
128 KB, full speed
PIII
32 KB
256 KB, full speed
Mobile Celeron
32 KB
128 KB, full speed
Mobile PIII
32 KB
256 KB, full speed
DRAM
DRAM 64 MB to 1 GB SDRAM with ECC,
running at 66/100MHz.
Chipset
Intel 82440GX with 82371EB (PIIX4e) ISA bridge.
Flash BIOS
Easy updating, in-system programmable
AMI BIOS
LSI Logic SCSI BIOS
Chips & Technology VGA BIOS
Intel Ethernet BOOT module
Hard/Flash Disk
Onboard mountable 2,5” IDE hard disk or FlashDrive.
EEPROM
Serial EEPROM 512 Bytes, System information.
CMOS RAM
114 byte non-volatile RTC, MC146818 compatible RTC
with onboard Lithium battery.
Keyboard/Mouse
IBM PC/AT compatible keyboard controller
with PS/2 style connector.
USB
Two high-speed 12 Mbit/sec USB ports.
Watchdog
Watchdog activates reset under software control.
SBS Technologies — CT7 Hardware User’s Manual Revision 1.3.2
Artisan Technology Group - Quality Instrumentation ... Guaranteed | (888) 88-SOURCE | www.artisantg.com
Page 11
INTRODUCTION
High Resolution Timer
User programmable timer, allows “Real Time Functions” with Windows 3.11,
Windows 95 and Windows NT.
LCD/VGA
AGP VGA C&T 69000 (2MB) or 69030 (4MB) with 64-bit Windows accelerator and LCD flat panel interface. Resolution on CRT up to 1280x1024/8Bit
(69000) or 1600x1280/16Bit (69030). Support color and monochrome TFT or
STN panel with up to 1024x768 resolution and max. 24-bit interfaces.
Fast Ethernet
Two high speed PCIbus Ethernet controller (Intel 82559ER) with 10BaseT and
100BaseTX interface and integrated FIFO buffer.
SCSI-2
PCI Ultra Wide SCSI-2 controller (SYM53C875) with up to 40 Mbytes/s transfer rate.
Floppy
Supported formats: 3.5 inch, 720 Kbyte - 1.44 Mbyte.
EIDE/ATAPI
PCI EIDE/ATAPI interface with two IDE controller (primary IDE offboard
and secondary IDE onboard). Transfer rate with up to 33 MB/s, for two external devices and one onboard 2,5” hard/flash disk.
Serial I/O
Two async. 16550 compatible channels with 16 byte FIFO, Transfer rates up
to 115.2 Kbaud.
Parallel I/O
Fully bidirectional IEEE 1284 enhanced parallel port support ECP and EPP
modes.
PMC slot
64Bit/33MHz PCI mezzanine connector for standard PMC with front and rear
IO. IO signals available at the rear connector J3 (pinout compliant with CPCI
spec PICMG 2.3 for single PMC).
PMC extension
Two 64Bit/33MHz PCI mezzanine connector for standard PMC with front and
rear IO are available on the optional extension board. I/O signals available at
the rear connector J3, J4 (pinout compliant with CPCI spec PICMG 2.3 for dual
PMC).
CPCI System slot
Up to 7 slot 64Bit CPCI/33MHz with 21154 bridge. Up to 14 slots 64Bit/
33MHz CPCI with optional extension board. Standard backplanes can be used.
CPCI I/O Slot
CT7 works as peripheral board with Hot Swap functionality.
IPMI
Support for Intelligent Peripheral Management Interface.
SBS Technologies — CT7 Hardware User’s Manual Revision 1.3.2
Artisan Technology Group - Quality Instrumentation ... Guaranteed | (888) 88-SOURCE | www.artisantg.com
Page 12
INTRODUCTION
Temperature Sensor
Shows temperature of CPU-heat sink and onboard. The sensors are software
readable in 1°C increments from -55 to +125°C.
Frontpanel I/O
2 x Ethernet, VGA, PMCIO, COM1, KB/MS, USB1, Reset, 3xLED (blue:
HotSwap; green, red: user definable).
Backpanel I/O
VGA, LCD, SCSI, IDE (Master/Slave), FDC, COM1-2, LPT1, USB1-2, PMCIO, KB, MS, speaker, reset, watchdog, ext. Battery, SMBus, IPMB,
GPIO[0...1], ICMB, 2x Ethernet. Transition modules for 1:1 PC compatible
connectors available.
Power supply
+5V
+12V
-12V
board supply
PMC and HotSwap controller supply
optional, if needed on PMC
Approval
UL approved: E214940
H110 Backplanes
When using the CT7 in backplanes providing H110 functionality, the CPCI-J4
connector shall not be assembled. The rear IO for the LCD connection will not
be available then.
Styles available
Front panel
C-Style
I-Style
X
X
Extended temp.
Parts soldered
X
X
X
SBS Technologies — CT7 Hardware User’s Manual Revision 1.3.2
Artisan Technology Group - Quality Instrumentation ... Guaranteed | (888) 88-SOURCE | www.artisantg.com
Page 13
CHAPTER 2
Unpacking and
Inspection
Chapter Scope
This chapter covers the suggested inspection and preparation considerations
and background information necessary prior to using the CT7. Unpacking, initial inspection, and first-time operation of the CT7 are covered. Following the
procedures given in the chapter is recommended, since they will verify proper
operation after shipping and before the product is integrated into your system.
ESD
Electrostatic Discharge Notice
The discharge of static electricity, known as Electro Static Discharge or ESD,
is a major cause of electronic component failure. The CT7 has been packed in
a static-safe bag which protects the board from ESD while the board is in the
bag. Before removing the CT7 or any other electronic product from its staticsafe bag, be prepared to handle it in a static-safe environment.
ATTENTION
Static Sensitive Devices
Handle only at Static Safe Work Stations
You should wear a properly-functioning anti static strap and ensure you are fully grounded. Any surface upon which you place the unprotected CT7 should
be static-safe, usually facilitated by the use of anti static mats. From the time
the board is removed from the anti static bag until it is in the card cage and
functioning properly, extreme care should be taken to avoid “zapping” the
board with ESD. You should be aware that you could “zap” the board without
you knowing it; a small discharge, imperceptible to the eye and touch, can often be enough to damage electronic components. Extra caution should be taken
in cold and dry weather when static easily builds up.
SBS Technologies — CT7 Hardware User’s Manual Revision 1.3.2
Artisan Technology Group - Quality Instrumentation ... Guaranteed | (888) 88-SOURCE | www.artisantg.com
Page 14
UNPACKING AND INSPECTION
Unpacking and
Handling
Although the CT7 is carefully packaged against the rigors of shipping, it is still
possible that shipping damages can occur. Careful inspection of the shipping
carton should reveal some information about how the package was handled by
the shipping service. If evidence of damage or rough handling is found, you
should notify the shipping service and SBS Technologies as soon as possible.
Static-Safe Bag
Shock Absorbent
Packaging
Board
Retain all packing material in case of future need.
Only after ensuring that both you and the surrounding area are protected from
ESD, carefully remove the CT7 from the shipping carton by grasping it by the
front panel and the connectors. Place the board, in its anti static bag, flat down
on a suitable surface. You may then remove the board from the anti static bag
by tearing the ESD warning labels.
Proper handling of the CT7 is critical to ensure proper operation and long-term
reliability. When unpacking the board, and whenever handling it thereafter, be
sure to hold the board by the front panel or the card ejectors as shown in the
drawing on the left. Do not hold the board by the circuit card edges, the heat
sink, or the connectors.
Initial Inspection
After unpacking the CT7, you should inspect it for visible damage that could
have occurred during shipping or unpacking. If damage is observed (usually in
the form of bent component leads or loose socketed components), contact SBS
Technologies for additional instructions. Depending on the severity of the
damage, it may need to be returned to the factory for repair. DO NOT apply
power to the board if it has visible damage. Doing so may cause further, possibly irreparable damage, as well as introduce a fire or shock hazard. Since the
CT7 incorporates a number of socketed components, including the CPU, memory, etc., these should be inspected to make sure they are seated fully in their
sockets.
SBS Technologies — CT7 Hardware User’s Manual Revision 1.3.2
Artisan Technology Group - Quality Instrumentation ... Guaranteed | (888) 88-SOURCE | www.artisantg.com
Page 15
UNPACKING AND INSPECTION
Delivery Volume
Please check that the delivered package contains the following items:
Qty.
Item
Purpose
1
CT7
CompactPCI Single Board Computer
1
Media
CD-ROM or floppy disks with driver software and manuals in Adobe Acrobat
(PDF) format:
ct7.pdf
CT7 Technical Manual
ami_ct7.pdf
AMI BIOS & Programmer’s Manual
ipmi.pdf
IPMI CT7-CE7 Programmer’s Manual
The manual files are also available through the World Wide Web from our
Web-Server:
http://www.sbs.com
Available Options
and Accessories
The following table lists accessories (options) which are available for the CT7:
Qty.
Item
Purpose
1
ZKAAPS2SPLIT
Front panel Y-cable for keyboard and
mouse
1
ET7
Extension board, 6U (233 x 160 x 40 mm)
1
CTM10
Transition module, 4U x 4HE/HP
1
CT7-TM
Rear I/O transition module, 6U x 80mm
Please contact the sales department or your sales representative for latest information on options and accessories.
Accessories are subject to change without notice.
SBS Technologies — CT7 Hardware User’s Manual Revision 1.3.2
Artisan Technology Group - Quality Instrumentation ... Guaranteed | (888) 88-SOURCE | www.artisantg.com
Page 16
CHAPTER 3
Installation
Chapter Scope
This chapter covers the installation of the CT7 CompactPCI Single Board
Computer in a CompactPCI backplane and initial power-on operations.
Advisories
Please observe all safety procedures to avoid damaging system and protect operators and users.
Unpacking and Handling
Please read the manual carefully before unpacking the module or fitting the device into your system. Also adhere to the following:
—
—
—
—
Observe all precautions for electrostatic sensitive modules.
If the product contains batteries, please do not place the board on
conductive surfaces, anti-static plastic, or sponge, which can cause
shots and lead to battery or board trace damage.
Please do not exceed the specified operational temperatures. Note that
batteries and storage devices might also have temperature restrictions.
Keep all original packaging material for future storage or warranty
shipments of the board.
ESD
Electrostatic Discharge (ESD) is a major cause of electronic component failure. The CT7 has been packed in a static-safe bag which protects the board
from ESD while the board is in the bag. From the time the board is removed
from the anti static bag until it is properly mounted in a backplane, extreme
care should be taken to avoid damaging board through electrostatic discharges.
See page 14 for details on how to prevent “zapping” the board with ESD.
General Advisories.
Before installing or removing any board, please ensure that the system power
and external supplies have been turned off.
Check that jumpers and piggybacks are correctly configured for your application.
SBS Technologies — CT7 Hardware User’s Manual Revision 1.3.2
Artisan Technology Group - Quality Instrumentation ... Guaranteed | (888) 88-SOURCE | www.artisantg.com
Page 17
INSTALLATION
Mount the board, piggyback, or transition module very carefully. See also sections on additional advisories below.
Do not restore power until you are sure that all modules are fitted correctly and
all connections have been made properly.
Advisories for CompactPCI products
Mount the CPU board carefully on the CPCIbus slot. Note that on some boards
connectors are used for I/O purposes which must not be inserted into a CPCIbus backplane. A transition module must be used instead.
Batteries
Danger of explosion if battery is incorrectly replaced. Replace only with the
same or equivalent type recommended by SBS Technologies.
Dispose of used batteries according to instructions of SBS Technologies and
applicable local regulations.
Minimum System
Requirements
As shipped, the CT7 has been thoroughly tested, and is nearly ready for use in
your system. In order to verify CT7 operation for the first time, it is suggested
that you only configure a minimal system. It is not necessary to have disk
drives, a Flash disk or other accessories connected in order to perform the CT7
confidence tests.
Because the CT7 is available in several options the description in this chapter
is related to the standard configuration.See the following table for standard and
optional configurations and their influence on initial operation:
Configuration
VGA
LAN
System /
non-system
LCD
interface
IPMI
Standard
yes
yes
both
yes
no
Others
option
option
both or non-sys
option
option
The following items are required to start the CT7 in a standard configuration:
Backplane and Power Supply. You will need a standard CompactPCI backplane wired into a regulated power supply capable of providing stable low
noise +5V and +12V sources. Make sure that the supply is capable of meeting
the total power requirements of the CT7. Please refer to chapter “Specifications” on page 48 for details.
SBS Technologies — CT7 Hardware User’s Manual Revision 1.3.2
Artisan Technology Group - Quality Instrumentation ... Guaranteed | (888) 88-SOURCE | www.artisantg.com
Page 18
INSTALLATION
The CT7 features Full Hot Swap capabilities according to the PCI Hot Plug
specification. This allows orderly insertion and extraction of the board from the
system host (backplane) without having to power down the system. Please note
that this feature requires that hot swap functions are also available on the backplane. See chapter “Hot Swap” on page 44 for details.
Initially, you may plug the CT7 into your 6U system slot of your CPCI system.
Optionally, when used as an intelligent peripheral board, the CT7 can also be
used in a non-system slot. In case that the CT7 is used in a non-system slot you
have to have an additional CPU board in the system slot for providing system
clock, arbiter function and more. Please make sure that you do not have the
power supply turned ON when the CT7 is plugged into your backplane.
Keyboard and Mouse. You should have a compatible keyboard for initial
system operation. Depending on your application, this keyboard may be a standard full-travel keyboard, or one which utilizes membrane switches for harsh
environments. The miniature DIN keyboard connector is located on the front
panel and is directly compatible with existing compliant keyboards. If your
keyboard has the normal IBM PC-type keyboard connector you will need to
use a cable adapter. This cable adapter is not delivered by SBS, but available
on the shelf.
The connector is defined for both keyboard and mouse. SBS delivers a split
adapter cable for keyboard and mouse, which has to be ordered separately. Plug
this adapter cable ZKAAPS2SPLIT (Y form) into the keyed PS2 connector on
the front panel, then plug the keyboard and mouse into the adapter. If the adapter is not used, only a keyboard can be connected.
!
Plugging and unplugging a PS/2 keyboard or mouse while power is applied is
not recommended and can cause software failure or damage to the PS/2 device
and/or on-board circuitry.
Video Monitor. Any VGA-compatible video monitor can be used initially for
display output. The CT7 does not offer front access to the video, but it comes
out as 10-pins on the rear I/O side, the CPCI connector J5. In order to get access
to these pins it is necessary to use a transition module. SBS offers two of them.
Installation
The CT7-TM is a 6U x 80mm rear I/O module which has to be plugged into
the CT7 with the backplane between. This transition module has a video connector which is fully compatible with the VGA standard connector and pinout.
Plug your video monitor into this connector. Make sure that your selected chassis supports this type of rear I/O transition module.
The transition module CTM10 has a 10-pin header (P4300) for video. This
module allows access to the I/O signals only within the chassis. For video access you have to manufacture a connector cable consisting of a 10-pin ribbon
with a 10-pin female connector on one side and a 15-pin female video connector on the other side.
After making sure that you have installed the CT7 properly into your CPCI
backplane, apply power to your video monitor and then the CPCI supply. When
the board is completely reset, the processor should begin executing initial
BIOS-resident routines.
Note: Make sure that the card ejectors are closed and the Hot Swap LED (blue)
is OFF.
Note: If the CT7 was ordered without video onboard, you can use an external
video CompactPCI card or a video PMC module. Consult the technical de-
SBS Technologies — CT7 Hardware User’s Manual Revision 1.3.2
Artisan Technology Group - Quality Instrumentation ... Guaranteed | (888) 88-SOURCE | www.artisantg.com
Page 19
INSTALLATION
scriptions of these boards for required voltage and power consumption in the
system.
Please see chapter “Interfaces” on page 22 for details on onboard interfaces.
The location of the CT7 interfaces is shown in section “IO-Diagram” on
page 23.
Initial Power-On
Operation
After a few seconds, the CT7 system BIOS banner will display on the and the
red LED on the front will go ON and OFF.
If you have seen all the messages to this point, you can be confident that the
board is running properly and is ready to be installed and setup for your application.
American
Megatrends
AMIBIOS © 1997 American Megatrends Inc.
SBS Technologies CT7
Release Date
.
.
.
.
. Board specific messages
.
.
.
.
.
.
.
.
© American Megatrends Inc.
62 – 0102 – 004199 – 00101111 – 071595 - 440GX – CT7 - Y2KC-0
SBS Technologies — CT7 Hardware User’s Manual Revision 1.3.2
Artisan Technology Group - Quality Instrumentation ... Guaranteed | (888) 88-SOURCE | www.artisantg.com
Page 20
INSTALLATION
year 2000 compliant
project ID
chip set
AMIBIOS core copyright date
BIOS features
supplier ID
major & minor BIOS revisions
processor, flash ROM size
Example/coding of an ID line:
62 – 0102 – 004199 – 00101111 – 071595 – 440GX – CT7/CE7 - Y2KC-0
You can stop the video output for proper reading the three information lines as
described: Simply press the “0 / Enter” key during the start-up sequence. This
key is located on the numeric keypad of your keyboard.
Entering the BIOS
SETUP
To enter SETUP during the initial power-on sequence press the key DELETE
during the boot up sequence. Also see the applicable message on the screen. It
tells you when you can enter the BIOS by pressing the DELETE key.
Consult the “AMI BIOS & Programmer’s Manual” (file AMI_CT7.pdf) for
further information on how to change settings and configurations.
If the board does not perform as described above, some damage may have occurred in shipping or the board is not installed or setup properly. Contact SBS
technical support as described in chapter “Support, Service, and Warranty Information” on page 91 for further instructions.
SBS Technologies — CT7 Hardware User’s Manual Revision 1.3.2
Artisan Technology Group - Quality Instrumentation ... Guaranteed | (888) 88-SOURCE | www.artisantg.com
Page 21
Interfaces
CHAPTER 4
Chapter Scope
This chapter describes the interfaces of the CT7 CompactPCI Single Board
Computer located solderside on the board and on the front panel. Each section
on a particular interface includes a graphics illustration of the connector and a
pin assignment table as well as notes on certain signal line characteristics, if
necessary.
For interfaces of expansion and transition modules, please refer to the appropriate chapters found in the appendices to this manual.
IDE (secondary)
PMC
Ethernet 1
Ethernet 2
VGA / LCD
COM 1
Keyboard
Mouse
USB 1
Reset
LEDs
SBS Technologies — CT7 Hardware User’s Manual Revision 1.3.2
Artisan Technology Group - Quality Instrumentation ... Guaranteed | (888) 88-SOURCE | www.artisantg.com
Page 22
INTERFACES
IO-Diagram
See the following drawing for positioning of onboard interfaces.
Front Panel Interfaces
Refer to the drawing for the location of interfaces on the front panel of the CT7
board.
This drawing indicates the location of interfaces on the front panel of the CT7
board with the ET7 extension board being mounted:
SBS Technologies — CT7 Hardware User’s Manual Revision 1.3.2
Artisan Technology Group - Quality Instrumentation ... Guaranteed | (888) 88-SOURCE | www.artisantg.com
Page 23
INTERFACES
CT7 Connectors
This chapter describes connector pinouts on the CT7. A pinout description for
available extension and transition modules can be found in the corresponding
appendix chapters. Apart from the ET7 extension board and the CTM10 transition module, a transition module with mechanical size compliant with IEEE
1101.11-1998 is also available (CT7-TM).
CPCI connector reference
The CPCI specification numbers the CPCI connectors from bottom to top J1,
J2, J3, J4, and J5. The CPCI connectors on the CT7 are P7201, P7202, P7203,
P7204, and P7205 respectively.
Signal groups
Determiner
floppy disk controller signals
\FD....
hard disk controller signals
HD.... and \HD....
Parallel port 1 signals
L1... and \L1....
COM1, COM2 signals
C1....., C2.....
SCSI signals
\S_... and S_....
VGA signals
VGA_
Universal Serial Bus
USB1-,USB1+
USB2-,USB2+
keyboard signals
KB_...
mouse signals
MS_...
LCD signals
LC_...
LAN signals
RJ... (with CT7R only)
SMB (I2C-Bus)
SMB_
IPMI
IPMI_
Misc. signals
\SPEAKER
\WDG_REL
\RST_BUT
VBATIN
PMC IO Signals
PMC...
nc:
not connected
SBS Technologies — CT7 Hardware User’s Manual Revision 1.3.2
Artisan Technology Group - Quality Instrumentation ... Guaranteed | (888) 88-SOURCE | www.artisantg.com
Page 24
INTERFACES
CompactPCI bus Connector P7201 and P7202
This interface is used for connection to a standard CPCI backplane.
P7201
A
B
C
D
E
F
1
2
3
+5V
nc
\INTA
-12VIN
+5V
\INTB
nc
nc
\INTC
+12VIN
nc
+5V
nc
\INTD
GND
GND
GND
4
IPMI_PWR
\Healthy
5
6
7
8
nc
\REQ0
AD30
AD26
nc
GND
AD29
GND
VIO b
\PCI_RST
nc
AD28
9
10
11
12-14
15
16
\C/BE3
AD21
AD18
KEY
nc
\DEVSEL
IDSEL
GND
AD17
KEY
\FRAME
GND
17
18
19
20
nc
\SERR
nc
AD12
nc
GND
AD15
GND
21
22
23
nc
AD07
nc
AD09
GND
AD04
24
AD01
+5V
25
+5V
\REQ64
a.
b.
VIO b
AD23
nc
AD16
KEY
\IRDY
VIO b
nc
nc
AD14
VIO b
AD08
nc
AD03
VIO b
\ENUM
L+5V a
INTP
INTS
GND
GND
PCICLK0
GND
AD25
\GNT0
AD31
AD27
AD24
GND
GND
GND
GND
GND
AD20
GND
KEY
\BD_SEL
\STOP
AD22
AD19
\C/BE2
KEY
\TRDY
\LOCK
GND
GND
GND
KEY
GND
GND
GND
PAR
GND
AD11
\PERR
\C/BE1
AD13
AD10
GND
GND
GND
GND
nc
AD06
\C/BE0
AD05
AD02
GND
GND
GND
L+5V a
AD00
\ACK64
GND
nc
+5V
GND
+5V on long backplane pins for early power supply
The VIO signals are either 5V or 3.3V, depending on backplane
P7202
A
B
C
D
E
F
1
2
3
4
5
PCICLK1
PCICLK2
PCICLK4
VIO
\C/BE5
GND
PCICLK3
GND
nc
\64EN
\REQ1
\SYSEN
\GNT3
\C/BE7
\GNT1
\GNT2
\REQ4
GND
\C/BE4
\REQ2
\REQ3
\GNT4
\C/BE6
PAR64
GND
GND
GND
GND
GND
6
7
AD63
AD59
AD62
GND
a
GND
AD58
AD60
AD57
GND
GND
8
9
AD56
AD52
AD55
GND
a
GND
AD51
AD53
AD50
GND
GND
10
11
AD49
AD45
AD48
GND
GND
AD44
AD46
AD43
GND
GND
12
13
AD42
AD38
AD41
GND
GND
AD37
AD39
AD36
GND
GND
14
15
16
17
18
19
20
21
22
AD35
nc
nc
nc
nc
GND
PCICLK5
PCICLK6
GA4
AD34
GND
nc
GND
nc
GND
GND
GND
GA3
GND
\REQ5
GND
\REQ6
GND
SMB_SCL
GND
nc
GA1
AD32
\GNT5
nc
\GNT6
nc
\ALERT
nc
nc
GA0
GND
GND
GND
GND
GND
GND
GND
GND
GND
a.
VIO a
AD61
VIO
AD54
VIO
AD47
VIO a
AD40
VIO a
AD33
\FAL
\DEG
\RST_BUT
nc
SMB_SDA
nc
nc
GA2
The VIO signals are either 5V or 3.3V, depending on backplane
SBS Technologies — CT7 Hardware User’s Manual Revision 1.3.2
Artisan Technology Group - Quality Instrumentation ... Guaranteed | (888) 88-SOURCE | www.artisantg.com
Page 25
INTERFACES
I/O Connector P7203, P7204, and P7205
The connector P7204 is not mounted, if the H110-Bus is used on the backplane.
For easy use a transition module is available from SBS Technologies to connect the I/O-Connectors with standard connectors.
P7203
A
B
C
D
E
F
1
2
3
4
5
6
7
8
9
10
11
12
13
14
15
16
17
18
19
+5V *
PMCIO_60
PMCIO_55
PMCIO_50
PMCIO_45
PMCIO_40
PMCIO_35
PMCIO_30
PMCIO_25
PMCIO_20
PMCIO_15
PMCIO_10
PMCIO_5
VCC3
L1_SLCT
L1_BUSY
\L1_SLIN
\L1_ERRO
\SPEAKER
PMCIO_64
PMCIO_59
PMCIO_54
PMCIO_49
PMCIO_44
PMCIO_39
PMCIO_34
PMCIO_29
PMCIO_24
PMCIO_19
PMCIO_14
PMCIO_9
PMCIO_4
VCC3
L1_PE
\L1_ACK
\L1_INIT
\L1_AFED
WDG_REL
PMCIO_63
PMCIO_58
PMCIO_53
PMCIO_48
PMCIO_43
PMCIO_38
PMCIO_33
PMCIO_28
PMCIO_23
PMCIO_18
PMCIO_13
PMCIO_8
PMCIO_3
VCC3
L1_D7
L1_D5
L1_D3
L1_D1
\L1_STRO
PMCIO_62
PMCIO_57
PMCIO_52
PMCIO_47
PMCIO_42
PMCIO_37
PMCIO_32
PMCIO_27
PMCIO_22
PMCIO_17
PMCIO_12
PMCIO_7
PMCIO_2
VCC
L1_D6
L1_D4
L1_D2
L1_D0
\RST_BUT
PMCIO_61
PMCIO_56
PMCIO_51
PMCIO_46
PMCIO_41
PMCIO_36
PMCIO_31
PMCIO_26
PMCIO_21
PMCIO_16
PMCIO_11
PMCIO_6
PMCIO_1
VCC
KB_DATA
KB_CLK
MS_DATA
MS_CLK
VBATIN
GND
GND
GND
GND
GND
GND
GND
GND
GND
GND
GND
GND
GND
GND
GND
GND
GND
GND
GND
P7204
A
B
C
D
E
F
1
2
3
4
5
6
7
8
9
10
11
12-14
15
16
17
18
19
20
21
22
nc
nc
nc
nc
nc
nc
nc
nc
nc
nc
nc
KEY
nc
nc
nc
nc
nc
nc
nc
nc
nc
nc
nc
nc
nc
nc
nc
nc
nc
nc
nc
KEY
nc
nc
nc
nc
nc
nc
nc
nc
nc
nc
nc
nc
nc
nc
nc
nc
nc
nc
nc
KEY
nc
nc
nc
nc
nc
nc
nc
nc
LC_VCC
LC_BACKL
LC_P16
LC_P03
LC_P01
LC_P10
LC_P08
LC_P06
LC_P17
LC_P14
LC_P12
KEY
LC_HSYNC
GND
LC_P19
LC_P21
LC_P23
nc
nc
LC_VEE
LC_DE
LC_P04
LC_P02
LC_P00
LC_P09
LC_P07
LC_P05
LC_P15
LC_P13
LC_P11
KEY
LC_VSYNC
LC_CLK
LC_P18
LC_P20
LC_P22
nc
nc
VCC a
VCC a
GND
GND
GND
GND
GND
GND
GND
GND
GND
GND
GND
KEY
GND
GND
GND
GND
GND
GND
GND
GND
23
nc
nc
nc
VCC a
VCC a
GND
24
nc
nc
nc
VCC
a
VCC
a
GND
25
nc
nc
nc
VCC
a
VCC
a
GND
a.
+5V for internal use only.
SBS Technologies — CT7 Hardware User’s Manual Revision 1.3.2
Artisan Technology Group - Quality Instrumentation ... Guaranteed | (888) 88-SOURCE | www.artisantg.com
Page 26
INTERFACES
P7205
A
B
C
D
E
F
1
\S_D11
\S_D10
\S_D09
\S_D08
\S_IO
GND
2
\S_REQ
\S_C/D
\S_SEL
\S_MSG
\S_RST
GND
3
\S_ACK
\S_BUSY
\S_ATN
\S_DPO
\S_D07
GND
4
\S_D06
\S_D05
\S_D04
\S_D03
\S_D02
GND
5
\S_D01
\S_D00
\S_DP1
\S_D15
\S_D14
GND
6
\S_D13
\S_D12
\HD1_CS3
\HD1_CS1
nc
GND
7
C2_DTR
C2_RI
HD1_A2
HD1_A0
nc
GND
8
C2_TXD
C2_CTS
HD1_A1
HD1_IRQ
GPIO1
GND
9
C2_RXD
C2_RTS
\HD1_DAK
HD1_RDY
GPIO0
GND
10
C2_DCD
C2_DSR
\HD1_IOR
\HD1_IOW
nc
GND
11
C1_DTR
C1_RI
HD1_DRQ
HD1_D00
nc
GND
12
C1_TXD
C1_CTS
HD1_D15
HD1_D01
nc
GND
13
C1_RXD
C1_RTS
HD1_D14
HD1_D02
nc
GND
14
C1_DCD
C1_DSR
HD1_D13
HD1_D03
VGA_VSYNC
GND
15
\FD_HDSL
\FD_RDAT
HD1_D12
HD1_D04
VGA_HSYNC
GND
16
\FD_WPRT
\FD_TRKO
HD1_D11
HD1_D05
VGA_BLUE
GND
17
\FD_WGAT
\FD_WDAT
HD1_D10
HD1_D06
VGA_GREEN
GND
18
\FD_STEP
\FD_DIR
HD1_D09
HD1_D07
VGA_RED
GND
19
\FD_MTRO
\FD_DCHG
HD1_D08
RJ_TDP1
RJ_TDN1
GND
20
\FD_DRVO
\FD_INDX
\HD1_RST
RJ_RDP1
RJ_RDN1
GND
21
USB2+
USB1+
nc
RJ_TDP2
RJ_TDN2
GND
22
USB2-
USB1-
TERMPW
RJ_RDP2
RJ_RDN2
GND
SBS Technologies — CT7 Hardware User’s Manual Revision 1.3.2
Artisan Technology Group - Quality Instrumentation ... Guaranteed | (888) 88-SOURCE | www.artisantg.com
Page 27
INTERFACES
IDE Connector P1800
The IDE interface is designed as a 44-pin 2mm pitch male onboard connector
P1800 to fit directly to a 2,5-inch IDE hard drive or flash disk. P1800 is the secondary IDE interface of the onboard IDE controller.
Name
P1800
GND
2
1
Name
\RST_DRV
HD_D8
4
3
HD_D7
HD_D9
6
5
HD_D6
HD_D10
8
7
HD_D5
HD_D11
10
9
HD_D4
HD_D12
12
11
HD_D3
HD_D13
14
13
HD_D2
HD_D14
16
15
HD_D1
HD_D15
18
17
HD_D0
nc
20
19
GND
GND
22
21
HD_DRQ0
GND
24
23
\HD_IOW
GND
26
25
\HD_IOR
nc
28
27
HD_RDY
GND
30
29
HD_DAK0
nc
32
31
HD_IRQ
nc
34
33
HD_A1
HD_A2
36
35
HD_A0
\HD_CS3
38
37
\HD_CS1
GND
40
39
nc
+5V
42
41
+5V
nc
44
43
GND
SBS Technologies — CT7 Hardware User’s Manual Revision 1.3.2
Artisan Technology Group - Quality Instrumentation ... Guaranteed | (888) 88-SOURCE | www.artisantg.com
Page 28
INTERFACES
Keyboard and PS/2 Mouse Interface P2000
The CT7 allows an easy adaptation of a keyboard to a standard 6-pin MINIDIN connector. Also a PS/2 mouse can be connected directly or via an external
cable splitter.
Name
P2000
Keyb. Data
1
Mouse Data
2
GND
3
Fused +5V
4
+5V unfused
-
Keyboard Clock
5
Mouse Clock
6
Ethernet Interface 10BaseT and 100BaseTX P5100 and P5700
The Ethernet output (front or rear) is software selectable for each channel.
Name
Ethernet1 P5100 and Ethernet2 P5700
TXD+ (RJ1)
1
TXD- (RJ2)
2
RXD+ (RJ3)
3
BIAS1 (RJ4)
4
BIAS1 (RJ5)
5
RXD- (RJ6)
6
BIAS2 (RJ7)
7
BIAS2 (RJ8)
8
left
LED
right
LED
FGND
LED
Name
Function
Left
Speed
ON if 100BaseT
Right
Link/Activity
ON for link, Blink for Activity
Please note: BIAS1 and BIAS2 are connected via a resistor bridge to the center
tabs of the input and output transformers.
SBS Technologies — CT7 Hardware User’s Manual Revision 1.3.2
Artisan Technology Group - Quality Instrumentation ... Guaranteed | (888) 88-SOURCE | www.artisantg.com
Page 29
INTERFACES
Serial Port COM1 P2200
The CT7 offers two RS232 serial ports. All COM ports are accessible via the
transition module, additionally COM1 is accessible via the front panel connector P2200.
6789
12345
Name (RS232)
P2200
\DCD
1
\DSR
6
RXD
2
\RTS
7
TXD
3
\CTS
8
\DTR
4
\RI
9
GND
5
+5V unfused a
-
a.
+5V supply via CTM10
VGA Interface P2400
The monitor signals are available at the front panel on a standard 15-pin female
D-Sub connector.
Name
P4200
RED
1
GREEN
2
BLUE
3
HSYNC
13
VSYNC
14
DDC-Data
12
DDC-Clock
15
Fused +5V
9
GND
5, 6, 7, 8, 10
nc
4, 11
n.a. not available
SBS Technologies — CT7 Hardware User’s Manual Revision 1.3.2
Artisan Technology Group - Quality Instrumentation ... Guaranteed | (888) 88-SOURCE | www.artisantg.com
Page 30
INTERFACES
USB Interfaces P1700
One USB channel is available at the front panel and two USB devices are available on rear IO.
Name
P1700
Fused +5V
1
+5V unfused a
-
USB1-
2
USB1+
3
USB2-
-
USB2+
-
GND
4
a.
+5V supply via CTM10
SBS Technologies — CT7 Hardware User’s Manual Revision 1.3.2
Artisan Technology Group - Quality Instrumentation ... Guaranteed | (888) 88-SOURCE | www.artisantg.com
Page 31
INTERFACES
PMC Connectors P7001, P7002, and P7003
The following table lists the pin assignments of the PMC connector.
P7001
P7002
P7003
Pin
Pin
P7001
P7002
Nc
+12V
nc
01
GND
Nc
GND
03
/INTA
Nc
C/BE6
Nc
GND
C/BE4
P7003
02
-12V
nc
GND
04
/INTD
nc
C/BE7
05
06
/INTB
GND
C/BE5
07
08
+5V
/ENUM a
GND
a
a
PAR64
RES.
+3.3V
AD62
/INTC
/GNT1
V(I/O)
09
10
GND
+5V
AD63
11
12
PCICLK
/PCIRST
AD61
13
14
GND
GND
GND
GND
+3.3V
GND
15
16
/GNT0
GND
AD60
/REQ0
RES.
AD59
17
18
+5V
GND
AD58
V(I/O)
AD30
AD57
19
20
AD31
AD29
GND
AD28
GND
V(I/O)
21
22
AD27
AD26
AD56
AD25
AD24
AD55
23
24
GND
+3.3V
AD54
GND
AD20
AD53
25
26
C/BE3
AD23
GND
AD22
+3.3V
GND
27
28
AD21
AD20
AD52
AD19
AD18
AD51
29
30
+5V
GND
AD50
V(I/O)
AD16
AD49
31
32
AD17
C/BE2
GND
/FRAME
GND
GND
33
34
GND
RES.
AD48
GND
/TRDY
AD47
35
36
/IRDY
+3.3V
AD46
/DEVSEL
GND
AD45
37
38
+5V
/STOP
GND
GND
/PERR
V(I/O)
39
40
/LOCK
GND
AD44
SDONE
+3.3V
AD43
41
42
/SBO
/SERR
AD42
PAR
C/BE1
AD41
43
44
GND
GND
GND
V(I/O)
AD14
GND
45
46
AD15
AD13
AD40
AD12
GND
AD39
47
48
AD11
AD10
AD38
AD9
AD8
AD37
49
50
+5V
+3.3V
GND
GND
AD7
GND
51
52
C/BE0
RES.
AD36
AD6
+3.3V
AD35
53
54
AD5
RES.
AD34
AD4
RES.
AD33
55
56
GND
GND
GND
V(I/O)
57
58
AD3
a
AD32
a
SIRQ
/REQ1
V(I/O)
I2CSDA
AD2
GND
Nc
59
60
AD1
GND
nc
AD0
/ACK64
Nc
61
62
+5V
+3.3V
GND
GND
GND
GND
63
64
/REQ64
RES.
nc
a.
a
I2CSCL
Proprietary signals used for special functions. These pins are defined as reserved in the IEEE P1386.1 specification.
Nc
Not connected
RES
Reserved. Do not connect anything!
V(I/O)
I/O Voltage, connected with +5V
+12V/-12V
Only available if connected to CPCI backplane.
PMC-I/O Connector P7004
Pin 1 of the I/O connector is GPIO1, Pin 2 is GPIO2 and so on. All traces are
not connected to any signal onboard.
Extension Board and
Transition Module
Connectors
Please refer to the appendix chapters for interface location and connector pinouts for the optional extension boards and transition modules.
SBS Technologies — CT7 Hardware User’s Manual Revision 1.3.2
Artisan Technology Group - Quality Instrumentation ... Guaranteed | (888) 88-SOURCE | www.artisantg.com
Page 32
CHAPTER 5
Resources
Chapter Scope
This chapter describes system resources, such as memory mapping, register set
and default interrupt request assignments.
Memory Map
The table below shows the memory address area used by the CT7.
Address
Size
Used by
$00000 - $9FFFF
640 Kbytes
System RAM
$A0000 - $BFFFF
128 Kbytes
Video RAM (if enabled)
$C0000 - $DFFFF
128 Kbytes
Used by PCI ROMs:
VGA, SCSI, Ethernet
$E0000 - $FFFFF
128 Kbytes
System BIOS
$100000 - $3FFFFFFF
depends on avail. DRAM
Extended RAM
$4000000 - $FFFBFFFF
depends on avail. DRAM
Dynamically used by PCI devices
$FFFC0000 - $FFFFFFFF
256 Kbytes
System BIOS
SBS Technologies — CT7 Hardware User’s Manual Revision 1.3.2
Artisan Technology Group - Quality Instrumentation ... Guaranteed | (888) 88-SOURCE | www.artisantg.com
Page 33
RESOURCES
Register Set
The following section provides an overview of the registers located in the I/O
address area of the CT7.
Note: The address location of PCI devices such as SCSI or Ethernet are not described in the following tables because the System BIOS automatically configures (PnP, Plug and Play) each PCI device to avoid address conflicts. Many
device drivers show the actual address locations after installation and loading.
Standard Register Set
The standard register set is equal to all standard PC/AT systems. The table below provides an overview of the address ranges occupied by these registers.
I/O Address Range (Hex)
Function
0000 - 000F
DMA Controller 1
0020 - 0021
Interrupt Controller 1
0040 - 0043
Counter / Timer
0060
Keyboard Controller
0061
NMI Status and Control
0064
Keyboard Controller
0070 - 0071
RTC, NMI Mask
0080 - 008F
DMA Page register
00A0 - 00A1
Interrupt Controller 2
00B2 - 00B3
Power Management
00C0 - 00DE
DMA Controller 2
00F0 - 00F1
Coprocessor
0160 - 016F
Reserved; see below
0170 - 0177
Secondary IDE
01F0 - 01F7
Primary IDE
0278 - 027F
LPT a
02E8 - 02EF
COM port a
02F8 - 02FF
COM port a
0378 - 037F
LPT a
03BC - 03BF
LPT a
03E8 - 03EF
COM port a
03F2 - 03F7
Floppy
03F8 - 03FF
COM1 port a
a.
Via setup three address ranges can be defined for the parallel interfaces and four
address ranges for the serial interfaces.
Plug and Play Devices
See Programmer’s Manual.
SBS Technologies — CT7 Hardware User’s Manual Revision 1.3.2
Artisan Technology Group - Quality Instrumentation ... Guaranteed | (888) 88-SOURCE | www.artisantg.com
Page 34
RESOURCES
Interrupts
The interrupt routing for standard components such as COM1/2 or LPT1 is in
compliance with standard PC/AT systems. Unused interrupts can be used for
add-on cards or other board specific PCI devices such as SCSI and Ethernet.
The CT7 BIOS setup allows manual routing for the PCI devices.
Hardware IRQ
INTC1
INTC2
NMI
a.
b.
c.
d.
e.
IRQ Source
IRQ00
System Timer
IRQ01
Keyboard
IRQ02
Cascade from INTC2
IRQ03
COM2 / COM1 a
IRQ04
COM1 / COM2 a
IRQ05
LPT1 a / PnP/PCI b
IRQ06
Floppy Disk Controller
IRQ07
LPT1 a / PnP/PCI b
IRQ08
Real Time Clock
IRQ09
Power Management Contr./PCI b
IRQ10
PnP/PCI b
IRQ11
PnP/PCI b
IRQ12
PS/2 Mouse c
IRQ13
Numeric Coprocessor
IRQ14
External IDE d
IRQ15
Onboard IDE e
Parity Error,
ECC Error,
System Error
Memory Controller
This interrupt is available when no ISR (Interrupt Service Routine) is installed.
Interrupts are available for Plug and Play PCI devices
This interrupt is available when PS/2 mouse is not connected.
This interrupt is available when the primary IDE controller is disabled in SETUP.
This interrupt is available when the secondary IDE controller is disabled in SETUP.
SBS Technologies — CT7 Hardware User’s Manual Revision 1.3.2
Artisan Technology Group - Quality Instrumentation ... Guaranteed | (888) 88-SOURCE | www.artisantg.com
Page 35
CHAPTER 6
Function Blocks
Chapter Scope
This section gives a brief overview over the software interfaces of onboard devices on the CT7 CompactPCI Single Board Computer.
Standard AT Devices
Please refer to interface specifications laid down in industry standards and
hardware reference documents for standard AT devices.
DMA Controller
In standard AT compatible PCs, as well as on the CT7, the two DMA controllers integrated on the board are internally cascaded. Both controllers are compatible with the Intel 8237A. The DMA Controller 1 (DMAC1) is used for
byte-wide transfers while the DMAC2 is used for word-wide transfers.
Interrupt Controller
The Interrupt controller on a standard PC consists of two 82C59A devices with
eight interrupt request lines each. The two controllers are cascaded so that 14
external and two internal interrupt sources are available.
The master interrupt controller provides IRQ[7...1], the slave interrupt controller provides IRQ[15...8]. IRQ2 is used to cascade the two controllers, IRQ0 is
used as a system timer interrupt and is tied to interval timer 1, counter 0. The
remaining 14 interrupt lines are mapped to various onboard devices.
Each 82C59A provides several internal registers. The interrupts at the IRQ input lines are handled by two registers, the interrupt request register IRR and the
in-service register ISR. For programming details see the 82C59A data sheet.
Timer
Standard PCs like the CT7 are equipped with a 8254 compatible timer. This
timer contains three counters. Each counter output provides a key system function. Counter 0 is connected to interrupt controller input IRQ0 and provides a
system timer interrupt for time-of-day, floppy disk timeout and other system
timing functions. Counter 1 generates a refresh request signal and Counter 2
generates the sound for the speaker.
SBS Technologies — CT7 Hardware User’s Manual Revision 1.3.2
Artisan Technology Group - Quality Instrumentation ... Guaranteed | (888) 88-SOURCE | www.artisantg.com
Page 36
FUNCTION BLOCKS
The following table gives an overview over the 8254 functions.
Interval Timer Functions
Function
Gate
Clock In
Out
Counter 0 (System Timer)
Always on
1.193 MHz (OSC/12)
IRQ0 (INT1)
Function
Gate
Clock In
Out
Counter 1 (Refresh Request)
Always on
1.193 MHz (OSC/12)
Refresh Request
Function
Gate
Clock In
Out
Counter 2 (Speaker Tone)
Programmable via Port $061
1.193 MHz (OSC/12)
Speaker
The counter/timers are programmed by I/O accesses. A single control word
register controls the operation of all three counters. For more information on
programming and a detailed register description see the 8254 data sheet.
Real Time Clock
The RTC is a low-power clock that provides a time-of day clock and a 100-year
calendar with alarm features and battery backed operation. The time-of-day
function includes 14 control registers. Other features include maskable interrupt sources and 242 bytes of general purpose CMOS RAM used by system
BIOS. Valid RAM data and time can be maintained after power down through
the use of an external battery source. The RTC is software compatible to the
Dallas DS1287 and the Motorola MC146818.
Keyboard and Mouse
Controller
The communication between the PC and the keyboard is managed by a device
compatible to the Intel 8042 microcontroller, which also provides the PS/2
mouse interface.
EIDE/ATAPI Interface
The CT7 offers two independent EIDE/ATAPI interfaces. Both devices are
logically connected to the primary PCI bus. Therefore a high data transfer rate
is achievable. The signals of the primary EIDE interface are available at the
backpanel IO connector only. The signals of the secondary EIDE interface are
used for connection of a 2,5'' HDD or flash disk via connector P1800 on board.
The CT7 System BIOS automatically detects a connected EIDE HDD or flash
disk and enters the corresponding drive parameters into the BIOS setup. This
feature allows faster and easier handling of varying types of EIDE hard disks.
At the primary EIDE interface two hard disks can be connected. In this case
one HDD must be configured as master and the other one as slave. Read the
hard disk manual to find out where these jumpers are located on your drive.
The optional 2,5” onboard disk is connected to an onboard EIDE connector
(secondary EIDE interface).
Using EIDE and SCSI devices: MS-DOS 6.22 can handle up to seven hard
disks. The PC allows the simultaneous use of EIDE and SCSI hard disks. BIOS
setup allows reordering drives to boot from either SCSI or EIDE drives.
Please note: For correct operation of the EIDE interface, a maximum cable
length of 12 inches (30 cm) must not be exceeded.
SBS Technologies — CT7 Hardware User’s Manual Revision 1.3.2
Artisan Technology Group - Quality Instrumentation ... Guaranteed | (888) 88-SOURCE | www.artisantg.com
Page 37
FUNCTION BLOCKS
Serial Interfaces
The CT7 serial ports are fully compatible with the NS16450 and NS16550.
This means that each serial interface provides a 16 byte FIFO and therefore offers a higher performance than earlier used standard serial interfaces. The
UARTs have programmable baud rate generators capable of 50 to 115200
baud. There are four address locations defined for serial interfaces on standard
PCs. The two serial interfaces are I/O mapped and can occupy four address
ranges.
Parallel Interfaces
The parallel ports are fully compatible with the new IEEE 1284 standard, including level 2 support. The parallel ports consist of an Enhanced Parallel Port
(EPP1.7/1.9) and an Extended Capabilities Port (ECP 16Byte FIFO + DMA
support). The new modes allow higher transfer rates up to 1 Mbyte/s. Via BIOS
Setup, the operating modes of the parallel interface can be selected.
The following modes are supported:
Mode
Average transfer rate
(Read)
Average transfer rate
(Write)
Standard
100 KByte/s
200 KByte/s
EPP
1 MByte/s
1 MByte/s
ECP
1 MByte/s
1 MByte/s
On a standard PC, three address areas are defined for a parallel interface. The
parallel interface is I/O-mapped and can occupy three address ranges.
The address range $3BC cannot be used with EPP operation.
Floppy Controller
The CT7 floppy controller is fully compatible with the PC8477, containing a
superset of the NEC uPD72065B and the N82077AA.
The following formats are supported:
Format
Disk Size
Disk Media
formatted Tracks
720 Kbyte
3.5
Double Density
96 tpi
80
1.44 Mbyte
3.5
High Density
135 tpi
80
The floppy controller uses various I/O addresses in the PC I/O address space.
Graphics Controller
The Graphic Controller CT69030 (optional CT69000) has the following features:
—
—
—
—
—
—
Highly integrated Flat Panel and CRT GUI
Max. pixel clock 170 a / 135 MHz
Accelerator & Multimedia Engine, Palette/DAC, Clock Synthesizer,
and integrated frame buffer
Integrated High Performance 41)/2 Mbytes 83MHz SDRAM memory
Hardware Windows Acceleration: 64-bit Graphics Engine with 2D
acceleration
Dual Independent Display for CRT and Flat Panel (CT69030 only)
SBS Technologies — CT7 Hardware User’s Manual Revision 1.3.2
Artisan Technology Group - Quality Instrumentation ... Guaranteed | (888) 88-SOURCE | www.artisantg.com
Page 38
FUNCTION BLOCKS
Video Modes
The following video modes are available:
Resolution
max. Colors
Pixel clock(MHz)
Hor. Freq.(kHz)
Vert. Freq.(Hz)
640x480
16 M
25.175
31.5
60
31.5
37.5
75
36
43.3
85
36
35.5
56
40
37.9
60
49.5
46.9
75
56.25
53.7
85
44.9
35.5
43 (Interlaced)
65
48.4
60
78.75
60
75
94.5
68.7
85
78.75
47
43 (Interlaced)
108
64
60
135
80
75
256
162/2
75
60
256, CRT
108
64
60
800x600
16 M
1024x768
6553616 a
1280x1024
1600x1200
25665536 a
b
1280x1024
Dual Display a
256, FlatP
a.
b.
60
CT69030
Flat panel only on CT69000
Supported Panel Types
The following displays have been tested with the CT7:
Manufacturer
Part Number
Resolution
Technology
Panel
Drive
Interface
Bit
Colors
NEC
NL6448AC33-18
640x480
TFT
SS
16/24
6
Sharp
LQ10S21
800x600
TFT
SS
16/24
6
1024x600
TFT
LVDS
2x12
5a
1024x768
TFT
LVDS
18
6
NEC
a.
NL10276BC28-21A
with FRC
SBS Technologies — CT7 Hardware User’s Manual Revision 1.3.2
Artisan Technology Group - Quality Instrumentation ... Guaranteed | (888) 88-SOURCE | www.artisantg.com
Page 39
FUNCTION BLOCKS
LCD Signal Mapping
Details for easy adaptation of EL, Plasma, monochrome, color STN and
9,12,18, 24 Bit TFT displays can be found in the data sheet of the CT69030
(optional CT69000). For a short overview see the following table for the assignment of the LCD-signals for the types available:
Mono
Mono
Mono
Color
Color
Color
Color
Color
Color
Color
SS
DD
DD
TFT
TFT
TFTHR
STN
SS
STN
SS
STN
DD
STN
DD
8
8
16
1
1
1
5-1/3
2-2/3
5-1/3
2-2/3
8 Bit
8 Bit
16 Bit
9/12/16
18/24
18/24
8 Bit
16 Bit
8 Bit
16 Bit
LC_P0
P0
UD3
UD7
B0
B0
FB0
R1
R1
UR1
UR0
LC_P1
P1
UD2
UD6
B1
B1
FB1
B1
G1
UG1
UG0
LC_P2
P2
UD1
UD5
B2
B2
FB2
G2
B1
UB1
UB0
LC_P3
P3
UD0
UD4
B3
B3
FB3
R3
R2
UR2
UR1
LC_P4
P4
LD3
UD3
B4
B4
SB0
B3
G2
LR1
LR0
LC_P5
P5
LD2
UD2
G0
B5
SB1
G4
B2
LG1
LG0
LC_P6
P6
LD1
UD1
G1
B6
SB2
R5
R3
LB1
LB0
LC_P7
P7
LD0
UD0
G2
B7
SB3
B5
G3
LR2
LR1
LC_P8
LD7
G3
G0
FG0
CLKU
B3
LG1
LC_P9
LD6
G4
G1
FG1
R4
UB1
LC_P10
LD5
G5
G2
FG2
G4
UR2
LC_P11
LD4
R0
G3
FG3
B4
UG2
LC_P12
LD3
R1
G4
SG0
R5
LG1
LC_P13
LD2
R2
G5
SG1
G5
LB1
LC_P14
LD1
R3
G6
SG2
B5
LR2
LC_P15
LD0
R4
G7
SG3
R6
LG2
LC_P16
R0
FR0
LC_P17
R1
FR1
LC_P18
R2
FR2
LC_P19
R3
FR3
LC_P20
R4
SR0
LC_P21
R5
SR1
LC_P22
R6
SR2
LC_P23
R7
SR3
LC_Backl
Backl
LC_CLK
CLK
LC_DE/M
DE/M
LC_Hsync/LP
Hsync
LC_Vsync/FLM
Vsync
Pixels
per
CLK
SBS Technologies — CT7 Hardware User’s Manual Revision 1.3.2
Artisan Technology Group - Quality Instrumentation ... Guaranteed | (888) 88-SOURCE | www.artisantg.com
Page 40
FUNCTION BLOCKS
Please observe the following:
—
—
Take care when using 9, 12 bit TFT displays: The high order output
lines should be used when only 9 or 12 bits of the 9/12/16 bit TFTinterface are needed. The low order bits should be left unconnected.
Take care when using 18 or 24 bit TFT displays with the 9/12/16 bit
TFT-interface: The high order output lines should be connected to the
high order lines of the display. The remaining low order inputs to the
display should be connected to GND.
Software Installation. Since the Chips & Technologies graphic chip is used
on a large number of computers, many operating systems like OS/2,Windows
NT, Windows 95 and Windows 98 already include high resolution drivers.
The software media (CD-ROM or floppy disks) supplied with the CT7 includes
the most commonly used software drivers and utilities. This software and more
is available from our Website or through Technical Support. See section
“Technical Support” on page 91 for details.
SCSI Interface
SCSI is the abbreviation for “Small Computer System Interface”. The SCSI
bus is a fast, bidirectional parallel bus for communication between computers
and peripheral units. The SCSI bus defines two adapter types, the host adapter
and the peripheral adapter. The host adapter controls the communication between the computer module and the SCSI bus. The peripheral adapter controls
the data transfer between the peripheral units like hard disks, CD-ROM, laser
printer or tape drives and the SCSI bus. Today in most cases the peripheral
adapter is integrated in the applied devices, therefore only cable from the SCSI
host adapter to the peripheral devices is needed.
The SCSI interface on the CT7 is a host interface, consisting of the PCI Bus
SCSI controller Symbios 53C875. This controller chip drives the SCSI protocol in accordance to the ANSI X3.131-1986 (SCSI-1) and ANSI X3.131-199x
(SCSI-2) specification, with the following functions:
—
—
—
—
—
—
—
Arbitration
Selection
Message Handling
Disconnect/Reconnect
Data Bus Parity Checking
Termination of the SCSI Signals
The SCSI interface is terminated on both sides of the connector cable.
The terminator on the CT7 is an active terminator and cannot be
disabled. The CT7 must reside on one end of the SCSI chain. The
other, usually on the peripheral unit must also be an active type. If
more than one unit is connected to the host adapter, all terminators on
the peripheral units must be removed or disabled, except for the one at
the far end of the SCSI cable chain.
Number of SCSI Devices
All units connected to the SCSI bus (including peripheral controller
and the host adapter) must have an unique ID-number with which they
may be accessed. 16 IDs total (0...15), named ID numbers, can be
assigned on the SCSI bus. These ID numbers can be changed by
jumpers or switches located on the device. The SCSI controller on the
CT7 usually reserves the ID number 7, meaning that ID numbers 0...6,
8...15 can be assigned to the peripheral devices. The CT7 SCSI
controller device ID can be altered by means of the SCSI BIOS
SBS Technologies — CT7 Hardware User’s Manual Revision 1.3.2
Artisan Technology Group - Quality Instrumentation ... Guaranteed | (888) 88-SOURCE | www.artisantg.com
Page 41
FUNCTION BLOCKS
—
configuration menu. When using more than two devices on the SCSI
bus, make sure that they all have unique IDs. If there are more SCSI
hard disks in the system, the hard disk with the lowest ID number is the
first hard disk unless SCSI BIOS is used to reverse the scan order or
boot drive selection. The CT7 tries to startup the operating system
from the first hard disk. SCSI scan order can be changed within the
SCSI BIOS configuration. EIDE versus SCSI scan order can be altered
in the system BIOS Setup. Please see the SCSI specification for details
on correct cabling.
Cable characteristic
The characteristic impedance of the cable required is shown below:
Characteristic impedance:
SCSI-2
90 ohms to 132 ohms
Ultra-20
90 ±10 ohm
Signal attenuation:
0,095 dB maximum
per meter at 5 MHz
Pair-to-pair propagation
delay delta:
0,20 ns maximum per meter
DC resistance:
0,230 ohms maximum per meter
For correct operation of the SCSI bus, the cable length shown in the
table below must not be exceeded.
SCSI-Type
Mbyte/s
Bus
No. of
devices
Cable
length
SCSI-2
≤5
8 Bit
8
6m
SCSI-2 Fast
10
8 Bit
8
3m
SCSI-2 Fast Wide
10
8 Bit
8
3m
Ultra
20
8 Bit
≤4
3m
Ultra
20
8 Bit
8
1.5 m
Ultra Wide
40
16 Bit
8
1.5 m
Please observe the following:
—
—
—
—
Using cables within the specified characteristics is necessary for
reliable system operation.
The active Terminator on the CT7 can not be disabled.
The minimum cable length between devices is 20 cm.
The devices should be evenly spaced on the SCSI cable.
Software Installation. The 53C875 SCSI controller provides a total SCSI solution in PC environments with the Symbios SCSI Device Management System (SDMS). SDMS provides driver support for hard disk, removable media
and CD-ROM peripherals for the DOS, Windows 3.xx, Windows95/98/NT,
OS/2 and Novell 3.x, 4.x and various UNIX environments.
The software media (CD-ROM or floppy disks) supplied with the CT7 includes
the most commonly used software drivers and utilities. This software and more
is available from our Website or through Technical Support. See section
“Technical Support” on page 91 for details.
SBS Technologies — CT7 Hardware User’s Manual Revision 1.3.2
Artisan Technology Group - Quality Instrumentation ... Guaranteed | (888) 88-SOURCE | www.artisantg.com
Page 42
FUNCTION BLOCKS
PMC Interface
The PCI Mezzanine Card (PMC) Interface is an additional slot for parallel
mounted expander or option cards. Please see chapter “PCI Mezzanine Card
(PMC)” on page 89 of this manual for further details. The CT7 PMC Connector
interface is described on page 32.
IPMI
A Baseboard management controller (BMC) is implemented on the CT7, the
interfacing between host processor and the system management network. This
controller can also work as a Peripheral management controller (PM). The
BMC is mapped into the local CPUs I/O address space, specified in the “Programmer’s Manual.” The functionality of the IPMI controller is described in
the 'CT7 IPMI Programmer's Manual'.
For information about the System Management in CompactPCI systems,
please refer to the PICMG 2.9 specification 'System Management Specification'. More information about IPMI can be found on the Intel website.
IPMB. The Intelligent Platform Management Bus (IPMB) is an I2C-based bus
that provides a standardized interconnection between different CPCI-boards
within a chassis. The standardized connection to the backplane is shown below:
P7201
Name
Description
B17
IPMB_SCL
Serial Clock
C17
IPMB_SDA
Serial Data
A4
VSM
Power Supply for all IPMI-devices
Private I2C. The Private IPMI I2C bus is equivalent to the SMBus (described
in 'Additional devices/SMB'). The IPMI-controller works as a second Master
on the I2C bus to read the SMBus devices.
Software Installation. The software media (CD-ROM or floppy disks) supplied with the CT7 includes the most commonly used software drivers and utilities. This software and more is available from our Website or through
Technical Support. See section “Technical Support” on page 91 for details.
SBS Technologies — CT7 Hardware User’s Manual Revision 1.3.2
Artisan Technology Group - Quality Instrumentation ... Guaranteed | (888) 88-SOURCE | www.artisantg.com
Page 43
FUNCTION BLOCKS
Ethernet Interface
The Ethernet controller 82559ER from Intel used with the CT7, is a high performance Fast Ethernet 10/100Mbit PCI controller. Two channels are available
on the CT7.
For registration and identification of a workstation in a LAN, a unique ID number is required. Each network card is assigned a unique ID number, which resides in an Ethernet address ROM on the CT7.
An Ethernet boot option can be enabled in BIOS setup. The Ethernet Connector
(front/rear) is selectable via BIOS Setup.
Software Installation. The drivers available for the Ethernet controller
82559ER support a large number of operating systems. The table shows operating systems supported by the available software:
Type
System
ODI
DOS
NDIS
DOS
NDIS
Windows NT 4.0, Windows 98, Windows 2000
The software media (CD-ROM or floppy disks) supplied with the CT7 includes
the most commonly used software drivers and utilities. This software and more
is available from our Website or through Technical Support. See section
“Technical Support” on page 91 for details.
Additional devices
Hot Swap
The Hot Swap compliant CT7 allows the orderly insertion and extraction under
power, without adversely affecting system operation. The Hot Swap process
can be described in terms of three processes:
—
—
—
Physical Connection Process - describes the acts of:
Hot Insertion - by which CT7 is installed in a live system (as a nonsystem CPU)
Hot Extraction - by which CT7 is removed from a live system (as a
non-system CPU)
Hardware Connection Process - Power Up/Down of the CT7 onboard
voltages
Software Connection Process - Connection/disconnection of the
software layer(s)
At the end of the Physical Connection Process (the shortest Pin has connection)
the Hot Swap controller powers up the onboard voltages in a defined manner.
After the handle switches are closed, the 21554 bridge generates an insertionevent, which signals a Hot Swap insertion to the system. The system then scans
the CPCI-bus for changes.
Please note, that the CPCI backplane must support this function and appropriate software must be installed for HotSwap to work properly.
SBS Technologies — CT7 Hardware User’s Manual Revision 1.3.2
Artisan Technology Group - Quality Instrumentation ... Guaranteed | (888) 88-SOURCE | www.artisantg.com
Page 44
FUNCTION BLOCKS
SMB bus devices
The CT7 uses a serial 2-wire I2C bus to communicate with several onboard devices:
Device
Desig.
SMB address
PIIX4 slave port (*)
U1700
0001000Xb
Clock synthesizer (*)
U1000
1101001Xb
Serial Eeprom (24C04)
U1981
101010(A81)Xb
SPD Eeprom Bank 1/2 (*)
U1436
1010000Xb
SPD Eeprom Bank 3/6 (*)
U1437
1010001Xb
SPD Eeprom Bank 5/6 (*)
U1436
1010010Xb
SPD Eeprom Bank 7/8 (*)
U1437
1010011Xb
Temperature sensor (MAX1617A)
U1982
1001111Xb
Devices marked by (*) are handled by BIOS. It is strongly recommended not
to access these devices by user software.
SMBus external
The SMBus is available on the P7002 CPCI connector for external use. The
user is responsible for avoiding any address conflicts with the onboard SMBus
devices.
Temperature Sensor MAX1617A
A Maxim MAX1617A temperature sensor is implemented on the CT7 board.
The sensor is located close to the CPU and shows the die-temperature of the
CPU and the local onboard temperature. The sensor has an over-temperature
output integrated, which can be used to take actions like reducing the CPU
speed. For programming information please see the CT7 'User's and Programmer's Manual '.
More information on the MAX1617A can be found in the data sheet from
MAXIM.
Serial EEPROM
For storage of user data a serial EEPROM is implemented on the CT7 board.
It is a standard 24C04 type EEPROM with 512 bytes. More information about
writing and reading the contents can be found in the data sheets from the manufacturer (e.g. Microchip Technology, SGS Thomson, Atmel, Catalyst and
many others).
SBS Technologies — CT7 Hardware User’s Manual Revision 1.3.2
Artisan Technology Group - Quality Instrumentation ... Guaranteed | (888) 88-SOURCE | www.artisantg.com
Page 45
FUNCTION BLOCKS
Power Management Event
A Power Management Event can be initiated on CT7 by one of the following
events.
Event
Description
ENUM
Wake CT7 a if a non-systemboard is removed or inserted
REMOVE
Wake CT7 if user wants to remove this CT7
Wake on LAN
Wake CT7 by ethernet event
Wake on IO
Wake CT7 by IO-device i.e. Modem, KB, MS, etc.
a.
CT7 in System slot
INTP, INTS
The INTP and INTS signals (PICMG2.0) are available on the P7201_D4/E4.
For CT7 in System Slot, the high active INTP is used as a steerable interrupt
which is routed to any legacy ISA interrupt. In Peripheral Slot, INTP can be
generated to trigger an interrupt in the system board. The corresponding interrupt for INTP is selectable via BIOS Setup.
Please note: Only one peripheral board is allowed to use INTP.
For CT7 in System Slot, the INTS signal can be used as serialized interrupt, in
compliance with the “Serialized IRQ Support for PCI Systems” specification,
Rev. 6.0. INTS is synchronous to the PCI clock an has the requirement of meeting the PCI specification.
ENUM#
ENUM (PICMG 2.0, open-collector) is available on P7201_C25. This signal
shall be driven by hot swap compatible boards after insertion and prior to removal. For CT7 in System Slot, the input ENUM is able to generate an interrupt to force the software to interrogate all boards within the system for
resource allocation regarding I/O, memory and interrupt usage.
If the CT7 works in a peripheral slot, the non-transparent bridge generate the
output ENUM conform to the specification of a Hot Swap compliant board.
For programming information about this PnP device, please see the CT7 'Programmer's Manual '.
Geographic Addressing
If the backplane supports geographic Addressing, the CT7 can detect the
unique Address in a CPCI-System with the GA[4...0] Pins (PICMG 2.0) on
P7202.
For programming information please see the CT7 “Programmer's Manual.” For
more information about geographic addressing in appliance to system management, see PICMG 2.9.
GPIO0/1
Two GPIO-Pins are available on P7205. These Pins are open drain signals with
a 2k2 Ohm pull-up and can be used i.e. for a user I2C-bus. The IO-mapped register GPCR controls the Signals. For more information please see the “Programmer's Manual.”
SBS Technologies — CT7 Hardware User’s Manual Revision 1.3.2
Artisan Technology Group - Quality Instrumentation ... Guaranteed | (888) 88-SOURCE | www.artisantg.com
Page 46
FUNCTION BLOCKS
Watchdog, Powerfail Monitor
For security of application software, the CT7 offers a software controlled hardware watchdog capable of issuing a reset signal if its time-out interval expires.
To prevent the watchdog from generating a reset signal, it must be re-triggered
within a 0.5-second interval by reading the Watchdog Control Register WCR.
Since standard software doesn't trigger the watchdog periodically, it is disabled
after reset. The watchdog function can be enabled via the Watchdog Control
Register WCR. Once the watchdog is enabled, it must be reset periodically by
reading WCR within 0.5 seconds. Otherwise, a reset pulse with duration of 200
msec is generated to restart the system. For more information please see the
“Programmer's Manual.”
Programmable Timer
An additional programmable Timer is implemented on the CT7. The timer can
be programmed to run only once, or in repeat mode. The timer can generate an
Interrupt. For more information please see the “Programmer's Manual.”
Timer values: 200us; 500us; 1.00ms; 4.00 ms; 5.00ms; 10.0ms; 20.0ms
LED Outputs
Three LED’s are available at the front panel.
Color
Function
Blue
Red
Hot Swap LED
Fail
Green
run
In Reset State, red LED is on state. The green LED is off.
During power up, BIOS turns both LED's off to indicate the CT7 has started.
Before entering the OS boot sequence, the green LED is turned on. While in
the OS, user software is free to use both LED's for their own purpose.
For further information please see the “Programmer's Manual.”
Reset Button
There is a Reset Button onboard. An external Reset button may be connected
between the appropriate IO connector at the back side and GND. The PRST#
on P7202_C42 (PICMG2.0) is used as Reset input only for the system board
and is in this case, compatible to the onboard button.
—
If the CT7 works as a System board:
The push button will issue a hard power on reset. The reset signal is active for all subsystems of the CT7.
—
If the CT7 works as a Peripheral board:
1) The push button will issue a hard power On reset. The reset signal is
active for the CT7 including PMC modules, but will not reset other peripherals or the System board.
2) The CT7 will signal a HotSwap Insertion event when reset.
Speaker
An external standard PC compatible speaker may be connected between the appropriate IO connector at the backside and +5V.
SBS Technologies — CT7 Hardware User’s Manual Revision 1.3.2
Artisan Technology Group - Quality Instrumentation ... Guaranteed | (888) 88-SOURCE | www.artisantg.com
Page 47
CHAPTER 7
Specifications
PCB
FR4 Multilayer
Size
Total board size: 6U, 4 HP
Total size with optional extension board 8HP
Dimensions
PCB: 233,35 mm x 178 mm x 40 mm (with extension board)
Weight
approx. 650 g (with frontpanel, extension board, HDD, CPU, and heatsink), depending on model and style
Power Consumption
The following table is intended to help you calculate the power consumption
of a CT7 system. For measurement, the CT7 board is mounted on a CPCI backplane, without keyboard and hard disk. The operation system (MS-DOS)
comes up from floppy disk. During measurement, the power consumption of
the backplane and the floppy drive can be ignored.
Order No.
Configuration
Typical Current at +5V
with Power
Management
without Power
Management
CT7P722500F0C
Celeron 400 MHz
64 MB SDRAM
66 MHz FSB
1,7 A
4,5 A
CT7P846xx1FxC
Celeron 500 MHz
128 MB SDRAM
100 MHz FSB
2 x Ethernet
WideSCSI
2,1 A
3,8 A
SBS Technologies — CT7 Hardware User’s Manual Revision 1.3.2
Artisan Technology Group - Quality Instrumentation ... Guaranteed | (888) 88-SOURCE | www.artisantg.com
Page 48
SPECIFICATIONS
Order No.
CT7P84880480C
Configuration
PIII 850 MHz
1 GB SDRAM
100 MHz FSB
2 x Ethernet
WideSCSI
4 MB VGA
—
—
—
Typical Current at +5V
with Power
Management
without Power
Management
3,0 A
6,5 A
For a keyboard connected add 100 mA (typical).
With extension board ET7 installed add 400 mA (typical).
Connectors P1700, P2001, and P4200 provide fused VCC voltage
(+5V). The total current drawn from this source may not exceed 1,0 A.
Methods for measurement are defined as follows:
DOS prompt with power management
—
—
—
—
—
Boot disk with MS-DOS 6.22
no autoexec.bat
config.sys: device=power.exe adv
wait until CPU enters HTL state
measure current on DOS prompt
DOS prompt without power management
—
—
—
—
Boot disk with MS-DOS 6.22
no autoexec.bat
config.sys: device=power.exe off
measure current on DOS prompt
Onboard Lithium
Battery
BR2032, estimated life time approx. 10 years (45°C)
External Battery Input
Input range 2,7 to 4,5 V, max. current (3,0 V) 5 uA
Environment
Conditions
Ambient temperatures and humidity values for the CT7:
High Temperature
— Storage
— Operating (see diagram below)
Low Temperature
— Storage
— Operating
Temperature Shock
— Storage
— Operating
C-Style
I-Style
+85°C
+85°C
-40°C
0°C
-40°C
-40°C
±10 °C/min
± 5 °C/min
± 20 °C/min
± 10 °C/min
SBS Technologies — CT7 Hardware User’s Manual Revision 1.3.2
Artisan Technology Group - Quality Instrumentation ... Guaranteed | (888) 88-SOURCE | www.artisantg.com
Page 49
SPECIFICATIONS
C-Style
Rel. Humidity
— Storage
— Operating
I-Style
up to 95%, non-condensing
up to 95%, non-condensing
For highest operating temperatures (C-Style and I-Style) please refer to the following diagram:
—
—
—
The highest admissible operating temperature for the CT7
CompactPCI Single Board Computer is 70°C!
0 m/s airflow means convention cooled only.
The core temperature of the CPU can be read out via the onboard
temperature sensor. The value must be kept within the limits in the
following table for all operating conditions. These temperature values
are already included in the airspeed diagram above.
CPU Type / Speed
max. Tcore
Mobile Celeron 400 MHz
100°C
Mobile Pentium III 500 MHz
100°C
Celeron FCPGA 566 MHz
90°C
Pentium III 700 MHz
80°C
Pentium III 850 MHz
80°C
Pentium III 1 GHz
75°C
SBS Technologies — CT7 Hardware User’s Manual Revision 1.3.2
Artisan Technology Group - Quality Instrumentation ... Guaranteed | (888) 88-SOURCE | www.artisantg.com
Page 50
SPECIFICATIONS
Electrical
Characteristics
The supply voltages are +5V, +12V and -12V if needed on the PMC slot. All
Output or Input voltages of the CT7 boards have an overcurrent protection. The
maximum current for each voltage is shown below.
Name
U
Imax
Description
Fuse
+5VIN
5V
10,6A
Main Power supply voltage
U7700 a
+12VIN
12V
0,85A
Supply for HotSwap controller and PMC-Module
U7700 a
-12VIN
-12V
0,45A
Supply for PMC-Modul
U7700 a
FUSE_VCC
5V
2A
Supply for Frontpanel IOs: KB/MS, USB, CRT-DCD
F9001 b
SCSI_TERMPW
5V
2A
Power for SCSI Termination
F6001 b
a.
b.
LTC1643L-1CGN (Linear Technologies)
TPS2034D (Texas Instruments)
Please note: A short circuit on FUSE_VCC or SCSI_TERMPW will result in
a power fail condition and all onboard voltages of the CT7 will be shut down.
To restart the system, switch the Power off and on again.
SBS Technologies — CT7 Hardware User’s Manual Revision 1.3.2
Artisan Technology Group - Quality Instrumentation ... Guaranteed | (888) 88-SOURCE | www.artisantg.com
Page 51
SPECIFICATIONS
Placement Plan
Placement Plan Component Side CT7 Version 3
SBS Technologies — CT7 Hardware User’s Manual Revision 1.3.2
Artisan Technology Group - Quality Instrumentation ... Guaranteed | (888) 88-SOURCE | www.artisantg.com
Page 52
SPECIFICATIONS
Placement Plan Solder Side CT7 Version 3
SBS Technologies — CT7 Hardware User’s Manual Revision 1.3.2
Artisan Technology Group - Quality Instrumentation ... Guaranteed | (888) 88-SOURCE | www.artisantg.com
Page 53
SPECIFICATIONS
Placement Plan Component Side CT7 Version 4
SBS Technologies — CT7 Hardware User’s Manual Revision 1.3.2
Artisan Technology Group - Quality Instrumentation ... Guaranteed | (888) 88-SOURCE | www.artisantg.com
Page 54
SPECIFICATIONS
Placement Plan Solder Side CT7 Version 4
SBS Technologies — CT7 Hardware User’s Manual Revision 1.3.2
Artisan Technology Group - Quality Instrumentation ... Guaranteed | (888) 88-SOURCE | www.artisantg.com
Page 55
Appendix A: Extension
Board ET7
The 6U ET7 extension board is designed as a PCI extension to the CT7 CompactPCI Single Board Computer. It meets the needs of embedded application
developers for more PCI backplane slots and PMC extensions.
The ET7 has two PCI bridges on board. One bridge drives two 64bit PMC slots,
the other offers a PCIbus for a second 64bit CompactPCI backplane besides the
primary bus at the CT7 system board. This design allows up to 14 PCI slots
withput the impact of performance loss of chained PCI bridges.
Please note that the ET7 is an optional accessory sold separately.
SBS Technologies — CT7 Hardware User’s Manual Revision 1.3.2
Artisan Technology Group - Quality Instrumentation ... Guaranteed | (888) 88-SOURCE | www.artisantg.com
Page 56
EXTENSION BOARD ET7
ET7 Connectors
This chapter describes all connector pinouts on the ET7 extension board. Apart
from this extension board, the CTM10 transition module and a transition module with mechanical size compliant with IEEE 1101.11-1998 are also available
(CT7-TM).
CPCI connector reference
The CPCI specification numbers the CPCI connectors from bottom to top J1,
J2, J3, J5. The CPCI connectors on the ET7 are P301, P302, P303, P305 respectively.
Signal groups
Determiner
PMC IO Signals
PMCIO_...
nc
not connected
SBS Technologies — CT7 Hardware User’s Manual Revision 1.3.2
Artisan Technology Group - Quality Instrumentation ... Guaranteed | (888) 88-SOURCE | www.artisantg.com
Page 57
EXTENSION BOARD ET7
CompactPCI P301 and P302
This connector is used for connection to a standard CPCI backplane. The signals shown here form the secondary PCI bus.
P301
A
B
C
D
E
F
1
+5V
-12V
nc
+12V
+5V
GND
2
nc
+5V
nc
nc
nc
GND
3
\INTA
\INTB
\INTC
+5V
\INTD
GND
4
nc
GND
VIO
nc
nc
GND
5
nc
nc
\PCI_RST
GND
\GNT0
GND
6
\REQ0
GND
nc
PCICLK0
AD31
GND
7
AD30
AD29
AD28
GND
AD27
GND
8
AD26
GND
VIO
AD25
AD24
GND
9
\C/BE3
nc
AD23
GND
AD22
GND
10
AD21
GND
nc
AD20
AD19
GND
11
AD18
AD17
AD16
GND
\C/BE2
GND
12-14
KEY
KEY
KEY
KEY
KEY
KEY
15
nc
\FRAME
\IRDY
GND
\TRDY
GND
16
\DEVSEL
GND
VIO
\STOP
\LOCK
GND
17
nc
nc
nc
GND
\PERR
GND
18
\SERR
GND
nc
PAR
\C/BE1
GND
19
nc
AD15
AD14
GND
AD13
GND
20
AD12
GND
VIO
AD11
AD10
GND
21
nc
AD9
AD8
nc
\C/BE0
GND
22
AD7
GND
nc
AD6
AD5
GND
23
nc
AD4
AD3
+5V
AD2
GND
24
AD1
+5V
nc
AD0
\ACK64
GND
25
+5V
\REQ64
\ENUM
nc
+5V
GND
P302
A
B
C
D
E
F
1
PCICLK1
GND
\REQ1
\GNT1
\REQ2
GND
2
PCICLK2
PCICLK3
nc
\GNT2
\REQ3
GND
3
PCICLK4
GND
\GNT3
\REQ4
\GNT4
GND
4
VIO
nc
\C/BE7
GND
\C/BE6
GND
5
\C/BE5
GND
VIO
\C/BE4
PAR64
GND
6
AD63
AD62
AD61
GND
AD60
GND
7
AD59
GND
VIO
AD58
AD57
GND
8
AD56
AD55
AD54
GND
AD53
GND
9
AD52
GND
VIO
AD51
AD50
GND
10
AD49
AD48
AD47
GND
AD46
GND
11
AD45
GND
VIO
AD44
AD43
GND
12
AD42
AD41
AD40
GND
AD39
GND
13
AD38
GND
VIO
AD37
AD36
GND
14
AD35
AD34
AD33
GND
AD32
GND
15
nc
GND
\FAL
\REQ5
\GNT5
GND
16
nc
nc
\DEG
GND
nc
GND
17
nc
GND
nc
\REQ6
\GNT6
GND
18
nc
nc
nc
GND
nc
GND
19
GND
GND
nc
nc
nc
GND
20
PCICLK5
GND
nc
GND
nc
GND
21
PCICLK6
GND
nc
nc
nc
GND
22
nc
nc
nc
nc
nc
GND
SBS Technologies — CT7 Hardware User’s Manual Revision 1.3.2
Artisan Technology Group - Quality Instrumentation ... Guaranteed | (888) 88-SOURCE | www.artisantg.com
Page 58
EXTENSION BOARD ET7
I/O Connector P303 and P305
P303
A
B
C
D
E
F
1
VCC
PMCIO_64
PMCIO_63
PMCIO_62
PMCIO_61
GND
2
PMCIO_60
PMCIO_59
PMCIO_58
PMCIO_57
PMCIO_56
GND
3
PMCIO_55
PMCIO_54
PMCIO_53
PMCIO_52
PMCIO_51
GND
4
PMCIO_50
PMCIO_49
PMCIO_48
PMCIO_47
PMCIO_46
GND
5
PMCIO_45
PMCIO_44
PMCIO_43
PMCIO_42
PMCIO_41
GND
6
PMCIO_40
PMCIO_39
PMCIO_38
PMCIO_37
PMCIO_36
GND
7
PMCIO_35
PMCIO_34
PMCIO_33
PMCIO_32
PMCIO_31
GND
8
PMCIO_30
PMCIO_29
PMCIO_28
PMCIO_27
PMCIO_26
GND
9
PMCIO_25
PMCIO_24
PMCIO_23
PMCIO_22
PMCIO_21
GND
10
PMCIO_20
PMCIO_19
PMCIO_18
PMCIO_17
PMCIO_16
GND
11
PMCIO_15
PMCIO_14
PMCIO_13
PMCIO_12
PMCIO_11
GND
12
PMCIO_10
PMCIO_9
PMCIO_8
PMCIO_7
PMCIO_6
GND
13
PMCIO_5
PMCIO_4
PMCIO_3
PMCIO_2
PMCIO_1
GND
14
VCC3
VCC3
VCC3
VCC
VCC
GND
15
nc
nc
nc
nc
nc
GND
16
nc
nc
nc
nc
nc
GND
17
nc
nc
nc
nc
nc
GND
18
nc
nc
nc
nc
nc
GND
19
nc
nc
nc
nc
nc
GND
P305
A
B
C
D
E
F
1
nc
nc
nc
nc
nc
GND
2
nc
nc
nc
nc
nc
GND
3
nc
nc
nc
nc
nc
GND
4
nc
nc
nc
nc
nc
GND
5
nc
nc
nc
nc
nc
GND
6
nc
nc
nc
nc
nc
GND
7
nc
nc
nc
nc
nc
GND
8
nc
nc
nc
nc
nc
GND
9
nc
nc
nc
nc
nc
GND
10
VCC
PMCIO_64
PMCIO_63
PMCIO_62
PMCIO_61
GND
11
PMCIO_60
PMCIO_59
PMCIO_58
PMCIO_57
PMCIO_56
GND
12
PMCIO_55
PMCIO_54
PMCIO_53
PMCIO_52
PMCIO_51
GND
13
PMCIO_50
PMCIO_49
PMCIO_48
PMCIO_47
PMCIO_46
GND
14
PMCIO_45
PMCIO_44
PMCIO_43
PMCIO_42
PMCIO_41
GND
15
PMCIO_40
PMCIO_39
PMCIO_38
PMCIO_37
PMCIO_36
GND
16
PMCIO_35
PMCIO_34
PMCIO_33
PMCIO_32
PMCIO_31
GND
17
PMCIO_30
PMCIO_29
PMCIO_28
PMCIO_27
PMCIO_26
GND
18
PMCIO_25
PMCIO_24
PMCIO_23
PMCIO_22
PMCIO_21
GND
19
PMCIO_20
PMCIO_19
PMCIO_18
PMCIO_17
PMCIO_16
GND
20
PMCIO_15
PMCIO_14
PMCIO_13
PMCIO_12
PMCIO_11
GND
21
PMCIO_10
PMCIO_9
PMCIO_8
PMCIO_7
PMCIO_6
GND
22
PMCIO_5
PMCIO_4
PMCIO_3
PMCIO_2
PMCIO_1
GND
SBS Technologies — CT7 Hardware User’s Manual Revision 1.3.2
Artisan Technology Group - Quality Instrumentation ... Guaranteed | (888) 88-SOURCE | www.artisantg.com
Page 59
EXTENSION BOARD ET7
PMC Connectors P201, P202, P203, P211, P212, and P213
The following table lists the pin assignments of the PMC connectors for PMC1
and PMC2.
P201
P211
P202
P212
P203
P213
Pin
Pin
P201
P211
P202
P212
nc
+12V
nc
01
GND
nc
GND
03
/INTA
nc
C/BE6
nc
GND
C/BE4
/INTC
RES.
GND
PCLK_PMC
P203
P213
02
-12V
nc
GND
04
/INTD
nc
C/BE7
05
06
/INTB
GND
C/BE5
07
08
VCC
RES.
GND
Vcc
09
10
nc
RES.
PAR64
Vcc
AD63
11
12
nc
+3.3V
AD62
/PCIRST
AD61
13
14
GND
GND
GND
GND
+3.3V
GND
15
16
/GNT0
GND
AD60
/REQ0
RES.
AD59
17
18
VCC
GND
AD58
VCC
AD30
AD57
19
20
AD31
AD29
GND
AD28
GND
Vcc
21
22
AD27
AD26
AD56
AD25
AD24
AD55
23
24
GND
+3.3V
AD54
GND
AD20
AD53
25
26
C/BE3
AD23
GND
AD22
+3.3V
GND
27
28
AD21
AD20
AD52
AD19
AD18
AD51
29
30
VCC
GND
AD50
VCC
AD16
AD49
31
32
AD17
C/BE2
GND
/FRAME
GND
GND
33
34
GND
RES.
AD48
GND
/TRDY
AD47
35
36
/IRDY
+3.3V
AD46
/DEVSEL
GND
AD45
37
38
VCC
/STOP
GND
GND
/PERR
VCC
39
40
/LOCK
GND
AD44
SDONE
+3.3V
AD43
41
42
/SBO
/SERR
AD42
PAR
C/BE1
AD41
43
44
GND
GND
GND
VCC
AD14
GND
45
46
AD15
AD13
AD40
AD12
GND
AD39
47
48
AD11
AD10
AD38
AD9
AD8
AD37
49
50
VCC
+3.3V
GND
GND
AD7
GND
51
52
C/BE0
RES.
AD36
AD6
+3.3V
AD35
53
54
AD5
RES.
AD34
AD4
RES.
AD33
55
56
GND
GND
GND
VCC
nc
Vcc
57
58
AD3
nc
AD32
AD2
GND
nc
59
60
AD1
GND
nc
AD0
/ACK64
nc
61
62
VCC
+3.3V
GND
GND
GND
GND
63
64
/REQ64
RES.
nc
PMC-I/O connector (P204, P214)
Pin 1 of the I/O connector is named PMCIO_01, Pin 2 is PMCIO_02 and so on.
All pins of P204 are directly routed to the corresponding pin at P303. The same
applies to P214 and P305.
SBS Technologies — CT7 Hardware User’s Manual Revision 1.3.2
Artisan Technology Group - Quality Instrumentation ... Guaranteed | (888) 88-SOURCE | www.artisantg.com
Page 60
EXTENSION BOARD ET7
Assembly ET7 to CT7
Please see the following figure for installation instructions:
SBS Technologies — CT7 Hardware User’s Manual Revision 1.3.2
Artisan Technology Group - Quality Instrumentation ... Guaranteed | (888) 88-SOURCE | www.artisantg.com
Page 61
EXTENSION BOARD ET7
Placement Plan
Placement Plan Component Side
SBS Technologies — CT7 Hardware User’s Manual Revision 1.3.2
Artisan Technology Group - Quality Instrumentation ... Guaranteed | (888) 88-SOURCE | www.artisantg.com
Page 62
EXTENSION BOARD ET7
Placement Plan Solder Side
SBS Technologies — CT7 Hardware User’s Manual Revision 1.3.2
Artisan Technology Group - Quality Instrumentation ... Guaranteed | (888) 88-SOURCE | www.artisantg.com
Page 63
Appendix B: Transition
Module CTM10
The CTM10 transition module is used for easy connection of I/O signals to
standard connectors. Additional +5V Power should be provided to the CTM10
via P18/P17 to supply IDE, keyboard, mouse, and floppy disk.
Please refer to the drawing for the location of available interfaces:
LCD
PMCIO
IDE
LPT1
COM1
COM2
SCSI
VGA
UW-SCSI
Misc.
LAN1
Floppy Disk
SBS Technologies — CT7 Hardware User’s Manual Revision 1.3.2
Artisan Technology Group - Quality Instrumentation ... Guaranteed | (888) 88-SOURCE | www.artisantg.com
LAN2
Page 64
TRANSITION MODULE CTM10
CTM10 Interfaces
This chapter describes all connector pinouts on the CTM10 transition module.
IDE Connector P1800
The IDE interface is designed as a 40-pin 2,54mm pitch male connector to fit
directly to one or two external IDE hard drives. The cable length must not exceed 30 cm.
Name
P1800
Name
GND
2
1
\RST_DRV
HD_D8
4
3
HD_D7
HD_D9
6
5
HD_D6
HD_D10
8
7
HD_D5
HD_D11
10
9
HD_D4
HD_D12
12
11
HD_D3
HD_D13
14
13
HD_D2
HD_D14
16
15
HD_D1
HD_D15
18
17
HD_D0
nc
20
19
GND
GND
22
21
HD_DRQ0
GND
24
23
\HD_IOW
GND
26
25
\HD_IOR
nc
28
27
HD_RDY
GND
30
29
HD_DAK0
nc
32
31
HD_IRQ
nc
34
33
HD_A1
HD_A2
36
35
HD_A0
\HD_CS3
38
37
\HD_CS1
GND
40
39
nc
+5V
nc
SBS Technologies — CT7 Hardware User’s Manual Revision 1.3.2
Artisan Technology Group - Quality Instrumentation ... Guaranteed | (888) 88-SOURCE | www.artisantg.com
+5V
GND
Page 65
TRANSITION MODULE CTM10
Ethernet Interface 10BaseT and 100BaseTX P5100 and P5700
The Ethernet interfaces for Rear-IO requires usage of CAT 5 cable which contains separate transmit and receive pairs for proper operation with 100BaseTX.
For operation with 10BaseT, a CAT 3 cable or better is required. The Ethernet
output (Front or Rear) is software selectable for each Channel.
Name
Ethernet1 P5100 and Ethernet2 P5700
TXD+ (RJ1)
1
TXD- (RJ2)
2
RXD+ (RJ3)
5
BIAS1 (RJ4)
3
BIAS1 (RJ5)
4
RXD- (RJ6)
6
BIAS2 (RJ7)
7
BIAS2 (RJ8)
8
FGND
9,10
Note: BIAS1 and BIAS2 are connected via a resistor bridge to the center tabs
of the input and output transformers.
SBS Technologies — CT7 Hardware User’s Manual Revision 1.3.2
Artisan Technology Group - Quality Instrumentation ... Guaranteed | (888) 88-SOURCE | www.artisantg.com
Page 66
TRANSITION MODULE CTM10
Parallel Interface LPT1 P2002
Name
P2002
\Strobe
1
D0
3
D1
5
D2
7
D3
9
D4
11
D5
13
D6
15
D7
17
\ACK
19
BUSY
21
PE
23
SLCT
25
\AUTOFEED
2
\ERROR
4
\INIT
6
\SLCTIN
8
GND
10,12,14,16,18,20,22,24
+5V unfused
a.
a
26
+5V supply via CTM10
SBS Technologies — CT7 Hardware User’s Manual Revision 1.3.2
Artisan Technology Group - Quality Instrumentation ... Guaranteed | (888) 88-SOURCE | www.artisantg.com
Page 67
TRANSITION MODULE CTM10
Serial Interfaces COM1 P2200 and COM2 P2201
The CT7 offers two RS232 serial ports. All COM ports are accessible via the
transition module.
Name
COM1 P2200 and COM2 P2201
\DCD
1
\DSR
2
RXD
3
\RTS
4
TXD
5
\CTS
6
\DTR
7
\RI
8
GND
9
+5V unfused a
10
a.
+5V supply via CTM10
SBS Technologies — CT7 Hardware User’s Manual Revision 1.3.2
Artisan Technology Group - Quality Instrumentation ... Guaranteed | (888) 88-SOURCE | www.artisantg.com
Page 68
TRANSITION MODULE CTM10
VGA Interface P4300
The monitor signals are available on P4300.
Name
P4300
RED
2
GREEN
4
BLUE
6
HSYNC
8
VSYNC
10
DDC-Data
n.a.
DDC-Clock
n.a.
Fused +5V
n.a.
GND
1, 3, 5, 7, 9
nc
-
n.a. not available
SBS Technologies — CT7 Hardware User’s Manual Revision 1.3.2
Artisan Technology Group - Quality Instrumentation ... Guaranteed | (888) 88-SOURCE | www.artisantg.com
Page 69
TRANSITION MODULE CTM10
Floppy connector P2003/2004
The CTM10 provides a connector for direct adaptation of a floppy drive via a
standard 2.54 mm 34-pin connector:
Alternatively, you can use a 26-pin foil cable connector:
Name
P2003
P2004
\INDEX
2
8
\DRVSEL
4
12
\DSKCHG
6
34
\MOTOR
10
16
\DIR
12
18
\STEP
14
20
\WRDATA
16
22
\WGATE
18
24
\TRACK0
20
26
\WRPROT
22
28
\RDDATA
24
30
\HDSEL
26
32
GND
15, 17, 19, 21, 23, 25
1, 3, 5, 7, 9, 11, 13, 15, 17,
19, 21, 23, 25, 27, 29, 31, 33
+5V unfused a
1, 3, 5
-
nc
7, 8, 9, 11, 13
2, 4, 6, 10, 14
a.
+5V supply via CTM10
SBS Technologies — CT7 Hardware User’s Manual Revision 1.3.2
Artisan Technology Group - Quality Instrumentation ... Guaranteed | (888) 88-SOURCE | www.artisantg.com
Page 70
TRANSITION MODULE CTM10
LCD/Panel connector P4100
A 42-pin header is mounted on the transition module to be used with LCD displays or for the connection to our external panel 'LCD1'. The high level of all
LCD signals is 3.3V.
Name
P4100
Name
COM2-TXD
1
2
KBCLK
3
4
KBDAT
enableVCC
5
6
enableVEE
BACKL
7
8
DE
GND
9
10
P16
P04
11
12
P03
P02
13
14
P01
P00
15
16
GND
P10
17
18
P09
P08
19
20
P07
P06
21
22
P05
GND
23
24
P17
P15
25
26
P14
P13
27
28
P12
P11
29
30
GND
VSYNC
31
32
HSYNC
CLK
33
34
GND
P18
35
36
P19
P20
37
38
P21
P22
39
40
P23
COM2-RXD
For the function of the signals P00...P23 please see chapter “LCD Signal Mapping” on page 40.
SBS Technologies — CT7 Hardware User’s Manual Revision 1.3.2
Artisan Technology Group - Quality Instrumentation ... Guaranteed | (888) 88-SOURCE | www.artisantg.com
Page 71
TRANSITION MODULE CTM10
Ultra Wide SCSI connector P6001
The UltraWide SCSI interface is a standard 16-bit SCSI 68 pin connector.
.
Name
P6001
Name
\D12
35
1
GND
\D13
36
2
GND
\D14
37
3
GND
\D15
38
4
GND
\DP1
39
5
GND
\D0
40
6
GND
\D1
41
7
GND
\D2
42
8
GND
\D3
43
9
GND
\D4
44
10
GND
\D5
45
11
GND
\D6
46
12
GND
\D7
47
13
GND
\DP0
48
14
GND
GND
49
15
GND
GND
50
16
GND
a
51
17
TERMPWR a
TERMPWR a
52
18
TERMPWR a
nc
53
19
nc
GND
54
20
GND
\ATN
55
21
GND
GND
56
22
GND
\BUSY
57
23
GND
\ACK
58
24
GND
\RST
59
25
GND
\MSG
60
26
GND
\SEL
61
27
GND
\C/D
62
28
GND
\REQ
63
29
GND
\IO
64
30
GND
\D8
65
31
GND
\D9
66
32
GND
\D10
67
33
GND
\D11
68
34
GND
TERMPWR
a.
Termination voltage from CT7
SBS Technologies — CT7 Hardware User’s Manual Revision 1.3.2
Artisan Technology Group - Quality Instrumentation ... Guaranteed | (888) 88-SOURCE | www.artisantg.com
Page 72
TRANSITION MODULE CTM10
SCSI connector P6000
This SCSI interface is a standard 8-bit SCSI 50 pin connector.
Name
P6000
\D0
2
1
GND
\D1
4
3
GND
\D2
6
5
GND
\D3
8
7
GND
\D4
10
9
GND
\D5
12
11
GND
\D6
14
13
GND
\D7
16
15
GND
\DP
18
17
GND
GND
20
19
GND
GND
22
21
GND
24
23
nc
26
25
nc
nc
28
27
nc
GND
30
29
GND
\ATN
32
31
GND
GND
34
33
GND
\BUSY
36
35
GND
\ACK
38
37
GND
\RST
40
39
GND
\MSG
42
41
GND
\SEL
44
43
GND
\C/D
46
45
GND
\REQ
48
47
GND
\IO
50
49
GND
nc
TERMPWR
a.
a
Name
Termination voltage from CT7
PMC-I/O connector P7400
Pin 1 of the I/O connector is GPIO1, Pin 2 is GPIO2 and so on. No traces are
connected to any signal onboard.
SBS Technologies — CT7 Hardware User’s Manual Revision 1.3.2
Artisan Technology Group - Quality Instrumentation ... Guaranteed | (888) 88-SOURCE | www.artisantg.com
Page 73
TRANSITION MODULE CTM10
Misc. connector P2000
Name
P2000
nc
1
2
nc
3
4
nc
GND
5
6
\RST_BUT
+5V unfused a
7
8
\SPEAKER
+5V unfused
a
9
10
\WDG_REL
+5V unfused
a
11
12
\LED
+5V unfused a
13
14
MOUSE_CLK
GND
15
16
MOUSE_DAT
17
18
KBD_CLK
GND
19
20
KBD_DATA
+5V unfused a
21
22
USB1-
USB1+
23
24
USB2-
USB2+
25
26
GND
GND
27
28
VBATIN b
nc
29
30
VIO c
+5V unfused
a.
b.
c.
a
Name
nc
+5V supply via CTM10
VBATIN is used to connect an external battery to CT7
VIO is the I/O voltage of the PMC slot and is connected to +5V on the CT
SBS Technologies — CT7 Hardware User’s Manual Revision 1.3.2
Artisan Technology Group - Quality Instrumentation ... Guaranteed | (888) 88-SOURCE | www.artisantg.com
Page 74
TRANSITION MODULE CTM10
Placement Plan
Mechanical Data
SBS Technologies — CT7 Hardware User’s Manual Revision 1.3.2
Artisan Technology Group - Quality Instrumentation ... Guaranteed | (888) 88-SOURCE | www.artisantg.com
Page 75
Appendix C: Transition
Module CT7-TM
The CT7-TM is a transition module which is used to route I/O signals from the
CT7 Pentium PC/AT Compatible 6U CompactPCI® Single Board Computer
with HotSwap to both front panel and onboard connectors for interface to external peripherals.
PMC
Misc.
LCD
IDE
UW-SCSI
SCSI
USB
LPT1
COM2
COM1
VGA
Keyboard LAN2
Mouse
LAN1
The module is a 6U x 80mm rear I/O module which has to be plugged into the
CT7 with the backplane between. It has a video connector which is fully compatible with the VGA standard connector and pinout. Plug your video monitor
into this connector. Make sure that your selected chassis supports this type of
rear I/O transition module.
The CT7-TM transition module is compliant with IEEE 1101.11-1998.
SBS Technologies — CT7 Hardware User’s Manual Revision 1.3.2
Artisan Technology Group - Quality Instrumentation ... Guaranteed | (888) 88-SOURCE | www.artisantg.com
Page 76
TRANSITION MODULE CT7-TM
The CT7 Single Board Computer has two Ethernet LAN ports routed to both
the front and the rear. Additionally, a SCSI, an UltraWide SCSI and IDE interface are routed to the rear of the card. The signals of these interfaces can be
routed to the CT7-TM transition module. Only passive components are used,
including the two LAN transformers.
The availability of the secondary IDE interface of the transition module and the
SCSI connectors are mutually exclusive.
Please note that no power connectors are available on the transition module for
external peripherals.
The following sections describe the functions and interfaces in detail.
CT7-TM Interfaces
This chapter describes connector pinouts on the CT7-TM transition module.
The following connectors are available on this module:
—
Transition nodule front panel connectors
—
Two Ethernet RJ45 connectors
—
Mini DIN for Keyboard/Mouse combo
—
Two full-size 9-Pin Dsub connectors
—
One USB Port
—
Full-size 15-Pin Dsub VGA connector
—
LPT connector in mini 25-Pin format
—
Transition module onboard connectors
—
IDE
—
68-Pin SCSI connector
—
50-Pin SCSI connector
—
34-Pin Floppy connector
—
42-Pin LCD connector
—
64-Pin PMC IO connector
—
10-Pin Misc. connector
Ethernet RJ1 and RJ2
Two RJ45 Ethernet connectors are mounted the the transition module’s front
panel.
Name
Ethernet1 and Ethernet2
TXD+ (RJ1)
1
TXD- (RJ2)
2
RXD+ (RJ3)
3
BIAS1 (RJ4)
4
BIAS1 (RJ5)
5
RXD- (RJ6)
6
BIAS2 (RJ7)
7
BIAS2 (RJ8)
8
left
LED
right
LED
FGND
SBS Technologies — CT7 Hardware User’s Manual Revision 1.3.2
Artisan Technology Group - Quality Instrumentation ... Guaranteed | (888) 88-SOURCE | www.artisantg.com
Page 77
TRANSITION MODULE CT7-TM
Keyboard / Mouse J6
The keyboard/mouse interface consists of six electrical connections provided
on a 6-pin circular mini-DIN connector (PS/2-style). Two terminal connections
are for communication between the keyboard and the keyboard interface port.
Two similar connections are for communication between the mouse and the
mouse interface port. All four of these signals are CMOS compatible. The two
remaining connections provide power for mouse and keyboard operation.
Pin
Signal
Function
1
KDATA
Bidirectional serial data to/from keyboard
2
MDATA
Bidirectional serial data to/from mouse
3
GND
Digital Ground (0 volt) reference to keyboard
4
FVCC
+5 volt power to the keyboard
5
KBCLK
Bidirectional data clock to/from keyboard
6
MSCLK
Bidirectional data clock to/from mouse
VGA J9
Monitor signals are available at the front panel on a standard 15-pin female
D-Sub connector.
Pin
Signal
Pin
Signal
1
RED
9
NC
2
GRN
10
GND
3
BLU
11
NC
4
NC
12
NC
5
GND
13
RHSYNC
6
GND
14
RVSYNC
7
GND
15
NC
8
GND
SBS Technologies — CT7 Hardware User’s Manual Revision 1.3.2
Artisan Technology Group - Quality Instrumentation ... Guaranteed | (888) 88-SOURCE | www.artisantg.com
Page 78
TRANSITION MODULE CT7-TM
COM1 J7 and COM2 J8
The two serial ports terminate into two full sized 9-Pin D-Sub connectors
mounted on the front panel.
COM1
54321
9876
COM2
54321
9876
Pin
Signal
Function
1
#DCD
Data carrier detect (low active)
2
RXD
Receive data
3
TXD
Transmit data
4
#DTR
Data terminal ready (low active)
5
GND
Ground
6
#DSR
Digital signal ready (low active)
7
#RTS
Ready to send (low active)
8
#CTS
Clear to send (low active)
9
RI
Ring Indicator
SBS Technologies — CT7 Hardware User’s Manual Revision 1.3.2
Artisan Technology Group - Quality Instrumentation ... Guaranteed | (888) 88-SOURCE | www.artisantg.com
Page 79
TRANSITION MODULE CT7-TM
LPT1 J10
A 25-pin parallel port male connector is available at the front panel to connect
a printer using a standard centronics cable.
Pin
Signal
Pin
Signal
1
L1_STRQ/
14
L1_AFED/
2
L1_D0
15
L1_ERRO/
3
L1_D1
16
L1_INIT/
4
L1_D2
17
L1_SLIN/
5
L1_D3
18
GND
6
L1_D4
19
GND
7
L1_D5
20
GND
8
L1_D6
21
GND
9
L1_D7
22
GND
10
L1_ACK/
23
GND
11
L1_BUSY
24
GND
12
L1_PE
25
GND
13
L1_SLCT
USB J11
One USB channel is available at the front panel.
Pin
Signal
1
VCC
2
USB0-
3
USB0+
4
GND
SBS Technologies — CT7 Hardware User’s Manual Revision 1.3.2
Artisan Technology Group - Quality Instrumentation ... Guaranteed | (888) 88-SOURCE | www.artisantg.com
Page 80
TRANSITION MODULE CT7-TM
SCSI J16
This SCSI interface is a standard 8-bit SCSI 50 pin connector.
Pin
Signal
Pin
Signal
Pin
Signal
Pin
Signal
Pin
Signal
1
GND
11
GND
21
GND
31
GND
41
GND
2
#D0
12
#D5
22
GND
32
#ATN
42
#MSG
3
GND
13
GND
23
NC
33
GND
43
GND
4
#D1
14
#D6
24
NC
34
GND
44
#SEL
5
GND
15
GND
25
NC
35
GND
45
GND
6
#D2
16
#D7
26
TPWR
36
#BUSY
46
#C/D
7
GND
17
GND
27
NC
37
GND
47
GND
8
#D3
18
#DP
28
NC
38
#ACK
48
#REQ
9
GND
19
GND
29
GND
39
GND
49
GND
10
#D4
20
GND
30
GND
40
#RST
50
#IO
SBS Technologies — CT7 Hardware User’s Manual Revision 1.3.2
Artisan Technology Group - Quality Instrumentation ... Guaranteed | (888) 88-SOURCE | www.artisantg.com
Page 81
TRANSITION MODULE CT7-TM
UW-SCSI J17
The UltraWide SCSI interface is a standard 16-bit SCSI 68 pin connector.
Pin
Signal
Pin
Signal
Pin
Signal
Pin
Signal
1
GND
18
TPWR
35
#D12
52
TPWR
2
GND
19
GND
36
#D13
53
NC
3
GND
20
GND
37
#D14
54
GND
4
GND
21
GND
38
#D15
55
#ATN
5
GND
22
GND
39
#DP1
56
GND
6
GND
23
GND
40
#D0
57
#BUSY
7
GND
24
GND
41
#D1
58
#ACK
8
GND
25
GND
42
#D2
59
#RST
9
GND
26
GND
43
#D3
60
#MSG
10
GND
27
GND
44
#D4
61
#SEL
11
GND
28
GND
45
#D5
62
#C/D
12
GND
29
GND
46
#D6
63
#REQ
13
GND
30
GND
47
#D7
64
#IO
14
GND
31
GND
48
#DP0
65
#D8
15
GND
32
GND
49
GND
66
#D9
16
GND
33
GND
50
GND
67
#D10
17
TPWR
34
GND
51
TPWR
68
#D11
SBS Technologies — CT7 Hardware User’s Manual Revision 1.3.2
Artisan Technology Group - Quality Instrumentation ... Guaranteed | (888) 88-SOURCE | www.artisantg.com
Page 82
TRANSITION MODULE CT7-TM
IDE J12
The IDE1 interface is a regular 40-pin male connector.
Pin
Signal
Pin
Signal
Pin
Signal
Pin
Signal
1
HDX_RST
11
HDX_D3
21
HDX_DRQ
31
HDX_IRQ
2
GND
12
HDX_D12
22
GND
32
NC
3
HDX_D7
13
HDX_D2
23
HDX_IOW
33
HDX_A1
4
HDX_D8
14
HDX_D13
24
GND
34
PDIAG
5
HDX_D6
15
HDX_D1
25
HDX_IOR
35
HDX_A0
6
HDX_D9
16
HDX_D14
26
GND
36
HDX_A2
7
HDX_D5
17
HDX_D00
27
HDX_RDY
37
HDX_CS1
8
HDX_D10
18
HDX_D15
28
HDX_SPSYNC
38
HDX_CS3
9
HDX_D4
19
GND
29
HDX_DAK
39
HDX_DASP
10
HDX_D11
20
NC
30
GND
40
GND
SBS Technologies — CT7 Hardware User’s Manual Revision 1.3.2
Artisan Technology Group - Quality Instrumentation ... Guaranteed | (888) 88-SOURCE | www.artisantg.com
Page 83
TRANSITION MODULE CT7-TM
Floppy Disk Drive J14
The CT7TM features a connector for direct adaptation of a floppy drive via a
standard 2.54 mm 34-pin connector
Pin
Signal
Pin
Signal
1
GND
18
#DIR
2
NC
19
GND
3
GND
20
#STEP
4
NC
21
GND
5
GND
22
#WRDATA
6
NC
23
GND
7
GND
24
#WGATE
8
#INDEX
25
GND
9
GND
26
#TRACK0
10
NC
27
GND
11
GND
28
#WRPROT
12
#DRVSEL
29
GND
13
GND
30
#RDDATA
14
NC
31
GND
15
GND
32
HDSEL
16
#MOTOR
33
GND
17
GND
34
#DSKCHG
SBS Technologies — CT7 Hardware User’s Manual Revision 1.3.2
Artisan Technology Group - Quality Instrumentation ... Guaranteed | (888) 88-SOURCE | www.artisantg.com
Page 84
TRANSITION MODULE CT7-TM
LCD J15
The flat panel (LCD) interface is a 2-row, 42-pin male connector.
Pin
Signal
Pin
Signal
Pin
Signal
Pin
Signal
1
LC_P23
12
LC_P11
23
LC_P09
34
LC_BACKL
2
LC_P22
13
LC_P12
24
LC_P10
35
LC_VEE
3
LC_P21
14
LC_P13
25
GND
36
LC_VCC
4
LC_P20
15
LC_P14
26
LC_P00
37
KBDATA
5
LC_P19
16
LC_P15
27
LC_P01
38
KBCLK
6
LC_P18
17
LC_P17
28
LC_P02
39
C2_RXD
7
GND
18
GND
29
LC_P03
40
C2_TXD
8
LC_CLK
19
LC_P05
30
LC_P04
41
MDATA
9
LC_HSYNC
20
LC_P06
31
LC_P16
42
MCLK
10
LC_VSYNC
21
LC_P07
32
GND
11
GND
22
LC+P08
33
LC_DE
SBS Technologies — CT7 Hardware User’s Manual Revision 1.3.2
Artisan Technology Group - Quality Instrumentation ... Guaranteed | (888) 88-SOURCE | www.artisantg.com
Page 85
TRANSITION MODULE CT7-TM
PMC
The following table lists the pin assignments of the PMC connector.
Pin
Signal
Pin
Signal
Pin
Signal
Pin
Signal
1
PMCIO01
17
PMCIO17
33
PMCIO33
49
PMCIO49
2
PMCIO02
18
PMCIO18
34
PMCIO34
50
PMCIO50
3
PMCIO03
19
PMCIO19
35
PMCIO35
51
PMCIO51
4
PMCIO04
20
PMCIO20
36
PMCIO36
52
PMCIO52
5
PMCIO05
21
PMCIO21
37
PMCIO37
53
PMCIO53
6
PMCIO06
22
PMCIO22
38
PMCIO38
54
PMCIO54
7
PMCIO07
23
PMCIO23
39
PMCIO39
55
PMCIO55
8
PMCIO08
24
PMCIO24
40
PMCIO40
56
PMCIO56
9
PMCIO09
25
PMCIO25
41
PMCIO41
57
PMCIO57
10
PMCIO10
26
PMCIO26
42
PMCIO42
58
PMCIO58
11
PMCIO11
27
PMCIO27
43
PMCIO43
59
PMCIO59
12
PMCIO12
28
PMCIO28
44
PMCIO44
60
PMCIO60
13
PMCIO13
29
PMCIO29
45
PMCIO45
61
PMCIO61
14
PMCIO14
30
PMCIO30
46
PMCIO46
62
PMCIO62
15
PMCIO15
31
PMCIO31
47
PMCIO47
63
PMCIO63
16
PMCIO16
32
PMCIO32
48
PMCIO48
64
PMCIO64
SBS Technologies — CT7 Hardware User’s Manual Revision 1.3.2
Artisan Technology Group - Quality Instrumentation ... Guaranteed | (888) 88-SOURCE | www.artisantg.com
Page 86
TRANSITION MODULE CT7-TM
Miscellaneous Connector J18
The miscellaneous connector is a 2-row, 10-pin male connector providing signal lines for a reset button, an external speaker, an external battery and ICMB/
SMB communication. A dedicated cable assembly is required.
Pin
Signal
Pin
Signal
1
SPKR
6
GND
2
WDG_REL
7
ICMB_A
3
RST_BUT
8
SMB_SDA
4
VBATIN
9
ICMB_B
5
GND
10
SMB_SCL
SBS Technologies — CT7 Hardware User’s Manual Revision 1.3.2
Artisan Technology Group - Quality Instrumentation ... Guaranteed | (888) 88-SOURCE | www.artisantg.com
Page 87
TRANSITION MODULE CT7-TM
Placement Plan
Specifications
General
Model CE7-TM / CT7-TM
Peripheral Transition Board
Host Compatibility C
E7 and CT7 cPCI SBC
Electrical Power
Drive Requirement Only
Physical
Size 6U x 80mm
Environment Conditions
0 to 55° Celsius Inlet Air Operating
-40 to 85° Celsius Non-Operating
Cooling: None
SBS Technologies — CT7 Hardware User’s Manual Revision 1.3.2
Artisan Technology Group - Quality Instrumentation ... Guaranteed | (888) 88-SOURCE | www.artisantg.com
Page 88
Appendix D: PCI
Mezzanine Card (PMC)
The PCI Mezzanine Card (PMC) Interface is an additional slot for parallel
mounted expander or option cards. The 64-bit/33MHz Interface is compliant to
the IEEE P1386.1 specification and is based on the electrical and logical layer
of the PCI specification. The user definable I/O Pins are connected to the rear
IO connector on the CT7, as defined in the PICMG 2.3 specification.
—
A 64Bit PCI-communication is only possible between CPCI- and
PMC- devices
A 5V key is mounted, for 5V compatible PMC-Cards. A PMCInterface with 3.3V I/O has to be 5V compliant.
—
Also see chapter “PMC Connectors P7001, P7002, and P7003” on page 32 for
details on the CT7 interface pin assignment.
Electrical
characteristics
Parameter
Comment
Value
Unit
I3.3V
Max. current on 3.3V Pins
1.5
A
I5V
Max. current on 5V Pins
1
A
I+12V
Max. current on +12V Pin
0.5
A
I-12V a
Max. current on -12V Pin
0.1
A
V(I/O) b
Voltage for PCI IO
5
V
a.
b.
-12V must be connected to the backplane.
5V key is mounted.
SBS Technologies — CT7 Hardware User’s Manual Revision 1.3.2
Artisan Technology Group - Quality Instrumentation ... Guaranteed | (888) 88-SOURCE | www.artisantg.com
Page 89
PCI MEZZANINE CARD (PMC)
Assembly PMC to ET7
Please refer to the drawing for assembly and mounting instructions:
To mount a PMC board to the CT7 follow these steps:
1.
2.
3.
4.
Remove cover.
Take PMC from inside through front panel and push connectors together.
Verify correct installation of EMC gasket!
Fix PMC on host boards with 4 screws. Screws must be locked with Loctite 243.
SBS Technologies — CT7 Hardware User’s Manual Revision 1.3.2
Artisan Technology Group - Quality Instrumentation ... Guaranteed | (888) 88-SOURCE | www.artisantg.com
Page 90
Appendix E: Support,
Service, and Warranty
Information
Chapter Scope
The following sections describe SBS Technologies’ product support program.
It states our product warranty terms and provides details about what action to
take if you experience a problem with the product.
Technical Support
If you should have a problem with a SBS product: Free technical support is
available by phone, fax or email. Telephone support is available during the
hours indicated.
Support on the Web
Europe
USA & World
Monday through Friday
8:00 – 17:00 (Germany)
Monday through Friday
8:30 AM – 5:30 PM (Eastern Time)
Phone +49 (821) 5034-170
Fax +49 (821) 5034-119
E-Mail [email protected]
Phone (505) 875-0600
Fax (505) 875-0400
E-Mail [email protected]
For support and information, visit our website at
http://www.sbs.com
A library of drivers, manuals, error report forms, updates, and applications
notes is also available on our FTP-servers:
ftp://www.sbs.com
SBS Technologies — CT7 Hardware User’s Manual Revision 1.3.2
Artisan Technology Group - Quality Instrumentation ... Guaranteed | (888) 88-SOURCE | www.artisantg.com
Page 91
SUPPORT, SERVICE, AND WARRANTY INFORMATION
Information for components, corresponding driver software, etc. can also be
found at the following locations:
AMD Advanced Microsystems
Devices Corp.
www.amd.com
American Megatrends (BIOS) www.ami.com
Asiliant Technology
(Chips & Technology VGA)
www.asiliant.com
IBM Corp.
www.ibm.com
Intel Corp.
www.intel.com
Linear Technology
www.linear-tech.com
Microsoft Corp.
www.microsoft.com
Motorola Corp.
www.motorola.com
PCI Industrial Computer
Manufacturing Group
www.picmg.org
QLogic Corp.
www.qlogic.com
QNX Software Systems
www.qnx.com
Smybios Logic
www.lsilogic.com
Tundra Semiconductor Corp.
www.tundra.com
VMEbus International
Trade Association
www.vita.org
Wind River Systems
www.windriver.com
SBS Technologies — CT7 Hardware User’s Manual Revision 1.3.2
Artisan Technology Group - Quality Instrumentation ... Guaranteed | (888) 88-SOURCE | www.artisantg.com
Page 92
SUPPORT, SERVICE, AND WARRANTY INFORMATION
Frequently Asked
Questions
This section covers frequently asked questions. It describes solutions and
workarounds in order to help customers to understand the solution and speed
up customer system design implementations.
Q 1. We have a CT7 with a CTM10 transition module running Windows NT
4.0 workstation with Service Pack 6 installed. The Ethernet is connected to port
1. This port is seen as port 2 in software. How can I configure the port identification?
A 1. We have confirmed this behavior. The ports are “switched” by the operating system. At present, there is no method to prevent Windows NT from toggling the port assignment.
Q 2. If the CT7 has an ET7 module mated to it, does the ET7 have to be
plugged into the backplane.
A 2. The CT7 is available in two options in regard to the ET7:
—
CT7xxxxxxx1x Dual slot, ET7 with 2 PMC
Backplane with system slot on the left side for CT7, ET7 is
plugged into slot 2.
—
CT7xxxxxxx2x Dual slot, ET7 with 2 PMC and cPCI extension
Backplane with system slot on the right side for CT7, ET7 is in
the second backplane with system slot on the left side
The CT7/ET7 combination does not work if the ET7 module is not plugged
into the backplane. If you split the CT7/ET7 combination, the CT7 can be used
as a single board.
Q 3. I am working with the RMX Operating System. The board works fine except for the activation of serial ports.
A 3. RMX is an old PC operating system and requires the definition of I/O addresses. Simply assign I/O addresses for serial port 1 and 2 in the systems BIOS
setup on page “Peripheral Setup”: Change the setting “Auto” for the “On Board
Serial Port #” to an appropriate value, e.g. 2F8h for COM2.
Q 4. How much flash memory can I install on the CT7?
A 4. The maximum size available for a Flashcard currently is 512 MB, however, the CT7 supports up to 1 GB. The capacity limitations are the same as for
high capacity hard disk drives. There is a height limitation of 10 mm.
Q 5. During boot, a temperature is displayed along with other boot messages.
What temperature value is this?
A 5. This is the temperature value measured by a thermal diode on the CPU
die.
Q 6. What PCI/PMC standards are officially supported by SBS for the CT7?
A 6. The CT7 is in compliance with:
—
—
cPCI-PICMG 2.0 Rev. 2.3
PCI 2.2 Rev. 2.3
SBS Technologies — CT7 Hardware User’s Manual Revision 1.3.2
Artisan Technology Group - Quality Instrumentation ... Guaranteed | (888) 88-SOURCE | www.artisantg.com
Page 93
SUPPORT, SERVICE, AND WARRANTY INFORMATION
Q 7. What kind of PMC cards can be attached to the CT7?
A 7. The CT7 supports both 5V and 3.3V PMC cards.
Q 8. What network boot options are available on the CT7?
A 8. Network boot is available through BootP DHCP. The function is only
supported on channel one.
Q 9. How can I detect the slot where the CT7 is mounted via software?
A 9. The slot number is displayed during system boot.
Q 10. What LCD panels have been tested with the CT7?
A 10. The following panel have been successfully tested with the CT7:
—
—
NEC NL6448AC33-18 (640 x 480 TFT 18 Bit)
Sharp LQ10S21 (800 x 600 TFT 18 Bit)
Q 11. What do the LEDs on the front panel mean?
A 11. There are three LEDs on the boards front panel:
—
—
—
Blue - HotSwap
Green - Run
Red - Fail
During power up, the BIOS turns the LEDs off to indicate that the CT7 has
started. Before entering the OS boot sequence, the green LED (Run) is turned
on. While the operating software is active, it is free to use both LEDs for its
own purposes. In reset state, the red LED is on, the green LED is off.
The blue LED is lighting when the ejector is open.
Q 12. That is the difference between the two floppy disk cables (34 pin standard cable vs. 26 pin slim line cable) and what has to be considered when used
with the CT7?
A 12. The standard cable can be used for two floppy disk drives (A: and B:).
The standard cable changes the two lines 10 and 16 on the secondary floppy
connector (B:). When using a standard cable connected to floppy A:, the BIOS
setup has to be changed. Set the “SWAP FLOPPY DRIVES” parameter in the
“Peripheral Setup” to “Yes”. A slim line cable can only be used for one floppy
drive (A: or B:). The “SWAP FLOPPY DRIVES” parameter in the “Peripheral
Setup” must be set to “No” for either drive when using a slim line cable.
Q 13. Do I need to supply +5V to the floppy?
A 13. The +5V must be supplied to the floppy only when using a 2.54 mm 34pin connector.
SBS Technologies — CT7 Hardware User’s Manual Revision 1.3.2
Artisan Technology Group - Quality Instrumentation ... Guaranteed | (888) 88-SOURCE | www.artisantg.com
Page 94
SUPPORT, SERVICE, AND WARRANTY INFORMATION
Warranty
SBS Technologies’ products come with a “return-to-factory” warranty which
covers defects in materials and workmanship for a period of two years from the
date of product shipment to the customer (original purchaser), provided the
product is unmodified and has been subject to normal and proper use. This warranty applies to all standard board-level products which do not incorporate disk
drives. Products which incorporate floppy or hard disk drives are also warranted for one year with the exception of the drives themselves. The drives will be
warranted for a period of six months, as is the normal period for electromechanical components. SBS Technologies makes no warranty or representation,
express or implied, with respect to software, its performance, quality, or fitness
for a particular purpose. This does not include the media on which the software
is distributed, which carries a warranty covering defects in materials and workmanship for a period of six months. For details refer to the “Terms and Conditions.”
Warranty and NonWarranty Repairs
Warranty Repairs
Any product returned and found to be under warranty will be repaired or replaced at the discretion of SBS. The return shipping freight is paid by SBS.
Non-Warranty Repairs
If a product is found not to be under warranty, SBS will:
1. repair the product without notice of the customer when the cost is below
Euro/US$250.
2. notify the customer of the non-warranty situation and provide a cost estimate to the customer, if the cost of the repair is equal to or greater than
Euro/US$250. Non-warranty repairs above Euro/US$250 generally
require that a purchase order be issued to SBS Technologies for the
amount of the repair before repairs are undertaken.
The shipping freight is paid by the customer in addition to repair cost.
Procedure
In the event of repair, please return the product together with additional information:
—
—
—
—
—
Description of the type of defect.
Is the defect restricted to certain environmental conditions?
What was the hardware environment before the defect appeared?
Where there input signals? If yes, which?
Please specify: “warranty” or “no warranty” repair.
You may use the report form at the end of this manual for this purpose.
Please use the original packing material for shipping to avoid damage. Otherwise warranty may be lost.
To expedite assistance for problems, also provide the following:
—
—
—
—
—
—
—
Your Name, Phone and Company.
Product with which you are having trouble.
Serial Number, Part Number and Revision.
Hardware environment the product is used.
Operating system you are running.
Detailed description of your problem and any error messages that have
appeared on the screen.
The name of a technically qualified individual at your company
familiar with the product failure.
SBS Technologies — CT7 Hardware User’s Manual Revision 1.3.2
Artisan Technology Group - Quality Instrumentation ... Guaranteed | (888) 88-SOURCE | www.artisantg.com
Page 95
SUPPORT, SERVICE, AND WARRANTY INFORMATION
Depending on the circumstances of the problem, it may be deemed necessary
to return the product to SBS Technologies for repair. In order to return the
product for repair, the following steps are necessary:
1. Obtain a Return Material Authorization number (RMA#) from SBS Customer Support.
2. Ship the product prepaid to the designated repair point.
3. Provide a written description of the claimed defect with the product.
Obtaining a RMA Number
To obtain a product Return Merchandise Authorization number (RMA#), you
should call our Customer Service department through our main number.
Shipping the Product
Any product returned to SBS should be in its original shipping carton if possible. Otherwise the product should be carefully packed in a conductive (ESD)
packing material and placed in a cushioned corrugated carton suitable for shipping.
Please mark the shipping label with the RMA number and return it to:
Europe
USA & World
SBS Technologies GmbH & Co. KG
GmbH & Co. KG
RMA# (put RMA here)
Memminger Strasse 14
86159 Augsburg
Germany
Customer Service Dept.
ATTN: RMA# (put RMA here)
SBS Technologies, Inc.
2400 Louisiana Blvd. NE, Suite 5-600
Albuquerque, NM 87110
U.S.A.
SBS Technologies — CT7 Hardware User’s Manual Revision 1.3.2
Artisan Technology Group - Quality Instrumentation ... Guaranteed | (888) 88-SOURCE | www.artisantg.com
Page 96
SUPPORT, SERVICE, AND WARRANTY INFORMATION
Error Report Form
When you are returning a product for repair, it is very important to include a
written report which details the nature of the problem in order to expedite the
repair. Please always use the Error Report Form attached at the end of this
manual or include the following information:
—
—
—
—
—
—
RMA Number, if applicable
Product & Serial Number
Part Number
Version
Contact: Name & Phone Number
Detailed Description of the Problem/Defect
American
Megatrends
AMIBIOS © 1997 American Megatrends
SBS Technologies CT7
Release Date
.
.
.
.
. Board specific messages
.
.
.
.
.
.
.
.
© American Megatrends Inc.
62 – 0102 – 004199 – 00101111 – 071595 - 440BX –
Inc.
These lines should be included
when reporting a problem to SBS
via phone or e-mail.
CT7 - Y2KC-0
year 2000 compliant
project ID
chip set
AMIBIOS core copyright date
BIOS features
supplier ID
major & minor BIOS revisions
processor, flash ROM size
Example/coding of the ID line:
62 – 0102 – 004199 – 00101111 – 071595 – 440GX – CT7/CE7 - Y2KC-0
You can stop the video output for proper reading the three information lines as
described: Simply press the “0 / Enter” key during the start-up sequence. This
key is located on the numeric keypad of your keyboard.
SBS Technologies — CT7 Hardware User’s Manual Revision 1.3.2
Artisan Technology Group - Quality Instrumentation ... Guaranteed | (888) 88-SOURCE | www.artisantg.com
Page 97
Index
Numerics
C
69000 C&T VGA Controller 12
Cache RAM 11
69030 C&T VGA Controller 12
Chips&Tech VGA BIOS 11
82371EB (PIIX4e) ISA bridge 11
Chipset 11, 11
82440GX Chipset 11
CMOS RAM 11
8254 compatible timer 36
CompactPCI bus Connector P7201 and P7202 25
82559ER Ethernet Controller 12
Connectors 24
CPCI
I/O Slot 12
System slot 12
A
Accessories 16
Advisories 17
AGP VGA C&T 12
AMI BIOS 11
ATAPI 12, 37
CPCI connector reference 24
CPU Speed 50
CPU Type 50
CT69000 38
CT69030 38
CT7 Connectors 24
B
Backpanel I/O 13
Backplane 18
Battery 49
BIOS 20
BIOS SETUP 21
Block Diagramm 9
Board Design 9
CT7 Placement Plan 52
CT7-TM 19, 76
CTM10 19
D
Delivery Volume 16
Design Features 11
Dimensions 48
DMA Controller 36
DRAM 11
SBS Technologies — CT7 Hardware User’s Manual Revision 1.3.2
Artisan Technology Group - Quality Instrumentation ... Guaranteed | (888) 88-SOURCE | www.artisantg.com
Page 98
INDEX
E
ECP 12, 38
EIDE 12
EIDE/ATAPI Interface 37
Electrical Characteristics 51
Electrostatic Discharge Notice 14
Environment Conditions 49
EPP 12, 38
ESD 14, 17
Ethernet Interface 10BaseT and 100BaseTX P5100
and P5700 29
External Battery 49
Interfaces 22
CT7-TM 77
Front Panel 23
IO-Diagram 23
Interrupt Controller 36
Interrupts 35
Interval Timer Functions 37
IO-Diagram 23
IPMI 12
ISA bridge 11
K
Keyboard 11, 19
Keyboard and Mouse Controller 37
F
Fast Ethernet 12
Flash BIOS 11
Floppy 12
Floppy Controller 38
Front Panel Interfaces 23
Frontpanel I/O 13
Function Blocks 36
G
Graphics Controller 38
Keyboard and PS/2 Mouse Interface P2000 29
L
LCD 12
LSI Logic SCSI BIOS 11
M
Mechanical Data
CT7-TM 88
Mechanical Variants 52
Memory Map 33
Microprocessor 11
H
Handling 15
Hard/Flash Disk 11
High Resolution Timer 12
Minimum System Requirements 18
Mouse 11, 19
O
Onboard Battery 49
I
I/O Connector P7203, P7204, and P7205 26
ID line 21, 97
IDE Connector P1800 28
IEEE 1284 enhanced parallel port 12
Initial Inspection 15
Initial Power-On Operation 20
Inspection 14
Installation 17
Intel 8237A 36
Intel 82440GX Chipset 11
Intel 82559ER Ethernet Controller 12
Intel Ethernet BOOT module 11
Options 16
P
P1700 31
P1800 28
P2000 29
P2200 30
P2400 30
P5100 29
P5700 29
P7201 25
P7202 25
P7203 26
SBS Technologies — CT7 Hardware User’s Manual Revision 1.3.2
Artisan Technology Group - Quality Instrumentation ... Guaranteed | (888) 88-SOURCE | www.artisantg.com
Page 99
INDEX
P7204 26
SETUP 21
P7205 26
Size 48
Panel Types 39
Specifications 48
Parallel I/O 12
Standard Register Set 34
Parallel Interfaces 38
Styles 13
PCB 48
Supply voltages 51
Pixel clock 39
SYM53C875 Ultra Wide SCSI-2 Controller 12
Placement Plan
CT7 52
CT7-TM 88
System Requirements 18
Plug and Play Devices 34
PMC
extension 12
slot 12
Power Consumption 48
Power supply 13, 18
Power-On 20
PS/2 Keyoard and Mouse 11
T
Temperature Sensor 13
Timer 12, 36
Timer Functions 37
Transition Module
CT7-TM 76
U
Unpacking 14
USB 11
R
Real Time Clock 37
Register Set 34
Resolution 39
Resources 33
USB Interfaces P1700 (P2000 on CTM-10) 31
V
VGA 12, 19
VGA Interface P2400 (P4300 on CTM-10) 30
Video Modes 39
S
SCSI-2 12
Serial I/O 12
Serial Interfaces 38
Serial Ports P2200 (COM1 on CT7), P2200 (COM1
on CTM10), P2201 (COM2 on CTM10) 30
Video Monitor 19
W
Watchdog 11
Weight 48
SBS Technologies — CT7 Hardware User’s Manual Revision 1.3.2
Artisan Technology Group - Quality Instrumentation ... Guaranteed | (888) 88-SOURCE | www.artisantg.com
Page 100
EUROPE
SBS Technologies GmbH & Co. KG
COMPANY NAME
Memminger Strasse 14
D–86159 Augsburg
Phone
+49.821.5034-170
Fax
+49.821.5034-119
E-Mail
[email protected]
Sender’s address
Please send report to
ERROR REPORT FORM
DEPARTMENT & CONTACT PERSON
MAILING ADDRESS
ADDRESS (CONT’D)
ZIP CODE AND CITY, COUNTRY
RMA
PUT YOUR RMA NUMBER HERE
PHONE
Product
FAX
PART NUMBER, E.G. CT7
VERSIONS AND DATE
SERIAL NUMBER
Error Description
PLEASE DESCRIBE THE ERROR OR PROBLEM YOU ARE EXPERIENCING
Hardware
PLEASE DESCRIBE THE HARDWARE ENVIRONMENT YOU ARE USING
OS / Software
PLEASE PROVIDE INFORMATION ON YOUR OPERATING SYSTEM AND VERSION, APPLICATION SOFTWARE, ETC.
Warranty repair?
PLEASE INDICATE, IF THIS IS A WARRANTY REPAIR. SEE SECTION “WARRANTY” FOR DETAILS.
YES
Artisan Technology Group - Quality Instrumentation ... Guaranteed | (888) 88-SOURCE | www.artisantg.com
NO
UNITED STATES AND THE REST OF THE WORLD
SBS Technologies, Inc.
COMPANY NAME
6301 Chapel Hill Road
Raleigh, NC 27607, U.S.A.
Phone
+1.919.851.1101
Fax
+1.919.851.2844
E-Mail
[email protected]
Sender’s address
Please send report to
ERROR REPORT FORM
DEPARTMENT & CONTACT PERSON
MAILING ADDRESS
ADDRESS (CONT’D)
CITY, STATE, ZIP CODE
RMA
PUT YOUR RMA NUMBER HERE
PHONE
Product
FAX
PART NUMBER, E.G. CT7
VERSIONS AND DATE
SERIAL NUMBER
Error Description
PLEASE DESCRIBE THE ERROR OR PROBLEM YOU ARE EXPERIENCING
Hardware
PLEASE DESCRIBE THE HARDWARE ENVIRONMENT YOU ARE USING
OS / Software
PLEASE PROVIDE INFORMATION ON YOUR OPERATING SYSTEM AND VERSION, APPLICATION SOFTWARE, ETC.
Warranty repair?
PLEASE INDICATE, IF THIS IS A WARRANTY REPAIR. SEE SECTION “WARRANTY” FOR DETAILS.
YES
Artisan Technology Group - Quality Instrumentation ... Guaranteed | (888) 88-SOURCE | www.artisantg.com
NO
www.sbs.com
Artisan Technology Group - Quality Instrumentation ... Guaranteed | (888) 88-SOURCE | www.artisantg.com
Artisan Technology Group is your source for quality
new and certified-used/pre-owned equipment
• FAST SHIPPING AND
DELIVERY
• TENS OF THOUSANDS OF
IN-STOCK ITEMS
• EQUIPMENT DEMOS
• HUNDREDS OF
MANUFACTURERS
SUPPORTED
• LEASING/MONTHLY
RENTALS
• ITAR CERTIFIED
SECURE ASSET SOLUTIONS
SERVICE CENTER REPAIRS
Experienced engineers and technicians on staff
at our full-service, in-house repair center
WE BUY USED EQUIPMENT
Sell your excess, underutilized, and idle used equipment
We also offer credit for buy-backs and trade-ins
www.artisantg.com/WeBuyEquipment
InstraView REMOTE INSPECTION
LOOKING FOR MORE INFORMATION?
Visit us on the web at www.artisantg.com for more
information on price quotations, drivers, technical
specifications, manuals, and documentation
SM
Remotely inspect equipment before purchasing with
our interactive website at www.instraview.com
Contact us: (888) 88-SOURCE | [email protected] | www.artisantg.com