1
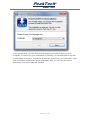
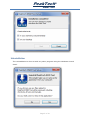
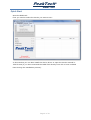
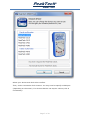
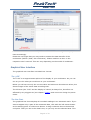
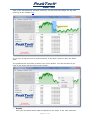
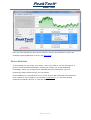
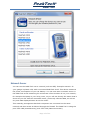
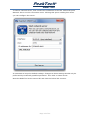
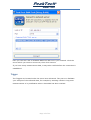
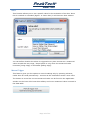
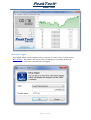
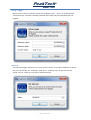
PeakTech® Manual Software for PeakTech Digital Multimeter DMM Tool PeakTech® DMM Tool Content Content........................................................................................................ 2 Installation ................................................................................................... 2 Uninstallation ................................................................................................ 5 Quick Start ................................................................................................... 6 Graphical User Interface ................................................................................. 8 The „LCD“ .................................................................................................. 8 The Line Chart ............................................................................................ 8 The Menu ................................................................................................. 10 File ........................................................................................................ 10 Connection ............................................................................................. 11 Advanced ............................................................................................... 11 Remote Control ....................................................................................... 11 Pause .................................................................................................... 11 ? ........................................................................................................... 11 Log .......................................................................................................... 11 Device Selection .......................................................................................... 12 Network Server ........................................................................................... 13 Trigger ....................................................................................................... 15 Alert ........................................................................................................ 16 Manual Trigger .......................................................................................... 16 Automatic Trigger ...................................................................................... 17 Range Trigger ........................................................................................... 18 Interval .................................................................................................... 18 Time Range .............................................................................................. 19 Updates and Versions .................................................................................. 19 Service ...................................................................................................... 19 Installation You can install the DMM tool on your computer. So you always have access to it, even if you just don’t have the CD at hand. This is recommended, but not required. You can also start the DMM Tool directly from the CD. To install the DMM Tool, insert the included CD into your computer and start the Setup.exe. Here you will be guided through each step of the installation. In the first step, you can select your language. This is automatically done based on the language of the operating system (if supported). Page 2 of 20 PeakTech® DMM Tool In the second step, you can choose which options you want to store on your computer. If a driver for your multimeter is required, you will find these in the list. It is advisable to check it, so that the drivers can be found on your computer, if you have not already installed the driver separately. Also you can copy the user's manual for your device with this function. Page 3 of 20 PeakTech® DMM Tool Example for the PeakTech 3415: Some devices like the PeakTech 2025 do not require a separate driver, as this is already integrated in Windows and works immediately. So don’t be surprised if your device driver is not listed. You are free to choose the destination folder, but it is it advised to remain at the default setting. In the third step, the DMM Tool and the selected drivers & manuals will be copied to your computer. Also the DMM Tool will be specially optimized for your computer. This may take up to one minute, please be patient. In the fourth and last step, you can choose whether you want to create shortcuts to the DMM Tool. By default Desktop and Start Menu are selected. Page 4 of 20 PeakTech® DMM Tool Uninstallation The uninstallation is done as with any other program using the Windows Control Panel. Page 5 of 20 PeakTech® DMM Tool Quick Start Start the DMM tool. First you need to select the device you want to use: In this window you can also install the device driver or open the device manual in .PDF format (if you have executed the DMM Tool directly from CD or have included them during the installation process). Page 6 of 20 PeakTech® DMM Tool Select your device and click OK to confirm. Then, under Connection click Connect. You may need to specify a COM port (depending on the meter). For devices that do not require a driver, this is unnecessary. Page 7 of 20 PeakTech® DMM Tool Once the connection is successful, the DMM Tool receives readings and displays them accordingly. Please do not forget that you may need to activate the data transfer of the multimeter (RS232 / USB / PC-Link button). Please read how to do it in the respective user’s manual. This can vary depending on the model of multimeter. Graphical User Interface The graphical user interface is divided into 2 areas. The „LCD“ The "LCD" is an approximate replica of the display of your multimeter. So you can see on your PC what you would see on your multimeter. Below you will see not only the current value and minimum & maximum values, but also averages of the active data recording time. The left area (the "LCD" and the display of values) is always live, therefore not affected by any triggers set (see chapter Trigger) and runs even during the pause mode. The Line Chart The graphical line chart displays all recorded readings in an automatic scale. If you want to appear only a part of the measured data, click with the left mouse button at the starting point à hold mouse button à drag a selection box to the desired end point. Then you are in the detail view, so you only see the selected area. This Page 8 of 20 PeakTech® DMM Tool area is also automatically selected in the log. You can find more about the log area referring to the Chapter Log. If you have a high amount of measurements, it can take a while to open the detail view. The graphical line chart also provides even more options. You will see them if you click on the chart with the right mouse button: • Display Here you can define which data is displayed in the chart. In All, each collected Page 9 of 20 PeakTech® DMM Tool measured value is displayed, in 1 Minute only the data of the last 60 seconds is displayed, etc. • Quality Relevant if your computer is a bit older or you are performing a long-term measurement with very many recorded samples. In the highest quality each measured value is marked in the chart (often not needed - for many measurements very slow). At Normal quality (standard) the DMM Tool itself selects a number of displayed measured values (for example each third) in order to ensure a balance between performance and display quality. On Lowquality, the number of measured values is limited similar to the Normal view, but in addition it also disables anti-aliasing, as well as filling the graphic. This is recommended for older computers. • Show Tooltips Once you move your mouse cursor over the chart you can see the measured value from the point where the mouse cursor is located. You can use this option to activate / deactivate this feature. • Copy image and Save image You can copy the chart either to the clipboard as an image to paste it into a program of your choice, or save the chart directly as an image file. The Menu File In this menu you will find options to load or save your data. • New This will delete all previously collected data from the log and graph, just as if you have restarted the DMM Tool. • Open You can reload previously stored readings (only .xml format) to view it in the chart and log. Also, you can open log files generated by the measuring instrument (if the meter supports this function). • Save Already collected measurement values can be saved in various formats. The .txt format is most suitable for the human evaluation, whereas the .csv format can be imported easily in spreadsheet programs like Microsoft Excel or OpenOffice. You can open previously saved data in the DMM Tool if they are stored in .xml format, to review the data. Also, this file format is very user friendly, if you consider using self-written software which evaluates the data. • Language The language is automatically selected depending on your operating system. However, here you have the option to use the DMM Tool in another language. • Exit Exits the program with a warning for possible loss of unsaved readings. Page 10 of 20 PeakTech® DMM Tool Connection • Device: xxx You need this menu to select your desired meter. For more details please refer to device selection in this guide. • Connect This menu option connects (or disconnects) your meter to the PC. Depending on the meter, you may have to select the correct COM port. For some devices, the data transfer must firstly be activated by pressing a special key. You can find detailed information about this in the manual of the instrument. • Connect to Server and Start Network Server Please refer to the chapter Network Server. Advanced In this menu, you can make different settings for Triggers. Please refer to the chapter Trigger to get more information. Remote Control This menu item is only visible for those instruments, which can be operated remotely. Here you can remotely control the meter (change measuring ranges and types, get detailed information ...). Since these menu items are highly dependent on the used meter, this function is not described here. Pause This menu item pauses the recording of the data until you click again on the pause button. At the bottom left you will see a notification when logging is paused. The measurement display (left side) is not affected by this. ? Here you can open the Help (this file) and view information about this application. Log The Log window displays all recorded readings including the time when they have been recorded. It will always be scrolled to the end automatically – to the most recent entry - but you can always scroll up and this function will be disabled. To activate the automatic scrolling again, either scroll all the way down to the latest entry or use the menu (right click on the log window), and click Auto Scroll. Page 11 of 20 PeakTech® DMM Tool Here you can activate the auto-scroll function, remove the selection or store the selected entries separately as a file (see Save File). Device Selection In this dialog you can select your meter, which you want to use. On the right is a picture of the selected multimeter. Clicking on it takes you to the PeakTech homepage, where you will get more detailed technical information (such as measuring ranges and accuracy) for this device. If the DMM tool is executed from CD or if the drivers and instruction manuals have been copied to your harddrive (see chapter Installation), you can also directly install the necessary drivers or view the manual. Page 12 of 20 PeakTech® DMM Tool Network Server You can use the DMM Tool over a network (such as WiFi). Example scenario: In your garage is placed a PC with a connected PeakTech 2025. This device measures the power consumption of your car battery. You can now start a network server in the DMM Tool at the measuring PC and access it from another PC on your network, for example the laptop in your living room, so you will see directly the same what is shown at your PC with the connected meter; previously collected data, as well as any new data displayed same as on the meter. This naturally presupposes that both computers are connected on the same network and also access is allowed through the firewall. The DMM Tool is using the port 3775 UDP (AutoDiscovery) and 3775 TCP (Data Connection). Page 13 of 20 PeakTech® DMM Tool To start a network server, first connect the multimeter to the PC. Select the point Network Server on the Connection menu. Clicking this opens a dialog box where you can configure the server. It is advised to keep the default settings. Changes to those settings should only be performed by technically qualified personnel. Then click on Start Server. Start the DMM Tool at the second PC and click the below link Connect. Page 14 of 20 PeakTech® DMM Tool Here you can see a list of available DMM Tool Servers in your network. Click the server which you want to connect to, then click Connect. If you have many measurement data, it may take a while before the connection is established. Trigger The Triggers are located under the menu item Advanced. They serve to facilitate your analysis of the collected data, for example by omitting results in long-term measurements or by notification when a threshold has been reached. Page 15 of 20 PeakTech® DMM Tool Alert This function allows you to set a specific value for the activation of an alert. Once this is reached or exceeded (higher- or lower than) it will show an alert window. You can define whether the alarm is triggered every time as soon as a measured value exceeds the set range / drops below or only when the measured value increases [rising edge] or decreases [falling edge]. Manual Trigger This feature gives you the option to record readings only by pressing a button, rather than as usual permanently - as soon as the multimeter sends a new value. The button to record the current measured value can be found in the application window on the lower left. Press this softkey and a new measured value is stored in the data table. Page 16 of 20 PeakTech® DMM Tool Automatic Trigger This trigger offers you the opportunity to wait for a certain event (similar to the Alert Trigger). Only when this event occurs readings are recorded; before all measurement values are ignored and not logged. Page 17 of 20 PeakTech® DMM Tool Range Trigger Allows you to select a specific range (for example 10°C - 20°C) of measurement values that are recorded. Readings outside this range will be discarded and not logged. Interval The interval trigger allows you to control the number of recorded measured values. So you can specify (for example), that only 1 reading every 5 minutes will be saved. This is useful for long-term measurements. Page 18 of 20 PeakTech® DMM Tool Time Range The DMM Tool gives you the ability to record data only in a specific time range (as for example between 10:00 am and 12:00 am). All measured values outside this time range are discarded and not logged. The time is controlled by the system clock. Updates and Versions You can find new versions of the DMM Tool occasionally at our homepage: www.peaktech.de Service If you have technical questions please contact us via e-mail or phone. Please use our contact information listed below. ® © PeakTech 06/2015/ Bau/Ehr PeakTech Prüf- und Messtechnik GmbH - Kornkamp 32 – DE-22926 Ahrensburg / Germany (+49-(0) 4102-42343/44 !+49-(0) 4102-434 16 : [email protected] " www.peaktech.de Page 19 of 20 PeakTech® DMM Tool Page 20 of 20