1
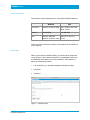
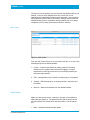
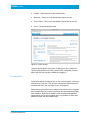
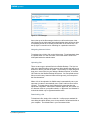
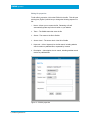
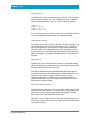
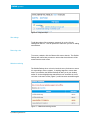
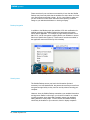
SIMIAN systems
Sitellite Desktop User Manual
Sitellite Professional Edition
SIMIAN systems
Introduction
The Sitellite Desktop is a cross-platform desktop application that can
manage one or more Sitellite 5-powered websites in a more intuitive and
integrated manner. It is currently compatible with both Windows and Mac
desktops, and we plan to support Linux desktops in the near future as
well.
The Sitellite Desktop features a unified editing interface for multiple
websites, remote file/document management, as well as website uptime
monitoring, and integrates seamlessly into the desktop environment,
complete with drag and drop capabilities for file uploads and moving files
between folders.
Installing the Sitellite Desktop
Before you install the Sitellite Desktop, you must install the Adobe AIR
runtime engine (Note: Depending on how the Sitellite Desktop was
provided to you, it may install the AIR runtime automatically). This is
available from the following address:
http://www.adobe.com/products/air/
After installing Adobe AIR, you should be able to double-click the Sitellite
Desktop installer (the SitelliteDesktop.air file) and complete the
installation process. Simply follow the installer prompts to complete the
installation. This will create the necessary shortcuts for your desktop
environment, in the start menu, on the desktop, or in the applications
folder.
Uninstalling the Sitellite Desktop
To uninstall the Sitellite Desktop, for Windows users go to your Control
Panel then to Add or Remove Programs and select the Sitellite Desktop
from the list and click the Change/Remove button. For Mac users, open
the Finder and go to your Applications folder, then drag the Sitellite
Desktop.app application into your Trash bin.
Please note that this will still leave the Adobe AIR runtime installed on
your system. To uninstall Adobe AIR as well, for Windows users go back
to the Control Panel and Add or Remove Programs and this time select
Adobe AIR from the list. For Mac users, double-click the “Adobe AIR
Uninstaller” also located in the Applications folder.
2 | Simian Systems Inc.
SIMIAN systems
System requirements
The minimum system requirements for running the Sitellite Desktop are:
Windows
Mac
Processor
Pentium 1.0 GHz or faster
G3 1.0 GHz or Intel 1.83
GHz or faster
Memory
256 MB RAM
256 MB RAM
OS
Windows 2000 SP4,
Windows XP SP2 or Vista
Mac OS X 10.4.10 or
10.5.x
Please note that an internet connection and a website running Sitellite 5
is also required.
Initial startup
When you first start the Sitellite Desktop, you will be shown a welcome
screen (Figure 1) with a basic introduction to the application and a form
for adding the first website to your new installation. Each website requires the following information:
1. Link to Sitellite (e.g., http://www.example.com/index/cms-app)
2. Username
3. Password
Figure 1 – Startup screen
3 | Simian Systems Inc.
SIMIAN systems
The link to use is the address you use to log into the Sitellite CMS on your
website. Once you have added the first site, you will see a list of
websites as the main Sitellite Desktop screen thereafter. You can add as
many Sitellite 5-powered sites as you want to manage, which makes the
Sitellite Desktop good for companies running multiple sites or for design
companies to use to easily access their customersʼ websites.
Main screen
Figure 2 – Main screen
From the main screen (Figure 2), you can add a new site, or do one of the
following things with an existing website:
1. Launch – Launches the website for editing, similar to launching
Sitellite via your standard web browser and logging in, except it
bypasses the usual login screen since youʼve already entered your
username and password.
2. Files – Manage files on your website, including drag ʻnʼ drop support.
3. Settings – Edit the settings for an existing site (link, username, and
password).
4. Remove – Remove the website from the Sitellite Desktop.
Website editing
When you click Launch next to a website, it will open a new window for
editing that site (Figure 3). The window has five options across the top
and your website in a browser-like frame under them. The file options
are:
1. Back – Standard browser-like back button
4 | Simian Systems Inc.
SIMIAN systems
2. Forward – Standard browser-like forward button
3. Web View – Takes you to the Sitellite Web View for the site
4. Control Panel – Takes you to the Sitellite Control Panel for the site
5. Close – Closes the editing window
Figure 3 – Editor window
Using the above options, the process of editing your site is exactly the
same as using Sitellite from inside a web browser, except that you were
able to skip the step of going to Sitellite and logging in.
File management
To upload, download or manage files on one of your websites, click on the
Files link next to that site. This will open a file browser window with a list
of folders and files in the root folder of your site (Figure 4).
Please note that these are not the websiteʼs own source code or template
files, but rather files you or other site admins have uploaded into the Web
Files collection. Web Files is Sitelliteʼs online document management
system which you can use to publish files to your website or share them
between yourself and other Sitellite users.
5 | Simian Systems Inc.
SIMIAN systems
Figure 4 – File manager
Across the top of the file manager window you will see the name of the
site followed by the folder path and underneath that there will be two links
for uploading a new file or creating a new folder on the remote site. On
the top right is a search box for searching for a particular remote file.
Navigating between folders
To navigate into a folder, click on the folder name. To navigate back down
to a parent folder or to the root folder, click on the folderʼs name in the
folder path beside the website name.
Uploading files
There are two ways to upload files in the Sitellite Desktop. The first is to
click on the Add File button, which opens a dialog window that will let you
browser for the file you want to upload. The second is to simply drag and
drop one or more files from your desktop, Windows Explorer, or the Mac
OS Finder into the Sitellite Desktop file browser. You can upload several
files at once this way, however folders will be ignored; you must upload
the files themselves.
When a file is first uploaded, its Sitellite team is automatically set to your
own team, its status is automatically set to “Draft” and its access level to
“Private”. To change these, simply edit the fileʼs properties after the
upload has completed. A file must be marked “Approved” and “Public” for
it to become visible on your public website, or “Approved” and “Member” if
it should be visible only to registered website users.
Downloading a file
To download a file, simply click on that file. It will pop up a standard file
save dialog box which allows you to choose where to download the file on
your computer. The default folder is your Documents folder.
6 | Simian Systems Inc.
SIMIAN systems
Editing file properties
To edit a fileʼs properties, click on the Edit link for that file. This will open
a dialog box (Figure 5) which lets you change the following aspects of a
file:
1. Name – Allows you to rename the file. Renaming a file will
automatically update any links to that file on your website
2. Team – The Sitellite team that owns the file
3. Status – The status of the file in Sitellite
4. Access Level – The access level of the file in Sitellite
5. Keywords – A list of keywords for the file search, including website
search results on published files, separated by commas
6. Description – A description also for search, including website search
results on published files
Figure 5 – Edit file properties
7 | Simian Systems Inc.
SIMIAN systems
Duplicating a file
To duplicate a file, click on the Duplicate link for that file. This will create a
new file beside it in the list with “copy” attached to its name. Additional
copies will be named with a “copy 2” or “copy 3” added, for example:
example.txt
example copy.txt
example copy 2.txt
example copy 3.txt
If a file is locked, you cannot edit it or move it until it is unlocked, however
you can still duplicate the file and work on the duplicate instead.
Locking and unlocking
To lock a file, click on the Lock link for that file. The link will change to say
“Unlock” showing you that the file is now locked for you. To unlock the
file, click the Unlock link. A lock prevents a file from being modified by
other users while you are editing that file yourself. Files that are locked
by other users have a lock icon beside them and their options except Duplicate are disabled. Locks expire automatically after one hour if they are
forgotten.
Deleting a file
To delete a file, click on the Delete link for that file. A confirmation dialog
will pop up asking you to confirm that you want to delete the specified file
and then it will be removed from the file list.
Files that are deleted through the Sitellite Desktop file browser are still
recoverable through the main Sitellite interface via the Deleted Files link
under the Control Panel > Content > Web Files screen. In fact, a
complete change history is available in the main Sitellite interface for
each file in Web Files, so you can always retrieve an earlier version of a
file that has since been modified.
Moving files between folders
To move a file into a sub-folder of the current folder, simply drag and drop
that file into the folder (Figure 6). To move a file from a sub-folder into its
parent folder or the root folder, simply drag and drop that file onto the
folder name in the folder path next to the site name.
Note that if you try to drag a file onto a folder that already contains a file
of that name, an error notice will pop up. Simply rename the file first then
you can move it safely.
8 | Simian Systems Inc.
SIMIAN systems
Figure 6 – Drag and drop
Site settings
To edit the settings (link, username, password) for a site, click the
Settings link next to it. This will present the same form you use for adding
new websites.
Removing a site
To remove a website, click the Remove link next to that site. The Sitellite
Desktop will confirm that you want to remove that site and then it will be
erased from the main screen.
Website monitoring
The Sitellite Desktop does a check of each site every 5 minutes to ensure
it is responding to visitor requests. If anything happens to cause down
time of your website, the Sitellite Desktop will alert you in your desktop
toolbar or dock and highlight the website that is not accessible in a bold
red colour in the main screen (Figure 7) until it becomes accessible again.
Figure 7 – Website monitoring service
9 | Simian Systems Inc.
SIMIAN systems
Please note that if your own internet connectivity is lost, then the Sitellite
Desktop may incorrectly think that the websites are down when it is in fact
your own internet access that is down. So it is a good idea to make sure
you are still able to browse other websites before reporting a website
outage to your website administrator or hosting company.
Desktop integration
In addition to the Windows task bar and Mac OS X dock notifications for
website monitoring, the Sitellite Desktop also integrates with system
menus where applicable. For example, by right-clicking the dock icon in
Mac OS X, you will see menus to quickly launch your websites or access
files from a specific site (Figure 8). These menus are also accessible in
the application menu across the top of the desktop.
Figure 8 – Desktop integration
Security notes
The Sitellite Desktop stores your basic site information (link and
username) in a local database file, but passwords are always stored in an
encrypted storage facility so they canʼt be read by others accessing your
computer.
However, since the Sitellite Desktop remembers your website information
and bypasses Sitelliteʼs online login, you should not install it on a shared
or public computer since that would potentially expose your websiteʼs
editing abilities to other people. For this reason, the Sitellite Desktop
should only be installed on your own work, home or laptop computers.
10 | Simian Systems Inc.