1
SIMIAN systems
SiteMailer 2 User Manual
Sitellite Professional Edition
SIMIAN systems
Introduction
SiteMailer 2 is an enterprise-level newsletter campaign manager. It
provides advanced features for importing, managing and publishing
newsletters in both email (HTML and automatically generated text-only
formats), RSS, and website browsable archive.
SiteMailer 2 can manage multiple lists, use customizable templates for
designing professional emails, embed dynamic content and
personalization into emails, save drafts for later, and preview messages
before sending. Email sending is also fault-tolerant through the use of a
journalling system which ensures that even if a message fails to send, it
will restart where it left off without sending duplicates or missing any
subscribers. SiteMailer 2 can handle 100,000+ subscriber lists.
SiteMailer 2 also has bounce-back handling and privacy protection
features such as email verification and double opt-in for new subscribers
built-in.
Logging In
To access the SiteMailer login screen, first log into Sitellite then enter the
Control Panel. From here, you will see SiteMailer 2 under the Tools menu
in the top right of the screen.
Alternately, you can access SiteMailer 2 directly by going to the following
address and entering your Sitellite username and password:
http://www.example.com/index/sitemailer2-app
Simply change www.example.com to your own website domain name.
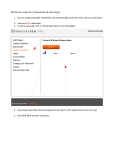
Menu Overview
Once logged into SiteMailer 2, you will see a series of tabs across the top
of the application. These are:
1. Newsletters
2. Subscribers
3. Drafts
4. Templates
2 | Simian Systems Inc.
SIMIAN systems
5. Campaigns
6. Stats
7. Settings
8. Help
This manual will follow the menu tabs for documenting the SiteMailer 2
user interface, then add some additional configuration information at the
end.
Newsletters
Adding a newsletter
To add a newsletter, click on the Add Newsletter link. In SiteMailer 2, you
can create an unlimited number of newsletters, and an individual subscriber can be subscribed to one or more of them.
A newsletter has the following properties:
1. Name - the general name of the newsletter
2. From Name - the name to send messages from
3. From Email - the email address to send messages from
4. Template - which template to render messages with
5. Subject - a default subject line for each mailing
6. Public - whether this newsletter is visible on the public archive/
subscription screens or not
7. Import Subscribers From - this allows you to import subscribers from
existing newsletters into your new ones automatically
When youʼre ready to create your new newsletter, simply click the Create
button.
Modifying a newsletter
To change the properties of a newsletter, from the Newsletters screen,
click on the pencil icon next to the newsletter. This will bring up a form
3 | Simian Systems Inc.
SIMIAN systems
similar to the Add Newsletter form which allows you to change all the
same properties of the newsletter.
Deleting a newsletter
To delete a newsletter, check it off in the list then click on the red X icon at
the top of the list. SiteMailer 2 will prompt you to confirm your decision
and then will proceed to delete the newsletter.
Sending a message
To send a message, click on the envelope icon next to the newsletter.
This will bring up the New Message form with the following fields:
1. From Name - allows you to customize this value on a message-bymessage basis
2. From Email - allows you to customize this value on a message-bymessage basis
3. Template - allows you to customize this value on a message-bymessage basis
4. Re-occurring - whether this individual message should automatically
be sent again on a weekly, bi-weekly or monthly basis -- note that this
requires the scheduler to be running correctly
5. Date - the date to send the message on, allowing you to publish a
message in advance and send it automatically at a later date
6. Time - the time to send the message on
7. Newsletters - allows you to send the same message to subscribers
from more than one newsletter at once
8. Subject - allows you to customize this value on a message-bymessage basis
9. Message Body - the actual message body as a visual editor
Please note that the editor has a few limitations compared to editing a
web page. Namely, the box and form choosers will not work. Most other
functions should behave as expected.
To send the message, click the Send Message button. To instead save it
as a draft to modify and send later, click the Save as Draft button.
4 | Simian Systems Inc.
SIMIAN systems
To send a test message to yourself to verify how the message will be
seen by others, click on the Send Test Message button. A popup dialogue
will appear asking for the email address to send the test message to.
Sent messages
To see messages that have previously been sent, click on the icon with
several envelopes. The following screen will show you when each message was sent, as well as its status (if itʼs still being sent) and a partial
calculation of how many times itʼs been viewed or bounced.
Subscribers
Subscribers are available under the Subscribers tab or by clicking on the
Subscribers icon next to a given newsletter in the Newsletters tab.
Subscribers are managed as one large list that can be assigned to one or
more newsletters.
Adding a subscriber
Weʼll cover later how a subscriber can add themselves. To add a subscriber manually, click on the Add Subscriber link. This brings up a form
to create a new subscriber with the following properties:
1. Email Address
2. First Name
3. Last Name
4. Organization - the name of the company the subscriber works for (optional)
5. Web Site - the website of the subscriber (optional)
6. Newsletters - which newsletters the subscriber is subscribed to
One youʼve filled out the form, click the Create button to create the subscriber.
Importing subscribers
Subscribers can be imported individually from vcard files exported from
3rd party address book software, as well as from CSV or “commaseparated values” files in bulk. CSV files can be exported from Excel and
other spreadsheet and database software.
5 | Simian Systems Inc.
SIMIAN systems
To import subscribers, click on the Import Subscribers link which brings up
a form. Next, click on the Browse button next to the vCard or CSV field
and browse your computer filesystem for the subscriber vcard or csv list.
Select the newsletters you wish to subscribe the new subscribers to then
click on the Next button.
For vCard imports, the following screen will verify the vcard data and
allow you to confirm it before saving the subscriber to the database.
For CSV imports, the following screen will allow you to assign values from
the CSV data to correspond to the properties of a subscriber in SiteMailer
2.
Modifying a subscriber
To change the properties of a subscriber, from the Subscribers screen,
click on the email address of the subscriber. This will bring up a form
similar to the Add Subscriber form which allows you to change all the
same properties of the subscriber.
Deleting a subscriber
To delete a subscriber, check them off in the list then click on the red X
icon at the top of the list. SiteMailer 2 will prompt you to confirm your decision and then will proceed to delete the subscriber.
Mass unsubscribe
To mass unsubscribe a group of users, click on the Mass Unsubscribe link
then browse for a CSV file containing the list of subscribers. Next, select
the newsletter(s) to unsubscribe the subscribers from then click the Next
button.
The following screen will verify the correct field from the CSV data that
corresponds to the subscriber email addresses.
Search parameters and sorting
You can sort the subscriber list by clicking on any of the table headings.
An arrow shows which column the list is currently being sorted by, and
which way (alphabetically ascending or descending). Click on the same
header again to change between ascending and descending sorting
order.
You can also search the subscriber list using a text search that searches
the email, name, organization name and website properties, as well as
the newsletter and status of the subscribers. The search parameters and
sorting form a powerful combination for managing users.
6 | Simian Systems Inc.
SIMIAN systems
Drafts
Messages that have been saved as drafts appear under the Drafts tab.
From here you can click on the subject of a given draft to continue to edit
it or send it. You can also delete unwanted drafts as well.
Clicking on a draft opens it up in the same editor found in the Newsletters
section.
Templates
Messages in SiteMailer 2 are sent in HTML format with an automatically
generated plain text version accompanying them for subscribers whose
email preferences are set to prefer plain text messages.
Templates are used to add style and branding to outgoing emails, as well
as personalization of the messages, using a combination of HTML and
tags in the SimpleTemplate format. SimpleTemplate is a template format
used throughout Sitellite by application developers, and is a simplified
template format compared to Sitelliteʼs main XML-based template format.
For a complete SimpleTemplate reference, please visit the following page:
http://www.sitellite.org/index/tutorials-story-action/story.59
Adding a template
To add a template, go to the Templates tab and click on the Add Template
link. This will open the template editor.
A template has only two properties, a name and a body. The name can
be anything you would like. The body must contain HTML and SimpleTemplate tags.
At the very least, the one required tag for your message to appear is the
{body} tag. This puts your message body into the template at the spot
where the tag is found.
The full list of available tags are as follows:
1. {body} - inserts the message body
2. {date} - inserts the current date
3. {email} - inserts the subscriberʼs email address
4. {firstname} - inserts the subscriberʼs first name
7 | Simian Systems Inc.
SIMIAN systems
5. {fullname} - inserts the subscriberʼs first and last name
6. {lastname} - inserts the subscriberʼs last name
7. {organization} - inserts the subscriberʼs organization name
8. {tracker} - inserts an invisible tracker that allows SiteMailer 2 to track
how many times the message has been read by subscribers -- note
that this number is never completely accurate because many
subscribers may have images disabled in their email clients, which
are required for this feature to work.
9. {unsubscribe} - inserts a link which the subscribers can use to unsubscribe themselves
10. {website} - inserts the subscriberʼs website
11. {campaign_link=ID} - inserts a link to the specified campaign based
on its ID number. See the Campaigns section to find out more about
campaigns.
To save a template, click on the Save button. You can also preview your
templates with the Preview button.
Campaigns
Campaigns are links which are tracked for their number of clicks in outgoing messages. Campaign links can be added using the following SimpleTemplate tag.: {campaign_link=ID} where ID is the campaign number, for
example {campaign_link=2}.
To find the campaign number, create a new campaign under the Campaigns tab and you will see the campaign ID in the link to that campaign
on the Campaigns page. It will appear in the form ?id=ID at the end of
the link.
This tag will be turned into a URL when the template is rendered, so the
best way to place it is to put it into an HTML link tag like this:
<a href=”{campaign_link=2}”>Link text</a>
This would make a link with the text Link text to the campaignʼs website,
which is automatically tracked for clicks. Alternately, you can use an image instead of text for things like banner ads and graphical advertisements. For example:
8 | Simian Systems Inc.
SIMIAN systems
<a href=”{campaign_link=2}”><img src=”http://www.example.com/pix/
banners/campaign2.gif” border=”0” alt=”Alternate text” /></a>
Stats
The stats screen shows you how many of your subscribers are active,
disabled or unverified. A disabled subscriber has requested themselves
to be removed from your newsletters. An unverified subscriber hasnʼt
confirmed their email address.
Settings
SiteMailer 2 has many settings which can be controlled from the Settings
tab. These include:
1. Subscriber registration - the degree of detail required from new
subscribers. The available options are:
1. None - disabled public subscriptions entirely
2. Email-only - requires only their email address to subscribe
(default)
3. Collect all data - requests but does not require all of the properties of a subscriber such as their name and organization
4. All data required - requires a subscriber to provide all of their
information to subscribe to your list
2. Subscribe email verification - whether to require new subscribers to
verify their email address by confirming it in a test email message
(default is yes)
3. Unsubscribe email verification - whether to require unsubscription
requests to be verified via a confirmation email (default is yes)
4. Public archive of messages - whether to create a publicly visible
archive of messages so that others may see them and search engines can index them (default is yes)
5. RSS subscribers - whether to allow subscribers to subscribe anonymously using RSS instead of email (default is yes)
6. Confirmation email address - The email address to send confirmation
messages from
9 | Simian Systems Inc.
SIMIAN systems
7. Confirmation email name - The name to send the confirmation messages from
8. Confirmation email subject - The subject line of the confirmation messages
9. Domain SiteMailer 2 resides on - The domain name that the website
runs on. This is used by the mailer script to correctly fill in link values.
10. Bounced message detection settings:
1. Disable subscribers after bounces - default is 2
2. Email address for bounced messages - this is a real email account which SiteMailer 2 will check for bounced messages
3. Email password for bounced messages - the password for the
email account
4. Server for bounced messages - the server name for the email
account
5. Port for bounced messages - the server port for the email account
Website/Public Features
SiteMailer 2 features several publicly accessible features. These include
the ability for visitors of your website to subscribe and unsubscribe themselves to your newsletters (only ones marked public of course). They
also include the ability to view previously sent messages as web pages
linked to from the newsletters page, and the ability to subscribe to your
newsletters as RSS feeds, which are quickly becoming a popular way of
subscribing to information online as all of the major web browsers now
include RSS support built-in.
To access the public features of SiteMailer 2, create a link somewhere on
your website to the following address:
http://www.example.com/index/sitemailer2-public-action
Installation/Configuration
SiteMailer 2 comes pre-installed with Sitellite Enterprise Edition, however
some additional configuration is also necessary to enable the message
queue, bouce-back handling, and scheduling of messages in the future.
10 | Simian Systems Inc.
SIMIAN systems
These steps are described in the file inc/app/sitemailer2/install/INSTALL
and are as follows:
Make the settings files writable and the scripts executable
Shell commands:
cd /path/to/sitellite
cd inc/app/sitemailer2
chmod -R 777 data conf
chmod -R 755 script
You can also do this via FTP if your FTP client has the ability to edit file
permissions on the server.
Configure your outgoing mail server
Open the file inc/app/sitemailer2/conf/properties.php and follow the instructions in that file to set the outgoing mail server, then verify any
additional settings by logging into the SiteMailer 2 administrative interface
and going to the Settings tab.
Edit the startup and bouncer scripts
Open the start.sh and start_bouncer.sh scripts in the inc/app/sitemailer2/
script folder as follows. You will need to know the absolute path to your
PHP command line binary. To find this out, on the command line try typing:
which php
Or:
which php-cli
Add the folder (not including the PHP binary file name) to the line beginning with export PATH= in both of these files and save them, for example:
export PATH=/usr/local/bin:/usr/bin:/bin
Where the PHP binary was found at /usr/local/bin/php. You can specify
multiple locations in the PATH value by separating them with commas,
and itʼs a good idea to leave the defaults in place. The startup and
bouncer scripts should now be ready to run.
Configure the scripts to be executed by Cron
11 | Simian Systems Inc.
SIMIAN systems
To edit your cron tab from the command line, enter the following
command:
crontab -e
This will bring up your cron tab for editing in your default text editor, most
likely Vi. Add the following line:
0,10,20,30,40,50 * * * *
/path/to/sitellite/inc/app/sitemailer2/script/running.sh
This will cause Cron to execute the running.sh script once every 10 minutes, which simply auto-starts or auto-restarts the message queue,
bouce-back handler, and scheduler daemons so that they are ready
whenever SiteMailer 2 adds an action to the queue or whenever a
bounced message arrives. Make sure to replace /path/to/sitellite in the
above example with the actual path to your Sitellite installation.
12 | Simian Systems Inc.