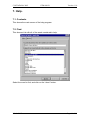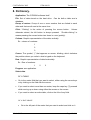
1
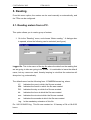
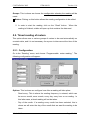
CONTAZARA 2005
CZMAN056
Version 1.10
CONTAZARA
2000A
SOFTWARE
USER MANUAL
Version 1.10
March 2005
Page 1 of 44
CONTAZARA 2005
CZMAN056
Version 1.10
CONTENTS
1. Introduction.............................................................................................4
1.1. Intended users.............................................................................4
1.2. Intended use................................................................................4
1.3. Minimum requirements ................................................................4
1.4. Program installation.....................................................................5
1.4.1. New installation .................................................................5
1.4.2. Un-installing a previous version.........................................7
1.4.3. Note about installation if a Psion TPL is going to be used.7
1.5. Start-up........................................................................................7
2. Table management ................................................................................8
2.1. Opening a table ...........................................................................8
2.2. Closing a table.............................................................................8
2.3. Saving a table..............................................................................9
2.4. Saving a table as.........................................................................9
2.5. Printing ......................................................................................10
3. Data management................................................................................11
3.1. Copy ..........................................................................................11
3.2. Paste to a current file ................................................................11
3.3. Paste to a new table..................................................................11
3.4. Cut.............................................................................................12
3.5. Delete ........................................................................................12
3.6. Find a number ...........................................................................13
3.7. Order .........................................................................................13
4. Databases ............................................................................................14
March 2005
Page 2 of 44
CONTAZARA 2005
CZMAN056
Version 1.10
4.1. Opening a database ..................................................................14
4.2. Closing a database....................................................................14
4.3. Adding to a database ................................................................15
4.4. Displaying records.....................................................................16
5. Reading ................................................................................................19
5.1. Reading meters from a PC .......................................................19
5.2. Timed reading of meters............................................................20
5.2.1. Configuration ...................................................................20
5.2.2. Verifying the result of programmed readings...................21
5.3. Dumping TPL data ....................................................................23
5.4. Configuring a TPL .....................................................................24
5.5. Reading options ........................................................................26
5.6. Reading meters from a TPL ......................................................33
5.6.1. Automatic reading ...........................................................34
5.6.2. Visual reading..................................................................35
5.6.3. Configuration ...................................................................35
5.6.4. To Select Configuration……………………………………..35
5.6.5. Communications...............................................................36
5.7. Delete configuration ..................................................................36
6. Windows...............................................................................................37
7. Help ......................................................................................................38
7.1. Contents ....................................................................................38
7.2. Find ...........................................................................................38
7.3. About .........................................................................................39
8. Dictionary .............................................................................................40
March 2005
Page 3 of 44
CONTAZARA 2005
CZMAN056
Version 1.10
1. Introduction.
The objective of this manual is to show the user how to use the program, such
that it serves as a guide and as complete help for mastering the application.
1.1.
Intended users.
This manual is directed at both new users who lack experience handling a
computer and people with computer knowledge who want to master the
program.
It is necessary to have some basic knowledge about the CONTAZARA meters,
given that they are the object of the program.
1.2.
Intended use.
This is a multi-function program that allows you to:
- Read CONTAZARA meters.
- Manage the data read from the meters.
- Configure portable, TPL-type readers.
1.3.
Minimum requirements.
The computer equipment necessary in order to be able to use the program is
the following:
- CPU: 486 or higher
- 4 MB RAM memory
- Hard drive with 10 MB free
- CD-ROM unit
- Windows 95 or later version, Windows NT 3.51 or later version
- Printer (optional, for printing the meter data)
March 2005
Page 4 of 44
CONTAZARA 2005
CZMAN056
Version 1.10
1.4. Program installation.
In order to be able to run the program, it must be installed on the hard drive by
strictly following the steps below. If you already have it installed, continue with
the steps in section 1.4.2.
1.4.1 New installation.
1. Insert the installation disk in the CD-ROM unit.
2. Wait a few seconds for the installation program to run automatically. If
this happens, go to step 6; if not, go to step 3.
3. Double-click on the desktop icon, “My PC.”
4. Double-click on the icon of the CD-ROM unit.
5. Double-click on the file, contazara2000a.EXE.
March 2005
Page 5 of 44
CONTAZARA 2005
CZMAN056
Version 1.10
6. Will appear the window, which allows to choose the lenguage version of
programm. Choosed ones between English and Spanish, the rest of
installation will appear in choosed language.
7. Will appear the window, idicating that it is advisable to close the rest of
the applications which are opened, to continue the istallation press “Next”
March 2005
Page 6 of 44
CONTAZARA 2005
CZMAN056
Version 1.10
8. This window presents our licence, to continue the installation press “I
Agree”
9. This window allows to change the directory where the application will be
installed by pressing the botton “Browse”. It is recommended not change
the destination folder.
March 2005
Page 7 of 44
CONTAZARA 2005
CZMAN056
Version 1.10
10) Presents the process of the installation of the necessary files on the
hard disc.
11) On the end of the installation, the window will appear , showing the
option of immediate execution of the program.
March 2005
Page 8 of 44
CONTAZARA 2005
CZMAN056
Version 1.10
It is possible that an error may occur if the installation tries to overwrite an
existing library. In this case, a warning window will appear, which gives you
options to follow. If this occurs, we recommend that you select the “Omit”
button in order to continue with the installation. This will not damage your
system at any time.
1.4.2 Un-installing a previous version.
If the previous version already exists on the PC, are two possible ways of
uninstall it :
a) 1st possibility: from a desktop of Windows go to “Start”, “Programs” and
chose “Contazara 2000A“. Make double “click” on “Uninstall” and to follow
the showed steps.
b) 2nd possibility:
1. Double click on the desktop icon called “My PC.”
2. Double click on the “Control Panel” icon.
3. Double click on the icon, “Add or remove programs.”
4. Select, “CONTAZARA 2000A,” and click on the button, “Add or remove.”
The un-installation will then begin.
5. Follow the un-installation directions step by step.
March 2005
Page 9 of 44
CONTAZARA 2005
CZMAN056
Version 1.10
Note: This process, do not deletes the logs files or the databases of the
program.
1.4.3 Note about installation if a Psion TPL is going to be used.
In order for communications with the Psion Workabout 5MX terminal to work
correctly, you must have the manufacturer’s communication drivers installed on
your PC. To do so, it is sufficient to have installed any of the communications
utilities that the manufacturer supplies with the TPL, such as PsiWin 2.3. In
order to install this utility, follow the instructions that accompany the product.
IMPORTANT: See the directions in section 5.4 in order to configure the reading
program for your TPL the first time that it is transferred.
1.5. Start-up.
To execute the program exists 2 possibilities:
a) 1st posibility: from a desktop of Windows go to “Start” “Programms” and
chose “Contazara 2000A“. Make double “click” on “Contazara 2000A” and
follow the showed steps.
b) 2nd possibility: from a desktop use a icon of a direct access.
March 2005
Page 10 of 44
CONTAZARA 2005
CZMAN056
Version 1.10
2. Table management.
Tables are files that are stored on the hard drive of your computer and that
contain the data from the meter readings made.
2.1. Opening a table.
This option allows you to open a file that already exists.
Go to the “file” menu, and choose “open table.”
A dialogue box will appear (see figure) where you can select the file to open. If
you do not know how to find a file, you can press F1, and help on how to do so
will be displayed.
When you click on the “Abrir” button, a grid will appear where each line
represents the data from a meter reading. At the top of the window, you can
see the total readings that the open table contains.
2.2. Closing a table.
This option allows you to close a table that was previously open.
1. Select the window that contains the table to be closed.
2. Go to the “file” menu, and choose “close.”
March 2005
Page 11 of 44
CONTAZARA 2005
CZMAN056
Version 1.10
If you have made changes to the table since it was opened, a box will appear
(see figure) that will allow you to store them.
Si (Yes) – Stores the changes and
closes the table.
No – Does NOT store the changes and
closes the table.
Cancelar – Cancels the operation.
2.3. Saving a table.
This option allows you to store the changes made to an open table and to
continue working with the table.
1. Select the window that contains the table to be saved.
2. Go to the “file” menu, and choose “save table.”
2.4. Saving a table as.
This option allows you to store the changes made to an open table in a different
file than the one that contains it and to continue working with the table.
1. Select the window that contains the table to be saved.
2. Go to the “file” menu, and choose “save table as...”
3. Enter the name of the file where the table is going to be stored.
4. Click on the “Save” (guardar) button.
March 2005
Page 12 of 44
CONTAZARA 2005
CZMAN056
Version 1.10
2.5. Printing.
This option makes a copy on paper of the selected table. Your printer must be
connected and configured correctly.
1. Select the window that contains the table to print.
2. Go to the “file” menu, and choose “Print.”
Choose the printer that you want to use. Click on the OK button in order to print
the table.
March 2005
Page 13 of 44
CONTAZARA 2005
CZMAN056
Version 1.10
3. Data management.
In order to be able to manage the movements of data obtained from the
readings, the following options are available:
3.1. Copy.
This option allows you to transfer the data from one table or database to
another file.
1. Select the origin window from where you want to copy.
2. Select the rows of data that you wish to copy (see “select data” in the
dictionary).
3. Go to the “Edit” menu, and choose “Copy.”
4. In order to send the data to another file, see the “Paste” option. If you
want to copy them to a database, see “Adding to a database,” 4.3.
3.2. Paste to a current file.
This option allows you to transfer the copied data from one file to another.
1. Select the data to copy (see the “Copy” option).
2. Select the window that contains the destination file of the copy. If it is not
open, choose “open table” or “open database,” as appropriate.
3. Go to the “Edit” menu -> “Paste” -> “In current file”
The data will be copied in the row preceding the one currently selected if it is a
table or at the end of the file if it is a database.
3.3. Paste to a new table.
This option allows you to transfer the data from one table or database to a new
table.
1. Select the data to copy (see the “Copy” option).
March 2005
Page 14 of 44
CONTAZARA 2005
CZMAN056
Version 1.10
2. Go to the “Edit” menu -> “Paste” -> “In new table.” A dialogue box will be
opened, where you have to enter the name of the new file that you wish
to create with the copied data.
3. The new file will open up automatically in a new window. In the event
that the table already exists, the following message will be displayed:
Si (YES) – Erases the selected file and creates a new one with the selected
data.
No – Cancels the operation.
3.4. Cut.
This option allows copying data from one file to another. It is different from
“Copy” in that it deletes the selected data from the origin file.
1. Select the window that contains the file from where you want to cut the
data.
2. Select the rows of data that you wish to cut (see dictionary).
3. Go to the “Edit” menu, and choose “Cut.”
The selected data will
disappear from the selected file.
4. In order to send the data to another file, see the “Paste” option.
3.5. Delete.
This option deletes the selected data from a table or database.
1. Select the window that contains the file with the data to be deleted.
2. Select the rows of data that you wish to delete (see dictionary).
3. Go to the “Edit” menu, and choose “Delete.”
The selected data will disappear from the selected file.
March 2005
Page 15 of 44
CONTAZARA 2005
CZMAN056
Version 1.10
3.6. Find a number.
This option seeks all occurrences of a certain meter in a table.
1. Select the window the contains the table that you want to search.
2. Go to the “Edit” menu, and choose “Find number.” Then,
Enter the serial number that
you are seeking (all of the
figures, including the zeros
to the left).
“Aceptar”
in
Click on
order
to
search.
If the number entered is in the table, the cursor will
stop at it, and a window will appear (see figure),
which will ask you if you wish to search for the rest
of the occurrences with the same number. (Si=Yes)
If the meter being sought is not in the table, you will see
this message.
It will also appear if, after you have
already found the meter and you are looking for more
occurrences, it does find any more occurrences.
3.7. Order.
This option orders a table by meter serial number, from low to high.
1. Select the window that contains the table to order.
2. Go to the “Edit” menu, and choose “Order.”
March 2005
Page 16 of 44
CONTAZARA 2005
CZMAN056
Version 1.10
4. Databases.
Databases are files that are stored on the hard drive of your computer and that
serve to save a large quantity of data so that they can later be accessed easily
and with powerful capabilities in order to perform all kinds of operations. This
software creates databases in the Microsoft Access format, manageable with
Microsoft Access 97 or later versions.
4.1. Opening a database.
This option allows you to open a file that already exists. The file must have
been created using this program (see “Adding to a database”).
Go to the “file” menu, and choose “Open database.”
A dialogue box will appear (see figure) where you can select the file to open. If
you do not know how to find a file, you can press F1, and help on how to do so
will appear.
4.2. Closing a database.
This option allows you to close a database previously opened.
1. Select the window that contains the database to close.
2. Go to the “file” menu, and choose “close.”
If you have made changes to the database, they will be saved automatically.
March 2005
Page 17 of 44
CONTAZARA 2005
CZMAN056
Version 1.10
4.3. Adding to a database.
This option allows you to add the data from a current table to a database.
The data will be added at the end of the database.
The database must have been created using this program.
If the database does not exist, you will be given the option to create it.
After the program adds the data, a window will open with the selected
database.
1. Select the origin table from where you want to copy the data.
2. Select the data to be copied from the table. If you want to copy an entire
table, you can go directly to the next point.
3. From the “File” menu, select -> “Add to database.”
SELECTED ROWS: With this option, only the data selected from the table will
be added to the database.
ALL ROWS: With this option, all data from the current table are added to the
database.
4. Select the destination database of the copy.
If the database does not exist, you will see the following message, which lets
you create it:
Si (Yes): Creates a new database with the selected data.
No: Cancels the operation.
March 2005
Page 18 of 44
CONTAZARA 2005
CZMAN056
Version 1.10
4.4. Displaying records.
With a database is open, we can apply various ordering criteria and filters,
thereby allowing us to find a certain range of meters.
From serial num.:
Enter the lowest serial number of the kind of meter that you want to display.
You have to enter all figures of the serial number (including the zeros to the
left).
To:
Enter the highest serial number of the kind of meter that you wish to display. In
the example of the figure, the meters between 1 and 1100000 will be displayed,
both inclusive.
From Date:
Enter the earliest reading data of the meter that you wish to display. The format
is dd/mm/yyyy, where:
March 2005
Page 19 of 44
CONTAZARA 2005
CZMAN056
Version 1.10
dd – day (two digits), mm – month (two digits), yyyy – year (four digits).
If you leave it blank, the earliest existing date is applied by default.
To:
Enter the latest reading data of the meter that you wish to display. If you leave
it blank, the latest existing date is applied by default.
In this example, it will show the meters that were read from 1 January 2000 to 2
January 2001, both inclusive.
Filter by a field:
With this option, you will be able to filter by a certain value of a reading. With
(1), you choose the name of the field of a reading to use as a filter. With (2),
you select the type of comparison <, <=, >, >=, =, <> (not equal). In (3), you
have to enter the value to compare.
1
2
3
In the figure, we can see that a filter has been applied to the “Battery” field. In
this case, we will see all meters with a low battery (<3).
Ordered by:
We can display the meters ordered by the following:
•
Serial number
•
Date
Ordering is always in the ascending order (from low to high).
March 2005
Page 20 of 44
CONTAZARA 2005
CZMAN056
Version 1.10
Apply Filter:
This button is used to apply the aforementioned ordering and search criteria to
the database. When you “Apply the filter,” the changes are only displayed, and
the database does not change.
Remove Filter:
This button is activated after having applied a filter.
It is used to cancel the filter applied.
When it is pressed, all meters in the database that we have open in the window
will be displayed. It also initialises the filter selection fields.
March 2005
Page 21 of 44
CONTAZARA 2005
CZMAN056
Version 1.10
5. Reading.
From this menu option, the meters can be read manually or automatically, and
the TPLs can be configured.
5.1. Reading meters from a PC.
This option allows you to read a group of meters.
1. Go to the “Reading” menu, and choose “Meter reading.” A dialogue box
is opened, where the following can be selected (see figure):
Logger file: This is the name of the log file where the data from the reading that
we are going to take are going to be stored. It is advisable to leave the default
name, but any name can used, thereby keeping in mind that the extension will
always be .log, automatically.
The default name has the following form: YYMMDDhhmmss.log, where:
YY:
Indicates the year in which the file was created.
MM:
Indicates the month in which the file was created.
DD:
Indicates the day on which the file was created.
hh:
Indicates the hour at which the file was created.
mm:
Indicates the minute at which the file was created.
ss:
Indicates the seconds at which the file was created.
.log:
Is the mandatory extension of this file.
Ex.: 040110184523.log. This file was created on 10 January of 04 at 18:45:23
hours.
March 2005
Page 22 of 44
CONTAZARA 2005
CZMAN056
Version 1.10
Groups: This is where we choose the configuration whereby the reading will be
made.
... Button: Clicking on this button allows the reading configuration to be edited.
2. In order to start the reading, click on the “Read” button.
When the
reading is finished, a table will open up that contains the data read.
5.2. Timed reading of meters.
This option allows one or various groups of meters to be read automatically on
a certain date, and it is not necessary for anyone to intervene at the time of the
reading.
5.2.1. Configuration.
Go to the “Reading” menu, and choose “Programmable meter reading.” The
following configuration will appear:
Options: This is where we configure how often a reading will take place.
-
Read every: This is where the reading frequency is entered, which can
be once a month, once a week, every day, every hour or no reading. In
this latter case, a timed reading will not be taken.
-
Day of the month: If a reading every month has been selected, this is
where we will enter the day of the month that we want the reading to be
taken.
March 2005
Page 23 of 44
CONTAZARA 2005
-
CZMAN056
Version 1.10
Day of the week. If a reading every week has been selected, this is
where we will enter the day of the week that we want the reading to be
taken.
-
Hour: This is where we choose the hour that we want the reading to be
taken.
-
Minutes: This is where we choose the minute that we want the reading to
be taken.
Under “minutes,” we can see the planned date and hour for the next
scheduled reading.
Groups: This is where all existing groups are displayed. In order to choose a
group to be included in the timed reading, proceed as follows:
a) Click on the group to be selected.
b) Click on the “>>>” button. The selected group will be put in the box to
the right, thereby indicating that it is selected. Repeat the process as
many times as necessary.
If a mistake is made and you want to remove a selected group, click on it and
then click on the button where the trashcan appears.
OK and Exit: Click on this button when you finish configuring the timed reading.
A message will then appear at the bottom of the screen, which indicates the
date and hour of the next timed reading.
If you exit the program, and a timed reading is active, the program will ask if you
want to keep it active when you run the application again. If you answer “Yes,”
when you enter the program again, the timing will be active. If you answer “No,”
the timing disappears.
Read now: Click on this button to take a reading of the groups selected at that
time.
5.2.2. Verifying the result of programmed readings.
When the reading date and time are reached, the reading is taken
automatically. When it finishes, a message will appear at the bottom of the
March 2005
Page 24 of 44
CONTAZARA 2005
CZMAN056
Version 1.10
screen, thereby advising you of the timed readings pending verification (see
figure).
In order to see the data that have been read, click on the message and a
window will open showing the data.
Date/Time: Indicates the date and time of the reading taken.
Log file: Indicates the name of the table that contains the data read. The name
has the following format: YYMMDDHHMMSS.log (year, month, day, hour,
minute and seconds of the reading).
Error: Indicates the number of the error that occurred during the reading. 0
indicates that there were no errors.
Basic: Indicates the number of meters basic read.
Extended: Indicates the number of meters extended read.
2000A: Indicates the number of meters 2000A read.
Group: Indicates the name of the group read.
In order to see the data of a scheduled reading, double-click on the reading
line.
A window will then open with the selected .log file.
Before double-
clicking, if you select “order file,” when it opens the window will be ordered by
the meter serial number. Moreover, if you select “delete repeated numbers”
then if there are various readings of the same meter taken, only the last one will
be kept.
If there is any error, or no meters were read (0 read), when you double-click, a
warning message will appear showing the event that has occurred. You can
March 2005
Page 25 of 44
CONTAZARA 2005
CZMAN056
Version 1.10
delete the pending reading by double-clicking on the line of the reading that
you wish to delete and pressing the “Del” key (delete).
5.3. Dumping TPL data.
This option transfers the data read from the readings taken with a TPL reader to
your computer.
1. Go to the “Reading” menu, and choose “Download data from handheld
computer.”
A window like the following will appear, where you can
configure:
Logger file: This is where you enter the name of the .LOG file where the data
read from the TPL reader is saved.
Order file: If this option is marked, the reading will be ordered by serial number.
Delete repeated numbers: This option can only be selected if “Order file” has
been previously marked. It only stores the last reading taken of each meter,
thereby discarding the previous readings.
Handheld types: This is where the TPL reader model used for the reading is
selected.
2. Click on the “Download” button, and the following window will appear:
Now connect the TPL reader
using an appropriate cable for a
serial port on your computer.
Keep in mind that you must have
March 2005
Page 26 of 44
CONTAZARA 2005
CZMAN056
Version 1.10
previously selected the port where you have the TPL connected (selected at the
“Reading” menu -> “Reading options”->”PC to TPL connection”). Put the TPL in
the “Communications” mode. If you are using a Husky TPL, it is put in the
communications mode by running HCOM from MS-DOS of the TPL or by
running the menu order of the CONTAZARA software, if it is already installed. If
you are using a Psion Workabout 5MX TPL, you must enter the option, Remote
Link, of the Special menu. Activate it there with the RS232 serial port at the
highest possible speed. When the communications mode is finished, you must
deactivate it from the same menu so that the port is free to read meters.
3. Click on the “OK” button. The data are read automatically. Once the
process has finished, the following window will appear:
Click on the “Aceptar” button. A window will then open
with the data downloaded from the TPL.
5.4. Configuring a TPL.
This option is used to configure how the readings on a TPL reader are going to
be taken.
1. Go to the “Reading” menu, and select “Configure handheld computer.” A
window like the following will appear:
Choose Groups : Available groups to choose.
March 2005
Page 27 of 44
CONTAZARA 2005
CZMAN056
Version 1.10
Groups Selected: Configurations choosed that you wish to save on the TPL.
If you wish to change the configuration of a group, click on it and press the ...
button. The first group selected will be the ‘default’ group in the TPL.
To remove a group from the selected list, click on the group and press
this button.
Handheld types: Choose the TPL model that you are using.
Setup software: Mark this option if you wish to update the reading software
that the TPL contains.
2. Click on the “Set TPL Reading” button.
The following window will appear:
Enter the name of your
company.
This data is
simply informative and will
appear on the reader.
Click on “Aceptar.”
3. Put the TPL reader in the
communications mode and click
on “Aceptar.” Follow the steps in
point 5.3.
The data are loaded in the TPL. As regards the Husky TPL, the program will be
reloaded if it was already on the drive, or if not, it will have to be restarted. On
the Workabout 5MX, its icon will have to be installed. To do so, enter the
“Install” option on the Apps menu and select HH.APP as the application. After
this, a new icon for running the program will appear on the screen.
March 2005
Page 28 of 44
CONTAZARA 2005
CZMAN056
Version 1.10
5.5. Reading options.
This option allows configuring all the parameters necessary to take a reading.
PC/TPL Reading Port: This is where you select the serial port of the computer
or TPL through which a reading is going to be taken.
For example: if a
telephone reading is going to be taken, and we have a MODEM connected to
serial port 2 on the computer, here we select 2.
Read tries: This is where you enter the number of times that the program tries
to take a reading in the event that the initial reading fails.
Read Type: This is where we select the data that is going to be read from the
meter.
This could be the following:
-
Basic reading: it reads the basic data of the meter. It is the quickest of
all. It returns the serial number, type, counting unit, maximum flow rate,
status and bank.
-
Extended reading: It takes a complete reading of the meter data (if the
model has the 2000A features, in order to take a complete reading, see
“2000A reading”).
March 2005
Page 29 of 44
CONTAZARA 2005
-
CZMAN056
Version 1.10
2000A reading. It takes a complete reading of the 2000A features (Plus,
Histometer and Timer).
-
Extended reading with update. It takes an extended reading with an
update.
The update causes the meter to record the date, time and
volume of the current reading as “date, time and volume of the previous
reading” the next time that it is read.
-
2000A reading with update. It takes a 2000A reading with update.
-
2000A partial reading: . It takes a partial 2000A reading of the bits that
we choose with the ‘partial reading config’ button.
Partial reading config: If ‘2000A partial reading’ choosed, with this button we
can do:
To choose a bit to read, only make a √. For
example: in the figure, we have choosed to
read
alarm
information,
and
read
histogram
the
‘User
(for
more
manual
of
CZReader’).
Pressing ‘Ok’ button,
changes are saved,
pressing ‘Cancel’, changes are not saved.
Update: If, under type of reading, one has been selected with an update, here
we can choose the following:
-
Erase times: It zeros out the time values of drip, sleep and normal.
-
Erase times and start-ups: It does the same as “Erase times,” and also
initialises the number of start-ups.
Verify: If a reading with update has been selected, after an update it verifies
that it has been performed correctly.
March 2005
Page 30 of 44
CONTAZARA 2005
CZMAN056
Version 1.10
Media: This option is used to specify the media that will be used to take the
reading:
-
Direct cable: in this case, a cable is connected to the serial port of the
computer (selected at “port”), and a reading “interface” is connected at
the other end.
-
Phone: For taking a remote reading via conventional telephone line. A
MODEM must be connected to the computer.
-
Radio: For taking a reading via radio.
-
GSM: For taking a reading of a bank of meters connected via mobile
GSM. A MODEM must be connected to the computer.
Phone number: If a telephone or GSM reading is taken, this is where you enter
the telephone number where the meters to be read are connected.
Dial tone: If a telephone or GSM reading is taken, this is where you enter the
kind of dialling to use – tones or pulses.
Single access: If we want to take a reading of a specific meter, this is where its
complete serial number is entered.
Interface: This is where you select the type of interface to which the meters to
be read are connected. If the CZ2100MX model is selected, the ... button
appears, which leads to the configuration screen for PLR2000 features:
March 2005
Page 31 of 44
CONTAZARA 2005
CZMAN056
Version 1.10
The following can be programmed on this screen:
•
Connection and disconnection times.
You can choose the hour and
minute that the equipment will connect (green lines) or disconnect (red
lines). It can be programmed to activate every day, a certain day of the
week, a certain day of the month or a certain month. In the example of
the figure, the equipment will connect every day at 0830 hours and also
on Fridays in May at 1600 hours. It will disconnect every day at 1030
hours and at 1700 hours on Fridays in May.
In order for the
programming to take effect, the box corresponding to each line and the
main box must be checked.
If no connection/disconnection time is
marked, the main box will indicate that you wish to deactivate the
programming existing on the equipment. If the main box is not marked, it
is neither programmed nor un-programmed in any event.
•
Set Password: It activates the password function on the equipment. As
from the moment in which this option is used, an access password must
be used for subsequent readings. The password must be written in the
text box and the corresponding box must be checked.
March 2005
Page 32 of 44
CONTAZARA 2005
•
CZMAN056
Access password.
Version 1.10
This is used to access equipment that has the
password previously activated through the “set password” option that
was used on previous readings. The password must be written in the
text box and the corresponding box must be checked.
•
Summer / Winter time: Set the PLR2000 time according to the European
or American time change, or none. The type of time change must be
selected
and
the
corresponding
box
checked.
When
connection/disconnection times are programmed, it is automatically
marked.
Bus bar: If the meters are connected to a multiplexer, this is where we can
mark the bus bars to be read. If none is marked, it will read 1 by default.
ID interface: This is where you enter the serial number of the interface to be
read. If nothing is entered, it contacts the interface at the other end of the line.
Register Unit: This setting allows us to configure the period of time to be used
when storing the last 5 indices, as follows:
-
Quarter: It will store the index of January 1, April 1, July 1, October 1 and
January 1.
-
2 Months: It stores the index every 2 months: January 1, March 1, May 1,
July 1, September 1 and November 1.
-
Month: It stores the index on day 1 of each month (It only saves the last
5).
-
Week: It stores the index of each Monday at 0000 hours (the last 5
weeks).
-
Not change: Maintains the record unit that the meter has stored.
Hold: It allows you to store the meter index at the time that you wish.
-
Day: You choose the holding day.
-
Monthly: You choose the holding month.
If the value is 99, the software will program the “next” month for the
programmed time and day. In other words, if day = 14 and hour = 3 are
programmed, and the reading is launched on 17 February, it will program
March. If the reading is launched 11 February, it will program February.
-
Hour: We choose the holding time.
March 2005
Page 33 of 44
CONTAZARA 2005
CZMAN056
Version 1.10
Time spans: We have up to 6 time spans available, which allow us to store the
water consumption between a certain day and time, within the same week. One
of the spans is always the remainder of the other 5.
For example, we could find out the consumption over a weekend. To do so, we
would program a span that goes from Saturday to Sunday from 0000 hours to
2359 hours.
In order to find out the consumption during the week in the
morning, we could create another span that goes from Monday to Friday from
0800 to 1359 hours.
Span: Indicates the span number (1 to 5.
The sixth span is not
programmable – it gives us the remaining consumption outside of the 5
programmed spans).
The data of each span are the fields in the
horizontal position, in the following order:
-SD: Start day of the span (Monday to Sunday).
-ED: End day of the span (Monday to Sunday).
-SH: Start time of the span (from 0 to 23 hours).
-EH: End time of the span (from 0 to 23 hours – the minutes are always
59).
When this button is pressed, we will see the configuration,
graphically, of the selected spans. In the event that any span has
been overlapped, it will show us where the overlap has occurred.
Set Alarm Clock: This activates the alarm and sets the meter clock, thereby
using the time of the computer that we are using for the reading.
March 2005
Page 34 of 44
CONTAZARA 2005
CZMAN056
Version 1.10
Alarm volume: This is where we indicate the volume in litres as from which we
want the alarm to activate.
Alarm period: This is where we configure the time during which, if the recorded
volume is equal to or greater than the alarm volume, it will cause the alarm to
activate (in minutes).
Summer / Winter time: We can configure the meter to automatically make the
winter and summer time change using the European (EU) or American (USA)
time change system, or using none (no automatic change).
Clear: This is where we can choose the data to be erased from the meter after
taking a reading.
Hourly registers: Erases the accumulated span data.
Histogram: Erases the data from the flow rate histogram.
Qmax: Erases the maximum flow rate stored.
Qmin: Erases the minimum flow rate stored.
Registers: Erases the data from the records.
Handhelds: This is where you select the TPL model
being used, either to read data from it or to configure
the kind of reading.
Drive letter: If the “Psion” model has been selected as
the TPL, this is where the drive unit of the reader is
configured.
PC to TPL Connection: This is where you select the serial port of the computer
where the TPL is connected.
Get from Handheld: This button is used to read the configuration that a TPL
has in order to be able to modify it as you wish and subsequently save it (you
must have first configured the port and model).
After you have finished configuring the reading, click on “OK,” and it allows you
to give the reading a name in order to save the configuration for subsequent
uses.
March 2005
Page 35 of 44
CONTAZARA 2005
CZMAN056
Version 1.10
5.6. Reading meters from a TPL.
This option allows taking a reading of a bank of meters from a TPL in the same
way as from a PC. In order to take readings from a TPL, the software must
have been previously loaded.
In order to access the reading program, go to the root of the directory tree (i.e.,
“C:\”), write in the next command, “H,” and then hit the “Enter” key (see figure).
In order to move through the options, use the arrow keys, and in order to select
an option, hit “Enter.”
•
Automatic reading: This allows “on site” reading of a bank of meters.
•
Visual reading: This is used to manually note a meter’s consumption.
•
View configuration: This displays the current configuration values of the TPL.
•
Select configuration: This allows to choose the reading configuration file,
from the TPL.
•
Communications: This is used to communicate the TPL with a PC.
March 2005
Page 36 of 44
CONTAZARA 2005
CZMAN056
Version 1.10
5.6.1. Automatic reading.
If automatic reading is selected, information about the type of reading will
appear (see figure).
Once the reading has been taken, the complete list of meters is displayed (see
figure).
If the extended reading mode has been configured, additional information about
the reading times can be obtained.
March 2005
Page 37 of 44
CONTAZARA 2005
CZMAN056
Version 1.10
In order to return to the main menu, press the “ESC” key.
5.6.2. Visual reading.
In order to take a visual reading, indicate the serial number of the meter and the
quantity of cubic meters consumed. In order to return to the main menu, press
the “ESC” key.
5.6.3. Configuration.
From this option, both the configuration parameters of the TPL and the type of
reading and invoicing are displayed.
5.6.4 Select Configuration.
From this option we access to a screen in which we can choose different
configuration files; when selecting one of these files, we will be doing is to
March 2005
Page 38 of 44
CONTAZARA 2005
CZMAN056
Version 1.10
change the configuration parameters of the reading, which can be visualized by
means of the option previously described.
5.6.5 Communications.
This option allows updating the software and dumping the data from a TPL to a
PC.
5.7 Delete configuration.
This option allows delete old reading configurations we don’t need . With this,
we save hard disk computer.
Go to the ‘read’ menu and choose ‘delete configuration’.
You can see all the available configurations.
To delete one of them, select it and press the “Delete” button (or del key).
To exit, press the ‘Exit’ button.
Note: The software doesn’t let to delete the configuration if it’s the only one.
March 2005
Page 39 of 44
CONTAZARA 2005
CZMAN056
Version 1.10
6. Windows.
This is where we configure how the various windows that we have open in the
application are viewed. It also includes a list of each window open. By doubleclicking on the one we want, we will be positioned in it.
March 2005
Page 40 of 44
CONTAZARA 2005
CZMAN056
Version 1.10
7. Help.
7.1. Contents.
This shows the main screen of the help program.
7.2. Find.
This shows a list with all of the words contained in help.
Select the word to find, and click on the “show” button.
March 2005
Page 41 of 44
CONTAZARA 2005
CZMAN056
Version 1.10
7.3 About.
This shows us the software version.
It also allows the following to be
configured:
•
Decimal point: What punctuation to use as the decimal point: a comma or
period.
•
Language: Allows configuring the language of the program.
•
Handheldcomputer: We can choose the TPL model to use in the
program.
•
Drive letter: If we have selected “Psion” as the TPL model, this is where
we select the drive unit of the TPL.
•
Log Directory: We can choose the directory where all the logs are saved.
By default is “... \application directory\log\”.
•
Organize LOG in folders. By selecting this option,
it
orders the log files obtained from the readings within the directory whose
name coincides with the name of the reading configuration used when the
reading was taken. For example, if we use “Example” as the configuration
to take a reading, by having this option selected, the logs obtained would be
saved in “... \application directory\log\Example.”
This is very useful for
sorting timed readings that are run often.
It is advisable to leave the values that are set by default.
March 2005
Page 42 of 44
CONTAZARA 2005
CZMAN056
Version 1.10
8. Dictionary.
Application: The CZ2000A software itself.
File: Set of data stored on the hard drive.
Can be both a table and a
database.
Group of meters: Group of one or more readers that are linked to each
other and that are all read at the same time.
Click: “Clicking” is the action of pressing the mouse button.
otherwise stated, the left button is always pressed.
Unless
“Double-clicking” is
means pressing the mouse button two times in a row (quickly).
Column: Graphic representation of the data vertically.
Ex.: column of numbers:
1
2
3
Cursor: The symbol, “|,” that appears on screen, blinking, which indicates
the position where you write in what is typed on the keyboard.
Row: Graphic representation of data horizontally.
Ex.: Row of numbers:
1
2
3
Program: see application.
Select data:
OF A TABLE:
Go to the meter field that you want to select, either using the arrow keys
or by clicking on the field with the mouse.
If you want to select more than one meter, keep the caps key (⇑) pressed
while moving up or down using either the arrows or the mouse.
If you want to select an entire table, click on the title of any field.
OF A DATABASE
Go to the left part of the meter that you want to select and click on it.
March 2005
Page 43 of 44
CONTAZARA 2005
CZMAN056
Version 1.10
If you want to select more than one meter, hold the “Control” key
down while you select the rest of the meters.
If you want to select an entire table, click on the title of any field.
Software: The intangible part of the computer. It makes the entire physical
part work. The software includes the operating system (Windows or others)
and the rest of the applications (spread sheets, word processors, CZ2000A
itself).
Overlap: This refers to when we are configuring a reading, and there are
time spans selected that overlap because there are 2 or more spans in
which the day and time coincide.
Ex.:
Span 1: from Monday to Friday, from 0800 to 2200 hours.
Span 2: from Wednesday to Wednesday from 1400 to 1500 hours.
Here there is an overlap, because the day and time coincide in both spans.
March 2005
Page 44 of 44