1
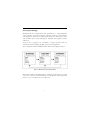
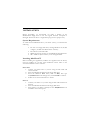
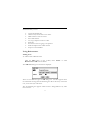
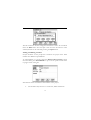
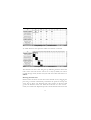
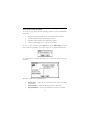
MindTools
Creative Business Management
USER MANUAL
Published by Widget Software Limited - 1999
The MindTools™ software and this manual are copyright ©1999 Widget
Software Ltd. All rights reserved.
LIMITATION OF LIABILITY
If within 12 months of purchase, this software can be shown to the
reasonable satisfaction of Widget Software Ltd. to be faulty and not to
function substantially as described in the user manual, Widget Software will
refund the purchase price or replace the product.
Apart from this warranty, Widget Software Limited will not in any event be
liable for loss, including consequential loss, caused by any error, defect or
failure of the software, or howsoever arising, including but not limited to
loss of use, loss of stored data, loss of profits or loss of contracts.
Widget Software Ltd.
121 London Road
Knebworth
Herts
SG3 6EX
United Kingdom
Tel: +44 (0)1438 818800
Fax: +44 (0)1438 815222
Email: [email protected]
Internet: www.widget.com
1
Contents
INTRODUCTION............................................................................ 4
CONCEPTUAL DESIGN................................................................................................................... 5
THE MINDTOOLS™ APPLICATIONS ........................................................................................... 6
Brainstormer................................................................................................................................... 6
CreativeMind ................................................................................................................................. 6
ActionPlanner ................................................................................................................................ 7
SUMMARY......................................................................................................................................... 7
INSTALLATION .............................................................................. 8
SYSTEM REQUIREMENTS ............................................................................................................... 8
INSTALLING MINDTOOLS™......................................................................................................... 8
Series 5mx ..................................................................................................................................... 8
Series 5 .......................................................................................................................................... 8
Installing from a Mac...................................................................................................................... 9
UNINSTALLING ............................................................................................................................... 9
GETTING STARTED...................................................................... 10
BRAINSTORMER ........................................................................... 10
OVERVIEW..................................................................................................................................... 10
USING BRAINSTORMER................................................................................................................ 11
Adding items................................................................................................................................ 11
Edit items .................................................................................................................................... 12
Delete items .................................................................................................................................. 12
Hide/show items .......................................................................................................................... 13
Find & Replace ........................................................................................................................... 13
Undo/Redo.................................................................................................................................. 14
Zoom ........................................................................................................................................... 14
Toolbar ........................................................................................................................................ 14
Navigation ................................................................................................................................... 14
Printing........................................................................................................................................ 15
Exiting ........................................................................................................................................ 15
CREATIVEMIND............................................................................ 16
OVERVIEW..................................................................................................................................... 16
USING CREATIVEMIND ............................................................................................................... 16
Adding and Editing Nodes........................................................................................................... 16
Associating files with nodes............................................................................................................ 17
Selecting and Moving items............................................................................................................ 18
Adding borders to branches............................................................................................................ 19
Adding clipart .............................................................................................................................. 19
Deleting nodes and clipart.............................................................................................................. 20
Hiding branches and clipart........................................................................................................... 20
Linking items and clipart.............................................................................................................. 21
Editing clipart items...................................................................................................................... 22
2
Other clipart operations ................................................................................................................. 22
Notes on clipboard usage ............................................................................................................... 23
Brainstormer options ..................................................................................................................... 23
View Preferences........................................................................................................................... 24
Undo/Redo.................................................................................................................................. 25
Zoom ........................................................................................................................................... 25
Navigation ................................................................................................................................... 25
Toolbar ........................................................................................................................................ 25
Printing........................................................................................................................................ 25
Exiting ........................................................................................................................................ 26
ACTIONPLANNER ........................................................................27
OVERVIEW..................................................................................................................................... 27
USING ACTIONPLANNER ............................................................................................................ 27
Starting a new project.................................................................................................................... 27
Changing the project settings .......................................................................................................... 28
Saving templates ........................................................................................................................... 28
Adding and editing activities.......................................................................................................... 29
Associating files with jobs .............................................................................................................. 29
Adding and Editing members........................................................................................................ 30
Modes, Views and Scales .............................................................................................................. 31
Drawing duration lines.................................................................................................................. 32
Adding member responsibilities...................................................................................................... 33
Inserting and deleting jobs and members.......................................................................................... 33
Costs summaries ........................................................................................................................... 34
Setting Alarms ............................................................................................................................. 34
Making Appointments/To-do’s .................................................................................................... 35
Notes on Cut, Copy and Paste ...................................................................................................... 36
General Preferences ....................................................................................................................... 37
View Preferences........................................................................................................................... 38
Protecting your project.................................................................................................................... 39
Undo/Redo.................................................................................................................................. 39
Zoom ........................................................................................................................................... 39
Toolbar ........................................................................................................................................ 40
Printing........................................................................................................................................ 40
Exiting ........................................................................................................................................ 40
TECHNICAL SUPPORT / HELP.................................................. 41
Technical Advice/Support............................................................................................................. 41
3
INTRODUCTION
Managing and analysing knowledge and information is a key skill for any
professional in our increasingly knowledge driven economy. However, the
proliferation of access to massive volumes of information, via technologies
such as the Internet, offers as many threats as opportunities. A prime
problem is that of information overload which stems from the inability to
structure, analyse and filter large volumes of data and ideas into more
manageable structures.
MindTools™ is a unique suite of programs designed for the Psion 5/5mx
palmtop computer. It comprises 3 programs designed to help structure,
organise and analyse information and turn this into a practical plan of
action with associated resources and costs. The 3 programs Brainstormer,
CreativeMind and ActionPlanner offer an effective portable solution for
those who need access on the move to powerful yet easy-to-use knowledge
mapping and project planning software.
Brainstormer can be used to organise information using hierarchical lists.
The CreativeMind utility makes use of visual memory and creativethinking techniques and the ActionPlanner helps to formulate project
plans to organise and prioritise activities.
4
Conceptual Design
MindTools™ was conceptualised and produced by a multi-disciplinary
team consisting of project managers, computer scientists, educationalists,
and designers to ensure that it reflected the needs of a wide range of users
and was built upon sound management, technical and cognitive practice
and theory.
Each of the 3 programs are optimised to support specific tasks for
information and knowledge mapping, and project management.
The conceptual model for MindTools™ is illustrated by Figure 1 below.
Figure 1- MindTools™ Conceptual Model
Brainstormer and CreativeMind help to visually map information (i.e. what
you want to achieve) and ActionPlanner to build project and responsibility
plans (i.e. how you will achieve your objective).
5
The MindTools™ Applications
Brainstormer
Brainstormer uses a hierarchical list to efficiently structure and record
information. This simple yet effective tool is ideal for recording and
structuring information and ideas, for example, during a meeting or
brainstorming session. It allows the user to insert, delete, cut, copy and
paste information in a list to promote structure. Brainstormer lists can be
directly exported to CreativeMind for further in-depth analysis and
structuring.
CreativeMind
CreativeMind helps to record, structure and associate information using
visual imagery enabling the user to shape and structure information, build
links and relationships, and emphasise key areas on which to focus
attention. CreativeMind maps can be linked to other electronic resources
such as Internet pages or other documents on the Psion Series 5/5mx.
This includes linking to other CreativeMind maps so that clusters of maps
with progressive levels of detail can be built.
CreativeMind offers many advantages over linear noting techniques (e.g. a
paper-based list) and are summarised as: •
hierarchy, categorisation and association to promote a deeper
processing of information
•
shape, structure and construct to emphasise information
•
time savings through: - recording only relevant words; reading
only relevant words and reviewing notes; and not having to
search for key words amongst unnecessary verbiage
•
shape and structure of a visual map to improve creativity and
recall
•
clear associations to link key areas of information
•
development of a visual map to encourage deeper processing of
information
6
ActionPlanner
ActionPlanner provides a range of tools and utilities to help develop
project plans. These plans help users to schedule and resource objectives
and tasks required to deliver a desired outcome. The 2 main components
of ActionPlanner are a Gantt and responsibility chart.
These tried and tested project management techniques offer powerful
techniques for planning the key stages of a project, identifying the
necessary resources and associated cost and communicating roles and
responsibilities amongst a project team. ActionPlanner can be linked to
the Psion Agenda to create reminders, to-do lists and schedule meetings.
Combined with this is the ability to have ActionPlanner to perform a series
of financial and resource workload analysis. ActionPlanner also supports
the development of templates for project management structures. This
helps to quickly build commonly used project plans.
ActionPlanner is a unique product in-terms of functionality and design for
the Psion Series 5/5mx and it offers a real solution for project managers
requiring project information wherever they may be.
Summary
MindTools™ is a unique suite of powerful information/knowledge
mapping and project management tools for the Psion 5/5mx. It draws
upon sound cognitive, management and technical practice and theory to
offer you an unparalleled suite of programmes for a palmtop computer.
We hope you enjoy using this software and find great value in its wide
range of tools and application.
7
INSTALLATION
Before proceeding, we recommend you make a backup of the
MindTools™ floppy disk in case the original becomes corrupted or
damaged. The license allows a single backup copy for this purpose only.
System Requirements
To install and run MindTools™ to your Series 5/5mx, you will need the
following:
• PC with 3.5” floppy disk drive, running Windows 95/98/NT
or higher. (Or Mac with MacConnect software)
• Psion Series 5/5mx link cable.
• 400kb free storage memory for the MindTools™ applications.
• 200 - 500kb of system memory to run the applications.
Installing MindTools™
Before installing this application, PsiWin v2.x supplied with the device,
must be installed on your PC. This installation routine relies on the
successful installation of this software.
Series 5mx
1. Connect your Series 5mx to your PC using the link cable and
activate the link.
2. Insert the ‘MindTools™’ disk in the floppy disk drive.
3. From the Windows Start menu, click on Run, then type
a:\mindtools.sis in the dialogue box, and click OK to continue.
4. Follow the on-screen instructions to install.
Series 5
1. Connect your Series 5 to your PC using the link cable and activate
the link.
2. Insert the ‘MindTools™’ disk in the floppy disk drive.
3. First check if your Series 5 already has the ‘Add/Remove’ icon
installed in the Control panel.
8
4.
5.
6.
If you do not have this icon, from the Windows Start menu, click
on Run, then type a:\setup.exe in the dialogue box, and click
OK to continue. This will install the icon to your Psion and setup
your PC to recognise SIS files. Then follow step 5 to complete
the installation.
If this icon already exists, from the Windows Start menu, click on
Run, then type a:\mindtools.sis in the dialogue box, and click
OK to continue.
Follow the on-screen instructions to install.
Installing from a Mac
1.
2.
You must have the MacConnect software installed to utilise it’s
support for SIS file installation.
If you do not have MacConnect, we suggest you contact
Technical Support using the details at the end of this manual to
request advice on manual installation.
When installation is complete, the MindTools™ application icons will
appear on the Extras bar of your Series 5/5mx and are ready to run.
Uninstalling
If you wish to uninstall the MindTools™ software, please follow the
instructions below:
1.
2.
3.
4.
Open the Control Panel from the System screen.
Select the Add/Remove icon and press Enter.
Select MindTools using the scroll bars if necessary.
Click Remove to uninstall the application.
9
GETTING STARTED
MindTools™ is a unique suite of tools for information management and
creative thinking, offering 3 utilities to help you, which can be launched
from a ‘Shell’ or direct from the Extras bar.
Sample files for each application can be found in the
\documents\mindtools folder.
The Shell screen
BRAINSTORMER
Overview
Brainstormer helps to organise information using hierarchical lists. It is
ideal for recording key issues during individual and group brainstorming
sessions.
Example Brainstormer Screen Shot
10
In Brainstormer you can:
•
•
•
•
•
•
•
•
•
Create hierarchical lists.
Add font style and colours to list items.
Hide and show sections of lists.
Save and load lists.
Cut, copy and paste sections of lists.
Print lists.
Preview how lists are going to be printed.
Find and replace items within the list.
Export to CreativeMind.
Using Brainstormer
Adding items
To Add an item in Brainstormer:
Click the Add button on the toolbar, Press Ctrl+A or select
Brainstormer>Add from the Menu.
The Add item dialog box will then be displayed:
There are two different types of Add dialog box. The first appears when
the initial item is being created. This dialog box allows the entry of the item
text, set the font style and colour.
The second dialog box appears when an item is being added to any other
item in the list.
11
This dialog box is identical to the previous except it has a new option,
whether the new item is to be added as a Child or Sibling of the current
item. A child item is indented below the current selected item. A sibling
item is added after all of the current item’s children.
Edit items
To Edit an item in the list:
Click on the Edit button on the toolbar, press Shift+Ctrl+Z or select
Brainstormer>Edit from the Menu.
The edit dialog displays the text, style and colour properties of the
currently selected item. All of these properties can be changed. The
changes do not take affect until the OK button is pressed.
Delete items
To Delete an item from the list:
Click the Delete button on the toolbar, press Ctrl+D or select
the Brainstormer>Delete item from the Menu.
12
Note: When an item is deleted from a list all of that item’s children are also
deleted.
Hide/show items
Items of a list can be hidden. When an item in the list is hidden all of its
children are also hidden.
•
•
The ‘+’ symbol next to an item indicates that it has hidden items.
The ‘-’ sign next to an item indicates that all the item’s children
are visible.
To hide items in the list:
Click on the ‘-’ sign in the box with the stylus, or select the
View>Hide/show option from the Menu.
To show items in the list:
Click on the ‘+’ sign on the left at the text with the stylus, or select the
View>Hide/show option from the Menu.
Tip: To show all the items in the list select View>Show all from the
Menu.
Find & Replace
Item text can be changed using the Edit>Find>Replace Menu item.
13
If there are multiple occurrences of an item then the Replace all option
from this dialog can be used. The Case sensitivity option enables a
narrower field of search to be performed.
Undo/Redo
Brainstormer supports a full undo/redo model by selecting the
Edit>Undo Menu item. Any operation can be undone, right back to
document creation or the most recent save.
Note: This gives more freedom when recovering from errors, but in
theory could prove to be memory intensive. Our tests have not found it to
be a problem, but you should Save to flush the buffers if problems with
memory shortages occur.
Zoom
Brainstormer has a 6 level zoom facility:
•
•
•
To increase the size of the text, select View>Zoom in from the
Menu, or press Ctrl+M.
Too decrease the size of the text, select View>Zoom out from
the Menu, or press Shift+Ctrl+M.
To reset the display to the standard zoom setting, choose
View>Default zoom from the Menu.
Toolbar
The toolbar on the right of the screen can be hidden to create more space
within the Brainstormer window. This can be accomplished by either
pressing Ctrl+T or selecting View>Toolbar from the Menu.
Navigation
To move to a new item in the list:
Use the Tab and Shift+Tab to move forward and backwards
respectively, or use the pointer to select the new item.
To move to the start of the list use Home key (Fn+left arrow).
To move to the end of the list use End key (Fn+right arrow).
To move one page down, use the PgDn key (Fn+down arrow).
14
To move one page down, use the PgUp key (Fn+up arrow).
Printing
Brainstormer supports the standard Psion printing model which can be
selected from the File>Printing option on the Menu. All standard
features are included such as Page setup, Print setup, etc. For more details
on printing from your Series 5/5mx, please refer to the user manual
supplied with the device.
Exiting
When exiting Brainstormer there are two options:
Ctrl+E quits back to the operating system, while Ctrl+Shift+E
quits back to the MindTools™ shell, from which ActionPlanner
and CreativeMind can be accessed.
15
CREATIVEMIND
Overview
CreativeMind helps you to graphically map out ideas, information and
relationships. Research has found that people find it easier to recall
pictorial maps over plain textual data - hence the rationale behind
CreativeMind. Such maps are commonly known as ‘Concept Maps’.
Example CreativeMind Screen Shot
Maps in CreativeMind are constructed from three basic constructs:
•
•
•
Nodes are text items that are linked hierarchically in branches
Clipart items are pictures that can be linked to other items
Optional links can be used to show relationships between items.
Using CreativeMind
Adding and Editing Nodes
To create a document in CreativeMind, firstly add the root node, which is
the central node to which every branch is attached. All other nodes are
children of this node.
16
Whether adding the root node or children to an existing node, the process
quite simple:
•
•
•
•
•
Select the node that you wish to add to (if it exists)
Press the Add toolbar button, press Ctrl+A or pick
CreativeMind>Add node from the Menu.
Type in the name for this node (which appears on the map)
Type any other information in the ‘notes’ section, then press OK
To edit an existing node at a later date, select the node and press
the Edit toolbar button, Ctrl+Q or pick CreativeMind>Edit
node from the Menu. This brings up a window where changes
can be made.
Note: the name can be formatted in a variety of fonts, weights, colours
and sizes, using the buttons just below the name in the edit window.
Associating files with nodes
Files can be associated with each node allowing you to link relevant
information sources together, e.g. attaching Word documents and Sheet
spreadsheets to nodes.
17
To make an association:
1.
2.
3.
4.
Select the relevant node
Press the Edit toolbar button, press Ctrl+Q or pick
CreativeMind>Edit node from the Menu
Select the Files tab, and press the Add button
Pick the file to associate with this item and press OK.
Once a document has been associated with a node, you can start the
document directly from within CreativeMind with the Start button in the
Add/edit node dialog box.
To remove an association:
The association can be removed with the Remove button in the
Add/edit node dialog box.
Selecting and Moving items
Most operations (e.g. Add, Move, Edit) are performed on the currently
selected item. Items may be selected with the pen or keyboard as follows:
Pick the item with the pen, or cycle through all the items with
Tab and Shift+Tab. Press Ctrl+Tab to toggle between clipart
items and nodes.
Once selected, an item can be moved with the arrow keys or by dragging
with the pen. Holding Ctrl down with the arrow keys allows bigger
18
movements to be made. Finally, if the item is a parent node holding Shift
down during the move will also move any children.
Adding borders to branches
Borders can be added to branches to highlight them.
To add a border to a branch:
1.
2.
3.
Select the starting node for the branch
Press the Edit toolbar button, press Ctrl+Q or pick
CreativeMind>Edit node from the Menu
Choose the Borders page, and pick a border type and style, then
press OK.
Note: Because borders considerably slow down performance, they are not
visible by default. To make your borders visible, pick the View>Borders
option from the Menu. It is advisable to edit without the borders, only
switching them on when printing or when the document is complete.
Adding clipart
Various clipart can be added to your ‘map’ for extra information or to
spruce up the presentation. This uses the built in clipart file provided for
the Sketch application.
19
To add a clipart picture to a document:
1.
2.
Press the Clipart toolbar button or pick Tools>Clipart>Select
Choose an item from the clipart palette
The item is then available in the document.
Deleting nodes and clipart
To delete a node or clipart item:
1.
2.
Select the item to delete
Press the Delete toolbar button, press Ctrl+D or pick
CreativeMind>Delete from the Menu
What happens next depends upon what kind of item is being deleted. If
you are deleting a clipart item or a node with no children, then the item will
be deleted. But if the item is a parent node, you will be asked what kind of
delete to perform. There are two options:
•
•
Branch delete: the entire branch is deleted, including all children
Item delete: the selected node is removed but the children are
attached to the nodes parent.
Hiding branches and clipart
Branches can be hidden if necessary to make a document clearer or to
provide more efficient editing (CreativeMind will run quicker with less to
draw).
20
To hide a branch, either:
Hold down Ctrl and click on the item to hide, choose the Hide
option from the menu that appears, or
Select the item to hide, pick View>Hide node from the Menu or
press Ctrl+H
To show a hidden node, either:
•
•
Hold down Ctrl and click on the parent of the hidden node,
choose the hidden node from the menu that appears, or just pick
Show All
Select the hidden branches parent node, pick View>Show
children from the Menu or press Ctrl+Shift+W choose the
hidden node from the menu that appears, or just pick Show All
Clipart can be hidden/shown by toggling the View>Clipart menu option.
Linking items and clipart
Links can be made between nodes in separate branches or between nodes
and clipart to represent associations.
To add a link:
1.
2.
3.
Select the item from which to make a link
Choose CreativeMind>Link from the Menu or press Ctrl+L
Select the item to which the link should terminate
If at any time you decide not to proceed with a link, simply press Ctrl+L
again, which cancels the operation. Links can be removed by following the
same process with the exception of choosing CreativeMind>Unlink
from the Menu or Ctrl+Shift+L.
A small box exists in the middle of each link line. Clicking on this box
brings up a window were further details can be recorded about the link.
21
Editing clipart items
Clipart items can be modified in the Sketch application. CreativeMind can
also import any Sketch document as clipart. This gives control over the
contents of your clipart palette.
To edit a specific clipart item in Sketch:
1.
2.
Select the clipart item
Choose Tools>Clipart>Export to Sketch from the Menu
A file is created in the C:\ (root) directory and the Sketch application is
started with this file. After you have made changes, the modified clipart
item can be imported back into CreativeMind (as any Sketch document can
be imported).
To do this:
1.
2.
Choose Tools>Clipart>Import from Sketch from the Menu
Pick the sketch file - the default location is the root directory of
the C drive, then press OK.
The clipart item will now be available as the last item in the clipart palette.
CreativeMind does not delete the clipart files it generates so remember to
delete them when you have finished with them so as not to waste valuable
disk space.
Other clipart operations
Each clipart item is stored within the CreativeMind document. This means
that documents can be exchanged between CreativeMind users without
requiring identical clipart palettes. If you find an interesting item in
someone else’s document that’s not in your palette, you can grab it into
your palette.
To do this:
1.
2.
Select the clipart item.
Choose Tools>Clipart>Grab from document from the Menu.
22
The clipart will then be available in the clipart palette window. If an item of
clipart is no longer required, it can be removed.
To do this:
1.
2.
3.
Choose Tools>Clipart>Delete from palette from the Menu.
Pick the clipart item which is to be removed
Confirm the delete operation
Note that built-in clipart cannot be deleted.
Notes on clipboard usage
Use the clipboard to copy nodes, clipart items and entire branches. The
operation is simple - just select the item to cut, copy or paste to. When
pasting nodes, select a node to be the parent for the pasted nodes. There
are no such restrictions with clipart.
Brainstormer options
CreativeMind can read/write Brainstormer documents. This means that a
project can be started in Brainstormer, then continued and further
expanded in CreativeMind. CreativeMind files can also be exported into
Brainstormer.
To read a Brainstormer project into CreativeMind:
1.
2.
Choose File>Brainstormer>ImportFile from the Menu or
press Shift+Ctrl+I
Choose the Brainstormer document and press OK.
CreativeMind will import the Brainstormer file, doing it’s best to arrange
the nodes in a reasonable fashion - but it’s likely that the automatic layout
will not be perfect. The layout can then be modified.
23
To export a CreativeMind document back to Brainstormer:
1.
2.
Choose File>Brainstormer>ExportFile from the Menu or
press Shift+Ctrl+X
Enter a name for the Brainstormer document and press OK.
The document is now available for loading into Brainstormer.
View Preferences
It’s nice to always display the map at the highest quality possible but the
flip side is that the screen will refresh slowly for larger documents - making
editing more cumbersome. CreativeMind provides a number of options,
which allow you to balance quality against speed.
•
•
•
•
The Quality Draw option eliminates screen flicker
Thick lines help to display the structure more clearly
Curvy lines produce a more organic looking map
Thick roots emphasise the root node and establish it as a central
focus for the map
We recommend using the quality draw with thick lines while editing, then
switching on curvy lines and thick roots when everything is complete.
Turning all these options off will give you the maximum speed
improvement.
If the screen update is sluggish, ensure that borders are not switched on
and try hiding clipart and unnecessary branches - this will give a significant
speed increase.
24
Undo/Redo
CreativeMind supports a full undo/redo model by selecting the
Edit>Undo Menu item. Any operation can be undone, right back to
document creation or the most recent save.
Note: This gives more freedom when recovering from errors, but in
theory could prove to be memory intensive. Our tests have not found it to
be a problem, but you should Save to flush the buffers if problems with
memory shortages occur.
Zoom
CreativeMind has a unique 33 level zoom facility to display your map
clearly on the screen:
•
•
•
To increase the size of the map, select View>Zoom in from the
Menu, or press Ctrl+M.
Too decrease the size of the text, select View>Zoom out from
the Menu, or press Shift+Ctrl+M.
To reset the display to the standard zoom setting, choose
View>Default zoom from the Menu.
Navigation
To move around the screen:
Use the Tab and Shift+Tab to move forward and backwards
respectively, or use the pointer to select the new item.
Toolbar
The toolbar on the right of the screen can be hidden to create more space
within the CreativeMind window. This can be accomplished by either
pressing Ctrl+T or selecting View>Toolbar from the menu.
Printing
CreativeMind supports the standard Psion printing model which can be
selected from the File>Printing option on the Menu. All standard
features are included such as Page setup, Print setup, etc. For more details
25
on printing from your Series 5/5mx, please refer to the user manual
supplied with the device.
Exiting
When exiting CreativeMind there are two options : Ctrl+E quits back to
the operating system, while Ctrl+Shift+E quits back to the MindTools™
shell, from which ActionPlanner and Brainstormer can be accessed.
26
ACTIONPLANNER
Overview
ActionPlanner is a project management tool to organise and control tasks
and activities. ActionPlanner uses a Gantt and responsibility chart format
to help sequence, prioritise and resource activities.
Example ActionPlanner Screen Shot
Other features include budget analysis, reminders, schedule-alarms and full
integration with Agenda.
Using ActionPlanner
Starting a new project
When starting a new project, there is the option to use a pre-saved or a
new blank project. The pre-saved templates give you a quick way of
loading project structures that you often use.
To start with a blank project, select File>Create new file option from the
Menu, then choose the Standard project option and press OK.
The Project settings window appears after choosing a project type.
27
This window allows more specific details to be entered such as name,
budget and start and end dates. After entering this information press the
OK button.
Changing the project settings
Project wide settings such as duration and budget can be changed at any
time. To make such changes, pick the Tools>Project settings option
from the Menu. The global changes made here cannot be undone.
Saving templates
Templates speed the creation of new projects by offering pre-determined
project structures that you frequently use. Templates are made from
existing projects, and save that project’s members, jobs and responsibilities.
Creating a new project is a simple matter of choosing a start/end date and
drawing in the duration lines.
To save a template from the current project, pick File>More>Save
template from the Menu or press Ctrl+Q. You will then be prompted for
a name for the new template. Enter the name and press OK. The next time
you start a new project, the template will be available in the templates
window.
Templates are saved in the \system\apps\actionplanner\templates
directory. Files from this directory can be deleted when they are no longer
required.
28
Adding and editing activities
Tasks represent specific project activities.
Objectives are project milestones, which comprise of a number
of tasks.
For example, a project may have a ‘Birth and Appraisal’ phase/objective.
This may consist of a series of tasks such as ‘Mission statement’, ‘Resource
analysis’, ‘Material analysis’ and ‘Feasibility study’.
Activities are added to a project by selecting Planner>New job from the
Menu, pressing Ctrl+Shift+J, or by tapping on the ‘?’ question mark in the
bottom left corner of the on-screen grid.
This will display the Add/Edit Job window, from where details about this
particular activity, such as its name, type (objective or task) and any other
notes can be entered. There is also a checkbox that can be ticked to show
that the activity has been completed. When all necessary information has
been entered, selecting the OK button will add the activity to the project.
To edit an existing activity, tap on the activity name or move to the specific
row with the arrow keys and press Ctrl+J.
Associating files with jobs
Documents can be associated with each activity. Open the Add/Edit Job
window for a specific task/objective (tap on the job name or press Ctrl+J)
and press the More button.
29
The file association window will appear which allows a file to be associated.
Press the Edit button here and pick a file from the file selector. Once
selected, the file can be started by pressing the Open button.
Adding and Editing members
Project members are the people that constitute the project team. Each
member has different responsibilities.
To add members to a project, select the Planner>New member option
from the Menu, press Ctrl+Shift+B or tap on the ‘?’ question mark in the
top right corner of the grid.
Information can be recorded for each member of the project:
•
The moniker entry allows for a 5 character, abbreviated name.
30
•
The unit cost field is the daily cost for this project member. This
figure is used for project financial analysis.
After entering this information, press the OK button and the new member
will be added to the project.
To edit an existing member, tap on the member name or move to the
column with the arrow keys and press Ctrl+B.
Modes, Views and Scales
ActionPlanner features two separate modes of operation, the Use and
Edit modes. To switch modes, press the toolbar Mode button or press
Ctrl+D.
When in Use mode, statistics can be retrieved by clicking on the grid
labels:
When in Edit mode, the project can be changed and further developed.
Two views are required to represent the duration’s of tasks and each
members responsibilities. In the responsibility view, responsibilities are
mapped to members for each task. In the calendar view, lines are drawn for
each task to indicate when that task is active.
31
Example Responsibility View Screen Shot
To switch between views press the toolbar view button or Ctrl+W.
Example Calendar View Screen Shot
The calendar view has a scale along the top indicating the dates when each
task is active. The unit for the scale is set to days by default, but can be
toggled through weeks, months and years with the toolbar scale button or
Ctrl+L.
Drawing duration lines
Duration lines are drawn for activities in the calendar view by dragging the
pen along a task line. Alternatively, hold down the space bar and tap the
arrow keys to draw your duration lines. The position of the line ends
govern the duration of the task. Each cell in the line is a unit of time exactly how much time depends upon the current calendar scale. Note that
32
you can’t draw in objective lines as these represent the cumulative lines of
the associated tasks.
Adding member responsibilities
Project responsibilities are given to individual tasks in the responsibility
view.
Add responsibilities to relevant tasks for each project member by tapping
on the cell in question and assigning the responsibilities. Alternatively,
navigate around the grid with the arrows and use the space bar to set the
responsibilities. Note that you can’t set responsibilities in objective lines.
Inserting and deleting jobs and members
The procedure for inserting and deleting is common between project
activities and members so we’ll tackle them together.
To insert a task/member, tap on the task/member that you wish to insert
before or press Ctrl+J or Ctrl+B respectively. This will bring up the
add/edit window. Press the Insert button here and enter the details for the
new member then press OK.
To delete a job/member, press the Delete button instead of the insert
button in the add/edit window. There is the option to cancel the delete
before proceeding.
33
Costs summaries
The costs summary provides a financial summary for a project. To display
the costs summary, choose Planner>Costs summary from the Menu or
press Ctrl+U.
The summary lists the project members, along with the number of days
they will work on tasks and gives the total cost for each member. It also
gives the total number of person days and the total cost and compares this
to the budget. The output can be sorted by each field, by pressing the
buttons at the bottom of the window. Pressing a button twice will invert
the sorting order.
Setting Alarms
ActionPlanner can be used to set Alarms. To add an alarm, choose
Planner>Alarms from the Menu or press Ctrl+A. The alarms window
will appear.
34
Pick the activity for which an alarm is required from the listbox. The start
date for this activity will automatically be entered. However, an alarm time
and some alarm text are also required. Press the Apply button to set the
alarm.
Note: This Alarm is generated separately in the Time application which is
limited to 8 system alarms, so when you add your alarm, the number of
free alarms will be reduced. If you can’t add an alarm, check that there are
alarms available.
Making Appointments/To-do’s
Instead of setting an alarm, it may be better to create an appointment in an
Agenda diary or a To-do item. To do this press Ctrl+Shift+O or choose
Planner>Appointments from the menu. You will be prompted for the
diary file, and will then see the appointments window.
Note: the Agenda file must be closed to enable ActionPlanner to write the
necessary information. If necessary, close the file before proceeding.
Choose a specific job from the listbox or simply enter the title, date, time
and duration for the appointment. Then choose whether you want the item
entered as an Appointment, To-do or both by clicking on the buttons at
the bottom of the window.
Once you have finished in this window, press Done. These items will now
appear in your diary file.
35
Notes on Cut, Copy and Paste
You can cut, copy and paste the following elements of the ActionPlanner
document:
•
•
•
•
Information found inside the job and member edit windows
Duration information from particular job lines
Member responsibilities from particular job lines
All the responsibilities from a group of members
To start a copy operation, press Ctrl+C (or select Edit>Copy from the
menu) and choose whether you want to copy job or member information:
You will then see a window that allows you to select the range of the copy
operation.
The other controls are explained below:
•
•
•
Information - copies all the information from the job/member
edit window
Duration lines - copies the duration lines for these jobs
Responsibilities - copies responsibilities for this job/member
36
Choose the range and tick the relevant boxes then press OK. To paste the
data back into the document, press Ctrl+V or select Edit>Paste from the
Menu. Tell the paste window where the new members should go by
picking a job/member from the Before list.
The Relative/Valid option is explained below:
•
•
•
•
Relative duration lines maintain their distance from the start of
the project. This could mean that a job starts on a different day if
the projects’ start date has changed since copying.
Valid duration lines always have the date they were copied with.
This is independent of changes in the project start date.
Relative member responsibilities maintain their distance from
the top of the job list. This could mean that responsibilities
change if new jobs have been inserted since the copy.
Valid member responsibilities always map to the correct job
item.
General Preferences
The General Preferences dialog helps to set custom responsibilities and
specify the format of the working week. Press Ctrl+Shift+K or select
Tools>Preferences from the Menu.
37
Add or remove responsibilities as required with the Add and Remove
buttons. Change any text for the responsibilities in the edit boxes below.
There is a maximum of eight responsibility items allowed.
Note: The Add button will not be displayed if the maximum of 8 items is
reached
The working week page lets you choose active workdays.
View Preferences
The View Preferences window customises how ActionPlanner looks.
Choose Tools>View preferences from the Menu or press Ctrl+K.
The Dates pane specifies how dates are shown in the column labels of the
calendar view.
The Labels pane controls the visibility of the grid labels - allowing more
information to fit onto a single screen if necessary.
The Summaries pane makes ActionPlanner calculate and display line
summaries for objectives. Turning both summaries on will summarise tasks
immediately below each objective line. Note that summaries come with a
38
significant performance overhead – it may be advisable to turn them on for
large projects only when printing.
Protecting your project
If a project contains sensitive information, it’s probably a good idea to
protect it with a password. To protect a document, choose
File>Password from the Menu or press Ctrl+Shift+Q. Enter and
confirm a password in the password window and press OK. Subsequently,
you will be prompted for the password each time the document is loaded.
To remove protection from a document, select File>Password from the
menu and re-confirm the password. The document is now unprotected and
anyone can read it. Try to choose passwords that don’t exist in the
dictionary and are mixtures of alphabetical characters and numbers where
possible.
Don’t forget your password - passwords cannot be determined if
forgotten!
Undo/Redo
ActionPlanner supports a full undo/redo model by selecting the
Edit>Undo Menu item. Any operation can be undone, right back to
document creation or the most recent save.
Note: This gives more freedom when recovering from errors, but in
theory could prove to be memory intensive. Our tests have not found it to
be a problem, but you should Save to flush the buffers if problems with
memory shortages occur.
Zoom
ActionPlanner has a 21 level zoom facility to display ActionPlanner clearly
on the screen:
•
•
To increase the size of the map, select View>Zoom in from the
Menu, or press Ctrl+M.
Too decrease the size of the text, select View>Zoom out from
the Menu, or press Shift+Ctrl+M.
39
•
To reset the display to the standard zoom setting, choose
View>Default zoom from the Menu.
Toolbar
The toolbar on the right of the screen can be hidden to create more space
within the ActionPlanner window. This can be accomplished by either
pressing Ctrl+T or selecting View>Toolbar from the menu.
Printing
CreativeMind supports the standard Psion printing model which can be
selected from the File>Printing option on the Menu. All standard
features are included such as Page setup, Print setup, etc. For more details
on printing from your Series 5/5mx, please refer to the user manual
supplied with the device.
Note: When printing from ActionPlanner, the output will be taken from
the currently active view. This means that two prints are required to print
both the calendar and member views.
Exiting
When exiting ActionPlanner there are two options:
Ctrl+E quits back to the operating system, while Ctrl+Shift+E
quits back to the MindTools™ shell, from which ActionPlanner
and Brainstormer can be accessed.
40
TECHNICAL SUPPORT / HELP
MindTools™ should give you many years of trouble free enjoyment.
However, should you have a problem with the floppy disk, installing the
software, or running the applications, please use the contact details below,
where our support staff will be only too pleased you help you:
Technical Advice/Support
Tel: 0891 717766
Fax: +44 (0)1438 815222
Email: [email protected]
Widget Software Ltd., 121 London Road,
Knebworth, Herts., SG3 6EX, United Kingdom
http://www.widget.co.uk
41