1
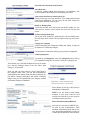
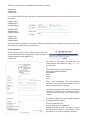
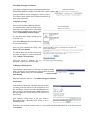
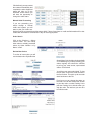
● Secure ● Efficient ● Expandable
A Comprehensive E-Commerce Service for Online Merchants
Powered by:
Pixelgate Networks
Internet and Network Solutions
733 Lakefield Rd, Ste A
Westlake Village, CA 91361
(805) 446-6254
www.pixelgate.net
Welcome
Welcome to the Website Administration for Pixelgate’s PG Web Shop. A powerful E-Commerce and Web Store
Management System. In order to effectively setup your store, you should first consider how you want to layout
your store. Consider that you are setting up a physical store. If you have 3 shelving units each with 6 shelves, how
would you group your products? For example if you were selling Wine, you might put all your Red wines on one
shelving unit and all your White wines on another. From there, you might split your Red wines up by type of wine
e.g. Cabernet Sauvignon on the top shelf, Merlot on the second shelf and Pinot Noir on the third shelf, etc.
Although there are several different ways to accomplish this in your store, one example would be to setup Red Wine
as a Category and make Cabernet Sauvignon a Sub Category. Give this process some thought, even test it out in
the store so that you are satisfied with the layout before entering all your products.
Logging in To PG Web Shop
Your Login information is below. Please keep this in a safe location so that others do not gain access to your
account.
To login to the administration, go to the URL provided below:
http://www.____________________________________________________________________________
Username: ___________________
Password: ___________________
Once you have logged in you will be at the main
Administrative Page as shown here:
Menu Overview
Page Generator - The Page Generator Control
Panel is a powerful tool for Web Designers. Using a
pre-defined template, you can create pages on the
fly and maintain your own content.
Products / Cart - The Products / Cart Control Panel is where you manage your Store Items. With the ability to
Add / Modify / Delete Product items and build diverse matrixes of your products, as well as build your Category
Structure and set the configuration of how your store manages your items.
Orders / Checkout - The Orders / Checkout Control Panel is where you manage the Checkout Process, including
Shipping Settings, Billing Settings. Management of your orders is easy with built in reporting and the ability to
Fulfill and provide a shipping tracking code to your customers.
Discount Coupons - Run a Special on one or all of your products. Setup special codes to help track your
Marketing Campaigns effectiveness or to clearance items and make room for new inventory. You set the code
and decide how to communicate it to your customers. They redeem it at checkout.
Users / Login - You can setup your store to provide your customers with the ability to Create accounts for
return visits. Manage your users through the backend. Setup different types of customers, such as retail or
wholesale.
Dashboard - A great overview tool to see where your store may be dropping customers. Analyze your shopping
process to see how many customers complete orders and how many abandon their carts and at what point.
The Dashboard is a wonderful analytical tool to help you work out your site inefficiencies. Includes Traffic
Statistics.
General Configuration - Setup your General information such as the logo that appears in the Administration
view of your store and the storefront entry page, whether you require Login to use your store or now. Setup Auto
Updates to keep your software up to date.
Navigating the backend
At the bottom of each screen and at the top of some screens
are navigation links. You can move about in each of the
modules or back to the main admin by using these links.
General Configuration
Select the General Configuration link from the Main Administration Menu. This will take you to the Configuration
Panel Program.
Cart Table Width
If you have a template, or Autohandler file that is used by your store, this is where you will define the Table Width
of the table that your store information will be dropped into. Define the width in Pixels.
Common Logo for PG Apps
The default logo for the PG Web Shop is the Pixelgate Logo. However, you can change the logo to a file of your
choice by selecting ‘Upload your own Logo file here’. Find the file, using the browse box Then click on ‘Select
a File and then click This Button’. Preview the image and if it is correct, click ‘Make this Image your Logo’. You
should see a message that states Your Settings have been updated. Click here to return to Panel.
Set Your Storefront Page
For some users, your storefront may be your index page. If this is the case, enter the index page
here, or enter the relative link to the page that is your designated storefront.
SSL Cert
This tells you if your Secure Certificate has been installed AND activated. If this shows N. Contact
Pixelgate to have your Cert activated.
Allow Updating of Components
This defaults to Y. It is a good idea to leave this setting as is. When software updates are made,
your store will automatically check for these updates in run a brief install whenever you select a
module that has updates ready.
Require Login for PGCART shopping
If you are setting up your store to require a guest to have an account with you in order to
shop, you would change this to Y, otherwise leave it N so that guests may browse your store
without creating an account. Guests will use Quck Checkout when purchasing. Which means their
information will be stored as an order and they will not be created in the User / Login database.
Require Login for CHECKOUT
If you want guest to be able to browse your store but still want them to create an account when
they checkout, set this to Y. Otherwise leave it an N.
Cart – Products Control Panel
Let’s start with Creation and Maintenance of your items, or products as they will be referred to in this section. Once
you have decided how you will layout your products in your store, you create them using the Products / Cart Control
Panel. Select this Control Panel from the menu.
You will be taken to the main products control panel as shown.
Overview of the Products Control Panel
Add a New Item
Is used for creating Adding New Products to your Database. See
Some information about Matrices before adding your items.
Clone a New Item from an existing Item_No
Cloning a New Item is a huge timesaver. If you adding products that
have several similiarities, you can clone an item then change the
fields that are different, such as price.
Modify an Existing Item
If you know the Item_No of the product you wish to modify, you can
enter the item number in this section and it will pull up only that
record.
Product Listings (Select by)
List all your items sorted by a particular field. List only Matrix items
OR only Single items. There is also an option to list only out of stock
items.
Listings in a Category
Used for Managing your Categories, adding new, editing, or listing all
the products in a particular category.
The best place to start when entering your products is Categories.
Creating Categories
If you plan to use Categories, setup your categories first by clicking
the ‘Create/Edit Categories’ Link in the ‘Listing in a Category’ box.
This will take you to the Main Categories Screen as shown
here. Add the Category Name in the box ‘Add a New
Category’. Click Submit.
Once you add your new Category, you are then taken to
the Category Detail view, you can add subcategories.
(Subcategories are children under the parent category) You
may add a Category Description and upload a category
image. Once you are satisfied with your category creation
Click Make Changes to Database.
Select Return to the Top of this Panel to
add additional Categories.
NOTE If you are ready to start adding
products to your store, read the next
section first to decide if you are going to
use Matrices with your items.
Some Information About Matrices
Item No’s are normally a SINGLE Item_
No with its own characteristics. Each
Variation of that item normally has its own
Item_No and thus traditionally you have to
re-enter the same data for each variation.
If you have lots of variations that can be quite time consuming.
The Pgwebshop has a feature that group like products all with the same base Item_No into what we call a
Matrix.
A Matrix is composed of the Matrix Master item and all the options (sizes,colors,materials,
etc) associated with it.
Remember, all items within a Matrix have the same price, description, image, etc.
and only the Matrix Master will show up in a search. You can only adjust the Available
Qty and Reorder Qty (both are used if you want to limit search results to items with a
quantity of one or more.)
Typically, when a Matrix Item is displayed to the customer, The Master item is shown with all the options listed
in a pull down menu. This is configurable if you want other display methods (radio button, etc).
By default we support three different types of groupings. Color, Size and a generic “Options” group for such
things as Materials, accessories, etc. You can use one or all three of the groupings.
Although Color, Size or Options are
the most common groups. Some types
of stores find it more convenient to
work with another type of Group. We
therefore have to ability to create an
“ALIAS” label for each of the stock groups. Thus a jeweler may choose to change the “Color” Label to “Metal
Type” and the Control Panel will show the label “Metal Type” and Metal Type Group” wherever “Color” or “Color
Group” used to appear.
To enable Matrices, you fill in the appropriate Group with each available option separated by a colon (:) . Options
must not have spaces or dashes. They should be alphanumeric (letters and numbers only).
If you must have two words separate them by an underscore “_” or use Capitalization to differentiate. For
example suppose you have an item with different materials and you need the following options:
Cloth, Leather, Textured Vinyl
In the Options Group you put in the following:
Cloth:Leather:TexturedVinyl
or
Cloth:Leather:Textured_Vinyl
If you just HAVE to have that space display in the web page you could use the %20 HTML command but that
means you see the %20 in all your Item_No reports.
If you aren’t using a particular grouping then simply leave it blank. To clear out a grouping just put in a space.
Matrix Example:
You sell a shirt with an 805 logo. Your base Item_No may be simply “shirt805” to indicate the Matrix Item_No.
If the shirt is available in three colors, Red, Blue and White then you would fill in the Colors Group with:
red:blue:white
and leave the other groupings blank, while filling in the rest of the data such as Price, Weight and Descriptions
and uploading your image.
When you have updated the Master Item, then you are given the option of generating the Matrix for the Base
Item. If you click on that link, the program will automatically create a unique Item_No for each of the options you
have provided.
The format used is the Matrix Item_No with dashes to separate out the options.
Thus in our example above, three Matrix Items would be created.
shirt805-red
shirt805-blue
shirt805-white
If you also had filled in the Size with S:M:L representing Small Medium and Large then a total of 9 items would
be created:
shirt805-red-S
shirt805-blue-S
shirt805-white-S
shirt805-red-M
shirt805-blue-M
shirt805-white-M
shirt805-red-L
shirt805-blue-L
shirt805-white-L
If Quantity Tracking is enabled, the program is capable of keeping track of the quantity for each of the Item_Nos
and warning you when restocking is necessary.
To add a New Item
Enter the Item number in the box labeled Add a New Item.
Item numbers should not have spaces or invalid characters.
Invalid characters include @#$%/?&*()
Click Submit
Now Enter the Item Name. The item name can
contain spaces, but refrain from using / or “ ‘ () in
the item name.
Select the category the item belongs to.
Enter Optional field information:
Manufacturer
Brand
Group
Type
Enter a Web Description. This is the detailed
information on the item that will show up on the
front end when the item is selected.
Alternate Description can be used for more detailed
information if required. For this example we have
used it to add an html link to the manufacturer’s
website.
Enter the item weight if you are calculating shipping
by weight, otherwise enter 0
Enter the Retail/List Price
Enter a discount price, if applicable
Quantity Available is used if you want to track a
specific number of items in your inventory. Leave
the default to 1 if you are not tracking inventory.
Click Make Changes to Database
If you want to upload an image associated with this item,
Select Make additional changes to Item No XXX
If you are finished, use the navigation to return to Top of
This Panel to enter another item or Return to Admin to go
back to the main menu
To Upload an Image
Once you select Made additional changes...
you are taken back to the item detail screen.
At the top of the detail screen is a thumbnail
for ‘No Image Available’ below that is a link.
Click on Upload/Alter Product Images
You are taken to the Image Upload Screen
as shown here.
Click on the Browse button to find the image
on your local machine.
Once you have selected the image, click
Select a File and Submit
You will be taken to a preview of the image
and have the option to create a thumbnail.
Click on Make a Thumb Image.
Once the thumb is created, use the
navigation to go back to the Cart Panel.
To Modify an Existing Item
If you know the Item Number of the item you want to modify
enter it in this box. Item numbers are case sensitive and must
be entered exactly as they are in the database.
Click Submit
Make the changes to the item - Click Make changes to Database
List all Items
In the Product Listings box, select the radio box of how
you want your items sorted. You can sort them by Item
No,, Item Name, or Brand. If you are using Matrices, you
have the option of selecting only the Matrix Masters, or
the Single Records. You can also pull only your ‘Out of
Stock’ Items.
Click Reverse Listing Order to list your items in
Descending Order, otherwise leave blank to list in
Ascending Order.
In the Box, you can enter a search string, e.g. if you want only items that contain ‘BL’ enter this in the box
Click Submit
Items appear in a listing showing the thumbnail image, Item No and other item information. To preview what the
item looks like to your visitors, click the thumbnail image
To modify the item, Click on the Item number. Make changes as before and click Make Changes to Database
to save your changes.
List items in a specific Category
You can list items in a specific Category by selecting that
category in the drop down box, then click Submit.
Checkout – Orders Control Panel
To manage your orders you will be using the Checkout
– Orders Control Panel. Before your start you must
know the process of which you are going to manage
your orders.
If you are using a credit card processing service that
is integrated with your shopping cart, you will need to
go in every day and Settle Credit Card Transactions.
This is called Batch processing and is much more
efficient than real time processing. The reason
being, if a customer purchases real time and their
card is declined, they are likely to never complete
the order. Batch processing takes them through the
entire order process and allows you, the merchant,
to batch process at the end of the day, giving you the
opportunity to contact them if there is a problem with
their credit card. Batch processing is not an efficient
method if you are receiving hundreds of orders a
day, but for the small business merchant it is more
effective in retaining orders.
Batch Order Processing
To Batch Process as described above, select Settle Credit Cards at the top of the Order Control Panel. Click on
the Charge button in the black box associated with the order. This will process the order through real time and
you will know immediately if the order has been accepted or declined.
If it is declined, you may contact
the customer immediately and
complete the order. Approved
orders will take you to the
fulfillment screen where you
will have the opportunity to
change the order status.
Manual Order Processing
If you are processing your
orders through a manual
credit card system, you will
want to print your orders out.
Orders must be processed through the system within 7 days of purchase or credit card information will be lost.
Credit card information is removed after 7 days for security purposes.
Order Search
Click on the Checkout – Orders
Control Panel. You can lookup
older orders or already processed
orders by Order Number or by
Name / email.
Review New Orders
To review all new orders you will
use the bottom box. By default the
Open Orders Only checkbox is selected with
a YTD daterange. If you are processing your
orders regularly this should be sufficient
to pull up your most current, unprocessed
orders. Click Submit
You will see your open orders listed. To view
the full order, Click on the Order number in
the first Column. This pulls up all the order
detail as shown to the left.
From here you can change the status on
the order. You can also select Print Version
to print the order or select Packing List to
print the Packing List to include when you
ship the order. The last item you can do is
to fulfill the order.
Fulfill Orders
Once you have printed the order, you can select
to fulfill the order from this screen by clicking on
the Fulfill this Order link at the bottom.
Fulfilling the order will send an email to the
customer to let them know that the order has
been processed. You can also enter the Shipping
Tracking Number of the order which will be
included in an email to the customer if you like.
To send the email, click Submit
Select Return to the Top of this Panel and
continue. You will notice the order just processed
no longer appears in the listing Window.
Page Generator Control Panel
The Page Generator allows you the flexibility of managing content
on your website pages, given that your website has been setup
using the Page Generator. This tool puts the ability to keep your
web pages fresh and new back in your hands. To use the Page
Generator, you may need to know a little html. Of course you can
use it regardless, however, to bold text or add a link, a very basic
knowledge of html is helpful.
Select the Page Generator Control Panel link from the main menu.
This will bring you to the main panel of the Page Generator. There
are 5 main sections to the Page Generator
- Add a New Page
- Modify an Existing Page
- Clone an Existing Page
- List Pages
- Regenerat Your Existing Pages
Adding a New Page
To add a page, you must first name it. All page names require the
file extension .jsp in order to utilize the template that has been
setup for that page. For instructional purposes,
we will create a page called testpage.jsp. Type
testpage.jsp in the box and click Submit.
This will bring you to the Update Page.
Depending on how your template is setup, you
have 4 blocks of text that you can edit on the
page, plus the title. In the title box, type My
Test Page.
In Block 1 type - This is the block 1 text that will
go on my page.
in Block 2 type - This is the block 2 text
in Block 3 type - My block 3 text appears here
in Block 4 type - In final, this is my block 4
text.
The page generator recognizes simple text formatting such as paragraph breaks. (When you hit enter on your
keyboard, this will insert a break) For more advanced formatting you must know a little html. I’ve included some
simple html formatting below to modify the page and make it a little more fancy:
To Bold text, use the <b></b>
You will need to put the <b> in front of the text you want bolded and the </b> after the text you want
bolded.
e.g. <b>October 31st – Annual Halloween Party</b>
Come to our annual Halloween Party on October 31st!
will display like this:
October 31st – Annual Halloween Party
Come to our annual Halloween Party on October 31st!
To add a line between blocks, use the <hr/> tag at the end of a paragraph.
Click on the button ‘Make Changes to Database’ in order to generate the page. Then select ‘Click Here to
Review the Page’ to see your changes.
Again, depending on how your template is layed out, you will see the text you typed on the page.
Modify an Existing Page
You can use Modify an Existing Page to pull up an existing page if you know the exact name of the file. Otherwise
use List pages option to select from your entire list of pages to modify and follow the same instructions below
to edit your page.
List Pages Created in the Page Generator
Go down to the List Pages and click Submit to
list all your Generated pages. In the listing, you
will see any pages that were created using this
module.
To See the page on your website, click on the link
in the Review column. Use the back button to go
back to the listing.
To modify an existing page, click on the link under
the Modify column.
From here, you will again see the 4 blocks of information included on the page. Make your modifications
according to the same instructions under ‘Add a New Page’. Then make sure to scroll to the bottom and
Click ‘Make Changes to Database’
Clone an Existing Page
If you want to create a page that is very similiar to an existing page without re-entering all the information,
you have the option of making a clone of that page. There are two ways to clone a page. From the main Page
Generator panel, you can enter the name of the page you want to clone (include the file extension) and the enter
the name of your new page. Then click submit. The new page is created with all the same text as the cloned
page.
The second way to clone a page is to List Pages, then select the modify link on the page you want to clone. At
the top you will notice 3 radio buttons that give you the option to Delete / Clone / Rename the page. Select Clone
and enter the name of your new page. Click Submit Query.
Delete a Page
To Delete a page, either using Modify an Existing Page or List Pages to bring up the Edit Screen. Select the
DELETE this page radio button and click Submit Query.
Regenerate Your Existing Pages
If you modify your template page, the changes will not show up on your Generated pages automatically.
Generated pages are static and not dynamic. To perpetuate your template onto your Generated pages, select
the Regenerat Your Existing Pages button. This will prompt the system to recreate each of your Generated
pages to include the changes to the template.
User / Login Management
There are several ways to manage the customers on your
website. You can allow quick buy status which doesn’t
require a login. You can require a login if you sell a product
that creates repeat customers, so that their information is
stored and accessible to them when they return, and you
can setup Wholesale buyers to have specific pricing. Your
administrator will help you to setup your cart the way that
works best for your customers.
Setting Up Wholesale buyers
When you allow wholesale buyers to purchase your
products with different pricing then the general public,
they will go through a registration process. Once they fill
out their registration information, their account goes into a
pending state. You will have to approve them before they can
actively purchase items from your website. You will receive an
email notifying you that someone has registered as a buyer.
To change a registered wholesale buyer to active status,
Select the Login User Control Panel link from the main
menu.
You will see a search box to find a specific user, however, at
the bottom you will see a list users, with the new registrants
being at the top of the list.
Select the new user by clicking on their email address.
To make them active, change the User Type to Wholesale
(1)
Change the Status to ACTIVE
Click Make Changes to Database
The user is now active and will be sent an email notifying
them of their status change.