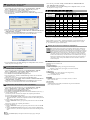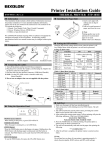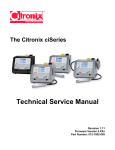
1
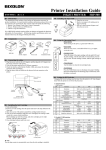
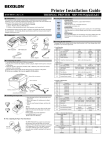
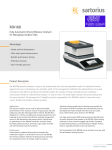
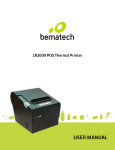
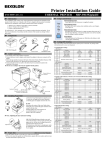
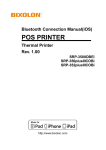
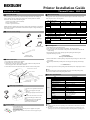
Printer Installation Guide
Thermal Printer SRP-150
KN04-00037B (Rev.1.5)
◈ About This Guide
◈ DIP Switch Setting
This installation guide contains only essential and simple information for installing the
product. Refer to the Users Guide in the CD that comes with the product for detailed
instructions. The CD contains the following data.
Changing DIP switch settings must be done while the printer is turned off. Changes made
while the power is on are not recognized.
1. Manual: Users Guide (Control Command)
2. Drivers: Windows Drivers
3. Utilities: Logo Download Tool
BIXOLON makes continuous improvements for better quality and functions of its products,
therefore the specifications and contents of the manual are subject to change without prior
notice for this reason.
◈ Contents of the Package
Procuct Installation CD
CD
Roll Paper
• DIP switches: Serial
SW
Function
1-1
Auto Cutter
1-2
1-3
Baud rate
1-4
Baud rate
9600 bps
19200 bps
57600 bps
115200 bps
ON
Disable
Reserved
OFF
Enable
Default
OFF
-
Refer to the following table
1-3
OFF
OFF
ON
ON
• DIP switches: Parallel, USB
SW
Function
1-1
Auto Cutter
1-2
1-3
1-4
1-4
OFF
ON
OFF
ON
ON
Disable
OFF
Note
Default value
OFF
Enable
Reserved
Default
OFF
-
◈ Self Diagnostic
Installation Guide
Power Cord
SRP-150
1. Check that the paper is mounted correctly.
2. Turn on the power while depressing the Feed button. The self test will start.
3. The printer prints out the current status of the printer such as the ROM version and DIP
switch settings.
4. After printing the current status, printing stops after printing the following lines.
(Paper indicator lamp stays ON.)
Interface cable
(Serial/Parallel/USB)
Self-test printing.
Please press the FEED button
◈ Cable Connection
1. Turn off the printer and ECR (host computer).
2. Connect the power cord to a power outlet.
3. Check the type of interface (serial, parallel, or USB) on the back of the printer and
connect the proper cable to the interface connector.
4. Connect the drawer kick-out cable to the drawer kick-out connector of the printer.
Drawer kick-out connector
5. Press the Feed button to continue printing. The printer will print all types of characters that
can be printed.
6. Self test stops automatically and the printer cuts the paper after printing the followings
lines.
*** COMPLETED ***
7. The printer goes back to normal operating mode immediately after completing the self test.
※ Note
The status of the printer can be checked through the self test. Check the printing quality,
ROM version, and DIP switch setting through the self test.
Power connector
◈ Product Specifications
Power cord
Interface connector
Interface cable
(Serial/Parallel/USB)
Drawer
kick-out
cable
◈ Roll Paper Installation
1. Press the cover-open button and open the
cover.
2. Insert a new roll paper in the right
direction.
3. Pull the paper slightly and close the cover.
※ Note
Hold down the center of the cover when
closing so that the paper adheres to the
roller.
Printing quality may not be optimum if
recommended paper is not used.
(Refer to the User's Manual.)
◈ Control Panel
• Power (indicator lamp)
Green light will be on when the power is supplied to the printer.
• Error (indicator lamp)
Red light will be on in the event of errors such as no paper or open
cover.
Printer
Item
Printer type
Dot pitch
Printing width
Number of characters
per line (default value)
Printing speed *1)
Receive buffer size
SMPS input voltage
Frequency
SMPS output voltage
Temperature
Humidity
Paper
Auto cutter
Mechanism MCBF *2)
Paper type
Roll paper width
Diameter of roll paper
Paper thickness
Description
Thermal transfer (thermal) printing
203 dpi (8dots/mm)
48 mm
32 (Font A) (12x24) / 42 (Font C) (9x24)
19 lines/sec, 65 mm/sec
4Kbyte
100 ~ 240 VAC
50/60 Hz
12 VDC
0 ~ 45 ℃ (Operating)
-20 ~ 60 ℃ (Storage)
10 ~ 80 % RH (Operating)
10 ~ 90 % RH (Storage)
; paper is not included
1,000,000 cuts
20,000,000 lines
Roll paper
58 ± 0.5mm
Maximum 80mm
0.062~0.075 mm
※ Note
*1) Printing speed may be slower depending on the combination of data transfer speed and
commands.
*2) This value is based on the measurement at standard temperature, specified paper, and
printing level 2, and it can be changed depending on the temperature or printing level.
◈ Serial (RS-232C) Interface Model
Windows Driver Installation
1. After installing the product installation CD, execute Thermal Printer > SRP-150 >
Drivers > Windows Driver > Drivers folder > SRP-150_WIN_Vx.x.x.exe .
2. Select the Next button in the initial installation window.
3. Select the Install button in the Ready to Install the Program window.
4. Select the Serial Port 1 (COM1) in Serial Port setting in Select Port Type window and
select the Next button.
5. Reboot the computer by selecting the Yes button from the Question window.
6. After rebooting, select Start> Setting > Printers and Faxes > BIXOLON SRP-150 Icon
> Right mouse click > Properties.
7. Select Port tab and then Port Configuration from the Properties window and set the
settings same as the result shown in the self test, and select the OK button.
6. After rebooting, select Start > Setting > Printers and Faxes > BIXOLON SRP-150
Icon > Right mouse click > Properties.
7. Select the General tab and then Print Test Page from the Properties window, and check
that the printer is working correctly.
◈ 有毒有害物质或元素名称及含量标识样式
部件名称
塑料机壳
金属框
主板
(排除集成电路)
自动切纸机
马达
滚轴 / 电线
/ 电源插头
手册 / 激光唱片
包卷纸
热敏打印头
集成电路
黄铜
适配器
有毒有害物质或元素
镉
六价铬
多溴联苯
(Cd)
(Cr+6)
(PBB)
O
O
O
O
O
O
铅
(Pb)
O
O
汞
(Hg)
O
O
多溴二苯醚
(PBDE)
O
O
O
O
O
O
O
O
O
O
O
O
O
O
O
O
O
O
O
O
O
O
O
O
O
O
O
O
X
X
X
X
O
O
O
O
O
O
O
O
O
O
O
O
O
O
O
O
O
O
O
O
O
O
O
O
O
O
O
O
O
O
注 1"O" 表示: 对应部品的均质物质内有害物质在 SJ/T 11363-2006 的最大允许范围以下时。
注 2"X" 表示: 对应部品的均质物质内有害物质超过 SJ/T 11363-2006 的最大允许范围时。
本表表示该部品内含有有害物质,部品别有害物质情报是以供应商提供的报告和公司
内部检验结果为依据制订的。部分部品含有的有害物质是现在的技术水平下无法替
代,并且 BIXOLON 也是为替代此部分而努力。
◈ WEEE (Waste Electrical and Electric Equipment)
This marking shown on the product or its literature, indicates that is should not be
disposed of with other household wastes at the end of its working life, To prevent
possible harm to the environment or human health from uncontrolled waste disposal,
please separate this from other types of wastes and recycle it responsibly to promote
the sustainable reuse of material resources. Household users should contact either
the retailer where they purchased this product, or their local government office, for
details of where and how they can take this item for environmentally safe recycling.
Business users should contact their supplier and check the terms and conditions of
the purchase contract. This product should not be mixed with other commercial
wastes for disposal.
(Fig 1)
☎ BIXOLON Co., Ltd.
8. Select the General tab and then Print Test Page from the Properties window, and check
whether the printer is working correctly.
● Website http://www.bixolon.com
◈ Parallel (IEEE1284) Interface Model
Windows Driver Installation
● Korea Headquarters
(Add) 7~8F, (Sampyeong-dong), 20, Pangyoyeok-ro241beon-gil,
Bundang-gu, Seongnam-si, Gyeonggi-do, 463-400, Korea (ROK)
(Tel.) +82-31-218-5500
1. After installing the product installation CD, execute Thermal Printer > SRP-150 >
Drivers > Windows Driver > Drivers folder > SRP-150_WIN_Vx.x.x.exe.
2. Select the Next button in the initial installation window.
3. Select Install in the Ready to Install the Program window.
4. Select the Parallel Port 1 (LPT1) in the Select Port Type window and select the Next
button. (Refer to Fig. 1)
5. Reboot the computer by selecting the Yes button in the Question window.
6. After rebooting, select Start> Setting > Printers and Faxes > BIXOLON SRP-150 Icon
> Right mouse click > Properties.
7. Select Port tab and then Port Configuration from the Properties window and set the
settings same as the result shown in the self test, and select the OK button.
◈ USB Interface Model Windows Driver Installation
1. After installing the product installation CD, execute Thermal Printer > SRP-150 >
Drivers > Windows Driver > Drivers folder > SRP-150_WIN_Vx.x.x.exe.
2. Select the Next button in the initial installation window.
3. Select Install in the Ready to Install the Program window.
4. Select USB from the Select Port Type window and select the Next button (refer to Fig. 1)
5-1. If using Windows 98/ME
① Follow the procedure and reboot the computer after completing the installation.
② Turn the printer off and on after rebooting.
③ When the New Hardware Search window pops up, keep selecting the Next button to
install the USB driver, and reboot the computer one more time after installing the USB
driver.
5-2. If using Windows 2000/VISTA/2008 Server/7
① When the Information window pops up, turn the printer off and on and select the OK
button.
② Reboot the computer after completing the installation.
5-3. If using XP/2003 Server
① When the Information window pops up, turn the printer off and on and select the OK
button.
② When the New Hardware Search window pops up, keep selecting the Next button to
install the USB driver, and reboot the computer one more time after installing the USB
driver.
※ Note
Click OK or Continue Anyway when digital certificate messages pop up during the
installation.
● China Factory
(Add) (CA3)#11 Luyi 2 Road, Tangxia Town, Dongguan City,
Guangdong Province, P.R.China
(Tel.) +86 769 8262 0704~07
● U.S. Office
(Add) BIXOLON America Inc., 3171 Fujita St, Torrance, CA 90505
(Tel.) +1-858 764 4580
● Europe Office
(Add) BIXOLON Europe GmbH, Tiefenbroicher Weg 35 40472 Düsseldorf
(Tel.) +49 (0)211 68 78 54 0