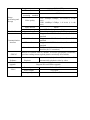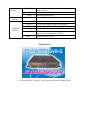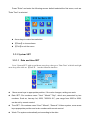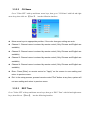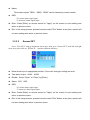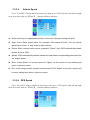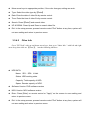
1
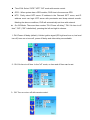
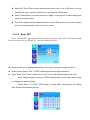
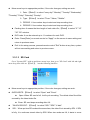
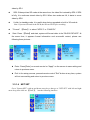
4CH SD Card Mobile DVR User Manual
H .264 Compression
1CH~4CH Video Input/Output
CIF/HD1/D1 Resolution (PAL/NTSC)
Further (China) Technology Company Limited
Email:[email protected]
MSN:[email protected]
http://fther.en,alibaba.com/
Tel: (86-769)87930500
Fax: (86-769)87900163
Address: 8th Floor,Wenhua Building
Tangxia Road 120,Tangxia Town
Dongguan City
Guangdong Province
China
1. Product Introduction
1.1 Product Overview
FTH-DVR-D Mobile DVR is a high cost-effective and good functional scalability device for
vehicle monitoring. It is introduced ARM+DSP high-speed dual-core processor and embedded
operating system, with the advanced H.264 video compression/ decompression, network technique,
GPS positioning, to playback or remotely manage video surveillance.
l Wide voltage
l Super shock-proof
l Store video by SD card
1.2 Main Function
a) H.264 compression supports 1CH to 4CH video. SD card stores DVR video, CIF, HD1, D1
resolutions are optional. Automatic adjusting video data according to sensor information to save
SD card space. Video playback supports sensor searching playback or reads video by general
PC.
b) Up to four sensor input interfaces and two alarm outputs, it supports to collect most car sensor
data, including switching door, speed, braking etc. User can adjust video data size automatically
and search video conveniently based on the information.
c) Wireless GPS/3G is available for recording geographic coordinates, speed, time, real-time video
transmission etc.
d) RJ45 10/100M adapts to net connect,and it’s convenient to transmit data and extend 3G
network.
e) Extension interface includes USB interface, RS232 interface, RS485 interface.
1.3 Parameters
Item
System
Performance
Language
Interface
Password security
Video input
Video output
Video playback
Video
Audio
Video standard
Parameter
Chinese/English
OSD Interface
Administrator manages password (No changing
the content after setting password by
administrator)
4CH video input, 1.0V, p-p, impedance 75 Ω
1CH video output, 1.0V, p-p, impedance 75 Ω
1 or 4 screens playback
PAL , 25FPS, CCIR625, 50 fields
NTSC, 30FPS, CCIR525, 60 fields
4CH audio input (1CH~4CH optional),
Audio input
impedance 600 Ω, PC player can choose turn on
or turn off audio channel.
Basic output level
1V-2V
Mode
Record audio and video together
Audio compression
ADPCM/G .726
Image compression
Video resolution
Image
processing and
storage
Audio
streaming standard
H .264, VBR
CIF/HD1/D1(Optional)
ADPCM
CIF: 256Kbps-1.5Mbps, 1~8 levels (1 is the
Video quality
best)
HD1: 600Kbps-2.5Mbps, 1~8 levels (1 is the
best)
Audio bit rate
8KB/s
Video storage
1 or 2 SD Cards (cycle recording)
Car black box
Input and output
3 level inputs, 1 pulse input, 2 level outputs
Serial interface
Support one RS232 interface, refer to DB44
standard
Serial interface
Support one RS485 interface, refer to DB44
Communication
standard
interface
USB interface
Support one USB1.1 interface, refer to DB44
standard
Network interface
RJ45,
10M/100M
adaptive
network
interface(for 3G extension)
Built-in or external GPS/3G module, record the geographic coordinates,
GPS/3G
speed into coding stream, upload pictures wirelessly are available.
Software
Software
upgrade
Others
Automatic playback
4CH video
automatically playback video by video
Playback
Support SD card/USB to upgrade
Power input
Power output
Working temperature
DC: +9V~45V
+12V@2A
–25▫C-----70▫C
file,
1. Product appearance and cable diagram
2.1 Cable diagram
Back view panel
Cable
Interface function
Interface
Name
DC+
DC-
Power
ACC
+12V
GND
VSP
Description
Positive power input :-9V~54V connects with
vehicle battery positive
Negative power input connects with vehicle power
negative
Video control line connects with car key ACC
Positive power output connects with camera and
voice recorder
Negative power output connects with camera and
voice recorder
Speed signal input connects with car speed sensor
signal wire
SEN1~SEN3
Alarm input. Such as braking, reversing, open or
Sensor
close door etc.
ALM1,ALM2 Alarm output. Such as indicator, buzzer etc.
GND
Alarm input and output
Communication USB/RS232/485 Expand USB, network functions etc.
Interface
VIN1~VIN4
1~4CH video output connects with camera
4GND
1~4CH video output connects with camera
AIN
Audio input connects with voice recorder
AUDIO&
GND
Audio output connect with audio device
VIDEO
VOUT
Video output connects with monitor. There is video
GND
output at the front and back of DVR.
Audio and video output
Appearance
1 or 2 SD card slots, 1 IR and 1 video output at the front of Mobile DVR.
Basic Operation Manual
3.1
Remote control
Name
Function
PWR
Turn on or turn off device
ADJ
Adjust brightness, contrast, color parameters
Up
Down
Right/VOL/Next
Left/VOL/Back
Menu
Switch to the System SET interface
Exit
Back to the previous interface / Stop play
Enter
6/21
Select or confirm
1
1 / Punctuation /Channel 1
2
2 / ABC/Channel 2
3
3 / DEF/Channel 3
4
4 / GHI/Channel 4
5
5 / JKL/4 CH Together
6
6 / MNO/Video
7
7 / PQRS/Play or pause
8
8 / TUV/ Fast Forward
9
9 / WXYZ/Stop Recording
0
0 / Space/ Fast Rewind
DEL
Delete information
Language
English and Chinese switch for number, small letter, big letter
Note: Multi-function button in green on the remote control
1、Only press the menu button to enter the system setup screen
2、Button 1:In the System SET, can enter number 1 and punctuation;when exit System
SET,can switch to Channel 1.
3、Button 2:In the System SET, can enter number 2 and ABC;when exit System SET,can
switch to Channel 2.
4、Button 3:In the System SET, can enter number 3 and DEF;when exit System SET,can
switch to Channel 3.
5、Button 4:In the System SET, can enter number 4 and GHI;when exit System SET,can
switch to Channel 4.
6、Button 5:In the System SET, can enter number 5 and JKL;when exit System SET,can
switch to 4CH video together.
7、Button 6:In the System SET, can enter number 6 and MNO;when exit System SET,
can control the video manually.
8、Button 7:In the System SET, can enter number 7 and PQRS;when exit System SET,
can replay and pause.
9、Button 8:In the System SET, can enter number 8 and TUV;when exit System SET,
can fast-forward play.
10、Button 9:In the System SET, can enter number 9 and WXYZ;when exit System SET,
can stop recording.
11、Button 0:In the System SET, can enter numbers 0 and space;when exit System SET,
can fast rewind playback.
12、Button Delete:In the System SET,short pressing to delete a single character, long
pressing to delete all.
13、Input method / Language key:In the System SET,can switch number, little letter, big
letter, English and Pinyin;when exit System SET, long pressing up to 3 seconds is switching
languages.
3.2 Turn on and login system
3.2.1
Turn on System
Connect DVR power cable with vehicle DC 12V, then system is standby. Turn on
system is decided by User SET (Please see User SET, Basic SET and Video SET). Usually,
vehicle in Power Mode DLI can provide power to the DVR, the sign of turn on is as follows.
Video out displays customer logo in the screen or customer parameter interface, as
long as the vehicle's power does not turn off, the camera recording signal is continuous.
When vehicle power is turned off, DVR can keep recording video.
3.2.2
The screen after turn on
3.2.3、Video
file
System access permission
1) When the Password Valid is set “Close”: Press【Menu】on remote control, then can
access system main menu directly and any change can be made to DVR.
2) When the Password Valid is set "Open":Only correct password can enter the main
menu and make any change to DVR.
System check and set
Once turn on DVR, the system enters administration interface, as shown below: main
menus are on the left. "System SET" is selected as the first menu by default.
Press "Enter" and enter the following screen: default selected the first menu, such as:
"Date Time" is selected.
l
Arrow keys to make item selection.
l
【Enter】to choose items.
l
【Exit】to exit the menu.
3.3.1 System SET
3.3.1.1 Date and time SET
Go to "System SET" with up and down arrow keys, then go to "Date Time" with left and right
arrow keys, then click on 【Enter】, into the following interface:
l
l
Move arrow keys to appropriate position, if the color changes, setting can work.
Date SET: Six numbers mean "Year" "Month" "Day", which are presented by two
numbers. Such as, January 1st, 2009, "2009-01-01", year range from 2000 to 2099,
can be set by remote control.
l
Time SET:Six numbers mean "Hour" "Minute", "Second". 24-hour system, move arrow
keys appropriate position and enter numbers with remote control.
l
Week: The system automatically set according to the date.
l
Time SYN: Select "GPS" "NTP" "Off" mode with remote control.
l
GPS:When system has a GPS module, DVR time is the same as GPS.
l
NTP:Firstly select NTP server IP address in the "Network SET" menu, and IP
address must can login NTP server with permission and keep network smooth.
Meeting the above conditions, DVR will automatically set time with network.
l
On /Off Mode: There are three modes: "DLI/ Power off delay", "DLI/ On time to off
time", "Off": ("Off" is defaulted), pressing the left and right to choose.
1、DLI/ Power off delay (default): Vehicle ignition signal (DC high level turn on, low level
turn off) turns on or turns off, power off delay and video delay are available.
2、DLI/ On time to off time: In the "off" mode, on time and off time can be set.
3、Off: Turn on or turn off with remote control.
l
Menu Exit Time: Enter number with remote control from 1 min to 60 mins. If no one
operate the menu, system will exit menu according to setting time.
l
Enter: Press [Enter] on remote control or "Apply" on the screen to save setting and
return to previous menu.
l
Exit: In the setup process, pressed remote control "Exit" button at any time, system
will not save setting and return to previous menu.
3.3.1.2 Basic SET
Go to "System SET" with up and down arrow keys, then go to "Basic SET" with left and right
arrow keys, then click on 【Enter】, into the following interface:
l
Move arrow keys to appropriate position, if the color changes, setting can work.
l
Video format: Select "PAL" "NTSC" format with left and right arrow keys.
l
Type: "Auto" and "Timer", select "Auto" and "Timer" with left and right arrow keys.
Auto: Default setting is the auto, DVR automatically record video after turning
on, please see above picture.
Timer: When it is Timer, DVR starts to record video according to the setting
time. Please see following picture:
l
Move arrow keys to appropriate position, if the color changes, setting can work.
1、Date: 【Enter】 to select "every day" "Monday" "Tuesday" "Wednesday"
"Thursday" "Friday" "Saturday" "Sunday".
2、Type: 【Enter】 to select "Timer" "Alarm," "Mobile".
3、PERIOD 1: Use number keys to start and stop recording time.
4、PERIOD 2: Use number keys to start and stop recording time..
l
Packing time: It means the time length of each video file, 【Enter】 to select "5" "15"
"30" "60" minutes.
l
DVR code: It can be entered up to 11 numbers for each DVR.
l
Enter: Press [Enter] on remote control or "Apply" on the screen to save setting and
return to previous menu.
l
Exit: In the setup process, pressed remote control "Exit" button at any time, system
will not save setting and return to previous menu.
3.3.1.3 SD Card
Go to "System SET" with up and down arrow keys, then go to "SD Card" with left and right
arrow keys, then click on 【Enter】, into the following interface:
l
Move arrow keys to appropriate position, if the color changes, setting can work.
l
OVER WRITE: 【Enter】 to select "Open" and "Close".
l
Open: When SD card is full, it will cycle recording. The oldest video file will be
covered by the latest video file.
l Close: SD card stops recording after full.
l
"BLOCK DEVICE": 【Enter】 to select "SD1" "SD2" "U disk"
l
SD1:When put two SD cards at the same time, the video file is stored by SD1. If SD1
is fully, it is continues stored video by SD2. When two cards are full, it starts to cover
video by SD1.
l
SD2:When put two SD cards at the same time, the video file is stored by SD2. If SD2
is fully, it is continues stored video by SD1. When two cards are full, it starts to cover
video by SD2.
l
U disk: In standby mode, it is useful when being upgraded or built-in 3G module.
Note: If just one SD card in the DVR, the SD card will cycle recording.
l
"Format": 【Enter】 to select "APPLY" or "CANCEL"
l
Start: Press 【Enter】and start, system will format video in the "BLOCK DEVICE". At
the same time, it appears format information and successful restart, please see
following three pictures :
l
Enter: Press [Enter] on remote control or "Apply" on the screen to save setting and
return to previous menu.
l
Exit: In the setup process, pressed remote control "Exit" button at any time, system
will not save setting and return to previous menu.
3.3.1.4 NET SET
Go to "System SET" with up and down arrow keys, then go to "NET SET" with left and right
arrow keys, then click on 【Enter】, into the following interface:
l
Move arrow keys to appropriate position, if the color changes, setting can work.
l
IP: IP is set directly by number keys on remote control.
l
Net Mask: Net Mask is set directly by number keys on remote control.
l
Gateway: Set directly with number keys on remote control.
l
MAC: Set directly with number keys on remote control.
l
NTP Server:Set directly with number keys on remote control.
l
Server IP:Set directly with number keys on remote control.
l
Server Port:Set directly with number keys on remote control.
l
Enter: Press [Enter] on remote control or "Apply" on the screen to save setting and
return to previous menu.
l
Exit: In the setup process, pressed remote control "Exit" button at any time, system will
not save setting and return to previous menu.
3.3.1.5 PASS SET
Go to "System SET" with up and down arrow keys, then go to "PASS SET" with left and right
arrow keys, then click on 【Enter】, into the following interface:
l
Move arrow keys to appropriate position, if the color changes, setting can work.
Password valid: 【Enter】to select the "Open" and "Close".
Close: When password valid is "Close", press【Menu】on remote control, then can
enter system main menu and change DVR parameters.
Open: When the password valid is "Open", only correct password can access the main
menu and change DVR parameters.
l
User Password:Enter numbers on remote control, default password is 666666;
l
Confirm: Enter the user password once more.
l
Enter: Press [Enter] on remote control or "Apply" on the screen to save setting and
return to previous menu.
l
Exit: In the setup process, pressed remote control "Exit" button at any time, system will
not save setting and return to previous menu.
3.3.1.6 Factory SET
Go to "System SET" with up and down arrow keys, then go to " Factory SET" with left and
right arrow keys, then click on 【Enter】, into the following interface:
l
Move arrow keys to appropriate position, if the color changes, setting can work.
l
Default Setup: Choose "Recover" and press Enter on remote control, all settings will
become to factory defaults. Please see the following diagram:
l
Export In Para: Put a SD card in the DVR, and enter "Export In".
l
Export Out Para: Put a SD card in the DVR, and enter "Export Out".
l
Enter: Press [Enter] on remote control or "Apply" on the screen to save setting and
return to previous menu.
l
Exit: In the setup process, pressed remote control "Exit" button at any time, system will
not save setting and return to previous menu.
3.3.2
Video SET
Go to "Video SET" with up and down arrow keys, then click on 【Enter】,
interface:
into the following
3.3.2.1 Video PMT
Go to "Video SET" with up and down arrow keys, then go to "Video PMT" with left and right
arrow keys, then click on 【Enter】, into the following interface: (Parameters default settings are:
Resolution CIF, Frame Rate 12, Quality 06, Audio Open.)
l
Move arrow keys to appropriate position, if the color changes, setting can work.
l
Channel: 4 channels in total, each channel works independently, select "Channel
1,2,3,4" with arrow keys or close video.
l
RES. : Select "CIF" "D1" "HD1" by 【Enter】.
l
Frame Rate: Select "25" "12" "6" "3" "1" by 【Enter】.
l
Quality: Select "1-6" by 【Enter】, 1 is best.
l
Audio: Select "Open" or "Close" by 【Enter】.
l
Enter: Press [Enter] on remote control or "Apply" on the screen to save setting and
return to previous menu.
l
Exit: In the setup process, pressed remote control "Exit" button at any time, system will
not save setting and return to previous menu.
3.3.2.2
CH Name
Go to "Video SET" with up and down arrow keys, then go to "CH Name" with left and right
arrow keys, then click on 【Enter】, into the following interface:
l
Move arrow keys to appropriate position, if the color changes, setting can work.
l
Channel 1: Channel name is entered by remote control (Only Chinese and English are
available)
l
Channel 2: Channel name is entered by remote control (Only Chinese and English are
available)
l
Channel 3: Channel name is entered by remote control (Only Chinese and English are
available)
l
Channel 4: Channel name is entered by remote control (Only Chinese and English are
available)
l
Enter: Press [Enter] on remote control or "Apply" on the screen to save setting and
return to previous menu.
l
Exit: In the setup process, pressed remote control "Exit" button at any time, system will
not save setting and return to previous menu.
3.3.2.3
REC Time
Go to "Video SET" with up and down arrow keys, then go to "REC Time" with left and right arrow
keys, then click on 【Enter】, into the following interface:
l
Move arrow keys to appropriate position, if the color changes, setting can work.
l
Date: 【Enter】 to select "every day" "Monday" "Tuesday" "Wednesday" "Thursday"
"Friday" "Saturday" "Sunday".
l
Type: 【Enter】 to select "Timer" "Alarm," "Mobile".
l
PERIOD 1: Use number keys to start and stop recording time.
l
PERIOD 2: Use number keys to start and stop recording time.
l
Enter: Press [Enter] on remote control or "Apply" on the screen to save setting and
return to previous menu.
l
Exit: In the setup process, pressed remote control "Exit" button at any time, system will
not save setting and return to previous menu.
3.3.2.4 Vehicle SET
Go to "Video SET" with up and down arrow keys, then go to "Vehicle SET" with left and right
arrow keys, then click on 【Enter】, into the following interface:
l
Move arrow keys to appropriate position, if the color changes, setting can work.
l
Line: Enter vehicle line by remote control. (English and Chinese are available)
l
Vehicle: Enter vehicle license plate number by remote control. (English and Chinese
are available)
l
Company: Enter company name by remote control. (English and Chinese are available)
l
Enter: Press [Enter] on remote control or "Apply" on the screen to save setting and
return to previous menu.
l
Exit: In the setup process, pressed remote control "Exit" button at any time, system will
not save setting and return to previous menu.
3.3.3
User SET
Go to "User SET" with up and down arrow keys, then click on 【Enter】,
interface:
3.3.3.1
into the following
Sensor SET
Go to "User SET" with up and down arrow keys, then go to "Sensor SET" with left and right
arrow keys, then click on 【Enter】, into the following interface:
l
Move arrow keys to appropriate position, if the color changes, setting can work.
l
Alarm SET:SEN1、SEN2、SEN3
l
Enable:
Open: Alarm signal input is open, video screen is "I".
Close: Alarm signal input is closed, video screen is "O".
l
Name:
Three alarm inputs ”SEN1、SEN2、SEN3” can be chosen by remote control.
l
OSD:
"O" means alarm signal input.
"I" means no alarm signal input.
l
Enter: Press [Enter] on remote control or "Apply" on the screen to save setting and
return to previous menu.
l
Exit: In the setup process, pressed remote control "Exit" button at any time, system will
not save setting and return to previous menu.
3.3.3.2
Sensor SET
Go to "User SET" with up and down arrow keys, then go to "Sensor SET" with left and right
arrow keys, then click on 【Enter】, into the following interface:
l
Move arrow keys to appropriate position, if the color changes, setting can work.
l
Two-alarm output:ALM1、ALM2.
l
Enable:Select "Open" or "Close" by [Enter].
l
Name:SO1 , SO2.
l
OSD:
"O" means alarm signal input.
"I" means no alarm signal input.
l
Enter: Press [Enter] on remote control or "Apply" on the screen to save setting and
return to previous menu.
l
Exit: In the setup process, pressed remote control "Exit" button at any time, system will
not save setting and return to previous menu.
3.3.3.3
Vehicle Speed
Go to "User SET" with up and down arrow keys, then go to "Vehicle Speed" with left and right
arrow keys, then click on 【Enter】, into the following interface:
l
Move arrow keys to appropriate position, if the color changes, setting can work.
l
Eigen Value: Enter speed value, For example: 040 means 40 km/h. Turn on vehicle
speed up to 40 km / h, and continue half a minute.
l
Pulses: After continue half a minute, press the "Check", then DVR automatically obtain
pulses, such as 1000.
l
Speed: DVR automatically obtains pulses and calculates corresponding speed with the
car engine speed.
l
Enter: Press [Enter] on remote control or "Apply" on the screen to save setting and
return to previous menu.
l
Exit: In the setup process, pressed remote control "Exit" button at any time, system will
not save setting and return to previous menu.
3.3.3.4 GPS Speed
Go to "User SET" with up and down arrow keys, then go to "GPS Speed" with left and right
arrow keys, then click on 【Enter】, into the following interface:
l
Move arrow keys to appropriate position, if the color changes, setting can work.
l
Speed Source: Select "vehicle" "GPS" with arrow keys. When there is "GPS", the
"vehicle" speed will automatically close; when there is no GPS, the "vehicle" speed
works.
l
Speed: It means GPS speed.
l
Limit: Limiting speed is set by remote control. If vehicle speed exceeds, it alarms.
l
Enter: Press [Enter] on remote control or "Apply" on the screen to save setting and
return to previous menu.
l
Exit: In the setup process, pressed remote control "Exit" button at any time, system will
not save setting and return to previous menu.
3.3.4
EPT Info
Go to " EPT Info" with up and down arrow keys, then click on 【Enter】,
interface:
3.3.4.1
into the following
Time Search
Go to "EPT Info" with up and down arrow keys, then go to " Time Search" with left and right
arrow keys, then click on 【Enter】, into the following interface:
l
Move arrow keys to appropriate position, if the color changes, setting can work.
l
Type: Select the video type by【Enter】.
l
Date: Enter the date of video file by remote control.
l
Time: Enter the time of video file by remote control.
l
Search: Press【Enter】and search video.
l
UP & DOWN: Press Up and Down to search video file.
l
Exit: In the setup process, pressed remote control "Exit" button at any time, system will
not save setting and return to previous menu.
3.3.4.2
Other Info
Go to "EPT Info" with up and down arrow keys, then go to "Other Info " with left and right
arrow keys, then click on 【Enter】, into the following interface:
l
HDD INFO:
Name:SD1、SD2、U disk
Status: HDD working state.
Capacity: Total capacity of HDD.
Space: Remain capacity of HDD.
l
Software Version: DVR software version
l
MCU Version: MCU software version
l
Enter: Press [Enter] on remote control or "Apply" on the screen to save setting and
return to previous menu.
l
Exit: In the setup process, pressed remote control "Exit" button at any time, system will
not save setting and return to previous menu.