1
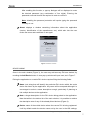
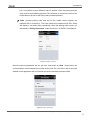
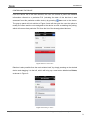
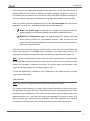
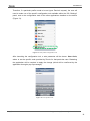
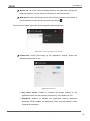
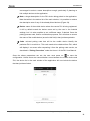
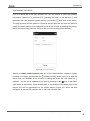
Remote Application for Controlling Z41 Document Version: [3.1]_a www.zennio.com USER MANUAL Z41 Remote Z41 Remote Contents Introduction .................................................................................................................................. 3 iOS Application (iPhone) .................................................................................................. 4 Installation ................................................................................................................. 4 Device Pairing ............................................................................................................ 7 Controlling the Device ............................................................................................... 9 User Profiles............................................................................................................. 11 Android Application ....................................................................................................... 13 Installation ............................................................................................................... 13 Device Pairing .......................................................................................................... 17 Controlling the Device ............................................................................................. 19 User Profiles............................................................................................................. 21 Troubleshooting .......................................................................................................................... 22 http://www.zennio.com Tecnical Support: http://zennioenglish.zendesk.com 2 Z41 Remote INTRODUCTION Versions 3.0 and later of the Z41 application program feature a specific function for the remote control of the device, which lets the user acting over the screen by means of remote mobile devices in the same manner as during on-site interaction. This document is offered as a guide for integrators who are willing to configure Z41 for being used from these remote applications. Hence, reading this document together with the actual Z41 user manual is encouraged. http://www.zennio.com Tecnical Support: http://zennioenglish.zendesk.com 3 Z41 Remote iOS APPLICATION (iPhone) Z41 can be controlled from remote devices running the iOS operating system. This is possible by installing the specific application Z41 Remote, developed by Zennio and available at the App Store. INSTALLATION The Z41 Remote application should be downloaded from the App Store: Figure 1 Z41 Remote app on the App Store Once installed on the terminal, it can be launched by pressing on its icon, similar to the logotype shown in Figure 1. When Z41 Remote runs for the first time, the user will be shown the terms and conditions of use: http://www.zennio.com Tecnical Support: http://zennioenglish.zendesk.com 4 Z41 Remote Figure 2 Terms and conditions of use After agreeing with the terms, the main window of the application will show up, as in Figure 3. Figure 3 Main window Four main elements can be identified: Device list: list of the devices already linked to the application through the pairing procedure. This list shows no elements on the first execution. Add device: button that brings up the Device Pairing window (see below). Preferences: button that brings up the application settings, where the following options can be set: http://www.zennio.com Tecnical Support: http://zennioenglish.zendesk.com 5 Z41 Remote Figure 4 Preferences Key press sound: enables or disables the beeps emitted by the application when the user remotely touches any of the buttons in Z41. Password: enables or disables the application start-up password protection. When enabled, the application will be only accessible by users knowing the password. Note: if the password function is active and the user types it wrong for three consecutive times during the start-up, the application will remain locked for 60 seconds prior to permitting further attempts. The user will be notified about this through a warning message and a countdown indicator. Figure 5 Password selection http://www.zennio.com Tecnical Support: http://zennioenglish.zendesk.com 6 Z41 Remote After enabling this function, a pop-up dialogue will be displayed to enter the desired password (any combination of four digits). Entering the password a second time will be required in order to confirm it. Note: disabling the password protection will require typing the password currently in use. About: displays a window containing information about the application (version, identification of the manufacturer, etc.) which also lets the user review the terms and conditions of use again. Figure 6 “About” window DEVICE PAIRING Once in the main window (Figure 3), the user may add as many Z41s as desired, by touching the Add Device button. A new pop-up window will open next, as in Figure 7. Pairing the application to a certain Z41 device requires filling the following fields: Name: text string that will identify the particular Z41 device within the entire device list shown by the application. Any name will be accepted although it is encouraged to select a name descriptive enough, particularly if planning to link multiple devices to the application. Note: a longer description for the Z41 device being paired to the application. Note that while in the device list of the main window, it is possible to retrieve the descriptive note of any of the already linked devices (Figure 9). Device: name of the mobile device where the remote Z41 is being registered. It will by default match the device name set by the user in the iOS settings, http://www.zennio.com Tecnical Support: http://zennioenglish.zendesk.com 7 Z41 Remote but it is possible to set a different name if desired. Once the pairing process ends, and for confirmation purposes, Z41 will show on screen the name of the mobile device (as set in this field) it has just been paired to. Code: univocal pairing code that will let the mobile device identify the particular Z41 it must link to. This code needs to be obtained from Z41, which will display it on screen after requesting it from the pairing code service, as described in “Pairing Procedure” under the Annex I of the Z41 User Manual. Figure 7 Adding a device Once the above parameters are set, the user must press on Save. Unless there are communication errors between the mobile device and Z41, the device list in the main window of the application will now include the device that has just been linked: Figure 8 Device just linked http://www.zennio.com Tecnical Support: http://zennioenglish.zendesk.com 8 Z41 Remote CONTROLLING THE DEVICE From the device list in the main window, the user can access a panel with detailed information referred to a particular Z41 (including the date of the last time it was accessed from this particular mobile device) by pressing icon next to the device. The pop-up panel will look similar to Figure 9 and will also give the user the option to modify the name and the note assigned to the device as well as deleting the pairing, which will remove that particular Z41 from the list of the already-paired devices. Figure 9 Device information Deletion is also possible from the main window itself, by simply pressing on the desired device and dragging it to the left, which will bring up a new button labelled as Delete, as shown in Figure 9. Figure 10 Deleting a device http://www.zennio.com Tecnical Support: http://zennioenglish.zendesk.com 9 Z41 Remote On the other hand, it is important to keep in mind that the device list only shows the five most recently accessed devices at a time. Should the user have more devices paired, those of them that have not been accessed for a long time will not be listed by default. In such case, it is necessary to press on Show all, which is visible only when there are actually more than five devices. Figure 11 Multiple devices Starting a remote control session with any of the linked devices consists in simply pressing on its name, provided that the indicator is being shown next to it (in case the device was not reachable at the moment of loading the device list, it will show the indicator – the list can be updated at any time by pressing on the icon, in the upper right corner of the screen). A few seconds later, a virtualisation of the Menu page of the remote Z41 will be represented on the mobile device (Figure 12), which will look analogous to the real Z41 interface the on-site user interacts with. Figure 12 Device remote control http://www.zennio.com Tecnical Support: http://zennioenglish.zendesk.com 10 Z41 Remote From this point, the application behaves as the actual Z41, so the user can get rid of learning about a new interface. In addition, any action implying changes on a control or an indicator will be notified to the real device, which will reflect equivalent changes on the screen and will also send the KNX bus the corresponding objects, when required. Note that certain functions implemented by Z41 are not controllable from the remote application (in such case, icons and indicators show faded colours): Within the Profile page: configuring the contrast, the brightness and the audible signals is not possible remotely, although the profile selection is. Within the Configuration page: the programming LED, device reset and device pairing controls are not available remotely, while the time set, the alarm log and the probe calibration do offer remote interaction (assuming they have been enabled in ETS). Once the user interaction with the remote device is over, the user should finish the session by pressing on the Close button, available on the upper right corner of the application. Closing the session takes the user back to the main window (Figure 3). Note: if a new communication session with the same remote device is started before 30 seconds after ending the previous session, the user will recover the control as it was before the interruption. However, more than 30 seconds after the interruption, new sessions will always begin from the Menu page of Z41. In case the application is ordered to run in background, all remote sessions currently active will be interrupted. USER PROFILES Note: this function is supposed to be used only upon Zennio’s request. Z41 Remote allows switching to certain user profiles depending on the context where the application is going to be used. The different profiles do not entail differences in the functionality nor implications for the user, but they ensure that the data of users of a particular profile (e.g., users that are testing the application) and that of users of a different profile (e.g., those performing everyday use) remain separated, thus avoiding interference or interruptions in the normal service due to punctual requirements. http://www.zennio.com Tecnical Support: http://zennioenglish.zendesk.com 11 Z41 Remote Therefore, if a particular profile needs to be set (upon Zennio’s request), the user will need to make use of the specific configuration tool available within the iOS “Settings” panel, next to the configuration tools of the other applications installed on the device (Figure 13). Figure 13 User profile configuration tool After launching the configuration tool, a sole parameter will be shown: User Code, where to set the specific code provided by Zennio for that particular case. Restarting the application will be required to apply the change (which will be confirmed by the application through a pop-up message). Figure 14 User profile code. http://www.zennio.com Tecnical Support: http://zennioenglish.zendesk.com 12 Z41 Remote ANDROID APPLICATION Z41 can be controlled from remote devices running the Android operating system (versions 4.0.0 or later). This is possible by installing the specific application Z41 Remote, developed by Zennio and available at the Google Play Store. INSTALLATION The Z41 Remote application should be downloaded from the Google Play Store: Figure 15 Z41 Remote app on the Google Play Once installed on the terminal, it can be launched by pressing on its icon, similar to the logotype shown in Figure 15. When Z41 Remote runs for the first time, the user will be shown the terms and conditions of use: http://www.zennio.com Tecnical Support: http://zennioenglish.zendesk.com 13 Z41 Remote Figure 16 Terms and conditions of use After agreeing with the terms, the main window of the application will show up, as in Figure 17. Figure 17 Main window The following elements can be identified: http://www.zennio.com Tecnical Support: http://zennioenglish.zendesk.com 14 Z41 Remote Device list: list of the devices already linked to the application through the pairing procedure. This list shows no elements on the first execution. Add device: button that brings up the Device Pairing window (see below). It is also possible to add a device by pressing the button . Touching on the upper right menu button brings the following options: Figure 18 Access to the Preferences window Preferences: button that brings up the application settings, where the following options can be set: Figure 19 Preferences Key press sound: enables or disables the beeps emitted by the application when the user remotely touches any of the buttons in Z41. Password: enables or disables the application start-up password protection. When enabled, the application will be only accessible by users knowing the password. http://www.zennio.com Tecnical Support: http://zennioenglish.zendesk.com 15 Z41 Remote Note: if the password function is active and the user types it wrong for three consecutive times during the start-up, the application will remain locked for 60 seconds prior to permitting further attempts. The user will be notified about this through a warning message and a countdown indicator. After enabling this function, a pop-up dialogue will be displayed to enter the desired password (any combination of four digits). Entering the password a second time will be required in order to confirm it. Figure 20 Password selection Note: disabling the password protection will require typing the password currently in use. User Code: this field is reserved for use upon Zennio’s request. Please refer to section User Profiles. IP: this field is reserved for use upon Zennio’s request. Please refer to section User Profiles. About: displays a window containing information about the application (version, identification of the manufacturer, etc.) which also lets the user review the terms and conditions of use again. http://www.zennio.com Tecnical Support: http://zennioenglish.zendesk.com 16 Z41 Remote Figure 21 “About” window DEVICE PAIRING Once in the main window (Figure 17), the user may add as many Z41s as desired, by touching the Add Device button. A new pop-up window will open next, as in Figure 22. Figure 22 Adding a device Pairing the application to a certain Z41 device requires filling the following fields: Name: text string that will identify the particular Z41 device within the entire device list shown by the application. Any name will be accepted although it is http://www.zennio.com Tecnical Support: http://zennioenglish.zendesk.com 17 Z41 Remote encouraged to select a name descriptive enough, particularly if planning to link multiple devices to the application. Note: a longer description for the Z41 device being paired to the application. Note that while in the device list of the main window, it is possible to retrieve the descriptive note of any of the already linked devices (Figure 24). Device: name of the mobile device where the remote Z41 is being registered. It will by default match the device name set by the user in the Android settings, but it is also possible to set a different name if desired. Once the pairing process ends, and for confirmation purposes, Z41 will show on screen the name of the mobile device (as set in this field) it has just been paired to. Code: univocal pairing code that will let the mobile device identify the particular Z41 it must link to. This code needs to be obtained from Z41, which will display it on screen after requesting it from the pairing code service, as described in “Pairing Procedure” under the Annex I of the Z41 User Manual. Once the above parameters are set, the user must press on to save the configuration. Unless there are communication errors between the mobile device and Z41, the device list in the main window of the application will now include the device that has just been linked: Figure 23 Device just linked http://www.zennio.com Tecnical Support: http://zennioenglish.zendesk.com 18 Z41 Remote CONTROLLING THE DEVICE From the device list in the main window, the user can access a panel with detailed information referred to a particular Z41 (including the date of the last time it was accessed from this particular mobile device) by pressing icon next to the device. The pop-up panel will look similar to Figure 24 and will also give the user the option to modify the name and the note assigned to the device as well as deleting the pairing, which will remove that particular Z41 from the list of the already-paired devices. Figure 24 Device information Starting a remote control session with any of the linked devices consists in simply pressing on its name, provided that the indicator is being shown next to it (in case the device was not reachable at the moment of loading the device list it will show the indicator – the list can be updated at any time by pressing on the icon, in the upper right corner of the screen). A few seconds later, a virtualisation of the Menu page of the remote Z41 will be represented on the mobile device (Figure 25), which will look analogous to the real Z41 interface the on-site user interacts with. http://www.zennio.com Tecnical Support: http://zennioenglish.zendesk.com 19 Z41 Remote Figure 25 Device remote control From this point, the application behaves as the actual Z41, so the user can get rid of learning about a new interface. In addition, any action implying changes on a control or an indicator will be notified to the real device, which will reflect equivalent changes on the screen and will also send the KNX bus the corresponding objects, when required. Note that certain functions implemented by Z41 are not controllable from the remote application (in such case, icons and indicators show faded colours): Within the Profile page: configuring the contrast, the brightness and the audible signals is not possible remotely, although the profile selection is. Within the Configuration page: the programming LED, device reset and device pairing controls are not available remotely, while the time set, the alarm log and the probe calibration do offer remote interaction (assuming they have been enabled in ETS). Once the user interaction with the remote device is over, the user should finish the session by pressing on the button, available on the upper right corner of the application. Closing the session takes the user back to the main window (Figure 17). Note: if a session with a certain remote device is closed and afterwards opened again without having closed the application (nor having opened sessions with other remote http://www.zennio.com Tecnical Support: http://zennioenglish.zendesk.com 20 Z41 Remote devices), the user will recover the control as it was before the interruption, and not from the Menu page of Z41 In case the application is switched to run in background for more than 30 seconds, the above will not apply. In such case, the new session will be opened from the Menu page. USER PROFILES Note: this function is supposed to be used only upon Zennio’s request. Z41 Remote allows switching to certain user profiles depending on the context where the application is going to be used. The different profiles do not entail differences in the functionality nor implications for the user, but they ensure that the data of users of a particular profile (e.g., users that are testing the application) and that of users of a different profile (e.g., those performing everyday use) remain separated, thus avoiding interference or interruptions in the normal service due to punctual requirements. To change the user profile in the Android application, please enter the Preferences window (Figure 20) and press ten times on any of the volume control keys of the mobile terminal. This will enable the User Code field, so the user can enter the required information, as provided by Zennio. When necessary, the IP field will also become enabled. http://www.zennio.com Tecnical Support: http://zennioenglish.zendesk.com 21 Z41 Remote TROUBLESHOOTING The following chart covers the most usual issues during the device pairing and the remote access to Z41. In case the suggested verifications do not solve your issue, please contact the Zennio Technical Support at http://zennioenglish.zendesk.com. Device Message / Event Verification Pairing error Pairing code expired. Ask for a new one from your Z41. Wrong pairing code Check that the pairing code provided by your Z41 is correctly typed in your mobile device. Check that your Z41 is running the latest firmware available at the Zennio home site. No Internet connection Mobile device Check Internet connectivity from your mobile device. Check connection speed (3G / WiFi). Can your Z41 reach the server? Check icon on Z41 (see below). Z41 unavailable (iOS or Android) Z41 not paired to this device Your device is trying to connect to a Z41 with which it is not paired anymore (the pairing list may have been reset from Z41). Remove the pairing from your device and try to pair again. Communication error An internal error occurred during the communication between your Z41 and your device. Restart the Z41 Remote application. Wait time exceeded Can your Z41 reach the server? Check icon on Z41 (see below). Can your Z41 reach the server? Error message during pairing Verify Internet connectivity. Check icon on Z41 (see below). Icons shown by Z41 (Device Pairing box): No Internet connection. Check that an IP address has been assigned by the router (the IP address is shown by Z41 during the startup). Is there another device with the same IP address within the same network? Server unreachable. Connect the same Ethernet cable to a PC and check the Internet access. Service unreachable. The internal clock of Z41 is properly set? Date st must be later than 31 / Nov / 2013. Z41 Connection OK. Under remote control. http://www.zennio.com No issues – service available. No issues – Z41 under remote control. Tecnical Support: http://zennioenglish.zendesk.com 22 Join and send us your inquiries about Zennio devices: http://zennioenglish.zendesk.com Zennio Avance y Tecnología S.L. C/ Río Jarama, 132. Nave P-8.11 45007 Toledo (Spain). Tel. +34 925 232 002. Fax. +34 925 337 310. www.zennio.com [email protected]