1
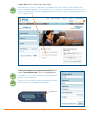
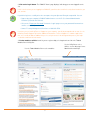
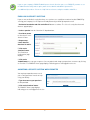
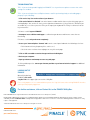
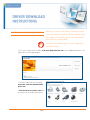
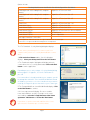
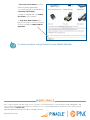
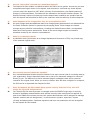
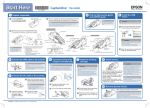
Below are the important system requirements your environment will need in order to ensure optimal usability of
the PINACLE® Deposit On-Site module.
Hardware
• Pentium® 1, 3.0 GHz processor
• Minimum 512MB of memory is recommended
• 1024x768 screen resolution is recommended
• USB 2.0 Port
Operating Systems
• Microsoft® Windows® XP SP 1/2/3 thru Windows® 8.1
Browsers*
• Microsoft® Internet Explorer® 7.0 - 9.0
•128-bit Transport Layer Security (TLS) encryption is
required
• Using Compatibility Mode (the broken page icon to
the left of the browser refresh icon) may resolve
display issues.
•JavaScript and Cookies must be enabled
*Other browsers may work with PINACLE; however, PNC has not validated compatibility with other browsers across all
PINACLE functions.
Internet Service Provider
• Connection rate of 56 kbps or higher (Broadband recommended)**
** Need to access PNC HTTPS secure URL with no firewalls
Other software
• Adobe® Reader® 6.0 or higher (for viewing and downloading reports)
Adobe, the Adobe logo, the Adobe PDF logo, and Reader are registered trademarks of Adobe Systems Incorporated in the United
States and/or other countries.
Microsoft, Windows and Internet Explorer are registered trademarks of Microsoft Corporation in the United States and/or other
countries.
PNC and PINACLE are registered marks of The PNC Financial Services Group, Inc.(“PNC”) Bank deposit, treasury management
and lending products and services are provided by PNC Bank, National Association, a wholly-owned subsidiary of PNC and
Member FDIC.
©2015 The PNC Financial Services Group, Inc. All rights reserved.
pnc.com/treasury
USING PINACLE TIP CARDS
LOGGING IN TO PINACLE
ENROLLING IN SECURITY QUESTIONS
ANSWERING A SECURITY QUESTION WHEN
PROMPTED
TROUBLESHOOTING
This is the first in a series of tip cards that
will assist you when using PINACLE®.
The instructions contained on the tip
cards are also available online under
'Help'.
LOGGING OUT OF PINACLE
USING PINACLE TIP CARDS
Throughout the tip cards, you may find:
1. Numbered steps are provided for each task to be performed in PINACLE. Actions to be performed are
shown in bold.
Example: Examples are provided to illustrate certain concepts or procedures.
Notes are provided with additional information about a step or procedure that is helpful in completing a task
in PINACLE.
Warnings are provided for actions that may interfere with the completion of a task in PINACLE.
LOGGING IN TO PINACLE
Once your Company User ID is activated, you will access PINACLE from your Internet browser.
1. Locate your Company User ID, Operator ID and password.
If you are your company’s PINACLE administrator, then this information can be found on your
Implementation Data Sheet. If you are not an administrator, then see your company’s PINACLE administrator
to obtain this information.
2. Access your Internet browser as you usually do.
3. Type the web address, http://www.pnc.com/pinacle, in the appropriate field (varies based on browser).
1
4. Press ‘Enter’ and the PINACLE log in page displays.
Specific browser versions are required to access PINACLE. Click on the ‘Browser and OS Requirements’
link on the PINACLE login page to view the details of these requirements. If your browser does not meet the
requirements and you need assistance upgrading your browser, please contact Treasury Management Client
Care at 1-800-669-1518.
5. Enter your Company User ID, Operator ID, password, and if
required, your token passcode, into the corresponding fields.
Passwords are case-sensitive. You must enter your password
exactly as it was established.
To generate your token passcode, press the button on the token
device and a one-time, random passcode displays.
Token Device
2
6. Click on the ‘Log In’ button. The PINACLE ‘Home’ page displays, indicating you are now logged in to the
site.
If this is the first time you are logging in to PINACLE, you will need to enroll in Security Questions before you
can continue.
If you fail to log in successfully after three attempts, then your Operator ID may be suspended. You can:
• Request that your company’s PINACLE administrator reset the ID. (See General Administrative
Functions Tip Card for instructions).
• Click on the ‘Forgot your Password?’ link on the ‘Log In’ page to reset your password. You must have
email access to complete the reset.
• Contact Treasury Management Client Care at 1-800-669-1518.
If you have not yet installed Trusteer Rapport on your computer, you will be prompted to do so now. See the
Installing Trusteer Rapport Tip Card for additional information. Trusteer Rapport is a software application
that, once installed, adds an additional layer of security that runs in the background to protect your login
credentials and financial information.
9. Use the modules or utilities for which you are registered by selecting them from either the Tabbed
Modules Bar or Utility Bar.
Use the Utility Bar to select
utilities, such as Message Center,
Use the Tabbed Modules Bar to select modules.
Administration and Help.
3
If you are your company’s PINACLE administrator, then the first time you access PINACLE, you must access
the Administration utility and set up the profile for the admin1 and admin2 Operator IDs.
See additional tip cards or click on the ‘Help’ link for assistance using the modules and utilities.
ENROLLING IN SECURITY QUESTIONS
If you are not enrolled in Security Questions, once you have successfully been authenticated to PINACLE by
entering your Company User ID, Operator ID and password, you will be prompted to enroll.
1. Review the introduction and click on the ‘Enroll’ button to continue. The ‘Select Security Questions and
Answers’ page displays.
2. Select a question from the ‘Question #1’ drop-down box.
3. Provide an answer
to ‘Question #1’ in the
‘Answer #1’ box.
4. Repeat steps
2 and 3 above for
Questions #2 and #3.
5. Click on the
‘Continue’ button.
The ‘Enrollment
Confirmation’ page
displays.
6. Click on the
‘Submit' button to accept your responses. You can go back and change your questions or answers by clicking
on ‘Previous’. The PINACLE ‘Home’ page displays, indicating you are now logged in to the site.
ANSWERING A SECURITY QUESTION WHEN PROMPTED
You may be prompted to answer one of
your security questions in order to help
verify your identity.
1. Type the answer to your question in
the box provided.
2. Click on the ‘Continue’ button.
The PINACLE ‘Home’ page displays,
indicating you are now logged in to the site.
4
TROUBLESHOOTING
TIP 1 - If you are having trouble logging in to PINACLE, check your Internet options to ensure that cookie
settings are enabled.
TIP 2 - If you are using the Internet Explorer browser and it is performing slowly or not loading pages
properly, try the following:
1. Click on the ‘Stop’ icon on the toolbar of your browser.
2. Click on the ‘Refresh’ or ‘Reload’ icon on the browser toolbar and the latest version of the page you are
viewing displays. You can also click once on the right mouse button then click on ‘Refresh’/ ‘Reload'. If you
are unable to access either, press the F5 key at the top of your keyboard. The F5 key is a universal refresh
key on most PCs.
3. If unsuccessful, log out of PINACLE.
4. Attempt to access a different web page to confirm that your browser and Internet connection are
functioning.
5. If unsuccessful, exit your browser completely.
6. Access your ‘Internet Options’ ‘General’ tab from the control panel and make the following selections:
• Delete browser history (temporary files, cookies, etc.)
• Check for newer versions of stored pages on every visit to the page
7. Click on ‘OK’ as needed to save the changes and close the dialog box.
8. Re-boot your computer.
9. Open your browser and attempt to access any web page.
10. If the problem persists, contact your Internet provider or your internal technical support for additional
information.
LOGGING OUT OF
PINACLE
When finished using
PINACLE, click on the
‘Log Out’ link at the upper right corner of the Utility Bar.
For security purposes, it is recommended that you use the ‘Log Out’ feature when exiting PINACLE otherwise
you may not be properly logged out.
For further assistance, click on ‘Contact Us’ on the PINACLE Utility Bar.
PNC and PINACLE are registered marks of The PNC Financial Services Group, Inc. (“PNC”)
Banking and lending products and services and bank deposit products are provided by PNC Bank, National Association, a wholly-owned
subsidiary of PNC and Member FDIC. Lending and leasing products and services as well as certain other banking products and services, may
require credit approval.
©2015 The PNC Financial Services Group, Inc. All rights reserved.
CIB 0906-002E-0115
pnc.com/treasury
INSTALLING THE SCANNER DRIVER
Before you can use the Deposit On-Site module,
you must download and install the scanner driver.
This application enables you to scan and upload
transactions to the module.
You must have admin rights to your computer to
install the driver.
To access the Deposit On-Site module, click on the ‘Deposit On-Site’ tab from the Tabbed Modules Bar. The
Deposit On-Site home page displays.
1. From the Deposit On-Site home page,
click on the “click here to download the
driver” link.
2. Click the link of the scanner name that
best represents the model that you have.
Page 1
Options include:
Desktop Check Scanner Certified for Use with the Deposit On-Site Module
Panini MyVisionX™ 30 (including RoHS-compliant
models)
Digital Check TellerScan® 220E
Panini MyVisionX™ 60 (including RoHS-compliant
models)
Digital Check TellerScan® 230 - 35
Panini MyVisionX™ 90 (including RoHS-compliant
models)
Digital Check TellerScan® 230 - 65
Panini I:Deal
Digital Check TellerScan® 230 - 100
Panini Vision™ Next
Digital Check TellerScan® 240
Panini VisionX™ 50/50
Digital Check TellerScan® 4120
Panini VisionX™ 50/100
Digital Check TellerScan® ChecxPress 30(CX30)
Panini VisionX™ 75/50
EC 7000i Series
Panini VisionX™ 75/100
Epson - CaptureOne
Burroughs SmartSource Micro Elite
Panini MyVisionX™ and Panini VisionX™ are registered trademarks of Panini S.p.A.
TellerScan® is a registered trademark of Digital Check Corporation.
The ‘File Download - Security Warning’ dialog box displays.
Do not connect your desktop check scanner to your local
computer until you have successfully downloaded the scanner
driver.
3. Click on the ‘Save’ button and the ‘Save As’ dialog box
displays. Select your desktop and click on the ‘Save’ button.
4. The ‘Download complete’ dialog box will display when the
scanner driver has successfully downloaded. Click on the ‘Run’
button to run the application.
Depending on your security settings, a ‘Security Warning’ dialog
box may appear. If it appears, click on the ‘Run’ button to
proceed.
If a scanner driver is already installed on your computer, you will
be prompted to uninstall it. If the InstallShield Wizard removed
an old driver, you must re-select the new driver that you want to
install by clicking on the picture that matches your scanner type.
5. The ‘PassportWebClient - InstallShield Wizard’ displays. Click
on the ‘Next’ button to continue.
6. A license agreement will display. Be sure to read the
terms and conditions carefully. If you agree to the terms
and conditions, select the “I accept the terms of the license
agreement” radio button and click on the ‘Next’ button.
If you do not accept the terms and conditions of the license
agreement, the installation process will terminate.
Page 2
7. Click on the ‘Install’ button to continue.
8. When InstallShield Wizard has
successfully installed PassportWebClient,
click on the ‘Finish’ button.
9. Using the supplied USB cord, connect
the scanner to your computer.
10. Click on the ‘Return’ button at the
bottom of the page to return to the Deposit
On-Site home page and begin using the
application.
For further assistance, click on ‘Contact Us’ on the PINACLE Utility Bar.
PNC is a registered mark of The PNC Financial Services Group, Inc. (“PNC”) Bank deposit, treasury management and lending products and
services, and investment and wealth management, and fiduciary services are provided by PNC Bank, National Association, a wholly-owned
subsidiary of PNC and Member FDIC.
©2015 The PNC Financial Services Group, Inc. All rights reserved.
pnc.com/treasury
PINACLE® Deposit On-Site
Frequently Asked Questions
Q:
A:
What is Deposit On-Site?
PNC’s Deposit On-Site module provides an efficient way to streamline deposit preparation and
eliminate multiple trips to the bank. Through PINACLE®, PNC’s central online portal and a
desktop check scanner located right in your office, you can easily capture images of consumer
and business checks. Once the deposit has been balanced, you can submit the check images to
PNC for processing. As a result, you can reduce administrative time and expenses associated with
deposit preparation activities and consolidate bank accounts from various locations.
Q:
A:
What type of checks can be deposited?
You can only deposit checks drawn on domestic banks that have a valid Federal Reserve Routing
Transit Number (RTN). Checks drawn on foreign banks or non-U.S. dollar checks cannot be
deposited using the Deposit On-Site module. In addition, any check that fails to meet the
minimum Image Quality Acceptance parameters (IQA) will be rejected. Also, you may not deposit
photocopies in lieu of mutilated items, or an electronically created image that did not actually
originate from a paper check.
Q:
A:
Is special equipment required to use PNC’s Deposit On-Site module?
In order to capture check images via Deposit On-Site, you will need a PC with Internet access as
well as access to PNC’s PINACLE portal. You will also need to purchase a check scanner from
the list of approved scanners.
Q:
A:
How do I purchase a desktop scanner and what is the cost?
For your convenience, PNC has provided you access directly to Vecmar Computer Solutions
web-based scanner fulfillment site, PNC’s preferred scanner provider. You can purchase a
scanner and maintenance services by going to our web sites at www.pnc/rdw or
www.pncorder.com. If you already have a scanner or choose to purchase one from a
supplier other than Vecmar Computer Solutions, the scanner must be from PNC’s list of
approved scanners. Your Treasury Management Officer can discuss this with you in more
detail.
What type of software is needed for the desktop scanner?
Deposit On-Site is delivered through the PNC’s PINACLE portal. Since this is a web-based
module, there is no application software required to be installed on your workstation, with the
exception of the required check scanner driver. There is a link to the check scanner drivers on
the Deposit On-Site module home page.
Q:
A:
1
Q:
A:
Will I receive training and documentation for Deposit On-Site’s actual workflow?
Yes. The system is very user-friendly. Training is provided in the form of online training tutorials,
online banking portal tip cards and you may also schedule an interactive online banking portal
training session. Client service telephone contact information will also be provided as part of the
enrollment process. For the check scanner, the vendor will supply a user manual.
Q:
What is the scan time per check and the number of checks that a desktop scanner can
process?
Different scanners are available with speeds ranging from manual check feed, to automated
document feeding systems, scanning checks at 30 to 90 DPM, (Documents Per Minute). Check
scanners with automated feeding systems, can have either 50 or 100 check documents in the
check hopper. Your company’s daily volume of deposited checks, as well as the time dedicated to
deposit preparation, should help to determine the speed of scanner that is needed to meet your
needs.
A:
Q:
A:
Is there a proper way to scan checks?
Yes, the instructions for scanning checks are listed in the scanner manual. For a high quality
image, there should be some preparation time for straightening out the corners and removing
any staples. Simple scanner preventive maintenance cleaning should be performed per the
manufacturer’s guidelines.
Q:
A:
What does MICR stand for?
MICR stands for Magnetic Ink Character Recognition. At the bottom of each check, the MICR line
information is imprinted with special ink. The numbers in each field represent key information,
including the bank, account and check numbers. It is important that the check is scanned properly
so that the MICR line information can be clearly captured and a high quality image can be
transmitted to PNC.
Q:
A:
What is CAR/LAR and does Deposit On-Site use this feature?
Yes, Deposit On-Site uses this feature. CAR/LAR stands for Courtesy Amount Recognition /Legal
Amount Recognition and is the process that is used for image matching. Deposit On-Site will read
the printed numbers in the amount box of the check (CAR) and will also read the line with the
handwritten amount (LAR). If this information matches the image of the item, then the item is
accepted. If the information does not match, then the item will appear on the screen and the
system will request that the amount be confirmed or key corrected by the operator processing the
deposit. Again, it is very important that the check be scanned properly so that all the information
can be captured in order to create a high quality image of the item.
Q:
Do I still have to place a physical endorsement on the back of all checks prior to
scanning?
No. The system will place a virtual endorsement on the back of all check images. You do have
the option to customize certain endorsement fields. Training on the process to customize your
company endorsement will be reviewed during the product training materials/classes.
A:
2
Q:
A:
When will my company have access to the information and images processed through
Deposit On-Site?
As items are scanned, you will have access to the images and information detail on Deposit OnSite via the PINACLE portal. There are a number of standard reports that are available the day
the deposit is created such as the Deposit Summary, Deposit Detail Reports and Audit Reports.
Reports can be created at several different levels including, deposit location, deposit account,
operator or across all check capture locations. Certain reports can be exported in CSV or Excel
format.
Available Reports:
• Client Account Listing Export File – Report shows all client accounts on module
• Client User Listing Export File – Report details all client module operators
• Deposit Details Report – Reports all deposit details for requested date range
• Deposit Summary Report – Summary of all deposits for requested date range
• Item Export File – Export of all deposit details for requested date range
• Location Deposit Status – Summary deposit recap by deposit location
• Login Audit Export File – Details all login activity for requested date range
• User Activity Audit Export File – Details all module activity by user
Q:
A:
What should I do if the item scanned does not meet the standard criteria for capture
quality?
Re-scanning the item is always the first step. If this fails, then the check must be deleted and
the original check taken to a PNC Branch or mailed to the bank for deposit at the following
address:
PNC Bank
Attn: Miscellaneous Accts Services
P.O. Box 8108
Philadelphia, PA 19101-8108
Q:
A:
Could I have more than one account listed for deposits?
Yes, an unlimited number of accounts can be assigned to a deposit location. The accounts all
have to be owned by the same company and established within the Deposit On-Site client
account profile.
Q:
A:
How many checks can I scan to one deposit?
During the enrollment process, you can establish your check deposit limit, up to a 500 item
maximum. Any deposit exceeding the check deposit limit will not be accepted until the operator
deletes all checks in excess of the established limit.
Q:
A:
When and how often can I submit my deposits to PNC? When will they be credited?
You can capture, scan and submit deposits 24 hours 7 days a week (24x7). The daily deadline
is currently 10:00p.m. ET, Monday through Friday, for same day credit. Any deposit
submissions received after the deadline or on weekends/holidays will be credited the next
business day. Funds may not be available for immediate withdrawal. Please see the applicable
funds availability policy for your account to determine when your funds will be made available.
3
Q:
A:
How do I know PNC received my transmitted deposit?
The Deposit On-Site module is maintained within the PNC’s server system. As soon as you have
completed scanning all checks in the deposit, and corrected or confirmed any check deposit,
you can submit the deposit to PNC. Within minutes of the submission, the deposit status will
change to a Received status. This status will be reflected on the Deposit Summary Report. The
Deposit Summary Report will show the time the deposit was created by the operator and the
time the deposit was submitted to PNC by the supervisor with the authority to submit deposits.
Q:
A:
What happens to the images after they are transmitted to PNC?
All check images that pass additional bank level Image Quality Assessment’s are submitted into
the Check Collection system for payment by the paying banks. Check images are cleared
through various collection intermediaries, including the Federal Reserve Bank, correspondent
banks and Clearing House Associations. Some of the check images maybe converted to
substitute checks by the collection intermediaries.
Q:
A:
What is a substitute check?
A substitute check (also known as an Image Replacement Document or IRD) is a printed copy
of the scanned original check.
Q:
A:
How should returned checks be handled?
Any returned deposited checks should be treated in the same manner that is now being used by
your organization. Return deposited checks can be set up for automatic redeposit or returned
directly to you. The difference is that a returned image or substitute check will be returned
instead of the original check. When you receive a Return Item IRD that is eligible for re-deposit,
the IRD can be re-deposited with Deposit On-Site.
Q:
Does the Deposit On-Site module have system security features? If so, who will
assign the logon ID and password?
Yes. Deposit On-Site security access is managed under the PINACLE single sign-on security
structure. Multifactor authentications with optional security token techniques are applied. As
part of the PINACLE enrollment process, two system administrators will be assigned to manage
operator creation and role assignments, i.e.check scanner operator, supervisor, reports
reviewer and administrator. Password expiration and time out parameters will also be applied
for the Deposit On-Site module.
A:
4
Q:
A:
How long is the storage retention for both images and information detail?
The report storage, including deposit detail information, is stored for 65 days, while check
images are retained for 35 days after deposit. Reports can be exported into Excel files and
retained as long as needed. The Deposit Details Report which is provided in a PDF format can
be generated with front and back of check images. This feature requires Adobe®Reader® to be
installed on your computer. To access a free download of Adobe Reader, click on Get Adobe
Reader at the bottom left corner of the Help page and follow the prompts. You can also request
copies of your imaged checks through PNC’s Image On-Demand module.
Q:
A:
How long should the original check be retained once it has been imaged?
PNC requires that all original checks be retained for a minimum of 14 days after the check
image deposit. When destroying the checks, it is recommended that they be shredded.
Q:
A:
Do I need to make copies of the checks that I scanned and transmitted to the bank?
No, you do not need to make copies of any scanned checks for deposit. Keep in mind that you
will retain and store the original checks for a minimum period of time of 14 days and potentially
longer based on your organization’s internal policy.
Q:
After implementation of the Deposit On-Site module is there a dedicated team to
administer and provide customer support?
Yes, PNC has a dedicated team that will administer and support the module after
implementation. A contact list with support numbers will be part of the installation
documentation supplied by PNC.
A:
Q:
A:
How will the module and scanner be billed?
Deposit On-Site requires accounts to be established on the PNC’s Analysis Business Checking
or CAA (Corporate Account Analysis) billing system to ensure accurate billing for the module.
The purchase of the scanner(s) may be placed via Vecmar Computer Solutions. Scanner
maintenance alternatives are also available through Vecmar Computer Solutions. Please note
that the scanner cost, including hardware, service maintenance and supplies ordered through
Vecmar Computer Solutions will be billed directly to your organization by Vecmar Computer
Solutions.
Q:
Can I deposit Canadian and foreign Checks using Deposit On-Site?
A:
No. Canadian and foreign checks are not supported within the Deposit On-Site module.
These items can be taken to a PNC branch or mailed to the bank for deposit at the following
address:
PNC Bank
Attn: Miscellaneous Accts Services
P.O. Box 8108
Philadelphia, PA 19101-8108
PNC and PINACLE are registered marks of The PNC Financial Services Group, Inc. (“PNC”)
Banking and lending products and services and bank deposit products are provided by PNC Bank, National Association, a wholly-owned subsidiary of PNC and
Member FDIC. Lending and leasing products and services as well as certain other banking products and services, may require credit approval.
©2015 The PNC Financial Services Group, Inc. All rights reserved.
Adobe, the Adobe logo, the Adobe PDF logo, and Reader are registered trademarks of Adobe Systems Incorporated in the United States and/or other countries.
Excel is a registered trademark of Microsoft Corporation.
pnc.com/treasury
5