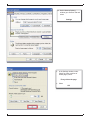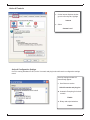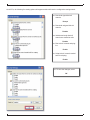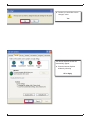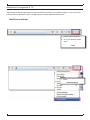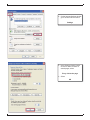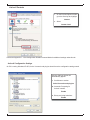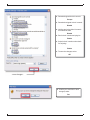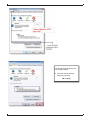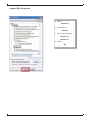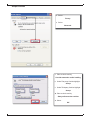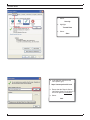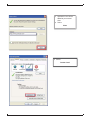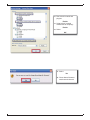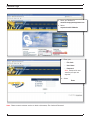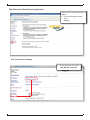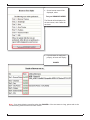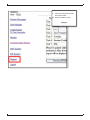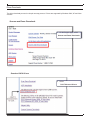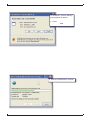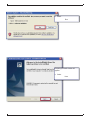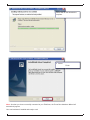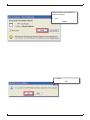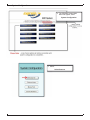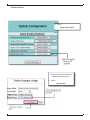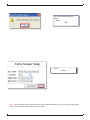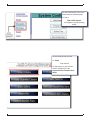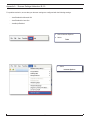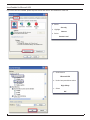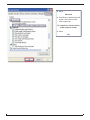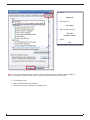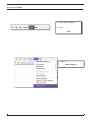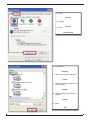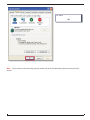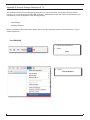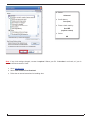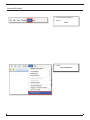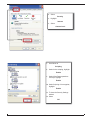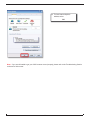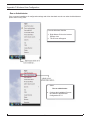
1
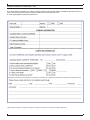
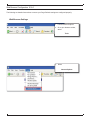
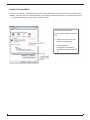
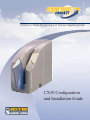
Electronic Check Processing and Remote Deposit System
CX30 Configuration
and Installation Guide
Table of Contents
Pre-Installation Checklist
2
About Secure Payment Systems, Inc.
4
The Company
4
Custom Tailored Applications
4
SPS Contact List
4
Web Browser Configuration IE 6.0
5
Web Browser Settings
5
Active X Controls
7
Active X Configuration Settings
7
Web Browser Configuration IE 7.0
10
Web Browser Settings
10
Active X Controls
12
Active X Configuration Settings
12
Support SSL Encryption
15
Accept Cookies
16
Turn off Pop-up Blocker
17
Trusted Sites
18
Customer Login
22
The Electronic Check Processing System
23
Test Your Browser Settings
23
Driver Downloads
26
Scanner and Demo Downloads
26
Download CX30 Drivers
26
First Time User Configuration
30
ARC/IRD System
30
System Configuration
32
Scanner Options
33
Appendix A - Browser Settings Addendum IE 6.0
36
Java Enabled for Microsoft VM
37
Java Enabled for Java Sun
39
Java Script Enabled
41
Appendix B Browser Settings Addendum IE 7.0
44
Java Enabled
44
Javascript Enabled
46
Appendix C Windows Vista Configuration
49
Run as Administrator
49
Disable Protected Mode
50
2
Pre-Installation Checklist
Take this opportunity to fill out the Pre-Installation Checklist below to be sure that you have all the requirements
needed for a successful scanner installation.
NOTE: You must have Administrative Privileges* on your PC to perform the installation. If you are not sure if you
have administrative privileges or if your system does not meet the requirements below, please check with your PC
support staff before proceeding.
*Administrative Privileges is the ability to change the computers configuration and install new software applications.
3
Scanner Installation Assistance Form
If you have difficulty installing your scanner, please complete and send the Scanner Installation Assistance Form to
Secure Payment Systems Technical Support Department via fax (858) 549-1323
or email [email protected].
*Administrative Privileges is the ability to change the computers configuration and install new software applications.
4
About Secure Payment Systems, Inc.
The Company
Secure Payment Systems (SPS) is a transaction processing and risk management company that specializes
in the needs of small and midsize businesses. In addition to traditional point-of-sale transaction processing,
we offer electronic check conversion, gift and loyalty card processing, a proprietary ATM debit payroll
/ international funds transfer card, as well as an array of sophisticated Web-based products including a
recurring debit and credit platform and the popular check21 solution. In other words, SPS provides you with
affordable solutions that you need to compete with the retail elite.
SPS is helping business change the way it operates – implementing enhanced check fraud algorithms,
focusing on new customer marketing strategies, maximizing untapped opportunity, protecting profits and
increasing revenues. And that is no small change.
Custom Tailored Applications
SPS products and services are highly scalable and adaptable within all business environments via our
secure state-of-the-art, web based software. We understand that one size does not fit all. No matter what
your business, SPS can custom tailor a payment solution to meet your specific needs so you can benefit
from electronic processing technologies. We fully integrated and enhanced the functionality of our products
and services to specifically meet the needs of merchants, banks, financial institutions, collection agencies,
property management companies, and more.
SPS Contact List
For more information on our various solutions, contact an SPS representative at: 1.888.313.7842.
Technical Support
[email protected]
Sales and Marketing
[email protected]
5
Web Browser Configuration IE 6.0
The following are detailed instructions to ensure your Page Refresh settings are configured properly.
Web Browser Settings
1. Launch Internet Explorer
2. Go to your browser toolbar,
select
Tools
3. Select
Internet Options
6
4. On the Internet Options
window go to General Tab and
select
Settings
5. In the Settings window, under
Check for newer versions of
stored pages, select
Every visit to the page
6. Select
OK
7
Active X Controls
7. On the Internet Options window
go to the Security tab, highlight
Internet
8. Select
Custom Level
Active X Configuration Settings
On PC’s running Windows XP-SP2, Active X controls and plug-ins should have the configuration settings
noted:
Security Settings window will
automatically appear.
9. Scroll down to section
ActiveX controls and plug-ins
10. Automatic Prompting for ActiveX
controls:
Enable
11. Binary and script behaviors:
Enable
8
On all PC’s, the following five setting options will appear and should have the configuration settings noted:
12. Download signed ActiveX
controls:
Prompt
13. Download unsigned ActiveX
controls:
Disable
14. Initialize and script ActiveX
controls not marked as safe:
Disable
15. Run ActiveX controls and plugins:
Enable
16. Script ActiveX controls marked
safe for scripting:
Enable
17. To save the changes, select
OK
9
18. Confirm you would like to save
changes, select
Yes
The Internet Options window will
automatically appear.
19. Close the Internet Options
window by selecting
OK or Apply
10
Web Browser Configuration IE 7.0
The following are detailed instructions to ensure your Browser settings are configured properly. If you are running
VISTA, please see Appendix C prior to configuring your browser and downloading drivers.
Web Browser Settings
1. Launch Internet Explorer
2. Go to your browser toolbar,
select
Tools
3. Select
Internet Options
11
4. On the Internet Options window
go to General Tab and select:
Settings
5. In the Settings window, under
Check for newer versions of
stored pages, select
Every visit to the page
6. Select
OK
12
Active X Controls
7. On the Internet Options window
go to the Security tab, highlight
Internet
8. Select
Custom Level
Please see Appendix C - Vista Configuration Disable Protected Mode for additional settings under this tab.
Active X Configuration Settings
On PC’s running Windows XP-SP2, Active X controls and plug-ins should have the configuration settings noted:
Security Settings window will
automatically appear.
9. Scroll down to section
ActiveX controls and plug-ins
10. Automatic Prompting for
ActiveX controls:
Enable
11. Binary and script behaviors:
Enable
13
12. Download signed ActiveX controls:
Prompt
13. Download unsigned ActiveX controls:
Disable
14. Initialize and script ActiveX controls
not marked as safe:
Disable
15. Run ActiveX controls and plug-ins:
Enable
16. Script ActiveX controls marked safe
for scripting*:
Enable
17. To save the changes, select
OK
18. Confirm you would like to save
changes, select
Yes
14
The Internet Options window will
automatically appear.
19. Close the Internet Options
window by selecting
OK or Apply
15
Support SSL Encryption
1. Select
Advanced
2. Scroll down to
Security
3. Place check marks by:
•
Use SSL 2.0
•
Use SSL 3.0
4. Select
OK
16
Accept Cookies
5. Select
Privacy
6. Select
Advanced
7. Place a check mark by
Override automatic cookie handling
8. Under First-party Cookies highlight
Accept
9. Under Third-party Cookies highlight
Accept
10. Place a check mark by
Always allow session cookies
11. Select
OK
17
Turn off Pop-up Blocker
12. Ensure Pop-up Blocker is turned
off.
13. Select
OK
18
Trusted Sites
1. Select
Security
2. Highlight
Trusted Sites
3. Select
Sites
4. In the Add this website to this
zone option, type,
https://www.spscheck21.com
5. Ensure that the Require Server
Verification (https:) for all sites in
this zone option is unchecked.
6. Select
Add
19
7. spscheck21.com will be
added to your trusted
sites.
8. Select
Close
9. Select
Custom Level
20
Security Settings window will
automatically appear.
10. Scroll down to section
ActiveX controls
and plug-ins
11. Automatic Prompting for
ActiveX controls:
Enable
12. Binary and script behaviors:
Enable
13. Download signed ActiveX
controls:
Enable
14. Download unsigned ActiveX
controls:
Prompt
15. Initialize and script ActiveX
controls not marked as safe:
Prompt
21
16. Run ActiveX controls and
plug-ins:
Enable
17. Script ActiveX controls
marked safe for scripting*:
Enable
18. Select
OK
19. Select
Yes
20. Close down all browser
sessions and relaunch
22
Customer Login
1. Direct your browser to
www.securepaymentsystems.com
2. Select
expresscheck21 Website
3. Enter your:
•
File Code
•
User Name
•
Password
Note: Password is case
sensitive, all caps are
required.
4. Select
Enter
Note: Please contact customer service to obtain a Username, File Code and Password.
23
The Electronic Check Processing System
Welcome to the Processing Page will
appear.
5. In the left navigation window,
select
Support
Test Your Browser Settings
6. On the right hand side, select:
Web Browser Test Suite
24
7. Seven browser tests will be
displayed, select
Test your BROWSER HERE!!
The Results will be displayed on
the next screen, with a status for
each test.
8. If your browser is configured
properly, all seven will display
PASSED
Note: If one status displays something other than PASSED or if the test seems to hang, please refer to the
Troubleshooting Section at the end of this manual.
25
9. Close the Results of browser
test suite window.
10. On the left panel, select
Support
26
Driver Downloads
The driver download process is a simple one step process. Drivers are supported by Windows 2000, XP and Vista
versions.
Scanner and Demo Downloads
1. On the Support page, select
Scanner and Demo Downloads
Download CX30 Drivers
2. Select
DCC Tellerscan Drivers
27
File Download – Security Warning
pop up window will appear.
3. Select
Run
4. Wait for the download to complete.
28
5. Select
Run
Preparing to Install window will
appear.
6. Select
Next
29
Please wait for the download to
complete.
7. Select
Finish
Note: Now that you have successfully connected to your TellerScan, the Found New Hardware Wizard will
automatically appear.
Your new hardware is installed and ready to use!
30
First Time User Configuration
If you’re already logged onto our website, please maximize the web page. Otherwise, go to
www.securepaymentsystems.com and click on “expresscheck21” to log on.
ARC/IRD System
Welcome to the Processing System
page will appear.
1. Select
ARC/IRD System
as it applies to your processing
needs.
Please wait as the System loads.
31
Internet Explorer Security Warning
window will appear.
2. Select
Install
3. Select
OK
32
System Configuration
4. The IRD/ARC System Main
Menu will appear, select
System Configuration
5. Select
Select Scanner
33
Scanner Options
6. Select
Digital Check CX30
Scanner Setup will automatically
appear with default values.
7. Select
Test Scanner
34
TurboScan testing window will
appear.
8. Select
OK
9. Select
Close
Note: The initialization of the Turbo Scanner may fail on the first attempt. If this occurs, please proceed to
Step 11 Scan Checks and attempt to scan your items.
35
You will automatically return to the
Select Scanner Hardware page.
10. Select
IRD or ARC System
as it applies to your processing
needs.
You are ready to scan checks!
11. Select
Scan Checks
For instructions on how to Scan
Checks, please refer to the
expresscheck21 Fasttrack User
Guide.
36
Appendix A - Browser Settings Addendum IE 6.0
For problem resolution, ensure that your browser settings are configured with the following settings:
•
Java Enabled for Microsoft VM
•
Java Enabled for Java Sun
•
JavaScript Enabled
1. Launch Internet Explorer
2. Select
Tools
3. Select
Internet Options
37
Java Enabled for Microsoft VM
If you have Java Sun installed, please skip this section and refer to Java Enabled for Java Sun.
4. Select
Security
5. Highlight
Internet
6. Select
Custom Level
7. Scroll down to
Microsoft VM
8. Under Java permissions select
High Safety
9. Select
OK
38
10. Select
Advanced
11. Scroll Down to the Microsoft VM
section, ensure that a check
mark is placed by:
JIT compiler for virtual machine
enable (requires restart)
12. Select
OK
39
Java Enabled for Java Sun
1. Launch Internet Explorer
2. Select
Tools
3. Select
Internet Options
40
4. Select
Advanced
5. Scroll down to
Java (Sun)
6. Place a check mark by
Use JRE
(requires restart)
7. Select
OK
Note: If any of the settings changed, a restart is required. Reboot your PC. If neither Microsoft VM nor
Java Sun is found, you need to install Java or if you do not have the latest version of Java.
1. Go to www.java.com,
2. Select Java Software Free Download
3. Follow the on-screen instructions for installing Java.
41
Java Script Enabled
1. Launch Internet Explorer
2. Select
Tools
3. Select
Internet Options
42
4. Select
Security
5. Highlight
Internet
6. Select
Custom Level
7. Scroll down to
Scripting
8. Under Active scripting, highlight
Enable
9. Under Allow Paste operations via
script, highlight
Enable
10. Under Scripting of Java applets,
highlight
Enable
11. Select
OK
43
12. Select
OK
Note: If your scanner is still not working properly, please refer to the Troubleshooting Section at the end of this
manual.
44
Appendix B Browser Settings Addendum IE 7.0
The addendum section if for troubleshooting purposes to be used in the event your scanner does not perform
properly or is not recognized by the ARC/IRD application. Additional items that may need to be addressed in your
web browser are the configuration of the following settings:
•
Java Enabled
•
JavaScript Enabled
Before proceeding to the section below, please ensure you have the latest version of Internet Explorer 7.0, go to
www.microsoft.com.
Java Enabled
1. Launch Internet Explorer
2. Select
Tools
3. Select
Internet Options
45
4. Select
Advanced
5. Scroll down to
Java (Sun)
6. Place a check mark by
Use JRE
(requires restart)
7. Select
OK
Note: If any of the settings changed, a restart is required. Reboot your PC. If Java Sun is not found, or if you do
not have the latest version of Java:
1. Go to www.java.com,
2. Select Java Software Free Download
3. Follow the on-screen instructions for installing Java.
46
Javascript Enabled
1. Launch Internet Explorer
2. Select
Tools
3. Select
Internet Options
47
4. Select
Security
5. Highlight
Internet
6. Select
Custom Level
7. Scroll down to
Scripting
8. Under Active scripting, highlight
Enable
9. Under Allow Paste operations
via script, highlight
Enable
10. Under Scripting of Java applets,
highlight
Enable
11. To close the Security Settings
window
12. Select
OK
48
13. To close Internet Options
window, select
OK
Note: If you are still unable to get your CX30 scanner to work properly, please refer to the Troubleshooting Section
at the end of this manual.
49
Appendix C Windows Vista Configuration
Run as Administrator
Prior to scanner installation, all configuration settings and driver download must be run under the Administrator
option when running Vista.
From the Windows Task Bar
1. Right Mouse Click on the Internet
Explorer Icon
2. The IE menu will appear
3. Select
Run as administrator
4. Continue the Installation Process
as outlined in Web Browser
Configuration IE 7.0
50
Disable Protected Mode
In order for the User to run the application normally (not as administrator) protected mode in Vista needs to be
disabled. If this process is not recommended by your company network administrator, then please follow Steps
1 - 3 as listed above each time you login to scan your checks.
To Disable Protected Mode:
From the Internet Options Security
Tab
5. Remove the check mark from
Enable Protected Mode
6. Continue Browser
Configuration as defined in
Web Browser Configuration IE
7.0
51