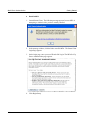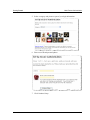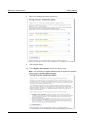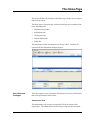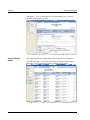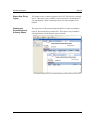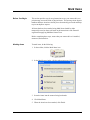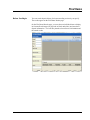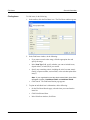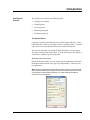
1
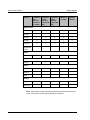
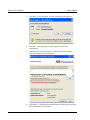
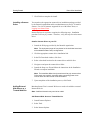
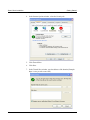
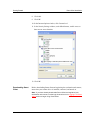
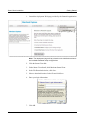
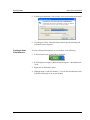
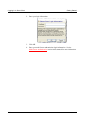
SendPoint Merchant Smart Client User Manual Original Publication: 1/08 Revision: 10/10 © 2010 Fidelity National Information Services, Inc. and its subsidiaries. All rights reserved worldwide. This document is protected as a trade secret and under the copyright laws as the property of Fidelity National Information Services, Inc. Copying, reproduction, or distribution to third parties is strictly prohibited.. 10/10 FIS Table of Contents Getting Started System Requirements . . . . . . . . . . . . . . . . . . . . . . . . . . . . . . . . . . . . . .1-1 Smart Client Installation. . . . . . . . . . . . . . . . . . . . . . . . . . . . . . . . . . . . .1-3 Logging in to Smart Client . . . . . . . . . . . . . . . . . . . . . . . . . . . . . . . . . .1-11 Multi-Factor Authentication . . . . . . . . . . . . . . . . . . . . . . . . . . . . . . . . .1-13 General Information The Home Page. . . . . . . . . . . . . . . . . . . . . . . . . . . . . . . . . . . . . . . . . . .2-1 Reports . . . . . . . . . . . . . . . . . . . . . . . . . . . . . . . . . . . . . . . . . . . . . . . .2-11 Mark Items . . . . . . . . . . . . . . . . . . . . . . . . . . . . . . . . . . . . . . . . . . . . . .2-17 Find Items . . . . . . . . . . . . . . . . . . . . . . . . . . . . . . . . . . . . . . . . . . . . . .2-19 The Deposit Process Introduction . . . . . . . . . . . . . . . . . . . . . . . . . . . . . . . . . . . . . . . . . . . . . .3-1 Creating a Deposit . . . . . . . . . . . . . . . . . . . . . . . . . . . . . . . . . . . . . . . . .3-5 Capturing Items . . . . . . . . . . . . . . . . . . . . . . . . . . . . . . . . . . . . . . . . . . .3-7 Correcting Items . . . . . . . . . . . . . . . . . . . . . . . . . . . . . . . . . . . . . . . . . .3-9 Balancing the Deposit . . . . . . . . . . . . . . . . . . . . . . . . . . . . . . . . . . . . .3-13 Finishing the Deposit . . . . . . . . . . . . . . . . . . . . . . . . . . . . . . . . . . . . . .3-17 SendPoint Merchant Smart Client User Manual 10/10 i Table of Contents ii 10/10 FIS Getting Started 10/10 FIS System Requirements This section lists the system requirements to support Merchant Smart Client. System requirements include client hardware and software and supported scanner drivers. Client Hardware Configuration The following is the recommended hardware configuration: Pentium 4 2.0 GHz processor or Core 2 Duo 1.86 GHz processor 1 GB RAM 40 GB hard drive Network card Broadband Internet access Screen resolution 1024 x 768 USB 2.0 port For optimal performance, a 3.0 GHz or Core Duo 2.33 GHz processor is recommended because of processing required for courtesy amount recognition (CAR) and legal amount recognition (LAR). Also, additional RAM is recommended, especially with scanner drivers faster than 30 dpm. Supported Scanners and Operating Systems Smart Client supports Internet Explorer 6, 7, and 8 for all the scanner and operating system configurations in the table below. Microsoft .NET 3.5 also needs to be installed. Scanner Windows XP, Service Pack 3 (32 bit) Windows Vista, Service Pack 1 and 2 (32 bit) Windows Vista, Service Pack 1 and 2 (64 bit) Windows 7 (32 bit) CR-25 v v v CR-55 v v v CR-180 v v v v v Windows 7 (64 bit) Canon CTS LS100 SendPoint Merchant Smart Client User Manual 10/10 v v 1-1 System Requirements Getting Started Scanner Windows XP, Service Pack 2 or 3 (32 bit) Windows Vista, Service Pack 1 (32 bit) Windows Vista, Service Pack 1 (64 bit) Windows 7 (32 bit) Windows 7 (64 bit) TS 215 v v v v v TS 220 v v v v v TS 230 v v v v v TS 240 v v v v v TS 4120 v v v v v CheXpress v v v v v v v v v v v v MyVisionX v v v v v VisionX v v v v v v v v v v v v Digital Check CX30 Epson TM-S1000 MagTek Excella Panini iDeal UniSys MyVisionX v v UEC7011 v v v Note: Panini iDeal scanners require the SendPoint Service Delivery team to create a virtual bank of first deposit (BOFD) endorsement. 1-2 10/10 FIS Smart Client Installation This section contains step-by-step instructions for the tasks necessary to successfully install Smart Client. These include: Installing Microsoft .NET 3.5 SP1 Installing a scanner driver Adding Smart Client’s external web server address as a trusted Internet Web site Downloading Smart Client and registering your scanner and workstation Steps for creating a Smart Client shortcut on your desktop are also included. Installing Microsoft .NET 3.5 SP1 Microsoft .NET 3.5 SP1 is a free download obtained from the Microsoft Web site. To download and install Microsoft .NET 3.5, do the following: 1. Open your Web browser and access the following Web page: http://www.microsoft.com/downloads/ details.aspx?familyid=AB99342F-5D1A-413D-8319-81DA479AB0D7& displaylang=en Note: A link to the Microsoft .NET 3.5 Release Notes can be found in the Instructions portion of the Web page. Links to other related information for .NET 3.5 are also on the Web page. 2. On the Web page, click the Download button. A File Download Security Warning window appears. Note: A Microsoft Download Confirmation page may prevent the File Download window from being visible. Minimize windows as needed to see the appropriate windows. SendPoint Merchant Smart Client User Manual 10/10 1-3 Smart Client Installation Getting Started 3. Click Run. A File Download - Security Warning window appears. 4. Click Run. Various progress windows appear and will close automatically. 5. In the Microsoft .NET Framework 3.5 SP1 Setup window, read the license agreement and accept the terms. 6. Click Install. A Download and Install Progress window appears and will close automatically when finished. 1-4 10/10 FIS Getting Started Smart Client Installation 7. Click Finish to complete the install. Installing a Scanner Driver You must have the appropriate scanner driver installation package provided by the financial organization and be an administrator on your PC to install a scanner. For a list of scanners supported for use with Smart Client, see Logging in to Smart Client. Internet Explorer is required to complete the following steps. Installation procedures will vary by scanner. Therefore, verify the steps for each scanner driver. Install a Scanner Driver on your PC 1. Launch the Web page provided by the financial organization. Note: The deployment page will vary based on the individual merchants and available hardware setup configurations. 2. Click the appropriate scanner driver installation link. 3. In the File Download window, click Save. 4. Select a download location for the scanner driver and click Save. 5. Navigate to and open the scanner driver folder. 6. Launch the Setup.exe file and follow the instructions in the Installation Wizard to complete installation. Note: The Installation Wizard and procedures will vary by scanner driver. Follow each step carefully, especially when connecting power to the scanner driver and the scanner to the workstation. 7. Upon completion of the installation process, click Finish. Adding External Web Server as a Trusted Web Site Merchant Smart Client’s external Web server needs to be added as a trusted Internet Web site. Note: Additional domains may need to be added. Add External Web Server to Trusted Site List 1. Launch Internet Explorer. 2. Select Tools. 3. Select Internet Options. SendPoint Merchant Smart Client User Manual 10/10 1-5 Smart Client Installation Getting Started 4. In the Internet Options window, select the Security tab. 5. Click Trusted Sites. 6. Click Sites. 7. In the Trusted Sites window, type the address of the domain (Example: https://www.provider name.com). 1-6 10/10 FIS Getting Started Smart Client Installation 8. Click Add. 9. Click OK. 10. In the Internet Options window, click Custom level. 11. In the Security Settings window, under Miscellaneous, enable access to data sources across domains. 12. Click OK. Downloading Smart Client Before downloading Smart client and registering the workstation and scanner, ensure that your scanner driver is installed, connected, and turned on. Note: If you have already downloaded Smart Client and registered your workstation and scanner, use the login instructions in the Logging in to Smart Client section to begin using Smart Client. SendPoint Merchant Smart Client User Manual 10/10 1-7 Smart Client Installation Getting Started 1. Launch the deployment Web page provided by the financial organization. Note: The deployment page will vary based on the individual merchants and available hardware setup configurations. 2. Click the Smart Client link. 3. Under Smart Client Install, click Merchant Smart Client. 4. In the File Download window, click Save. 5. Select a download location for the file and click Save. 6. Enter your login information. 7. Click OK. 1-8 10/10 FIS Getting Started Smart Client Installation 8. In the Register Merchant Client window, select your location and scanner. 9. Click Register Client. Merchant Smart Client begins downloading and will launch when completed. Creating a Smart Client Shortcut To create a Smart Client shortcut on your desktop, do the following. 1. In the left-hand corner of the toolbar, click Start. 2. In All Programs, navigate to Remote Deposit Capture > Merchant Smart Client. 3. Right-click on Merchant Capture. 4. Highlight Send To and click Desktop. You can now launch Smart Client by double-clicking the icon on your desktop. SendPoint Merchant Smart Client User Manual 10/10 1-9 Smart Client Installation 1-10 Getting Started 10/10 FIS Logging in to Smart Client Before You Begin This section contains step-by-step instructions for logging in to Merchant Smart Client. Before completing these steps, ensure that your scanner driver is installed, connected, and turned on. Note: If you have not downloaded Smart Client and registered your workstation, complete the appropriate tasks described in Smart Client Installation. Password Messages During the login process, a password event can occur that prompts you to change your password: Invalid user or password Non-conforming password New account reset Administrative password reset Password expired Password expires in X number of days If your password expires within a certain number of days, you have the option to change it immediately or later. Offline Mode An offline connection occurs when the connection to the server could not be established during login, but your credentials are the same as those authorized from the previous Merchant Smart Client session. You cannot submit deposits or reset your password in offline mode. File Encryption on Local PCs Smart Client encrypts data and images stored on local PCs to protect against unauthorized use. The only way to access the data and images is directly through the application. Logging In To log in to Smart Client, do the following: 1. Double-click the Smart Client shortcut on your desktop. SendPoint Merchant Smart Client User Manual 10/10 1-11 Logging in to Smart Client Getting Started 2. Enter your login information 3. Click OK. 4. Enter your multi-factor authentication login information. See the Multi-Factor Authentication section in this manual for more information. 1-12 10/10 FIS Multi-Factor Authentication Before You Begin Multi-factor authentication (MFA) can help prevent unauthorized access to Smart Client. MFA requires users to set up a picture, personal phrase, and confirmation questions to be associated with their user ID and password. Register Computer Registering a computer for MFA allows you to bypass the confirmation questions when you log in and is recommended if you commonly use the same computer to access Smart Client. If you are logging in to Smart Client and the computer is not registered, you must answer the confirmation questions before you can enter your password. When you answer the confirmation questions, you have the option to register the particular computer. Forgotten Confirmation Answers and/or Password Registered Computer If you forget your password, you can click the Forgot Password link on the Sign on to Merchant Capture page. You then have three attempts to answer all your confirmation questions correctly. If you answer the questions correctly, you will be prompted to create a new password. If you are not able to answer your confirmation questions, your account will be locked after three failed attempts. You then must contact the system administrator to unlock your account and then re-enroll in MFA. Unregistered Computer On an unregistered computer, you must answer your confirmation questions prior to entering your password. When you answer your confirmation questions correctly, you can click the Forgot Password link to create a new password. If you are not able to answer your confirmation questions, your account will be locked after three failed attempts. You then must contact the system administrator to unlock your account and then re-enroll in MFA. Enrolling in MFA MFA requires you to first enroll in MFA and then register the computer you commonly use to access Smart Client. SendPoint Merchant Smart Client User Manual 10/10 1-13 Multi-Factor Authentication Getting Started Enroll in MFA 1. Launch Smart Client. The following message appears because MFA is attempting to initiate before you have actually enrolled. 2. In the message window, click the link to enroll in MFA. The Smart Client Login Page appears. 3. On the login page, enter your user ID and click Login. The MFA Set Up Secure Authentication page appears. 4. Click Begin Setup. 1-14 10/10 FIS Getting Started Multi-Factor Authentication 5. Select a category and picture as part of your login information. 6. Enter a user ID and personal phrase. 7. Click Continue Setup. SendPoint Merchant Smart Client User Manual 10/10 1-15 Multi-Factor Authentication Getting Started 8. Select four challenge questions and answers. 9. Click Continue Setup. 10. Select Register this computer and click Continue Setup. Note: You still need to complete additional steps to register the computer after you have completed MFA enrollment. 1-16 10/10 FIS Getting Started Multi-Factor Authentication 11. Review the information and make any necessary changes. 12. Confirm your password and click Submit. The enrollment confirmation appears, which you can close. Register the Computer 1. Launch Smart Client. The login page appears. 2. Click the MFS link. 3. On the Set Up Secure Authentication page, click Begin Setup. SendPoint Merchant Smart Client User Manual 10/10 1-17 Multi-Factor Authentication Getting Started 4. On the Sign on to Merchant Capture page, answer your questions, select Register this computer, and click Continue. 5. Enter your password and click Login. The computer is now registered and the confirmation page appears, which you can close. 1-18 10/10 FIS General Information 10/10 FIS The Home Page This section explains the elements of the Home page and the various features that can be accessed. The Home page is displayed after each successful login and is organized into to the following areas: Main menu and toolbar Information pane All Deposits pane Deposit Details pane Status Bar The main menu, toolbar, and status bar are always visible. You have the option to hide the Information and deposit panes. User Roles and Privileges The roles assigned to a user determine what that user can access and the tasks that can be performed in Smart Client. Administrator Role The administrator role can only be assigned by FIS at the request of the organization. The administrator role does not give that user the subsequent SendPoint Merchant Smart Client User Manual 10/10 2-1 The Home Page General Information privileges of the other user roles. For full access, the user must be assigned all available user roles. In Smart Client, the administrator can do the following: Reset duplicate item history (if allowed by the financial organization) View and change own scanner information Mark items Reset passwords Role Privileges The Deposit Approval feature affects deposit tasks and deposit workflow for the user roles, but basic application tasks accessible from the Home page are minimally affected. Privileges associated with each user role are listed in the tables below as appropriate depending on whether Deposit Approval is enabled. For detailed information about how the Deposit Approval feature affects the deposit workflow, see the Deposit Process User Roles without Deposit Approval Feature The table below lists available user roles and associated privileges for organizations that do not use the Deposit Approval feature with Smart Client: Role Privileges Supervisor Register merchant and scanner Reset own password Mark items View own scanner information Reviewer View reports (all deposits and accounts on workstation) View closed deposits (all deposits and accounts on workstation) Find Items Reset own password Mark items View own scanner information 2-2 10/10 FIS General Information The Home Page Role Privileges Depositor Operator Create, capture, correct, balance, and finish deposits (own deposits only) View reports (own deposits only) View closed deposits (own deposits only) Reset own password Mark items Find items View own scanner information Finish user deposits that have operator role Create, capture, correct, and balance deposits (own deposits only) View list of closed deposits (own deposits only) Reset own password Mark items View own scanner information Note: Privileges granted to all roles (except the reviewer role) are limited to the deposit accounts assigned to that user. User Roles with Deposit Approval Feature The table below lists available user roles and associated privileges for organizations that use the Deposit Approval feature with Smart Client: Role Privileges Supervisor Register merchant and password Reset own password Mark items View own scanner information Reviewer SendPoint Merchant Smart Client User Manual View reports (all deposits and accounts on workstation) View closed deposits (all deposits and accounts on workstation) Find items Reset own password Mark items View own scanner information Update deposit approval status 10/10 2-3 The Home Page General Information Role Privileges Depositor Transmit and finish deposits (own deposits only) View reports (own deposits only) View closed deposits (own deposits only) Reset own password Mark items Find items View own scanner information Update deposit approval status Operator Create, capture, correct, and balance deposits View list of closed deposits (own deposits only) Submit deposits (own deposits only) Reset own password Mark items View own scanner information Update deposit approval status Note: Privileges granted to all roles (except the reviewer role) are limited to the deposit accounts assigned to that user. To perform functions of the depositor role, the user must also be assigned the operator role. Main Menu and Toolbar 2-4 Main Menu The main menu provides access to the following functions: Name Function File | Home Returns you to the Smart Client Home page. File | New Deposit Allows you to begin creating a new deposit. File | Exit Exits Smart Client. Tools | Mark Items Allows you to endorse a message stating that an item has been previously captured to a deposit. Tools | Reports Allows you to generate available reports. Tools | Find Items Allows you to search for captured items. Tools | Scanner Information Provides information about the registered scanner, such as name, brand, model, library, and current status. You also have the ability to reset the scanner if necessary. Tools | Register Allows you to register a new scanner. 10/10 FIS General Information The Home Page Name Function Tools | Reset Duplicate History Resets all duplicate history. Tools | Reset Password Resets your login password. Help | Contents Displays the online user guide. Help | About Displays Merchant Smart Client application information. Toolbar The toolbar provides quick access to the following features, which are also available using the main menu: Home New Deposit Mark Items Reports Find Items Information Pane This area displays branding information. You can hide the information pane by clicking the Hide Info Pane link. All Deposits Pane This area contains information for each deposit that has been created. This includes deposits that have been transmitted, are ready to be transmitted, or are currently active. You can use the Show field to apply the following filters to the deposit list: All Deposits—Displays all local deposits. SendPoint Merchant Smart Client User Manual 10/10 2-5 The Home Page General Information Approval Pending—When the Deposit Approval feature is enabled, displays deposits that need to be reviewed by an approver. Approval Rejected—When the Deposit Approval feature is enabled, displays deposits that have been rejected by the approver. Open Deposit—Displays created deposits that are not ready for transmission. Ready—Displays corrected and balanced deposits that are ready for transmission. Transmitted—Displays successfully transmitted deposits. Returning to an Open Deposit You can return to an open deposit by double-clicking the deposit or using the deposit’s Arrow icon. You are then taken to the task in which the deposit was left. You can capture and correct items as needed before balancing the deposit. For more information about the tasks in the deposit process, see the Deposit Process chapter in this manual. Modifying a deposit (such as adding or removing an item) after balancing but before transmitting causes the existing virtual credit to be deleted and the deposit to need re-balancing. A new virtual credit with accurate information is created when the deposit is re-balanced. If you are using virtual payee endorsements, you cannot modify deposit information. Additionally, you can use the X icon to delete a deposit. Note: If you apply a filter, the header changes to reflect the applied filter. Data fields will vary according to your settings. Find Deposits You can search for a single deposit or subset of deposits using the Find Deposits button. When you perform a search, the header changes to Find 2-6 10/10 FIS General Information The Home Page Deposits Results and lists the deposits that met your search criteria. Use the Show field to return the display to All Deposits. Finding Deposits To search deposits, do the following: 1. Click Find Deposits. The Find Deposits window appears. 2. To specify your search, do the following: If you want to search a date range, click the appropriate box and specify the range. In the Status field, specify whether you want to include open, transmitted, or all deposits in your search. Specify any remaining criteria, including the check item total, number of items, custom fields, and so on. Note: If your organization uses custom fields, those fields will appear in place of Additional Field1 and Additional Field2. Click Search. SendPoint Merchant Smart Client User Manual 10/10 2-7 The Home Page Deposit Details Pane General Information This area contains detailed information for the selected deposit and buttons to delete, submit, or open the selected deposit. You can hide the Deposit Details pane by clicking the Hide Details link in the All Deposits pane. Note: Data fields can vary according to your organization’s settings. Deposits Details contains the following fields: Account is the assigned deposit account number. Number of Items is the number of captured items in the deposit. Date is either the current date or the date the deposit was created. Control $ is the deposit total entered during deposit creation. Status Bar 2-8 Check Item $ is the combined amount of all the captured items in the deposit. Difference is the amount discrepancy between the deposit total and the captured item total. Deposit Ticket $ is the amount of the virtual deposit ticket. Tracking # is the deposit’s tracking number. Status represents the current state of the deposit. • Capture—Deposit is in the capture stage. • Correct—Deposit is in the correction stage. • Balance—Deposit is in the balance stage. • Ready—Deposit is balanced and ready to be transmitted. • Transmitted—Deposit has been transmitted. The status bar indicates the security, scanner, and connection status. 10/10 FIS General Information The Home Page Security Status The security status can be either secured or unsecured. A secured connection means all data received and transmitted is encrypted. An unsecured connection means that all data received and transmitted is not encrypted, which can pose a security risk. Scanner Status The scanner status can either be ready or unknown. A ready status means that the scanner is fully operational and ready to capture items in a deposit. An unknown status means a complication with the scanner has occurred. Items cannot be captured when the scanner status is unknown. Connection Status The connection status can either be online or offline. An online connection means that the server is responding and that Merchant Smart Client can transmit deposits and receive configuration updates. An offline connection occurs when the connection to the server could not be established during login but your credentials are the same as those authorized from the previous Merchant Smart Client session. You cannot submit deposits or reset your password in offline mode. SendPoint Merchant Smart Client User Manual 10/10 2-9 The Home Page 2-10 General Information 10/10 FIS Reports Introduction Merchant Smart Client offers the following reports: Deposit Detail Report All Deposits Detail Report Deposit Summary Report Deposit Image Report • Deposit Image Report (Front Only) • Deposit Image Report (1x3) Item Detail Data Report Export Data File by Layout Note: Export Data File by Layout is only available if your organization has established data layouts. Pending and Rejected Deposits Summary Report Note: The Pending and Rejected Deposits Summary Report is only available if your organization uses the Deposit Approval feature. Generating Reports You can generate reports by clicking the Reports icon in the toolbar. You then select the report you want and complete its associated criteria. Some reports have required, unique criteria and are described in the report descriptions below. For each report, you can specify a start date and end date. If you do not specify a date, the report information for the current day is displayed. When you have specified all the needed criteria for a report, click Generate Report to view it. SendPoint Merchant Smart Client User Manual 10/10 2-11 Reports General Information Report Toolbar The report toolbar allows you to perform the following functions: Deposit Detail Report 2-12 Function Description Flip Page Displays the next or previous page. Refresh Refreshes the active report page. Print Prints the report. Print Layout Displays a print preview of the report. Page Layout Allows you to adjust page options, such as size, margins, and so on. Export Allows you to output and save report data in CSV, PDF, or XLS format. Zoom In / Out Increases or decreases the display size of the report. Find next Allows you to search for text within the report. This report contains detailed information for a selected deposit during a specified date range. If deposit and date ranges are not specified, the current day’s deposits are displayed. You also have the option to include custom fields, if applicable. 10/10 FIS General Information Reports All Deposits Detail Report This report provides a list of all deposits. You can display an individual deposit at a time to view its details. You also have the option to include custom fields, if applicable. Deposit Summary Report This report provides a detailed summary of an individual deposit. You must specify an account number for this report. You also have the option to include custom fields, if applicable. Deposit Image Report This report provides a detailed summary of an individual deposit and includes front and back images in a 2x3 layout. The Front Only option displays only SendPoint Merchant Smart Client User Manual 10/10 2-13 Reports General Information front images. The 1x3 option displays only front images in a 1x3 layout, providing larger images per page. Item Detail Data Report 2-14 This report provides all available field data for captured items within the specified date range. You also have the option to include custom fields, if applicable. You can export the report by clicking Export Report. 10/10 FIS General Information Reports Export Data File by Layout This feature creates a comma-separated value (CSV) file based on a selected layout. This report is only available if export layouts have been defined for your organization. When exporting the report, you must designate a save location. Pending and Rejected Deposits Summary Report This report lists locally-generated deposits that have a status of pending or rejected. Rejected deposits are listed first. This report is only available if your organization uses the Deposit Approval feature. SendPoint Merchant Smart Client User Manual 10/10 2-15 Reports 2-16 General Information 10/10 FIS Mark Items Before You Begin This section provides step-by-step instructions to use your scanner driver to print message text on the front of physical items. This message alerts deposit handlers that these items have already been electronically processed and helps to prevent duplicate capture. All items that have been marked using Mark Items should be either temporarily stored or destroyed based on the instructions of the financial organization supplying Merchant Smart Client. Before completing these steps, ensure that your scanner driver is installed, connected, and turned on. Marking Items To mark items, do the following: 1. In the toolbar, click the Mark Items icon. 2. In the Mark Items window, edit the endorsement text, if necessary. 3. Insert the items into the scanner facing backwards. 4. Click Mark Items. 5. When the items have been marked, click Finish. SendPoint Merchant Smart Client User Manual 10/10 2-17 Mark Items 2-18 General Information 10/10 FIS Find Items Before You Begin You can search deposit history for items according to criteria you specify. The results appear on the Find Items Results page. On the Find Items Results page, you can select an individual item to display its front and back images (in grayscale or black and white) and associated deposit information. You can also print the selected item’s information and the search results. SendPoint Merchant Smart Client User Manual 10/10 2-19 Find Items Finding Items General Information To find items, do the following: 1. In the toolbar, click the Find Items icon. The Find Items window appears. 2. In the Find Items window, do the following: If you want to search a date range, click the appropriate box and specify the range. In the Item Type field, specify whether you want to include items, deposit tickets, or both (all) in your search. Specify any remaining criteria, including the serial, account, transit routing, sequence number, custom fields, or the user that captured the item(s). Note: If your organization uses item-level custom fields, those fields will appear in place of Additional Field1 and Additional Field2. Click Search. The Find Items Results page appears. 3. To print an individual item’s information, do the following: 2-20 On the Find Items Results page, select the item you want from the items list. Click Print Selected Item. In the Print Item window, click Print. 10/10 FIS The Deposit Process 10/10 FIS Introduction The Deposit Process The deposit process includes the following tasks: Creating a new deposit Capturing items Correcting items Balancing the deposit Finishing the deposit The Deposit Wizard Capturing, correcting, and balancing occur within a Deposit Wizard. At any point during the wizard you can capture items by clicking Capture. You then may need to correct the additional items and re-balance the deposit. You can click the Home icon during the Deposit Wizard to exit the deposit. The deposit remains in its current status. You can then return to the deposit at a later time to complete any remaining tasks. Modifying Deposit Information During the Deposit Wizard, you can modify deposit information contained in the Deposit Details portion of the page by clicking Modify. Fields may vary by organization. Note: Existing virtual deposit tickets will not reflect a deposit account change; you will need to delete the existing virtual deposit ticket and create a new one. If virtual payee endorsement is allowed, you cannot change the deposit account for an active deposit. SendPoint Merchant Smart Client User Manual 10/10 3-1 Introduction Deposit Approval The Deposit Process The Deposit Approval feature changes the deposit workflow and the behavior of user roles. Before enabling the feature, ensure all roles are assigned as appropriate. User Role Impact Associated privileges for user roles vary depending on whether the organization providing Smart Client uses the Deposit Approval feature. Deposit Workflow Impact The process to finish the deposit (Task 5) is affected by whether your organization uses the Deposit Approval feature. Finish Deposit without Deposit Approval Feature If your organization does not use the Deposit Approval feature, users assigned the depositor role can finish the deposit and transmit it to the financial organization. Approvals are not required to finish a deposit. Finish Deposit with Deposit Approval Feature If your organization uses the Deposit Approval feature, users assigned the operator roles submit the deposit for approval. When you submit a deposit in Smart Client, the deposit appears on the Deposits page of Web Client, in the My Open Deposits section, with a status of pending until a Web Client approver approves or rejects the deposit. Pending deposits cannot be edited. Note: If you have the operator and depositor user roles, the deposit does not need approval, and you can finish and transmit the deposit. If the Web Client approver rejects the deposit, the deposit returns to Smart Client with a rejected status and may include approver comments. The Smart Client user that submitted the deposit must then open the deposit, read the approver’s comments, and make the necessary corrections by repeating tasks 2 through 5 as necessary until the deposit is approved and transmitted. You can include comments when submitting the deposit for reapproval. Task Summary 3-2 Following is a summary of the tasks involved in the deposit process. See the following sections for step-by-step instructions for each task. 10/10 FIS The Deposit Process Introduction Note: This represents the deposit process from start to finish. Depending on the status of the deposit and your workflow, you can repeat tasks two through four as needed. Task 1: Create a New Deposit Task 2: Capture Items Task 3: Correct Items Select a deposit account. Enter deposit information. Load Items into the scanner. Scan the items. Review each exception item. Repair and update the item or exclude it from the deposit. Note: If no exception items exist, this task is skipped. Task 4: Balance the Deposit Task 5: Finish the Deposit SendPoint Merchant Smart Client User Manual 10/10 Balance the deposit. Note: If the deposit is already balanced, this task is skipped. Submit the deposit for approval (if applicable). Finish and transmit the deposit. 3-3 Introduction 3-4 The Deposit Process 10/10 FIS Creating a Deposit Before You Begin This section provides step-by-step instructions for creating a new deposit. Your scanner driver must be installed, connected, and turned on to create a deposit. Your financial organization establishes the deposit information needed to create a new deposit. Required fields are displayed in yellow. Optional fields are displayed in white. Creating a New Deposit To create a new deposit, do the following: 1. On the Home page, click the New Deposit button. The Create New Deposit window appears: Note: This is a sample image. Fields can vary according to your organization’s custom fields. 2. Select a deposit account or enter the account number to filter the list. 3. In the Deposit Total field, enter the expected total for the deposit. 4. If your organization requires additional fields, complete the remaining fields. 5. Click Capture Items. SendPoint Merchant Smart Client User Manual 10/10 3-5 Creating a Deposit 3-6 The Deposit Process 10/10 FIS Capturing Items Before You Begin This section provides step-by-step instructions for capturing items. Ensure that your scanner is installed, connected, and turned on. The Capture Page The Capture page is the first page of the Deposit Wizard and is split into the following areas: Capturing Items Image display—Shows the front and back image of a selected item. You can rotate the image and adjust its display size. Item information—Contains detailed information about each captured item. Deposit Details—Contains detailed information about the current deposit. To capture items, do the following: 1. Load items into the scanner. The scanner begins scanning items automatically. 2. If necessary, click Stop Scanner to stop capturing items. The button then changes to Start Scanner to resume capturing items. 3. When all items have been captured, click Next. SendPoint Merchant Smart Client User Manual 10/10 3-7 Capturing Items 3-8 The Deposit Process 10/10 FIS Correcting Items Before You Begin This section provides step-by-step instructions for correcting exception items. You can replace an item’s image, correct the item’s information, or remove the item from the deposit. Performing a corrective action automatically advances you to the next exception item. When the last item is corrected, the deposit can be balanced. Exception Items Exception items can be any of the following: Items with image quality errors Items missing an assigned amount Items considered as a reject Duplicate captured items Items requiring additional data entry The table below describes the circumstances that qualify an item as an exception: Analysis Field Type Description Image Quality Exceptions Image quality and usability errors are associated with the item, such as a payor name or memo not being usable. Amount Recognition Failed Amount recognition for the item failed. Reject Item Exception An item is labeled as a reject, such as: The item is foreign (for example, an item drawn in Canada or Mexico). The scanner is unable to successfully read the MICR. The item routing number is not a valid U.S. number. Duplicate Item If a duplicate item is captured, you are presented the current and original images for verification. Item Data Entry Item data is incomplete. Fields highlighted in yellow are required. SendPoint Merchant Smart Client User Manual 10/10 3-9 Correcting Items The Deposit Process The Correction Page The Correction page is split into the following areas: Repairing an Item Image display—Shows the front and back image of a selected item and allows you to rotate the image and adjust its display size. You can also toggle between bitonal (black and white) and grayscale image displays. Analysis—Lists the reasons that caused the item to fail. Correction panel—Allows you to replace an item’s image, correct the item’s information, or remove the item. Deposit Details—Contains detail information about the current deposit. To repair an exception item, do the following: 1. In the correction panel, update any field information that failed during capture. 2. Click Accept. 3. Click OK. 3-10 10/10 FIS The Deposit Process Removing an Item Correcting Items To remove an exception item, do the following: 1. Click Remove. 2. Click Yes. Note: Any item that is removed can be recaptured by returning to the Capture page of the Deposit Wizard. If the recaptured item continues to fail and you cannot accept it, the item must be deposited by traditional means (such as paper deposit). Replacing an Image To replace an image, do the following: Note: Replacing an image does not delete or update the item’s details. 1. Click Replace Image. 2. On the confirmation page, click OK. 3. Load the item into the scanner. The item scans automatically. SendPoint Merchant Smart Client User Manual 10/10 3-11 Correcting Items 3-12 The Deposit Process 10/10 FIS Balancing the Deposit Before You Begin This section provides step-by-step instructions for balancing a deposit. Ensure that your scanner is installed, connected, and turned on. The Balance Page The Balance page is split into the following areas: Balancing a Deposit Image display—Shows the front image of a selected item. You can rotate the image and adjust its display size, as well as adjust the selected item’s amount or remove it from the deposit. Item information—Contains detailed information about each captured item, including the number and total amount of credits (deposit tickets) and debits (checks). Deposit Details—Contains detailed information about the current deposit. Deposits are unbalanced when the deposit control total does not equal the deposit items total. You can balance a deposit by doing the following: Updating the deposit control total to match the deposit items total. Editing the amount of individual items to resolve the discrepancy between the deposit control and deposit items totals. Removing an item to resolve the discrepancy between the deposit control and deposit items totals. SendPoint Merchant Smart Client User Manual 10/10 3-13 Balancing the Deposit The Deposit Process When the deposit is balanced, you are prompted to submit or transmit the deposit. Update the Deposit Control Total To update the deposit control total, do the following: 1. Click the Balance button. 2. In the Balance Adjustment window, update the deposit control total to match the deposit items total. 3. Click Generate Deposit Ticket. Edit Individual Items To change the amount of individual items in a deposit, do the following: 1. Select the item in the items list. 2. Change the item amount in the Amount field below the item image or within the Amount column for the selected item. 3-14 10/10 FIS The Deposit Process Balancing the Deposit Remove Individual Items To remove individual items from a deposit, do the following: 1. Select the item in the items list. 2. Click Remove. 3. Click Yes to confirm. SendPoint Merchant Smart Client User Manual 10/10 3-15 Balancing the Deposit 3-16 The Deposit Process 10/10 FIS Finishing the Deposit Before You Begin This section provides step-by-step instructions for finishing a deposit. Ensure that your scanner is installed, connected, and turned on. Depending on your assigned role and whether the organization uses the Deposit Approval feature, you have the option to submit the deposit for approval or to transmit and finish the deposit. For more information, see Deposit Approval. If you transmit the deposit using Smart Client, the transmission summary appears and you have the option to view the Deposit Detail report. Finishing the Deposit To finish the deposit, do the following: 1. In the Deposit Ready window, click Submit Now to submit the deposit for approval or Transmit Now to finish the deposit, as appropriate. The specific button that appears is determined by your assigned user roles. 2. Do one of the following: If you submitted the deposit for approval and it was rejected, read the approver’s comments and repeat the deposit process as needed until the deposit is approved. SendPoint Merchant Smart Client User Manual 10/10 3-17 Finishing the Deposit The Deposit Process 3-18 If you transmitted the deposit, you can close the Transmission Summary window. To view the Deposit Detail report, click View Deposit Receipt. 10/10 FIS