1
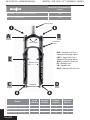
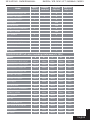
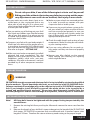
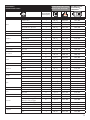
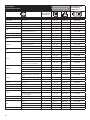
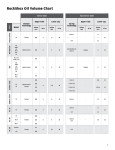
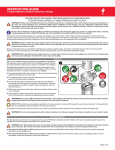
Owners Manual COIL SPING SERIES M2025 M3000AL XCU SR SUNTOUR - OWNERS MANUAL RAIDON / XCR /XCM / XCT / M3000AL / M2025 TABLE OF CONTENTS Owners Manuals INTENDED USE ................................................................................ 1 IMPORTANT SAFETY INFORMATION .............................................. 4 BEFORE EACH RIDE! ........................................................................ 5 FORK INSTALLATION ....................................................................... 5 TIRE CLEARANCE ! ........................................................................... 6 REMOTE LOCK LEVER INSTALLATION RAIDON RL / XCR RL SERIES ............................................................... 8 LOCK-OUT SYSTEMS ......................................................................10 REBOUND DAMPING ADJUST .......................................................11 Qloc HUB REQUIREMENTS ............................................................11 QLOCK SYSTEM 15mm ..................................................................12 FORK MAINTENANCE ....................................................................13 LIMITED WARRANTY ......................................................................14 INTENDED USE Category Freeride All Mountain XC ATB RAIDON XCR / XCM XCT / M Make sure to select the correct fork according to your frames build in height and personal riding style. Please note that the AXON, EPICON and RAIDONair series forks were not designed for jumping, dropping, aggressive downhill riding, freeriding or urban style riding. Not following these instructions could result into a failure of the product, accident and even death of the rider. Not following these instructions will void the fork‘s warranty! 1 English SR SUNTOUR - OWNERS MANUAL RAIDON / XCR /XCM / XCT / M3000AL / M2025 MAX ROTOR DIAMETER [ mm ] RAIDON / XCR / XCM V2 SERIES 185 XCT V2 / M SERIES 160 Steerer Tube 1 2 B A Stanchion Tubes Fork Crown E RLD = Remote Lock Out + Rebound Damping Adjust LOD = Speed Lock Out + Rebound Damping Adjust HLO = Hydraulic Lock Out RL = Remote Lock LO = Speed Lock MLO = Mechanical Lock Out Bottom Case C D Dropouts 4 3 Model Speed Lock Out RAIDON RLD / RLD 15QLC 2 RAIDON LOD / LOD 15QLC RAIDON RLD 15QLC 29“ English Remote Lock Out Preload Adjuster Rebound Adjuster 1 2 3 2 3 2 3 1 1 SR SUNTOUR - OWNERS MANUAL Model RAIDON LOD 15QLC 29“ Speed Lock Out Remote Lock Out Preload Adjuster Rebound Adjuster 2 3 1 1 XCR RL / RL 15QLC XCR LO / LO 15QLC RAIDON / XCR /XCM / XCT / M3000AL / M2025 2 1 2 XCR 15QLC 1+2 XCR & XCR 24“ 1+2 XCM V2 HLO / V2 PM HLO 1 2 1+2 XCM V2 / V2 PM XCT V2 MLO 1 2 1+2 XCT V2 XCT V2 JR MLO 24“ 1 2 XCT JR 24“ & XCT JR 20“ 1 1+2 1+2 M2025 MLO 1 M- Series TORQUE VALUES (all values including a tolerance of ± 10%) MODEL A B C D E RAIDON RLD / RLD 15QLC 10Nm 10Nm 6Nm 10Nm 7Nm RAIDON LOD / LOD 15QLC 10Nm 10Nm 6Nm 10Nm 7Nm RAIDON RLD 15QLC 29“ 10Nm 10Nm 6Nm 10Nm 7Nm RAIDON LOD 15QLC 29“ 10Nm 10Nm 6Nm 10Nm 7Nm XCR RL / RL 15QLC 10Nm 4Nm 10Nm 10Nm 7Nm XCR LO / LO 15QLC 10Nm 4Nm 10Nm 10Nm 7Nm XCR 15QLC 4Nm 4Nm 10Nm 10Nm 7Nm XCR & XCR 24“ 4Nm 4Nm 10Nm 10Nm 7Nm XCM V2 HLO / V2 PM HLO 10Nm 4Nm 10Nm 10Nm 7Nm XCM V2 / V2 PM 4Nm 4Nm 10Nm 10Nm 7Nm XCT V2 MLO 4Nm 4Nm 10Nm 10Nm 7Nm XCT V2 4Nm 4Nm 10Nm 10Nm 7Nm XCT V2 JR MLO 24“ 4Nm 4Nm 10Nm 10Nm 7Nm XCT JR 24“ & XCT JR 20“ 4Nm 4Nm 10Nm 10Nm 7Nm M2025 MLO 4Nm 4Nm 10Nm 10Nm 7Nm M- Series 4Nm 4Nm 10Nm 10Nm 7Nm 3 English SR SUNTOUR - OWNERS MANUAL RAIDON / XCR /XCM / XCT / M3000AL / M2025 IMPORTANT SAFETY INFORMATION WARNING ! Failure to comply with the given warnings and instructions may cause damage to the product, injuries or even death to the rider. Ź Be sure to read this manual carefully before using your suspension fork. Inappropriate usage of your suspension fork may cause damage to the product, serious injuries or even death to the rider. Ź Suspension forks contain fluids and gases under extreme pressure, warnings included in this manual must be followed in order to reduce the possibility of injuries or possible death. Never try to open any SR SUNTOUR cartridge, as stated above they contain fluids and gases under high pressure. Opening any SR SUNTOUR cartrigde implies the risk of getting seriously injured. Ź Only use genuine SR SUNTOUR parts. The use of aftermarket replacement and spare parts voids the warranty of your fork and might cause failure to the fork. This could result into an accident, injury or even death. Ź SR Suntour suspension forks are designed for the usage by a single rider. i t n o Ź This instruction sheet contains important information about the correct installation, service and maintenance of your suspension fork. Nevertheless please be informed that special knowledge and tools are essential to install, service and maintain SR SUNTOUR forks. Common mechanical knowledge may not be sufficient to repair, service or maintain a suspension fork. Therefore we strongly recommend getting your fork installed, serviced and/or maintained by a trained and qualified bicycle mechanic. Improper installation, service or maintenance can result in failure of the product, accident, injury or even death. 4 C u a Ź Always be equipped with proper safety gear. This includes a properly fitted and fastened helmet. According to your riding style you should use additional safety protection. Make sure your equipment is in flawless condition. Ź Make sure to select the correct fork according to your frame’s built in height and your personal riding style. Installing a fork which does not match the geometry of your frame could result into a failure of the fork itself and will void the forks warranty. Installing a suspension fork will change the geometry and handling of your bike. Learn how to ride and train your skills. Know your limits and never ride beyond those. Ź When using a bike carrier please always fully release the quick release fastener. Not properly unfastened quick releases may result into bending, breaking or other structural damage while removing your bike of the bike carrier. If your bike fell off the carrier please do not ride it, until it has been inspected by a qualified bike mechanic. When using a bike carrier which just secures the bike by clamping the forks dropouts, make sure to fasten your rear wheel as well. A not accurate fastened rear wheel could allow the bike to jiggle which might result into a breakage of the dropouts. Ź Please note that SR SUNTOUR suspension forks do not come with the proper reflectors for on road riding. If you intend to ride on public roads or bicycle lanes your dealer should mount the required reflectors to your fork. Ź Study all other owner’s manuals provided with your bike and make yourself familiar with the components mounted to your bike. English SR SUNTOUR - OWNERS MANUAL RAIDON / XCR /XCM / XCT / M3000AL / M2025 BEFORE EACH RIDE! Do not ride your bike, if one of the following test criteria can’t be passed! Riding your bike without eliminating any defect or carrying out the necessary adjustments can result into an accident, fatal injury or even death. ŹDo you notice any cracks, dents, bent or tarnished parts at your suspension fork or any other part of your bicycle? If so, please consult a trained and qualified bicycle mechanic to check your fork or bike. ŹCan you notice any oil leaking out your fork? Also check out hidden areas like the bottom side of your fork crown. If so, please consult a trained and qualified bicycle mechanic to check your fork or bike. ŹCompress your fork with your body weight. If it feels too soft, relating to the proper pressure to achieve an accurate SAG, inflate it until you have reached the required value. Please also refer to chapter “ SETTING SAG” ŹMake sure your brakes are properly installed/ adjusted and work appropriate. This also applies to every other part of your bike like handlebars, pedals, crank arms, seat post, saddle etc. Also refer to the owner‘s manuals provided by all other component manufacturers. ŹMake sure your wheels are centered perfectly in order to avoid any contact with your suspension fork or brake system. ŹIf you are using a quick release system to fasten your wheel set, make sure that all levers and nuts are adjusted properly. In case you are using a through axle system, make sure that all fixing bolts are tightened with the appropriate torque values. ŹCheck the cable length and routing of your components. Make sure they do not interfere your steering actions. ŹIf you are using reflectors for on-road cycling, make sure they are clean and properly installed. ŹBounce your bike slightly on the ground while looking and listening for anything which might be loose. FORK INSTALLATION WARNING! SR SUNTOUR strongly recommends that your fork is being installed by a trained and qualified bicycle mechanic. Special knowledge and tools are essential to install SR SUNTOUR forks. Common mechanical knowledge may not be sufficient to install a SR SUNTOUR suspension fork. If you intend to install the fork by yourself, the whole job has to be inspected by a trained and qualified bicycle mechanic. Please note, that improperly installed forks are extremely dangerous and can cause damage to the product, serious injuries or even death. INSTALLATION INSTRUCTIONS Note! All fixing bolts have to be tightened with the proper fasting torque stated by the manufacturers 1. Remove the existing fork from your bicycle. Afterwards remove the crown race from the fork. Measure the length of your old fork’s steerer tube against the length of the SR SUNTOUR fork steerer. SR SUNTOUR suspension forks are delivered with a standard steerer tube length of 255mm. Therefore the steerer tube may need cutting to the proper length. 2. English 5 SR SUNTOUR - OWNERS MANUAL RAIDON / XCR /XCM / XCT / M3000AL / M2025 FORK INSTALLATION 3. In order to define the proper length of your steerer tube you can apply the following formula: Frame‘s head tube+Head sets stack height+Spacers+Stem‘s clamp height-3mm clearance Warning! If your SR SUNTOUR fork does come with a threadless steerer tube, do not add a thread to it. SR SUNTOUR’S fork steeres are a one time press fit which can not be removed. Do not try to replace the steerer tube by a steerer tube with a threaded steerer. This will void the warranty of your fork and result into a failure of the product or could cause fatal injuries or even death to the rider. 4. Install the headset crown race (30mm for 1 1/8”) firmly against the top of your fork crown. Install the fork unit (headset,spacers,stem) back on the bike. Adjust the headset until you do not feel play anymore. Also refer to the headset’s manufacturer installation instructions. Install the brakes according to the manufacturer’s instructions. Make sure to adjust the brake pads properly. If you use a disc brake, only mount your brake to the original disc brake mounting holes. Only use cantilever brakes which are intended to be used with a hangerless brace. Check the installation instructions of your brake manufacturer and follow them. Make sure you choose the correct length of the brake cable in order to not interfere the performance of the fork. Re-install the wheel back on to your bike. If you are using a quick release system to fasten your wheel set, make sure that all fasteners and nuts are adjusted properly (four or more threads have to be engaged in the nut when it is closed) In case your fork comes with a through axle system, make sure that all fixing bolts are tightened with the appropriate torque values. Please also refer to the Qloc section of this manual. 5. 6. TIRE CLEARANCE ! Your SR SUNTOUR suspension fork is designed to be used with 26” tires. Each tire has a different outer diameter (tire width and height).Therefore the clearance between your tire and fork needs to be checked, to make sure your tire does not get in contact with any part of your fork. Keep in mind that the narrowest part of your fork is located at the brake bosses. If you want to remove your wheel, you might have to deflate your tire, in order to be able to pass it through your brake bosses. Tire Clearance Test: Note! Using a tire which exceeds the maximum tire size suitable to your fork is very dangerous and could cause an accident, fatal injuries or even death to the rider 1. 2. 3. 4. Release all air of your fork Compress your fork completely Measure the distance between the top of your tire and the bottom of the crown. Make sure the gap is not less than 10mm! Exceeding maximum tires size will cause the tire to jam against the bottom of the crown when the fork is fully compressed. Inflate the fork again Keep in mind that if you are using a mudguard the clearance is limited! Repeat the “Tire Clearance Test” again to make sure the gap is big enough. Every time you are going to change your tires you have to repeat the test again! 6 English SR SUNTOUR - OWNERS MANUAL RAIDON / XCR /XCM / XCT / M3000AL / M2025 REMOTE LOCK LEVER INSTALLATION Mount the „Remote-Lock-Lever“ on your handlebar using a 3mm Allen key. Afterwards you can mount your brake and shifting lever back on again. RAIDON RLD SERIES 3mm 1.5 Nm Take off the plastic cover cap using a 2.5mm Allen key. 2.5mm Unscrew the cable fixing bolt using a 2mm Allen key. 2.0mm Thread the cable through the outer casing stopper and through the cover unit hole. Tension the cable slightly and tighten it using a 2mm Allen key. 2mm 0.5 Nm Cut the cable to a proper length to make sure it will still fit into the sliding carriage. CUT 7 7mm English SR SUNTOUR - OWNERS MANUAL RAIDON / XCR /XCM / XCT / M3000AL / M2025 This pictures shows the remote lock unit in the „OPEN“ position. The cable is cut perfectly, still fits into the sliding carriage. Reassemble the plastic cover cap using a 2.5mm Allen key. Tighten it slightly. 2.5mm 0.5 Nm TURN If the fork does not lock, the tension of the cable is probably too low. In this case you have to increase the tension of the cable by turning the adjustment barrel counterclockwise. If the cable‘s tension is too high and the fork does not unlock, you have to turn the adjust barrel clockwise. REMOTE LOCK LEVER INSTALLATION Mount the „Remote-Lock-Lever“ on your handlebar using a 3mm Allen key. Afterwards you can mount your brake and shifting lever back on again. RAIDON RL / XCR RL SERIES 3mm 1.5 Nm Take off the plastic cover TAKE OFF 8 English Adjustment Barrel SR SUNTOUR - OWNERS MANUAL RAIDON / XCR /XCM / XCT / M3000AL / M2025 Unscrew the cable fixing bolt using a 1.5mm Allen key 1.5mm Thread the cable through the outer casing stopper and through the cover unit hole. Tension the cable slightly and tighten it using a 1.5mm Allen key. 1.5mm 0.5 Nm Reinstall the plastic cover cap again.. CLIP ON Cut the cable to a proper length. Approximately 12mm is recommended. CUT 12mm Install a cable end cap at the end of the cut cable using a needle nose pliers. 9 English SR SUNTOUR - OWNERS MANUAL TURN If the fork does not lock, the tension of the cable is probably too low. In this case you have to increase the tension of the cable by turning the adjustment barrel counterclockwise. If the cable‘s tension is too high and the fork does not unlock, you have to turn the adjust barrel clockwise. RAIDON / XCR /XCM / XCT / M3000AL / M2025 Adjustment Barrel Adjustment Barrel LOCK-OUT SYSTEMS The „Lock-Out“ function of SR SUNTOUR forks is intended to reduce teetering during rides out of saddle or uphill riding. The forks will not be locked 100%. A few millimeters of travel will remain, according to our „Anti-Blow-Off-System“. This system will protect you in case you have forgotten to unlock the fork while riding in rough terrain. Nevertheless, you should never set your fork to the „Lock-Out-Mode“ while riding in rough terrain, going down hill or jumping. This implies the risk that the fork will get damaged when it‘s being compressed under high load. This could also result into an accident, injuries or even death of the rider. Never Lock your fork while it‘s being compressed. This is a missuse of your fork and implies the risk that it‘s getting damaged. Moreover this could result into an accident, injuries or even death. RAIDON RLD / RAIDON RL SERIES XCR RL SERIES In order to lock your fork you have to push the „Remote-Lock-Lever“ towards your handlebar. For unlocking you have to press the blue release button. RAIDON LO / LOD SERIES XCR LO SERIES XCM V2 HLO SERIES In order to unlock your fork you have to turn the „Speed Lock Out“ knob 90° counter-clockwise. 10 English 90° SR SUNTOUR - OWNERS MANUAL RAIDON / XCR /XCM / XCT / M3000AL / M2025 XCT V2 MLO SERIES M2025 MLO SERIES In order to lock your fork you have to turn the lock out lever clockwise. Locking or unlocking your fork while riding is not posssible. REBOUND DAMPING ADJUST The rebound function of SR SUNTOUR hydraulic suspension forks allows you to tune your fork according to your personal preferences and the terrain you are riding on. This function enables you to control the speed of your fork‘s rebound after it‘s being compressed. If you are going to ride on a terrain with a lot of small and fast bumps, we recommend to increase your forks rebound speed. Otherwise it implies the risk that your front wheel loses its contact to the ground. If you are going to ride on a terrain with a lot of big and slow bumps, we recommend to decrease your forks rebound speed. RAIDON RLD SERIES RAIDON LOD SERIES TURN In order to increase the rebound speed of your fork you have to turn the adjuster knob counter clock-wise. To decrease the speed you have to turn it clockwise. Adjuster Knob Qloc hub requirements According to function of our Qloc system there are some requirements hub‘s have to fullfil to make this system work smoothly. Please find the explanation down below: Non-Recommend Shape Limited Function Edges within the hub can cause the axle to get stuck Recommend Shape Full Function No Edges English 11 SR SUNTOUR - OWNERS MANUAL RAIDON / XCR /XCM / XCT / M3000AL / M2025 QLOCK SYSTEM 15mm ALL RAIDON 15QLC MODELS ALL XCR 15QLC MODELS 2. ADJUST 1. SLIDE IN Adjust until finding the proper tightening torque for closing the QR lever. CLICK! SS P RE SS P RE 4. PULL OUT SS P RE 3. PRESS + PUSH PRE EN 2. OPEN 1. CLOSED English 4. CLOSED CLOSE 3. CLOSE 12 SS OP SR SUNTOUR - OWNERS MANUAL RAIDON / XCR /XCM / XCT / M3000AL / M2025 FORK MAINTENANCE SR SUNTOUR forks are designed to be nearly maintenance free. However, as long as moving parts are exposed to moisture and contamination, the performance of your fork might be reduced after several rides. To maintain a high performance, safety and a long life of your fork, a periodic maintenance is required. Please keep in mind that a fork which has not been serviced in accordance with the maintenance instructions will loose its warranty! Never use a pressure washer or any water under pressure to clean your fork as water may enter the fork at the dust seal level. We recommend that your fork is being serviced more fequently as indicated below if you ride in extreme weather (winter time) and terrain conditions. Any case you may feel that your forks performance has changed or handles differently immediately call on your local dealer to inspect your fork. FORK MAINTENANCE Maintenance Schedule after each ride every 25h every 50h every 100h clean stanchion tubes and dust seals inspect upper tubes for scratches check main fixing bolts for proper torque (Nm) check air pressure oil dust seals with teflon oil (e.g. Brunox Fork Deo) service 1 (at the dealer) service 2 (at the dealer) SERVICE 1: Checking fork‘s functions / cleaning and greasing bushings / lubricate remote lock cable and housing / checking torque values / checking air pressure / checking fork for any scratches, dents, cracks, bent or tarnished parts and stress marks. SERVICE 2: Service 1 + disassembling / cleaning whole fork / lubricating dust seals and oil wipers / greasing remote lock and travel adjust top caps / sealing air valve top caps by greasing it / checking for any air leakings / checking torque values / tuning according to rider‘s personal preferences. English 13 SR SUNTOUR - OWNERS MANUAL RAIDON / XCR /XCM / XCT / M3000AL / M2025 LIMITED WARRANTY SR SUNTOUR warrants its suspension forks to be free from defects in material and workmanship under normal use for a period of two years from the date of original purchase. This warranty is made by SR SUNTOUR Inc. with only the original purchaser and is not transferable to any third party. Lodging a claim under this warranty must be made through the dealer where the bicycle or SR SUNTOUR suspension fork was purchased. To prove the original purchase the original retail invoice has to be provided. LOCAL LAW: This warranty gives you specific legal rights. According to the state (USA) or province (Canada) or every other country you are living in, you may have other rights than explained within these warranty regulations. These regulations shall be insofar adapted to the local law to be consistent with such law. LIMITATION OF WARRANTY This limited warranty does not apply to any defect of the suspension fork caused by: improper installation, disassembling and re-assembling, intentional breakage, alterations or modification to the fork, any unreasonable use or abuse of the product or any use for which this product was not intended for, accidents, crashes, improper maintenance, repairs improperly performed. The obligation of this “Limited Warranty” is restricted to repairs and replacements of the suspension fork or any parts of it in which there is a defect in materials or workman-ship within a period of two years. SR SUNTOUR makes no express or implied warranties of fitness or merchatability of any kind, except as set forth above. Under no circumstances will SR SUNTOUR be liable for incidental or consequential damages. Damages which are caused by the use of other manufacturer‘s replaceements parts or damages which are caused by the use of parts that are not compatible or suitable to SR SUNTOUR suspension forks are not covered by this warranty. This warranty does not apply to normal wear and tear. WEAR AND TEAR PARTS: ʇDust Seals ʇO-rings ʇRubber Moving Parts ʇStanchion Tubes Please note that there is a limited warranty of 1 year on all SR SUNTOUR cartridges! Please note that there is a limited warranty on sleeves and glide rings of 6 month! 14 English www.srsuntour-cycling.com www.srsuntour-tuning-base.com August 2009 SR SUNTOUR HEADQUATER SR SUNTOUR INC. #7 Hsing Yeh Rd Fu Hsing Industrial Zone Chang Hua Twaiwan, R.O.C. Tel.: +886 4 769115 Fax: +886 4 7694028 email: [email protected] SR SUNTOUR EUROPE SR SUNTOUR USA SR SUNTOUR EUROPE GMB H Am Marschallfeld 6a 83626 Valley Germany Tel.: +49 8024 473 99 0 Fax: +49 8024 4730984 email: [email protected] SR SUNTOUR USA 503 Columbia Street, Vancouver, WA 98660 USA Tel.: +1 (360) 737 6450 Fay: +1 (360) 60 737 6452 email: [email protected] SPECIALIZED BICYCLE OWNER’S MANUAL APPENDIX A SUPPLEMENT 2013 RIDER/BIKE WEIGHT LIMITS AND TERRAIN CONDITIONS 2013 APPENDIX A SUPPLEMENT INTRODUCTION This Appendix A manual supplement is designed as an annual addition to the Appendix A section found in the Specialized Bicycle Owner’s Manual. This appendix is designed to help the rider differentiate between frame structural weight limits and braking distance weight limits. Each bike model is designed and tested to support a structural weight limit, which includes a cargo weight limit. As the weight of the rider approaches the structural weight limit of the bike, the allowable cargo weight might be reduced. For example, a bike may have a 55lb cargo weight limit, but if the weight of the rider is too close to the bike's structural weight limit, the rider may only be allowed to carry a smaller amount of cargo or no cargo at all. See following page for model-specific example and graphs. STRUCTURAL WEIGHT LIMIT CARGO WEIGHT RIDER WEIGHT 0 25 50 75 100 125 150 175 200 225 250 275 300 Additionally, CEN (European Committee for Standardization) has braking distance weight limits, which require that the combined weight of the rider and cargo can be stopped within a specified distance. Exceeding the max weight per CEN braking standards does not mean that the bike will not stop, but that it might not stop within the distance specified by CEN. The following information contains structural weight limits for frames, as well as recommended weight limits based on CEN standards for safe stopping distances. This information will also help determine if the rider and cargo weights are within the weight limits outlined in the Bike Model / Rider Weight Table (pages 5-6). UNDERSTANDING WEIGHT LIMITS FRAME STRUCTURAL WEIGHT LIMITS Structural weight limits for each bike are determined by Specialized Bicycles through extensive lab testing, and are listed in the Bike Model / Rider Weight Table. STRUCTURAL WEIGHT LIMIT: The maximum weight (rider and cargo) a bike can physically support. This limit is different from the MAX WEIGHT PER CEN BRAKING STANDARDS (see below). RIDER WEIGHT: The weight of the rider in riding gear (e.g., jacket, helmet cam, hydration pack, helmet, etc.). CARGO WEIGHT: The weight of any additional accessories (e.g., panniers, rear racks, saddle bags, handlebar bags, baskets, etc.) not accounted for in Rider Weight. CARGO WEIGHT LIMIT: The maximum cargo weight a bike has been tested to support structurally. MAX WEIGHT PER CEN BRAKING STANDARDS Recommended Max Weights relate to stopping distances and are not structural weight limits for the bikes. TOTAL WEIGHT: The sum of Rider Weight and Cargo Weight. RECOMMENDED MAX WEIGHT: Each bike model is tested to determine the maximum amount of weight (combined weight of Rider and Cargo) that can be applied to a bike and the capability to stop the bike within a prescribed distance. 1 DETERMINING STRUCTURAL AND BRAKING WEIGHT LIMITS 1. Find your bike in the Bike Model / Rider Weight Table. 2. Lookup the cargo weight limit and the max weight per CEN braking standards of the bike model. 3. Determine the rider weight, which includes all riding gear. 4. Determine the cargo weight, which includes the weight of any additional accessories. 5. .Substract the rider weight from the recommended max weight. The result is the amount the rider is allowed for cargo weight, up to the cargo weight limit prescribed for the bike model. EXAMPLE: HARDROCK PRO (Max Weight Per CEN Braking Standards = 300lb / 136kg. Cargo Weight Limit = 55lb / 25kg) RIDE AT STRUCTURAL WEIGHT LIMIT CARGO WEIGHT RIDER WEIGHT 0 OWN RISK 25 50 75 100 125 150 175 210 200 225 250 275 300 Rider (210lb) + cargo (65lb) = 275lb Total too heavy. Cargo weight exceeds cargo weight limit and has to be reduced. STRUCTURAL WEIGHT LIMIT CARGO WEIGHT RIDER WEIGHT 0 25 50 75 100 125 Rider (245lb) + cargo (55lb) = 300lb Total weight ok 150 175 200 225 250 STRUCTURAL WEIGHT LIMIT 275 300 CARGO WEIGHT RIDER WEIGHT 0 25 50 75 100 125 150 175 200 225 250 275 300 Rider (255lb) + cargo (20lb) =275lb Total weight ok RIDE AT STRUCTURAL WEIGHT LIMIT CARGO WEIGHT RIDER WEIGHT 0 OWN RISK 25 50 75 100 125 150 175 200 225 250 275 310 300 Rider (255lb) + cargo (55lb) = (310lb) Total too heavy. Rider and/or cargo weight has to be reduced. STRUCTURAL WEIGHT LIMIT CARGO WEIGHT RIDER WEIGHT 0 25 50 75 100 125 150 175 200 225 250 275 200 225 250 275 290 300 Rider (290lb) + cargo (10lb) =300lb Total weight ok RIDE AT STRUCTURAL WEIGHT LIMIT RIDER WEIGHT 0 OWN RISK 2 25 50 75 100 125 150 Rider (310lb) + no cargo = 310lb Rider weight exceed structural weight limit 175 310 300 INTENDED USE OF YOUR BICYCLE WARNING: Understand your bike and its intended use. Choosing the wrong bicycle for your purpose can be hazardous. Using your bike the wrong way is dangerous. No single type of bicycle is suited for all purposes. Your retailer can help you pick the “right tool for the job” and help you understand its limitations. There are many types of bicycles and many variations within each type. There are many types of mountain, road, racing, hybrid, touring, cyclocross and tandem bicycles. There are also bicycles that mix features. For example, there are road/racing bikes with triple cranks. These bikes have the low gearing of a touring bike, the quick handling of a racing bike, but are not well suited for carrying heavy loads on a tour, for which, you want a touring bike. Within each of type of bicycle, one can optimize the bicycle for certain purposes. Visit your bicycle shop and find someone with expertise in the area that interests you. Do your own homework. Seemingly small changes such as the choice of tires can improve or diminish the performance of a bicycle for a certain purpose. On the following pages, we generally outline the intended uses of all bike types and, based in part on max weight per CEN braking standards, we specify the maximum rider weights by bike family/model. Industry usage conditions are generalized and evolving. Consult your dealer about how you intend to use your bike. HIGH-PERFORMANCE ROAD 9ED:?J?ED'0Bikes designed for riding on a paved surface where the tires do not lose ground contact. ?DJ;D:;:0To be ridden on paved roads only. DEJ?DJ;D:;:0For off-road, cyclocross, or touring with racks or panniers. JH7:;E<<0Material use is optimized to deliver both light weight and specific performance. You must understand that (1) these types of bikes are intended to give an aggressive racer or competitive cyclist a performance advantage over a relatively short product life, (2) a less aggressive rider will enjoy longer frame life, (3) you are choosing light weight (shorter frame life) over more frame weight and a longer frame life, (4) you are choosing light weight over more dent resistant or rugged frames that weigh more. All frames that are very light need frequent inspection. These frames are likely to be damaged or broken in a crash. They are not designed to take abuse or be a rugged workhorse. See also Appendix B. GENERAL PURPOSE RIDING 9ED:?J?ED(0Bikes designed for riding Condition 1, plus smooth gravel roads and improved trails with moderate grades where the tires do not lose ground contact. ?DJ;D:;:0For paved roads, gravel or dirt roads that are in good condition, and bike paths. DEJ?DJ;D:;:0For off-road or mountain bike use, or for any kind of jumping. Some of these bikes have suspension features, but these features are designed to add comfort, not off-road capability. Some come with relatively wide tires that are well suited to gravel or dirt paths. Some come with relatively narrow tires that are best suited to faster riding on pavement. If you ride on gravel or dirt paths, carry heavier loads or want more tire durability talk to your dealer about wider tires. CYCLO-CROSS 9ED:?J?ED(0Bikes designed for riding Condition 1, plus smooth gravel roads and improved trails with moderate grades where the tires do not lose ground contact. ?DJ;D:;:0For cyclo-cross riding, training and racing. Cyclo-cross involves riding on a variety of terrain and surfaces including dirt or mud surfaces. Cyclo-cross bikes also work well for all weather rough road riding and commuting. DEJ?DJ;D:;:0For off road or mountain bike use, or jumping. Cyclo-cross riders and racers dismount before reaching an obstacle, carry their bike over the obstacle and then remount. Cyclo-cross bikes are not intended for mountain bike use. The relatively large road bike size wheels are faster than the smaller mountain bike wheels, but are not as strong. CROSS-COUNTRY, MARATHON, HARDTAILS 9ED:?J?ED)0Bikes designed for riding Conditions 1 and 2, plus rough trails, small obstacles, and smooth technical areas, including areas where momentary loss of tire contact with the ground may occur. NOT for jumping. All mountain bikes without rear suspension are Condition 3, as well as some lightweight rear suspension models. ?DJ;D:;:0For cross-country riding and racing which ranges from mild to aggressive over intermediate terrain (e.g., hilly with small obstacles like roots, rocks, loose surfaces, hard pack and depressions). Cross-country and marathon equipment (tires, shocks, frames, drive trains) are light-weight, favoring nimble speed over brute force. Suspension travel is relatively short since the bike is intended to move quickly on the ground. DEJ?DJ;D:;:0For Hardcore Freeriding, Extreme Downhill, Dirt Jumping, Slopestyle, or very aggressive or extreme riding. Not for spending time in the air, landing hard and hammering through obstacles. JH7:;E<<0Cross-Country bikes are lighter, faster to ride uphill, and more nimble than All-Mountain bikes. Cross-Country and Marathon bikes trade off some ruggedness for pedaling efficiency and uphill speed. 3 ALL MOUNTAIN 9ED:?J?ED*0Bikes designed for riding Conditions 1, 2, and 3, plus rough technical areas, moderately sized obstacles, and small jumps. ?DJ;D:;:0For trail and uphill riding. All-Mountain bicycles are: (1) more heavy duty than cross country bikes, but less heavy duty than Freeride bikes, (2) lighter and more nimble than Freeride bikes, (3) heavier and have more suspension travel than a cross country bike, allowing them to be ridden in more difficult terrain, over larger obstacles and moderate jumps, (4) intermediate in suspension travel and use components that fit the intermediate intended use, (5) cover a fairly wide range of intended use, with models that are more or less heavy duty. Talk to your retailer about your needs and these models. DEJ?DJ;D:;:0For use in extreme forms of jumping/riding such as hardcore mountain, Freeriding, Downhill, North Shore, Dirt Jumping, Hucking etc. Not for large drop offs, jumps or launches (wooden structures, dirt embankments) requiring long suspension travel or heavy duty components; and not for spending time in the air landing hard and hammering through obstacles. JH7:;E<<0All-Mountain bikes are more rugged than cross country bikes, for riding more difficult terrain. All-Mountain bikes are heavier and harder to ride uphill than cross country bikes. All-Mountain bikes are lighter, more nimble and easier to ride uphill than Freeride bikes. All-Mountain bikes are not as rugged as Freeride bikes and must not be used for more extreme riding and terrain. GRAVITY, FREERIDE AND DOWNHILL 9ED:?J?ED+0Bikes designed for jumping, hucking, high speeds, or aggressive riding on rougher surfaces, or landing on flat surfaces. However, this type of riding is extremely hazardous and puts unpredictable forces on a bicycle which may overload the frame, fork, or parts. If you choose to ride in Condition 5 terrain, you should take appropriate safety precautions such as more frequent bike inspections and replacement of equipment. You should also wear comprehensive safety equipment such as a full-face helmet, pads, and body armor. ?DJ;D:;:0For riding that includes the most difficult terrain that only very skilled riders should attempt. Gravity, Freeride, and Downhill are terms which describe hardcore mountain, north shore, slopestyle. This is “extreme” riding and the terms describing it are constantly evolving. Gravity, Freeride, and Downhill bikes are: (1) heavier and have more suspension travel than All-Mountain bikes, allowing them to be ridden in more difficult terrain, over larger obstacles and larger jumps, (2) the longest in suspension travel and use components that fit heavy duty intended use. There is no guarantee that extreme riding will not break a Freeride bike. The terrain and type of riding that Freeride bikes are designed for is inherently dangerous. Appropriate equipment, such as a Freeride bike, does not change this reality. In this kind of riding, bad judgment, bad luck, or riding beyond your capabilities can easily result in an accident, where you could be seriously injured, paralyzed or killed. DEJ?DJ;D:;:0To be an excuse to try anything. Read Section 2. F of the Bicycle Owner’s Manual, p. 12. JH7:;E<<0Freeride bikes are more rugged than All-Mountain bikes, for riding more difficult terrain. Freeride bikes are heavier and harder to ride uphill than All-Mountain bikes. DIRT JUMP 9ED:?J?ED+0Bikes designed for jumping, hucking, high speeds, or aggressive riding on rougher surfaces, or landing on flat surfaces. However, this type of riding is extremely hazardous and puts unpredictable forces on a bicycle which may overload the frame, fork, or parts. If you choose to ride in Condition 5 terrain, you should take appropriate safety precautions such as more frequent bike inspections and replacement of equipment. You should also wear comprehensive safety equipment such as a full-face helmet, pads, and body armor. ?DJ;D:;:0For man-made dirt jumps, ramps, skate parks other predictable obstacles and terrain where riders need and use skill and bike control, rather than suspension. Dirt Jumping bikes are used much like heavy duty BMX bikes. A Dirt Jumping bike does not give you skills to jump. Read Section 2. F of the Bicycle Owner’s Manual, p. 12. DEJ?DJ;D:;:0For terrain, drop offs or landings where large amounts of suspension travel are needed to help absorb the shock of landing and help maintain control. JH7:;E<<0Dirt Jumping bikes are lighter and more nimble than Freeride bikes, but they have no rear suspension and the suspension travel in the front is much shorter. KIDS Bikes designed to be ridden by children. Parental supervision is required at all times. Avoid areas involving automobiles, and obstacles or hazards including inclines, curbs, stairs, sewer grates or areas near drop-offs or pools. The Hotwalk Owner's Manual is available as a separate document, supplied with the Hotwalk bikes 4 BIKE MODEL / RIDER WEIGHT TABLE SPECIALIZED STRUCTURAL WEIGHT LIMIT ON FRAME 6 MAX WEIGHT PER CEN BRAKING STANDARDS 7, 8, 9 CATEGORY (See Intended Use Page 3) Allez S-Works Allez 1 30 / 14 2 240 / 109 3 240 / 109 30 / 14 2 Elite, Sport, Base 1 275 / 125 220 / 100 1 30 / 14 2 Race 275 / 125 243 / 110 Expert, Elite Int., Sport Int. 1 30 / 14 2 275 / 125 265 / 120 2 Comp 1 30 / 14 Amira All models 1 5 / 2.3 1 Ariel All models 2 Pro, Expert, Expert EVO R 4 Comp Carbon 4 30 / 14 2 Comp, Base 4 30 / 14 2 Ned Overend LTD 3 55 / 25 Camber Carve 275 / 125 275 / 125 240 / 109 3 240 / 109 55 / 25 300 / 136 300 / 136 30 / 14 2 240 / 109 3 240 / 109 275 / 125 275 / 125 300 / 136 300 / 136 240 / 109 3 240 / 109 Pro, Expert, Comp, SL 3 55 / 25 300 / 136 300 / 136 Crossover All models 2 55 / 25 300 / 136 300 / 136 Crossroads All models 2 55 / 25 300 / 136 300 / 136 LTD Disc 2 55 / 25 Pro, Expert, Comp, Elite, Sport, Base 2 55 / 25 300 / 136 300 / 136 Pro 2 5 / 2.3 1 240 / 109 3 240 / 109 Expert, Comp 2 5 / 2.3 1 275 / 125 275 / 125 Elite 2 30 / 14 2 275 / 125 275 / 125 All models 2 55 / 25 300 / 136 220 / 100 Carbon Team Replica, II 5 30 / 14 2 240 / 109 3 240 / 109 I Carbon 5 30 / 14 2 275 / 125 275 / 125 I 5 30 / 14 300 / 136 300 / 136 CrossTrail CruX Daily Demo 8 Dolce Enduro Epic Expedition Fate Hardrock Hotrock Jett Langster 2 240 / 109 3 240 / 109 All models 1 55 / 25 275 / 125 220 / 100 S-Works, Expert 4 30 / 14 2 240 / 109 3 240 / 109 Comp, Evo 4 30 / 14 300 / 136 300 / 136 S-Works 3 5 / 2.3 1 240 / 109 3 240 / 109 Marathon, Expert 3 30 / 14 2 240 / 109 240 / 109 Comp Carbon 3 30 / 14 2 275 / 125 275 / 125 Comp 3 30 / 14 2 300 / 136 300 / 136 All models 2 55 / 25 300 / 136 300 / 136 S-Works, Expert 3 5 / 2.3 240 / 109 All models 3 5 / 2.3 275 / 125 All models 3 55 / 25 300 / 136 300 / 136 24" XC Disc, 24" XC boy/girl 3 5 / 2.3 1 220 / 100 220 / 100 24" 21spd, 7spd boy/girl 20" 6spd, coaster boy/girl 6 5 / 2.3 220 / 100 220 / 100 16" and 12" coaster boy/girl 6 5 / 2.3 80 / 36 80 / 36 2 3 3 240 / 109 275 / 125 Hotwalk 6 0/0 40 / 18 40 / 18 All models 3 55 / 25 300 / 136 300 / 136 Pro 1 30 / 14 2 240 / 109 240 / 109 Base 1 30 / 14 2 275 / 125 220 / 100 5 BIKE MODEL / RIDER WEIGHT TABLE SPECIALIZED STRUCTURAL WEIGHT LIMIT ON FRAME 6 MAX WEIGHT PER CEN BRAKING STANDARDS 7, 8, 9 CATEGORY (See Intended Use Page 3) Myka FSR All models 3 30 / 14 2 300 / 136 300 / 136 Myka HT P. Series All models 3 55 / 25 300 / 136 300 / 136 All models 5 0/0 300 / 136 300 / 136 Rockhopper All models 3 55 / 25 300 / 136 300 / 136 8 Rare 1 30 / 14 2 300 / 136 220 / 100 8 Step Through, 1 Drop, 1 1 30 / 14 2 300 / 136 243 / 110 Roubaix All models 1 Ruby All models Expert Comp 3 30 / 14 Expert Disc, Sport Disc 1 55 / 25 Comp, Elite, Sport Int. 1 55 / 25 275 / 125 265 / 120 Sport, Base 1 55 / 25 275 / 125 220 / 100 S-Works, Pro, Expert,Comp 1 5 / 2.3 1 240 / 109 3 240 / 109 Elite A1 1 30 / 14 240 / 109 3 240 / 109 Limited 1 5 / 2.3 1 240 / 109 3 240 / 109 Pro 2 55 / 25 240 / 109 240 / 109 Expert, Comp 2 55 / 25 275 / 125 265 / 120 Elite 2 55 / 25 275 / 125 275 / 125 Expert Disc, Comp Disc, Elite Disc, Elite Int., Sport Int., Sport, Base 2 55 / 25 300 / 136 300 / 136 S-Works, Expert Carbon 4 5 / 2.3 1 240 / 109 3 240 / 109 Expert Carbon Evo, Elite 4 30 / 14 240 / 109 240 / 109 Comp Carbon 4 30 / 14 2 275 / 125 275 / 125 Comp, Comp Evo 4 30 / 14 300 / 136 300 / 136 S-Works, Marathon, Expert Evo, Expert 3 5 / 2.3 1 240 / 109 3 240 / 109 Comp Carbon 3 5 / 2.3 1 275 / 125 275 / 125 Comp, Evo 3 30 / 14 300 / 136 300 / 136 Roll Safire Secteur Shiv Sirrus SJ FSR SJ HT 5 / 2.3 1 1 5 / 2.3 1 3 30 / 14 2 2 2 2 2 2 240 / 109 3 240 / 109 240 / 109 3 240 / 109 240 / 109 3 240 / 109 300 / 136 300 / 136 240 / 109 3 240 / 109 3 3 Source All models 2 55 / 25 300 / 136 300 / 136 Status All models 5 30 / 14 2 300 / 136 300 / 136 Tarmac All models 1 5 / 2.3 1 Transition All models 1 5 / 2.3 1 Comp Disc 1 TriCross Elite Steel Disc, Elite Disc, Sport Disc, Sport, Base Turbo Venge Vita Work See following page for footnotes 6 240 / 109 3, 5 240 / 109 3 240 / 109 55 / 25 240 / 109 3 240 / 109 1 55 / 25 275 / 125 275 / 125 All models 2 55 / 25 240 / 109 3 240 / 109 All models 1 5 / 2.3 1 240 / 109 3, 5 240 / 109 Limited 1 5 / 2.3 Pro, Comp, Elite 2 55 / 25 275 / 125 265 / 120 Elite Disc, Elite, Sport, Base 2 55 / 25 300 / 136 265 / 120 All models 2 55 / 25 300 / 136 300 / 136 1 240 / 109 240 / 109 3 240 / 109 FOOTNOTES 1 Seat Bag Only. 2 For ALLOY bikes manufactured without original equipment dropout rack mounts: A rear rack can be installed with the use of separate rack mount clips. Cargo capacity with separate mounting clips is limited to 30lb / 14kg. 3 STRUCTURAL WEIGHT LIMITS FOR FRAMES: Carbon and alloy road frames: 275lb / 125kg. Carbon mountain frames: 275lb / 125kg. Alloy mountain frames: 300lb / 136kg. If any weight-bearing Specialized-branded carbon components (i.e. handlebar, seatpost, stem, crank, saddle, rim) are present, then the weight ... limit is 240lb / 109kg. This does not include non-weight-bearing carbon components such as brake levers, chainrings, bottle cages, etc. IMPORTANT: Braking limits do not change regardless of carbon or alloy components. 4 Live bikes have a built-in front rack limited to 55lb / 25kg. They can accept a rear rack limited to 55lb / 25kg for a total of 110lb / 50kg. The S-Works Venge EPS and S-Works Tarmac Black models are equipped with a Zipp 404 Firecrest tubular wheelset, which has a weight rating of 225lb / 102kg. For riders above this weight, the wheelset should be replaced with a wheelset that has appropriate weight ratings. 5 6 The STRUCTURAL WEIGHT LIMIT for a particular model can exceed the RECOMMENDED MAX WEIGHT specified by CEN standards for stopping distance. If a rider's weight is above the RECOMMENDED MAX WEIGHT but below the STRUCTURAL WEIGHT LIMIT, the rider would be able to use the bike from a structural standpoint, but it would not pass CEN stopping distance requirements. 7 Recommended max weights are based on European (CEN) testing standards (for cargo and rider only). 8 Recommended max weights are based on braking limits, not structural weight limits of the frames. 9 CEN braking standards are based on the brakes specified on the bike models from the manufacturer. Changing the brakes can result in an increase or decrease in the braking distance. WARNING: For riders at the RIDER WEIGHT LIMIT, you may not be able to carry cargo if the TOTAL WEIGHT LIMIT is exceeded. SPECIALIZED BICYCLE COMPONENTS 15130 Concord Circle, Morgan Hill, CA 95037 (408) 779-6229 IG0225USA 2013_revA, September 2012 Please note all instructions are subject to change for improvement without notice. Please visit www.specialized.com for periodic tech updates. Feedback: [email protected] 7