1
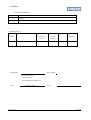
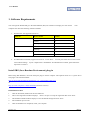
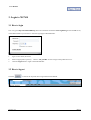
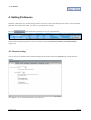
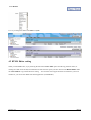
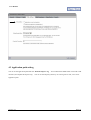
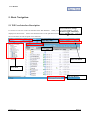
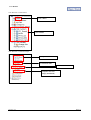
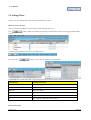
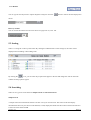
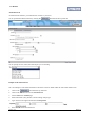
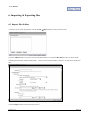
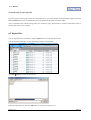
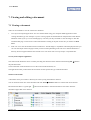
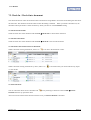
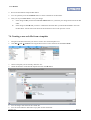
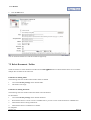
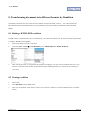
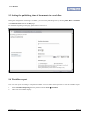
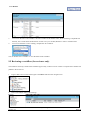
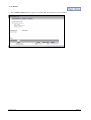
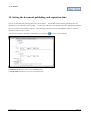
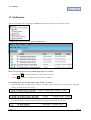
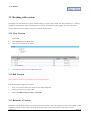
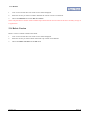
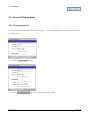
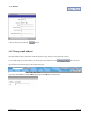
User Manual
User Manual
For
OGCIO WCMS Project
Prepared By
Marco Chan
©Automated Systems (HK) Limited
December 2006
Version 1.2
Page 1
User Manual
Distribution and Release
Copy No.
Holder
1
OGCIO
2
ASL
Amendment History
Change
Revision Description
Number
1
Pages Affected
Revision /
on Respective
Version
Version
Number
First Draft
Date
Reference
Oct 2006
Prepared By:
Approval
ASL
Approved By:
Mr. Marco CHAN
Project Manager
Automated Systems (HK) Ltd.
Date:
Version 1.2
December 2006
Date:
Page 2
User Manual
Table of Content
1. Software Requirements .......................................................................................................................... 5
Install JRE (Java Runtime Environment) plug-in ........................................................................ 5
2. Connection to SSLVPN......................................................................................................................... 6
3. Login to WCMS ........................................................................................................................................... 7
3.1 How to login .............................................................................................................................................. 7
3.2 How to logout............................................................................................................................................ 7
4. Setting Preference ....................................................................................................................................... 8
4.1 General setting .......................................................................................................................................... 8
4.2 HTML Editor setting ............................................................................................................................ 9
4.3 Application path setting .................................................................................................................... 10
5. Basic Navigation........................................................................................................................................ 12
5.1 WP User Interface Description ..................................................................................................... 12
5.2 Setting Filters .......................................................................................................................................... 14
5.3 Sorting ......................................................................................................................................................... 15
5.4 Searching ................................................................................................................................................... 15
6. Importing & Exporting files ............................................................................................................ 18
6.1 Import files/folders............................................................................................................................... 18
6.2 Export files................................................................................................................................................ 19
7. Viewing and editing a document................................................................................................. 20
7.1 Viewing a document ........................................................................................................................... 20
7.2 Check-In / Check-Out a document ............................................................................................. 21
7.3 Editing a document .............................................................................................................................. 22
7.4 Creating a new web file from a template ................................................................................ 23
7.5 Delete Document / Folder ................................................................................................................ 24
8. Transforming document into different formats by Rendition............................ 26
8.1 Making a HTML/PDF rendition .................................................................................................. 26
8.2 Viewing rendition ................................................................................................................................. 26
Version 1.2
Page 3
User Manual
8.3 Delete a rendition .................................................................................................................................. 27
9. Publish a document with workflow .......................................................................................... 28
9.1 Starting a workflow ............................................................................................................................. 28
9.2 Adding documents in a workflow ............................................................................................... 29
9.3 Setting the publishing time of documents in a workflow.............................................. 31
9.4 Workflow report .................................................................................................................................... 31
9.5 Reviewing a workflow (for reviewer only) ........................................................................... 32
10. Setting the document publishing and expiration time ........................................... 34
11. How to check document status .................................................................................................. 35
12. Notification.................................................................................................................................................. 36
13. Working with version......................................................................................................................... 37
13.1 View Version ........................................................................................................................................ 37
13.2 Diff Version........................................................................................................................................... 37
13.3 Reinstate a Version ........................................................................................................................... 37
13.4 Delete Version ..................................................................................................................................... 38
14. Account Management ........................................................................................................................ 39
14.1 Change password................................................................................................................................ 39
14.2 Change email address ...................................................................................................................... 40
Version 1.2
Page 4
User Manual
1. Software Requirements
You will login the WCMS and go to the Web Publisher (WP) user interface to manage your web content.
Your
computer must have the following software installed:
1.
Web Browser: the supported version are
Platform
Brower Name
Version
Windows
Internet Explorer
6.0
FireFox
1.5
Netscape
7.2
FireFox
1.5
Netscape
7.2
Mozilla
1.7
FireFox
1.5
Mac OS
Unix/Linux
2.
Java Runtime Environment, supported version are 1.4.2 or above. You may check the current version in the
Control Panel settings. If your computer hasn’t installed the Java Runtime Environment, please follow the
step below to install it.
Install JRE (Java Runtime Environment) plug-in
Before using Web Publisher, user must install java plug-in on their computer. The required version is 1.4.2_08 or above.
The plug-in can be downloaded at:
http://wcms.scig.hksarg:8080/wp/plugins/j2re-1_4_2_08-windows-i586-p.exe
Or
http://java.sun.com/j2se/1.4.2/download.html (Sun Java web site)
Installation Procedure
1.
After the download, double click the executable file.
2.
The License Agreement windows displays. Select “Accept” to accept the Agreement then click “Next”
3.
The Installation Mode windows displays. Leave the default settings and click “Next”
4.
The installation process start.
5.
After the installation is completed, restart your computer
Version 1.2
Page 5
User Manual
2. Connection to SSLVPN
Please refer to the WCMS-SSLVPN connection guide for the details on the connection to the SSL/VPN server before
login to the WCMS.
Version 1.2
Page 6
User Manual
3. Login to WCMS
3.1 How to login
User can type in http://hostname:8080/wp (where the ‘hostname’ should be wcms.scig.hksarg for the WCMS server)
in the address field of your browser to enter the login page of Web Publisher.
1.
Type in User Name, Password
2.
Select an appropriate repository. Choose “CIS_WCMS” for the storage on the production server.
3.
Click the Login button to login to the Web Publisher.
3.2 How to logout
Click the
Version 1.2
icon from the top menu bar to logout from Web Publisher
Page 7
User Manual
4. Setting Preference
Preferences determine your personal settings and are stored in a cookie on the machine from which you accessed Web
Publisher. If you delete the cookie, you will loose your preference settings.
Press the
button from the top menu bar to set your own preference
There are three important tags that we concern. The three tags are General, Web Authors and Web Developers
respectively.
4.1 General setting
You can select your default location, theme and drag and drop feature under the “General” tag in the Preferences
settings.
For example, you can select the theme for your preference
Version 1.2
Page 8
User Manual
Let’s try to change the theme from tahoe to royale
4.2 HTML Editor setting
When you edit HTML files, say by checking the file and click File->Edit option from the top pull down menu, or
clicking the “Edit” shortcut link, Documentum will search for the option you have chosen in the HTML Editor under
the “Web Authors” tag in the Preferences setting. You can either use an application that is installed on your local
machine or you can use the default web-based application (e-WebEditPro).
Version 1.2
Page 9
User Manual
4.3 Application path setting
You can set the application path under the “Web Developers” tag. You can define the default editor to be used to edit
rule files (for template developers only). You can set the temporary directory for viewing source code, view source
application path.
Version 1.2
Page 10
User Manual
Version 1.2
Page 11
User Manual
5. Basic Navigation
5.1 WP User Interface Description
User Preferences, Change
Let us have an overview on the User Interface of the Web Publisher. When you login
to WebLogout,
Publisher,
a page
is
E-Mail,
Online
Help
displayed as shown below. Please note that the function on the pull down menu changes in different node. User can
also use the short cut links for quick access functions.
Searching Area
Top Menu
Short Cut Button
Tree Menu
Message Button
Version 1.2
Page 12
User Manual
Tree Menu for Content Editor
User’s Inbox
Web Cabinet
Tree Menu for Content Developer
Templates
Presentations Files
Rules Files
Templates Previews
Image (Thumbnail)
Version 1.2
Page 13
User Manual
5.2 Setting Filters
In WP view, you can filter the content listing by the following criteria.
Filter by Version or Type
You can use the filter button to narrow the type of items displayed in a list.
The
button, which is located in the menu bar, as shown below, allows you to apply multiple filters
at once.
The filter setting would be shown next to the filter button.
By clicking the
button, you can filter by item type, locale or status.
In the Status filter, the file status that is later than the selected one will be shown. Details are listed as follows:
Selected Status
Version will be show
WIP
WIP, Staging, Approved, Active
Staging
Staging, Approved, Active
Approved
Approved, Active
Active
Active
Expired
Expired
All
WIP, Staging, Approved, Active, Expired
Filter by File Name
Version 1.2
Page 14
User Manual
You can type in some keywords to replace the [Starts with] text. Press the
button to narrow the item displayed in
the list.
Filter by Number
You can choose the number of items to be shown in a page from 10, 50 or 100.
5.3 Sorting
There is a sorting bar on the top of the items. By clicking the underlined text on the sorting bar, the items will be
displayed from ascending or descending order.
By clicking the
icon, you can select the properties that appear in the lists and change the order in which the
columns for the properties appear.
5.4 Searching
There are two types of search functions Simple Search and Advanced Search.
Simple Search
A simple search returns documents that have at least one of your search words. The search results first display
documents that have all your search words and then, second, display documents that do not have all the terms but have
at least one in the whole WCMS.
Version 1.2
Page 15
User Manual
You can perform simple search by typing the word in the Search field in the top menu bar.
After the
button has been pressed, a list of documents which match the searching criteria will be displayed.
To view the full path of the files, you can select View => Page View => Locations from the pull down menu.
Version 1.2
Page 16
User Manual
Advanced Search
An advanced search allows you to add selection criteria to your search.
You can perform the advanced search by clicking the
button from the top menu bar.
You can specify the size, status, date of the object you are searching.
Example of Advanced Search
This is an example to search files which have a file name consists of “head” under the web cabinet named “citb”.
button from the top menu bar
1.
Click on the
2.
Click on the Edit button next to the Location field
3.
Choose citb in the Location page
4.
Select Document ( dm_document ) for the setting of object type
5.
Type “head” in the right most field from the Properties
6.
Press Search button from the bottom
Version 1.2
Page 17
User Manual
6. Importing & Exporting files
6.1 Import files/folders
A local file can be easily imported by clicking the File
Import button in the pull down menu.
Click the Add Files button to browse and select the desired files or Click the Add Folders to import a whole folder
(including all the folders and files underneath).
However the maximum number of items to be imported is 1000 each
time.
You can edit the file name and select Object Type and Lifecycle for the imported files
Click the Import button to start the import process.
Version 1.2
Page 18
User Manual
Troubleshooting on importing folder
If you are going to clean up the cookies from the web browser, you will be unable to import folder though you press the
Next or Import button since no default lifecycle is assigned to the document inside the folder.
You are advised to import file and assign lifecycle to it before trying to import folder if you have cleaned the cookies or
the first time WP run on a computer.
6.2 Export files
You can export files (but not folders) with the Export function in the pull down menu.
You can check the check box of your desired file(s) under a specific folder
Click File
Export on the pull down menu.
Select the output directory and click OK button to execute the export process.
Version 1.2
Page 19
User Manual
7. Viewing and editing a document
7.1 Viewing a document
There are two methods to view the content of a document.
1.
View by local computer application: You view the document using your computer default application of the
viewing document type. For example: if you are viewing a plain text document then notepad will be used. But the
limitation is that if you try to view an html page by view then you may be unable to view the image or other file
inside the html page. As the browser cannot find the file according to the path. In this case you need to use Web
View.
2.
Web view: You view the document with a web browser. And all images or stylesheets will be displayed so that you
can view the output of the web page as what you will see after publishing to the web server. But the limitation is
that only browser supported format can be Web View. You cannot web view a javascript or stylesheet files.
View by local computer application
The content of the document can be viewed by checking the check box of the document and clicking File
View in
the pull down menu
Click on the name of the document can view the content of the document, too.
The application which you have done the association for the specific file type would be launched.
WebView a document
A document can be previewed in a Web Layout View by using the WebView function.
You can check the check box of the document and click View
Be attention that there is a green light
WebView button to call the Web View function.
between the document’s name and document’s check box when the
document support Web View function.
Version 1.2
Page 20
User Manual
7.2 Check-In / Check-Out a document
The check-out function locks the document when a document is being edited to avoid users from editing the same file at
the same time. The document would be check-in when the editing is finished. When you check a document out, the
document will be placed into a check-out directory which you have set in the Preference setting.
To Check-Out a document
Check the check box of the document and click File
Check Out to check out the document.
To Check-In a document
Check the check box of the document and click File
Check In to check in the document
To Check the Check In/Out Status of a document
When a document is being checked out, there is an
icon next to the document’s name.
When a document is being checked out by others, there is an
icon instead. Then you cannot edit but only export
or view the file.
To cancel check-out
You can cancel the check-out of a document with
Checkout from the top pull down menu.
icon by checking its check box and click File
Cancel
All revision of the content of the document will be lost if you Cancel Checkout a document.
Version 1.2
Page 21
User Manual
7.3 Editing a document
In WP, the edit action would also include checking out a document.
In other words the document would be
automatically checked out when you edit a document. There are two types of document you may edit, one with template
and other without template. For editing documents created from template, you must use the WP Editor. For other
content, WP will use your computer default application to open the document. For example, if you select edit a text file
in WP then WP will open your computer text editor to you. Then you will need to edit the opened document, save it
locally and check in it from WP.
Editing a HTML file
You can edit a HTML file placed in the Web Cabinet
1.
Check the check box of the file
2.
Click File from the pull down menu
3.
You can click Edit or Native Edit to edit the file
When you choose Edit, the editor as selected in the Preference tab would be launched. For details, please
check from the HTML Editor Setting in Preferences section.
When you choose Native Edit, the editor as default in your file association setting would be triggered.
Editing a content file created from template
You can edit a content file created from template as follows:
1.
Check the check box of the file.
2.
Click File
3.
A content editor is shown as below:
Edit from the pull down menu.
Web Publisher Editor User Interface
The user interface of the Web Publisher Editor would be different as the look and feel depends on the definition of the
rule file. Below are the functions of each button:
Version 1.2
Page 22
User Manual
4.
Revise the information and press Save button
5.
You can optionally click the Comment button to set the comment for the document.
6.
Then you can press Web View to view your change.
A.
If the change is OK you then Press Close & Unlock button to you finish your change and exit from the WP
editor.
B.
If the change is Not OK and you want to rollback the document then you should Press Close to exit from
the WP editor. And in WP cancel check out the document to retrieve the previous version.
7.4 Creating a new web file from a template
1.
Navigate to the desired location you want to create a new content template on it.
2.
Click File
3.
Choose a template you are basically reference on it.
4.
Check the checkbox of the desired template and click the OK button.
5.
You can assign a new name for the content file.
New
Content in the top pull down menu or select the shortcut link New Content.
6. You can set the effective date and/or expiry date for the content file.
Version 1.2
Page 23
User Manual
7.
Click the OK button.
You can check the checkbox to edit the content file right away.
7.5 Delete Document / Folder
Check the check box of the document or folder and click File
Delete button to delete the document. You can delete
multiple files or folders at the same time.
Limitation of deleting folder
The following states the condition that a folder cannot be deleted:
1.
User without delete privilege on the desired folder.
2.
The folder is not empty.
Limitation of deleting document
The following states the condition that a document cannot be deleted:
For documents:
1.
User without delete privilege on the desired document.
2.
When the document’s current version is in Active state or previous version of the document is in Active state.
3.
When the document is being checked out.
4.
When the document is included in a workflow.
For templates:
Version 1.2
Page 24
User Manual
1.
Template is mark as Available.
2.
Template is referred by a/some content in web cabinet. It means that the content is generated by the template.
For presentation and rule files:
1.
File is referred by other document
Version 1.2
Page 25
User Manual
8. Transforming document into different formats by Rendition
In WCMS, a document may have more then one rendition such as html, PDF, word etc. You can transform the
Microsoft documents (Word documents, Excel spreadsheets, Powerpoint slides) into different formats like PDF,
HTML.
8.1 Making a HTML/PDF rendition
WCMS contains a Transformation Server which allows you to transform a Plain Text, Word, Excel and Powerpoint file
to a PDF or HTML file through WP.
1.
Select a document you want to transform.
2.
From menu File
3.
After clicking the menu, it will generate the rendition accordingly. User can view the rendition after one or two
New
Create Rendition, select PDF Rendition or HTML Rendition
minutes to check the result. If there are problems with the rendition generation, you will receive a message in
your inbox.
8.2 Viewing rendition
1.
Select a file.
2.
Click Rendition from the View menu
3.
Then a list of rendition will be shown. The first one is primary rendition. It cannot be deleted unless you delete
the file.
Version 1.2
Page 26
User Manual
4.
You can select each rendition for viewing, or exporting as another file as required.
8.3 Delete a rendition
To Delete Rendition
1.
Select a rendition you want to delete.
2.
Then click Delete button on the top right hand corner.
Version 1.2
Page 27
User Manual
9. Publish a document with workflow
Workflow can be started by content authors or reviewers.
There are two types of workflows:
1.
Approval for site (started by content author)
When the workflow is submitted, the documents in the workflow will be routed to the content reviewer for
approval.
2.
Auto publish to site (started by content reviewer)
When the workflow is submitted, the documents in the workflow will be published directly to the staging
and production web server.
9.1 Starting a workflow
1.
Select the file you want to publish to the web server.
2.
Click the Start Workflow button
3.
Or you will have to select from the pull down menu if you include more than one document in a workflow.
Version 1.2
next to your desired document
Page 28
User Manual
4.
Select the workflow by checking its checkbox and press the OK button.
5.
Fill in description in the description field and press the Finish button.
An
icon will be shown next to the document which has a workflow started on it.
9.2 Adding documents in a workflow
During the configuration of starting a workflow, you can add more than one document to the workflow in the Info page.
For the detail of getting in this page, please refer to section 9.1.
There is a Files option at the bottom of the Info page
1.
Press the
Version 1.2
button to add document to the workflow
Page 29
User Manual
2.
Check the checkbox of the desired document and press Select button in the bottom to add document to the
workflow
3.
Press Finish button at the end.
Version 1.2
Page 30
User Manual
9.3 Setting the publishing time of documents in a workflow
During the configuration of starting a workflow, you can set the publishing time by choosing Date, Hour and Minute
in the Effective Date field in the Info page.
For the detail of getting in this page, please refer to section 9.2.
9.4 Workflow report
User can view report of running or completed workflow. You can follow the steps below to view the workflow report
1.
Select Workflow Reporting from the pull down menu Tools
2.
Then a list of workflow display.
Version 1.2
Workflow
Page 31
User Manual
3.
You can see the state of all workflow. The state includes the Workflow Name, Status (Running, Completed and
Paused), Active Task Name and Performer of a task. Also you can Halt, Resume or Abort a workflow here.
4.
You can use the filter to select running, completed or all workflows.
You can double click a workflow to view the detail of the workflow
9.5 Reviewing a workflow (for reviewer only)
The workflow started by content author should be approved by content reviewer in order to complete the workflow and
publish to the web server.
1.
Login to WP as an reviewer and navigate to the Inbox node from the navigation tree.
2.
Click on the subject name of the message
3. You should view the content on the attached file by clicking on its name
Version 1.2
Page 32
User Manual
4.
Press Submit or Reject button to approve or decline ALL the document(s) in the workflow.
Version 1.2
Page 33
User Manual
10. Setting the document publishing and expiration time
You can set the publishing and expiration time of a document. The WCMS will check if the publishing time of a
document if it is not defined in the workflow. It will expire and remove the document from the staging and production
web servers when the document is expired. The publishing and expiration time will ONLY be effective when the
document reaches the active status.
You can view and edit a document’s information by pressing the
icon next to the document
The Effective field allows you to set its publishing time
The Expiration field allows you to set its expiration time
Version 1.2
Page 34
User Manual
11. How to check document status
The status of the document reflects the stages (WIP, Staging, Approved, Active, Expiry) in a lifecycle. The status of a
document can be checked from the Status field along with the document.
If there is an
icon under the Change Set column it means that the document is in workflow. Then you cannot
edit the document.
Version 1.2
Page 35
User Manual
12. Notification
You can get notification by navigating to the Inbox node from the navigation tree on the left of WP
The Inbox page is shown when you click on the Inbox node
There are some important messages which might appear in you Inbox
1.
Notifications
2.
Tasks
are messages that tell you an event has occurred.
.are electronic assignments that are part of a workflow.
The following shows the message in inbox when workflow is started:
1.
When an editor starts an “Approval for <website>” workflow, there is a message in reviewer’s inbox asking the
reviewer to submit or reject the request.
2.
If the reviewer rejects the request, there is a Reject to Author message in editor’s inbox
3.
If you have stopped a workflow, an Abort Workflow message will be shown in your inbox.
Version 1.2
Page 36
User Manual
13. Working with version
In WCMS, every document has a version number. When you create a new content, the version number is 1.0. Then if
you Edit (with Checkout), Check In and Save then a new version number will be assigned. You can view the old
version, delete the version, diff two versions or reinstate an old version.
13.1 View Version
1.
Select a file.
2.
Click Version from the View menu.
3.
Then a list of version will be shown.
4.
You can select each version just like select a file.
13.2 Diff Version
Notes: Diff two versions is processed by external comparison tool.
Diff version means compare two versions.
1.
View version of a file then a list of the version will be displayed.
2.
Select two versions you want to diff.
3.
Then select Diff versions from File
Versions
13.3 Reinstate a Version
Reinstate a version means make the old version become the current version. By doing this a new version will be created
and the file content is same as the old version. And the previous current version will become an old version.
Version 1.2
Page 37
User Manual
1.
View version of a file then a list of the version will be displayed.
2.
Select the version you want to reinstate. Reinstate the current version is not allowed.
3.
Then select Reinstate from menu File
Versions
Notes: Only the latest 5 versions of files would be kept online and old versions will be archived to secondary storage on
a regular basis.
13.4 Delete Version
Delete a version is similar to delete a document.
1.
View version of a file then a list of the version will be displayed.
2.
Select the version you want to delete. Each time only one file can be deleted..
3.
Then select Delete Version from the File menu
Version 1.2
Page 38
User Manual
14. Account Management
14.1 Change password
Every user can change his password in the WP login page. It is recommended that users will change their passwords
on a regular basis.
1.
Click the
2.
Press the
Version 1.2
button
button to enter the change password page
Page 39
User Manual
3. Revise the password and click
button.
14.2 Change email address
The email address will be required for notification purposes (eg. during a content approval process).
To view and change your email address, you must login to the WP and click the
button from the
top pull down menu and navigate to the change email page.
Type a new email address in the E-Mail field and press the OK button at the bottom.
Version 1.2
Page 40