1
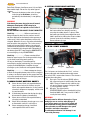
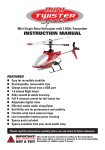
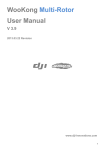
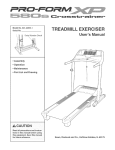
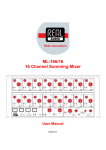
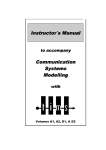
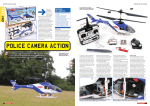
READY-BUILT MINI R/C HELICOPTER WITH 4-CHANNEL R/C INCLUDING 'BUDDY BOX' FLIGHT TRAINING SYSTEM WITH PUPIL TRAINER CABLE READY TO FLY! COMPLETELYASSEMBLED! Learn to fly R/C helicopters with the completely assembled Twister –includes 35FM precision transmitter with all equipment factory-fitted AND test-flown FREE Instructional DVD FREE Flight Training Guide FREE 'Buddy Box' trainer cable EVERY TWISTER IS FLIGHT-GUARANTEED! EVERY TWISTER IS TEST-FLOWN! 4-in-1 unit SPECIFICATIONS Main rotor diameter ........................................520 mm Fuselage length ................................................500 mm Radio control ............................................... 4-channel (with 2 micro servos, speed controllers, piezo gyro) Flying weight..........................................................300g CONTENTS Assembled helicopter (incl. main & tail motors) ... 1 4 ch 35Mhz FM transmitter (incl. trainer switch)... 1 “4 in1” on-board electronics unit (6 channel receiver, piezo gyro, electronic mixers and speed controllers) ............................................... 1 Micro servos................................................................ 2 Transmitter and receiver crystals .................... 1 pair 8.4V 600 mAh Ni-Mh battery pack............................ 1 Mains charger (220V UK 3-pin type) ........................ 1 Trainer cable................................................................ 1 Instructional DVD (showing Mode 1 setup) ........... 1 Transmitter instruction manual................................. 1 Twister instruction manual........................................ 1 http://www.jperkinsdistribution.co.uk Includes 3pin charger, Nimh rechargeable and 'Buddy box' trainer cable FEATURES Factory-assembled, RC installed COMPLETELY READY-TO-FLY micro RC helicopter One-piece '4 in 1' on-board computerised electronics unit saves weight, improves performance and simplifies use Transmitter with buddy box training switch and charging socket with adjustable height sticks and silky smooth operation Trainer lead AND instructional DVD included Speed controller disallows high throttle starts Throttle Fail-safe cuts in when signal lost Gyro is disabled at closed throttle to prevent unexpected tail rotor starts during transport Ball bearing swashplate, rotor head, main shaft and tail shaft for ultimate precision Carbon fibre boom, UC struts, flybar, etc Rechargeable 8.4V Nimh battery Around 10 minutes flying per charge UK 3-pin 240V mains flight charger Only requires 8 AA alkaline cells Ideal for newcomers to R/C Upgradeable to collective pitch CONTENTS Introduction .................................................... 1 Preparing for flight......................................... 1 1. Unpacking your Twister .................... 1 2. Charging the flight battery................ 1 3. Nimh flight battery safety ................. 2 4. Fitting the flight battery ..................... 2 Preflight checks ............................................. 2 1. '4-in-1 unit' checks ............................ 2 2. Rotor blades check............................ 3 3. Visual check........................................ 3 4. Switch on transmitter........................ 3 5. Range check ....................................... 3 6. Control operation check ................... 4 How does a helicopter fly?........................... 4 Flight training guide ....................................... 5 Step 1–Positioning ................................. 5 Step 2–Rotor spin-up............................. 6 Step 3–Going for a walk........................ 6 Step 4–Taking the first 'hop'................. 6 Step 5–Hovering and manoeuvres...... 7 Step 6–Beyond the hover ..................... 7 Troubleshooting.............................................. 7 Vibration .................................................. 7 Main rotor does not turn....................... 8 Twister exploded view .................................. 8 Spare parts and option parts ....................... 9 VITAL SAFETY INFORMATION IF YOU HAVE NEVER FLOWN R/C MODELS, FLY ONLY UNDER THE SUPERVISION OF AN EXPERIENCED R/C MODEL HELICOPTER PILOT. READ ALL INSTRUCTIONS CAREFULLY PRIOR TO USING OR FLYING. CONTACT YOUR SUPPLIER IF ANY INFORMATION IS UNCLEAR. YOU ASSUME ALL RISK AND RESPONSIBILITY WHEN USING THIS MODEL. KEEP WELL CLEAR OF ROTATING BLADES. NEVER WEAR LOOSE CLOTHING WHEN OPERATING HELICOPTERS. ALWAYS WEAR PROTECTIVE EYE WEAR WHEN OPERATING MODEL HELICOPTERS. FLY ONLY WHERE IT IS SAFE TO DO SO. A HARD FLAT SURFACE CLEAR OF ALL OBSTACLES AND A CLEAR INDOOR SPACE OF AROUND 400 SQUARE FOOT IS THE MINIMUM RECOMMENDED REQUIREMENT. CRASHES & SPARE PARTS If you are new to model helicopters, please be aware that many people have learned to hover helicopters and have broken nothing in the process. However, the Twister is not invulnerable and most people will tip their Twister over or break parts during their flying career. Crash damage is not covered by warranty. The Twister has been designed to be very strong and very easy to repair. In addition, all parts are available as spares from your supplier. Study the exploded view of the helicopter carefully to understand the relationship between parts and how to replace them if necessary. DVD–IMPORTANT INFORMATION Transmitter mode–Please note that the Instructional Flight DVD included with this product shows use of a MODE 1 transmitter–a different transmitter setup to the mode II transmitter supplied. A mode I transmitter has throttle and roll on the right stick. In the UK, most pilots fly mode II, throttle and tail rotor on the left hand stick, cyclic on the right stick. Aerial deployment–contrary to the video, please ensure your receiver aerial is COMPLETELY unwrapped from the skid as per this manual. J. Perkins Distribution Ltd guarantees this product is free from manufacturing or assembly defects for a period of one year from time of purchase. This does not affect your statutory rights. This warranty is not valid for any damage or consequential damage arising as a result of a crash, misuse, modification or for damage or consequential damage arising as a result of failure to observe the procedures outlined in this manual. Operation of this model is carried out entirely at the risk of the operator. Please note that, whilst every effort is made to ensure the accuracy of the material included with this product, mistakes can occur and neither J. Perkins Distribution Ltd nor it’s distributors will be held liable for any loss or damage arising from the use of this model or for any loss or damage arising from omissions or inaccuraccies in the associated instructions or materials included with this product. We reserve the right to modify the design of this product, box contents and instruction manual without prior notification. E&OE. © 2004 J Perkins Distribution Ltd, Northdown Business Park, Ashford Road, Lenham, Kent, ME17 2DL, UK. All rights reserved. Instruction Manual INTRODUCTION Congratulations on your purchase of the most complete, high quality RC micro indoor helicopter available today. This electric helicopter is designed by expert engineers and assembled at the factory. It is the finest model yet devised for learning the sport of RC model helicopters as it is complete (except for 8 AA alkaline batteries), very strong, easy to fly with numerous innovative safety features. The Twister employs the highest quality control systems and engineering. Careful and appropriate use of carbon fibre has been made throughout to improve strength and save weight, whilst many precision miniature ball bearings support the important components. The '4-in-1' on-board electronics package includes 6 channel receiver, piezo gyro, electronic mixers and speed controllers PLUS a computer fail-safe, an LED system check, and a motor safe start facility. The fail-safe cuts power to the main motor in the event of transmitter failure, whilst the safe-start only allows starting when the throttle stick is low–so there is no danger of connecting the flight battery and inadvertently sending power instantly to the motors. The transmitter has been designed with high quality, adjustable stick units, convertible between Mode II (throttle left) and Mode 1 (throttle right), whilst a 'buddy box' trainer socket AND trainer cable is included as standard. Both transmitter trims and stick units operate at a professional level of quality–a vitally important feature for successful helicopter control. The Twister is ready to fly and requires only 8AA alkaline transmitter batteries. It is designed for use indoors in an adequate and safe space, for example a large room or a sports hall. It can also be flown outdoors in calm weather. The Twister is upgradeable to higher performance through the purchase of upgrade parts. Spare parts are available through your local model shop. We wish you successful and safe flying. NEW HELICOPTER PILOTS Welcome to the fascinating world of RC model helicopters. If you are new to RC model helicopters, please do not expect to be able to 'open the box and immediately 'fly around'. This model requires a commitment by the customer to spend time learning the procedures required for safe and successful operation. To most people, this represents an interesting and often exciting challenge. During the course of this manual we will present you with an outline of the http://www.jperkinsdistribution.co.uk way model helicopters operate plus suggested training techniques written by experienced RC model helicopter pilots. We hope this well help you. However, this information is not designed as a definitive guide and is not a guarantee that you will achieve successful helicopter flight. Neither do we guarantee you will not break anything! If this is not what you expected and demands more commitment than you wish to give, we advise you not to buy this product. Your supplier will be pleased to advise you on additional sources of information if you need to know more about RC model helicopters. Please observe the principles of safety laid down by the British Model Flying Association (http: //www.bmfa.org/) in their safety code which is available on-line. PREPARING FOR FLIGHT 1. UNPACKING YOUR TWISTER 1. Carefully remove the model and other items from the packaging. 2. Screw the transmitter aerial into its socket in the top of the transmitter. 3. Insert 8AA alkaline batteries into the transmitter battery compartment being careful to observe battery polarity. See the E Sky manual for details. 4. Unwrap the receiver aerial ENTIRELY from its stowed location around the right side undercarriage and leave it to dangle freely. Do NOT tape it to any helicopter components as this may cause interference. WARNING! RC flight is achieved through low power RF transmissions and is susceptible to interference. The carbon and metal parts in a helicopter create potential interference hazards for your receiver, therefore it is important to route the receiver aerial directly away from the helicopter and away from interference hazards. Useful tip ........................... Although the Twister is very strong and includes many carbon fibre parts, all model helicopters require careful handling and a delicate touch when setting up for flight or during maintenance. In particular, take great care with the electrical connections to and from the '4-in-1' control unit. 2. CHARGING THE FLIGHT BATTERY The mains charger supplied is designed to charge the 8.4V 600mAh Nimh battery in approximately 60 minutes. For fully automatic fast charging we recommend purchase of the JP 5510540 Automatic 1 Instruction Manual Delta Peak Charger (see Spare parts list) available from model shops. Do not use any other type of charger. Connect the battery to the mains charger and charge for 60 minutes, checking periodically that the battery is not getting hot. WARNING! If the battery becomes hot to the touch (around 40 degrees Centigrade): STOP charging at once as batteries can explode or cause a fire if overcharged! DO NOT CHARGE FOR LONGER THAN 75 MINUTES! Useful tip ........................... When a new battery is being charged for the first time, make a note of the time required for the battery to become warm to the touch. At this point the battery will be fully charged. When this occurs, disconnect the battery and record the charging time. This is the correct length of time required for battery charging and should be observed when recharging the battery from a completely discharged state. Remember, if the battery gets HOT, stop charging IMMEDIATELY as overcharging is very DANGEROUS! Useful tip ........................... Please note that Nimh batteries require up to 5 or 6 charge and discharge cycles before reaching peak capacity. As long as the battery is not damaged by overcharging and/or overheating, you can expect to enjoy around 500 flights (complete charge/ discharge cycles) from one rechargeable battery! Useful tip ........................... Never attempt to charge a Nimh rechargeable battery that still has charge in it–always run the helicopter on the ground until the main rotor speed drops to half normal flight speed. It will then be ready to charge. 3. NIMH FLIGHT BATTERY SAFETY Never throw a Nimh rechargeable battery into a normal refuse bin. Always recycle Nimh rechargeable batteries as they contain chemicals dangerous to people, animals and the environment. If the battery becomes hot during charging, disconnect the battery immediately! Never leave a Nimh rechargeable battery charging unattended. Never leave a battery charging on a car seat or flammable surface in case of fire. Never attempt to charge a hot Nimh rechargeable. Wait until it cools. 2 4. FITTING THE FLIGHT BATTERY 1. Secure the charged battery pack between the front and the rear battery retainers ensuring the rubber band is in place. Slide the battery to the fully forward position and hold in position by sliding the silicone rubber sleeves up to the rear battery retainers. Do not connect just yet. PREFLIGHT CHECKS 1. '4-IN-1 UNIT' CHECKS Gyro gain Mix gain Status LED The 2 trimmers on the front of the '4-in-1' unit are factory adjusted and should need no adjustment. The status LED is next to the trimmers. The trimmers perform these functions: Gyro gain. The left trimmer (GAIN) adjusts the amount of gyro tail stabilisation from 0 to 100%. The gyro automatically stabilises the tail against torque changes and gusts. 90% is usually the best setting. Mix gain. The right trimmer (PROPORTIONAL) adjusts throttle/tail mixing from 0 to 100% and is very uncritical. 90% is usually the best setting. WARNING! This unit contains delicate electronics. If your model tips over or crashes when flying or if your Twister motors are physically stalled and prevented from turning, you must immediately reduce throttle to avoid damage to the speed controllers and other components. Crash damage and motor stall damage is not covered by warranty. http://www.jperkinsdistribution.co.uk Instruction Manual 2. ROTOR BLADES CHECK Unfold the main rotors to the flying position as per the above pic ensuring they are exactly perpendicular to the flybar and paddles and that they are not damaged. WARNING! The main blades are factory fitted and should feel 'tight' in the rotor hub as they are unfolded to the flying position. If the blades are too loose, this will lead to incorrect and/or nodding flight behaviour. N.B. Helicopter experts only: This is the reverse of what you might expect... please be assured the Twister requires the blades to be reasonably tight in the blade holders - not loose! 3. VISUAL CHECK Check that all linkages, electrical connectors are attached and that rotating parts are free to rotate smoothly. Check that all linkages move freely with no binding or stiffness. Free off any linkages that show any level of tightness or binding. 4. SWITCH ON TRANSMITTER The transmitter is supplied in Mode II version where the left stick controls height (climb or descent) and tail rotor (yaw left or right). The right stick operates the cyclic steering controls which are used to pitch the helicopter nose up/nose down and to roll the helicopter left or right. Note that the included DVD depicts the use of a Mode I (throttle right) transmitter. See pic below for Mode II layout. 1. Move the throttle stick and throttle trim of your transmitter to the lowest (low throttle) position. 2. Centre the trim controls for the 3 other transmitter functions. 3. Extend the transmitter aerial fully. 4. Switch on the transmitter. 5. Check that the receiver aerial is unwrapped ENTIRELY from its stowed location around the right side undercarriage and is free to dangle from the front of the helicopter where it will not become caught in the tail rotor. 6. To power up the helicopter, you must connect the JST battery connector to the matching lead emerging from the '4-in-1' control unit. Do this now - ensuring you are well clear of main and tail rotors and that throttle stick and trim are in the low position. 7. Observe the '4-in-1' status LED. Initially, it will blink red, then blink green. After the on-board computer has completed satisfactory systems checks, it will glow green continuously. Do not move the helicopter during this checking and calibration process. WARNING! Keep hands, clothing, eyes, animals and children well clear when connecting power to this model or flying it! WARNING! Do not operate this model with a collapsed or partially collapsed transmitter (or receiver) aerial. The model may suffer from interference and may endanger your personal safety! Always extend aerials fully. Never tape an aerial to any carbon fibre helicopter components. 5. RANGE CHECK Check that all controls operate without interference at a minimum distance of 50 metres with transmitter and receiver aerials extended. WARNING! At distances of greater than 50 metres, it will become impossible to see your Twister clearly enough to be able to control it safely. Do not fly at 50 metres distance or greater. We strongly recommend you fly no further away than 15 metres. Throttle stick set to low Cyclic controls on right stick http://www.jperkinsdistribution.co.uk 3 Instruction Manual NEVER FLOWN R/C HELICOPTERS? WE RECOMMEND YOU SEEK ADVICE FROM YOUR LOCAL MODEL SHOP 6. CONTROL OPERATION CHECK Swashplate HOW DOES A HELICOPTER FLY? Check swashplate and flybar paddles are horizontal Flybar paddle 1. The helicopter swashplate should be perfectly horizontal when viewed from the side and horizontal with the flybar and paddles when viewed from the side of the helicopter. If it is not, adjust the transmitter trims until it is. 2. Roll cyclic - Move the roll (aileron) stick to the left. The swashplate should tilt to the left. If it tilts the opposite way, reverse the roll (AIL) reverse switch on the front of the transmitter. 3. Fore and aft cyclic - Move the fore and aft (elevator) stick forward. The swashplate should tilt forward. If it tilts the opposite way, reverse the fore and aft (ELE) reverse switch on the front of the transmitter. 4. Slowly move the throttle trim forward until the tail rotor unit rotates but the main rotor does not. 5. Move the tail rotor stick gently to the right. The nose of the helicopter should try to swing right (whilst the tail swings left). 6. Throttle - Slowly push the throttle stick forward and check that the main rotors start to rotate. Then immediately throttle back. Your Twister is ready for flight. N.B. After finishing flying you should always first disconnect the battery from the helicopter FIRST. Then switch off the transmitter. WARNING! If you are new to RC helicopters we strongly recommend you read the two following sections: How does a helicopter fly? Flight training tips 4 Both model and full-size helicopters are controlled in similar ways. A helicopter must be controlled about 4 axes simultaneously; yaw, pitch, roll and height. Your E Sky transmitter has 2 dual-axis precision stick units designed specifically for this task. The transmitter is supplied in Mode II version where the left stick controls height (climb or descent) and tail rotor (yaw left or right). The right stick operates the cyclic steering controls which are used to pitch the helicopter nose up/nose down and to roll the helicopter left or right. Note that the included DVD depicts the use of a Mode I (throttle right) transmitter. Transmitter stick movements Helicopters require relatively small control inputs of relatively small duration. Do not move the sticks to extreme positions. A delicate touch is required on the sticks. The sticks should be allowed to return to neutral almost immediately after a control input is made. If you watch an experienced pilot hovering his helicopter, you will see that his transmitter sticks hardly move. This is the goal you will be working towards in this guide. Height control A helicopters rotating wings - the rotor blades, generate lift, in the same way that a propeller generates thrust. The lift generated by the main rotor blades increases as rotor speed rises causing the helicopter to climb. Conversely as the main rotor speed is reduced, the helicopter descends. This method of helicopter height control is called 'fixed pitch'. Height is managed using the throttle stick of your E Sky transmitter. Push forward to climb, pull back to descend. Tail control Motor-driven rotor blades generate an opposing force (torque) that acts on the body of the helicopter, twisting the fuselage in the opposite direction of rotation to the main rotor blades. This rotation needs to be balanced by thrust generated by the tail rotor. When a helicopter is in the hover and the torque generated by the main rotor has been balanced by the tail rotor, a helicopter can be yawed left or right. If the tail rotor speed is increased, more tail thrust is generated and the nose of the helicopter yaws (swings) to the right. If the tail rotor speed is decreased the nose of the helicopter will swing to the left. This is called 'tail rotor control' and is http://www.jperkinsdistribution.co.uk Instruction Manual achieved by operating the rudder stick of your E Sky transmitter. Push the rudder stick left to yaw the nose of the helicopter to the left and push to the right to yaw the nose right. Your Twister helicopter is fitted with a micro piezo gyro and electronic mixing system which automatically compensates for torque changes and helps stabilise the tail making for much easier flight. Steering control - cyclic control The main directional or steering controls in a helicopter are known as the 'cyclic' controls and work by directing the thrust generated by the main rotor blades in the direction required for flight. When helicopter main rotor blades are spinning in flight you will often be able to make out what looks like a disc - as the blades blur with speed and viewing angle. This is known as the 'rotor disc' and is operated by the cyclic controls which are the right hand stick of your E Sky transmitter. Steering control - fore and aft cyclic When hovering, a brief forward push on the cyclic control stick will tilt the rotor disc forward causing the helicopter to accelerate in that direction. By pulling the stick back, any forward speed gained will be reduced as the rotor disc tilts backwards and thereby reverses the thrust generated by the forward stick command. Steering control - roll cyclic When hovering, a brief right control stick movement will roll the rotor disc to the right and helicopter will start moving to the right. By briefly moving the stick to the left any right drift or movement will be arrested or reduced. A helicopter in the hover behaves in an analogous way to a stick balanced vertically on ones finger - small movements of your hand will be required in order to prevent the stick from accelerating away from the vertical and falling to terra firma! Both experienced model and full-size pilots in the hover will gently 'nudge' the cyclic controls automatically in order to keep their helicopter in one spot and prevent it from accelerating away down the flying field. A large part of the initial learning phase in helicopter flight is about mastering the cyclic controls so that their correct use in the hover or whilst 'ground handling' becomes automatic and instinctive. Cyclic controls in detail In order to fly and maintain a model helicopter a basic understanding of the control mechanisms involved is required. The sequence of control works like this: As the cyclic transmitter stick is moved forwards, a pulsed signal is picked up by the receiver in the '4 in 1' control unit which is passed to the proportional fore and aft cyclic servo mounted in the model. http://www.jperkinsdistribution.co.uk The servo output arm operates the 'swashplate' tilting the swashplate forward. The swashplate is connected by linkages to the flybar and control paddles. The paddles are small 'wings' in their own right and are connected to the rotor head. It is the paddles that effectively drive the main rotor blade angle and hence move the rotor disc forwards/ backwards or left/right. When the forward cyclic command is released the swashplate is returned to the horizontal position and the rotor disc follows suit. FLIGHT TRAINING GUIDE WARNING! If you are a newcomer to R/C model helicopters, you must seek assistance from an experienced R/C model helicopter pilot. You should be aware that the main rotor blades and tail rotor blades spin at a high rpm and are capable of inflicting serious injury to people and animals. You must take care when you are flying and make sure there are no children or animals in the room or flying area. In addition, make sure the flying area is large enough and contains no obstacles (such as furniture) which could be hit while you are learning to come to terms with the flight characteristics of your Twister. The flying area The flying area should be indoors in a large room or a hall or office. In this room you should have all doors closed as any wind can affect the movement of the Twister. Make sure the take-off floor has a smooth surface rather than carpet which can trip up the Twister during ground handling. Be prepared for the fact that the helicopter will slide around on the floor until flying rpm has been reached. STEP 1–POSITIONING First, double check that all the controls are working and operating correctly. Place the model in the middle of the room. Position yourself at least 2 metres behind the helicopter and slightly off to one side so that you are able to see the nose of the helicopter. Useful tip ........................... Please note when flying that you must always watch the nose of the helicopter. If the nose of the helicopter yaws to the left, you must apply right tail rotor to correct this by pushing the tail rotor stick to the right. STEP 2–ROTOR SPIN-UP Watch the nose and apply just enough throttle until the model becomes light on its skids. Useful tip ........................... All helicopters exhibit a degree of instability when approaching take-off due to the side thrust generated by the tail rotor and to 5 Instruction Manual turbulence generated by the main rotor blades. These disturbing influences mainly manifest themselves as a drift to the left before and during take-off and a tendency to yaw left or right just prior to take-off. Observe whether or not the helicopter is tending to tilt forwards or backwards. If it tilts forward, you will need to apply rear elevator trim to correct. And vice versa if the Twister tends to tilt backwards towards you. Observe the helicopter about the roll axis and adjust the trims in the same way–if it tends to roll or hop to the left, apply a little right roll trim and vice versa. Adjust the trims until the Twister shows no detectable forward, backwards or sideways drift tendencies. Useful tip ........................... When applying throttle, you must apply it gently and in small amounts. At this stage the Twister MUST STAY ON THE GROUND! Too much throttle will cause the helicopter to leave the ground and you may have difficulty in bringing it under control quickly enough to avoid tipping it over. WARNING! Too much throttle applied too quickly will cause your helicopter to leap rapidly and uncontrollably into the air! Never apply too much throttle too quickly. STEP 3–GOING FOR A WALK The helicopter should now be trimmed and you should be in a position to start learning to 'take your Twister for a walk'. These first flights should be made with the Twister in contact with the ground at all times. Apply just enough power to make the helicopter light on the skids and add a few clicks of forward trim to tilt the rotor disc forwards. Apply enough power so that the machine starts to move slowly forwards. Watch for any change of direction of the model and use the controls to correct. If you cannot correct immediately, reduce the throttle and try again. The aim is to travel steadily and progressively across the floor. Walk forwards following the helicopter across the floor and using the controls to maintain slow and accurate progress. The 'walking technique' is the method required to safely develop the automatic ability to apply the right control input when needed. You must practice this until you believe you are starting to automatically input the control commands required to keep the helicopter moving gently forwards along the ground. When you feel confident in your ability to operate the controls correctly, proceed to the next step... 6 STEP 4–TAKING THE FIRST 'HOP' If you are ready for the first 'hop' into the air you will have spent some time mastering the skills required to observe the attitude of your Twister. You should be making the necessary control inputs automatically and you should able to make smooth progress across the surface of your floor. If you cannot, please keep practicing Step 3! The first 'hop' is a natural next step from walking your Twister. Whilst walking you apply a small amount of extra throttle to briefly raise the helicopter off the floor and into the air for a second. Then you should reduce throttle almost immediately to settle back onto the floor. You will notice that as the helicopter breaks free from the floor its nature changes and it may attempt to accelerate in an unforeseen direction. Be prepared for this natural consequence of leaving the friction of the floor for the 'friction-free' realm of 'real flying'! Most people feel they have just limited control when they leave the safety of the floor for the first time. However, with practice, you will find that you are able to make more and more of the correct control commands required to keep your Twister upright and that the hops become longer and higher. It is important during these stages to keep moving forward by applying a small amount of forward trim to tilt the rotor disc forwards. Always make sure you watch the nose of your helicopter–not the tail. The gyro will attempt to keep the tail straight for you but you will have to use the tail control to swing the nose of the helicopter straight as you make progress across the floor. Keep practising and you will find that your flights will become longer. Also please note that, depending on the size of your room, some control instability may be felt as a result of the air circulated around the room by your helicopters down draft. If you find this off-putting, we suggest that you land and let the air settle. Please be aware that a model helicopter in the hover–regardless of design–will never stay still! A helicopter will always require some level of input to stop drift or a tendency to turn or climb. This is not a sign of something faulty with the helicopter, but is in the nature of a hovering helicopter. As you become more familiar with your helicopter, you will find that your developing hand/eye coordination skills will enable you to correct any drift, roll or yaw almost as soon as it starts, and this will make your flying smoother and less jerky. By this stage in your training you should be able to manage hops at a height of between 10 and 30cm with duration of 5-10 seconds per hop. Flights will become longer and easier as your co-ordination and understanding of flight dynamics develop. http://www.jperkinsdistribution.co.uk Instruction Manual STEP 5–HOVERING AND MANOEUVRES By now you will have realised that in order to maintain flight, brief control inputs or 'nudges' are required–plus enough practice to manage operation of all the primary flying controls successfully together. As your co-ordination and anticipation improves, you should be able to reduce forward speed when making 'hops', thereby bringing your helicopter into a hover. Practice hovering until you feel confident with the basic handling of your helicopter. Next, you should start experimenting at rotating (yawing) the helicopter slightly to the left or right using the tail rotor (yaw) controls–but only proceed to this stage when you have mastered the hover! From the hover, yaw the model a few degrees left and then back to straight ahead–always remembering to watch the nose. Practice yawing to left and to right until you feel confident. Next, practice crabbing your Twister to the right and left using cyclic controls. Proceed as follows: From the hover, briefly 'nudge' a small amount of right roll. Your Twister will start a drift to the right. Put in a small amount of opposite roll to halt the drift, then a small amount of left roll to start a drift to the left. You will probably need to keep the tail straight using tail rotor whilst doing this. Always be ready to correct the drift by using opposite roll. If you get into trouble at any stage, reduce the throttle, land, change you trousers and try again. STEP 6–BEYOND THE HOVER As you become more proficient with your helicopter you will want a larger space so you can really start to fly around instead of hovering about all day. If you do fly outside, please remember that any wind will affect the performance of your Twister. Please keep this in mind if you do fly outdoors and don't be too surprised if, while flying your model, it suddenly climbs or drops without you making any input. This can be caused by a slight breeze or even a 'thermal' coming through. A training undercarriage can be a huge help by providing your Twister with a wide track and a degree of cushioning to aid stability and therefore help prevent 'tip-overs'. See the parts listing at the end of this manual. Another useful training aid is a computer flight simulator which can greatly enhance and speed up the learning process. In addition a simulator is great for teaching you “nose in”. This is when the nose of the helicopter is pointing at you and where some of the controls become effectively reversed–which can catch out both experienced and novice pilots alike! GOOD LUCK AND HAPPY FLYING! http://www.jperkinsdistribution.co.uk TROUBLESHOOTING VIBRATION Solution 1 – Out of balance main blades If vibration of tail boom or undercarriage is noticeable, the most likely problem will be out of balance main blades. To cure this, balance the blades as follows: Remove the metal pin retaining the complete rotor head onto the main shaft. Turn the head upside down and support it on 2 glass tumblers or similar. Observe which blade falls lowest and add tape to the undersurface tip area of the higher blade. Adjust until the blades are level and re-attach rotor head. Solution 2 – Bent main shaft The tail boom and undercarriage will vibrate if the main shaft is bent. Replace the main shaft and gear unit if you suspect a bent main shaft Solution 3 – Main blades not aligned correctly The main blades must be at 90 degrees to the flybar. If they are not straight, the helicopter will vibrate and/or 'nod'. Straighten the blades out to the flying position and try again. Solution 4 – Blade tracking is out. Sometimes, the rotor blades will fly at different heights and this will cause vibration. When the helicopter rotor disc is viewed in flight, the white-tipped main blade may fly at a different height to the other main blade. The blades are running 'out of track'. Note which blade is higher. Land the helicopter and physically twist the outboard half of the lower flying blade to a higher flying angle by firmly grasping the blade at the half-span point and twisting clockwise from the blade tip. The idea is to increase the angle of attack which causes the blade to fly higher. Be careful you do not damage any parts. Test fly and check tracking again. Adjust again if required until the blades run 'in track' as closely as possible. Solution 5 – Flybar paddles out of balance. Check that the distances from the rotor hub centre out to the flybar paddles are the same for both paddles. Adjust the flybar position by loosening the flybar control plate grub screws, re-centring the flybar, then tightening the grub screws. N.B. A small Allen key will be required. MAIN ROTOR DOES NOT TURN Solution 1 – Check throttle stick and trim lever are in the fully down position. Solution 2 – Check all electrical connectors and that the '4-in1' receiver crystal is seated securely in the socket in the '4-in-1' unit. 7 MAIN ROTOR TURNS BUT HELICOPTER DOES NOT TAKE OFF Solution 1 – This sometimes happens if your rotor blades are flying at too low or too shallow an angle. The helicopter will sometimes take off but appears to have too little power to climb. This is nearly always because one main blade is flying too low. If you can see which blade is flying low, follow the same procedure as outlined in Solution 4 on the previous page. Alternatively, increase the angle on both main blade tips as outlined in Solution 4. Solution 2 – Main motor needs to be loosened because the main gear/motor pinion gear mesh is too tight. The motor is retained by 2 screws. Slacken off both screws. Push the motor away from the main gear and retighten the screws in the new position. TWISTER EXPLODED VIEW 6600610 6600620 6600660 6600630 6600640 6600750 6600820 6600800 6600650 6600810 6600670 6600790 6600690 6600770 6600680 6600780 6600730 6600750 6600710 6600830 6600360 6600700 6600350 6600760 6600720 6600300 6600740 6600720 6600730 6600760 6600740 8 http://www.jperkinsdistribution.co.uk SPARE PARTS AND OPTION PARTS Helicopter components 6600800 TAIL GEAR & SHAFT 6600610 ROTOR HEAD PLATE 6600810 TAIL BEARING 2x6x3 (2) 6600620 MAIN BLADE CONTROL LINK 6600820 TAIL ROTOR BLADE SET 6600630 MAIN BLADES (PAIR) 6600830 TAIL BOOM (CARBON FIBRE) 6600640 CENTRE HUB 6600880 SCREW/NUT/WASHER SET 6600650 FLYBAR CARBON FIBRE (2) 6600890 TAIL MOTOR WIRE 6600660 FLYBAR PADDLES (2) 6600900 MAIN MOTOR WIRE 6600670 FLYBAR CONTROL SET Other parts & option parts 6600680 SWASHPLATE 5510540 AUTOMATIC DELTA PEAK CHARGER 6600690 LINK SET 6600300 Ni-Mh 8.4V 600MAH BATTERY PACK 6600700 MAIN MOTOR 6600310 220-230v UK MAINS CHARGER (3 PIN) 6600710 MAIN FRAME SET 6600340 3-IN-1 ESC/GYRO/MIXER UNIT 6600720 BATTERY MOUNTING SET 6600350 4-IN-1 ESC/GYRO/MIXER/RECEIVER 6600730 MAIN GEAR & MAIN SHAFT SET 6600360 MICRO SERVO 6600740 UNDERCARRIAGE SET 6600840 TRAINING UNDERCARRIAGE SET 6600750 HEAD/MAIN SHAFT BEARINGS (2) 6600860 TAIL MOTOR HEAT-SINK 6600760 CABIN SET ASSEMBLED WITH DECAL 6600870 MAIN MOTOR HEAT-SINK 6600770 TAIL HOUSING 6600850 ALLEN KEY/TIE WRAPS/SERVO TAPE 6600780 VERTICAL FIN SET 7711000 4-CH 35MHZ FM TRANSMITTER INC TX X'TAL 6600790 TAIL MOTOR 7711120 35MHZ FM CRYSTAL PAIR 6600300 Ni-Mh 8.4V 600MAH 6600360 MICRO SERVO 6600610 ROTOR HEAD PLATE 6600310 230v CHARGER (3 PIN) 6600620 BLADE CONTROL LINK 6600650 FLYBAR CARBON (2) 6600660 FLYBAR PADDLES (2) 6600670 FLYBAR CONTROL SET 6600340 3-IN-1 ESC/GYRO/MIXER 6600630 MAIN BLADES (PAIR) 6600680 SWASHPLATE 6600350 4-IN-1 ESC/GYRO/MIXER/RX 6600640 CENTRE HUB http://www.jperkinsdistribution.co.uk 9 6600690 LINK SET 6600780 VERTICAL FIN SET 6600870 MOTOR HEAT-SINK 6600700 MAIN MOTOR 6600790 TAIL MOTOR 6600880 SCREW SET 6600710 MAIN FRAME SET 6600800 TAIL GEAR & SHAFT 6600890 TAIL MOTOR WIRE 6600720 BATTERY MOUNTING 6600810 TAIL BEARING 2x6x3 (2) 6600900 MAIN MOTOR WIRE 6600730 MAIN GEAR & SHAFT 6600820 TAIL ROTOR BLADE SET 7711000 4-CH TRANSMITTER 6600740 UNDERCARRIAGE 6600830 TAIL BOOM (CARBON) 7711120 35FM CRYSTAL PAIR 6600750 HEAD/SHAFT BRGS (2) 6600760 CABIN SET WITH DECAL 6600770 TAIL HOUSING 10 6600840 TRAINING UNDERCART 6600850 ACCESSORY PACK 5510540 AUTOMATIC DELTA PEAK CHARGER 6600860 TAIL MOTOR H/SINK http://www.jperkinsdistribution.co.uk