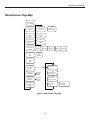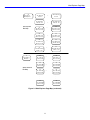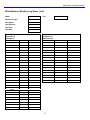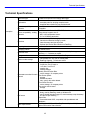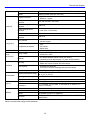
1
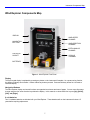
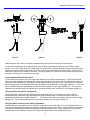
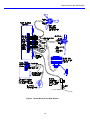
WIND EXPLORER User’s Manual 110 Riggs Road · Hinesburg · VT 05461 USA · TEL (802) 482-2255 · FAX (802) 482-2272 · EMAIL [email protected] · www.nrgsystems.com NRG Systems, Inc. PO Box 509 Hinesburg VT 05461 Tel: 802-482-2255 Toll free in USA: 800-448-WIND Fax: 802-482-2272 e-mail: [email protected] Specifications are subject to change without notice. \\Sol\SALES\Sales Released\Wind_Explorer_manual22.doc Rev.2.2 2 11 April 2006 Table of Contents Table of Contents Customer Support.......................................................................................................................................................4 Introduction ................................................................................................................................................................5 Welcome! ...............................................................................................................................................................5 Using This Manual...................................................................................................................................................5 Definitions...............................................................................................................................................................5 Features .................................................................................................................................................................5 Precautions ................................................................................................................................................................6 Wind Explorer Components Map .................................................................................................................................7 Getting started with the Wind Explorer .........................................................................................................................9 Wind Explorer Page Map...........................................................................................................................................10 Wind Explorer Display Pages ....................................................................................................................................12 Installation, Sensors and Connections........................................................................................................................16 Starting up the Wind Explorer ....................................................................................................................................20 Begin Data Collection................................................................................................................................................20 Completing the Installation ........................................................................................................................................20 Maintenance and Data Collection...............................................................................................................................22 Technical Specifications ............................................................................................................................................24 Glossary ..................................................................................................................................................................27 Two Year Limited Warranty .......................................................................................................................................28 Sending Repair Items to NRG Systems ......................................................................................................................29 3 Customer Support Customer Support NRG Systems offers a variety of support options to help you get the most from your NRG product. If you have questions about your Wind Explorer, first look in the printed product documentation or visit the Customer Support section of NRG’s web site, www.nrgsystems.com. NRG Systems maintains an extensive website which includes an in-depth customer support area for NRG customers. During our regular business hours, you may contact your salesperson or NRG Systems Customer Support for assistance using the information below. Customer Support is available 8:30 AM to 5:00 PM EST, Monday through Friday. NRG Systems, Inc. 110 Riggs Road Hinesburg, Vermont 05461 U.S.A. Telephone: 802-482-2255 Toll Free (USA only): 800-448-WIND (800-448-9463) FAX: 802-482-2272 Email: [email protected] When you call or email, you should have the appropriate product documentation at hand and be prepared to give the following information: • • • • • • • • • Customer name Who purchased equipment Item number or description Serial number When equipment was purchased Where equipment is installed – climate and terrain conditions Description of the problem with some detail What events took place leading up to the problem What you have tried while attempting to solve the problem All instruments, sensors, software and towers manufactured by NRG Systems are designed to be reliable and easy to use. We welcome your comments and appreciate your help in making NRG products the best available. 4 Introduction Introduction Welcome! Congratulations on your purchase of the NRG Wind Explorer. The Wind Explorer combines the features of two loggers into one. Standing alone, the Wind Explorer collects monthly wind summary information for up to an entire year, saved in its built-in non-volatile memory. The information for each month includes: • monthly gust data; • a wind speed distribution with total hours and percent of time in each of 27 wind speed bins; • a wind direction distribution with total hours and percent of time in each of 16 compass point direction bins. The Wind Explorer also collects an ongoing summary, including a running average wind speed, and gust data. You can clear this summary at any time, allowing you to use the summary for any time period you wish. With the addition of the DataPlug, the Wind Explorer is also a time series wind data recorder, collecting wind speed average and standard deviation, average wind direction, and one additional sensor average for each 10 minute interval. The DataPlug provides 128 KBytes of removable non-volatile storage for the time-series data. Even with all these features, the Wind Explorer is easy to use. The 2-line, 32-character alphanumeric display shows you data and control information with clear titles. The DataPlug needs no special controls to start or stop; just plug an erased DataPlug into the Wind Explorer, and logging begins. Just remove the DataPlug to collect the stored data for later transfer to your PC. Using This Manual This User’s Manual should be read completely before installing and operating the Wind Explorer. Be sure to review the Glossary so that you are familiar with important terminology. Follow all instructions and recommendations closely. Do not jeopardize the reliability of your data collection system by not being prepared with the required information and tools. Definitions This type style is used for the general body of this manual and is used for general descriptions and instructions to the user. This type style is used to warn users of a potential danger, either to themselves or to the equipment or data. Instructions in [Brackets] refer to Wind Explorer’s navigation buttons and require you to press a button or series of buttons to perform a specific function. Features • • • • • • Simple to use Intuitive navigation Inexpensive turbine performance verification Operates on (2) 9 volt batteries for about 1.5 years Allows historical comparisons of 1 year’s worth of data Calculates actual power in the wind 5 Precautions Precautions • Your Wind Explorer must be properly grounded. A ground wire is included and should be connected from the Wind Explorer’s ground terminal to an appropriate earth ground. • Sensor cables become less flexible and are more easily damaged at very low temperatures. Make sure that all sensor cables are securely fastened to the tower or mounting hardware so they do not flap in the wind. • Be sure that all connections are tight and securely fastened to ensure reliability in high winds. • Always use good quality alkaline batteries, and always stay within reasonable limits when establishing your battery replacement schedule. • Make sure that all sensor cables are spiral wrapped (2 wraps every 3 meters) around the tower to discourage natural frequency vibrations. Use a high quality electrical tape rated for extreme conditions to further secure the cables to the tower or mounting hardware. 3M Scotch® Super 88 electrical tape works very well in cold climates. 6 Instrument Components Map Wind Explorer Components Map DISPLAY WIND SPEED CHANNEL NAVIGATION BUTTONS WIND DIRECTION CHANNEL EXTRA ANALOG CHANNEL DATAPLUG SOCKET GROUND TERMINAL BATTERIES Figure 1: Wind Explorer Front Panel Display The liquid crystal display is activated by pressing any button on the instrument’s faceplate. As a power saving function, the display will always shut off after 1 minute without any buttons pressed. Press and hold any button for 4 seconds to reactivate display. Navigation Buttons The Wind Explorer display and control functions are organized as columns and rows of pages. You can move from page to page using the four arrow direction keys below the display. In this manual, we show these four keys as [Up], [Down], [Left], and [Right]. 9 volt batteries Two 9 V alkaline batteries are included with your Wind Explorer. These batteries will run the instrument for about 1.5 years before requiring replacement. 7 Instrument Components Map Ground terminal The ground terminal is designed for connection directly to earth ground with the provided ground wire. The Wind Explorer must be grounded before connecting any sensors. Failure to ground the Wind Explorer voids its warranty and could result in damage to the unit. DataPlug socket With the addition of the DataPlug, the Wind Explorer is also a time series wind data recorder, collecting wind speed average and standard deviation, average wind direction, and one additional sensor average for each 10 minute interval. The DataPlug provides 128 KBytes of removable non-volatile storage (about 7 months) for the time-series data. Channel description Speed The Wind Explorer wind speed input is engineered for use with the NRG Maximum #40 anemometer. The display scaling and wind speed distribution bin widths are pre-determined for this anemometer. Other low-level AC wind speed sensors may be compatible with the Wind Explorer, although special processing of the data will be required to obtain data that is properly scaled in miles-per-hour or meters-per-second. Vane The Wind Explorer wind direction input is engineered for the NRG #200P Wind Direction vane. Extra The Extra channel of the Wind Explorer will log data from any 0 to 2.55 volt analog signal, with specific support for the NRG #110S air temperature sensor, and the Licor total solar pyranometer. 8 Getting started with the Wind Explorer Getting started with the Wind Explorer We recommend getting familiar with the Wind Explorer functions and features before going out into the field for installation. Unscrew the four cover screws and remove the Wind Explorer cover to access the display and controls. The batteries plug straight into the Wind Explorer at the lower left and lower right. Observe the polarity; the positive side end of the battery (with the smaller terminal) goes toward the top of the logger. Plug in one of the batteries to start the Wind Explorer. The Wind Explorer display and control functions are organized as columns and rows of pages. You can move from page to page using the four arrow direction keys below the display. In this manual, we show these four keys as [Up], [Down], [Left], and [Right]. The Wind Explorer Page Map (Figure 2) shows you all the pages, arranged in their rows and columns. To move from page to page, press the direction arrows. When you are at the page at the top of a column, pressing [Up] will "roll" you back to the page at the bottom of the column. At the bottom of the column, pressing [Down] will "roll" you back to the top page of the column. Similarly, when you are at the rightmost page of the row, if you press [Right] you will "roll" to the left-most page in the row. If you press [Left] when at the left-most page of a row, you will "roll" back to the right-most page of the row. If no keys are pressed for one minute, the display is turned off to conserve battery power. To re-start the display, press and hold any key for 4 seconds. The display will re-start at the Identification page. 9 Wind Explorer Page Map Wind Explorer Page Map 1 Wind Explorer Ver 2 SN 0001 2 11 27 Present Speed 10 mph Average Speed 10.1 mph Interval Gust 120.0mph NNW 3 12 Present Dir 000 Average Dir. 160 4 13 Present Ext. 255 Batt. 8.4V Average Ext. 200 5 14 15 16 17 18 13 Nov 1997 13:30:05 Set Year Set Month Set Day Set Hour Set Minute 6 19 Site 1234 Set Site Number 7 Units Metric 8 20 Summary Avg 10.0 m/s Wind Speed Summary -> Freq. Dist. of Wind Speed 9 Freq. Dist. of Wind Dir-> 21 Gust 28.0 m/s 315 14Sep1997 14:30 See Wind Speed Bin Map 22 Summary since 12 Jan 1997 14:30 See Wind Direction Bin Map 23 Press -> to Erase Summary 10 DataPlug 1234 Logging 24 Are you sure? [Down] to Erase! Figure 2: Wind Explorer Page Map 10 Wind Explorer Page Map 20 Freq. Dist of Wind Speed -> Jan 1997 Avg 8.3 m/s Jan 1997 Gust 38.0 m/s 115 Wind Speed Bin Map 25 Jan 1997 <.5 m/s 199.5 hrs, 21.5% ... Dec 1997 Avg 8.3 m/s ... Dec 1997 Gust 38.0 m/s 115 ... 25 25 ... Jan 1997 1 m/s 100.5 hrs, 21.5% ... 25 Jan 1997 2 m/s 25.3 hrs, 21.3% ... ... 26 25 Dec 1997 2 m/s 25.3 hrs, 21.3% 25 Dec 1997 >25 m/s 2.8 hrs, 1.1% Jan 1997 >25 m/s 2.8 hrs, 1.1% Jan 1997 N 45.5 hrs,10.0% Dec 1997 1 m/s 100.5 hrs, 21.5% ... 25 9 Freq. Dist. of Wind Dir. -> 25 Dec 1997 <.5 m/s 199.5 hrs, 21.5% ... 26 Dec 1997 N 45.5 hrs,10.0% 26 Jan 1997 NNE 45.5 hrs,10.0% Wind Direction Bin Map 26 Jan 1997 NE 45.5 hrs,10.0% 26 ... ... . . . Dec 1997 NNE 45.5 hrs,10.0% 26 Dec 1997 NE 45.5 hrs,10.0% . . . 26 26 Jan 1997 NNW 45.5 hrs,10.0% Dec 1997NNW 45.5 hrs,10.0% Figure 2: Wind Explorer Page Map (continued) 11 Wind Explorer Display Pages Wind Explorer Display Pages Identification Page When the Wind Explorer is first turned on, you will see the Identification page. This page tells you the serial number of your Wind Explorer, and the revision of its program. The Identification page always displays for 3 seconds (the keys are ignored during this time), then Wind Explorer will display the Present Wind Speed page and the keys are activated. Present Wind Speed Page The Present Wind Speed page displays the wind speed of the last 2 second sample, scaled in either miles per hour, or meters per second (for selection of English or Metric units for display, see "Units Page", below). This page is updated every 2 seconds. Average Wind Speed Page This page displays the average value of wind speed from the last 10 minute interval. This page is updated at the end of each 10 minute averaging interval, so this value may be almost 10 minutes old just before update. When the Wind Explorer is first turned on, it has not yet completed a 10 minute interval. In this case, the logger displays "collecting data" instead of a value. Interval Gust Page This page displays the highest 2 second wind speed that occurred during the previous 10 minute averaging interval. This value is updated every 2 seconds, if a new gust occurs. It is reset to zero automatically at the beginning of each 10 minute averaging interval. For a gust value that you can reset manually, see the Wind Speed Summary. Present Wind Direction Page This page shows the present wind direction in compass degrees. This page is updated every 2 seconds. Average Wind Direction Page This page displays the vector average wind direction from the last 10 minute interval. As with the other average displays, this page is updated at the end of each 10 minute averaging interval, so this value may be almost 10 minutes old just before update. When the Wind Explorer is first turned on, it has not yet completed a 10 minute interval. In this case, the logger displays "collecting data" instead of a value. Present Extra Page This page shows the present value from the sensor on the extra channel. Since the type of this sensor may vary, the display is the raw value from 0 to 255. To interpret this value for your sensor, see "Sensors and Connections", below. The second line of this page shows the battery voltage. The batteries need to be changed when their voltage drops below 7 volts. Don't forget to change the batteries one at a time to keep the logger continuously powered. See Maintenance and Data Collection" below for more information about replacing the Wind Explorer batteries. Average Extra Page This page displays the average for the sensor on the Extra channel from the last 10 minute interval. As with the other average displays, this page is updated at the end of each 10 minute averaging interval, so this value may be almost 10 minutes old just before update. When the Wind Explorer is first turned on, it has not yet completed a 10 minute interval. In this case, the logger displays "collecting data" instead of a value. Date and Time Page This page shows the current date and time maintained by the Wind Explorer. Press [Right] to set the time and date. -Hint: if you accidentally hit [Right], and do not want to re-set the clock, wait one minute for the display to shut off. This cancels the setting operation, and the previous time is maintained. Sometimes it is quicker to just reset the clock, if you have a reference clock available. 12 Wind Explorer Display Pages Set Date and Time Pages To set the Wind Explorer clock, press [Right] at the Date and Time page. Set the Year. Though some pages display 2 digits for the year, the Wind Explorer uses 4-digit years internally, so the year 2000 will not cause special problems. When the correct year is displayed, press [Right] to set the month. Set the month by pressing [Up] for the previous month, or [Down] for the next month. [Down] from December "rolls" to January, and [Up] from January rolls to December. When the correct month is displayed, press [Right] to set the day. Set the day by pressing [Up] to increase the day, and [Down] to decrease the day. Note that the Wind Explorer knows how many days are in the month you have set. Pressing [Up] at the last day of the month "rolls" back to the first of the month. Pressing [Down] at the first will "roll" to the last day of the month. When the day is correct, press [Right] to set the hour. Set the hour by pressing [Up] to increase the hour, and [Down] to decrease the hour. The hour is set in 24-hour format, not a.m./p.m., so remember to use 24-hour time if you are setting the clock in the afternoon. As with the other pages, the hour "rolls" from 23 to 00, and from 00 to 23. When the hour is correct, press [Right] to set the minute. Set the minute by pressing [Up] to increase the minute, and [Down] to decrease the minute. As with the other pages, the minute "rolls" from 59 to 00, and from 00 to 59. When you press [Right] the Wind Explorer seconds are set to 00 and the clock resumes running from that time. Hint: To synchronize the Wind Explorer exactly to your reference, set the minute value to the upcoming minute, then wait until the reference clock is exactly at the minute before pressing [Right]. Site Number Page This page displays the four-digit Site number you have assigned for this data collection site. The Site number is stored on the DataPlug (when used) to identify what site the data came from. The Wind Explorer sets the Site Number to the logger serial number when it is first turned on, but later remembers the number you have assigned even if it is turned off. Press [Right] to set the Site Number. Set Site Number Page Set each digit of the site number by pressing [Up] to increase the digit, or [Down] to decrease it. Pressing [Down] at 0 "rolls" to 9, and pressing [Up] at 9 "rolls" to 0. Press [Right] to move to the next digit. When all four digits are set, the Site Number page is displayed again. Units Page This page shows the units setting which is used to scale all displayed wind speed values. Press [Right] or [Left] to toggle the wind speed units from Metric to English and back. The Wind Explorer defaults to Metric units when first started, but later remembers your preferred setting even if it is turned off. The displayed Wind Speed distribution bins are either English (2 mph wide) or Metric (1 m/s wide) depending on this setting as well. The data is collected and stored internally in both formats so that you can change the displayed units at any time without loss of data or loss of accuracy. Wind Speed Summary Header Page This page is a title page for the wind speed Summary data. This title page allows you quickly page past the entire Summary by pressing [Up] or [Down]. Press [Right] to display the wind speed Summary Average page. Summary Average Page This page displays the running average wind speed of the entire period since the Summary was reset. This value is recomputed and updated at the end of each 10 minute averaging interval. To return to the Summary Header page, press [Left]. Summary Gust Page This page displays the highest 2 second wind speed since the Summary was reset, the time and date the gust occurred, and the direction of the gust. 13 Wind Explorer Display Pages Summary Since Page This page displays the date and time the Summary was reset. Summary Reset Pages This page just displays the message "Press [Right] to erase Summary." If you do not want to erase the Summary, press [Up] or [Down] to display the desired Summary page. To erase the Summary data and restart a new Summary, Press [Right]. Because the old Summary data will be lost by this function, a confirmation page is displayed. It asks if you are sure you want to erase the Summary. To erase the Summary, press [Down] to confirm. The Summary is reset, and the Summary Since page is displayed, showing that that the Summary has restarted at the present time. If you have reached the confirmation page by accident, press [Up], [Left], or [Right] to exit. The Summary Since page is displayed, showing the existing Summary time is unchanged. About Monthly Wind Speed Data The Wind Explorer has room for 12 one-month data sets. Each data set includes the month's average, the month's gust data, and the monthly wind speed distribution bins. Each month's data is displayed as a column of pages in the Wind Speed data area. For each month, the Wind Explorer stores several pieces of information. The monthly average is the average wind speed for the entire month. For the current month, it is the average to date. The monthly gust is the highest 2 second wind speed that occurred in the month. The time and date of occurrence are recorded as well as the direction of the gust. The frequency distribution of wind speed records how often the 10 minute average wind speed is in each bin. When English units are selected, the bins are 2 miles-per-hour wide. The first bin is the "<1 mph" bin recording average wind speeds less than 1 mph, the next bin, "2 mph" records averages from 1 to 3 mph, the next bin is "4 mph" and records averages from 3 to 5 mph, and so on. The next-to-last bin is "50 mph", recording average wind speeds of 49 to 51 mph, and the last is the ">51 mph" bin, recording any average greater than 51 mph. When Metric units are selected, the bins are 1 meter-per-second wide. The first bin is the "<0.5 m/s" bin recording average wind speeds less than 0.5 m/s. The next bin, "1 m/s" records averages from 0.5 to 1.5 m/s. The next bin is "2 m/s" and records averages from 1.5 to 2.5 m/s, and so on. The next-to-last bin is "25 m/s", recording average wind speeds of 24.5 to 25.5 m/s, and the last is the ">25 m/s" bin, recording any average greater than 25.5 m/s. The frequency distribution of wind direction records how often the 10 minute average direction is in each of the 16 compass-point bins. There are 16 bins each centered on a compass point, from North, to North-Northeast, to Northeast, and so on, around to North-Northwest. Data is stored in these monthly data sets according to the logger's clock. When the Wind Explorer is placed in service, it begins storing data for the month in which it was started. Since the Wind Explorer has room for only one year's data, old monthly data is discarded when the same month begins in the following year. So, to preserve the data, you must record the monthly information for each month sometime before that month of the next year. The Wind Explorer displays the year and month for each monthly column so you always know which year the monthly data is from. When the Wind Explorer has been in service for less than 11 months, some of the monthly columns will not have data yet. In this case, the logger displays "No Data" instead of a value on the display pages. New data is stored at the end of each 10 minute average, but the display is not automatically refreshed. Hint: If you wish to see an update of a monthly display after a new interval has completed, move off the page and then back to it. The logger will re-read the data and re-compute the displayed values. Wind Speed Data Header Page This page is a title page for the Monthly wind speed data. This title page allows you quickly page past the entire Monthly data area by pressing [Up] or [Down]. Press [Right] to display Monthly wind speed data pages. Monthly Average Page The first page of Monthly data is the Monthly Average page. This page displays the average wind speed for the entire month. For the current month, this is the average to date. 14 Wind Explorer Display Pages Monthly Gust Page This page displays the highest 2 second wind speed that occurred during the month. The time and date of the gust, and the direction of the gust are also displayed. Frequency Distribution of Wind Speed Pages Below the gust data is the frequency distribution of wind speed. The bins are displayed one at a time. The top line shows the month and wind speed at the center of the bin, as explained above. The bottom line shows the total hours and percent of time the wind was in the bin range. Notice that when displaying the frequency distribution of wind speed, moving across the rows shows each month's data for the selected bin, and moving up and down the columns moves from bin to bin for the selected month. Frequency Distribution of Wind Direction Header Page This page is a title page for the frequency distribution of wind direction. As with the other title pages, this page allows you quickly page past the distribution of direction by pressing [Up] or [Down]. Press [Right] to display the frequency distribution of wind direction. Frequency Distribution of Wind Direction Pages The bins are displayed one at a time. The top line shows the month and direction at the center of the bin, as explained above. The bottom line shows the total hours and percent of time the wind direction was in the bin range. Notice that when displaying the frequency distribution of wind direction, moving across the rows shows each month's data for the selected bin, and moving up and down the columns moves around the compass from bin to bin for the selected month. DataPlug Status Page This page shows the current status of the DataPlug. If no DataPlug is installed, this page displays "No DataPlug, Logging Stopped", indicating that no time-series data is being logged. Normally, DataPlugs are erased after the data has been read and archived. This ensures that there is no old data after the end of the new data. When a DataPlug is inserted, the Wind Explorer checks to be sure that the DataPlug has been erased. If so, time-series data logging begins, and the page shows the DataPlug serial number and the message "Logging". If for some reason you need to re-use a DataPlug that has not been erased, you can plug it into the Wind Explorer as usual. The Wind Explorer detects that there is data on the DataPlug. To prevent data loss if this is done accidentally, the Wind Explorer will ask for confirmation before beginning to store new data over the old data. The page will display "Data on DataPlug, Press [Right] to erase". If you plugged in the wrong plug, remove it now. If you want the Wind Explorer to write new data over the old, press [Right]. Time-series data logging begins, and the page shows the DataPlug serial number and the message "Logging". 15 Installation, Sensors and Connections Installation, Sensors and Connections The logger should be turned off during installation; remove both batteries until all connections are complete. Mounting and Shelter boxes To install the Wind Explorer, begin by mounting the logger in the desired location. The Wind Explorer comes with 4 logger mounting screws which thread into the 4 corner holes in the back of the Wind Explorer’s case. The Wind Explorer should be mounted in a location which is protected from direct precipitation and direct sunlight whenever possible. The Wind Explorer's enclosure is weather resistant to IP55 standards, but the external connections should be protected. Also, long exposure to sunlight over years of use will degrade the Wind Explorer's enclosure. And, since the logger case must be open to monitor and read out the data, a sheltered location is needed. The complete Wind Explorer NRG NOW System includes a shelter box. The Wind Explorer is mounted to the shelter box with the supplied logger mounting screws, and the shelter box is mounted to the tower with 2 hose clamps. Earth Grounding Next, connect the Wind Explorer earth grounding terminal (the bottom screw terminal, labeled “GND”) directly to an earth ground point using the included logger grounding cable. NRG NOW systems include a grounding kit with a ground rod to provide an earthing point for both tower lightning protection and for the logger's earth ground. Connect the logger’s earth ground directly to the ground rod, not to the tower ground cable. A high quality earth ground connection is essential for 2 reasons. First, it provides the return for the Wind Explorer's protection against electrostatic discharge and other over-voltage damage. Second, it provides the return for the logger and sensor cable shielding to protect against electrical interference. Sensors for the Wind Explorer Refer to the sensor and tower system documentation for mounting of sensors. Figure 6 shows the connections from the sensors to the Wind Explorer. There are labels for each of the 9 screw terminals on the front panel adjacent to each terminal. The Wind Explorer wind speed input is engineered for use with the NRG Maximum #40 anemometer. The display scaling and wind speed distribution bin widths are pre-determined for this anemometer. Other low-level AC wind speed sensors may be compatible with the Wind Explorer, although special processing of the data will be required to obtain data that is properly scaled in miles-per-hour or meters-per-second. The Wind Explorer wind direction input is engineered for the NRG #200P Wind Direction vane. The Extra channel of the Wind Explorer will log data from any 0 to 2.55 volt analog signal, with specific support for the NRG #110S air temperature sensor, and the Licor total solar pyranometer. This section includes connection information for these sensors. Consult NRG for information on Wind Explorer compatibility with other sensors. Connecting the Anemometer Refer to Figures 3 through 5. • Insert the tinned ends of the sensor cable through the top of the rubber sensor terminal boot’s cable sleeve. • Pull through until the end of the cable with lugs extends out the top of the boot. • Slide the rubber sensor terminal boot and anemometer onto the straight stub mast. • Secure the anemometer with the supplied cotter pin and set screw. • Loosen the nut on each of the 2 studs on the sensor and slide on the lugs. • Tighten the nuts down using a ¼” nut driver. Do not over-tighten. • Lightly coat the terminals with petroleum jelly, and slide the rubber boot over the bottom of the sensor. • Secure the bottom of the rubber boot with electrical tape, leaving a hole for drainage of moisture (Figure 5). Don’t tape the top of the boot to the sensor because if the tape unravels, it can interfere with the sensor’s rotation. 16 Installation, Sensors and Connections Figure 3 Figure 4 Figure 5 Attach the sensor stub mast to your chosen installation site, and run sensor cables to the Wind Explorer. To connect the anemometer to the Wind Explorer, first connect the anemometer’s shield wire to the Earth Ground terminal. Touch the 2 signal wires to the earth terminal to ensure there is no static electricity built up in the sensor, then connect the 2 wires from the anemometer to the top 2 terminals on the Wind Explorer, labeled "SPD" . NRG supplied cables use a black wire and a white or clear wire. There is no polarity; the 2 wires may be connected either way, but by convention, the black wire is connected to terminal 2. Connecting the Wind Direction Vane To connect the wind direction vane, first connect the shield wire to the Earth Ground terminal. Touch the three signal wires to the earth terminal to ensure there is no static electricity built up in the sensor, then connect the three wires from the sensor to the Wind Explorer. NRG cables use red, white and black wires for the vane. The black wire is connected from the end terminal on the wind vane without the red polarity mark, to terminal 5 on the logger, labeled "V-". The white wire is connected from the center terminal on the wind vane to terminal 4 on the logger, labeled "VS". The red wire is connected from the end terminal on the wind vane, with the red polarity mark, to terminal 3 on the logger, labeled "V+". Using the Extra Channel for Temperature The Wind Explorer supports one of 2 NRG sensors on the Extra channel. If you are using the model 110S air temperature sensor, first connect the shield wire to the Earth Ground terminal. Connect the sensor’s black wire is connected to terminal 8 on the logger, labeled "E -". The sensor's white wire is connected to terminal 7 on the Logger, labeled "ES". The red wire from the sensor is connected to terminal 6 on the logger, labeled "E+". Using the Extra Channel for the Solar Pyranometer The Wind Explorer also supports the Licor total solar pyranometer on the extra channel. To use the pyranometer, you must turn on the pyranometer switch on the logger to configure the input for this sensor. With the batteries out, there are 2 tiny switches accessible behind the front panel, above the right battery socket. Turn the left switch on by pushing it upward with a small screwdriver or a pen tip to configure the Wind Explorer for the pyranometer input. 17 Installation, Sensors and Connections The pyranometer is provided with a 150 Ohm resistor. The resistor has no polarity; it may be connected either way. The pyranometer's cable has a braided outer wire and center clear wire. Connect one end of the resistor and the center clear wire to logger terminal 8, labeled "E-". Connect the other end of the resistor and the braid lead to logger terminal 7, labeled "ES". Terminal 6, labeled "E+" is not used for the pyranometer. Make sure that the leads are not touching from terminal 7 to 8. 18 Sensor Wiring for the Wind Explorer Figure 6: Sensor Wiring for the Wind Explorer 19 Starting up the Wind Explorer Starting up the Wind Explorer When the sensor connections are completed, turn the Wind Explorer on by inserting one of the batteries. You will see the Identification page, then the Present Wind Speed page. Check that the wind speed as displayed is reasonable. If not, check for loose connections at the sensor or at terminal 1 and 2 of the Wind Explorer. Loose wiring will often give a zero wind speed reading, but a connection which is intermittent can give a high false wind speed. On a day with very low wind speeds, turn the anemometer by hand to confirm proper operation of the wind speed channel. Go to the Present Wind Direction page. Check that the displayed wind direction is reasonable. If possible, turn the wind vane to various directions by hand to confirm proper operation of the wind vane and wind direction channel. As with wind speeds, if the wind direction channel is not working correctly, check for loose connections at the sensor and at Wind Explorer terminals 3, 4, and 5. If the extra channel is used, check the Current Extra page to see that the displayed value is reasonable. The extra channel display is in raw counts. For the 110S temperature sensor, subtract 123.5 from the displayed value to get the indicated temperature in degrees Fahrenheit. For the Licor Pyranometer, the raw value is in microamperes. The calibration sheet for your Pyranometer gives its calibration factor in microamperes per kilowatt per square meter. Depending on sun conditions, the present value will vary widely, up to 2000 watts-per-square-meter. Try shadowing the sensor then uncovering it to confirm that the sensor and extra channel are operating properly. Begin Data Collection When you are satisfied that the logger and sensors are working properly, you can start data collection. When beginning data collection at a new site, we recommend erasing any previous data stored in the Wind Explorer’s internal memory. Erase All Data The Wind Explorer allows you to erase all the data in its memory. This feature is designed to be used only when installing the Wind Explorer for the first time at a new location. All 12 monthly data sets will be lost, and the Summary data will be lost. If the Wind Explorer contains historical data that is of value, you must record it now before erasing! To begin the Erase All function, remove both batteries from the Wind Explorer so it is shut off. Then press and hold the [Up] button while plugging in the battery. You will see the Erase All Data page, which tells you to “Press [Right] to erase all data”. You can stop the erase by pressing any of the other keys. To begin the erase, press [Right]. You will be asked to confirm. The confirmation page says “Are You Sure? Press [Down] to Erase!”. This is the last opportunity to stop the erase. To begin the erase, press [Down]. “Erase all data” is displayed. The erase process takes about 30 seconds. As each month is being erased, the month name is displayed to show that the erase is progressing. When the erase is complete, the Present Wind Speed page is displayed. Starting Time-Series Logging If you are collecting time series data on the optional DataPlug, start logging now. Make sure the display is active, at any display page. Plug the DataPlug into the Wind Explorer’s DataPlug socket to begin collecting data. The DataPlug Status page will be displayed, telling you the DataPlug number and that logging is started. See the DataPlug Status Page, in the Wind Explorer Display Pages section of this manual, for more details on this page. Completing the Installation To complete the installation, make sure both batteries are plugged in. Make one last scan of the Present readings pages, making sure that the battery voltage is approximately 9 volts. Remove the desiccant pack from the plastic bag, and clip the pack onto the Wind Explorer cover. Fold one edge of the pack over and slip it into the desiccant clip at the top inside 20 Starting up the Wind Explorer edge of the cover. Place the cover on the logger. Start the four screws into the case. Make sure the case gasket is seated correctly, and tighten the cover screws. Do not over tighten! Close and lock the shelter box. 21 Maintenance and Data Collection Maintenance and Data Collection We recommend making site visits at least monthly to collect the data logged by the Wind Explorer. Here is a recommended routine for these periodic site visits. What to Bring • • • Batteries Log Sheets Erased DataPlug, if used Site Visit To-Do Checklist q q q q q q q q q q Open the shelter box and remove the logger cover Press and hold any key to start the display Check battery voltage. Replace batteries if voltage is less than 7 volts. Always remove and replace one battery, then the other, so that the logger is continuously powered. Pull DataPlug, if used. Note DataPlug number, when it was collected, and the site number. Check Present readings for reasonable values; make a visual check of the site and the sensors. Record Summary information and monthly bin information onto log sheets if desired. Check clock, re-set if needed. Reset Summary, if desired. Plug in new DataPlug, if used. Note the DataPlug number, when it was started, and the site number. Close logger box; close and lock shelter box. 22 Maintenance and Data Collection Wind Explorer Monthly Log Sheet (m/s) Month: Year: Monthly Average: Gust Speed: Gust Direction: Gust Time: Gust Date: Frequency Distribution of Wind Speed: Speed Hours % time Frequency Distribution of Wind Direction: Direction < 0.5 m/s North 1 m/s NNE 2 m/s Northeast 3 m/s ENE 4 m/s East 5 m/s ESE 6 m/s Southeast 7 m/s SSE 8 m/s South 9 m/s SSW 10 m/s Southwest 11 m/s WSW 12 m/s West 13 m/s WNW 14 m/s Northwest 15 m/s NNW 16 m/s 17 m/s 18 m/s 19 m/s 20 m/s 21 m/s 22 m/s 23 m/s 24 m/s 25 m/s > 25 m/s 23 Hours % time Technical Specifications Wind Explorer Monthly Log Sheet (mph) Month: Year: Monthly Average: Gust Speed: Gust Direction: Gust Time: Gust Date: Frequency Distribution of Wind Speed: Speed Hours % time Frequency Distribution of Wind Direction: Direction < 1 mph North 2 mph NNE 4 mph Northeast 6 mph ENE 8 mph East 10 mph ESE 12 mph Southeast 14 mph SSE 16 mph South 18 mph SSW 20 mph Southwest 22 mph WSW 24 mph West 26 mph WNW 28 mph Northwest 30 mph NNW 32 mph 34 mph 36 mph 38 mph 40 mph 42 mph 44 mph 46 mph 48 mph 50 mph > 51 mph 24 Hours % time Technical Specifications Technical Specifications Instrument type 3 channel micropower wind energy data logger Applications • wind resource assessment of small turbine sites • secondary sites for studying complex terrain • simplified data collection by non-technical staff Sensor compatibility - counter Speed Channel dedicated for NRG #40 Maximum anemometer or channels compatible Sensor compatibility - analog channels Vane Channel dedicated for NRG 200P direction vane or compatible Extra channel supports one of: • NRG 110S temperature sensor • Li-Cor LI200SA pyranometer Functions • • • • Sampling interval 2 seconds, fixed Averaging interval 10 minutes, fixed Real time clock Programmable date and time adjust automatically for leap years; accuracy + / - 3 minutes per month Storage medium Removable Non-Volatile 128 KByte DataPlug Maximum data storage • Internal data bins: one year of monthly data • DataPlug Capacity: 7 month time series Description Data Collection Internal wind speed binning by month Internal wind direction binning by month Internal average and gust by month Optional time series data collection on DataPlug Monthly Wind Speed Bins: • 2 mph bins, 0 to 50 mph, or • 1 m/s bins, 0 to 25 m/s • monthly gust • monthly average Monthly Wind Direction Bins: • vector average, 16 compass points Parameters recorded for each Time Series Speed: channel • average • standard deviation • max. gust for the entire dataset Time Series Direction: • vector average, 16 compass points Time series extra channel: • average File format Raw data: • binary, read by DataPlug reader to Windows PC • raw file header includes logger ID, start timestamp, stop timestamp • one raw file per DataPlug Output files: • comma delimited ASCII, compatible with spreadsheets and databases Other requirements DataPlug (Item 2369) and DataPlug Reader Kit (Item 2601) for optional time series data collection 25 Technical Specifications Resolution Software Wind Data Retriever Software (included in Data Kit, Item 2601) Reader DataPlug Reader (Data Kit, Item 2601) Displayed resolution • Speed: 0.1 m/s or 0.1 mph • Direction: 1 degree Analog measurement resolution 8 bit A/D converter, 256 counts Counter average stored resolution 0.0625 Hz Analog average stored resolution 1 count (0.39 % of full scale) Min / Max stored resolution 1 Hz Standard deviation stored resolution 0.0625 Hz User interface • 2 line x 16 character LCD display • 4-button keypad Configurable parameters • clock • site number • display units Sensor wiring Terminal strip for signal inputs and grounding Supply voltage • Nominal 9 V DC • minimum 5.6 V DC Batteries • 9 V alkaline batteries (NEDA 1604A, IEC 6LR61) • 2 batteries provide approximately 1.5 years normal operation Mounting • Mounts with 4 bolts (included) to inside of metal shelter box • Shelter box mounts to tower with hose clamps Tools required • screwdriver for terminals • 5/16 inch nut driver for mounting bolts and hose clamps Other accessories • Wind Explorer shelter box kit, Item 2668 Operating temperature range -40 °C to 65 °C (-40 °F to 149 °F) Note: display useable from -18 °C to 49 °C (0 °F to 120 °F) Operating humidity range 0 to 100% RH non-condensing Lifespan Over 10 years Weight 0.86 kg (1.9 pounds) Dimensions 171 mm height, 121 mm width, 97 mm depth (6.75 inches x 4.75 inches x 3.8 inches) Faceplate Lexan laminated to galvanized steel Buttons four buttons Display 32-character (2 lines x 16 characters) Enclosure Weatherproof PVC; meets NEMA type 4, 4X and 13, and IEC IP55 specifications Configuration Connections Power requirements Installation Environmental Physical Materials Meets or exceeds wind energy industry standards. 26 Glossary Glossary anemometer A sensing device that is used to measure wind velocity. The Wind Explorer collects data from an anemometer and wind direction vane. The NRG #40 Maximum anemometer is a 3-cup anemometer. averaging interval The time period over which the Wind Explorer collects data for averaging. The averaging interval for the Wind Explorer is fixed at 10 minutes. sampling interval The time period between samples of the input sensors. The Wind Explorer samples data once every 2 seconds. At the end of the averaging interval, the Wind Explorer calculates and stores an average of these samples. storage intervals The period of time that data are gathered before being stored to non-volatile memory. The Wind Explorer has a storage interval of 10 minutes. terminal block Place where sensor and grounding wires are connected to the Wind Explorer. wind direction The compass direction, as compass points (NE, NNE, etc.) or degrees (0 to 360°) from which the wind is blowing. See Wind Power for Home & Business: Renewable Energy for the 1990s and Beyond by Paul Gipe (Real Goods Independent Living Book, 1999) for more detailed wind energy information. 27 Warranty Two Year Limited Warranty NRG Systems, Inc. (NRG) warrants its products for a period of 2 years from date of original purchase solely for the benefit of the original consumer purchaser. If this NRG product is determined to be defective in materials or workmanship, NRG will, at NRG’s option, repair or replace this product without charge. This warranty does not cover damage due to improper installation or use, accident or misuse, lightning or damages due to any unauthorized service. This warranty also will not apply if any seal on any instrument or sensor is broken or the equipment was not adequately grounded. To return a defective product, call NRG Systems at the telephone number listed below for a RMA return authorization number. You must also have available when you call the serial number of the item as well as date of purchase. No products will be accepted for warranty work without a RMA number. The product must be returned, postage prepaid, to NRG with a brief description of the problem, RMA number and a return address with phone number. The foregoing limited warranty is given in lieu of all other warranties, express or implied. NRG specifically disclaims all implied warranties including, but not limited to, any implied warranties of merchantability and fitness for a particular purpose. The above limited warranty expressly excludes, and NRG shall not be liable for, any incidental or consequential damages caused by or related to the use of, inability to use or malfunction of this product. Prompt disposition: NRG will make a good faith effort for prompt correction or other adjustment with respect to any product which proves to be defective within the warranty period. First, contact NRG or the representative from whom the product was purchased and ask for a RMA number. NRG will also make a good faith effort for prompt service after the warranty period of a product has expired. Please contact NRG with the nature of the problem and serial number to obtain a RMA number. Inspect your shipments for damage to packages or missing packages immediately upon receipt. Record any such exceptions on the freight receipt of the delivery agent. If any contents are damaged or missing, report this in writing to the freight carrier and send NRG a copy of the damage report. If you insured the shipment yourself, report any damages to your insurance carrier. Tel: 802-482-2255 Fax: 802-482-2272 28 email: [email protected] Repairs Sending Repair Items to NRG Systems If you wish to return an item to NRG Systems for repair or any other reason, please before shipping contact NRG’s Service Department by phone (802) 482-2255 or fax (802) 482-2272 to obtain a Return Material Authorization (RMA) Number. The RMA Number allows us to track and route your shipment or repair. Note the RMA Number on all boxes shipped to us and refer to it in your correspondence or phone calls to us. Please fill out a copy of this sheet and send it with your shipment to NRG Systems. Date: _____________ Your Name: ________________________________ RMA No: ______________ Items being returned: _____________________________________ Serial Number: ________________ Reason for return: _____________________________________________________________________ Warranty: Yes No Not Sure Estimate for repair charges requested? Purchase Date / Invoice No: ______________ Yes No Repair not to exceed US$: _______________ Person to be contacted with estimate: ____________________________ Phone: ___________________ Person to issue Purchase Order for repair: _________________________ Phone: __________________ Billing Address: Shipping Address: Send your shipment FREIGHT PREPAID and INSURED against loss or damage in transit to: NRG Systems, Inc. Attn: Receiving Dept., RMA No. R-________ 110 Riggs Road Hinesburg, VT 05461, USA SHIPMENTS SENT FREIGHT COLLECT WILL NOT BE ACCEPTED BY NRG SYSTEMS. International Customers please state the following in your shipping documents: “THESE ITEMS ARE BEING RETURNED TO THEIR U.S. MANUFACTURER. COUNTRY OF MANUFACTURE AND ORIGIN IS U.S.A. HS CODE 9801.00.1025 29